NEILPRYDE RS:One Quick start guide

RS:One RIGGING &
TUNING GUIDE
WWW.NEILPRYDE.COM
Size: 118mm(W)X120mm(H)
WWW.NEILPRYDE.COM

CONTENTS
ENGLISH DEUTSCH FRANCAIS
ESPAÑOL
BOARD
Allgemeines und Entlüftungsschraube
Fußschlaufen
Verstellbare Mastschiene
Power box finne & Schwert
19
20
22
24
SEGEL und RIGG
Schritt für Schritt Aufriggen
Abriggen
27
30
PLANCHE
Informations générales et Vis de
pression
Footstraps
Rail de pied de mât reglable
Aileron – power box
et Dérive
33
34
36
38
VOILE et GRÉEMENT
Conseils pour gréer
Dégréer
41
44
BOARD
General and Pressure Valve
Foot Straps
Adjustable Mast Track
Fin-Deep T
uttle Box &
Daggerboard
05
06
08
10
SAIL and RIG
Step by Step Rigging
De-Rigging
13
16
TABLA
General y Válvula de Presión
Fijaciones para los pies (Footstraps)
Corredera de pie de mástil regulable
Quilla- power box y orza
VELA y APAREJO
Armado paso a paso
Desarmado
47
48
50
52
55
58
61
62
64
66
69
72

English Deutsch Français Español
04
RS:One BOARD

Français Deutsch EnglishEspañol
05
The “Valve” or “Pressure Release screw” (located at the front of the mast track)
compensates for the difference of air pressure between the inside and outside
of the board, mostly caused by extreme temperature or sun exposure.
The valve should be:
- Closed for windsurfing.
- Opened at all other times.
IMPORTANT: Make sure to store the board in a dry place after Pressure Valve
is opened, your board is not water proof with pressure valve open!!
Use original NeilPryde RS:One assembling and spare parts only.
PRESSURE VALVE
GENERAL

English Deutsch Français Español
Assembly
There are 9 different footstraps supplied with the NeilPryde RS:One.
2 x Front foot reaching straps.
2 x Back foot reaching straps.
2 x Forward “railing” straps.
2 x Back “railing” straps.
1 x Back foot center strap. (not shown on image below)
06
Assemble the foot straps with the foot strap screws tightened firmly. Do not use an
electrical screwdriver.
FOOT STRAPS

Français Deutsch EnglishEspañol
07
Footstrap Position: which hole?
For each different position, there are a number of different forward and back holes
into which the footstraps can be fitted. Finding the correct hole is a matter of
personal preference, and can var y according to the height and weight of the
sailor. Be sure to spend the necessary time on the water under various conditions
to find the right footstrap position for you.
As a general guideline:
- Back – Gives the board more “lift” and a lively feeling.
- Middle – Gives the board slightly less lift, while still remaini ng performance
orientated.
- Front – Improves the control, recommended for strong winds.
The back foot center strap is used for down-wind sailing and deep angles off the
wind. This strap can also be used for reaching in strong winds.

English Deutsch Français Español
WARNINGLocking mechanism must
be fully closed before going out on the
water
08
WARNINGThe Powerbase unit, including the universaltendonjoint, is subject
to extreme loads & forces and should be regularly checked and replaced if it
shows any signs of wear and tear. The universal tendon joint has a limited
approximate “lifetime” of up to 120 hours and should be automatically replaced
after this time. Furthermore, always check that the RS:One Powerbase is fully
inserted into the mast track of the board, and the locking mechanism is fully
closed, before going out onto the water. For more information on the use, care
and maintenance of your Powerbase, please read the User Manual provided
with this product or visit the NeilPryde website: www.neilpryde.com
ADJUSTABLE MAST TRACK

Français Deutsch EnglishEspañol
1
2
3
09
The adjustable mast track allows you to adjust the position of the mast track while
you are sailing on the water. Depressing the button at the back of the track will
cause the mast base to slide either forwards or backwards. Releasing this button
will lock the mast track at the fixed points along its length.
Tip: Changing the position of the track will significantly af fect the performance of
the board. As a general rule:
1. In light wind conditions, the sub-planing performance of the board is better when
the mast base is located in the front half of the mast track.
2. In planing conditions, when the daggerboard is no longer required, the board
has the most lift and performance when the base is located at the very back of
the track.
3. As the wind increases in strength, moving the track forward several steps gradually
increases the level of control and helps the board to sit on the water.

English Deutsch Français Español
10
Insert the shaft of the fin into the power box and tighten the fin screw until the
fin is flush with the bottom of the board. Be sure to use the plastic and iron
washers, tighten firmly. Do not use an electrical screwdriver.
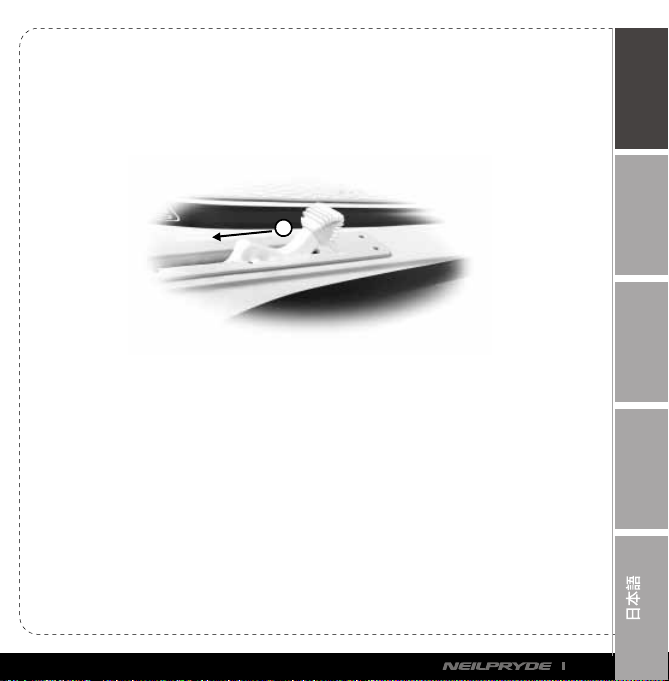
DAGGERBOARD
To lower the daggerboard:
1. Place your back foot on the daggerboard bump and push downwards. This
will release the daggerboard from the lips holding it into the board.
2. Place your front foot underneath the white daggerboard handle, and pull the
daggerboard handle towards the back of the board. In this position, the
daggerboard is fully down, and will provide the board with the most lift. This
is the better position for lightwind sub-planing conditions.
In sub-planing light wind conditions, putting the daggerboard down provides
lift and helps the board to track upwind. The daggerboard should be retracted
as soon as the wind increases and it is possible to plane. If th e board starts
“railing up”, or turning into the wind uncontrollably, there is too much wind for
the daggerboard and it should be retracted.
FIN – POWER BOX
1
2

Français Deutsch EnglishEspañol
11
To raise the daggerboard:
3. Place your foot on the white daggerboard handle, and push the handle right to
the front of the daggerboard case. In this position, the daggerboard is fully
retracted. This is the better position for planing conditions.
3

English Deutsch Français Español
12
RS:One SAIL AND RIG

Français Deutsch EnglishEspañol
13
1. Set the mast extension and boom to
the recommended lengths. Insert the
mast up the luff pocket without threading
through the cams (above the battens).
Use the rigging handle located at the
bottom of the tack fairing to help thread
your mast approx. 3/4 of the way up
the sleeve. Once the top of the mast
reaches the last 1/4 of the luff sleeve,
Take hold of the mast in the boom
opening and reach up the sleeve as
far as you can to pull the mast into the
top of the sail.Do not use the rigging
handle to force the mast right to the
top of the sleeve, as this may damage
your sail.
STEP BY STEP RIGGING
Check if the head cap is engaged with
the top cap of the mast by inserting your
finger and feeling if the mast is all the way
up the sleeve.

English Deutsch Français Español
14
2. Apply downhaul until the mast
exposes itself trough the boom
opening.
3 .Mount the boom onto the mast and
apply outhaul to approximately 5cm
short of the max setting.

Français Deutsch EnglishEspañol
15
4. Now let of all the down-haul
tension and place the cams onto
the mast starting with the bottom
cam. For each cam, open the
zipper and place one hand on
the batten pocket right behind the
mast sleeve, while pushing the
cam up onto the mast with the
other hand.
5. Apply outhaul and downhaul to
recommended settings.

English Deutsch Français Español
16
1. Detach outhaul line from the clew
of the sail. Detach the boom from
the mast and remove.
2. Open the cam zippers on the
luff pocket.
DE-RIGGING
3. Slowly release the down-haul
tension completely. Please note
that the cambers will pop off the
mast quite loudly - this is normal.
For those that don’t pop of the
mast please manually remove
them by reaching in trough the
zipper opening and pushing them
of the mast before removing the
mast from the sail.

Français Deutsch EnglishEspañol
17
If you have any questions with regards to the rigging of your sail, please ask our Technical
Experts directly on the Support desk: www.neilpryde.com
By following this step-by-step Rigging Guide, the durability of your sail is greatly increased.
As the mast is not thread directly onto the cambers, there is no "wrinkling" of the
monofilm during Rigging or De-Rigging.
4. Remove the mast from the sail,
this can be done by taking a
screw driver and pushing trough
the de-rigging loop in the top of
the sail, this will hold the sail in
place while pulling the mast out.

English Deutsch Français Español
18
ÜBERSETZUNG RS:One

Français Deutsch EnglishEspañol
19
ALLGEMEIN
Benutzen Sie ausschließlich NeilPryde RS:One Zubehör und Ersatzteile.
Die Entlüftungsschraube, die vor der Mastschiene liegt, sorgt für den Druckausgleich
zwischen dem Board inneren und der Umgebung. Dies ist besonders wichtig,
wenn das Board extremenTemperaturen wie Sonneneinstrahlung ausgesetzt ist.
Das Ventil sollte:
- Geschlossen sein, wenn Sie windsurfen.
- Immer geöffnet sein, wenn das Board sich nicht im Wasser befindet.
WICHTIG: Stellen Sie sicher, dass Ihr Board an einem trockenen Ort gelagert
wird, wenn die Entlüftungsschraube geöffnet ist. Bei offener Schraube ist das
Board nicht wasserdicht!!
ENTLÜFTUNGSSCHRAUBE

English Deutsch Français Español
20
Montage
Mit dem NeilPryde RS:One Board werden 9 unterschiedliche Fußschlaufen
mitgeliefert.
2 x Fußschlaufen für Raumwind vorne
2 x Fußschlaufen für Raumwind hinten
2 x Fußschlaufen für Amwind vorne.
2 x Fußschlaufen für Amwind hinten.
1 x Centerschlaufe hinten.(im unteren Bild nicht abgebildet)
FUßSCHLAUFEN
Schrauben Sie die Fußschlaufen mit den Fußschlaufenschrauben fest auf das
Board. Benutzen Sie keinen Elektroschrauber.

Français Deutsch EnglishEspañol
21
Fußschlaufenposition: Welches Loch wähle ich?
Es gibt sowohl vorne als auch hinten unterschiedliche Schraublöcher, die eine
unterschiedliche Positionierung der Fußschlaufen er möglichen. Die W ahl der
idealen Fußschlaufenposition ist individuell sehr verschieden und hängt unter
anderem von der Körpergröße und dem Gewicht des Fahrers ab. Sie sollten
einige Zeit auf dem W asser verbringen und mit den Fußschlaufenpositionen
experimentieren, um die für Sie ideale Fußschlaufenposition zu finden.
Es gelten jedoch folgende allgemeine Richtlinien:
- Positionierung hinten – Gibt dem Board mehr Lift und ein lebendigeres Fahrgefühl.
- Positionierung mittig – Sorgt für weniger Lift, das Board bleibt jedoch
leistungsorientiert.
- Positionierung vorne – Verbessert die Kontrollierbarkeit des Boards, besonders
bei starkem Wind.
Die Centerschlaufe kommt auf steilen Raumwindkursen und Vorwindkurs zum Einsatz.
Diese Schlaufe kann auch bei starkem Wind auf Raumwindfahrt genutzt werden.
Table of contents
Languages:
Other NEILPRYDE Windsurfing Equipment manuals