Nemaxx SP5-NF User manual

Version: 5.0
19.05.2016
EN / DE / FR / IT / ES
SMOKE ALARM DEVICE ●RAUCHWARNMELDER
DÉTECTEUR DE FUMÉE ● RILEVATORE DI FUMO
DETECTOR DE HUMO
SP5-NF
ORIGINAL OPERATING INSTRUCTIONS / ORIGINAL GEBRAUCHSANLEITUNG
MODE D´EMPLOI ORIGINAL / ISTRUZIONI PER L’USO ORIGINALI
INSTRUCCIONES DE USO ORIGINALES
EN
page
2 - 9
DE
Seite
10 - 17
page
18 - 25
FR
pagina
26 -33
IT
página
34 -41
ES
0832-CPR-F1353
DOP: SP-NFDOP01
EN14604:2005/AC:2008
15
0832

Version: 5.0
19.05.2016
2
EN
This smoke detector is designed to warn against re hazards by detecting
the smoke given o by burning ammable materials (wood, paper, plastic) etc.
It is essential to respect the installation, set-up and maintenance instructions
in order to ensure a rapid warning.
RECOMMENDED INSTALLATION LOCATIONS
1. In houses with several oors: it is recommended that you install a minimum of one
detector on each oor. (See diagram A)
2. Place a detector in proximity to the bedrooms so that the occupants will hear the alarm
should it go o during the night.
For optimum protection, place a smoke detector in every room.
3. Install a detector near the stairs, as a stairwell can act as a chimney.
4. Due to heat, smoke and other products of combustion rise toward the ceiling and
disperse horizontally.
Therefore install the detector in the middle of the room for most ecient detection.
5. When you attach the detector to a ceiling, make sure it is at least 1m away from any wall.
(See diagram B)
LOCATIONS TO AVOID
• In a kitchen or a garage - smoke from cooking or from your car could trigger the alarm
unnecessarily.
• In front of a heating outlet or air conditioning vent.
• At the highest point of a sloping ceiling.
• In any place where the temperature may fall below 0°C or exceed 40°C.
• Close to a source of steam or dirt, in a dirty room or one which is conducive to insects.
Diagram A
Bedroom Bathroom
Lounge Kitchen Garage
Diagram B
Ceiling
Wall
1 m minimum
Version: 5.0
19.05.2016
3
EN
THIS SMOKE DETECTOR CANNOT FUNCTION WITHOUT A BATTERY
- A NEW BATTERY MUST BE INSTALLED IMMEDIATELY ONCE THE ALARM
SOUNDS SIGNALLING THE BATTERY IS DEAD OR DISFUNCTIONAL
- TEST IT EVERY WEEK
- READ AND FOLLOW THESE INSTRUCTIONS CLOSELY TO MAKE SURE
THIS DEVICE FUNCTIONS TO ITS FULL CAPACITY.
FUNCTIONING, TESTING AND MAINTENANCE
• FUNCTIONING: The detector is operational provided its circuits are supplied by the
current generated by a battery.
When products of combustion are detected, the alarm will sound until smoke can no
longer be detected in the air.
• TESTING: Test by lightly pressing the test button on the detector until the alarm sounds.
This test activates the auto test function, and the alarm will sound if the electronic circuits
and the battery are all in good working order.
IT IS STRONGLY RECOMMENDED THAT YOU CARRY OUT THIS TEST EVERY WEEK.
If the alarm does not sound during a test, in order to verify whether it is due to the
battery, replace it with a new one and do the test again.
Minimum intensity of the alarm: 85dB.
• MAINTENANCE: The smoke detector does not require any specic maintenance.
However, you should vacuum the room to ensure it does not detect dust.
DISPOSE OF USED BATTERIES IN DESIGNATED CONTAINERS, LOOK AFTER THE
ENVIRONMENT.
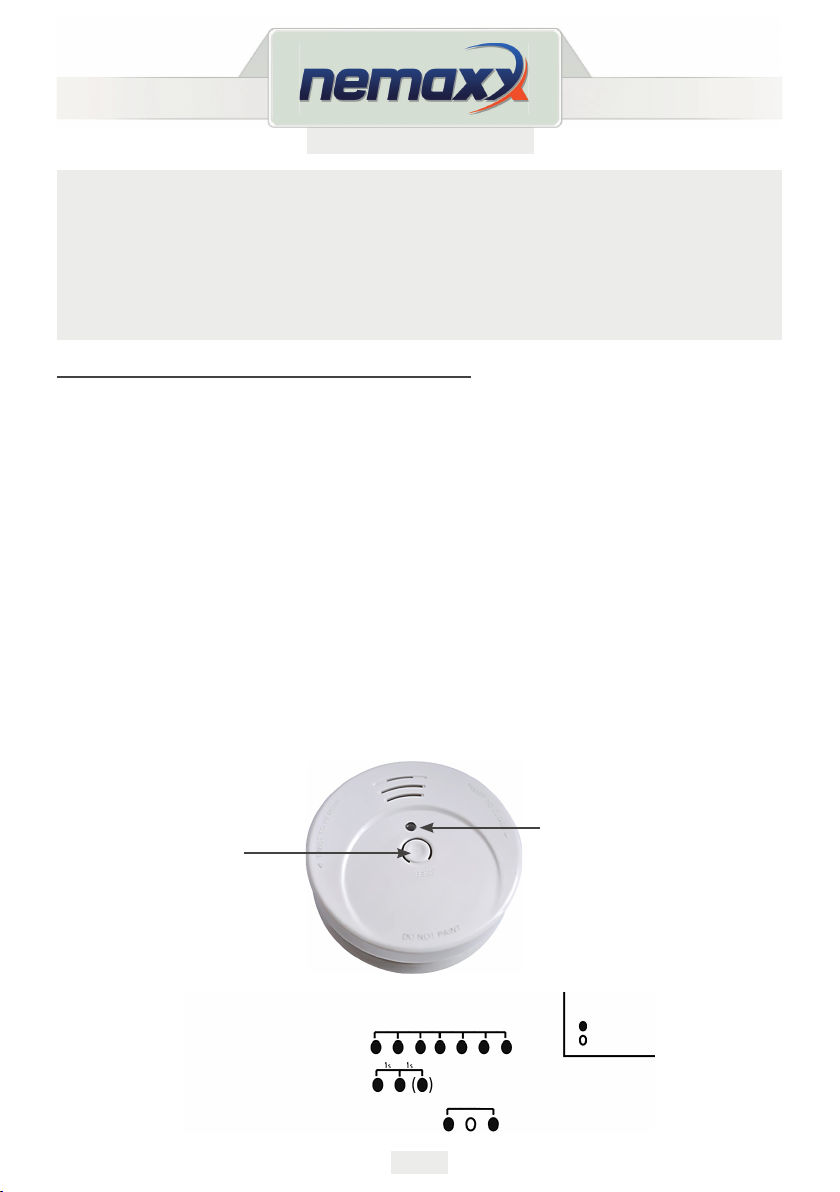
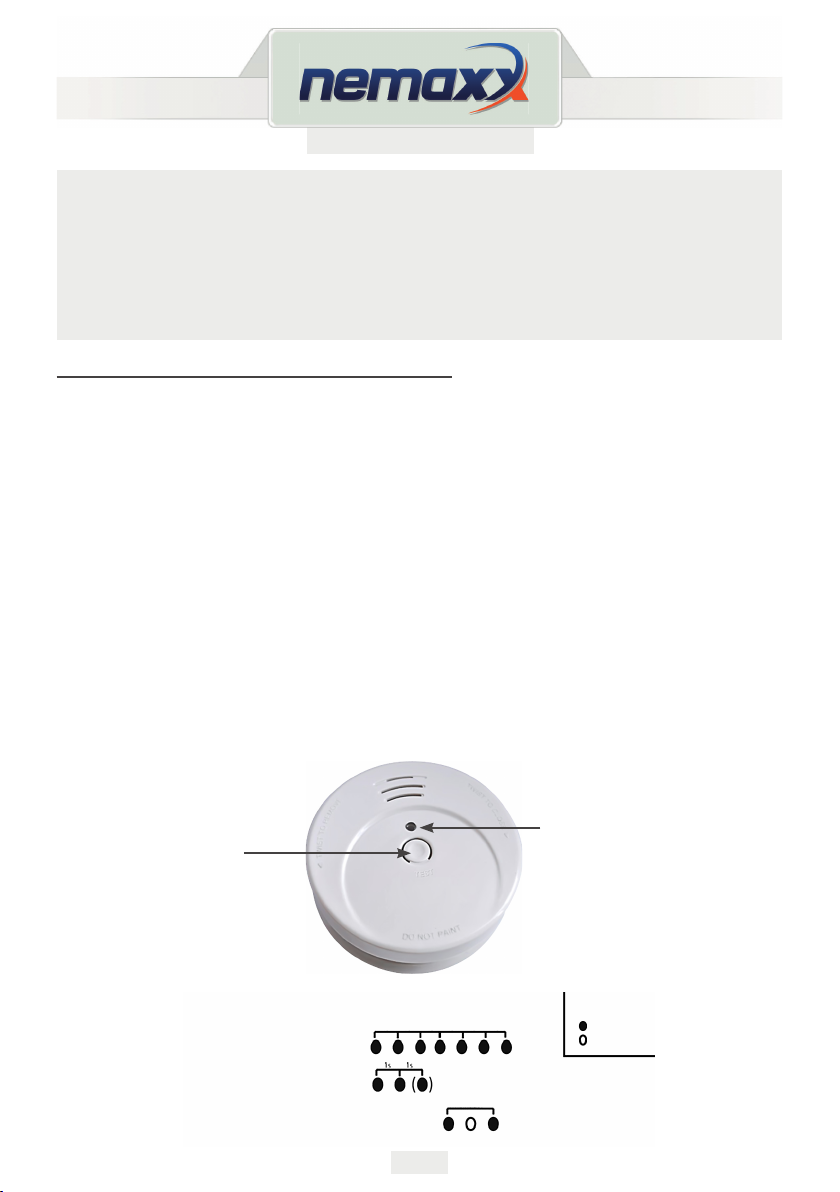
Red diode
(a ash approximately every
40 seconds signals normal
functioning)
Test button
Understanding the dierent “beep” alarms
- Alarm (regular “beep”)
- Test (2 or 3 “beeps”)
- Dead battery alarm
40 to 50 seconds
Key
“Beep” sound
Silence
Version: 5.0
19.05.2016
4
EN
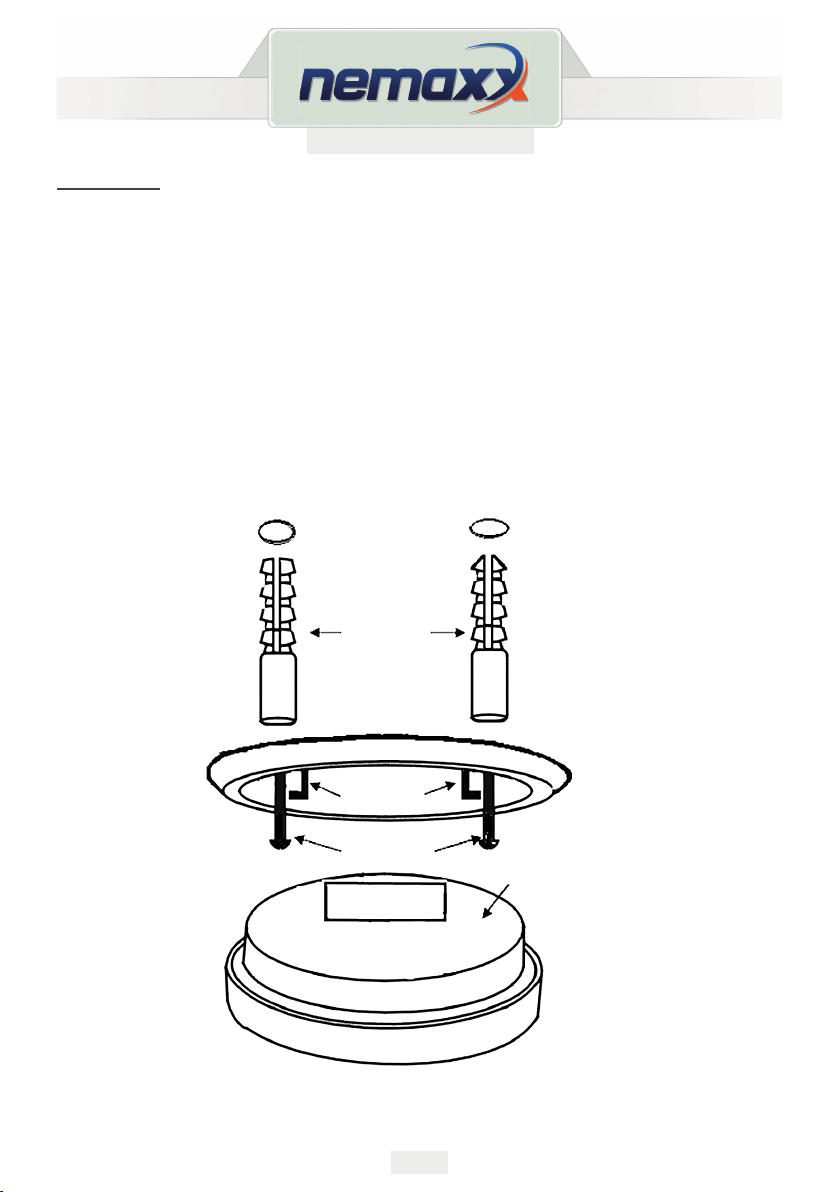
ASSEMBLY
This product is designed to be mounted to the ceiling with ease (pins and screws provided).
1. Firstly, separate the mounting base from the detector by twisting the base a quarter turn
to the right.
2. Hold the base in the desired position, use a pencil to mark the 2 holes, then drill them
and push in the pins, and nally screw the base on rmly.
3. After having carefully installed the battery, fasten the detector to the base by twisting it
in a clockwise direction.
The detector is correctly attached to the base if you hear a small “click”.
If you have diculty in installing your detector, check again that the battery is inserted
correctly.
Holes in the ceiling
Plastic pins
Hooks
Screws
Body of the detector
Version: 5.0
19.05.2016
5
ATTENTION
The batteries listed below will ensure proper functioning of the detector:
Type Alkaline: Raymax 6LR61, Duracell MN1604
ATTENTION
If you are ever unsure as to the cause of an alarm, always evacuate the
building and make sure the alarm has not been triggered by an actual re.
EN
REPLACING THE BATTERY
The detector works using a 9V Alkaline battery.
The battery will last approximately 5 years in normal conditions, provided the instructions
and recommendations in this guide are followed.
The detector has a low-battery indicator and emits a beep at an interval of 40-50 seconds
for at least 30 days.
As soon as you hear this signal, replace the battery with one of the 9V batteries below.
(models available in most shops)
FALSE ALARMS
The smoke detector is designed to minimize unnecessary alarms.
Smoking will usually not trigger the alarm, unless you blow directly towards the detector.
Cooking fumes can set it o if the detector is too close to the stove-top, and if a large
amount of smoke is given o by the hot-plates or the grill.
The battery must be connected correctly to the pressure connector while bearing in mind the
polarity of the batteries.
Once the battery is inserted, press the button to test it.
The design of this detector means it is impossible to x it in place if there is no battery inside.
Be sure to check that the battery is properly installed, then it will be easy to attach it to the base.
If the alarm in the detector goes o, rst of all check if it is because of a re.
If there is a re, evacuate and call the emergency services.
If no re can be found, check if one of the possible causes mentioned earlier is responsible for the
false alarm.

Version: 5.0
19.05.2016
6
EN
WORTHWHILE PRECAUTIONS
LEARN AND TEST THE FIRE EXITS
• Examine your house closely in order to determine two possible re exits for every room.
In houses with numerous oors, having a ladder on hand can be useful.
• Share this evacuation plan with your entire family and show them what to do in case of a
re.
• Choose a location outside where the whole family would meet if the re should spread.
• Familiarize everyone with the sound of the detector’s alarm and practice your evacuation
procedures for each room so that you are ready if the alarm should ever sound.
• Identify your children‘s bedrooms by placing a reective sticker on the window, in order
that they can be easily identied at night.
• Carry out re drills regularly.
It is possible that you may not be able to retrieve your children - it is therefore vital that they
know the re drills so they can follow them if there is ever a re.
WHAT TO DO IF THE FIRE ALARM SOUNDS
• Evacuate your house immediately using your evacuation plan.
Every second counts, so don’t waste time getting dressed or retrieving valuable objects.
• During an evacuation, do not open a door without rst having checked if it is hot, and,
if you see smoke escaping from the gaps, do not open it, and choose a dierent exit.
If everything seems safe, press your shoulder to the door and open it gently, being ready
to close it quickly if heat or smoke comes through the opening.
• Stay close to the oor if the air is lled with smoke, and breathe lightly through a piece of
wet fabric if possible.
• Once outside at the agreed location, check that every member of your family is present.
• Call the re service from your neighbor‘s house, and not from inside your own.
• Do not go back into your house if the reghters have not said you can do so.

Version: 5.0
19.05.2016
7
EN
GENERAL INFORMATION
• ERP Recycling network
• Keep this user manual for the duration of the life of the product.
* Refer to annex ZA of norm EN 14606 for CE markings
The CE marking printed on this product confirms its conformity to the
European directives that apply to it, in particular to the harmonized
specifications of norm EN 14606 in regard to regulation 305/2011 relating
to construction products.
EN 14604:2005/AC:2008
DOP: SP-NFDOP01
0832-CPR-F1353
15
0832
The NF mark applied to smoke detectors is a guarantee of security and of
consistent quality monitored by specialists.
These rigorous and exhaustive checks (holder’s quality management
system, controls on manufacture, audits and surveillance tests...), provide
the consumer with a guarantee of conformity for all certified products.
The smoke detector NF mark confirms the product’s conformity with the
certification document NF 292.
Certifying body:
AFNOR Certification
11, rue Francis de Pressensé
F-93571 La Plaine Saint Denis Cedex
Tel : +33(0)1.41 62 80 00
Fax : +33(0)1 49 17 90 00
Web site : www.afnor.org et www.marque-nf.com
Email : certification@afnor.org
Characters covered by the mark NF that are certified as essential:
Features covered by the mark NF certified as essential:
Type of assembly Wall-mounted only YES NO
Ceiling-mounted only YES NO
Ceiling or wall-mounted YES NO
Principle source of power Inside the device
Autonomy 1 year 5 years 10 years
Inter-connectable device YES NO
Designed for use in a motor home YES NO
Coupling with auxiliary external devices YES NO
Radio link YES NO
Individual alarm indicator YES NO
Alarm neutralization device YES NO
Accessibility option YES NO

Version: 5.0
19.05.2016
8
EN
ĞĐůĂƌĂƚŝŽŶŽĨWĞƌĨŽƌŵĂŶĐĞ
ĐĐŽƌĚŝŶŐƚŽŶŶĞdž///ŽĨƚŚĞZĞŐƵůĂƚŝŽŶ;hͿϯϬϱϮϬϭϭ
EĞŵĂdždž^WϱͲE&EĞŵĂdždž^WϭϬͲE&
EΣ^WͲE&KWϬϭ
ϭ hŶŝƋƵĞŝĚĞŶƚŝĨŝĐĂƚŝŽŶĐŽĚĞŽĨƚŚĞƉƌŽĚƵĐƚƚLJƉĞ1HPD[[ 631)1HPD[[ 631)
Ϯ dLJƉĞďĂƚĐŚŽƌƐĞƌŝĂůŶƵŵďĞƌŽƌĂŶLJŽƚŚĞƌĞůĞŵĞŶƚĂůůŽǁŝŶŐŝĚĞŶƚŝĨŝĐĂƚŝŽŶŽĨƚŚĞĐŽŶƐƚƌƵĐƚŝŽŶƉƌŽĚƵĐƚ
ĂƐƌĞƋƵŝƌĞĚƉƵƌƐƵĂŶƚƚŽƌƚŝĐůĞϭϭ;ϰͿ^WͲE&KWϬϭ
ϯ /ŶƚĞŶĚĞĚƵƐĞŽƌƵƐĞƐŽĨƚŚĞĐŽŶƐƚƌƵĐƚŝŽŶƉƌŽĚƵĐƚŝŶĂĐĐŽƌĚĂŶĐĞǁŝƚŚƚŚĞĂƉƉůŝĐĂďůĞŚĂƌŵŽŶŝnjĞĚ
ƚĞĐŚŶŝĐĂůƐƉĞĐŝĨŝĐĂƚŝŽŶĂƐĨŽƌĞƐĞĞŶďLJƚŚĞŵĂŶƵĨĂĐƚƵƌĞƌƐŵŽŬĞĂůĂƌŵĚĞǀŝĐĞ
ϰ EĂŵĞƌĞŐŝƐƚĞƌĞĚƚƌĂĚĞŶĂŵĞŽƌƌĞŐŝƐƚĞƌĞĚƚƌĂĚĞŵĂƌŬĂŶĚĐŽŶƚĂĐƚĂĚĚƌĞƐƐŽĨƚŚĞŵĂŶƵĨĂĐƚƵƌĞƌĂƐ
ƌĞƋƵŝƌĞĚŝŶƌƚŝĐůĞϭϭ;ϱͿ
ĂƌŐĂŝŶϮϰ'
^ŝŚůĞŐŐƐƚƌϮϯ
ϴϴϯϮtŽůůĞƌĂƵ
^ǁŝƚnjĞƌůĂŶĚ
ϱ EĂŵĞĂŶĚĂĚĚƌĞƐƐŽĨĂƵƚŚŽƌŝnjĞĚƌĞƉƌĞƐĞŶƚĂƚŝǀĞ
&ƵůŝĨŝůůŵĞŶƚ'ŵď,
/ŬĂƌƵƐĂůůĞĞϭϱ
ϯϬϭϳϵ,ĂŶŶŽǀĞƌ
'ĞƌŵĂŶLJ
ϲ ^LJƐƚĞŵŽƌƐLJƐƚĞŵƐŽĨĂƐƐĞƐƐŵĞŶƚĂŶĚǀĞƌŝĨŝĐĂƚŝŽŶŽĨĐŽŶƐƚĂŶĐLJŽĨƉĞƌĨŽƌŵĂŶĐĞŽĨƚŚĞĐŽŶƐƚƌƵĐƚŝŽŶ
ƉƌŽĚƵĐƚĂƐƐĞƚŽƵƚŝŶŶŶĞdžs^LJƐƚĞŵϭ
ϳ /ŶĐĂƐĞŽĨƚŚĞĚĞĐůĂƌĂƚŝŽŶŽĨƉĞƌĨŽƌŵĂŶĐĞĐŽŶĐĞƌŶŝŶŐĂĐŽŶƐƚƌƵĐƚŝŽŶƉƌŽĚƵĐƚĐŽǀĞƌĞĚďLJĂŚĂƌŵŽŶŝƐĞĚ
ƐƚĂŶĚĂƌĚ
Z'ůŽďĂůĞƌƚŝĨŝĐĂƚŝŽŶŶŽϬϴϯϮ
ϴ /ŶĐĂƐĞŽĨƚŚĞĚĞĐůĂƌĂƚŝŽŶŽĨƉĞƌĨŽƌŵĂŶĐĞĐŽŶĐĞƌŶŝŶŐĂĐŽŶƐƚƌƵĐƚŝŽŶƉƌŽĚƵĐƚĨŽƌǁŚŝĐŚĂƵƌŽƉĞĂŶ
dĞĐŚŶŝĐĂůƐƐĞƐƐŵĞŶƚŚĂƐďĞĞŶŝƐƐƵĞĚE

Version: 5.0
19.05.2016
9
EN
ϵĞĐůĂƌĞĚWĞƌĨŽƌŵĂŶĐĞƐEϭϰϲϬϰϮϬϬϱ^ƚĂŶĚĂƌĚнϮϬϬϴ
ϭϬdŚĞƉĞƌĨŽƌŵĂŶĐĞŽĨƚŚĞƉƌŽĚƵĐƚĂĐĐŽƌĚŝŶŐƚŽŶƵŵďĞƌƐϭĂŶĚϮĐŽƌƌĞƐƉŽŶĚƐƚŽƚŚĞĚĞĐůĂƌĞĚ
ƉĞƌĨŽƌŵĂŶĐĞĂĐĐŽƌĚŝŶŐƚŽŶƵŵďĞƌϵ
dŚĞŵĂŶƵĨĂĐƚƵƌĞƌĂĐĐŽƌĚŝŶŐƚŽŶƵŵďĞƌϰŝƐƐŽůĞůLJƌĞƐƉŽŶƐŝďůĞĨŽƌƚŚĞƉƌĞƉĂƌĂƚŝŽŶŽĨƚŚŝƐĚĞĐůĂƌĂƚŝŽŶŽĨ
ƉĞƌĨŽƌŵĂŶĐĞ
^ŝŐŶĞĚĨŽƌĂŶĚďĞŚĂůĨŽĨ
EĂŵĞDĂdžŝŵŝůŝĂŶ&ƌŝĞĚĞƌLJ
ŝƌĞĐƚŽƌŽĨĂƌŐĂŝŶϮϰ'
ĂƚĞϮϴϬϵϮϬϭϲ
^ŝŐŶĂƚƵƌĞ

Version: 5.0
19.05.2016
10
DE
Dieser Rauchmelder wurde entwickelt, um Brände anhand des Rauchs zu erkennen,
der bei der Verbrennung entzündlicher Materialien (Holz, Papier, Plastik etc.) entsteht.
Die rasche Raucherkennung ist nur gewährleistet, wenn die Installations-,
Montage- und Wartungsempfehlungen strikt eingehalten werden.
EMPFOHLENE MONTAGEORTE
1. Für mehrstöckige Wohngebäude: es wird empfohlen, in jedem Stockwerk mindestens
einen Rauchmelder anzubringen. (Siehe Skizze A)
2. Bringen Sie einen Rauchmelder in der Nähe der Schlafzimmer an, um die Bewohner bei
einem eventuellen Alarm rechtzeitig auch aus tiefem Schlaf zu wecken.
Einen optimalen Schutz erzielen Sie, wenn Sie einen Rauchmelder in jedem Raum
installieren.
3. Bringen Sie einen Rauchmelder im Treppenhaus an, da dort durch die Kaminwirkung ein
Sog entsteht.
4. Aufgrund der Hitze steigen Rauch und andere Verbrennungsprodukte nach oben und
verteilen sich anschließend horizontal.
Besonders wirksamen Schutz erzielen Sie, wenn Sie den Rauchmelder in der Mitte der
Zimmerdecke anbringen.
5. Achten Sie bei der Installation in der Zimmerdecke darauf, dass zu jeder Wand ein
Mindestabstand von 1 m eingehalten wird. (Siehe Skizze B)
UNGEEIGNETE INSTALLATIONSORTE
• In der Küche oder Garage - Kochdämpfe oder Abgase können einen Fehlalarm
auslösen.
• Vor dem Luftaustritt einer Heiz-/Klimaanlage.
• Am höchsten Punkt einer Dachschräge.
• In Bereichen, wo die Temperaturen auf unter 0°C fallen oder über 40°C steigen können.
• In der Nähe einer Dampf- oder Staubquelle, in einem schmutzigen Raum oder an
Stellen, wo sich viele Insekten aufhalten.
Abbildung A
Schlafzimmer Bad
Wohnzimmer Küche Garage
Abbildung B
Zimmerdecke
Wand
1 m Minimum
Version: 5.0
19.05.2016
11
DE
DIESER RAUCHMELDER FUNKTIONIERT NUR MIT EINER BATTERIE
- BEI EINEM BATTERIE-SCHWACH-ALARM ODER EINER BETRIEBSSTÖRUNG IST
UMGEHEND DIE BATTERIE GEGEN EINE NEUE AUSZUTAUSCHEN
- FÜHREN SIE JEDE WOCHE EINE FUNKTIONSPRÜFUNG DURCH
- LESEN SIE DIESE BEDIENUNGSANLEITUNG SORGFÄLTIG DURCH UND
BEACHTEN SIE SÄMTLICHE HINWEISE, DAMIT DAS GERÄT
OPTIMAL FUNKTIONIEREN KANN.
FUNKTIONSWEISE, PRÜFUNG & WARTUNG
• FUNKTIONSWEISE: Der Rauchmelder ist batteriebetrieben. Damit er funktioniert, muss
eine geeignete Batterie eingesetzt werden.
Erkennt er Rauchpartikel in der Luft, wird ein Alarm ausgelöst, der erst wieder
verstummt, wenn keine Partikel mehr festgestellt werden.
• PRÜFUNG: Drücken Sie hierzu auf den Testknopf, bis ein Signalton ertönt.
Diese Selbsttestfunktion und der Signalton informieren Sie darüber, ob alle Stromkreise
und die Batterie in einwandfreiem Zustand sind. ES WIRD DRINGEND EMPFOHLEN,
JEDE WOCHE DIE FUNKTIONSTÜCHTIGKEIT DES GERÄTS ZU PRÜFEN.
Bleibt der Signalton aus, prüfen Sie die Batterie; setzen Sie gegebenenfalls eine neue
ein und wiederholen Sie den Vorgang.
Mindestlautstärke des Alarmtons: 85dB.
• WARTUNG: Der Rauchmelder bedarf grundsätzlich keiner besonderen Pege.
Entfernen Sie von Zeit zu Zeit mithilfe eines Staubsaugers den Staub aus der Rauchkammer.
ENTSORGEN SIE LEERE BATTERIEN NICHT ÜBER DEN HAUSMÜLL SONDERN GEBEN
SIE SIE AN GEEIGNETEN SAMMELSTELLEN AB. HANDELN SIE UMWELTBEWUSST.
Rotes Lämpchen
(blinkt im normalen
Betriebszustand etwa alle 40
Sekunden auf)
Testknopf
Bedeutung der verschiedenen Tonsignale
- Alarm (üblicher Piepton)
- Test (2 oder 3 Pieptöne)
-Batterie-schwach-Signal
40 bis 50 Sekunden
Zeichenerklärung
Piepton
Stille

Version: 5.0
19.05.2016
12
DE
MONTAGE
Das Produkt ist so konzipiert, dass es sich einfach an Zimmerdecken montieren lässt
(Dübel und Schrauben sind im Lieferumfang enthalten).
1. Halten Sie den Sockel des Rauchmelders fest und drehen Sie das Gehäuse eine
Vierteldrehung nach links, um beide Teile voneinander zu trennen.
2. Positionieren Sie den Sockel am gewünschten Montageort und zeichnen Sie die
2 Bohrlöcher an.
Bohren Sie die Löcher, setzen Sie die Dübel ein und schrauben Sie den Sockel mit den
mitgelieferten Schrauben fest.
3. Legen Sie die Batterie ein. Setzen Sie das Gehäuse auf den Sockel und drehen Sie es
mit einer Vierteldrehung im Uhrzeigersinn fest.
Das Gehäuse sitzt korrekt auf dem Sockel, wenn Sie ein deutliches Einrastgeräusch
hören konnten.
Sollte sich das Gehäuse nicht gutwillig befestigen lassen, überprüfen Sie erneut den Sitz
der Batterie.
Bohrlöcher
Plastikdübel
Haken
Schrauben
Gehäuse des Detektors

Version: 5.0
19.05.2016
13
ACHTUNG
Zur Wahrung der Funktionstüchtigkeit des Rauchmelders ist eine der im Folgenden
aufgeführten Batterien zu verwenden:
Alkalibatterie: Raymax 6LR61, Duracell MN1604
ACHTUNG
Sollten Sie nicht sicher sein, was die Ursache für den Alarm ist, sorgen Sie
dafür, dass die Räumlichkeiten geräumt werden und vergewissern Sie sich,
dass es sich nicht doch um einen Brand handelt.
DE
BATTERIEWECHSEL
Das Rauchmelder wird mit einer 9V-Alkalibatterie betrieben.
Die Lebensdauer der Batterie beträgt etwa 5 Jahre unter normalen Betriebsbedingungen
und sofern die Anweisungen und Empfehlungen in dieser Gebrauchsanweisung
genauestens befolgt werden.
Der Rauchmelder verfügt über einen Signalton, der über einen Zeitraum von mindestens
30 Tagen alle 40-50 Sekunden akustisch darauf aufmerksam macht, dass die Batterie
schwächer wird.
Ersetzen Sie baldmöglichst die Batterie gegen eine neue, verwenden Sie dabei eines der
unten aufgeführten 9V-Modelle (diese sind in den meisten Geschäften erhältlich).
BEI EINEM FEHLALARM
Aufgrund der Konzeption des Rauchmelders ist ein Fehlalarm nahezu ausgeschlossen.
Zigarettenrauch löst unter normalen Umständen keinen Alarm aus, sofern nicht direkt
unterhalb des Rauchmelders geraucht wird.
Küchendämpfe können einen Alarm auslösen, falls der Rauchmelder zu nah an den
Herdplatten angebracht ist und eine große Menge Rauch oder Dampf von Herd oder
Grill aufsteigt.
Die Batterie muss korrekt mit den entsprechenden Druckknöpfen verbunden werden.
Die richtige Polarität ist zu beachten. Betätigen Sie nach dem Batteriewechsel den Testknopf, um
die Funktionstüchtigkeit zu prüfen.
Der Rauchmelder ist so konzipiert, dass er ohne Batterie nicht montiert werden kann.
Vergewissern Sie sich, dass die Batterie ordnungsgemäß einsetzt wurde, nur dann lässt sich das
Gehäuse wieder einfach am Sockel befestigen.
Sollte das Alarmsignal des Rauchmelders ertönen, vergewissern Sie sich als erstes, dass es sich
um einen tatsächlichen Brand handelt.
Verlassen Sie in dem Fall das Gebäude und alarmieren Sie die Feuerwehr.
Sollten Sie keinen Brand entdecken können, überprüfen Sie, ob eine der genannten Ursachen für
einen Fehlalarm infrage kommt.

Version: 5.0
19.05.2016
14
DE
ZU ERGREIFENDE VORSICHTSMASSNAHMEN
MACHEN SIE SICH MIT DEN NOTAUSGÄNGEN VERTRAUT UND PRÜFEN SIE DEREN
ZWECKMÄSSIGKEIT.
• In jedem Raum Ihrer Wohnung/des Gebäudes sollten 2 Notausgänge vorhanden sein.
In Obergeschossen kann die Installation einer externen Fluchttreppe angebracht sein.
• Machen Sie alle Mitbewohner/Familienmitglieder mit dem Evakuierungsplan sowie den
wichtigsten Maßnahmen, die im Fall eines Brandes zu ergreifen sind, vertraut.
• Vereinbaren Sie einen Trepunkt im Freien, an dem sich alle Mitbewohner /
Familienmitglieder versammeln.
• Machen Sie alle Mitbewohner/Familienmitglieder mit dem Signalton vertraut und proben
Sie die Evakuierung, um auf den Notfall vorbereitet zu sein.
• Markieren Sie die Fenster der Kinderzimmer mit reektierenden Aufklebern, damit sie im
Dunkeln schnell auszumachen sind.
• Wiederholen Sie die Brandschutzübung in regelmäßigen Abständen.
Unter Umständen sind Sie selbst nicht in der Lage, Ihre Kinder zu retten, weshalb es
wichtig ist, dass diese mit dem richtigen Verhalten im Brandfall vertraut sind, um sich
gegebenenfalls selbst retten zu können.
VERHALTENSREGELN FÜR DEN BRANDFALL
• Verlassen Sie umgehend die Wohnung/das Gebäude.
Befolgen Sie dabei den Evakuierungsplan.
Jede Sekunde zählt, verlieren Sie also keine Zeit, indem Sie sich ankleiden oder
versuchen, Wertsachen zu retten.
• Önen Sie bei der Evakuierung keine Tür, deren Oberäche warm ist und/oder durch
deren Türspalten Rauch dringt; suchen Sie in diesem Fall einen anderen Fluchtweg.
Wenn es Ihnen sicher erscheint, önen Sie die Tür vorsichtig und lehnen Sie sich mit der
Schulter dagegen.
Seien Sie darauf vorbereitet, die Tür rasch wieder zu schließen, sollten Hitze oder Rauch
eindringen.
• Sollte die Luft stark verraucht sein, legen Sie sich auf den Boden und atmen Sie
langsam und, falls möglich, durch ein angefeuchtetes Tuch.
• Vergewissern Sie sich am vereinbarten Trepunkt im Freien, dass alle Familienmitglieder
anwesend sind.
• Alarmieren Sie die Feuerwehr von Ihren Nachbarn aus, niemals von zuhause.
• Kehren Sie erst dann in Ihre Wohnung/Ihr Haus zurück, wenn die Feuerwehr es Ihnen
gestattet.

Version: 5.0
19.05.2016
15
DE
ALLGEMEINE ANGABEN
• Rücknahmestelle gemäß ERP
• Bewahren Sie diese Gebrauchsanweisung während der
gesamten Lebensdauer des Geräts auf.
* Siehe Anhang ZA zur Norm EN 14604 zur CE-Kennzeichnung
Mit der CE-Kennzeichnung wird bescheinigt, dass dieses Gerät den
Vorgaben der geltenden Europäischen Richtlinien entspricht, insbesondere
die Übereinstimmung mit den harmonisierten Spezifikationen der Norm
EN 14604 in Anwendung der Verordnung 305/2011 über Bauprodukte.
EN 14604:2005/AC:2008
DOP: SP-NFDOP01
0832-CPR-F1353
15
0832
Mit der NF-Kennzeichnung des DAAF-Rauchwarnmelders wird für eine
gleichbleibend hohe Sicherheit und durch Fachleute kontrollierte Qualität
gebürgt.
Die strengen und umfangreichen Kontrollen (u. a. Qualitätssicherungssystem
des Vertragspartners, Kontrolle der laufenden Produktion, Audits und
Prüfungen) garantieren dem Verbraucher, dass die zertifizierten Produkte
den Vorgaben entsprechen.
Die Kennzeichnung NF - DAAF bescheinigt die Konformität des Produkts
mit dem Rahmendokument NF 292.
Zertifizierende Stelle:
AFNOR Certification
11, rue Francis de Pressensé
F-93571 La Plaine Saint Denis Cedex
Telefon : +33(0)1.41 62 80 00
Fax : +33(0)1 49 17 90 00
Webseite : www.afnor.org et www.marque-nf.com
Email : certification@afnor.org
Wesentliche mit der NF-Kennzeichnung zertifizierte Produktmerkmale:
Wesentliche mit der NF-Kennzeichnung zertifizierte Produktmerkmale
Montageart Ausschließlich Wandmontage JA NEIN
Ausschließlich Deckenmontage JA NEIN
Wand- oder Deckenmontage JA NEIN
Hauptstromquelle Geräteintern
Autonomie 1 Jahr 5 Jahre 10 Jahre
Vernetzbares Gerät JA NEIN
Zur Installation in einem Wohnwagen bestimmt JA NEIN
Anschlüsse für externe Geräte JA NEIN
Funksteuerung JA NEIN
Individuelle Alarmanzeige JA NEIN
Vorrichtung zur Deaktivierung des Alarms JA NEIN
Barrierefrei JA NEIN

Version: 5.0
19.05.2016
16
DE
/HLVWXQJVHUNOlUXQJ
*HPl9HURUGQXQJ(8
1HPD[[631)631)
1U 631)'23
ϭ ŝŶĚĞƵƚŝŐĞƌ<ĞŶŶĐŽĚĞĚĞƐWƌŽĚƵŬƚƚLJƉƐEĞŵĂdždž^WϱͲE&EĞŵĂdždž^WϭϬͲE&
Ϯ dLJƉĞŶͲŚĂƌŐĞŶͲŽĚĞƌ^ĞƌŝĞŶŶƵŵŵĞƌŽĚĞƌĞŝŶĂŶĚĞƌĞƐ<ĞŶŶnjĞŝĐŚĞŶnjƵƌ/ĚĞŶƚŝĨŝŬĂƚŝŽŶĚĞƐ
ĂƵƉƌŽĚƵŬƚƐ^WͲE&KWϬϭ
ϯ sŽŵ,ĞƌƐƚĞůůĞƌǀŽƌŐĞƐĞŚĞŶĞƌsĞƌǁĞŶĚƵŶŐƐnjǁĞĐŬŽĚĞƌǀŽƌŐĞƐĞŚĞŶĞsĞƌǁĞŶĚƵŶŐƐnjǁĞĐŬĞĚĞƐ
ĂƵƉƌŽĚƵŬƚƐŐĞŵćƘĚĞƌĂŶǁĞŶĚďĂƌĞŶŚĂƌŵŽŶŝƐŝĞƌƚĞŶƚĞĐŚŶŝƐĐŚĞŶ^ƉĞnjŝĨŝŬĂƚŝŽŶƌĂŶĚƐĐŚƵƚnj
ϰ EĂŵĞĞŝŶŐĞƚƌĂŐĞŶĞƌ,ĂŶĚĞůƐŶĂŵĞŽĚĞƌĞŝŶŐĞƚƌĂŐĞŶĞDĂƌŬĞƵŶĚ<ŽŶƚĂŬƚĂŶƐĐŚƌŝĨƚĚĞƐ
,ĞƌƐƚĞůůĞƌƐ ĂƌŐĂŝŶϮϰ'
^ŝŚůĞŐŐƐƚƌϮϯ
ϴϴϯϮtŽůůĞƌĂƵ
^ǁŝƚnjĞƌůĂŶĚ
ϱ EĂŵĞƵŶĚĚƌĞƐƐĞĚĞƐĞǀŽůůŵćĐŚƚŝŐƚĞŶ
ĨƵůĨŝůůŵĞŶƚ'ŵď,
/ŬĂƌƵƐĂůůĞĞϭϱ
ϯϬϭϳϵ,ĂŶŶŽǀĞƌ
ĞƵƚƐĐŚůĂŶĚ
ϲ ^LJƐƚĞŵŽĚĞƌ^LJƐƚĞŵĞnjƵƌĞǁĞƌƚƵŶŐƵŶĚmďĞƌƉƌƺĨƵŶŐĚĞƌ>ĞŝƐƚƵŶŐƐďĞƐƚćŶĚŝŐŬĞŝƚĚĞƐĂƵƉƌŽĚƵŬƚƐ
^LJƐƚĞŵϭ
ϳ EĂŵĞĚĞƌŶŽƚŝĨŝnjŝĞƌƚĞŶ^ƚĞůůĞĚŝĞĞŝŶĞƌƚŝĨŝŬĂƚĂƵƐŐĞƐƚĞůůƚŚĂƚ
Z'ůŽďĂůĞƌƚŝĨŝŬĂƚEƌϬϴϯϮ;ϬϴϯϮͲWZͲ&ϭϯϱϯͿ
ϴ ƵƐƐƚĞůůƵŶŐĞŝŶĞƌƵƌŽƉćŝƐĐŚĞŶdĞĐŚŶŝƐĐŚĞŶĞǁĞƌƚƵŶŐE

Version: 5.0
19.05.2016
17
DE
3DJH
ϵƌŬůćƌƚĞ>ĞŝƐƚƵŶŐ
)URP(16WDQGDUG$&
&DUDFWpULVWLTXHV(VVHQWLHOOHV(VVHQWLDO
FKDUDFWHULVWLFV3HUIRUPDQFHV
3HUIRUPDQFH6SpFLILFDWLRQ WHFKQLTXH KDUPRQLVpH
+DUPRQL]HGWHFKQLFDOVSHFLILFDWLRQ
&RQGLWLRQVQRPLQDOHVGHGpFOHQFKHPHQWVHQVLELOLWpGpODLGHUpSRQVH
WHPSVGHUpSRQVHHWSHUIRUPDQFHVHQFRQGLWLRQGLQFHQGLH
1RPLQDODFWLYDWLRQFRQGLWLRQVVHQVLWLYLW\UHVSRQVHGHOD\UHVSRQVHWLPH
DQGSHUIRUPDQFHXQGHUILUHFRQGLWLRQV
&RQIRUPH
3DVVHG
$UWWRWR
)LDELOLWpRSpUDWLRQQHOOH2SHUDWLQJ
UHOLDELOLW\&RQIRUPH
3DVVHG
$UWWRWRWR
7ROpUDQFHGHODWHQVLRQGDODLPHQWDWLRQ 7ROHUDQFH
RQVXSSO\YROWDJH&RQIRUPH
3DVVHG
$UW
'XUDELOLWpGHODILDELOLWpRSpUDWLRQQHOOHHWGXGpODLGHUpSRQVHUpVLVWDQFHj
ODWHPSpUDWXUH
'XUDELOLW\RIRSHUDWLRQDOUHOLDELOLW\DQGUHVSRQVHGHOD\WHPSHUDWXUH
UHVLVWDQFH
&RQIRUPH
3DVVHG
$UWDQG
'XUDELOLWpGHODILDELOLWpRSpUDWLRQQHOOH UpVLVWDQFHDX[YLEUDWLRQV'XUDELOLW\
RIRSHUDWLRQDOUHOLDELOLW\YLEUDWLRQUHVLVWDQFH&RQIRUPH
3DVVHG
$UWDQG
'XUDELOLWpGHODILDELOLWpRSpUDWLRQQHOOHUpVLVWDQFHjOKXPLGLWp'XUDELOLW\
RIRSHUDWLRQDOUHOLDELOLW\+XPLGLW\UHVLVWDQFH&RQIRUPH
3DVVHG
$UW
'XUDELOLWpGHODILDELOLWpRSpUDWLRQQHOOHUpVLVWDQFHjODFRUURVLRQ'XUDELOLW\RI
RSHUDWLRQDOUHOLDELOLW\&RUURVLRQUHVLVWDQFH&RQIRUPH
3DVVHG
$UW
'XUDELOLWpGHODILDELOLWpRSpUDWLRQQHOOHVWDELOLWppOHFWULTXH 'XUDELOLW\
RIRSHUDWLRQDOUHOLDELOLW\(OHFWULFDOVWDELOLW\&RQIRUPH
3DVVHG
$UW
ϭϬsĞƌĂŶƚǁŽƌƚůŝĐŚĨƺƌĚŝĞƌƐƚĞůůƵŶŐĚŝĞƐĞƌ>ĞŝƐƚƵŶŐƐĞƌŬůćƌƵŶŐŝƐƚĂůůĞŝŶĚĞƌ,ĞƌƐƚĞůůĞƌŐĞŵćƘ
EƵŵŵĞƌϰ
EĂŵĞĚĞƐhŶƚĞƌnjĞŝĐŚŶĞƌƐDĂdžŝŵŝůŝĂŶ&ƌŝĞĚĞƌLJ
&ƵŶŬƚŝŽŶŝƌĞŬƚŽƌĂƌŐĂŝŶϮϰ'
ĂƚĞϮϴϬϵϮϬϭϲ
hŶƚĞƌƐĐŚƌŝĨƚ
,QGLFDWHXUGDODUPH
,QGLFDWRURIDODUP<(6
0RQWDJH0RXQWLQJ3ODIRQG
FHLOLQJ
5DFFRUGHPHQWH[WHUQH
([WHUQDOFRQQHFWLQJ12
1RPEUH GH SLOH
EDWWHU\4W\
$XWRQRPLH
$XWRQRP\
\HDUVOLWKLXP

Version: 5.0
19.05.2016
18
FR
Ce détecteur de fumée est conçu pour prévenir des risques d’incendie
en détectant de la fumée issue de la combustion de matériaux inammables
(bois, papiers, plastiques) etc.
L’alerte rapide ne sera possible que si les consignes d’installations,
d’implantations et d’entretiens sont strictement respectées
LIEUX D’INSTALLATION RECOMMANDES
1. Pour les habitations à plusieurs niveaux : il est recommandé d’installer un détecteur par
niveau, au minimum. (Voir schéma A)
2. Placez un détecteur à proximité des chambres à coucher an que les occupants
puissent entendre l’alarme en cas de déclenchement pendant la nuit.
Placez un détecteur de fumée dans toutes les chambres pour une protection optimale.
3. Installer un détecteur dans les escaliers, car les cages d’escaliers font oce de
cheminée.
4. Avec la chaleur, la fumée et autres produits de combustions s’élèvent vers le plafond et
se dispersent horizontalement.
Installez donc le détecteur au centre de la pièce an que la détection soit la plus
ecace possible.
5. Lorsque vous installez le détecteur au plafond, placez le à 1 m d’un mûr au minimum.
(Voir schéma B)
LES EMPLACEMENTS A EVITER
• Dans une cuisine ou un garage - la fumée de cuisine ou de votre véhicule pourrait
déclencher l’alarme de façon intempestive.
• Devant une sortie de chauage ou d’air conditionné.
• Au point le plus haut d’un plafond mansardé.
• Dans les lieux où la température peut tomber au-dessous de 0°C ou dépasser les 40°C.
• Proche d’une source de vapeur, de poussière, dans une pièce sale ou propice aux
insectes.
Schéma A
Chambre Salle de
bain
Salon Cuisine Garage
Schéma B
Plafond
Mur
1 m minimum

Version: 5.0
19.05.2016
19
FR
CE DETECTEUR DE FUMEE NE PEUT FONCTIONNER
SANS L’INSTALLATION D’UNE PILE
- UNE PILE NEUVE DOIT ETRE PLACEE IMMEDIATEMENT LORSQUE RETENTIT
L’ALERTE DE FIN DE VIE DE LA PILE OU LORS D’UN DYSFONCTIONNEMENT
- FAITES UN TEST CHAQUE SEMAINE
- LISEZ ET SUIVEZ CORRECTEMENT CES INSTRUCTIONS
AFIN QUE L’APPAREIL FONCTIONNE DE FACON OPTIMUM.
FONCTIONNEMENT, TEST & MAINTENANCE
• FONCTIONNEMENT : Le détecteur fonctionne lorsque ses circuits sont alimentés par
le courant issu d’une pile.
Quand les produits d’une combustion sont détectés, l’alarme se déclenche jusqu’à la
disparition de ceux-ci dans l’air.
• TEST : Testez en appuyant légèrement sur le bouton test du détecteur jusqu’à ce
qu’une alarme se déclenche.
Ce test permet d’activer la fonction autotest et l’alarme sonne si tous les circuits
électroniques et la pile sont en bon état de fonctionnement.
IL EST FORTEMENT RECOMMANDE DE FAIRE CE TEST CHAQUE SEMAINE.
Si lors du test l’alarme ne sonne pas, an de vérier que ce dysfonctionnement est
dû à la pile, remplacez la par une neuve et faites le test à nouveau.
Intensité de l’alarme minimum : 85dB.
• MAINTENANCE: Le détecteur de fumée n’a pas besoin de maintenance particulière.
Mais passez l’aspirateur an de nettoyer la chambre de détection de la poussière.
JETEZ LES PILES USAGEES UNIQUEMENT DANS LES CONTAINERS PREVUS A CET
EFFET. PRENEZ SOIN DE L’ENVIRONNEMENT.
Diode rouge
(un ash toutes les
40 secondes environ en
fonctionnement normal)
Bouton test
Comprendre les diérentes alarmes ‚bip‘
-Alerte (‚bip‘ régulier)
-Test 2 ou 3 ‘bip’)
-Alerte de n de vie de la pile
40 à 50 secondes
Légende
‘bip’ sonore
silence

Version: 5.0
19.05.2016
20
FR
MONTAGE
Ce produit est conçu pour être monté facilement au plafond (Chevilles et vis fournies).
1. D’abord, séparez la base de xation du détecteur en faisant pivoter d’un quart de tour
vers la droite la base.
2. Placez la base à l’endroit où vous voulez la xer puis avec un crayon, faites les
marquages des 2 trous an de connaitre les emplacements, puis percez, enfoncez les
chevilles et enn vissez la base fermement.
3. Après avoir placé soigneusement la pile, xez le détecteur à la base en le faisant pivoter
dans le sens des aiguilles d’une montre.
Le détecteur est correctement xé à la base lorsque vous entendez un petit “clip”.
Si vous avez des dicultés à xer votre détecteur, vériez à nouveau que la pile soit
bien placée.
Trous au plafond
Chevilles
plastiques
Crochets
Vis
Corps détecteur
Table of contents
Other Nemaxx Smoke Alarm manuals


