Nemera MEGAPTH Pen User manual
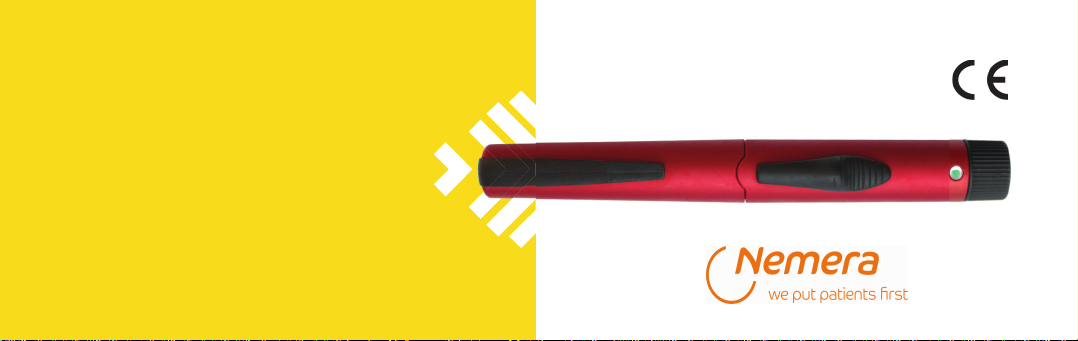
REUSABLE TERIPARATIDE PEN INJECTOR 0197
MEGAPTH Pen
®
USER'S MANUAL
MEGAPTH Pen
Table of content
2
1before the first use
construction of pen injector, pen needle
and cartridge
installation of cartridge and pen needle
priming your MEGAPTH Pen
injecting a dose
removing a needle
replacing a cartridge
replacing a needle
storage and cleaning
information from the manufacturer
3
4
5
6
7
8
9
10

przed pierwszym użyciem
1 3before the first use
Before the first use ofMEGAPTHPen pen injector carefully read ALL instructions included in this user's manual.
MEGAPTHPen is a reusable, intuitive automatic teriparatide injector. It provides you or your child with a precise, safe
and effortless way to administer teriparatide doses recommended by the doctor, in the range from 2,5 to 20
micrograms (mcg), with incremental dose of 2,5 mcg.
MEGAPTHPen is recommended for use exclusively with teriparatide 3.0 ml cartridges according to ISO 11608-3.
Use MEGAPTHPen only in doses recommended by your doctor.
MEGAPTHPen is recommended for use with disposable needles: BD Micro-Fine 0.25mm x5mm, BD Micro-Fine 0.23mm x
4mm and BD Micro-Fine 0.25mm x8mm according to ISO11608-2
Use a new needle for each injection to ensure sterility, prevent infections or leakage of teriparatide and reduce the risk of
needle clogging.
MEGAPTHPen is intended for use by one person only and should not be shared with others.
Do not use MEGAPTHPen, ifit is not working properly, or any ofits parts look damaged.
Using MEGAPTHPen without teriparatide cartridge may cause defective operation.
MEGAPTHPen is not recommended for self-administration ofteriparatide by people who are blind, visually impaired,
with severely limited motor skills or children without the assistance ofa third party, trained in its use.

construction of the pen injector
pen cap
pen body
cartridge holder plunger selector window
release button
p
dose
selector
pen needle teriparatide
cartridge
rubber cartridge tip
outer needle shield paper tab metalic cartridge cap cartridge plunger
2window displaying the
end of the injection
inner needle shield needle
window of
cartridge holder
Wash your hands with soap thoroughly, and make
sure that you have the following items:
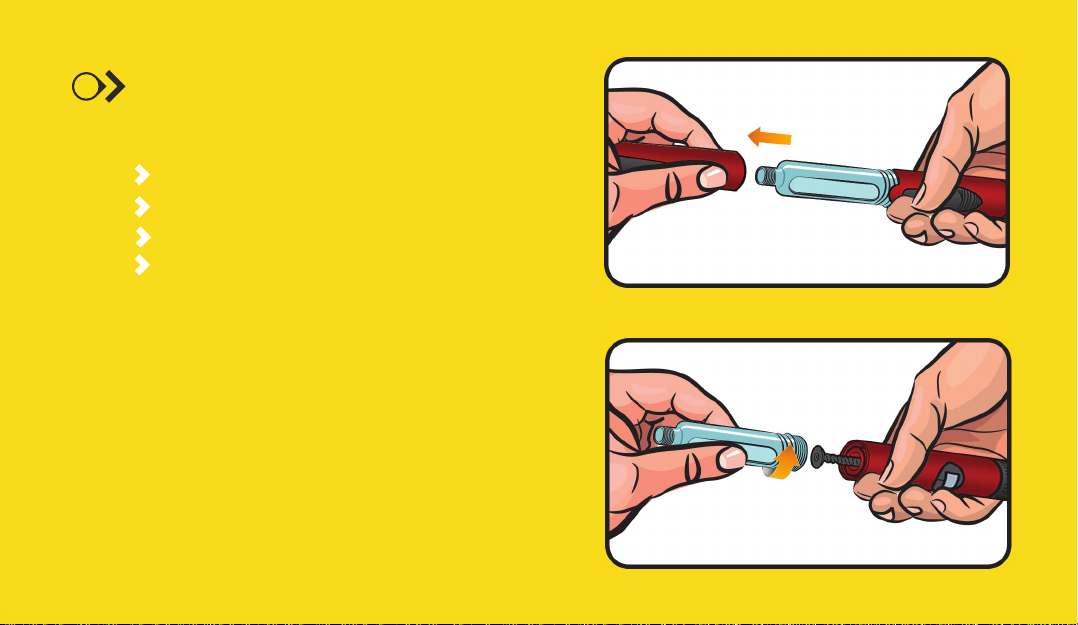
3installation of cartridge and pen needle
Step 1
Pull off the cap
Step 2
Unscrew the cartridge holder from the pen body
by turning it according to the direction shown on
the drawing.
MEGAPTHPen pen injector
teripartide cartridge
new disposable pen needle
two alcohol swabs

3installation of cartridge and pen needle
Step 4
Step 3
Check the teriparatide cartridge.
Make sure that it is not cracked or broken, the teriparatide
solution is clear and transparent and check the medicine
expiration date.
Do not use the teriparatide after the medicine expiration date.
Wipe the teriparatide rubber cartridge tip with the swab.
Press the plunger into the pen body.
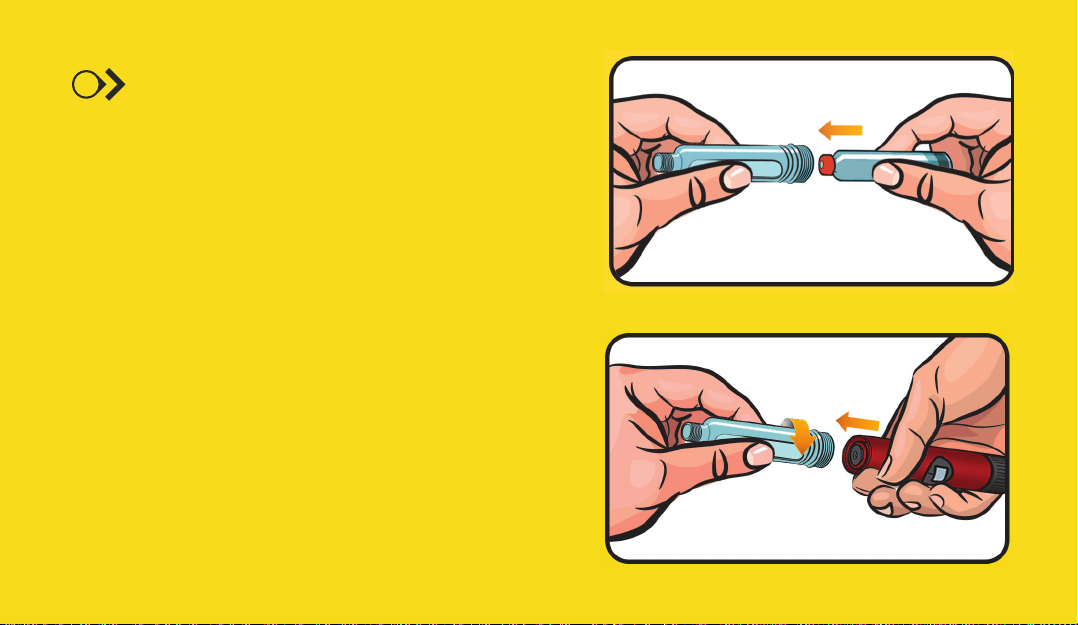
3installation of cartridge and pen needle
Step 6
Step 5
Insert teriparatide cartridge into the cartridge holder,
metallic tip to the front.
Attach the cartridge holder to the pen body by
turning it according to direction shown on the
drawing, until first resistance is met.

3installation of cartridge and pen needle
Step 7
For each injection use a new needle.
Do not use needles if the paper cover if damaged.
Reuse of the same needle or needle with a damaged unit pack
(paper cover) is not in line with epidemiological
recommendations.
Step 8
Take a new sterile needle and remove the paper tab
from the outer needle shield.
Hold the pen injector by the cartridge holder.
Attach the outer needle shield to the cartridge holder until
first resistance is met, according to the direction shown on
the drawing.

To minimise the risk of unintended needle penetration and
transmission of infectious diseases, never replace the inner
needle shield once removed. If by accident you puncture
your skin, clean the wounded spot with a skin disinfectant.
3installation of cartridge and pen needle
Step 9
Step 10
Remove the outer needle shield.
Retain it for removal of the needle after
the completion of the injection process.
Remove the inner needle shield as
recommended by the manufacturer.
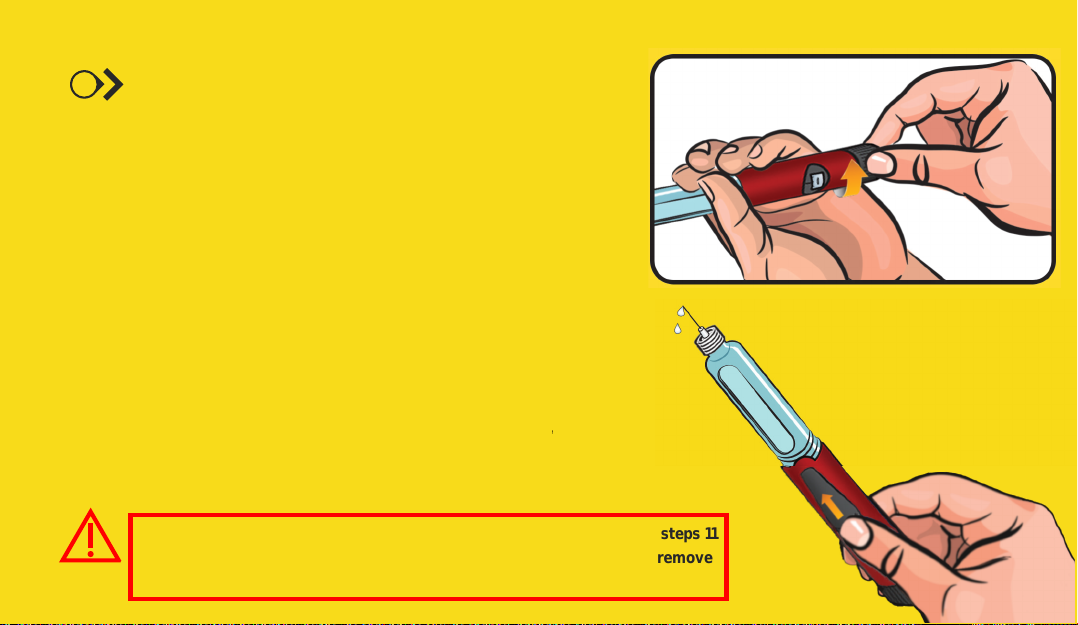
4priming
If a drop of teriparatide does not appear at the end of the needle, repeat steps 11
and 12. If a drop of teriparatide does not appear after several attempts, remove
the needle with step 17. Repeat steps 7 through 12, afterwards.
The number in the dose selector window corresponds to the drug volume in
micrograms (mcg). Choose 5 mcg of teriparatide as a test dose.
Howto selectthe test dose?
1. Turn the dose selector according to the direction shown on the drawing.
2. Turn the dose selector until figure 5appears in the dose selector window.
Step 12
Hold the pen with the needle pointing upwards. Using your thumb, slide the
release button in the needle direction. Hold the release button until a green
dot appears in the window displaying the end of injection. If a drop of teriparatide
appears on the tip of the needle the pen injector is ready for use.
Step 11
Prime your MEGAPTH Pen before each injection. Hold MEGAPTHPen
with needle pointing up.Tap lightly with your finger on the cartridge holder to
move any air bubbles in the cartridge to the top of the cartridge.

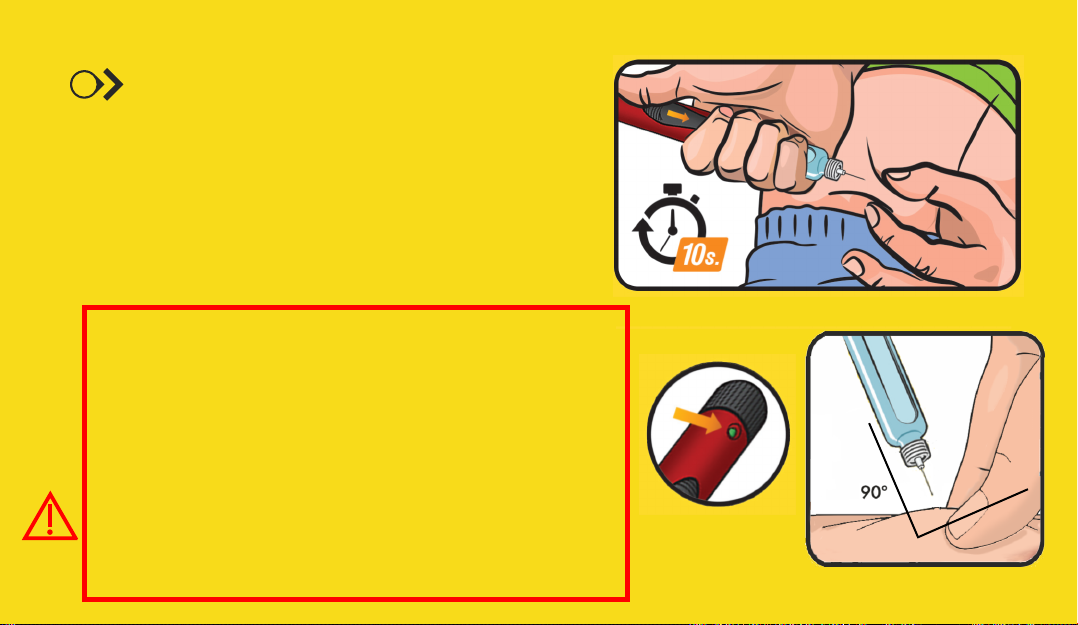
5injecting a dose
If by accident you inject yourself a dose higher than
prescribed, immediately contact your doctor.
Step 13
Step 14
Select a dose of teriparatide you want to inject. To do that,
turn the dose selector according to the direction shown on the
drawing, until the desired figure corresponding to the number
of teriparatide mcg appears in the dose selector window.
Make sure that dose selector window shows the correct
number of doses. If the dialled dose is to high you can correct it
by turning the dose selector backwards.
Select the injection site (abdomen, thighs, buttocks)
and wipe your skin with an alcohol swab.
Rotate your injection sites daily.
5injecting a dose
zapamiętane wcześniej oznaczenie, następnie postępuj
zgodnie z krokami 14-15.
Step 15
turining the dose selector until the figure, whichyou have seen in
the selector window, appears. Perform accordingly the actions
described in steps 14 to 15.
If the green dot does not appear...
it means that there is no teriparatide in the cartridge. Note the
number of units remaining, as it corresponds to the number of mcg
of teriparatide which you must inject to complete the injection. At-
tach the outer needle shield and remove the needle. Replace the
old cartridge with a new one, accordingly to Section 7 - replacing a
cartridge. Prepare the pen injector to use accordingly to the actions
described in steps 7 to 10. Perform the priming dose injection.
Next, complete the interrupted dose delivery by turning the dose
selector according to the direction shown on the drawing until the
figure, which you have seen in the selector window, appears.
Perform accordingly the actions described in steps 14 to 15.
Gently hold a fold of the skin and insert the tip of the needle
into subcutaneous tissue in a 90 degrees angle.
Using your thumb slide the release button in the needle
direction, hold the release button until a green dot appears
in the window displaying the end of injection. Count to 10
slowly, while not removing the needle from the skin.
5injecting a dose
Krok 18
Nałóżna wstrzykiwacz nasadkę. SciTropin A PEN 5 wraz
z wkładem z somatropiną, przechowuj w warunkach
zgodnych z informacjąproducenta leku.
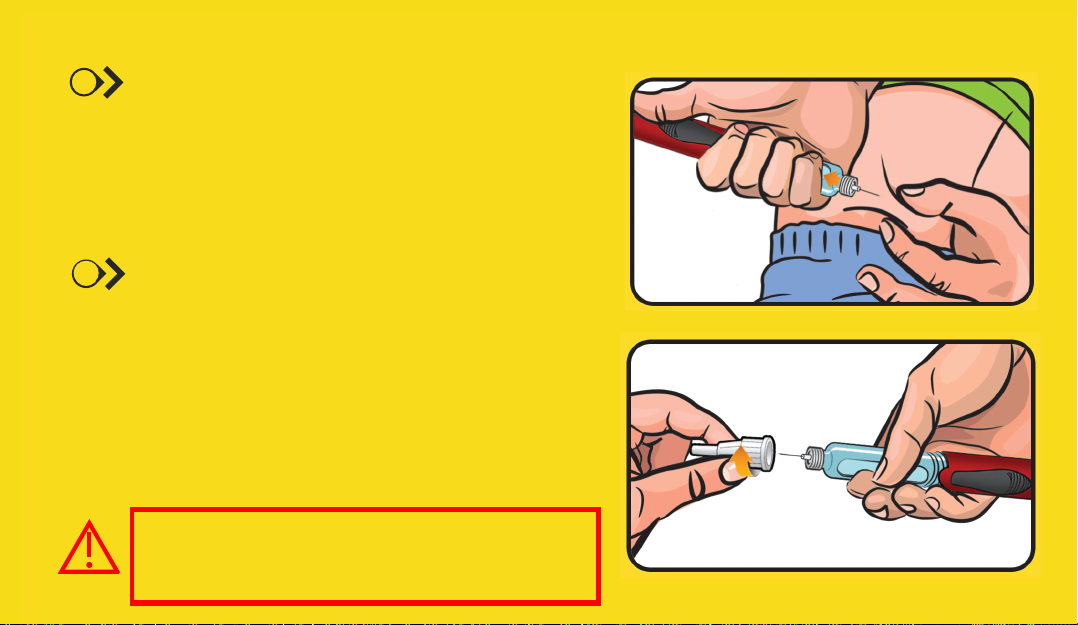
6removing a needle
Used needles and empty teriparatide cartridges are classified
among potentially dangerous waste which can cause
microbiological contamination. Keep them out of thereach of
children.
Step 16
Step 17
Remove the needle from the skin at the same
angle it was inserted into subcutaneous tissue.
After the injection put the outer needle shield on the needle.
Holding the cartridge holder rotate the outer needle shield
according to the direction shown on the drawing. Remove the
used needle.
Dispose of it in accordance with information provided by the
manufacturer of the needle.

7replacing an empty cartridge
Step 18
Put the cap on the pen injector.
The teriparatide injection has been completed.
Remove the cartridge holder from the pen body by turning
it according to the direction shown on the drawing.
Shake the empty cartridge and remove it in accordance with
information provided by the manufacturer of teriparatide.
Set the dose selector to "0" position by turning it according
to the direction shown on the drawing.
Follow steps 3 through 6.

8storage and cleaning
Do not immerse
MEGAPTH Pen
into water.
Always keep your MEGAPTHPen and needles out of the reach of other people, es-
pecially children.
MEGAPTHPen should always be stored and carried with the pen cap on, without a
needle.
MEGAPTHPen with the teriparatide cartridge should be refrigerated at
+2°C to +8°C.
MEGAPTHPen without the teriparatide cartridge, can be stored at -40°C to +70°C.
Keep the pen injector far from extreme temperatures, humidity, dust and direct
sun exposure.
MEGAPTHPen should be stored in its case.
Clean your MEGAPTHPen daily. Use only a damp cloth for cleaning. Do not
immerse the injector into water. Do not use alcohol, hydrogen peroxide,
disinfectants or lubricants to clean the pen injector.
MEGAPTHPen should be protected against major physical forces.
9
Nie mogępołączyć
osłony wkładu z obudową
wstrzykiwacza. Sprawdźczy wkład zostałpoprawnie
włożony do obudowy wkładu
(metalowym pierścieniem do przodu
Problem: HOW TO ELIMINATE:
Incorrectly insert
teriparatide cartridge.
Cannot attach the cartridge
holder onto the pen body. Check ifthe cartridge was properly
insert into the cartridge holder
(metallic cap first)
Pushed out plunger.
Problem: Possible cause: HOW TO ELIMINATE:
User error. You can correct the dose by turning the
dose selector in the opposite direction.
A higher dose
was dialled then
required.
Push the plunger back into
the pen body.
Possible cause:
Troubleshooting
Troubleshooting

9
Troubleshooting
Problem:
Despite a number ofpriming
procedures a drop of
teriparatide has not appeared
on the end ofthe needle.
Possible cause: HOW TO ELIMINATE:
Possible cause:
Problem:
Postępuj zgodnie z krokami 14-15.
Clogged pen needle. Replace the needle with a new one.
Check if the cartridge was properly
installed. There should be no space
between the plunger and the cartridge.
Incorrectly installed
teriparatide cartridge.
After the injection the green
dot did not appear in the the
window displaying the end
ofinjection
There was not enough
teriparatide in the cartridge
to inject the full set dose.
HOW TO ELIMINATE:
Note the number of units remaining, as it
corresponds to the number of mcg of teriparatide
which you must inject to complete the injection.
Attach the outer needle shield and remove the
needle. Replace the old cartridge with a new one,
accordingly to Section 7. Prepare the pen injector
to use accordingly to the actions described in
steps 7 to 10. Perform the priming dose injection.
Complete the interrupted dose delivery by turning
the dose selector until the figure, which you have
seen in the selector window, appears. Follow
steps 14 through 15.

10 information from the manufacturer
Manufacturer:
Nemera Szczecin Sp. z o.o.
ul. Litewska 10A
71 -344 Szczecin
plszc_inf[email protected]
www.nemera.net
TH-EN-V4
Date of issue: 01/2023
Package contents: MEGAPTHPen automatic teriparatide pen injector, pen case, user's manual.MEGAPTHPen
meets the requirements of ISO 11608-1 standard with respect to general requirements dosing accuracy and
robustness.
MEGAPTHPen in intended for use with disposable needles: BD Micro-Fine 0.25mm x 5mm,
BD Micro-Fine 0.23mm x 4mm and BD Micro-Fine 0.25mm x 8mm.
MEGAPTHPen should be replaced:
- after 2 years in use;
- when decided by your doctor or
- in any case where there are doubts as to MEGAPTHPen functionality.
MEGAPTHPen is made of materials safe for the health of patients.
Particular attention should be paid to the information preceded by this sign
which will ensure safe and comfortable use of the device.
In the events of serious incidents, this should be reported to the manufacturer and to the competent authority.
Distributor/Importer:

legend
Indicates the medical device manufacturer
(red color) Indicates that caution is necessary when operating the device or control close to where the symbol is
placed or that the current situation needs operators awareness or operator action in order to avoid undesirable
consequences
Indicates the need for the user to consult the instructions
Patient information website

notes
Table of contents
Other Nemera Personal Care Product manuals


Popular Personal Care Product manuals by other brands


Adaptive Sound
Adaptive Sound ASM1002 ASTI owner's manual

Orliman
Orliman SITLIVE OSL1302 INSTRUCTIONS FOR USE AND PRESERVATION

HYPERICE
HYPERICE Venom Series operating instructions

Beurer
Beurer EM 29 Instructions for use

Rio
Rio 60 SECOND FACE TONER user guide

Juzo
Juzo Toomac Solutions ACS Light Lower Leg Wraps Instructions for use and care