Silhouet-Tone EVOLUTION 5HD User manual


1"
"
Content
Evolution 5HD 2
01. Contraindications 4
02. Connecting accessories 5
03. Unit settings 8
04. Treatment screen 12
05. System configuration 18
06. Consultation & Scheduling treatments 21
07. Hair growth cycles 22
08. Probes & other supplies 23
09. Evolution 5HD treatment release form 24
10. Client post care instructions 25
11. Accessories for with Evolution 5HD 26
12. Important 27
13. WARRANTY 27
14. SPECIFICATIONS 28
All rights reserved. No part of this work covered by the copyright hereon may be reproduced or used in any form or by
any means – graphic, electronic, or mechanical, including photocopying, recording, taping, or information storage and
retrieval systems – without permission of the company.
© 2013

2"
"
We appreciate your confidence in Silhouet-Tone’s products and value your decision to
purchase the Evolution 5 HD.
The purpose of this manual is to familiarize the operator with the features, maintenance and
operation of the unit.
The new Evolution 5HD is an innovative permanent hair removal system with a communication
interface that enables taking advantage of any future technical updates. This guarantee, your
electrolysis unit will always remain on the leading edge of technology.
VECTOR MODULATION TM (Exclusive Technology)
After years of research, Silhouet-Tone and its team of engineers have conceived the Vector
ModulationTM technology, an advanced current delivery system. At its core, Vector
ModulationTM modulates the current in both intensity and duration while the needle is in the
follicle. This major breakthrough in permanent hair removal, firmly places electrolysis at the
forefront of this industry by solving three important issues:
1. Pain: is reducing the pain to the lowest level possible.
2. Efficiency: is maximizing treatment efficiency.
3. Satisfaction: achieves permanent results faster.
Vector Modulation TM is more accurate and stable than any other existing technology. This
technology uses a two millisecond segment current, the fastest on the market, to maximize the
transfer of energy through the follicle.
Traditionally, a pulsing current technology is alternating ON / OFF settings to mitigate pain.
However, this results in an uncomfortable pounding sensation while significantly reducing the
amount of energy delivered in the hair follicle.
In the past, Silhouet-Tone has been innovated this pulsing technology by eliminating the inactive
“OFF” phase. Our Sequentium VMC unit is employing intermediate intensity levels to
complete each modulation and to maintain constant energy in the hair follicle. This improved
treatment’s efficacy and comfort level.
Now, with the introduction of the Evolution 5HD unit, we push further the innovation and we
create the Vector Modulation TM. This technology emits complex wave forms to deliver greater
amounts of energy in the hair follicle associated by unprecedented and optimal comfort.
Fractional modulated current in 2 millisecond segments eliminates discomfort caused by current
pulsation or repeated application. Energy remains constant at the follicle base, optimizing the
destruction of hair growing cells.

3"
"
Benefits
• Uses the only technology to remove hair permanently.
• Permit rapid destruction of all “hair growing cells”.
• Achieves quicker permanency.
• Is effective on all hair types (fine, medium, heavy, light or dark).
• Eliminates ingrown hairs.
• Does not damage the surrounding tissue.
• Does not leave hyperpigmentation or scars.

4"
"
01.Contraindications
PRIOR TO TREATMENT, EACH CLIENT MUST FILL OUT A CLIENT RECORD CARD AND
THE CONSENT FORM.
!Pacemaker.
!Metallic implant.
!Insulin-dependent or severe diabetes.
!Pregnancy.
!Prescription blood thinning drugs (anti-coagulants such as Warfarin or Coumadin).
!Viral hepatitis.
!HIV.
!Cancer.
!Keloid scars.
!Rosacea (during active phase or with severe acne).
!Infectious acne.
!Herpes simplex (cold sore).
!Any health problems or medical condition that can delay healing process.
When in doubt, refer client to her / his physician or ask for a written physician’s
authorization.

5"
"
02.Connecting Accessories
Caution: Risk of electrical shock, do not remove back cover.
Refer servicing to qualified service personnel.
Rear side :
1. Power outlet.
2. ON / OFF switch.
3. Fuse box.
4. Pedal outlet (big black outlet).
5. Soothing roller electrode (red
outlet).
6. Contact electrode outlet (small
black outlet).
7. Satellite 2 leds red & green
(silver outlet).

6"
"
Front side:
8. Probe Holder Connection.
Right side:
9. Screen pen and probe holder supports
10. Standby button.

7"
"
Connections and accessories:
NOTE: Make sure that the ON / OFF switch is in the OFF position before connecting any
accessory.
Onto the Rear panel:
•Power cable to be connected into # 1 Power outlet.
•Pedal to be connected into # 4 Pedal outlet (black small outlet) on the rear unit’s side.
•Red extension cable to be connected into # 5 Roller electrode outlet (red outlet) on the
rear unit’s side wile other end inserted into the Soothing roller outlet.
•Black extension cable to be connected into # 6 Contact electrode outlet (black small
outlet) on the rear unit’s side, while other end is inserted into the Electrode outlet.
•Satellite to be plugged into # 7 Satellite outlet (silver outlet) on the rear unit’s side.
Onto the Front panel:
•Cable for Probe holder: thicker end to be connected into # 8 Probe Holder Connection
on the front unit’s side (insert and rotate to insure holding protection) wile other end
inserted into the Probe holder.
Now you can Turn the unit ON.
Turning the unit ON
1. To turn the unit on, use the power switch located at the back of the unit to the "ON"
position.
2. The screen will display the following message: “Loading OS please wait”.
3. The computer will take approximately 15-30 seconds to load all programs.
4. The unit is ready to use when the screen displays “Depilation” and “Soothing phase”.
Please read the Instruction Manual by pressing “Instruction” button. This will help
you to well understand the functions of the apparatus.

8"
"
03.Unit settings
Your new Evolution 5HD system uses a touchscreen interface. It is highly recommended that
you carefully read and understand the instructions to properly use your electrolysis system.
INSTRUCTIONS: The touch screen interface is very sensitive, therefore:
1. ALWAYS use the screen pen provided with the unit to touch the screen. There is no
need to press hard for a response.
2. NEVER use sharp objects as these may damage the screen.
3. NEVER put the probe holder or the tip of the needle in contact with the screen
surface.
The probe carries high voltage and will damage the screen.
Turning the unit ON
1. To turn the unit on, use the power switch located at the back of the unit. Switch to the
"ON" position.
2. The screen will display the following message: “Loading OS please wait”.
3. The computer will take approximately 15-30 seconds to load all programs.
4. The unit is ready to use when the screen displays “Depilation” and “Soothing phase”.
5. Function selection: touch “Depilation” or “Soothing phase” key to access the main
“Treatment Menu”.
All treatments and functions are selected by simply touching the appropriate key.

9"
"
STANDBY Mode
The “standby” mode should only be used between clients (in the course of the same day) to
save time.
The unit should be completely powered OFF at night and turned back ON the following morning,
before the first client.
This procedure will increase screen longevity.
Procedure: there are two ways to place the unit in “STANDBY” mode:
1. by pressing the blue “standby” button, located on the right side of the unit, or
2. by holding the “standby” button for few seconds which brings up the menu on the screen,
then select “Suspend”. When in “STANDBY” mode, the fan will continue to operate for 3
minutes to cool down the unit, and then will turn OFF.
3. to restart the unit, simply press the “standby” button again. The unit will turn back ON,
ready to operate.
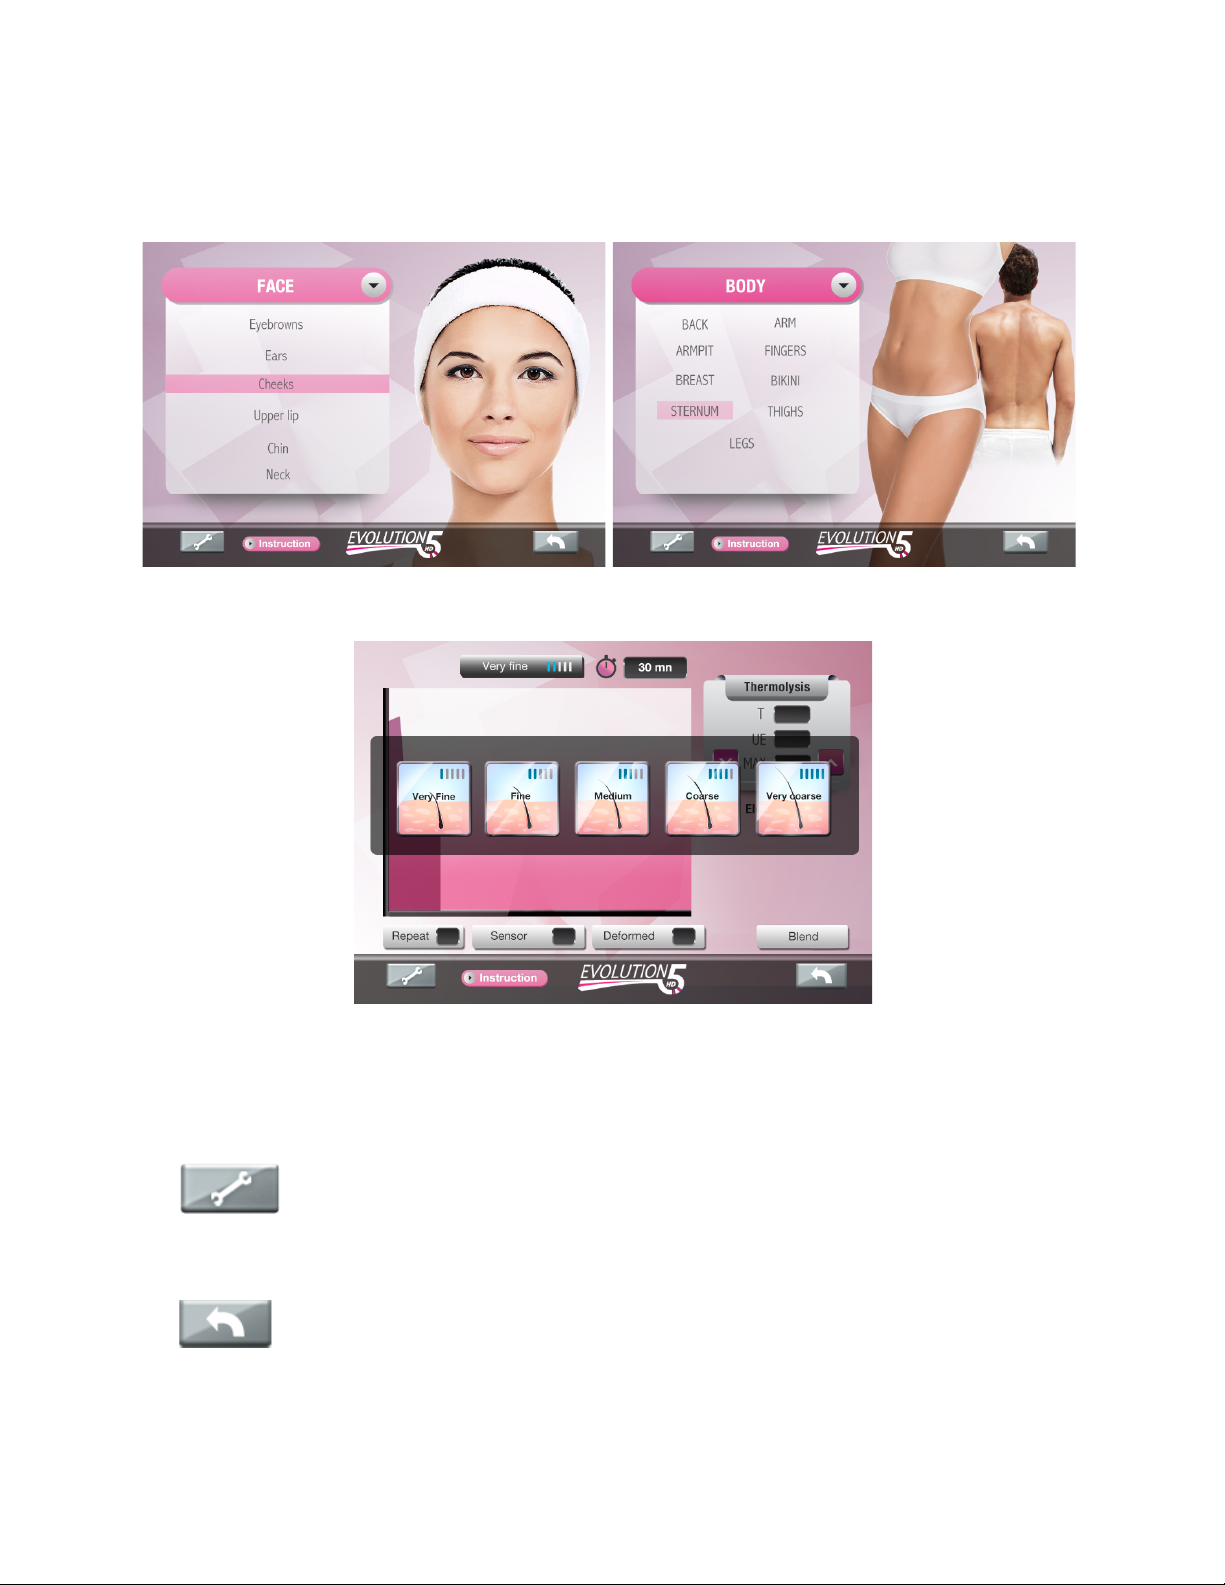
Treatment selection
•Use this screen to select treatments
Screen description
10"
"
3 Selection butons are available in « Depilation » program :
•The “Face” or “Body” icon will bring up all face or body areas to be treated.
•The “Hair type” icon selects generic intensity settings based on hair size.
2 Selection buttons are available in Soothing phase program (Ana / Cata): Refer to section
Soothing Phase into the 04. Treatment Screen Chapter for treatment details.
The “TOOL key”on the bottom left of the screen, is a configuration key that
enables system’s setting parameters, such as modifying screen brightness, beep sound
insertion delay, language and when applicable, updating your unit interface through Wi-Fi.
The “Back key” (arrow pointing to the left) will bring up the previous screen.

11"
"
Performing a treatment
•Select the treatment area: “Face” or “Body”. If you wish, you can access generic
programs “By hair type”. Note that these last programs are less comfortable than “Face”
or “Body” programs and require a long treatment experience on the machine as well as
long experience with client.
•Select the area or the hair type encountered to be treated or select the Soothing phase
to be applied.
•You are now ready to work.
Turning the unit OFF
There are two ways to turn the unit OFF:
1. by using the power button located at the back, or
2. by holding the “standby” button for few seconds which brings up the menu on the screen,
then select “Power Off”. As in STANDBY mode, the fan will continue to operate for 3
minutes to cool down the unit and dissipate residual heat, and then will turn OFF.
To save energy, we recommend that you turn “ON” the unit in the morning or before your first
treatment, keep it in "STANDBY Mode" between treatments and turn the unit “OFF” at the end of
the day.

12"
"
04. Treatment Screen
Note: before any treatment verify if:
•All jewelleries are removed.
•The contact electrode covered with wet gauze, is placed under the shoulder, when
working around face area or under the upper body or under the thighs when working on
lower body.
Area to select: Face / Body Programs
The user can select the specific “Face” or “Body” area to be treated by simply pressing the
desired area. Each area to be treated has specific waveforms and modulation programs
designed for its own sensitivity and degree of difficulty. A fine hair on the chin does not respond
the same way as a fine hair on the upper lip. These programs insure maximum comfort for
the client.
When selecting a new treatment area, the unit will display the “hair type” icons. Choose the type
of hair by pressing on the corresponding picture: “Very Fine”, “Fine”, “Medium”, “Coarse”,
“Very coarse”. The example below shows following selection:
•Depilation / Face / Chin;
To select a different hair type while staying in the same area, simply press the hair icon.
Note: When selecting “Upper Lip” from the “face” menu, you will notice that very coarse hair is
not displayed and is not available.

13"
"
Treatment screen :
The unit is ready to perform the selected treatment, when the screen displays all treatment
parameters.
NOTE: Two dials display parameters for Thermolysisand Electrolysis (DC current) ONLY in
following modes:
•Depilation / Face / Chin / Very coarse hair;
•Depilation / Face / Sternum / Very coarse hair.
In all other modes ONLY Thermolysis option is available.

14"
"
The pink Up / Down arrows are used to increase or decrease the intensity. Modifying treatment
parameters will affect only the wave power. The wave’s total duration will not change.
T => Time / seconds represents the duration of Thermolysis /
Electrolysis wave.
UE => Total RF energy.
MAX => is the maximal value that RF energy wave will reach.
UE => Total DC energy of Electrolysis wave.
MAX=> The maximum value that DC current will reach.
When selection « By Hair Type » is used, wave duration can be adjusted by pressing pink
arrows Left / Right into the “Time” square. The graph displays wave duration accordingly.

15"
"
Other treatment parameters:
“Repeat” key can be used to repeat the modulation wave up to 3 times
without re-inserting the needle or having to activate the pedal. Pressing
this key will increment the repeat count until it reaches 3. Pressing
once more will reset it back to zero. Zero means that the modulation wave will discharge once. A
“Repeat 1” will discharge once and then repeat.
“Sensor” key is used to select the “Insertion Delay” “On”/ “Off”. The
blue color confirms that the “Insertion delay” function is “On”. When the
sensor key is activated, the current will automatically flow upon
detecting insertion. When Sensor is “Off” (black color), the current must be activated with the
pedal.
”Deformed” key is used to provide extra bursts of energy when
working with difficult or distorted hair follicles.
“Blend”key will only appear if Blend modality is available for the
selected area or hair type. Activating this key will switch modality from
“Thermolysis” to “Blend”. When blend is selected, an extra
“Electrolysis” dial will appear which can be used to modify galvanic parameters. Pressing the
“Thermo” key will switch back to Thermolysis mode.
The hair selection bar displays the selected hair. The blue lines
represent a graphic of the power output. For coarse hair, the power
is 80% of the total available power. To select a different hair size
while working in the same area, simply press this bar key, the hair selection icons will appear.

16"
"
SOOTHING PHASE PROGRAMS
The Soothing phase key on the front screen is used to select “Cata”or “Ana”.
CONNECTING ELECTRODES
Note: The POLARITY of the DC current is pre-set, inside the unit, by a relay. Therefore, there is
no need to modify connection of the electrodes when switching between “Cata”and “Ana”.
Default treatment time is 3 minutes. DC current intensity can be increased or decreased by
1/10th of a mA (milliamp) increment. Pressing the “On”key will start the treatment. The
treatment will stop when the increment chronometer reaches the pre-set time. To start a new
treatment, the user will have to exit this screen or increase the set time. The unit will not allow
the time to restart if the limit has been reached.

17"
"
“Cata” / “Ana” modes:
•All jewelleries must be removed.
•Place the contact electrode covered with wet gauze, under the shoulder, when working
around face area or upper body or under the thighs when working on lower body.
•Apply a layer of Sensibilis Lotion / Sensiblis Gel (post-depilation soothing gel for
“Cata” mode and pre-depilation lotion for “Ana” mode).
•Use the roller electrode over the treated area for 3 minutes. (Never use metallic roller on
bare skin).
•Remove gel and rinse the skin.
•To prevent electrode deterioration, remove gel residues from roller electrode.
•Use bactericidal wipes to disinfect roller.
Recommended intensity settings for “Cata” mode:
•For Face: 0.35 mA to 1.00 mA
•For Body: 1.00 mA to 2.00 mA
"Treatment should be comfortable and soothing.
"Client should feel very light tingling or cooling sensation.
"A tingling may also be felt under the contact electrode (make sure the electrode is
covered with wet gauze).
Recommended intensity settings for “Ana” mode:
•For Face: 0.30 mA to 1.00 mA
•For Body: 1.00 mA to 2.00 mA
"Note: This phase should NEVER be used after electrolysis treatments.
"Client should only feel slight tingling. Lower intensity if client is uncomfortable.
"Treatment should never cause any discomfort.
"A tingling may also be felt under the contact electrode (make sure the electrode is
covered with wet gauze).

18"
"
05.System configuration
Configuration screen is accessible by pressing the “tool” icon.
All operating parameters can be modified to suit your needs.
TIMER: 2 options are available
1- True Time Mode: Can be used to countdown a pre-set
time. Useful to control time with a client.
2- Chrono Mode: Can be used as a chronometer (counts
from zero upward) to keep track of time with client.
The choice of Timer mode is selected by using the “Treatment Duration” bar.
!True Time Mode: To use the timer as a countdown timer, select the desired treatment
time, using the “up” or “down” arrow keys on the timer panel. It will change by 15 minute
increments. Next, press the “True Time” key to turn the timer on. The blue indicator will
confirm the timer is counting down. You can press the “True Time” key to pause or
activate the timer.
!Chrono Mode: To use the timer as a chronometer, press the “Continuous”key. The
blue indicator will confirm your choice and count time. Pressing the “continuous” key a
second time will cancel the timer.
19"
"
!When using “Continuous” mode, you cannot pause the timer. If you stop the timer, any
subsequent press of this key will reset the timer to zero.
!The choice of Timer option will be displayed on the treatment screen.
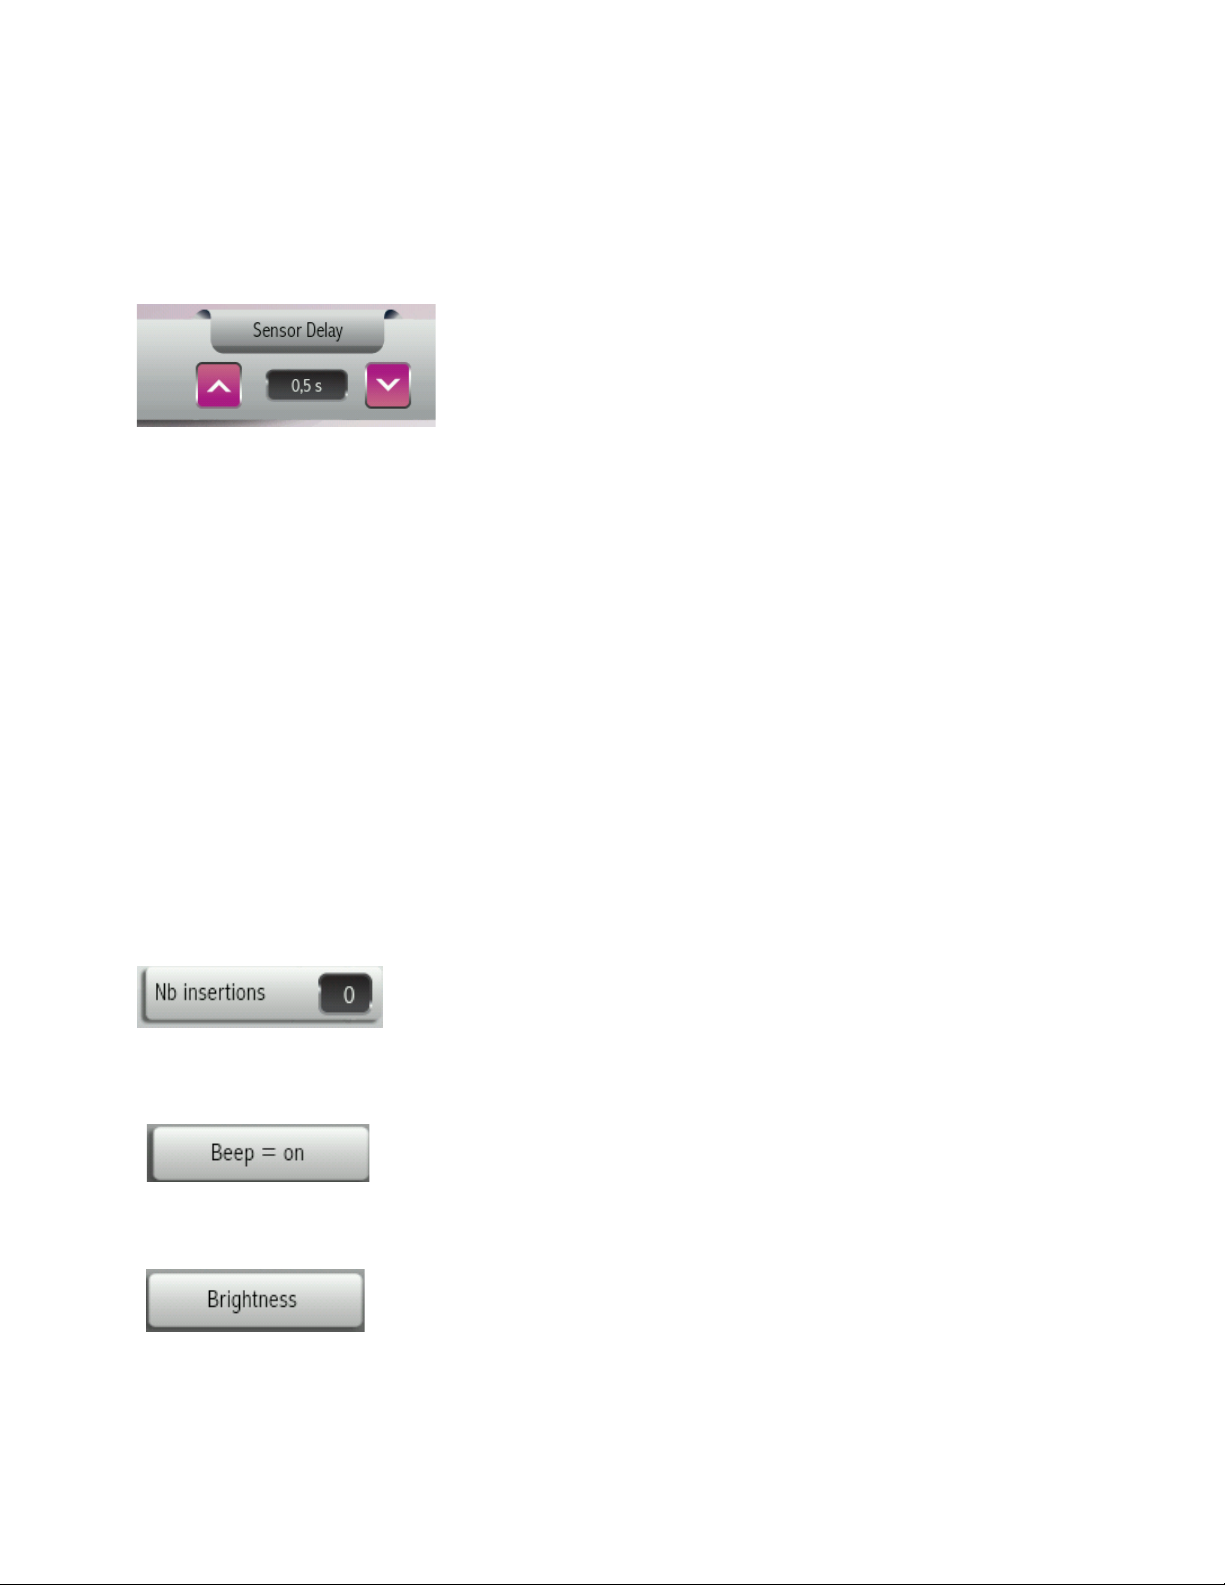
Insertion Delay (automatic current activation mode)
The Sensor Delay key is used to work in the automatic current
activation mode, without the pedal.
•The “Sensor Delay” is the interval of time between the beginning of your insertion into the
follicle and the activation of current passage. This delay time can be modified to suit the
technician’s dexterity and difficulty encountered at the treated area. The delay may be
set from 0.5 sec to 10 sec., in 0.10s increments.
•This mode will contribute to the technician’s comfort and reduce lengthy work fatigue.
•Using the “Sensor Delay” necessitates a certain amount of dexterity. The probe must
always be accurately inserted into the follicle at the moment of current activation.
Note:
•It is not recommended to work with the “Sensor delay” mode when work areas present
difficult insertions or tight follicles.
•If you are not familiar or comfortable with the Insertion delay technique, set the delay
time to 2.5 seconds or longer.
Insertion counter
Registers the number of times the current is actually activated during
a specific treatment. Pressing the “Insertion” key for more than a
second will reset the insertion counter.
Sound
At the end of each insertion, the unit beeps to indicate that it is safe for
the needle to be removed from the follicle. If you wish to use the visual
“satellite” signal, the beep can be silenced by pressing the “Beep” key.
Screen brightness
This key serves to adjust the brightness of your screen. The screen is
set at maximum brightness by default. If you wish to dim the screen,
press the key repeatedly until the desired brightness is reached.
Brightness will loop around from high to low when the highest setting is reached.
Table of contents


