Nemesis 240 FPV User manual

Nemesis 240 FPV Assembly Manual
Revision 1.1
Assembly:
Part 1: Dirty Section
Part 2: Clean Section
Part 1: Dirty Section Assembly
Top View Exploded

Top View Assembled

Bottom View
Paddle edges o arms all oriented orward.
Frame parts:
1 - Dirty Bottom Plate
1 - Dirty Top Plate
4 - Arms
Hardware:
4 - M4 x 14mm
4 - M4 Nylock Nuts
8 - M4 Flat Washers (optional part, not included)
4 - M2 X 9mm
4 - M2 Standard Nuts
4 - High Quality Vibration Dampers
4 - M3 Standard Nuts
*Paddles o arms should all ace orward. Arm should not be over tightened at this point. Keep them loose.

Part 2: Clean Section Assembly
Frame parts:
1 - Clean Bottom Plate
1 - Clean Top Plate
1 - Camera Plate
1 - Rear Bulkhead
Hardware:
8 - M3 x 35mm Nylon Stando s
16 -M3 x 6mm Nylon Screws
4 - M3 Standard Nuts
Align Clean Bottom Section so extra M3 hole in ront is on the le t and the elongated Hole in the rear is also on the
le t. Install the rear bulkhead with the arrow on the bottom and pointing le t. Install the camera plate with the
asymmetric prong on top and on the le t side. Camera plate and bulkhead are designed to it tightly and should
click in. The slots may require mild sanding in the center o each slot i it's too tight. I it's too loose you can shim
the prongs on the plate with scotch tape.

Install Clean Top Plate so the slots in the ront are on the right side.
Install all 8 stando s and 16 stando screws.
Center 4 stando s will mount on the inner set o holes on the top plate.
Insert Clean section into vibration dampers and install compress dampers by pushing down on top chassis. Install
4 damper top nuts to a ix clean section to dirty section while under compression. Tighter till hand tight with
wrench and release compression.

Adjust tightness o M4 bolts on arms until they can turn in and arms can retract in slot under orce. They should
absorb energy in a crash by olding. They should not move when hitting light objects.

Storage:
To store your quad the arms designed to old neatly into center to maintain the smallest possible ootprint. Even
with motors and props mounted you can still old all the way inward.

Flight configurations
The Nemesis supports di erent light con igurations which will all change the handling o the quad. Experiment to
see what you like best and what works or you.
Per ect H 5" (More sensitive Pitch Axis then Roll Axis, Keeps props out o view):
Swing arms out until arms are parallel and the inside hole on the top, bottom, and arm align per ectly where the
blue circles are shown. I you want to solid mount this con iguration you can put a m3 x 8mm-12mm screw
through here and a ix the bottom with a standard or nylock nut.

Per ect X (symmetric) 5" (Symmetric Even geometry with balanced Pitch and Roll Axis):
Swing arms out until arms are past the H con iguration and the inside edge hole on the top, bottom, and arm align
per ectly where the blue circles are shown. I you want to solid mount this con iguration you can put a m3 x
8mm-12mm screw through here and a ix the bottom with a standard or nylock nut.
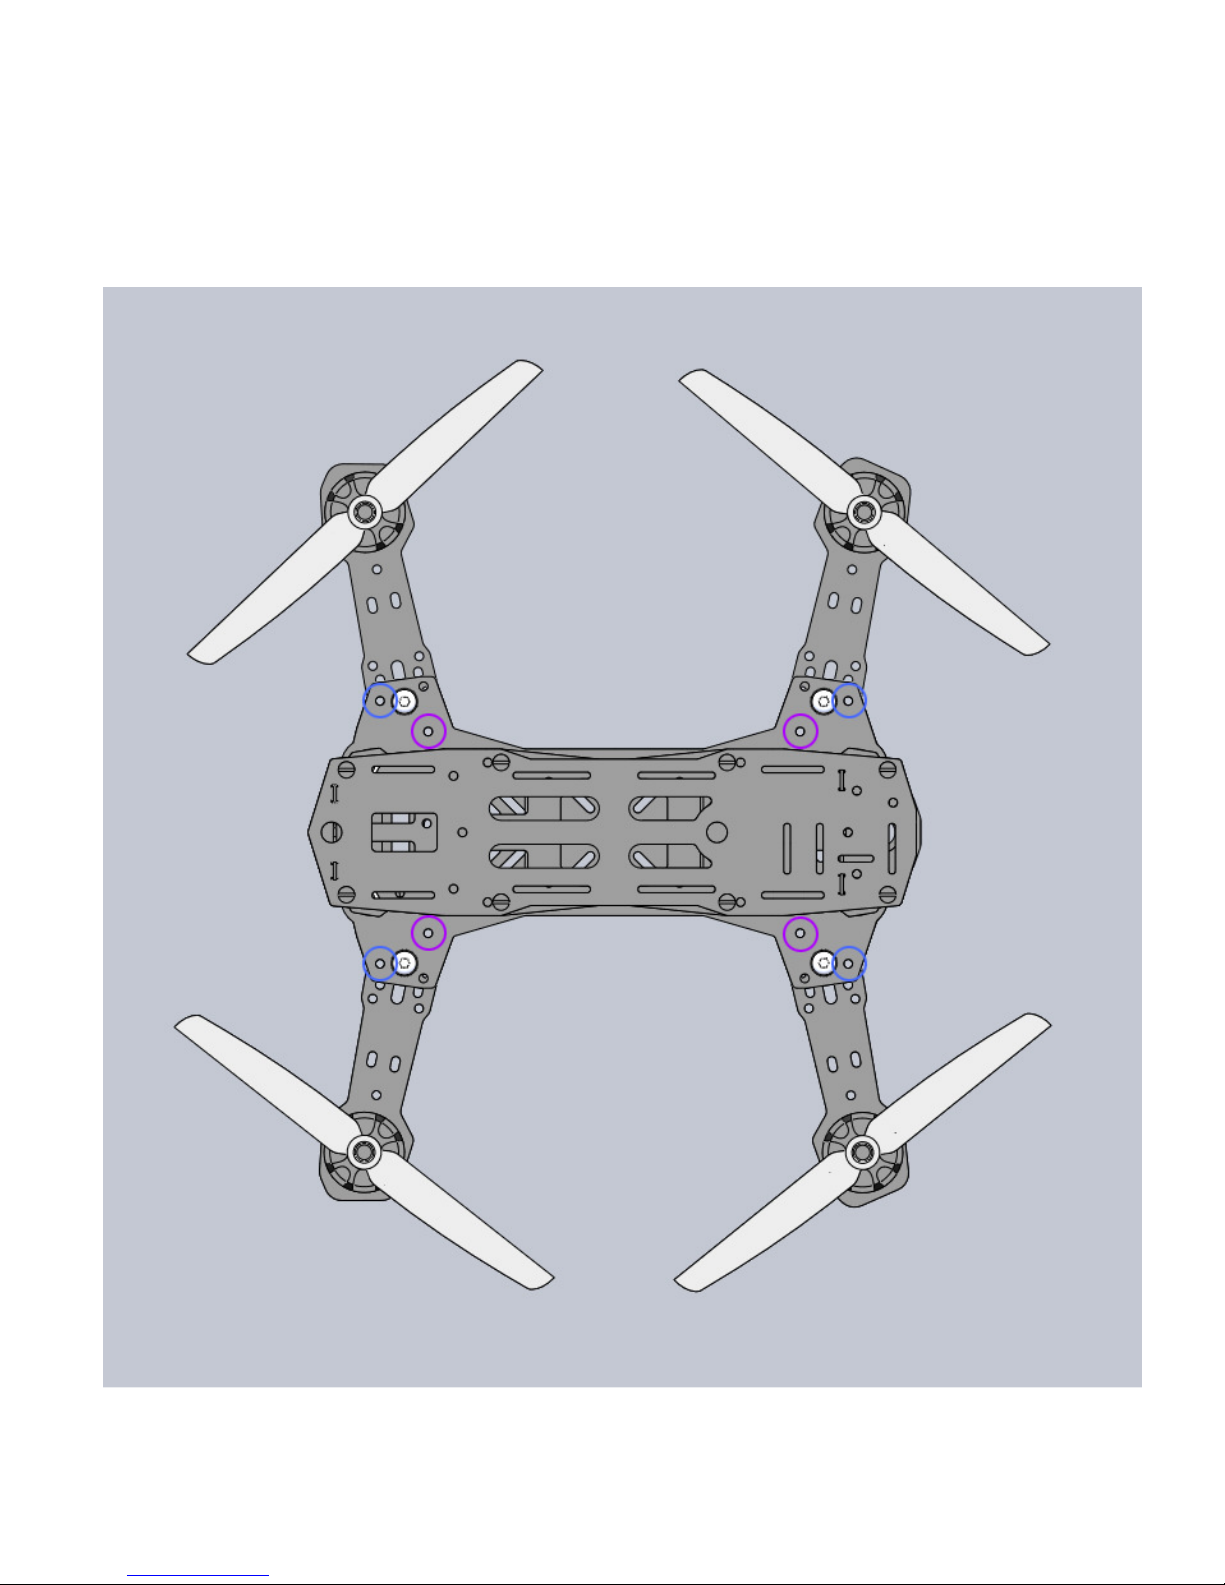
Extended Wingspan 6" (Designed to support Larger Diameter props, more sensitive Pitch then Roll) :
Extend arms out to their ull length. Swing arms out until arms are past the H con iguration and the outside edge
hole on the top, bottom, and arm align per ectly where the blue circles are shown. To sti en the rame in 6"
con iguration it is required to insert an m3 spacer in the gap where the purple circle is and bolt it down with m3 x
8-12mm screws and a standard or nylock nut.
Also recommended to solid mount this con iguration by putting an m3 x 8mm-12mm screw through the blue hole
and a ix the bottom with a standard or nylock nut.

Dead Cat (Near symmetric con iguration, FC slighty orward, props out o view):
Extend rear arms out to their ull length. Retract ront arms in ully. Set ront arms or 5" H position. Swing rear
arms out till the center o the motors are aligned horizontally with the ront motors.

Flight Electronics:


