NEP BDG?256 User manual
QUICK INSTALLATION GUIDE
BDG-256 GATEWAY
USA Dirección: 2570 N.
First Street, Suite 200,
San Jose, CA 95131
TEL: +1 888-598-9901
Japón Dirección: 812-0011
福岡市博多区博多駅前
3-10-24 藤井ビル 1F
TEL: +81 092-433-3252
FAX: +81 092-433-3171
China Dirección: No.1 Anhe
Rd Tsingtao Export Processing
Zone, Tsingtao,China 266113
TEL: +86 532 87963900
FAX: +86 532 81100917
Email: [email protected]
es-la.northernep.com
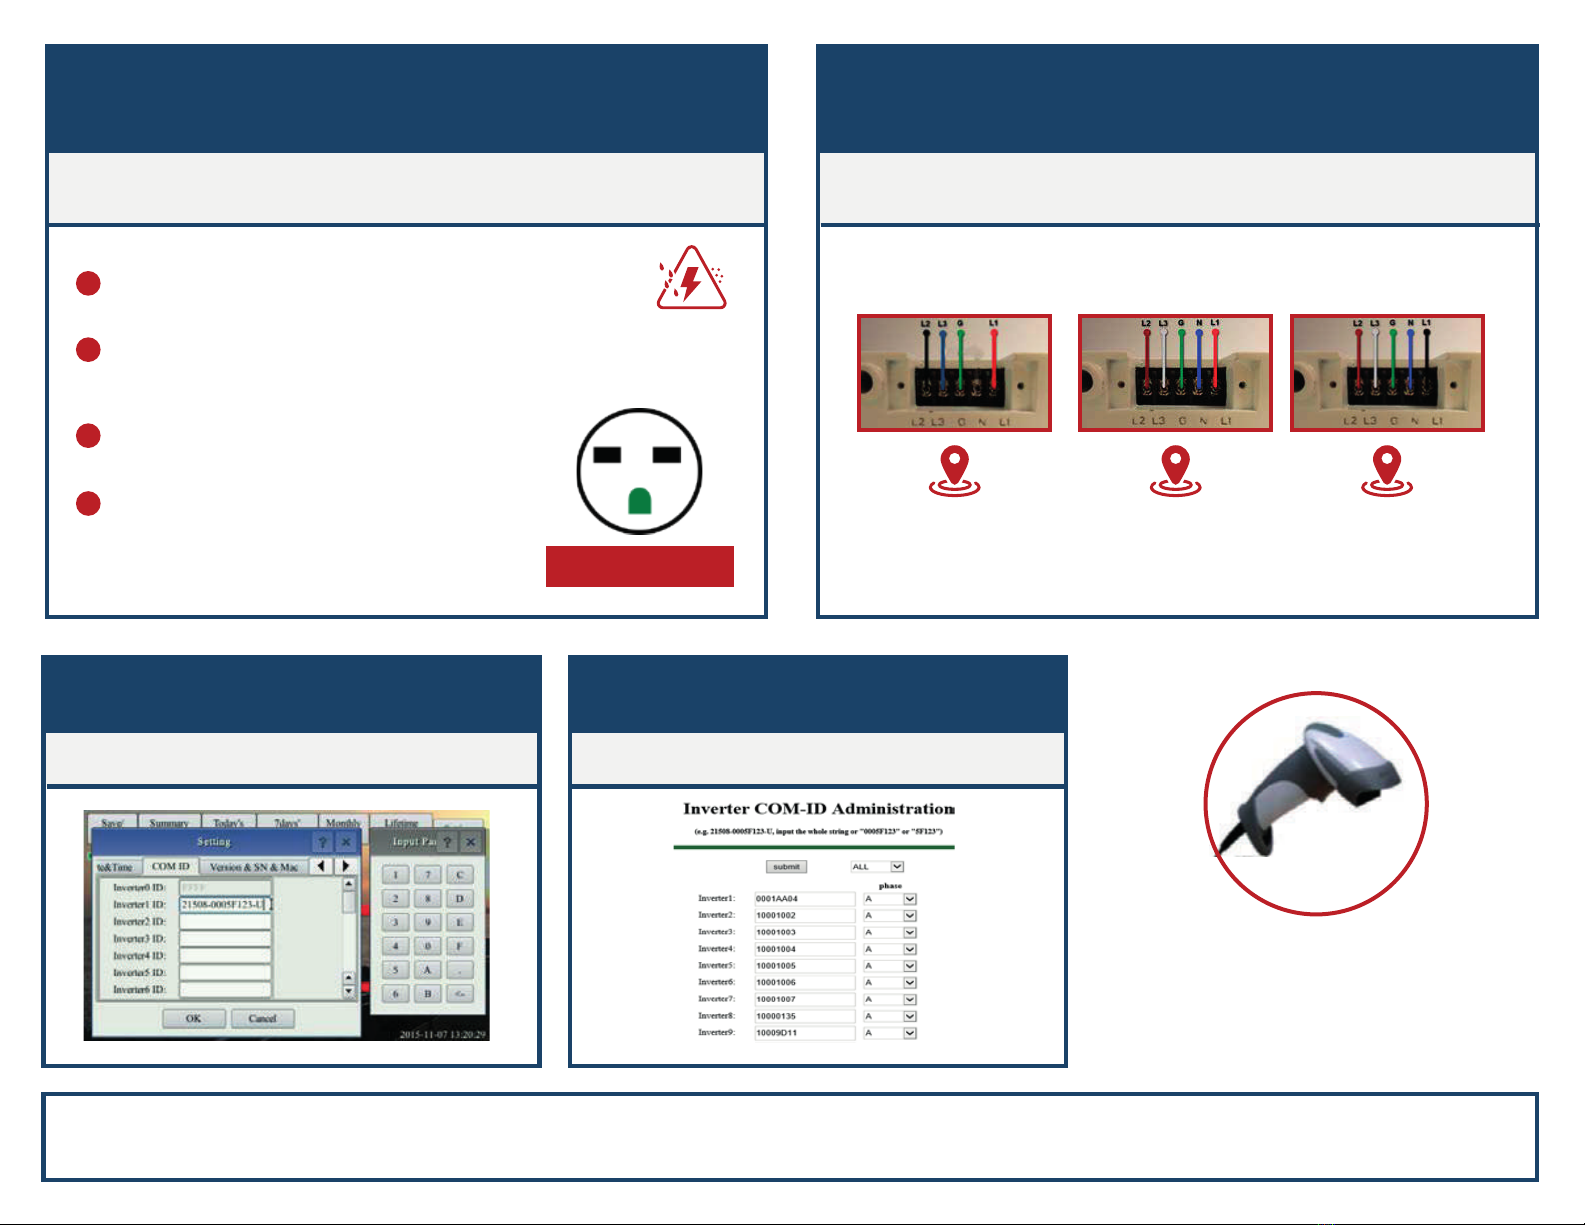
CONNECT TO POWER GRID (BDG-256)
INPUT MICRO INVERTER SERIAL NUMBER THROUGH BUILT-IN WEB PAGE
Plug the AC power cord into a dedicated power outlet.
Once connected, the gateway will take several minutes to boot up.
Through gateway touch screen.
BDG-256P3 connects to a 3-phase power grid directly
1
2
3
4
NEMA 6-15 OUTLET
BDG-256 works on voltages between
100Vac - 240Vac.
Install the gateway on a dedicated outlet
as close to the solar-fed circuit breaker as
possible.
Do not plug the gateway into a power strip,
GFDI outlet or through an ELCB.
For split-phase power grid (U.S., Canada,
Mexico, Japan, Philippine), we recommend
using NEMA 6-15 240V power outlet.
CONNECT TO POWER GRID (BDG-256P3)
BDG-256P3-NA BDG-256P3-AU BDG-256P3-EU
U.S., Japan, Canada
Mexico, Philippine
Australia
New Zealand
Europe
S/N format: (e.g. 21508-3005F121-U, input the whole string “21508-3005F121-U“ or "3005F121")
Phase assignment: A – (L1-L3 or L1-N), B – (L2-L3 or L2-N), C – (L1-L2 or L3-N) (U.S or Europe/Australia)
(e.g. http://10.208.32.52/module)
10.208.32.52 is the gateway IP at the bottom of the touch screen
Note: Handheld barcode
scanner is a very helpful
tool in inputting the
inverter SN.

CONNECT TO INTERNET
BDG-256 can be connected to internet using a cable.
“DHCP” is the default option and most commonly used.
Refer to “Wi-Fi Configuration Guide” for setting up Wi-Fi
Navigate through “Setting” to “Network Test”, and
then click on “Execute”. If the “Net State” shows
Good, then the gateway has connected to internet.
TEST NETWORK CONNECTION
SET DATE/TIME

http://user.nepviewer.com/
Follow the instructions and fill in information
BDG-256 can be monitored by a smart device
connected to the same router
NEPVIEWER REMOTE MONITORING
MICROVIEWER LOCAL MONITORING
Gateway IP address
NOTE: MICROVIEWER local monitoring uses BDG-256
IP address as the link to an internal webpage.
NOTE: NEPVIEWER supports
IE 9.0 or later, Firefox,
Chrome, Apple iOS and
Android web browsers.
Verification code is
sent to the email
address registered.
REGISTER USER ACCOUNT
ADD PV SITE INFORMATION REGISTER A GATEWAY
Each PV site requires two registered
email addresses: end user and installer Add BDG-256 gateway SN in the
V site information
BDG-256 gateway SN can be found on
touch screen Setting/ Version & SN & Mac

Method C: By Smart Mobile Devices
Method A: By Routers Support WPS Method B: By Routers Do Not Support WPS
WI-FI CONFIGURATION GUIDE
Step-1: Plug the wireless adapter to BDG-256
gateway, and wait for several seconds.
Step-2: Press the WPS button on the router for
2 seconds, and for most routers, the WPS
button would flash at this point.
Step-1: Connect the BDG gateway to a router with a cable, and a few seconds later,
an IP address will appear at the bottom of the BDG-256 screen;
Step-2: Log on to the webpage: http://BDG_IP/wifi (BDG-IP refers to the IP shown at
the bottom of BDG-256 screen, e.g. 10.208.32.52).
Step-3: Set Wi-Fi parameters.
Wireless
Adapter
Step-3: Within 2 minutes, return to the BDG-256
gateway, click on Setting/Ethernet, and press
“WPS” (the red button). If the gateway reports the
WPS setup is successful, the IP address on the
gateway screen will be updated instead of 0.0.0.0
within 5 minutes.
Step-1: On an iPhone, click on Settings/General/About. Input
name “MI Installer”
Step-2: Turn on “Personal Hotspot”, and input Wi-Fi Password
“my-gateway”. This password is for other devices such as the
BDG-256 gateway to connect to this mobile device.
Step-3: On the BDG-256 gateway, click on Setting/Ethernet, and
choose “Connect to Mobile” or “Link to Mobile” (the green button).
Step-4: If the connection has been set, a flashing banner “Personal
Hotspot: 1 Connection” will appear at the top of the iPhone screen.
Step-5: Continue from Step-3 of Method B.
Step-6: After using the hot-spot communication, Wi-Fi setup can
be restored, if the Wi-Fi configuration in BDG-256 gateway is not
changed by hot-spot link. First hit on the button “Disconnect from
Mobile” (see Step-3), and then reboot the gateway, then the Wi-Fi
connection will be restored.
NOTE:
1. set the name of the hotspot
link as “MI Installer”
2. set the password of the
hotspot link as “my-gateway”
Enter the password “gateway” Set WLAN parameters and save your settings
Wireless Network Setup Wireless Network Setup
SSID: The name of the home wireless network.
Security type: The wireless adapter supports several security protocols. Please refer
to the wireless router user’s manual for suitable type (default one works for most
routers).
Password: The password for home wireless network.
DHCP: If yes, the wireless router will assign an IP to the gateway. This is most
commonly used (no need to change unless for advanced users).
IP: If DHCP is set to “NO”, users could fix an IP to the gateway. This function is only for
advanced users, who should be responsible for confliction with other network devices
if this IP address is not set properly.
Step-4: plug in the wireless adapter, and then reboot gateway.
If Wi-Fi is connected, a signal
strength bar at the left upper
corner and an IP address at the
bottom should be notified.

Wireless Network Setup
Method D: Using AP (Access Point) mode
WI-FI CONFIGURATION GUIDE
Step-1: Click on the AP button on
the BDG-256 gateway and follow
the instructions to reboot the
gateway. Note that after reboot the
IP address at the bottom of the
gateway is 192.168.99.1
Step-2: Search for a WiFi network named
NEP-xxxxxxxxxxxxxx (xxxxxxxxxxxxxx is
the gateway SN) on a phone or computer,
and link the phone or computer to this
WiFi network, the password is 12345678
Note: This method only applies to BDG-256
gateways with firmware version “20170701-01”
or later, and with the “TP-LINK” WiFi dongle
shipped inside the BDG-256 box.
Step-3: Log on to the webpage: http://192.168.99.1/wifi Enter
password gateway.
Step-4: The pull down menu SSID List shows all available WiFi networks.
Click on Search WiFi may rescan the available WiFi networks. If the WiFi
network is “hidden” and does not show in the list, the network name can
also be input manually on the line of SSID.
SSID: The name of the home wireless network.
Security type: The wireless adapter supports several security protocols.
Please refer to the wireless router user’s manual for suitable type (default
one works for most routers).
Password: The password for home wireless network.
DHCP: If yes, the wireless router will assign an IP to the gateway. This is most
commonly used (no need to change unless for advanced users).
IP: If DHCP is set to “NO”, users could fix an IP to the gateway. This function
is only for advanced users, who should be responsible for confliction with
other network devices if this IP address is not set properly.
Step-5: Click on Save. Uncheck AP on the BDG-256 gateway touch
screen and then reboot the gateway following instructions.
If Wi-Fi is connected, a signal strength bar at the left upper corner
and an IP address at the bottom should be notified.
Other manuals for BDG?256
5
This manual suits for next models
1
Table of contents
Other NEP Gateway manuals


Popular Gateway manuals by other brands

LST
LST M500RFE-AS Specification sheet

Kinnex
Kinnex Media Gateway quick start guide

2N Telekomunikace
2N Telekomunikace 2N StarGate user manual

Mitsubishi Heavy Industries
Mitsubishi Heavy Industries Superlink SC-WBGW256 Original instructions

ZyXEL Communications
ZyXEL Communications ZYWALL2 ET 2WE user guide

Telsey
Telsey CPVA 500 - SIP Technical manual


