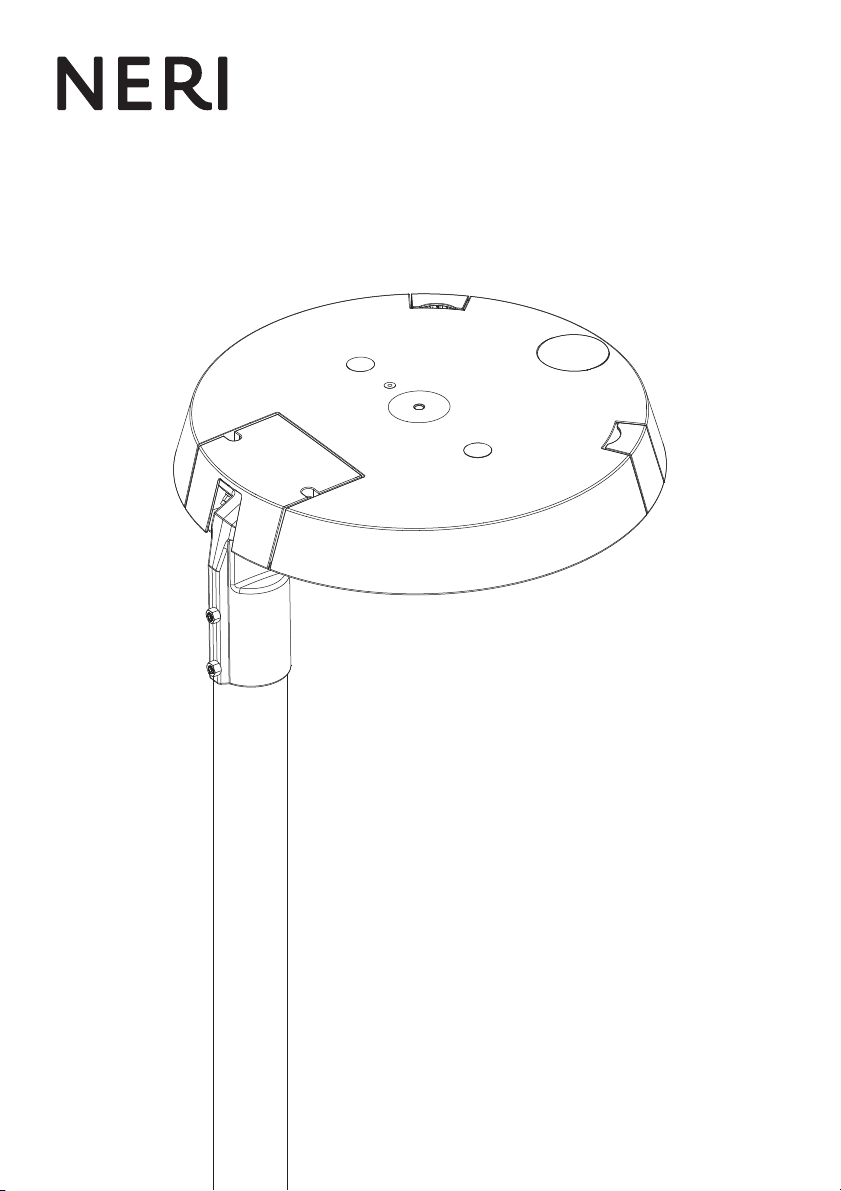
NERI POLIS Operating and maintenance instructions
GUIDA ALL’INSTALLAZIONE
INSTALLATION GUIDES
GUIDE D‘INSTALLATION
INSTALLATIONSANLEITUNG
GUÍA DE INSTALACIÓN
POLIS
LED
Z013.0107
REV. 00 - 2022/05/25

IT – Questo manuale va letto e conservato con molta attenzione.
EN – This manual should be read with attention and kept with great care.
FR – Ce manuel doit être lu très attentivement et soigneusement conservé.
DE – Die Anleitung sollte mit gr oßer Aufmer ksamkeit gelesen und aufbewahrt werden.
ES – Este manual se debe leer con detenimiento y conservar cuidadosamente.

3neri.biz
IT – Neri SpA è impegnata costantemente nella ricerca
e progettazione di prodotti di alta qualità, lunga durata
e sicurezza. Questo manuale intende presentare le
metodiche di installazione corrette dei corpi illuminanti,
ponendosi come guida nei confronti di installatori
professionali.A tale scopo questo manuale va letto con
molta attenzione.
EN – Neri SpA is constantly committed to research
and design for products of high quality, durability and
safety. This manual aims to present correct installation
procedures for light fixtures as a guide for professional
installers.To this end the manual should be read with
extreme attention.
FR – Neri SpA a toujours eu pour objectif la recherche
et la conception de produits de haute qualité,offrant
longévité et sécurité. Ce manuel, qui présente
les modes d’installation corrects des armatures
d’éclairage,est un guide à l’adresse des installateurs
professionnels. Il doit donc être lu très attentivement.
DE – Die Neri SpA ist konstant um Forschung und
Entwicklung zeitbeständiger und sicherer Produkte
von hoher Qualität bemüht. Dieses Handbuch stellt die
korrekten Installationsmethoden für die Leuchtkörper
bereit und bietet sich gegenüber professionellen
Installateuren als ein Ratgeber an. Deswegen sollte
dies Handbuch sehr aufmerksam gelesen werden.
ES – Neri SpA trabaja de continuo en el estudio y
proyección de productos de alta calidad,larga duración
y seguridad. Este manual presentará los métodos de
instalación correcta de los cuerpos de iluminación,
siendo una guía para instaladores profesionales. Por
ello,este manual debe leerse con gran detenimiento.
IT – 1. Abbigliamento da lavoro/ 2. Scarpe
antinfortunistiche/ 3. Casco obbligatorio/ 4. Guanti
da lavoro/ 5. Danni ai componenti/ 6. Inquinamento
ambientale/ 7. Nota informativa/ 8. Verifica tecnica/
9. Efficienza energetica/ 10. Pericolo per l’operatore 11.
Rischio fotobiologico/ 12 Rischio di shock elettrico.
EN – 1.Work apparel/ 2. Safety shoes/ 3. Obligatory
helmet/ 4. Work gloves/ 5. Damage to components/ 6.
Environmental pollution/ 7. Informative note/
8. Technical check/ 9. Energy-Efficiency class/10.
Danger for the operator/ 11. Photobiological risk/ 12.
Risk of electric shock.
FR – 1.Vêtements de travail/ 2. Chaussures de
sécurité/ 3. Casque obligatoire/ 4. Gants de travail/
5. Dommages aux composants/ 6. Pollution de
l’environnement/ 7. Note d’information/ 8. Vérification
technique/ 9. Éfficacité énergétique/ 10. Danger pour
l’opérateur/ 11. Risque photobiologique/ 12. Risque de
choc électrique.
DE – 1. Arbeitskleidung/ 2. Schutzschuhe/
3. Helmpflicht/ 4. Arbeitshandschuhe/ 5. Schäden an
den komponenten/ 6. Umweltverschmutzung/
7. Informationsblatt/ 8. Technische kontrolle/ 9.
Energieeffizienzklasse/10. Gefahr für den techniker/
11. Photobiologische risiko/ 12. Stromschlaggefahr.
ES – 1. Ropa de trabajo obligatoria/ 2. Calzado
de seguridad obligatorio/ 3. Casco de seguridad
obligatorio/ 4. Guantes de seguridad obligatorios/
5. Daños a los componentes/ 6.Contaminación del
medio ambiente/ 7.Nota informativa/ 8.Comprobación/
9.Eficencia energética/ 10. Peligro para el operador/ 11.
Riesgo fotobiológico/ 12. Riesgo de descarga eléctrica.
INTRODUZIONE
INTRODUCTION
INTRODUCTION
EINLEITUNG
INTRODUCCIÓN
SIMBOLI
SYMBOLS
SYMBOLES
SYMBOLE
SÍMBOLOS
1
5
9
2
6
10
3
7
11
4
8
12

4 Neri Spa · Guida all’installazione · Installation guides · Guide d‘installation · Installationsanleitung · Guía de instalación
IT – Etichette adesive di avvertimento e indicazione
sono poste sull’apparecchio e l’installatore deve
scrupolosamente seguirne le indicazioni.Vi possono
essere richiami di attenzione sulle caratteristiche o
altre indicazioni di particolare importanza.
EN – Adhesive warning and indication labels are affixed
to the luminaire and the installer must adhere strictly
to the indications given therein.These may highlight
characteristics or other indications of particular
importance.
FR – Des étiquettes adhésives d’avertissement
et d’indication sont positionnées sur l’appareil et
l’installateur doit en respecter scrupuleusement
les consignes. Ces étiquettes peuvent reporter des
rappels d’attention sur les caractéristiques ou d’autres
indications de grande importance.
DE – Auf dem Gerät sind selbstklebende Warn- und
Hinweisschilder Gerät angebracht. Der Installateur
muss die darin enthaltenen Anweisungen strikt
befolgen.Sie können auf besondere Eigenschaften oder
auf besonders wichtige Angaben hinweisen.
ES – Las etiquetas adhesivas de advertencia e
información están aplicadas en el aparato y el
instalador debe respetarlas escrupulosamente. Pueden
contener advertencias sobre las características o
información importante.
ETICHETTE
ADHESIVE
ÉTIQUETTES
AUFKLEBER
ETIQUETAS
ORIENTAMENTO
ORIENTATION
ORIENTATION
ORIENTIERUNG
ORIENTACIÓN
IT – Il corretto orientamento si ottiene posizionando
il corpo illuminante seguendo le indicazioni riportate
internamente al prodotto.
EN – The correct orientation is achieved by positioning
the lighting fixture following the instructions inside the
product.
FR – Pour obtenir une orientation correcte il est
nécessaire de positionner le luminaire suivant les
instructions à l’intérieur du produit.
DE – Die richtige Orientierung wird durch die
Positionierung der Leuchte gemäß den Anweisungen im
Inneren des Produkts erreicht.
ES – Para que el cuerpo de iluminación esté bien
orientado debe seguir las instrucciones dentro del
producto.
5neri.biz
IT – L’apparecchio è stato realizzato a regola d’arte.
Questo apparecchio deve essere destinato solo all’uso
per il quale è stato progettato,e cioè l’illuminazione di
ambienti esterni.Ogni altro uso è considerato improprio
e pericoloso,ed il costruttore non può essere considerato
responsabile per danni derivanti da un uso improprio e
irragionevole.
EN – The luminaire has been manufactured in
compliance with correct practice.This luminaire must
be installed only for the use for which it was designed,
namely for the illumination of outdoor spaces.Any other
use must be considered to be improper and dangerous,
and the manufacturer cannot be held liable for any
damage caused by improper and unreasonable use.
FR – L’appareil a été réalisé dans les règles de l’art.
Cet appareil ne doit être destiné qu’à l’utilisation pour
laquelle il a été conçu,à savoir, l’éclairage de milieux
extérieurs.Toute autre utilisation étant considérée
comme impropre et dangereuse, le constructeur décline
toute responsabilité en cas de dommages dérivant d’une
utilisation impropre et irraisonnable de l’appareil.
DE – Der Apparat ist fachgerecht hergestellt worden.
Diese Vorrichtung darf nur für den Zweck
verwendet werden,für den diese konzipiert wurde,
nämlich für die Außenbeleuchtung.Jede andere
Verwendung ist als unsachgemäß und gefährlich
anzusehen, und der Hersteller kann nicht verantwortlich
für Schäden gemacht werden,die aus einem
unsachgemäßen und unvernünftigen Gebrauch
herrühren.
ES – El aparato ha sido fabricado perfectamente.Este
aparato debe ser destinado exclusivamente al uso
para el cual ha sido concebido,es decir:para alumbrar
entornos externos.Cualquier otro empleo se considera
inadecuado y peligroso,y el constructor no puede ser
considerado responsable de ello.
DESTINAZIONE D’USO
INTENDED USE
UTILISATION DES LUMINAIRES
ZWECKBESTIMMUNG
UTILIZACIÓN
IT – ATTENZIONE! Disinserire l’apparecchio dalla rete
elettrica.
Le operazioni di manutenzione vanno eseguite solo da
personale specializzato, e riguardano:
• Pulizia schermo di protezione e struttura esterna per
la rimozione di eventuali materiali che ne potrebbero
alterare il funzionamento: (ad apparecchio chiuso)
solo con acqua e spugna (non utilizzare idropulitrici a
pressione e altri prodotti per la pulizia).
• Verifica del serraggio dell’apparecchio al supporto
(una volta l’anno).
In occasione della verifica annuale,controllare che le
superfici verniciate non presentino alterazioni come
rigonfiamenti o screpolature, in questo caso intervenire
urgentemente per ripristinare le parti. Rivolgersi a Neri
SpA per le indicazioni e i materiali da utilizzare per i
ritocchi.
Per maggiori informazioni,si invita a consultare le
istruzioni supplementari presenti sul sito alla pagina
www.neri.biz/it/corpi-illuminanti/uso-e-
manutenzione
EN – WARNING! Disconnect the light fi xture from the
power supply system.
Maintenance operations must be carried out by expert
personnel only.These operations involve:
• Cleaning the safety shield and external structure to
remove any material which could negatively affect
performance:(with the appliance closed) use only
clean water and a sponge (do not use high-pressure
water jets or other cleaning products).
• Checking that the appliance is securely fastened to
the support (once a year).
During annual inspection operations,check the
painted surfaces for signs of damage such as blistering
or cracking.Should any such damage be found,
intervene immediately to restore the paintwork. Contact
Neri SpA for indications and materials to be used for
retouching the paintwork.
For more information, please see the supplementary
instructions on the website at
www.neri.biz/en/luminaires/use-and-maintenance
MANUTENZIONE
MAINTENANCE
ENTRETIEN
WARTUNG
MANTENIMIENTO
6 Neri Spa · Guida all’installazione · Installation guides · Guide d‘installation · Installationsanleitung · Guía de instalación
FR – ATTENTION! Débrancher l’appareil du réseau
électrique.
Les opérations d’entretien doivent être effectuées
uniquement par un personnel spécialisé,et concernent
notamment :
• Nettoyage de l’écran de protection et de la structure
externe pour l’élimination de tout éventuel matériel
qui pourrait en altérer le fonctionnement (avec
l’appareil fermé) uniquement avec de l’eau et une
éponge (ne pas utiliser d’hydro-nettoyeuses à
pression et d’autres produits pour le nettoyage.
• Vérification du serrage de l’appareil au support (une
fois par an).
À l’occasion du contrôle annuel, vérifier que les
surfaces vernies ne présentent pas d’altérations telles
que gonflements ou craquelures ;dans ce cas il est
nécessaire d’intervenir avec urgence pour rétablir
les différents composants.Contacter Neri SpA pour
les indications et les matériaux à utiliser pour les
retouches.
Pour en savoir plus,veuillez consulter les instructions
supplémentaires publiées sur le site Internet à la page
www.neri.biz/en/luminaires/use-and-maintenance
DE – ACHTUNG! Trennen Sie das Gerät vom Stromnetz.
Die Wartungsarbeiten dürfen nur von Fachpersonal
ausgeführt werden und betreffen:
• Reinigung des Schutzschirms und des äußeren
Gehäuses zum Entfernen von Verunreinigungen, die
die Funktionsfähigkeit beeinträchtigen könnten:(bei
geschlossenem Gerät) nur mit Schwamm und Wasser
(keinen Hochdruckreiniger und keine Reinigungsmittel
verwenden).
• Kontrolle der sicheren Befestigung des Geräts am
Halter (einmal jährlich).
Bei der jährlichen Kontrolle auch sicherstellen, dass
die lackierten Oberflächen keine Veränderungen wie
Blasen oder Risse aufweisen;andernfalls müssen
die betroffenen Teile unverzüglich instandgesetzt
werden.Wenden Sie sich bitte an die Firma Neri SpA
für Informationen zu der Verfahrensweise und zu den
Materialien für Ausbesserungsarbeiten.
Für weitere Informationen lesen Sie bitte in den
zusätzlichen Anweisungen nach, die Sie auf der
Webseite
www.neri.biz/en/luminaires/use-and-maintenance
ES – ATENCIÓN! Desconecten el aparato de la red de
alimentación eléctrica.
Las siguientes operaciones de mantenimiento solo
pueden ser realizadas por personal especializado:
• Limpieza de la pantalla de protección y de la
estructura externa para eliminar los eventuales
materiales que pueden alterar e lfuncionamiento:(con
aparato cerrado) sólo con agua y esponja (no utilizar
hidrolimpiadoras a presión ni otros productos de
limpieza).
• Comprobar si el aparato está fijado correctamente al
soporte (una vez al año).
Durante la revisión anual, comprobar que las
superficies pintadas no estén hinchadas ni agrietadas.
Si lo están, intervenir inmediatamente para restablecer
su estado original. Contactar con Neri SpA para obtener
más información sobre los materiales de retoque que
se han de utilizar.
Para obtener más información, consulte las
instrucciones adicionales en el sitio en
www.neri.biz/en/luminaires/use-and-maintenance
MANUTENZIONE
MAINTENANCE
ENTRETIEN
WARTUNG
MANTENIMIENTO

7neri.biz
IT – Questo prodotto contiene sorgenti luminose di
classe di efficienza energetica “ C ”,“ D ”, “ E ”.
EN – This product contains an energy -efficiency class
light sources “ C ”,“ D ”,“ E ”.
FR – Ce produit est équipé de sources lumineuses
classée en termes d’efficacité énergétique “ C ”,“ D ”, “ E ”.
DE – Dieses Produkt enthält eine Lichhtquelle der
Energieeffizienzklasse “ C ”,“ D ”,“ E ”.
ES – Este producto contiene fuentes de luz de clase de
eficiencia energética “ C ”,“ D ”,“ E ”.
EFFICIENZA ENERGETICA
ENERGY-EFFICIENCY CLASS
ÉFFICACITÉ ÉNERGÉTIQUE
ENERGIEEFFIZIENZKLASSE
EFICIENCIA ENERGÉTICA
IT – Le sostituzioni di componenti danneggiati con
ricambi originali deve essere fatta solo da personale
specializzato autorizzato da Neri SpA. Rivolgersi
direttamente a Neri SpA per la manutenzione.
ATTENZIONE! La sorgente luminosa LED deve essere
sostituita solo dal costruttore o dal suo servizio di
assistenza o da personale altrettanto qualificato.
EN – The replacement of damaged parts with original
spares must be carried out exclusively by expert
personnel authorized by Neri SpA Please contact Neri
SpA directly for maintenance needs.
WARNING! The LED light source must be replaced
only by the manufacturer or his customer service or by
equally qualified.
FR – Le remplacement de composants endommagés,
avec des pièces de rechange originales, doit être
effectué uniquement par un personnel spécialisé,
autorisé par Neri SpA. S’adresser directement à Neri
SpA pour l’entretien.
ATTENTION! La source de lumière LED doit être
remplacé que par le fabricant ou son service à la
clientèle ou par tout aussi qualifié.
DE – Austausch von defekten Komponenten durch
Originalersatzteile nur von Fachpersonal ausgeführt
werden,das von der Firma Neri SpA autorisiert. Wenden
Sie sich bitte für die Wartung direkt an die Firma Neri
SpA.
ACHTUNG! Die LED-Lichtquelle hat nur durch den
Hersteller oder seinen Kundendienst oder gleich
qualifizierte ersetzt werden.
ES – Los componentes dañados deben ser sustituidos
con recambios originales,exclusivamente por
personal especializado y autorizado por Neri SpA.
Contactar directamente con Neri SpA para realizar el
mantenimiento.
ATENCIÓN! La fuente de luz LED debe ser reemplazado
únicamente por el fabricante o su servicio al cliente o
por las mismas calificaciones.
RICAMBI
SPARE PARTS
PIÈCES DE RECHANGE
ERSATZTEILE
RECAMBIOS
CCT CRI Classe / Class / Classe / Klasse / Clase
2200K 70 E
2700K 70 D
3000K 70 D
4000K 70 C
2200K 80 E
2700K 80 E
3000K 80 D
4000K 80 D

8 Neri Spa · Guida all’installazione · Installation guides · Guide d‘installation · Installationsanleitung · Guía de instalación
IT – Apparecchio contrassegnato in conformità
alla Direttiva Europea 2002/96/CE;2003/108/
CE; 2012/19/UE (WEEE). Il simbolo sul prodotto o
sulla documentazione,indica che il prodotto non
va trattato come rifiuto domestico, ma deve essere
consegnato presso specifici punti di raccolta per il
riciclaggio di apparecchiature elettriche o elettroniche.
Assicurandosi che questo prodotto sia smaltito in modo
corretto, l’utente contribuisce a prevenire le potenziali
conseguenze negative per l’ambiente e la salute.Lo
smaltimento abusivo o inadeguato comporta sanzioni
economiche e/o amministrative, stabilite a norma
di legge.Per informazioni sui centri di raccolta e sul
corretto smaltimento del prodotto, contattare l’autorità
locale.
EN – This product is marked according to the European
directive 2002/96/CE;2003/108/CE; 2012/19/
UE (WEEE).The symbol on the product, or on the
documents, indicates that this appliance may not be
treated as household waste. Instead it shall be handed
over to the applicable collection point for the recycling
of electrical and electronic equipment. Make sure
that this product is disposed in corrected way, the
customer contributes to prevent the negative potential
consequences for the environment and the health.The
illicit disposal or inadequate involves economic and/or
administrative sanctions,established according to the
law. For information about the centers of collection and
the corrected disposal of the product, contact the local
authority.
FR – Cet appareil porte le symbole du recyclage
conformément à la Directive Européenne 2002/96/
CE;2003/108/CE;2012/19/UE concernant les Déchets
d’Equipements Èlectriques et Èlectroniques (WEEE). Le
symbole présent sur l’appareil ou sur la documentation
indique que ce produit ne peut en aucun cas être traité
comme déchet ménager. Il doit par conséquent être
remis à un centre de collecte des déchets chargé du
recyclage des équipement électrique et électroniques.
Assurez-vous que ce produit est disposé de la manière
correcte, le client contribue à empêcher les possibles
conséquences négatives pour l’environnement et la
santé.La disposition illicite ou inadéquate implique
des approbations économiques et/ou administratives,
établies selon la loi. Pour informations é propos des
centres de collection et des la correcte disposition du
produit, contactez l’autorité locale.
SMALTIMENTO
DISPOSAL
MISE AU REBUT
ENTSORGUNG
RECICLADO
DE –In Übereinstimmung mit den Anforderungen der
Europäischen Richtlinie 2002/96/EG;2003/108/EG;
2012/19/EG über Elektro- und Elektronik- Altgeräate
(WEEE) ist vorliegendes Geräat mit einer Markierung
versehen. Auf den Produkt oder der beiliegend
produktdokumentation
ist folgendes Symbol einer durchgestrichenen
Abfalltonne abgebildet. Es weist darauf hin, dass eine
Entsorgung im normalen Haushaltsabfall nicht zulässig
ist Entsorgen Sie dieses Produkt im Recyclinghof
mit einer getrennten Sammlung für Elektro- und
Elektronikgeräate.Überprüfen Sie ob dieses Produkt
wird in behobener Weise abgeschafft, der Kunde
beiträgt, um die Minuspotentialkonsequenzen für
das Klima und die Gesundheit zu verhindern. Die
unerlaubte oder unpassende Beseitigung bezieht die
ökonomischen und/oder administrativen Aufschriften
mit ein, entsprechend dem Gesetz. Zu Information
über die Mitten der Ansammlung und die behobene
Beseitigung des Produktes, treten Sie der lokalen
Berechtigung.
ES – Este aparado lleva el marcado en conformidad
con la Directiva 2002/96/EC;2003/108/EC;2012/19/EC
del Parlamento Europeo y del Consejo sobre residuos
de aparados eléctricos y electrónicos (RAEE). l simbolo
en el producto o en los documentos, indica que no se
puede tratar como residuo doméstico. Es necesario
entregarlo en un punto de recogida para reciclar
aparados elétricos y electrónicos. Recicle los productos
de manera correcta. La disposición ilícita o inadecuada
implica los endosos económicos y/o administrativos,
establecidos según la ley. Para la información sobre
los centros de colección y la disposición correcta del
producto, entre en contacto con la autoridad local.
9neri.biz
IT – Apparecchio per illuminazione stradale conforme
alle norme riportate in tabella, con marchio di sicurezza
ENEC15.
NOTA: Solo i prodotti riportanti il marchio ENEC devono
essere considerati a marchio e sottoposti al controllo di
produzione.Controllare sempre il marchio sul prodotto!
Le caratteristiche elettriche specifiche sono riportate
sull’etichetta dati posta sull’apparecchio.
EN – Street lighting appliance in compliance with the
standards indicated in the table, with ENEC15 safety
mark .
NOTE:Only those products bearing the ENEC mark
should be considered to be listed and covered under
follow-up service. Always look for the mark on the
product! Specific electrical characteristics are
indicated on the data label affixed to the appliance.
FR – Appareil pour éclairage routier conforme aux
normes reportées dans le tableau,avec marquage de
sécurité ENEC15.
NOTE:Seuls les produits comportant le marquage
ENEC doivent être considérés comme marqués et
soumis à un contrôle de production.Toujours contrôler
le marquage sur le produit! Les caractéristiques spé
cifiques sont reportées sur l’étiquette de données
apposée sur l’appareil.
CONFORMITÀ
COMPLIANCE
CONFORMITÉ
KONFORMITÄT
CUMPLIMIENTO DE NORMAS
DE – Die Vorrichtung zur Straßenbeleuchtung
entspricht den in der Tabelle beschriebenen Normen
mit dem Sicherheitszeichen ENEC15.
HINWEIS:Nur die Produkte mit dem ENEC-Zeichen
dürfen als solche berücksichtigt werden und einer
Produktionskontrolle unterzogen werden. Überprüfen
Sie immer die Kennzeichnung auf dem Produkt! Die
elektrischen Spezifikationen finden Sie auf dem
Typenschild, das sich auf der Vorrichtung befindet.
ES – Aparato para iluminación vial conforme a las
normas que figuran en la tabla, con marca de seguridad
ENEC15.
NOTA: Solo los productos con el sello ENEC deben
considerarse marcados y sometidos al control de
producción. ¡Controlar siempre que el producto cuenta
con la marca! Las características eléctricas específicas
se recogen en la etiqueta de datos fijada al aparato..
LVD Directive 2014/35/EU Low Voltage Directive (LVD)
EN 60598-1 Luminaires - Part 1:General requirements and tests
EN 60598-2-3 Luminaires - Part 2-3:Particular requirements - Luminaires for road and street lighting
EMC Directive 2014/30/EC Electromagnetic Compatibility
EN 61547 Equipment for general lighting purposes - EMC immunity requirements
EN 55015 Limits and methods of measurement of radio disturbance characteristics of electrical
lighting and similar equipment
EN 61000-3-2 Electromagnetic compatibility (EMC) - Part 3-2:Limits - Limits for harmonic current
emissions (equipment input current <= 16 A per phase)
EN 61000-3-3 Electromagnetic compatibility (EMC) - Part 3-3:Limits - Limitation of voltage changes,
voltage fluctuations and flicker in public low-voltage supply systems, for equipment
with rated current <= 16 A per phase and not subject
to conditional connection
ErP Directive 2009/125/CE Energy Related Product (ErP)
RoHS Directive 2011/65/EU Restriction of the use of certain hazardous substances (RoHS)
15
10 Neri Spa · Guida all’installazione · Installation guides · Guide d‘installation · Installationsanleitung · Guía de instalación
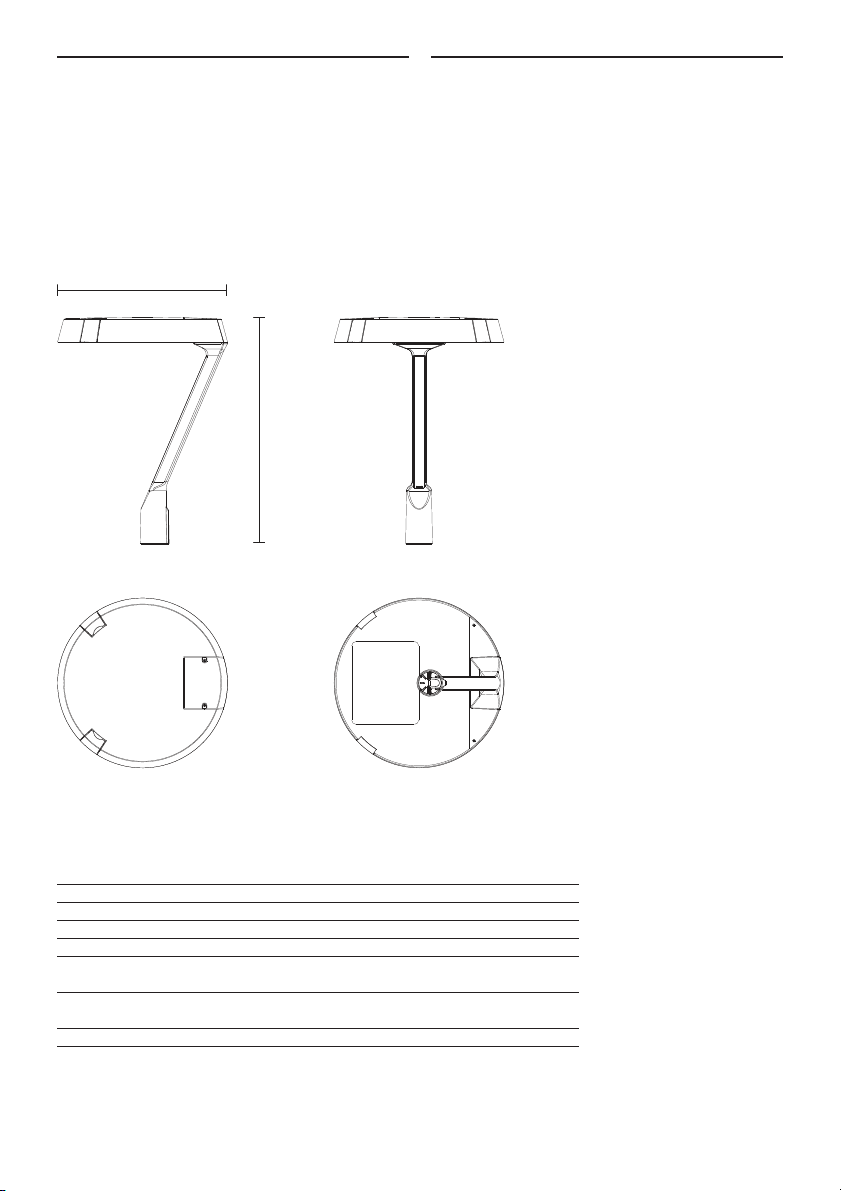
POLIS
LED
LUPOL00
Superficie esposta al vento / Surface exposed to wind / Surfaces exposées au vent /
Windangriffsfläche / Superficie expuesta al viento
Area laterale / Side area /Zone latérale / Seitlicher Bereich / Área lateral 0.062m2 [0.66ft2]
Area frontale / Frontal area / Área frontal / Vorder Bereich / Área frontal -
Area superiore / Top area / Área superior / Oberer Bereich / Oberer Bereich 0.180m2 [1.93ft2]
EPA 0.79ft2
Peso / Weight / Poids / Gewicht / Peso 9.5kg [20.94lb]
H installazione / H installation / H installation / H installation / H instalación
H max. > 15m [> 49ft]
480mm [18 7/8”]
640mm [25 2/8”]
11neri.biz
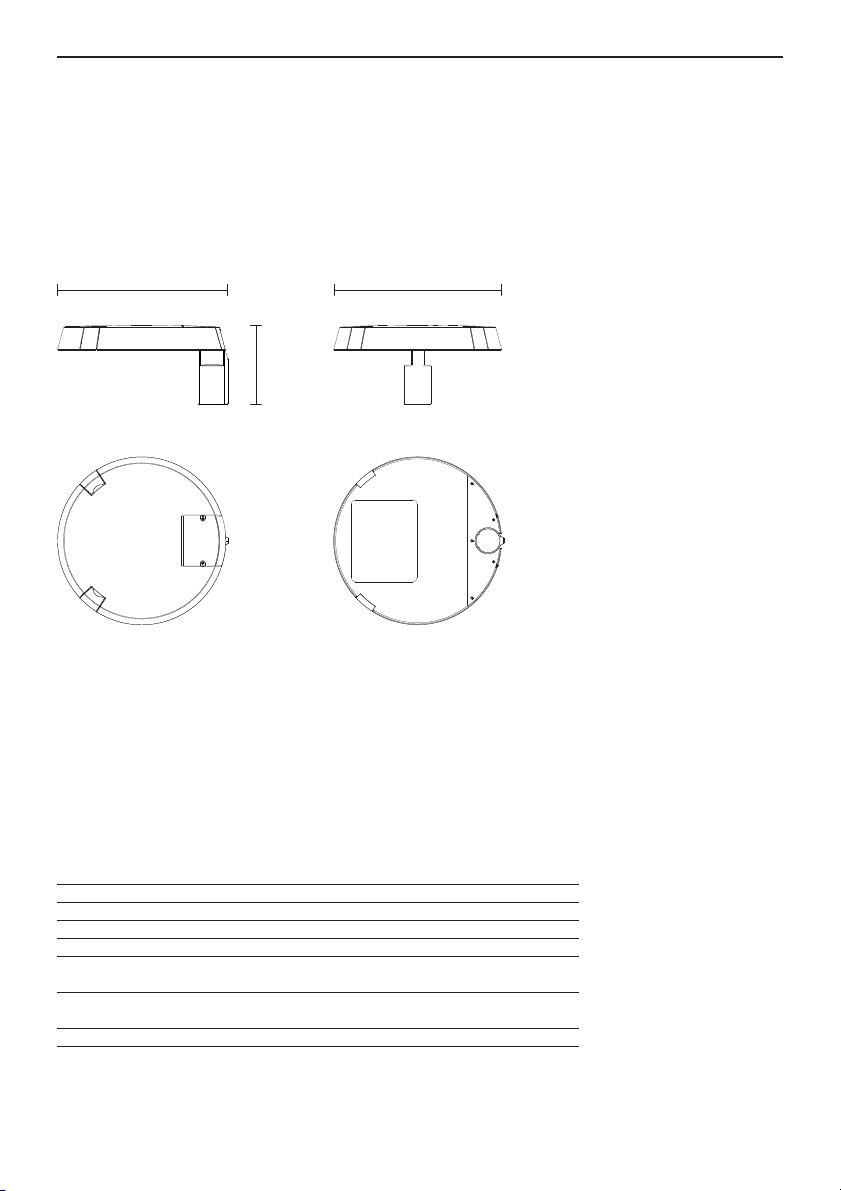
POLIS
LED
LUPOL01
Superficie esposta al vento / Surface exposed to wind / Surfaces exposées au vent /
Windangriffsfläche / Superficie expuesta al viento
Area laterale / Side area /Zone latérale / Seitlicher Bereich / Área lateral 0.045m2 [0.48ft2]
Area frontale / Frontal area / Área frontal / Vorder Bereich / Área frontal -
Area superiore / Top area / Área superior / Oberer Bereich / Oberer Bereich 0.180m2 [1.93ft2]
EPA 0.57ft2
Peso / Weight / Poids / Gewicht / Peso 8.8kg [19.40lb]
H installazione / H installation / H installation / H installation / H instalación
H max. > 15m [> 49ft]
486mm [19 1/8”]
225mm [8 7/8”]
480mm [18 7/8”]

12 Neri Spa · Guida all’installazione · Installation guides · Guide d‘installation · Installationsanleitung · Guía de instalación
POLIS
LED
LUPOL02
Superficie esposta al vento / Surface exposed to wind / Surfaces exposées au vent /
Windangriffsfläche / Superficie expuesta al viento
Area laterale / Side area /Zone latérale / Seitlicher Bereich / Área lateral 0.035m2 [0.37ft2]
Area frontale / Frontal area / Área frontal / Vorder Bereich / Área frontal -
Area superiore / Top area / Área superior / Oberer Bereich / Oberer Bereich 0.180m2 [1.93ft2]
EPA 0.44ft2
Peso / Weight / Poids / Gewicht / Peso 8.0kg [17.63lb]
H installazione / H installation / H installation / H installation / H instalación
H max. > 15m [> 49ft]
120mm [4 6/8”]
480mm [18 7/8”]

13neri.biz
POLIS
LED
LUPOL03
Superficie esposta al vento / Surface exposed to wind / Surfaces exposées au vent /
Windangriffsfläche / Superficie expuesta al viento
Area laterale / Side area /Zone latérale / Seitlicher Bereich / Área lateral 0.035m2 [0.37ft2]
Area frontale / Frontal area / Área frontal / Vorder Bereich / Área frontal -
Area superiore / Top area / Área superior / Oberer Bereich / Oberer Bereich 0.180m2 [1.93ft2]
EPA 0.44ft2
Peso / Weight / Poids / Gewicht / Peso 8.0kg [17.63lb]
H installazione / H installation / H installation / H installation / H instalación
H max. > 15m [> 49ft]
180mm [7 1/8”]
480mm [18 7/8”]
14 Neri Spa · Guida all’installazione · Installation guides · Guide d‘installation · Installationsanleitung · Guía de instalación
GUIDA ALL’INSTALLAZIONE - LUPOL00
AVVERTENZE PER L’INSTALLAZIONE
Eseguire l’installazione secondo le norma
in vigore nel paese d’installazione.
L’apparecchio deve essere utilizzato solo
se completo dello schermo di protezione.
Se lo schermo risulta danneggiato o rotto,
l’apparecchio non va utilizzato.
Ripristinare le condizioni originali prima
di riutilizzarlo.
L’apparecchio è in CL II (o CL I)
d’isolamento elettrico,fare attenzione che
durante l’installazione, parti metalliche
esposte non vadano in contatto elettrico
con parti dell’installazione elettrica
collegate ad un conduttore di protezione.
Questo apparecchio deve essere
destinato solo all’uso per il quale è
stato progettato,e cioè l’illuminazione
di ambienti esterni. Ogni altro uso è
considerato improprio e pericoloso, ed il
costruttore non può essere considerato
responsabile per danni derivanti da un
uso improprio e irragionevole.
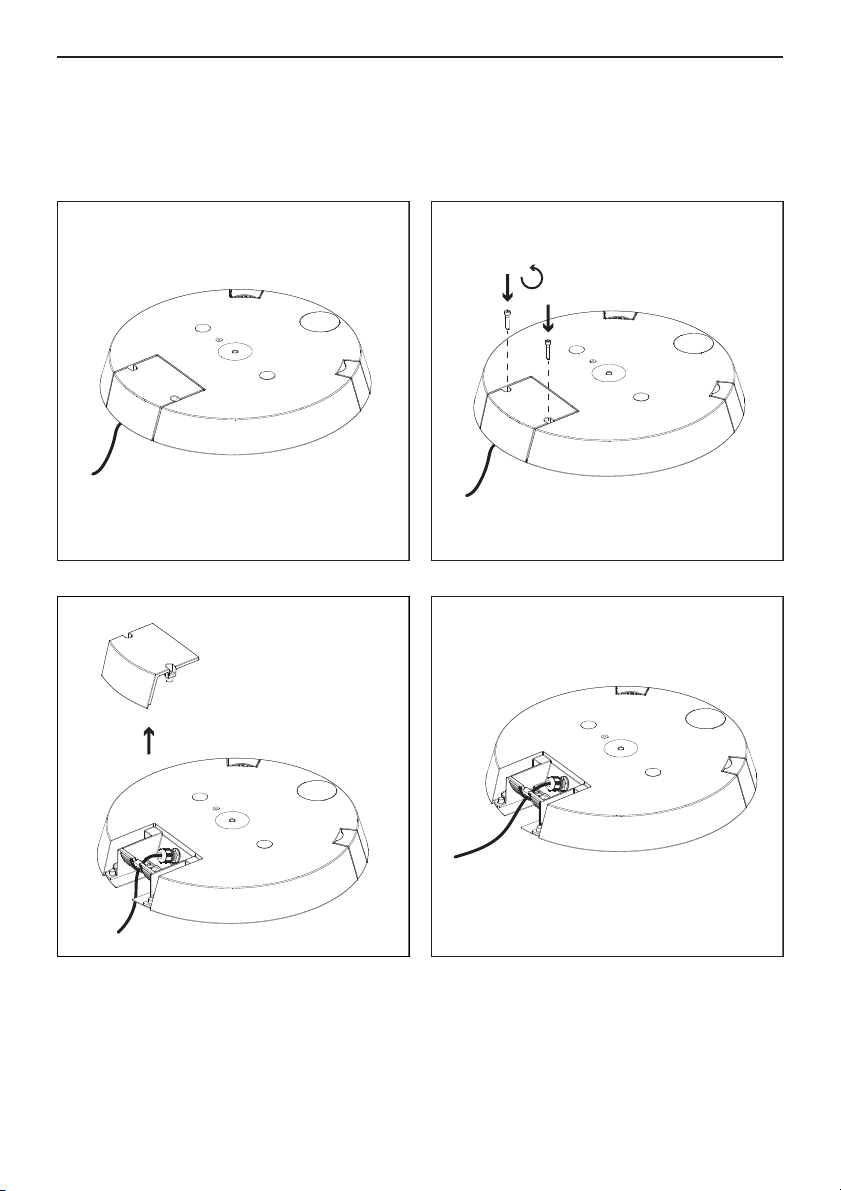
Installazione
Svitare le due viti (M6) dal telaio superiore
(Fig. 1-2) e sollevare la cover (Fig. 3-4).
Svitare le due viti (M8) e le due rondelle
dall’attacco presente sul telaio superiore
(Fig. 5). Avvicinare la forcella (Fig.6),
accoppiarla con l’attacco del telaio
superiore e avvitare le due viti (M8) e le
due rondelle (Fig.7).
Collegamento elettrico
Allentare la vite (M4) (Fig. 8) e aprire
la lamiera posta nella parte interna
della forcella (Fig. 9). Inserire il cavo di
alimentazione all’interno dell’attacco
palo (Fig.10) e far scorrere il cavo
all’interno della forcella (Fig. 11).
Richiudere la lamiera (Fig. 12) e collegare
il cavo di alimentazione (Fig.13-14).
Se il cavo flessible esterno di questo
apparecchio risultasse danneggiato deve
essere sostituito esclusivamente
dal produttore, dal suo agente di servizio
o da una persona qualificata per evitare
pericoli.
Fissaggio del corpo illuminante al
supporto
Inserire l’apparecchio, completo di cavi
già collegati, all’interno del supporto
(Fig. 15). Riporre la cover sul telaio
superiore e avvitare le due viti (M6)
(Fig. 16). Orientare l’apparecchio
correttamente rispetto all’asse stradale
(Fig. 17). Stringere i due grani (M8)
sull’attacco dell’apparecchio e bloccare i
grani con i dadi (Fig.18).
IT

15neri.biz
INSTALLATION GUIDES- LUPOL00
INSTALLATION INFORMATION
Installation must be carried out in
accordance with national standards.
The fixture must only be used when
complete with safety screen.If the
screen is damaged or broken, the fixture
must not be used. Restore the original
conditions before reusing.
The fixture is installed under CL II (or
CL I) protection standards,particular
care must be taken while assembling to
ensure that exposed metal parts do not
come into electrical contact with parts of
the electrical installation connected to
a protection conductor.This light fixture
must be installed only for the use for
which it was designed, namely for the
illumination of outdoor spaces.
Any other use must be considered to
be improper and dangerous, and the
manufacturer cannot be held liable for
any damage caused by improper and
unreasonable use.
Installation
Unscrew the two screws (M6) from the
upper frame (Fig.1-2) and lift the cover
(Fig. 3-4). Unscrew the two screws (M8),
and the two washers from the connection
present on the upper frame (Fig.5).Move
the fork closer (Fig.6), couple it with the
upper frame connection and tighten the
two screws (M8) and two washers (Fig. 7).
Electrical connection
Loosen the screw (M4) (Fig. 8) and open
the plate on the inside of the fork
(Fig. 9). Insert the power cable into the
pole attachment (Fig.10) and slide the
cable inside the fork (Fig.11).
Close the plate (Fig.12) and connect
the power cable (Fig.13-14). If the
external flexible cable of this appliance is
damaged, it must only be replaced
by the manufacturer, its service agent or a
qualified person to avoid danger.
Attaching the luminaire to the support
Insert the device, complete with already
connected cables,into the holder (Fig. 15).
Place the cover back on the upper frame
and tighten the two screws (M6) (Fig.16).
Orient the device correctly in relation to
the road axis (Fig.17).
Tighten the two grub screws (M8) on the
device connection and lock the
grub screws with nuts.(Fig. 18).
EN

16 Neri Spa · Guida all’installazione · Installation guides · Guide d‘installation · Installationsanleitung · Guía de instalación
GUIDE D‘INSTALLATION- LUPOL00
AVERTISSEMENTS POUR L‘INSTALLATION
Effectuer l‘installation selon les normes
en vigueur dans le pays d‘installation.
L‘appareil doit être utilisé uniquement
s‘il est complété de l‘écran de protection.
Si l‘écran est endommagé ou cassé,
l‘appareil ne doit pas être utilisé.
Restaurer les conditions d‘origine avant
de l‘utiliser à nouveau. L‘appareil est
en CLII (ou CL I) d‘isolation électrique;
s‘assurer que, durant l‘installation,les
pièces métalliques exposées n‘entrent
pas en contact électrique avec les parties
de l‘installation électrique reliées à un
conducteur de protection. Cet appareil
doit être destiné uniquement à l‘usage
pour lequel il a été conçu,c‘est-à-dire
l‘éclairage d‘environnements extérieurs.
Toute autre utilisation est considérée
impropre et dangereuse, et le fabricant
ne peut être tenu responsable des
dommages causés par une utilisation
incorrecte et déraisonnable.
Installation
Dévissez les deux vis (M6) du support
supérieur (Fig. 1-2) et soulevez le
couvercle (Fig. 3-4). Dévissez les deux vis
(M8) et les deux rondelles de connexion
présentes sur le support supérieur (Fig.
5).Rapprochez la fourche (Fig.6), placez-
la sur la connexion du support supérieur
et serrez les deux vis (M8) et les deux
rondelles (Fig. 7).
Branchement électrique
Desserrez la vis (M4) (Fig. 8) et ouvrez
la plaque située dans la partie interne
de la fourche (Fig. 9). Insérez le câble
d’alimentation à l’intérieur de l’attache
poteau (Fig.10) et faites glisser le câble à
l’intérieur de la fourche (Fig. 11).
Fermez la plaque (Fig.12) et connectez
le câble d’alimentation (Fig. 13-14). Si
le câble flexible externe de cet appareil
est endommagé,il doit être remplacé
uniquement par le fabricant, son agent
de service ou une personne qualifiée pour
éviter tout danger.
Fixation de l‘appareil au support
Insérez l’appareil, avec les câbles déjà
connectés,dans le support (Fig. 15).
Replacez le couvercle sur le support
supérieur et serrez les deux vis (M6) (Fig.
16).Orientez correctement le dispositif
par rapport à l’axe de la route (Fig. 17).
Serrez les deux vis sans tête (M8) sur la
connexion de l’appareil et verrouillez
les vis avec les écrous. Fig. 18).
FR
17neri.biz
INSTALLATIONSANLEITUNG- LUPOL00
INSTALLATIONSANLEITUNG
Führen Sie die Installation gemäß den
geltenden Normen im Einsatzland durch.
Die Vorrichtung darf nur einschließlich
der Schutzabdeckung verwendet werden.
Wenn die Schutzabdeckung beschädigt
oder nicht funktionstüchtig ist, darf die
Vorrichtung nicht verwendet werden.
Stellen Sie den ursprünglichen Zustand
vor der erneuten Verwendung wieder
her. Die Vorrichtung entspricht der
Schutzklasse II (und I) (Schutz durch
doppelte oder verstärkte Isolierung),
achten Sie während der Installation
drauf, dass freiliegenden Metallteile
nicht in elektrischem Kontakt mit Teilen
der elektrischen Anlage gelangen, die
mit einem Schutzleiter verbunden
sind. Diese Vorrichtung darf nur für
den Zweck verwendet werden, für den
diese konzipiert wurde, nämlich für
die Außenbeleuchtung. Jede andere
Verwendung gilt als unsachgemäß und
gefährlich,der Hersteller haftet nicht für
Schäden, die durch unsachgemäße und
unvernünftig Verwendung verursacht
werden.
Installation
Lösen Sie die beiden Schrauben (M6)
vom oberen Rahmen (Abb.1-2) und heben
Sie die Abdeckung an (Abb.3-4).Schrauben
Sie die beiden Schrauben (M8) und die
beiden Unterlegscheiben von der Kupplung
am oberen Rahmen ab (Abb.5).Führen
Sie die Gabel näher heran (Abb.6),
verbinden Sie sie mit der Kupplung
am oberen Rahmen und ziehen Sie die
beiden Schrauben (M8) und die beiden
Unterlegscheiben fest (Abb.7).
Elektrischer Anschluss
Lösen Sie die Schraube (M4) (Abb.8)
und öffnen Sie die Abdeckplatte an der
Innenseite der Gabel (Abb.9).Führen Sie
das Stromkabel in das Rohr ein (Abb. 10)
und lassen Sie das Kabel in die Gabel
gleiten (Abb.11).
Schließen Sie die Abdeckung (Abb.12)
und schließen Sie das Netzkabel an (Abb.
13-14).Um Gefahren zu vermeiden,darf
das externe flexible Kabel dieses Geräts
im Schadensfall nur durch den Hersteller,
seinen Servicedienst oder eine qualifizierte
Person ersetzt werden.
Befestigung der Vorrichtung an der
Halterung
Führen Sie das Gerät inklusive aller bereits
angeschlossener Kabel in die Halterung ein
(Abb.15).Bringen Sie die Abdeckung wieder
am oberen Rahmen an und ziehen Sie
die beiden Schrauben (M6) fest (Abb.16).
Richtigen Sie das Gerät zur Straßenachse
hin aus (Abb.17).
Ziehen Sie die beiden Gewindestifte
(M8) an der Kupplung des Geräts fest
und befestigen Sie diese mithilfe der
Muttern(Abb.18).
DE
18 Neri Spa · Guida all’installazione · Installation guides · Guide d‘installation · Installationsanleitung · Guía de instalación
GUÍA DE INSTALACIÓN- LUPOL00
ADVERTENCIAS PARA LA INSTALACIÓN
Llevar a cabo la instalación de acuerdo
con las normas vigentes en el país de
instalación. El aparato debe utilizarse
únicamente si incluye la pantalla de
protección.Si la pantalla se encuentra
dañada o rota, el aparato no debe ser
utilizado. Restablecer las condiciones
originales antes de su reutilización.
El aparato es de CL II (o CL I) en lo que
respecta a su aislamiento eléctrico;
durante la instalación debe prestarse
atención para que las partes metálicas
expuestas no entren en contacto
eléctrico con partes de la instalación
eléctrica conectadas a un conductor de
protección.Este aparato debe utilizarse
exclusivamente para el uso para el que
fue diseñado,es decir,la iluminación de
ambientes externos.Cualquier otro uso
es considerado inadecuado y peligroso,
y el fabricante no puede ser considerado
responsable de daños derivados de un
uso indebido o inapropiado.
Instalación
Desenrosque los dos tornillos (M6) del
bastidor superior (Fig.1-2) y levante la
tapa (Fig. 3-4). Desenrosque los dos
tornillos (M8) y las dos arandelas de la
conexión del bastidor superior (Fig.5).
Acerque la horquilla (Fig. 6), acóplela con
la conexión del bastidor superior y apriete
los dos tornillos (M8) y las dos arandelas
(Fig. 7).
Conexión eléctrica
Afloje el tornillo (M4) (Fig.8) y abra
la placa situada en el interior de la
horquilla (Fig.9). Inserte el cable de
alimentación del interior de la conexión
con la columna (Fig. 10) y deslice el cable
dentro de la horquilla (Fig. 11).
Cierre la placa (Fig.12) y conecte el cable
de alimentación (Fig. 13-14). Si el cable
flexible externo de este dispositivo está
dañado,solo debe ser sustituido
por el fabricante,su agente de servicio
o una persona cualificada para evitar
peligros.
Fijación del aparato al soporte
Introducir el aparato con los cables ya
conectados en el interior del soporte (Fig.
15).Vuelva a colocar la tapa en el bastidor
superior y apriete los dos tornillos
(M6) (Fig. 16). Oriente el dispositivo
correctamente respecto el eje vial
(Fig. 17). Apriete los dos tornillos
prisioneros (M8) en la conexión del
dispositivo y bloquee los tornillos con las
tuercas. (Fig. 18).
ES
19neri.biz
1 2
3 4
GUIDA ALL’INSTALLAZIONE
INSTALLATION GUIDES
GUIDE D‘INSTALLATION
INSTALLATIONSANLEITUNG
GUÍA DE INSTALACIÓN
IT
EN
FR
DE
ES

20
8Nm
5 6
7 8
Neri Spa · Guida all’installazione · Installation guides · Guide d‘installation · Installationsanleitung · Guía de instalación
GUIDA ALL’INSTALLAZIONE
INSTALLATION GUIDES
GUIDE D‘INSTALLATION
INSTALLATIONSANLEITUNG
GUÍA DE INSTALACIÓN
Table of contents
Other NERI Lighting Equipment manuals

Popular Lighting Equipment manuals by other brands


Eastwood
Eastwood 33935 instructions

CZZN
CZZN FL48-M300 user manual

Lithonia Lighting
Lithonia Lighting CUC8 installation instructions

LUMEN CENTER ITALIA
LUMEN CENTER ITALIA VENDOME Assembly instructions

Robus
Robus HARBOUR RHA10402FTV2-24 instructions

LED World
LED World HH-S3527X-120-24 Important instructions