NETGEAR VNC4030-111PAS User manual

FlexPower ONVIF
Wire-FreeIPCameraandBase
Station User Manual
User Manual
ModelVNC4030-111PAS and
VNB4000-111PAS
October 2017
202-11848-01
350 E. Plumeria Drive
San Jose, CA 95134
USA

Support
Thank you for purchasing this NETGEAR product.You can visit www.netgear.com/support to register your
product, get help, access the latest downloads and user manuals, and join our community.We recommend that
you use only official NETGEAR support resources.
Conformity
For the current EU Declaration of Conformity, visit http://kb.netgear.com/app/answers/detail/a_id/11621.
Compliance
For regulatory compliance information, visit http://www.netgear.com/about/regulatory.
See the regulatory compliance document before connecting the power supply.
Trademarks
©NETGEAR, Inc., NETGEAR, and the NETGEAR Logo are trademarks of NETGEAR, Inc.Any non-NETGEAR
trademarks are used for reference purposes only.
2
FlexPower ONVIF Wire-Free IP Camera and Base Station User Manual

Contents
Chapter 1 Introduction and Hardware Overview
System Concepts...................................................................................................6
System Requirements............................................................................................6
Base Station Hardware Overview..........................................................................6
Base Station Package Contents........................................................................7
Base Station Back Panel...................................................................................7
Base Station Front Panel...................................................................................8
Base Station Top Panel With LEDs...................................................................9
Base Station Label............................................................................................9
Camera Hardware Overview................................................................................10
Camera Package Contents.............................................................................10
Insert the Battery.............................................................................................11
Camera LED and SYNC Button......................................................................11
Camera Label..................................................................................................12
Chapter 2 Install the System Components and Access the Base Station
Installation Overview............................................................................................14
Install the Base Station in Your Network..............................................................14
Synchronize a Camera With the Base Station.....................................................15
Access the Base Station for the First Time..........................................................16
Add a Camera to an ONVIF-Compliant VMS.......................................................17
Place a Camera for Optimal Motion Detection.....................................................19
Access and Test the Base Station Camera Feeds...............................................21
Save the Local Browser Interface of the Base Station as a Web App..................21
Access the Local Browser Interface of the Base Station From OutsideYour
Network................................................................................................................22
Chapter 3 Manage Base Station Settings
Add a Camera by Synchronizing It With the Base Station...................................24
Remove a Camera From the Base Station..........................................................25
Change the Base Station Password.....................................................................26
Manage Emails and Notifications.........................................................................26
Configure the Base Station SMTP Server Settings.........................................26
Add Email Recipients......................................................................................28
Set Up Email Notifications...............................................................................29
Reset the Email Notifications Configuration....................................................29
Assign a Static IP Address to the Base Station...................................................30
Reenable the DHCP Client on the Base Station..................................................31
Manage the System Time....................................................................................32
Change the Flicker Rate......................................................................................33
View Base Station Information.............................................................................34
Download the Logs..............................................................................................34
3

Update the Firmware...........................................................................................35
Check for and Install New Firmware................................................................35
Manually Download and Install New Firmware...............................................36
Disable the Automatic Firmware Check..........................................................37
Manage the Configuration....................................................................................37
Back Up the Configuration..............................................................................38
Restore the Configuration...............................................................................38
Restart the Base Station From the Local Browser Interface................................39
Reset the Base Station to Factory Default Settings.............................................40
Reset the Base Station From the Local Browser Interface..............................40
Reset the Base Station by Using the Reset Button.........................................41
Chapter 4 Manage Camera Settings
Extend the Battery Life of a FlexPower Camera..................................................44
Arm or Disarm a Camera.....................................................................................44
Take a Camera Snapshot.....................................................................................45
Change the Name for a Camera..........................................................................46
Manage the Video Settings for a Camera............................................................46
Set the Streaming Duration.............................................................................47
Enable or Disable Night Vision........................................................................48
Enable or Disable Image Rotation...................................................................48
Manage Motion Sensitivity for a Camera.............................................................49
Calibrate the Motion Sensitivity for a Camera.................................................49
Set the Motion Sensitivity for a Camera..........................................................50
Assign a Static IP Address to a Camera..............................................................51
Reenable DHCP for a Camera.............................................................................52
Manage a Camera Arming Schedule...................................................................52
Add and Enable an Arming Schedule Block....................................................53
Enable or Disable All Arming Schedules.........................................................54
Change the Time for an Arming Schedule Block.............................................55
Delete an Arming Schedule Block...................................................................56
View Information About a Camera.......................................................................57
Assign a Camera to Another Camera Slot...........................................................57
Copy a Camera Configuration to Another Camera Slot.......................................58
Copy a Camera Configuration From Another Camera Slot..................................59
Reset the Configuration for a Camera Slot..........................................................60
Chapter 5 Set Up FlexPower With Milestone Arcus or Another VMS
Milestone Arcus on NETGEAR ReadyNAS.........................................................62
Automatic Camera Discovery in Milestone Arcus............................................62
Manually Add a Camera to Milestone Arcus...................................................62
Add the User Name and Password for Camera Access in Milestone Arcus....63
Manage the Video Settings for a Camera in Milestone Arcus.........................64
Set Up a Computer as an ONVIF Storage Device...............................................65
Appendix A Factory Default Settings andTechnical Specifications
Factory Default Settings.......................................................................................67
Technical Specifications.......................................................................................68
4
FlexPower ONVIF Wire-Free IP Camera and Base Station User Manual
1
Introduction and Hardware Overview
This manual is for the NETGEAR FlexPower ONVIF®-compliant Wire-Free IP Camera, model VNC4030, and
the FlexPower Base Station for FlexPower Cameras, model VNB4000.
Open NetworkVideo Interface Forum (ONVIF) is an open industry forum for the development of a global standard
for the interface of IP-based physical security products.This standard defines communication between devices
such as FlexPower cameras and base stations, a video management system (VMS), and access control systems.
The FlexPower camera, which you can place indoors or outdoors, streams video only when motion is detected.
The camera can operate for months on a single charge with its rechargeable battery, which you can power with
an optional solar panel or with the power adapter that is supplied with the camera.
The FlexPower base station acceptsWiFi streaming video data from FlexPower cameras and delivers the video
data to an ONVIF-compliant VMS such as Milestone Arcus on NETGEAR ReadyNAS. A single base station
supports WiFi streaming from up to four cameras.
The chapter contains the following sections:
•System Concepts
•System Requirements
•Base Station Hardware Overview
•Camera Hardware Overview
For more information about the topics that are covered in this manual, visit the support website
at netgear.com/support.
Note
Firmware updates with new features and bug fixes are made available from time to time at
downloadcenter.netgear.com.You can check for and download new firmware manually. If
the features or behavior of your product does not match what is described in this guide, you
might need to update your firmware.
Note
5

System Concepts
The FlexPower camera and base station are designed for small and medium-sized businesses, security
management, and facility management.
The FlexPower base station is always on and available over your local network, WAN, or both.The FlexPower
camera functions in standby mode until the camera detects motion and starts video streaming to the base
station and VMS. From the base station, you can schedule the camera to be armed only during specific
times.If motion occurs in the camera field of view, the camera starts video streaming only if the camera is
armed.
In addition to limited controls from the base station, you can use the pan-tilt-zoom software buttons in the
VMS to wake the camera for live viewing from the VMS.
You can also configure theVMS to record only when it detects motion from the camera video stream or only
during specific times.That is, the camera might detect motion and start a video stream, but recording of the
video stream is controlled by theVMS.If you configure theVMS to record only during certain times of the
day, make sure that you also configure the camera to be armed only during those times.This way you
prevent the battery from being used unnecessarily and avoid a reduced battery life.However, if you schedule
the VMS to record but the camera is disarmed, no recording occurs.
System Requirements
A system with FlexPower cameras and FlexPower base stations requires you to obtain and install the
following additional components for the system to be fully functional:
•VMS software application. ONVIF-compliant VMS application such as NETGEAR Milestone Arcus.
However, you can use the FlexPower components with any other ONVIF-compliantVMS application.
For more information, see Set Up FlexPower With Milestone Arcus or Another VMS on page 61.
•Storage system.A storage system such as a NETGEAR ReadyNAS system for storage and replaying
of the video data streams.However, you can use the FlexPower components with any other storage
system that supports an ONVIF-compliant VMS application.
You can even store the data streams on your computer using the Milestone XProtect Essential+
application. For more information, visit
milestonesys.com/solutions/platform/video-management-software/xprotect-essential//. Unless your
computer includes a very high-capacity hard drive, you can store only a limited number of data streams
on your computer.
Base Station Hardware Overview
The FlexPower base station accepts WiFi streaming video data from FlexPower cameras and delivers the
video data to ONVIF-compliant VMS platforms such as Milestone Arcus on NETGEAR ReadyNAS. Each
base station can support WiFi streaming from up to four FlexPower cameras.
You can mount the base station on a ceiling or wall, or install it on a flat surface.For optimal antenna
performance, we recommend mounting the base station on a ceiling or installing it on a flat surface.For
information about how to mount the base station, see the FlexPower Base Station for FlexPower ONVIF
Cameras Model VNB4000-111PAS Quick Start Guide, which is included in the product package or which
you can download by visiting downloadcenter.netgear.com.
Introduction and Hardware Overview
6
FlexPower ONVIF Wire-Free IP Camera and Base Station User Manual

Base Station Package Contents
The package for the base station contains the following items:
•FlexPower base station
•Power adapter (localized to the region)
•Ethernet cable
•Drop ceiling T-bar and wall mount with hardware (not shown in the following)
•Quick start guide (not shown in the following figure)
Figure 1. Base station package contents
Base Station Back Panel
Figure 2. Base station back panel
Introduction and Hardware Overview
7
FlexPower ONVIF Wire-Free IP Camera and Base Station User Manual

The back panel of the base station provides the following components (listed from left to right):
•DC power receptacle. A DC power receptacle for the power adapter that is included in the product
package.
•On-Off power button. A power button that lets you turn the base unit on or off.
•LAN port. An RJ-45 Ethernet port to connect the base station to your LAN.
•USB2 port.A USB 2.0 port labeled USB2.This port is disabled and might be enabled in a future update.
•USB1 port.A USB 2.0 port labeled USB1.This port is disabled and might be enabled in a future update.
•Reset button.A recessed button that lets you reset the base station to factory default settings. For
more information, see Reset the Base Station by Using the Reset Button on page 41.
Base Station Front Panel
Figure 3. Base station front panel
The front panel of the base station provides the SYNC button that lets you synchronize a FlexPower camera
with the base station. For more information, see Synchronize a Camera With the Base Station on page 15.
Introduction and Hardware Overview
8
FlexPower ONVIF Wire-Free IP Camera and Base Station User Manual
Base StationTop Panel With LEDs
Three status LEDs are located on the top panel of the base station.The following table describes the LED
status.
Table 1. LED descriptions
DescriptionLED
Off. No power is supplied to the base station.
Solid green. Power is supplied to the base station and the base station is ready.
Solid amber.The base station is booting.
Blinking green.The base station is upgrading firmware.
Power LED
Off. No link with the network is detected.
Solid green. A link with the network is detected.
Solid amber. A network connection problem occurred.The base station is not connected to the
LAN or to the router, the cable is disconnected, or another network problem occurred.
Network LED
Off. No cameras are connected to the base station.
Solid green. One or more cameras are connected to the base station.
Blinking green.The base station and a camera are attempting to synchronize.
Solid amber. A camera is too far from the base station or the signal is weak.
Camera LED
Base Station Label
The base station label, also referred to as the product label, is on the bottom panel.The label shows the
serial number, the MAC address, and other information for the base station.
Figure 4. Base station label
Introduction and Hardware Overview
9
FlexPower ONVIF Wire-Free IP Camera and Base Station User Manual
Camera Hardware Overview
The FlexPower camera synchronizes with the FlexPower base station to send video data streams to the
VMS.The camera comes with indoor and outdoor mounting hardware and a battery, which you can recharge
with the power adapter (included in the package) or a solar panel (not included but available as an option).
Depending on how you use the camera, the battery can operate for months on a single charge.The camera
uses Quick Charge technology. A typical USB charger is not compatible with the camera.Therefore, to
recharge the camera, use only the power adapter and USB cable that are included in the package.
For more information about how to install the camera, see the following guides, both of which are included
in the product package and which you can also download by visiting downloadcenter.netgear.com:
•FlexPower ONVIF Wire-Free IP Camera Model VNC4030-111PAS Quick Start Guide
•Wall-Mounting the FlexPower Camera Model VNC4030-111PAS Quick Start Guide
Camera Package Contents
The package for the camera contains the following items:
•FlexPower camera
•Rechargeable battery
•Power cable
•Power adapter
•Outdoor mount
•Outdoor mount plate
•Magnetic wall mount
•Mounting screws (two sets of two screws)
•Drywall anchors
•Quick start guide (not shown in the following figure)
Figure 5. Camera package contents
Introduction and Hardware Overview
10
FlexPower ONVIF Wire-Free IP Camera and Base Station User Manual
Insert the Battery
Figure 6. Insert the battery
The rechargeable battery is fully charged when the camera leaves the factory.
For information about recharging the battery, see the FlexPower ONVIF Wire-Free IP Camera Model
VNC4030-111PAS Quick Start Guide, which is included in the product package or which you can download
by visiting downloadcenter.netgear.com.
To insert the battery:
1. Unlock the battery compartment by pressing and holding the latch.
2. Gently pull the battery door back to open the compartment.
3. Align the battery contacts.
4. Insert the battery.
5. Close the battery door.
Camera LED and SYNC Button
Figure 7. Camera LED and Sync button
The camera provides an LED that indicates the general, synchronizing, and charging state of the camera
(see the following table).The camera also provides a SYNC button that lets you add the camera to (that is,
Introduction and Hardware Overview
11
FlexPower ONVIF Wire-Free IP Camera and Base Station User Manual

synchronize the camera with) the base station. For more information about adding the camera to the base
station, see Synchronize a Camera With the Base Station on page 15.
Table 2. LED descriptions
LED descriptionCamera state
Blinks blue once.The camera was powered on.
Blinking blue and amber.A firmware update is in progress. Do not turn off the camera.
Off.The camera is either powered off or is powered on and is synchronized with a base station.
General
Slow blinking blue.The camera is attempting to synchronize with a base station.
Fast blinking blue.The camera is synchronizing with a base station.
Fast blinking amber.The camera failed to synchronize with a base station.
Synchronizing
Fast blinking blue.The camera is connected to power and is charging.
Solid blue.The camera is powered on and the battery is fully charged.
Slow blinking amber.The camera battery charge is low.
Fast blinking amber.The power connection failed.
Charging
Camera Label
The camera label, also referred to as the product label, is on the bottom panel.The label shows the serial
number and other information for the camera.
Figure 8. Camera label
Introduction and Hardware Overview
12
FlexPower ONVIF Wire-Free IP Camera and Base Station User Manual

2
Install the System Components and
Access the Base Station
This chapter describes how you can install the FlexPower base station and FlexPower cameras and access the
base station.
The chapter contains the following sections:
•Installation Overview
•Install the Base Station inYour Network
•Synchronize a Camera With the Base Station
•Access the Base Station for the First Time
•Add a Camera to an ONVIF-Compliant VMS
•Place a Camera for Optimal Motion Detection
•Access and Test the Base Station Camera Feeds
•Save the Local Browser Interface of the Base Station as a Web App
•Access the Local Browser Interface of the Base Station From OutsideYour Network
13

Installation Overview
Set up your FlexPower system in the following order:
1. Install the base station in your network (see Install the Base Station inYour Network on page 14).
2. Add one or more cameras to the base station by synchronizing them with the base station (see
Synchronize a Camera With the Base Station on page 15).
3. Discover the base station in your network, access the base station for the first time, create a new
password, and perform the initial setup (see Access the Base Station for the FirstTime on page 16).
4. Add one or more cameras to an ONVIF-compliant VMS (see Add a Camera to an ONVIF-Compliant
VMS on page 17).
Make sure that theVMS can access a storage device in your network so that you can
store and replay the camera video feeds. If no storage device is available, you can
only take snapshots but not play video feeds.
Note
5. Place the camera or cameras at their permanent locations (see Place a Camera for Optimal Motion
Detection on page 19).
6. Access and test the base station camera feeds (see Access and Test the Base Station Camera Feeds
on page 21).
After you complete the setup, you can configure and customize the settings for the base station (see Manage
Base Station Settings on page 23) and cameras (see Manage Camera Settings on page 43).
Install the Base Station inYour Network
You must install the base station in your network.By default, the DHCP client of the base station is enabled,
allowing a DHCP server or router in your network to assign an IP address to the base station. If you want
to assign a static IP address, see Assign a Static IP Address to the Base Station on page 30.
Install the System Components and Access the Base Station
14
FlexPower ONVIF Wire-Free IP Camera and Base Station User Manual

To install the base station in your network:
1. Connect one end of the Ethernet cable that came in the package to the base station and connect the
other end to a router or switch in your network.
2. Connect the power cord that came in the package to the base station and plug it into an electrical outlet.
3. Press the Power button on the back panel of the base station.
After the base station boots, the Power LED and the Network LED light solid green.This process might
take several minutes.
Synchronize a Camera With the Base Station
You must install the base station in your network before you can add a camera to (that is, synchronize a
camera with) the base station.
To synchronize a camera with the base station:
1. Bring the camera within 2 to 4 feet (60 to 120 cm) of the base station.
After you synchronize the camera with the base station, you can place the camera at its permanent
position.
2. Press the SYNC button on the front panel of the base station for about two seconds and release the
button.
Install the System Components and Access the Base Station
15
FlexPower ONVIF Wire-Free IP Camera and Base Station User Manual

The base station camera LED blinks green, indicating that the base station is attempting to pair with a
camera.
3. Press the SYNC button on top of the camera for about two seconds and release the button.
The camera LED blinks blue, indicating that the camera is attempting to pair with the base station.When
the camera is synchronized with the base station, the camera LED on the camera blinks blue rapidly
and the camera LED on the base station lights solid green to confirm the synchronization.
If the synchronization is not successful, the camera LED blinks amber.In such a situation, repeat Step 2
and Step 3.
Access the Base Station for the FirstTime
During initial setup,yourcomputer ormobiledevice must be connected to thesameLANas the base station.
An Internet connection is not required.We recommend that you first synchronize your cameras with the
base station (see Synchronize a Camera With the Base Station on page 15) before you perform the initial
setup.
By default, the base station is assigned a fully qualified domain name (FQDN, or just
domain name), which is FlexPowerBS-xxx, in which you must replace xxx with the
last three digits of the base station serial number.The serial number is on the base
station label. Instead of the domain name, you can also use the IP address that is
assigned to the base station. However, if you use secure HTTP (HTTPS) to access
the base station, use the domain name because SSL certificate validation functions
only with the domain name.How you can use either the domain name or the IP
address is described in the following procedure.
Note
The first time that you access the base station, you must create a new password that replaces the default
base station password.To access the base station after the first time, you must use the new password.The
first time that you access the base station, you are also required to set the camera flicker rate to either 50
Hz or 60 Hz.
To access the base station for the first time and perform the initial setup:
1. Connect your computer or mobile device to the same LAN as the base station.
If you cannot connect to the same LAN usingWiFi, use an Ethernet cable to connect a computer to the
same router or switch as the base station.
2. Depending on your device and situation, do one of the following:
•Use aWindows-based computer.Depending on your operating system, open Windows Explorer
or File Explorer and then click Network or Network Places.Look for and double-click the
Install the System Components and Access the Base Station
16
FlexPower ONVIF Wire-Free IP Camera and Base Station User Manual

FlexPowerBS-xxx icon, in which xxx represent the last three digits of the base station serial number.
The serial number is on the base station label.The FlexPowerBS-xxx icon might display in the
Other Devices category.
•Use a Mac,Linux,or mobile device.Open a web browser and enter http://FlexPowerBS-xxx.local,
in which you must replace xxx with the last three digits of the base station serial number.The serial
number is on the base station label.
•Determine the IP address.Use the local browser interface of your router or an IP address scanner
tool to look up the IP address for the base station in your network and record the IP address for
future use.Then enter the IP address in your browser address bar.
A login window opens.
3. Enter the base station password.
The default password is password.The password is case-sensitive.
You are prompted to create a new password.
In addition to alphanumeric characters, you can use the following special characters in a password:
! " # $ % & ( ) * + , - . / : ; < = > ? @ [ \ ] ^ { | } ~ and a space.However, a space is not allowed at the
beginning and at the end of a password. A password can be a maximum of 32 characters.
4. Create a new password, record the password for future use, and enter the new password.
You are prompted to select 60 Hz or 50 Hz for the flicker rate.
5. Either accept the 60 Hz default setting, or select 50 Hz.
The flicker rate (or frequency) that you must use for the camera depends on the region in which you
use the camera.If you use the camera in North America, use 60 Hz.For most other regions and countries,
use 50 Hz.The flicker rate applies to all cameras that you add to the base station.
The Dashboard page displays.You are now ready to configure and use the base station and camera
settings.
For optimal performance, we recommend that you refine the camera motion detection
sensitivity and set up a camera arming schedule.For more information, see Manage
Motion Sensitivity for a Camera on page 49 and Manage a Camera Arming Schedule
on page 52.
Note
Add a Camera to an ONVIF-CompliantVMS
A system with FlexPower cameras and one or more FlexPower base station requires you to obtain and
install a video management system (VMS) software application such as NETGEAR Milestone Arcus and
connect the base station to a network that includes a storage system for storing and replaying the video
data streams.
We recommend that the camera, base station, and the platform on which the VMS application runs are all
on the same LAN and subnet. Before you add a camera to an ONVIF-compliant VMS, the camera must be
synchronized with the base station.
Install the System Components and Access the Base Station
17
FlexPower ONVIF Wire-Free IP Camera and Base Station User Manual

To add a camera to an ONVIF-compliantVMS:
1. Determine the IP address of the camera in your network by doing the following:
a. Open a web browser from a computer or mobile device that is connected to the same LAN as the
base station.
If you are unable to connect to the same LAN using WiFi, use an Ethernet cable to connect a
computer to the same router or switch as the base station.
b. Enter the domain name or IP address of the base station.
If you do not know the domain name or IP address, see Access the Base Station for the First Time
on page 16.
A login window opens.
c. Enter the base station password.
The password is the one that you specified the first time that you logged in.The password is
case-sensitive.
The Dashboard page displays.
d. For the camera for which you want to view the IP address, click the Settings icon and select Camera
Info.
The Camera Info page displays and shows the camera information, including the IP address.
e. Write down the IP address.
2. Open yourVMS application.
3. Follow the instructions provided by your VMS application vendor to discover an ONVIF camera.
If the automatic discovery process does not work, you might need the following information to manually
add the camera to your VMS application:
•IP address.The camera IP address that you determined in Step 1.
•Port numbers. HTTP port 80, RTSP port 554.
•The camera login credentials.The camera user name is admin and the default password is
password.(The camera password might be different from the password for the base station.)
4. As the device type, select ONVIF or Generic ONVIF.
5. For best performance, select h.264 for video.
After you add the camera to the VMS, you can select one of three default streaming profiles or create
your own custom profile.
6. Adjust the bit rate as needed for your network environment.
Reduce the bit rate in environments with high 2.4 GHz interference or if you place the camera farther
away from the base station (also see Place a Camera for Optimal Motion Detection on page 19).
7. Select no more than 24 frames per second as the frame rate.
Install the System Components and Access the Base Station
18
FlexPower ONVIF Wire-Free IP Camera and Base Station User Manual

Place a Camera for Optimal Motion Detection
When you place a camera, consider the maximum and minimum distances between the camera and the
base station:
•Maximum distance.Do not place the camera more than 300 feet (90 meters) from the base station.
The maximum line-of-sight range of 300 feet is reduced by each wall, ceiling, or other major obstruction
between the camera and base station.The following materials reduce signal strength the most:
-Unusually thick walls and ceilings
-Brick walls
-Concrete walls
-Stone walls
-Ceramic walls or surfaces
-Glass walls or surfaces, especially mirrors
-Metal walls or surfaces
-Large quantities of water, such as the water in a fish tank or water heater
Check the camera signal strength and target three or more bars of signal strength for
best performance and battery life.For more information, see View Information About
a Camera on page 57.
Note
•Minimum distance.Place the camera at least 10 feet from the base station, and allow at least 6.5 feet
(2 meters) between cameras.Doing so prevents WiFi signals between the devices from interfering with
each other.
When you place a camera, keep the following tips in mind:
•Keep active locations in the field of view of the camera.The camera provides a 130-degree viewing
angle.Position the camera so that the space that you want to monitor is within the field of view of the
camera.
•Aim with the snapshot feature.Each time that you move the camera during placement, use the
snapshot feature to refresh the camera snapshot (see Take a Camera Snapshot on page 45).
Alternatively, you can use the app or local browser interface offered by yourVMS provider to stream
live video while adjusting the camera.
Install the System Components and Access the Base Station
19
FlexPower ONVIF Wire-Free IP Camera and Base Station User Manual

•Elevate the camera. Mount the camera at least 7 feet (2.1 meters) above the floor and aim it slightly
downward for the best sensor performance.
•Make sure that side-to-side traffic crosses the field of view of the camera.The motion sensor on
the camera is much more sensitive to side-to-side movement across its field of view than to movement
directly toward or away from the camera.The best area for motion detection is 5 to 20 feet (1.5 to 6
meters) from the camera position.
In the previous figure, the horizontal movement (indicated by the green arrow) in the area 5 to 20 feet
(1.5 to 6 meters) from the camera provides the best detection.The vertical movement (indicated by the
dark orange arrow) does not provide good detection.
Install the System Components and Access the Base Station
20
FlexPower ONVIF Wire-Free IP Camera and Base Station User Manual
Other manuals for VNC4030-111PAS
1
This manual suits for next models
1
Table of contents
Other NETGEAR Accessories manuals

NETGEAR
NETGEAR AXM762 - ProSafe 10 Gigabit User manual

NETGEAR
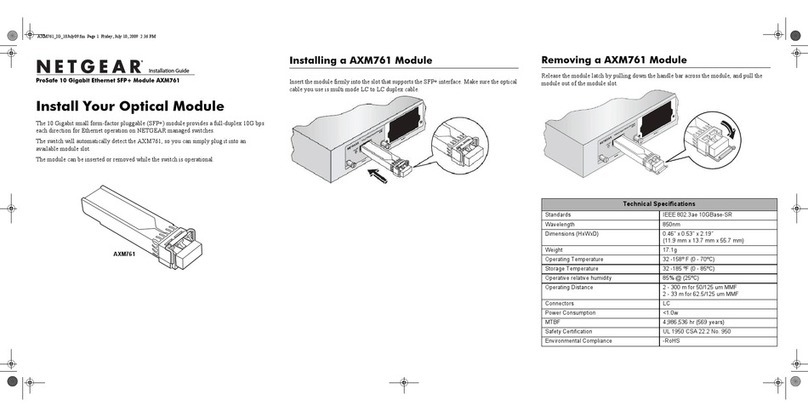
NETGEAR AXM761 - ProSafe 10 Gigabit User manual

NETGEAR
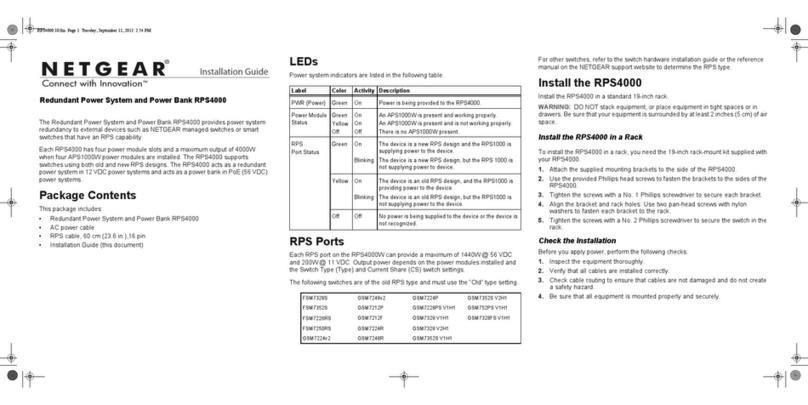
NETGEAR RPS4000 Manual

NETGEAR
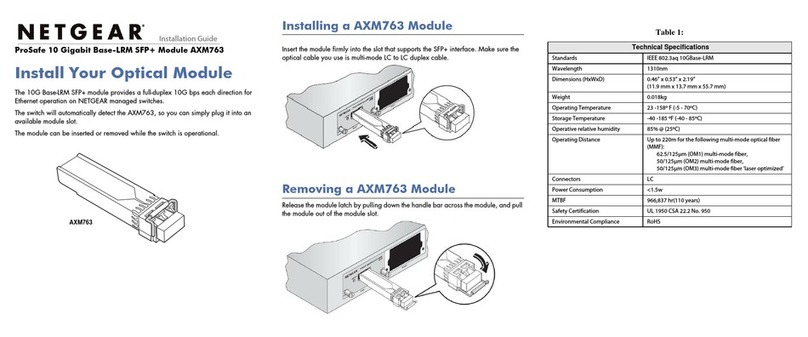
NETGEAR AXM763 - ProSafe 10 Gigabit LRM User manual

NETGEAR
NETGEAR VNB4000 User manual

NETGEAR
NETGEAR RPS4000 User manual

NETGEAR
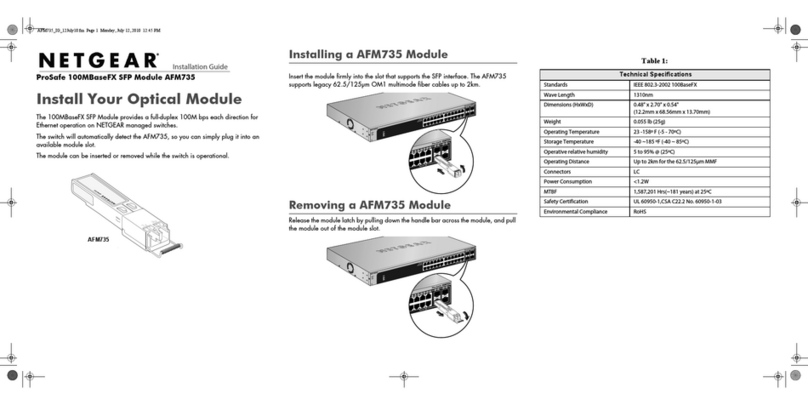
NETGEAR AFM735 - Fiber 100BASE-FX SFP LC GBIC Module User manual