DUNE HD Base 3.0 User manual

Dune HD Base 3.0
Quick Start Guide
Guide d’utilisation rapide
Schnellstartanleitung
Snelstart gids
Guía de Instalación
Краткое руководство
Короткий посібник
English •Français •Deutsch •Nederlandse •Español •Русский •Українська


3
4
10
16
22
28
34
40
Table of Contents
Table of Contents
English
Quick Start Guide
Français
Guide d’utilisation rapide
Deutsch
Schnellstartanleitung
Nederlandse
Snelstart gids
Español
Guía de Instalación
Русский
Краткое руководство
Українська
Короткий посібник

4Dune HD Base 3.0 Quick Start Guide
Dune HD Base 3.0 is an all-in-one solution for up to Full HD (1080p) video playback.
Key Features
● The newest Sigma Designs 8642 media processor: enjoy excellent playback and performance of
interactive features.
● HDD player: connect an HDD to the player and play content directly from the HDD.
● Network player: connect the player to a local network and play content directly from PC or NAS (UPnP,
SMB, NFS).
●MKV player: play HD video in a popular MKV format and other modern video file formats, including top
quality HD video with very high bitrate.
●3 USB ports: conveniently connect HDDs, USB flash drives, USB card readers and other USB storage
devices.
● eSATA port: connect an HDD via the most efficient eSATA interface.
● HDD mobile rack: easily and quickly connect and exchange internal 3.5" SATA HDD.
● HDMI 1.3: ensure the best possible quality of HD video and HD audio.
● 7.1 audio decoders and 7.1 audio outputs: get an excellent surround sound with any audio equipment.
● Full set of standard A/V connectors: use S/PDIF optical audio, S/PDIF coaxial audio, stereo audio,
component video, composite video outputs to easily connect any A/V equipment.
● Video output flexibility: output video in any resolution and format (from SD to 1080p, 24p/PAL/NTSC).
● Upscaling: high quality upscaling of DVD and any other SD video content to Full HD (1080p) or other
HD resolution.
● File browser: convenient file browser with powerful file management (copy, move, delete, rename,
organize).
● Extra functions: Full HD photo viewer, Internet radio, multicast UDP/RTP streams playback and
recording, playlists, NAS (SMB, FTP), BitTorrent client, media collections with cover art and icon
browsing (with Full HD graphics).
Introduction

5
Package Contents
1. Dune HD Base 3.0 media player
2. Remote control (batteries may not be included)
1 2 3
4 5 6
NOTE: Additional items (optional) may be included into the package, depending on player configuration, region,
and distributor, such as CD with additional documentation and/or demo content.
English
Exterior
Front view
Rear view
1. Power switch
2. Display
3. HDD rack
4. EJECT
5. PLAY/PAUSE
6. STOP
7. PREV
8. NEXT
9. USB 2.0 host
1. LAN and USB 2.0 host
2. HDMI 1.3
3. Coaxial digital audio output
4. Optical digital audio output
5. Analog stereo (left/right) audio output
6. Composite video output
7. Component (Y/Pb/Pr) video output
8. USB 2.0 host
9. eSATA host
10. Multichannel (7.1) analog audio output
11. AC power
3. Power supply cord
4. AV cable
5. HDMI cable
6. Quick start guide
HD BASE 3.0
1 2 3 4 5 6 7 8 9
HD BASE 3.0
NETWORK MEDIA PLAYER
1 2 3 5 6 7 98 10 114

6Dune HD Base 3.0 Quick Start Guide
1. Command indicator — ashes in response to RC button pressing.
2. EJECT — open/close the optical drive tray. MUTE — turn the sound
on/off. MODE — switch the video output mode; control some other
player functions. POWER — toggle the standby mode.
3. A (Red), B (Green), C (Yellow), D (Blue) — control the playback
and some other player functions.
4. 0–9 — enter numbers and text; control some other player functions.
5. SEARCH — jump to a specied playback position. ZOOM —
change the zoom factor for the video content being played. SET-
UP — enter/leave the setup menu; adjust playback settings during
playback.
6. V+/V- (volume up / volume down) — adjust the volume.
7. P+/P- (page up / page down) — scroll up and down in various
lists; control some other player functions.
8. Arrows (LEFT, RIGHT, DOWN, UP), ENTER, RETURN, TOP
MENU, POP UP MENU, INFO — main buttons for controlling the
player (navigate across the items on the screen, open/use the cur-
rently selected item, go back to the previous screen, go to main
menu, show popup menu with actions, show information, control
some other player functions).
9. PLAY, PAUSE, STOP, SLOW, REW, FWD, PREV, NEXT — control
the playback.
10. SUBTITLE, URL/2nd audio, ANGLE/ROTATE, REPEAT, SHUF-
FLE/PIP, AUDIO — control the playback and some other player
functions.
NOTES:
● Use alkaline AAA batteries.
● Observe polarity when inserting batteries.
● Direct the remote control to the player. There must be no obstacles between
the RC and the player.
● If RC functions only at short distances or stops functioning, make sure to
replace the batteries.
● Some RC buttons may have several functions depending on the current player mode.
● Some RC buttons may be available only in certain player modes or only during playback of a certain content.
1
2
3
4
5
6
7
8
10
9
Remote Control

7
The "MODE" RC button allows quick setting of video output mode without entering the player setup menu.
This way of video output conguration may be required if you see no picture on the screen after connect-
ing your player to a TV.
Press the "MODE" RC button and then one of the RC buttons "1", "2", "3", "4", or "5" to switch to one of
the following video output modes respectively:
1. Composite/Component, PAL
2. Composite/Component, NTSC
3. HDMI, 480i, 60 Hz
4. HDMI, 720p, 60 Hz
5. HDMI, 1080i, 60 Hz
After you see a picture on the TV, press the "ENTER" RC button, and then go to the player setup menu to
perform a more precise conguration of the video output mode if needed.
NOTE: The procedure of quick setting of video output mode can not be used during playback. To ensure this procedure
can be used, switch the player off, then switch the player on, and the wait about 1 minute to ensure the player loading is
nished.
Getting Started
Remove the transparent protecting film from the front panel of the player to ensure good look of the player.
Ensure there is enough space around the player for proper cooling. The space at each side should be not
less than 10 cm.
Ensure the RC has batteries installed.
Connect the player to your TV and to other A/V equipment in an appropriate way. Use HDMI connection
to get the best possible quality of video and audio. Make sure to switch off the player and all relevant A/V
equipment before connecting them. Ensure your TV and other A/V equipment are configured to use proper
inputs.
Switch on the player. The player will perform its initial loading procedure, which may take up to about 1
minute. During the loading procedure, "DUNE" logo is shown on the TV.
● If you do not see "DUNE" logo on the TV when you switch on the player, it may mean some problem with
the connection between the player and the TV or that a wrong video input is chosen in the TV or A/V
receiver/switch. In such a case, recheck the cables and the settings of the TV or A/V receiver/switch, or
try to use different cables or a different way of connecting the player to the TV.
● If you see "DUNE" logo on the TV when you switch on the player, but then the picture disappears and
no other picture appears during at least 10 seconds, it may mean that a wrong video output mode is
configured in the player. In such a case, press the "MODE" RC button, and then press one of the RC
buttons "1", "2", "3", "4" or "5" to switch to a different video output mode (see "Quick Setting of Video
Output Mode").
Finally, you should see the main screen of the player menu. The main screen shows items allowing to use
different player functions and access all storage devices and network drives connected to the player.
Adjust the player settings as needed using "SETUP" item on the main screen of the player menu (or by
pressing the "SETUP" RC button). In particular, you may want to adjust video settings, audio settings, and
network settings.
To choose the language of the player menu, use “Setup / General / Interface language” setting.
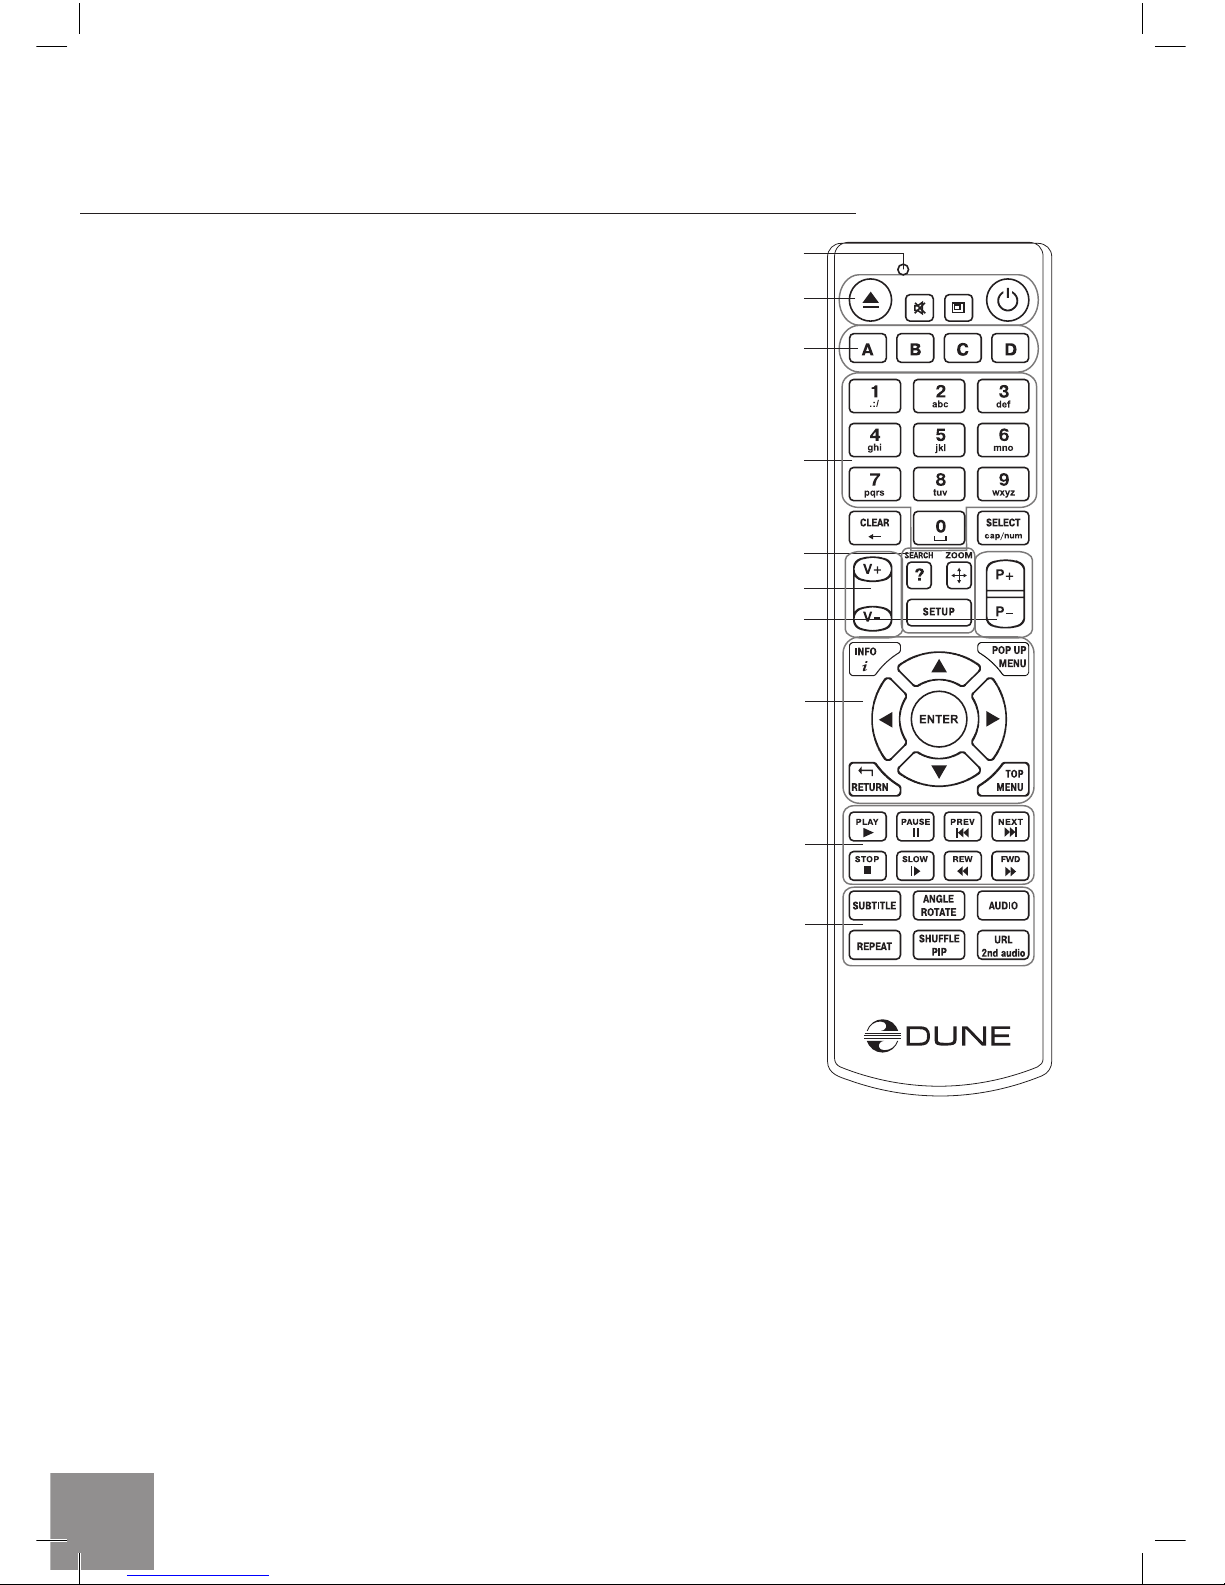
Use the RC buttons "LEFT", "RIGHT", "UP", "DOWN", "ENTER", "RETURN" to navigate through the
player menu. Use the "MENU" RC button to show the list of available commands. Use the "INFO" RC
button to show the information about the selected item.
Quick Setting of Video Output Mode
English

8Dune HD Base 3.0 Quick Start Guide
Connecting USB Drives
To connect a USB drive, ensure you are on the main screen of the player menu and connect the USB drive
to an USB port of the player. The player will recognize the USB drive, and will show an item corresponding
to the USB drive on the main screen.
When connecting a USB drive requiring signicant power (such as USB HDD), use an external power
supply for the USB drive. Power provided by the USB ports of the player may not be enough for correct
functioning of the USB drive.
Do not disconnect or switch off the USB drive when some write operation is in progress.
Connecting eSATA Drives
To connect an eSATA drive, switch off both the player and the eSATA drive, connect the eSATA drive to the
eSATA port of the player (and connect the eSATA drive to its power supply), switch on the eSATA drive,
and, as the last step, switch on the player. The player will recognize the eSATA drive, and will show an item
corresponding to the eSATA drive on the main screen of the player menu.
Switch off and disconnect the eSATA drive only after switching off the player.
Formatting HDD
To format a HDD attached to the player, select the drive item on the main screen of the player menu, press
the “INFO” RC button and choose “Format Disk” (to format the entire disk) or “Format Partition” (or to for-
mat an already existing disk partition only). The player will format the disk using “EXT2” lesystem. NOTE:
To use disks formatted by the player on a Windows PC, you may need to install additional software on the
PC, such as “EXT2FSD” (http://www.ext2fsd.com/).
Accessing Network Drives
To connect a network drive using SMB or NFS protocol, ensure you are on the main screen of the player menu,
press the "MENU" RC button, and choose "Create Network Folder", then ll the parameters of the network drive
as needed. The player will show an item corresponding to the congured network drive on the main screen.
To browse the list of network resources accessible via SMB or UPnP protocols, use "Network Browser"
item on the main screen of the player menu. NOTE: If some network resources are not shown by the
player, you may need to wait some minutes and then retry (or press the "MENU" RC button and choose
"Refresh" command).
Power Off and Standby
To switch off the player completely, toggle the power switch on the front panel. After the player is switched
off, it is recommended to wait about 1 minute before switching it on again. NOTE: Do not switch off the
player if some drive is connected to the player and some write operation is in progress.
To put the player into the standby mode, press the "POWER" RC button. In the standby mode, the player
produces no signal on the video output, but is still functioning. For example, if you have some storage
devices connected to the player, you may still access them from network ("NAS" function of the player).
To exit the standby mode, press the "POWER" RC button again. Exiting the standby mode takes just a
few seconds. NOTE: When the player is in the standby mode, it still consumes signicant power. It is not
recommended to keep the player in the standby mode for a while if you do not need it.

9
Alternatively, you can congure the player to switch off completely when pressing the "POWER" RC button
(see "Miscellaneous / Advanced / POWER remote button" in the player setup menu).
NAS (Network Attached Storage)
You can access storage devices connected to the player from the local network using FTP and SMB pro-
tocols. On a Windows PC, just type "ftp://ip_address" or "\\ip_address" in the Windows explorer, where
"ip_address" is the IP address of the player.
WiFi
You can use a USB WiFi adapter to connect the player to the local network via WiFi.
Please see here for the information on supported USB WiFi adapters: http://dune-hd.com/support/hw_
compat/.
.Limitations
Compatibility of the player with a particular hardware (A/V equipment, network equipment, disk drives, etc)
may depend on various factors (particular hardware model, specics of hardware installation and usage,
conguration of the player and the hardware, etc). If the player does not correctly work with a particular
hardware, try to adjust the conguration of the player or hardware, try to use the hardware in a different
way, or try to use some other hardware.
Compatibility of the player with a particular media content (les, discs, etc) may depend on various factors
(specics of media content encoding, specics of the conguration of the player, etc). If the player does not
play correctly a particular media content, try to adjust the conguration of the player, or try to use media
content encoded in a different way.
Updating Your Player and Getting More Information
Please check here for updated versions of player rmware (which may improve player functioning and
extend player possibilities): http://dune-hd.com/rmware/.
lease check here for more detailed and up-to-date documentation and information on player usage: http://
dune-hd.com/manuals/, http://dune-hd.com/support/.
English

10 Dune HD Base 3.0 Quick Start Guide
Le Dune HD Base 3.0 est une solution tout-en-un de résolution FULL HD (1080p).
Fonctions clés
● Nouvelle puce multimédia Sigma Designs 8642 pour une lecture améliorée et fonctions interactives plus
performantes.
● Connectez un Disque Dur au lecteur et lisez directement son contenu.
● Connectez le lecteur à un réseau local et lisez vos fichiers depuis un PC ou un NAS (UPnP, SMB,
NFS).
● Lecture de fichiers vidéo HD au format MKV.
● 3 ports USB: connectez Disques Durs, Clés USB, Lecteurs de cartes USB ou autre périphérique de
stockage USB.
● Port eSATA: connectez un Disque Dur via l’interface eSATA.
● HDD mobile rack: facilement et rapidement installer interne de 3,5” SATA HDD.
● HDMI 1.3 pour une qualité HD audio et vidéo optimale.
● Décodeurs audio 7.1 et sorties audio analogiques 7.1 audio pour une restitution sonore multi-canaux de
haute qualité sur tout type d’amplificateur.
● Connecteurs A/V multiples: S/PDIF optique, S/PDIF coaxial, stéréo, YUV, composite video.
● Sorties vidéo multiples: depuis la SD jusqu’au 1080p (24p/PAL/NTSC).
● Mise à l’échelle de haute qualité de DVD (ou autre source SD) jusqu’au 1080p.
● Gestionnaire de fichiers avancé permettant de copier, déplacer, supprimer, renommer, organiser.
● Fonctions supplémentaires: lecture de photo en résolution Full HD, radio internet, lecture et enregistre-
ment de flux UDP/RTP, listes de lectures, NAS (SMB, FTP), client BitTorrent, gestion des jaquettes et
icônes en résolution FULL HD.
Introduction

11
Français
Contenu de la boîte
1. Dune HD Base 3.0 media player
2. Télécommande (piles non incluses)
NOTE: Des accessoires supplémentaires (optionnels) peuvent être inclus dans la boîte en fonction du pays, du
distributeur et de la configuration du lecteur, tels que la documentation sur support CD, etc…
Vues extérieures
Panneau avant:
Panneau arrière:
1. Bouton Marche/Arrêt
2. Affichage
3. HDD rack
4. EJECT
5. PLAY/PAUSE
6. STOP
7. PREV
8. NEXT
9. Port USB 2.0
1. Connecteur réseau LAN et port USB 2.0
2. HDMI 1.3
3. Sortie audio numérique coaxiale
4. Sortie audio numérique optique
5. Sortie audio analogique stéréo (gauche/droite)
6. Sortie vidéo composite
7. Sortie vidéo composante (Y/Pb/Pr)
8. Port USB 2.0
9. Port eSATA
10. Sortie audio analogique multi-canaux (7.1)
11. AC power
3. Cordon d’alimentation
4. Cordon A/V
5. Cordon HDMI
6. Guide d’utilisation rapide
HD BASE 3.0
1 2 3 4 5 6 7 8 9
1 2 3
4 5 6
HD BASE 3.0
NETWORK MEDIA PLAYER
1 2 3 5 6 7 98 10 114

12 Dune HD Base 3.0 Quick Start Guide
Télécommande
1. Command indicator — ashes in response to RC button press1.
Témoin — le voyant de la télécommande clignote en réponse à la
pression d’une touche.
2. EJECT — ouverture/fermeture du tiroir du lecteur optique. MUTE
— Mise en sourdine temporaire du son. MODE — changement
de sortie vidéo; peut s’appliquer à d’autres fonctions du lecteur.
POWER — passe le lecteur en mode veille.
3. A (Rouge), B (Vert), C (Jaune), D (Bleu) — contrôle de lecture
ainsi que d’autres fonctions du lecteur.
4. 0-9 — clavier numérique et alphabétique; peut s’appliquer à
d’autres fonctions du lecteur.
5. SEARCH — permet l’accès à une position dénie durant la lec-
ture. ZOOM — permet de modier le mode zoom durant la lecture.
SETUP — entrée/sortie du menu setup; modier les critères de
lecture durant la lecture.
6. V+/V- (volume + / volume -) — contrôle du volume.
7. P+/P- (page + / page -) — permet de naviguer dans différentes
listes; peut s’appliquer à d’autres fonctions du lecteur.
8. Flèches (LEFT, RIGHT, DOWN, UP), ENTER, RETURN, TOP
MENU, POP UP MENU, INFO — touches principales de con-
trôle du lecteur (navigation entre les options à l’écran, validation
de l’option sélectionnée, retour à l’écran précédant, aller au menu
principal, afchage du popup menu et de ses options, afchage
des informations, peut s’appliquer à d’autres fonctions du lecteur).
9. PLAY, PAUSE, STOP, SLOW, REW, FWD, PREV, NEXT — con-
trôle de lecture.
10. SUBTITLE, URL/2nd audio, ANGLE/ROTATE, REPEAT, SHUF-
FLE/PIP, AUDIO — contrôle de lecture ainsi que d’autres fonctions
du lecteur.
NOTES:
● Utilisez de préférence des piles alkaline AAA.
● Assurez-vous de placer les piles en respectant la polarité.
● Dirigez bien la télécommande vers le lecteur. Aucun obstacle ne doit se
trouver entre la télécommande et le lecteur.
● Si la télécommande ne fonctionne qu’à courte distance ou ne fonctionne plus, remplacez les piles.
● Certaines touches de la télécommande peuvent avoir plusieurs attributions en fonction du mode de lecture.
● Certaines touches de la télécommande peuvent être uniquement accessibles dans certains modes de lecture sur
certains programmes.
1
2
3
4
5
6
7
8
10
9

13
Réglage Rapide de Sortie Vidéo
La touche "MODE" de la télécommande permet de régler de façon rapide les modes de sortie vidéo sans
passer par le menu setup du lecteur ; ce qui peut être utile si aucune image n’apparaît après allumage du
lecteur. Appuyez sur la touche "MODE" de la télécommande et appuyez ensuite sur la touche "1", "2", "3",
"4", ou "5" an de commuter entre les différents modes de sortie vidéo suivants:
1. Composite/Composante, PAL
2. Composite/Composante, NTSC
3. HDMI, 480i, 60 Hz
4. HDMI, 720p, 60 Hz
5. HDMI, 1080i, 60 Hz
Après l’afchage de l’image à l’écran, appuyez sur la touche "ENTER" de la télécommande, allez ensuite
dans le menu setu p du lecteur an d’effectuer des réglages de sortie vidéo plus précis si nécessaire.
NOTE: La procédure de réglage rapide de sortie vidéo ne peut être utilisée durant la lecture de contenu. Pour assurer
le bon déroulement de la procédure, éteignez le lecteur puis rallumez-le et patientez environ 1 minute afin que le lecteur
puisse achever son démarrage.
Démarrage
Retirez le film transparent protecteur de la façade avant du lecteur.
Pour la bonne marche du lecteur, assurez-vous d’avoir au moins 10 cm d’espace libre de chaque coté du
lecteur.
Assurez-vous que les piles sont installées dans la télécommande.
Connectez le lecteur à votre téléviseur et/ou à tout autre équipement A/V de manière appropriée. Utilisez
la connexion HDMI pour obtenir la meilleure qualité audio et vidéo possible. Assurez-vous d’éteindre le
lecteur ainsi que tous les équipements A/V avant d’effectuer les branchements.
Allumez le lecteur. Le lecteur effectue sa procédure de démarrage, qui peut prendre jusqu’à 1 minute.
Durant le démarrage, le logo "DUNE" s’affiche à l’écran.
● Vous ne voyez pas le logo "DUNE" à l’écran lorsque vous allumez le lecteur: défaut de connexion entre
le lecteur et le diffuseur ou erreur d’entrée vidéo sur le diffuseur. Dans ce cas, vérifiez les câbles ainsi
que les réglages vidéo de votre diffuseur, remplacez les câbles si nécessaire ou choisissez une autre
manière de connecter le lecteur au diffuseur.
● Vous voyez le logo "DUNE" à l’écran lorsque vous allumez le lecteur, mais l’image disparaît et aucune
autre image n’apparaît pendant au moins 10 secondes: la sortie vidéo configurée dans le lecteur n’est
pas la bonne. Dans ce cas, Appuyez sur la touche "MODE" de la télécommande, et appuyez ensuite
sur la touche "1", "2", "3", "4" ou "5" afin de commuter entre les différents modes de sortie vidéo (Cf.
"Réglage Rapide de Sortie Vidéo").
Le menu principal du lecteur devrait maintenant s’afficher. Le menu principal vous permet d’accéder aux
différentes fonctions du lecteur ainsi qu’à tout périphérique (interne, externe) ou réseau connecté au
lecteur.
Sélectionnez l’élément "SETUP" du menu principal du lecteur (ou appuyez sur la touche "SETUP" de la
télécommande) afin d’accéder aux réglages vidéo, audio et réseau.
Pour choisir la langue du lecteur, allez à “Setup / General / Interface language”.
Utilisez les touches "LEFT", "RIGHT", "UP", "DOWN", "ENTER", "RETURN" de la télécommande afin
de naviguer à travers les menus du lecteur. Utilisez la touche "MENU" de la télécommande pour afficher
la liste des commandes disponibles. Utilisez la touche "INFO" de la télécommande pour afficher les
informations disponibles sur l’élément sélectionné.
Français

14 Dune HD Base 3.0 Quick Start Guide
Connexion de périphérique USB
A partir du menu principal, connectez un périphérique USB à un port USB libre du lecteur. Le lecteur re-
connaît alors le périphérique et afche l’élément correspondant dans le menu principal du lecteur.
Lorsqu’un périphérique USB nécessitant un surplus de courant est connecté (tels que les Disques Durs ex-
ternes USB), veuillez utiliser une alimentation externe reliée au périphérique USB. Le courant délivré par les
ports USB du lecteur peut ne pas être sufsant pour faire fonctionner correctement le périphérique USB.
Ne pas éteindre ou déconnecter le périphérique USB lorsqu’une opération d’écriture est en cours.
Connexion de périphérique eSATA
Pour connecter un périphérique eSATA, éteignez le lecteur ainsi que le périphérique eSATA, puis connec-
tez le périphérique eSATA sur le port eSATA du lecteur et connectez l’alimentation externe du périphérique
eSATA. Allumez le périphérique eSATA, puis le lecteur, dans cet ordre. Le lecteur reconnaît le périphéri-
que eSATA et afche l’élément correspondant dans le menu principal du lecteur.
Ne pas éteindre ou déconnecter le périphérique eSATA lorsque le lecteur est allumé. Veuillez d’abord
éteindre le lecteur avant d’effectuer ces opérations.
Formatage Disque Dur
Pour formater un Disque Dur connecté au lecteur, sélectionnez l’élément correspondant à partir du menu
principal du lecteur, puis appuyez sur la touche «INFO» de la télécommande et sélectionnez «Format
Disk» (pour formater entièrement le disque) ou «Format Partition» (pour formater une partition déjà exis-
tante). Le lecteur formate le disque en utilisant le système de chiers «EXT2». NOTE : Pour utiliser les
disques durs formatés par le lecteur sur un PC Windows, vous devez installer un logiciel sur le PC, tel que
«EXT2FSD» (http://www.ext2fsd.com/).
Accès Lecteur Réseau
Pour connecter un lecteur réseau utilisant les protocoles SMB ou NFS, appuyez sur la touche "MENU" de la
télécommande à partir du menu principal du lecteur, et choisissez "Create Network Folder" puis renseignez
les paramètres demandés. Le lecteur afche ensuite l’élément correspondant dans le menu principal.
Pour naviguer à travers la liste des ressources réseau accessible via les protocoles SMB ou UPnP, sé-
lectionnez l’élément "Network Browser" dans le menu principal du lecteur. NOTE : Un délai de quelques
minutes est parfois nécessaire pour faire apparaître les ressources réseau. Si aucune ressource réseau
ne s’afche à l’écran, recommencez l’opération (ou appuyez sur la touche "MENU" de la télécommande
et sélectionnez la commande "Refresh").
Extinction et Mise en Veille
Pour éteindre complètement le lecteur, appuyez sur la touche power située sur la façade avant du lecteur. Après
extinction complète du lecteur, il est recommandé de patienter environ 1 minute avant de le rallumer. NOTE: Ne
pas éteindre le lecteur si un périphérique est connecté et qu’une opération d’écriture est en cours.
Pour mettre le lecteur en mode veille, appuyez sur la touche "POWER" de la télécommande. En mode
veille, le lecteur ne produit aucun signal de sortie vidéo mais fonctionne encore. Par exemple, si des pé-
riphériques de stockage sont connectés au lecteur, vous pouvez toujours y accéder à travers le réseau
(fonction "NAS" du lecteur). Pour sortir du mode veille, appuyez de nouveau sur la touche "POWER" de
la télécommande. La sortie du mode veille ne dure que quelques secondes. NOTE: Lorsque le lecteur

15
est en mode veille, il continue à consommer de l’énergie. Il n’est pas recommandé de rester en mode
veille pendant une longue durée.
Vous pouvez congurer l’extinction complète du lecteur en appuyant sur la touche "POWER" de la télé-
commande (allez à "Miscellaneous / Advanced / POWER remote button" dans le menu setup du lecteur).
NAS (Network Attached Storage)
Vous pouvez accéder aux périphériques de stockage connectés au lecteur depuis le réseau local en
utilisant les protocoles FTP et SMB. Sur un PC Windows, tapez juste "ftp://ip_address" ou "\\ip_ad-
dress" dans vôtre navigateur internet, l’"ip_address" étant l’adresse IP du lecteur.
WiFi
Vous pouvez utiliser un périphérique USB WI-FI pour connecter le lecteur au réseau local via WI-FI.
Pour connaître les périphériques compatibles, rendez-vous à l’adresse suivante:
http://dune-hd.com/support/hw_compat/.
Limitations
La compatibilité du lecteur avec certains matériels (amplicateurs A/V, matériels réseau, disques durs,
etc.) peut dépendre de plusieurs facteurs (modèle particulier, installation et usage spécique, congu-
ration du lecteur avec le matériel, etc.). Si le lecteur ne fonctionne pas correctement avec un matériel
particulier, essayez de modier la conguration du lecteur et du matériel, d’utiliser le matériel différem-
ment ou d’utiliser un autre matériel.
La compatibilité du lecteur avec certains contenus multimédia (chiers, disques, etc.) peut dépendre
de plusieurs facteurs (encodage spécique de chier, conguration particulière du lecteur, etc.). Si le
lecteur ne fonctionne pas correctement avec un contenu multimédia particulier, essayez de modier la
conguration du lecteur, ou utilisez un contenu multimédia encodé différemment.
Mise à Jour du lecteur et Informations Complémentaires
Pour rechercher les dernières mises à jour rmware du lecteur (pouvant améliorer le fonctionnement
du lecteur et étendre ses capacités), rendez-vous à l’adresse suivante: http://dune-hd.com/rmware/.
Pour obtenir les dernières informations et documentations sur l’utilisation du lecteur, rendez-vous aux
adresses suivantes: http://dune-hd.com/manuals/, http://dune-hd.com/support/.
Français

16 Dune HD Base 3.0 Quick Start Guide
Der Dune HD Base 3.0 ist die umfassende Lösung für volle HD (1080p) Videowiedergabe.
Grundfunktionen
●NeusterSigmaDesigns8642MultimediaProzessor:Für perfekte Wiedergabe von Videos und be-
eindruckende Geschwindigkeit bei interaktiven Funktionen (z.B. Menüaufbau)
●Festplatten-Player: Verbinden Sie eine Festplatte mit dem Player und spielen Sie die Inhalte direkt von
der Festplatte ab.
●Netzwerk-Player: Verbinden Sie den Player mit dem lokalen Netzwerk und spielen Sie die Inhalte direkt
von PC oder NAS über UPnP, SMB, NFS Verbindungen ab.
●MKV-Player: Spielen Sie HD-Videos im populären MKV-Format und zusätzlich allen weiteren gängigen
Videoformaten ab. Inklusive hochauflösenden HD-Videos bei extrem hoher Bitrate.
●3 USB Anschlüsse: Verbinden Sie auf einfachste Weise Festplatten, USB-Sticks, USB Cardreader und
weitere USB Massenspeicher Geräte mit dem Player.
●eSATA Anschluss: Verbinden Sie externe eSATA Festplatten mit dem Player.
●HDD mobile rack: Einfach und schnell installieren interne 3,5“ SATA HDD.
●HDMI 1.3: Zur Sicherstellung der bestmöglichen HD-Video und HD-Audio Qualität.
●7.1 Audiodekoder und 7.1 Audioausgänge: Erleben Sie exzellenten Raumklang.
●Komplette A/V Anschlussmöglichkeiten: Nutzen Sie S/PDIF optical Audio, S/PDIF coaxial Audio,
Stereo Audio, Component Video und Composite Videoausgänge, um Ihre A/V Geräte zu verbinden.
●Flexible Videoauflösung: Videowiedergabe in jeder Auflösung und allen Formaten (von SD bis 1080p,
24p/PAL/NTSC).
●Skalierung: Automatische Skalierung von DVD und allen anderen SD Videoinhalten zu Full HD (1080p)
oder jeder anderen HD-Auflösung in perfekter Qualität.
●Dateimanager: Einfach zu nutzender Dateimanager (Kopieren, Verschieben, Löschen, Umbenennen
und mehr).
●ZusätzlicheFunktionen: Volle HD Fotowiedergabe, Internet Radio, Wiedergabe und Aufnahme von
multicast UDP/RTP Streams, Playlisten, NAS (SMB, FTP) Verbindung, BitTorrent Client, Video Samm-
lungen mit Coverbildern und Coverbild Navigation (in HD Grafik).
Einführung

17
Deutsch
Lieferumfang
1. Dune HD Base 3.0 Media-Player
2. Fernbedienung (Batterien evtl. nicht enthalten!)
HINWEIS: Zusätzliches (optionales) Zubehör kann im Paket enthalten sein. Dies ist abhängig von der Konfiguration
des Gerätes, der Verkaufsregion und des Lieferanten. So können z.B. CDs mit weiterer Dokumentation oder
Demonstrationsmaterial.
Gehäuse
Vorderansicht:
Rückansicht:
1. Ein/Ausschalter
2. Display
3. HDD rack
4. EJECT
5. PLAY/PAUSE
6. STOP
7. PREV
8. NEXT
9. USB 2.0 Anschluss
1. LAN und USB 2.0 Anschluss
2. HDMI 1.3 Ausgang
3. Digitaler Coaxial Audioausgang
4. Optischer Digital Audioausgang
5. Analog Stereo (links/rechts)
Audioausgang
6. Composite Video Ausgang
7. Component (Y/Pb/Pr) Videoausgang
8. USB 2.0 Anschluss
9. eSATA Anschluss
10. Multikanal (7.1) Analog Audioausgang
11. Netzkabel Anschluss
3. Netzkabel
4. A/V Kabel
5. HDMI Kabel
6. Schnellstartanleitung
HD BASE 3.0
1 2 3 4 5 6 7 8 9
1 2 3
4 5 6
HD BASE 3.0
NETWORK MEDIA PLAYER
1 2 3 5 6 7 98 10 114

18 Dune HD Base 3.0 Quick Start Guide
1.Funktionskontrolle (LED) — Blinkt, wenn ein Knopf gedrückt wird.
2.EJECT — Öffnen/Schließen des optischen Laufwerks. MUTE —
Audio Stummschaltung. MODE — Wechseln des Videoausgabe
Modus; weitere Funktionen des Players kontrollieren. POWER —
Wechsel zwischen Standby- und Betriebsmodus.
3.A (Rot), B (Grün), C (Gelb), D (Blau) — Darstellungsoptionen än-
dern.
4.0–9 — Eingabe von Zahlen und Text; weitere Funktionen des Play-
ers kontrollieren.
5.SEARCH — Zu festgelegter Wiedergabeposition springen. ZOOM
— Wechseln des Zoomfaktors für aktuelle Videowiedergabe. SE-
TUP — Setup Menü aufrufen/verlassen; Wiedergabeoptionen wäh-
rend der Darstellung ändern (Helligkeit/Kontrast...).
6.V+/V- (Lautstärke rauf / Lautstärke runter) — Einstellen der Laut-
stärke.
7.P+/P- (Seite rauf / Seite runter) — Seitenweise in verschiedenen
Listen blättern; weitere Funktionen des Players kontrollieren.
8.Pfeiltasten (LINKS, RECHTS, RUNTER, RAUF), ENTER, RE-
TURN, TOP MENU, POP UP MENU, INFO — Tasten zur Kontrolle
des Players (Navigation im Menü, Öffnen/Abspielen des gerade se-
lektierten Eintrags, zurück zum vorherigen Menüpunkt, Hauptme-
nü öffnen, Popup Menü aufrufen, Informationen anzeigen, weitere
Funktionen des Players kontrollieren).
9.PLAY, PAUSE, STOP, SLOW, REW, FWD, PREV, NEXT — Wie-
dergabekontrolle.
10. SUBTITLE, URL/2nd audio, ANGLE/ROTATE, REPEAT,
SHUFFLE/PIP, AUDIO — Darstellungsoptionen ändern.
HINWEISE:
● Nutzen Sie Alkaline AAA Batterien.
● Achten Sie auf richtige Polung beim Einlegen der Batterien.
● Halten Sie die Fernbedienung immer direkt auf das Gerät gerichtet. Es dür-
fen sich keine Gegenstände oder andere Hindernisse zwischen Fernbedie-
nung und Gerät benden.
● Funktioniert die Fernbedienung nur noch über kurze Distanz, bitte Batterien wechseln.
● Einige Tasten können verschieden Funktionen besitzen, abhängig vom aktuellen Modus.
● Einige Tasten sind nur abhängig vom aktuellen Modus oder bei Wiedergabe verschiedener Inhalte nutzbar.
1
2
3
4
5
6
7
8
10
9
Fernbedienung

19
Die "MODE" Taste der Fernbedienung erlaubt das schnelle Ändern des Video-Modus, ohne das Menü auf-
zurufen. Diese Art der Umschaltung könnte nötig sein, wenn Sie nach dem Einschalten des Gerätes keine
Ausgabe auf dem TV sehen und so die Umstellung per Menü nicht möglich ist.
Drücken Sie die "MODE" Taste der Fernbedienung, gefolgt von der Taste "1", "2", "3", "4", oder! "5", je
nachdem welcher Modus gewünscht ist. Die Zahlen stehen dabei für folgende Modi:
1. Composite/Component, PAL
2. Composite/Component, NTSC
3. HDMI, 480i, 60 Hz
4. HDMI, 720p, 60 Hz
5. HDMI, 1080i, 60 Hz
Sehen Sie nun ein Bild auf dem TV, drücken Sie bitte die "ENTER" Taste der Fernbedienung und wechseln
bei Bedarf in das Video Setup Menü, um weitere Feinheiten der Videodarstellung zu kongurieren.
HINWEIS: Der Schnellwechsel des Video-Modus funktioniert nicht bei der Wiedergabe von Inhalten. Um diese Funktion
zu nutzen, schalten Sie den Player aus und warten etwa 1 Minute, bis der Player wieder voll betriebsbereit ist.
Inbetriebnahme
Entfernen Sie die transparente Schutzfolie von der Front des Gerätes für eine bessere Optik.
Um eine ausreichende Kühlung des Gerätes zu gewährleisten, stellen Sie bitte sicher, dass sich auf allen
Seiten des Gerätes mindestens 10 cm Freiraum befinden.
Legen Sie die Batterien in die Fernbedienung ein.
Verbinden Sie das Gerät mit Ihrem TV und evtl. anderen vorhandenen A/V Komponenten. Nutzen Sie die
HDMI Verbindung für die bestmögliche Qualität der Video- und Audiowiedergabe. Schalten Sie das Gerät
und evtl. vorhandene A/V Komponenten aus, bevor Sie die Geräte verbinden. Stellen Sie bitte sicher, dass
Ihr TV und evtl. vorhandene andere A/V Komponenten auf die richtigen Eingänge konfiguriert wurden.
Schalten Sie den Player ein. Der Player startet nun mit dem Ladevorgang, welcher bis zu einer Minute
dauern kann. Während dieser Zeit erscheint das "DUNE" Logo auf dem TV.
● Erscheint das "DUNE" Logo nicht auf dem TV nachdem der Player eingeschaltet wurde, deutet dies auf
ein Problem mit der Verkabelung zwischen Player und T, oder falsch eingestelltem Videoeingang am TV
hin. In diesem Fall überprüfen Sie bitte nochmals die korrekte Verkabelung und die Einstellungen am TV
Gerät. Alternativ versuchen Sie, den Player über andere Anschlüsse mit dem TV zu verbinden.
● Sehen Sie das "DUNE" Logo auf dem TV Gerät nach dem Einschalten, dann aber verschwindet das “DUNE”
Logo und das Menü erscheint im Anschluss nicht nach etwa 10 Sekunden auf dem TV, deutet dies auf ei-
nen falsch eingestellten Video-Modus am Player hin. In diesem Fall drücken Sie bitte die "MODE" Taste der
Fernbedienung und im Anschluss die Tasten "1", "2", "3", "4" oder! "5", um einen anderen Video-Modus
zu wählen. (s.u. "Schnellwechsel des Video-Modus").
Das Hauptmenü sollte nun auf dem TV erscheinen. Dieses Hauptmenü erlaubt über verschiedene Menü-
punkte den Zugang zu den einzelnen Funktionseinstellungen des Players ebenso, wie den Zugriff auf
angeschlossene Speichermedien und Netzwerkfreigaben.
Nehmen Sie nun, wie gewünscht, die Konfiguration des Gerätes über den Menüpunkt “SETUP” oder
durch Drücken der Taste “SETUP” auf der Fernbedienung vor. Im einzelnen sollten Sie die Einstellungen
für die Audio- und Videowiedergabe und die Netzwerkeinstellungen prüfen.
Um die Sprache zu ändern (z.B. Deutsch), wählen Sie bitte “Setup / General / Interface language”.
Nutzen Sie die Tasten "LINKS", "RECHTS", "RAUF", "RUNTER“, "ENTER", "RETURN" der Fernbedienung,
um im Menü zu navigieren. Drücken Sie die "MENU" Taste auf der Fernbedienung, um eine Liste der möglichen
Kommandos und weitere Informationen zu erhalten. Drücken Sie die "INFO" Taste der Fernbedienung, um
mehr Informationen zum ausgewählten Menüpunkt zu erhalten.
Schnellwechsel des Video-Modus
Deutsch

20 Dune HD Base 3.0 Quick Start Guide
USB Geräte anschließen
Zum Einbinden von USB-Geräten wechseln Sie bitte zunächst in das Hauptmenü. Nach Anstecken des USB-
Gerätes wird dieses vom Player erkannt und es erscheint der entsprechende Menüpunkt auf dem Bildschirm.
Bei Verwendung eines externen USB-Laufwerks mit hohem Strombedarf (z.B. Festplatte), nutzen Sie bitte
eine externe Stromversorgung für das Gerät. Die Ausgangsspannung für das Gerät über den USB-Port
kann zu gering sein und somit das Gerät nicht funktionieren.
Entfernen Sie kein externes Gerät vom USB-Anschluss, wenn noch Daten geschrieben werden!
eSATA Laufwerke anschließen
Um ein eSATA Laufwerk anzuschließen, schalten Sie bitte beide Geräte zunächst aus! Verbinden Sie
nun das eSATA Laufwerk mit dem eSATA Anschluss des Players und schließen die externe Stromver-
sorgung des eSATA Laufwerks an das Laufwerk an. Schalten Sie nun zuerst das eSATA Laufwerk, und
im Anschluss den Player ein. Das eSATA Laufwerk wird nun vom Player erkannt und es erscheint der
entsprechende Menüpunkt auf dem Bildschirm.
Entfernen oder schalten Sie das eSATA Laufwerk nur aus, nachdem der Player ausgeschaltet wurde.
Festplatten formatieren
Um eine an den Player angeschlossene Festplatte zu formatieren, wählen Sie bitte das entsprechende Laufwerk
im Hauptmenü und drücken die "INFO" Taste auf der Fernbedienung. Wählen Sie “Formatieren” (zum Formatieren
der gesamten Festplatte) oder "Partition Formatieren" (zum Formatieren einer bestehenden Partition). Der Player
wird die Festplatte nun im “EXT2” Dateisystem formatieren. HINWEIS: Um mit dem Player formatierte Festplat-
ten mit einem Windows PC nutzen zu können, benötigen Sie zusätzliche Software für Ihren Windows PC, z.B.
“EXT2FSD“ von http://www.ext2fsd.com/. Andernfalls wird die Festplatte nicht erkannt.
Netzwerkfreigaben einbinden
Um eine Netzwerkfreigabe mittels SMB oder NFS(Linux) einzubinden, wechseln Sie bitte zunächst ins Hauptme-
nü. Drücken Sie dort nun die „MENU“ Taste der Fernbedienung und wählen „Netzwerkordner erstellen“. Geben
Sie nun alle benötigten Parameter für die Netzwerkfreigabe über die Fernbedienung ein. Im Anschluss erscheint
im Hauptmenü dann ein neuer Menüpunkt mit der von Ihnen erstellten Netzwerkverbindung
Um alle verfügbaren SMB oder UPnP Netzwerk Ressourcen anzuzeigen, wählen Sie bitte den Menüpunkt
„Network Browser“ im Hauptmenü des Players. HINWEIS: Sollten nicht alle verfügbaren Netzwerk Res-
sourcen angezeigt werden, warten Sie bitte einige Minuten oder drücken nochmals die „MENU“ Taste der
Fernbedienung und wählen „Refresh“.
Ausschalten und Standby
Um den Player komplett auszuschalten, drücken Sie bitte den Ein-Ausschalten Knopf auf der Vorderseite des
Players. Nachdem der Player ausgeschaltet wurde, empfehlen wir, mindestens eine Minute vergehen zu las-
sen, bevor Sie den Player wieder einschalten. HINWIES: Schalten Sie den Player nicht aus, wenn auf externe
Geräte noch Daten geschrieben werden.
Um den Player in den Standby Modus zu versetzen, drücken Sie die "POWER" Taste auf der Fernbedienung. Im
Standby Modus erzeugt der Player kein Videosignal mehr, ist aber trotzdem noch voll betriebsbereit. Z.B. Können
Sie weitere am Gerät angeschlossene Geräte über die NAS Funktion des Players ansprechen und nutzen. Zum
Beenden des Standby Modus drücken Sie bitte erneut die "POWER" Taste der Fernbedienung und warten einige
Sekunden, bis das Gerät wieder voll betriebsbereit ist. HINWEIS: Auch im Standby Modus benötigt der Player
signikant Strom. Wir empfehlen daher, den Player bei längerer Nichtnutzung richtig auszuschalten und nicht im
Other manuals for HD Base 3.0
1
Table of contents
Languages:
Other DUNE Media Player manuals