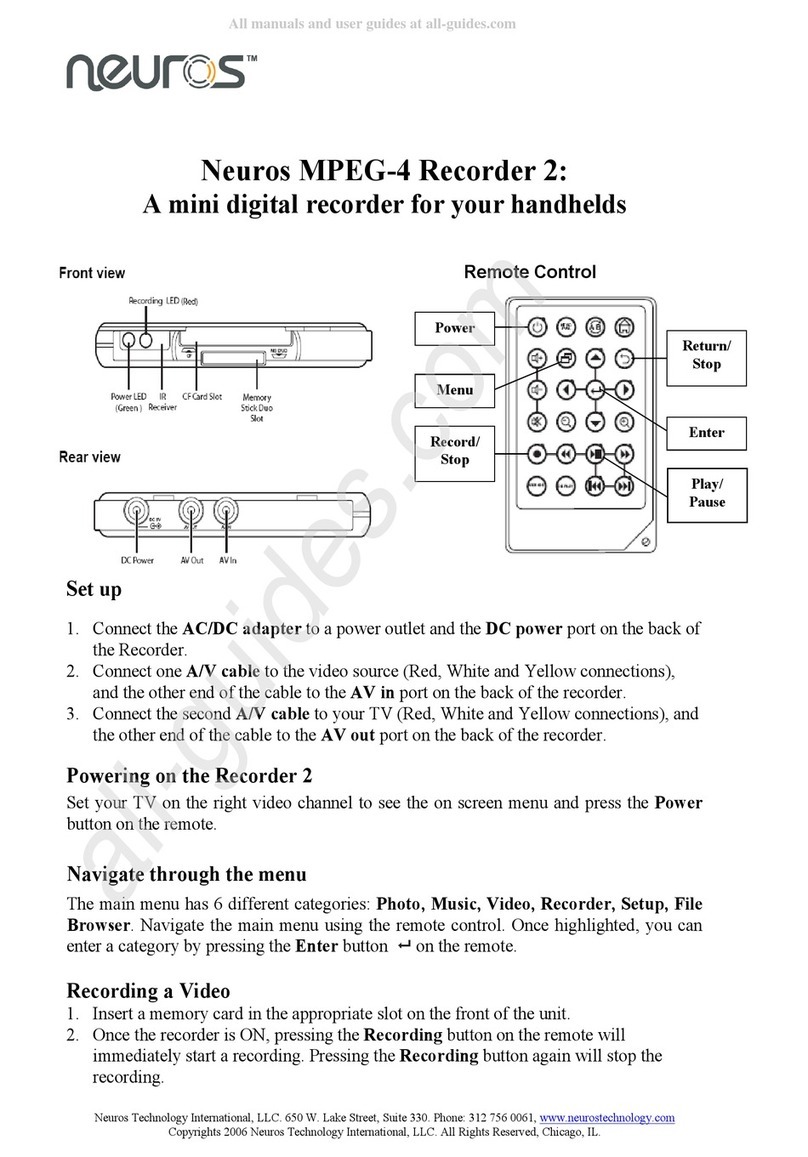
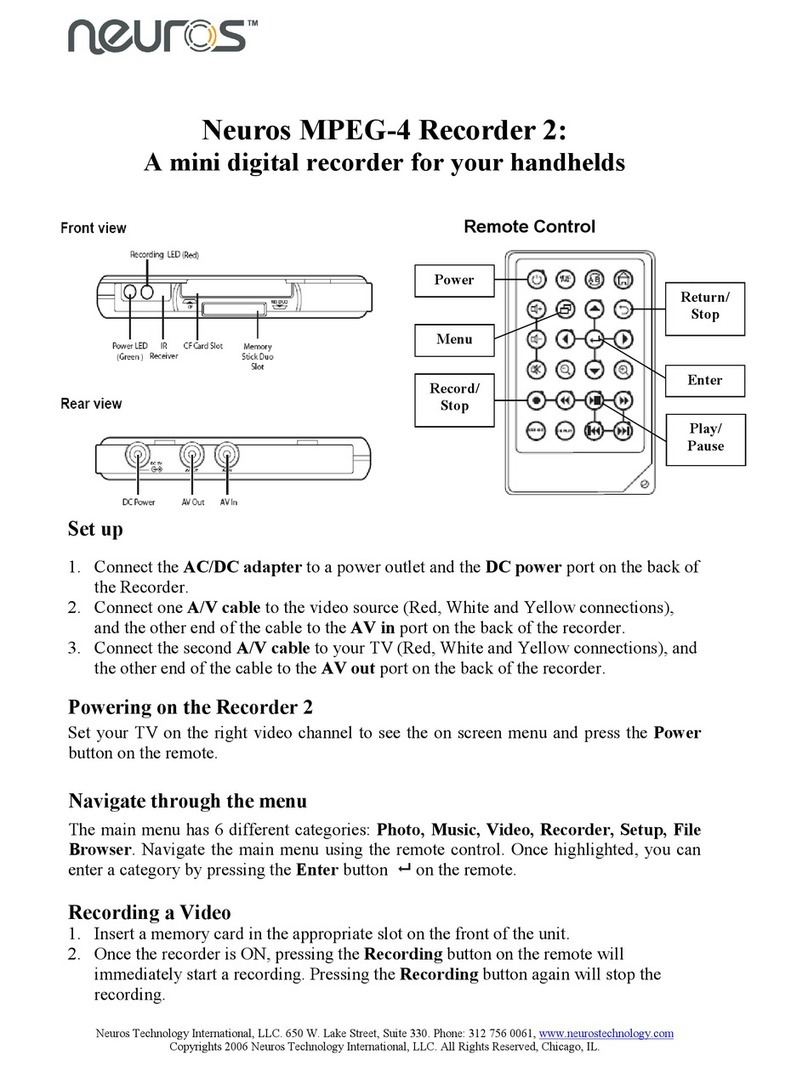
Neuros MPEG4 Recorder 2 User manual

MPEG-4 Video Recorder_UM_EN.book Page i Monday, June 19, 2006 8:22 PM

ii
Preface
Information in this document has been carefully checked for accuracy; however, no
guarantee is given as to the correctness of the contents. The information in this doc-
ument is subject to change without notice. This document contains proprietary infor-
mation protected by copyright. No part of this manual may be reproduced by any
mechanical, electronic or other means, in any form, without prior written permission
of the manufacturer.
All trademarks are the property of their respective owners.
Copyright© 2005. All Rights Reserved.
Safety Information
Please read the following safety instructions, and keep the user manual for later
reference.
• Use only the power adapter supplied with the product.
• Do not place the product near any source of heat or expose it to direct sunlight.
• Do not attempt to connect any computer accessory or electronic product with-
out instruction from qualified service personnel. It may result in risk of electric
shock.
• Do not expose the product to moisture. Never spill any liquids on the product.
• Do not place the product in regions with extreme temperatures.
Routine care
Wipe the product with a soft cloth. Do not use abrasive powders or solvents, such as
benzene or thinner. When you leave the product unused for a long time, unplug the
AC adapter from the outlet.
● For the most up-to-date copy of the guide in English or a copy in German, French, Italian
or Spanish please visit:
http://www.neurostechnology.com/support
● Pour un exemplaire du guide d’utilisation en francais, consultez la page :
http://www.neurostechnology.com/support
● Per ottenere una copia del manuale utente in italiano, visitare:
http://www.neurostechnology.com/support
● Para obtener una copia de la guia del usuario en "Espanol" visite:
http://www.neurostechnology.com/support
● Ein Exemplar der deutschen Bedienungsanleitung finden Sie auf folgender Website:
http://www.neurostechnology.com/support
MPEG-4 Video Recorder_UM_EN.book Page ii Monday, June 19, 2006 8:22 PM

iii
Table of Contents
1 Overview
Features ................................................................................................ 1
Package contents .................................................................................. 2
About the Neuros MPEG-4 Recorder 2 ................................................. 3
Front view ..................................................................................... 3
Rear view ..................................................................................... 3
About the remote control ....................................................................... 4
2 Getting started
Installing the remote control battery ...................................................... 7
Connecting power ................................................................................. 8
Turning on the Recorder 2 .................................................................... 8
Inserting the Compact Flash (CF) or 1"Micro Drive Card ...................... 9
Inserting the MS Duo/Pro Duo, MMC or SD Series Card..................... 10
Connecting to a TV (viewing only)........................................................ 11
Connecting to a TV, DVD player, VCR or camcorder (recording) ....... 12
Confirming / Selecting the correct TV output........................................ 13
3 Using the Neuros MPEG-4 Recorder 2
Viewing pictures .................................................................................. 15
Displaying images ...................................................................... 15
Photo Settings menu .................................................................. 16
Slideshow ............................................................................. 16
Background music ................................................................ 17
Delete Files ........................................................................... 17
Listening to music ................................................................................ 18
Playing audio .............................................................................. 18
Setting menu for Music .............................................................. 19
Repeat .................................................................................. 19
Delete Files .......................................................................... 19
Watching videos .................................................................................. 21
Playing videos ............................................................................ 21
Setting menu for Video ............................................................... 22
Repeat .................................................................................. 22
Delete Files ........................................................................... 22
Recording video .................................................................... 24
Record menu .............................................................................. 24
Resolution .................................................................................. 24
Quality ........................................................................................ 24
MPEG-4 Video Recorder_UM_EN.book Page iii Monday, June 19, 2006 8:22 PM

iv
Quick setup .................................................................................24
Timer record ............................................................................... 25
Programs .............................................................................. 25
Start and Stop Times ............................................................ 25
Frequency ............................................................................. 26
Auto record ................................................................................. 26
Storage ....................................................................................... 26
Selecting the right recording resolution setting ................................... 27
Simple Record ...................................................................... 28
Setup menu ......................................................................................... 29
Date and Time ...................................................................... 29
Language .............................................................................. 29
Format Disk .......................................................................... 30
TV Output ............................................................................. 30
Factory Reset ....................................................................... 30
File browsing ....................................................................................... 31
Data management settings menu .............................................. 31
Copy ..................................................................................... 32
Delete ................................................................................... 32
Playing back recorded files ................................................................. 33
Playing back files recorded with the Recorder 2 ........................ 33
I. Sony PSP ......................................................................... 33
II. Neuros 442 Protable Media player / Recorder ................. 34
III. i-Pod Video ...................................................................... 35
IV. Nintendo Game Boy Micro .............................................. 42
V. Other Handhelds .............................................................. 43
4 Firmware Upgrade Instructions
Firmware Upgrade Instructions ........................................................... 45
5 Contact US
Contact Us............................................................................................ 47
6 Appendix
FCC Certification ................................................................................. 49
CE Notice (European Union) ............................................................... 50
Troubleshooting ................................................................................... 51
Specifications ...................................................................................... 52
MPEG-4 Video Recorder_UM_EN.book Page iv Monday, June 19, 2006 8:22 PM

1. Overview
Congratulations on purchasing the Neuros MPEG-4 Recorder 2.
Now you can enjoy quality multimedia anywhere you go and
record your favorite video programs from a variety of video
sources. The Recorder 2 also plays back your favorite audio
tracks, and displays photos and video on your TV.
Refer to this user manual for detailed descriptions about the prod-
uct and instructions for using it.
Features
The Neuros MPEG-4 Recorder 2 allows you to:
• record video from a TV, DVD, VCR or camcorder
• display images (jpg, gif, and bmp formats)
• play audio files (mp3 and wma formats)
• play videos (ASF, AVI, MP4 formats)
MPEG-4 Video Recorder_UM_EN.book Page 1 Monday, June 19, 2006 8:22 PM

2
Package contents
Package contents
RCA Video cables (x2) User Manual
Recorder 2
User Manual
Power Adapter
NTSC
PAL
A
B
STORAGE
DISPLAY
Remote Control
MPEG-4 Video Recorder_UM_EN.book Page 2 Monday, June 19, 2006 8:22 PM

About the Neuros MPEG-4 Recorder 2
3
About the Neuros MPEG-4 Recorder 2
Refer to the following sections for information about the hardware
components of the Recorder 2.
Front view
Rear view
CF
Memory Stick Pro
SD, MMC, Slot
Power LED
(Green )
Recording LED (Red)
IR
Receiver
CF Card Slot
AV OUT
DC 5V
AV IN
DC Power AV Out AV In
MPEG-4 Video Recorder_UM_EN.book Page 3 Monday, June 19, 2006 8:22 PM

4
About the remote control
About the remote control
NTSC
PAL
A
B
STORAGE
DISPLAY
1
2
3
4
5
6
7
8
9
10
11
12
Icon Description
1. Turns on the power
2. Switches between NTSC and
PAL system
3. Increases the volume
4.
Enters the setting menu
(Note:settings menu options
vary depending on when
selected)
5. Decreases the volume
6. Scrolls left
7. Mutes all sound
8. Zooms out
9. Start and stop recording
10. Rewinds playback of video
and audio files
11. Switches between CF and
Memory Stick/SD/MMC.
12. Turn on and off the on screen
display
MPEG-4 Video Recorder_UM_EN.book Page 4 Monday, June 19, 2006 8:22 PM

About the remote control
5
NTSC
PAL
A
B
STORAGE
DISPLAY
24
23
22
21
20
19
18
17
16
15
14
13
Icon Description
13. Returns to the top menu
14. Repeats playback of selected
audio/video file.
15. Returns to the previous menu
16. Scrolls up
17. Scrolls right
18. Confirms selection of menu
item
19. Zooms in
20. Scrolls down
21. Fast Forwards playback of
video and audio files
22. Plays or pauses playback of
photo, video and audio
23. Plays the next photo, video and
audio files
24. Playsthe previous photo, video
and audio files
MPEG-4 Video Recorder_UM_EN.book Page 5 Monday, June 19, 2006 8:22 PM

Sticker for Recording Setting
Before recording for target player (TV, PDA or PSP...), user can
refer to the sticker (as picture shows below) for the setting includ-
ing resolution and quality.
Please refer to page 21 to setup the recording format.
Please see www.neurostechnology.com / supporteddevices.asp and the manual of your playback device for details.
640X480
176X144
3GP
320X240
3GP
176X120
320X240
15fps
368X208
320X240
30fps
Normal Fine Super fine Legend
--- ---
Economic
TV
PSP
PDA
S/Phone
Mobile
iPod
Suggested Recording Resolutions
MPEG-4 Video Recorder_UM_EN.book Page 6 Monday, June 19, 2006 8:22 PM

2. Getting started
This chapter describes the preliminary steps required to set up the
Recorder 2 and how to make connections before starting to use
the device.
Installing the remote control battery
Follow these instructions to insert the remote control battery:
1. Push in the clip at the side of the battery
holder.
2. Pull battery holder out.
3. Insert the battery as shown, while noting
the correct polarity.
4. Push battery holder and snap it in place.
MPEG-4 Video Recorder_UM_EN.book Page 7 Monday, June 19, 2006 8:22 PM

8
Connecting power
Connecting power
Connect the power adaptor to the DC-
in socket on the rear panel of the
Recorder 2. Plug the other end of the
adaptor into a power outlet.
Turning on the Recorder 2
Once the Recorder 2 is plugged in, the green power LED turns on.
Press the button on the remote and the system turns on. Press
the button again to turn off the Recorder 2.
Note: the green light will remain on even if the Recorder 2 is
turned off, as long as the unit is connected to a power outlet.
MPEG-4 Video Recorder_UM_EN.book Page 8 Monday, June 19, 2006 8:22 PM

Inserting the Compact Flash (CF) or 1"Micro Drive Card
9
Inserting the Compact Flash (CF) or 1"Micro
Drive Card
Push the CF card or Hitachi 1" Micro
Drive into the CF card slot until it is firmly
in place.
To remove the card, grip the CF card and
gently pull.
The Hitachi 1"Micro Drive should be formatted using the
Recorder 2 before using (See Page 22). This is to ensure that
the 1" Micro Drive has been formatted in the FAT16 format and
can therefore be recognized by the Recorder 2.
Note1:
File size is limited to 2 GB for the Hitachi 1"Micro Drive. This
is an inherent limitation of the FAT16 format. If you attempt to
record a file larger than 2 GB, the Recorder 2 will begin a sec-
ond file once the 2 GB limit is reached. A small amount of data
may be lost while the Recorder 2 is transitioning to the second
file.
Note2:
MPEG-4 Video Recorder_UM_EN.book Page 9 Monday, June 19, 2006 8:22 PM

10
Inserting the MS Duo/Pro Duo, MMC or SD Series Card
Inserting the MS Duo/Pro Duo, MMC or SD
Series Card
Insert the card into the card slot with the
metal contacts going in first and facing
up, until the card is firmly in place. The
beveled corner of the card must be away
from you and to the right as the card is
inserted.
To remove the card, grip the card and
pull gently.
See diagram below for proper adapters:
MS DUO
CF
Memory Stick Duo Adaptor
INSERT
PUSHPUSH 128 MB
2.0GB
1.0
GB
RS-MMC
microSD/TransFlash
to SD Adapter
Lock
LOCK
Adapter
512
MB
MMC
mobile
1.0
GB
MPEG-4 Video Recorder_UM_EN.book Page 10 Monday, June 19, 2006 8:22 PM

Connecting to a TV (viewing only)
11
Connecting to a TV (viewing only)
Connect the A/V connectors (red, white, and
yellow) of the A/V cable, to the correspond-
ing input sockets on the TV. Connect the
other end to the AV Out socket at the back of
the Recorder 2.You will also need to set your
TV to the appropriate video channel to see
the user interface and set up your recording
preferences (use the TV/video button on your remote--Just like
you would for a VCR).
The appropriate channel dedicated to the inputs you are plugged
into varies. Please refer to your television's manual for details (or
try switching between channels)
Note: If the TV has only 1 video and 1 audio socket, insert the yel-
low connector in the video socket and the white connector in the
audio socket, leaving the red connector unused.
I
N
MPEG-4 Video Recorder_UM_EN.book Page 11 Monday, June 19, 2006 8:22 PM

12
Connecting to a TV, DVD player, VCR or camcorder (recording)
Connecting to a TV, DVD player, VCR or cam-
corder (recording)
Connect the A/V connectors (red, white, and yellow) of the A/V
cable to the corresponding output connectors on the cable box,
satellite receiver, VCR, DVD player, camcorder etc. Connect the
other end to the AV In socket at the back of the Recorder 2. Con-
nect the second A/V cable to the AV Out socket of the Recorder 2
and the corresponding input sockets on the TV as described in the
previous section.
Note: Most TVs do not have video output (only audio output). In
this case, you won't be able to record directly from the TV.
Instead, record TV shows from the cable box, satellite receiver
box, or PVR (like Tivo). If you don't have cable or satellite TV, you
can record from broadcast TV by plugging the video out from a
VCR into the A/V In on the Recorder 2, then plugging the A/V Out
from the Recorder 2 into the Video In on the TV.
I
N
O
U
T
ANTENNA IN
S-VIDEO
CHANNEL
34
I
N
MPEG-4 Video Recorder_UM_EN.book Page 12 Monday, June 19, 2006 8:22 PM

Confirming/Selecting the correct TV output
13
Confirming/Selecting the correct TV output
Note: Different regions of the world use different TV output for-
mats. For example, the U.S. uses NTSC and much of Europe
uses PAL. Depending on your region, you may need to change
the TV output from NTSC to PAL. If you have a color TV and only
black and white is visible when the Recorder 2 menu is visible (the
picture may also appear somewhat unstable), you may need to
change the TV output as detailed below. If colors are visible on
the menu screen, the TV output is already correct, and you can
skip this step. Changing the TV output is done by accessing the
Setup menu (see below) and changing the TV Output mode. If
you don't know what setting is used in your local region, you may
want to consult the user's guide for your TV set, but, if you have
any doubt, it will probably be easier to just follow the simple steps
below and use the format that makes the screen color and image
appear normal.
Note: Many TV sets in France use a different TV Output format
called Secam. This format is not currently supported by the
Recorder 2.
To determine the current TV Output setting and to change it (if
necessary):
SETUP
Time H:M:S
Language
Format Disk
TV Output
Upgrade Devic~
Date M/D/Y
20 : 57 : 35
Dutch
CF
PAL
Upgrade
07 / 21 / 2001
MPEG-4 Video Recorder_UM_EN.book Page 13 Monday, June 19, 2006 8:22 PM

14
Confirming/Selecting the correct TV output
1. Highlight the Setup menu from the main menu screen using the
buttons.
2. Press to access the Setup menu options.
3. You should see TV Output as one of the options along the left
side. The currently selected format (NTSC or PAL) will be dis-
played across from it on the right. If this is the desired format, you
are finished with this step. Simply exit the menu by pressing the
button. If you want to change the format, scroll down to the TV
Output line using the buttons. Use the button to highlight
TV Output, then use the buttons to change the format.
Once the desired format is displayed, exit the menu by pressing
the button as above.
MPEG-4 Video Recorder_UM_EN.book Page 14 Monday, June 19, 2006 8:22 PM

3. Using the Neuros MPEG-4
Recorder 2
Now that you have set up the Recorder 2, you are ready to start
using it to view your favorite images, listen to audio tracks, watch
videos, and record videos. This chapter provides detailed instruc-
tions for these tasks and for navigating through the OSD (On
Screen Display) menu.
Viewing pictures
The Recorder 2 is able to display.JPG, .GIF and .BMP image file
formats.
Displaying images
To display still images:
1. Highlight the Photo menu icon using the buttons.
2. Press to access the file list.
3. Use the buttons to highlight the required file and press
the button to play the file.
PHOTO
<MP_R001>
<MUSIC>
<PHOTO>
John_peel_~
_40896894_~
<DCIM>
MPEG-4 Video Recorder_UM_EN.book Page 15 Monday, June 19, 2006 8:22 PM

16
Viewing pictures
Photo Settings menu
To access the Settings menu related to viewing photos,press the
while in the main Photo menu. The following three functions
will appear:
SLIDESHOW
To set up a photo slide show, follow the procedure below:
1. Use the buttons to scroll to and highlight the Slide-
show option.
2. Use the buttons to Select ALL photos or only the pho-
tos in the FOLDER for the slideshow or to turn the slideshow
OFF.
3. Use the button to return to the menu.
4. Using the buttons, select a photo for the slide show by
pressing the button on the remote control. The screen
icon will change from to .
5. Press to play the slide show.
Note: If All is selected for the slide show then all pictures will
appear in the show. If Folder is selected then only those
MUSIC
usic
Delete Files
Slide Show
On
Selected
Folder
PHOTO
MPEG-4 Video Recorder_UM_EN.book Page 16 Monday, June 19, 2006 8:22 PM
Other manuals for MPEG4 Recorder 2
2
This manual suits for next models
1
Table of contents
Other Neuros DVR manuals
