Nevoox LF UV-C User manual

1
Bedienungsanleitung
Instruction manual / Manuel d‘instructions
Nevoox LF UV-C Luftreiniger
Nevoox LF UV-C air purier
Puricateur d‘air Nevoox LF UV-C

2
Produkt Bestandteile / Product Components / Composantes du produit
1 Frontabdeckung
Front cover / Couverture
2 Gehäuse
Housing / Logement
3 6 fach Filter HEPA 13
6-way lter HEPA 13 / Filtre à 6 voies HEPA 13
4 Rückwandabdeckung
Back cover / Couverture arrière
5 Abnehmgri
Removal handle/Poignée de déménagement
6 Bedienfeld
Control panel / Panneau de contrôle
7 HighDenitionDisplay
High Denition Display /
Achage haute dénition
8 versenkbareGrie(abModellLF2030)
Retractable handles (from model LF 2030)
Poignées rétractables (à partir du modèle
LF 2030)
9 Luftauslässe
Air outlets / Sorties d‘air
10 Standfuß
Stand / Stand
11 UV-C Einheit
UV-C unit / Unité UV-C

3
1. Bitte beachten
Vielen Dank, dass Sie sich für einen
Nevoox Luftreiniger entschieden haben.
Abbildungen in dieser Anleitung dienen nur als
Beispielbilder.
BevorSiedasGerätinBetriebnehmen,ent-
fernenSieunbedingtdieKunststofoliedes
Filtersiebs im Gerät.
UmsicherzustellendassSiediesesProdukt
richtigverwenden,lesenSiedieseAnleitung
bitte sorgfältig durch.
2. Zubehör
Die Luftreiniger werden mit folgendem Zu-
behör ausgeliefert:
- 1 x Handbuch
- 1 x Fernbedienung
Zusätzlich, nur für die Modelle LF 2030 / LF
2040 / LF 2050 / LF 2060 / LF 2070:
- 1 x Schraubenpaket
- 1 x runder Standfuß
Sollten die genannten Teile nach dem Önen
der Verpackung nicht übereinstimmen,
wenden Sie sich bitte unverzüglich an Ihren
Fachberater.
Produkt Bestandteile / Product Components / Composantes du produit
D
3. LCD Display
Grüner Bildschirm PM2,5 <75UG / m³
Die Luftqualität ist ausgezeichnet.
grün blau rot
Im Lieferumfang ist eine Infrarot Fernbedie-
nung enthalten. Der Fernbedienungssensor
(receiving hole) bendet sich unterhalb des
Frontdisplays und darf nicht verdeckt werden.
Die Reichweite der Fernbedienung beträgt
max. 5 Meter.
4. Fernbedienung /Bedieneinheit
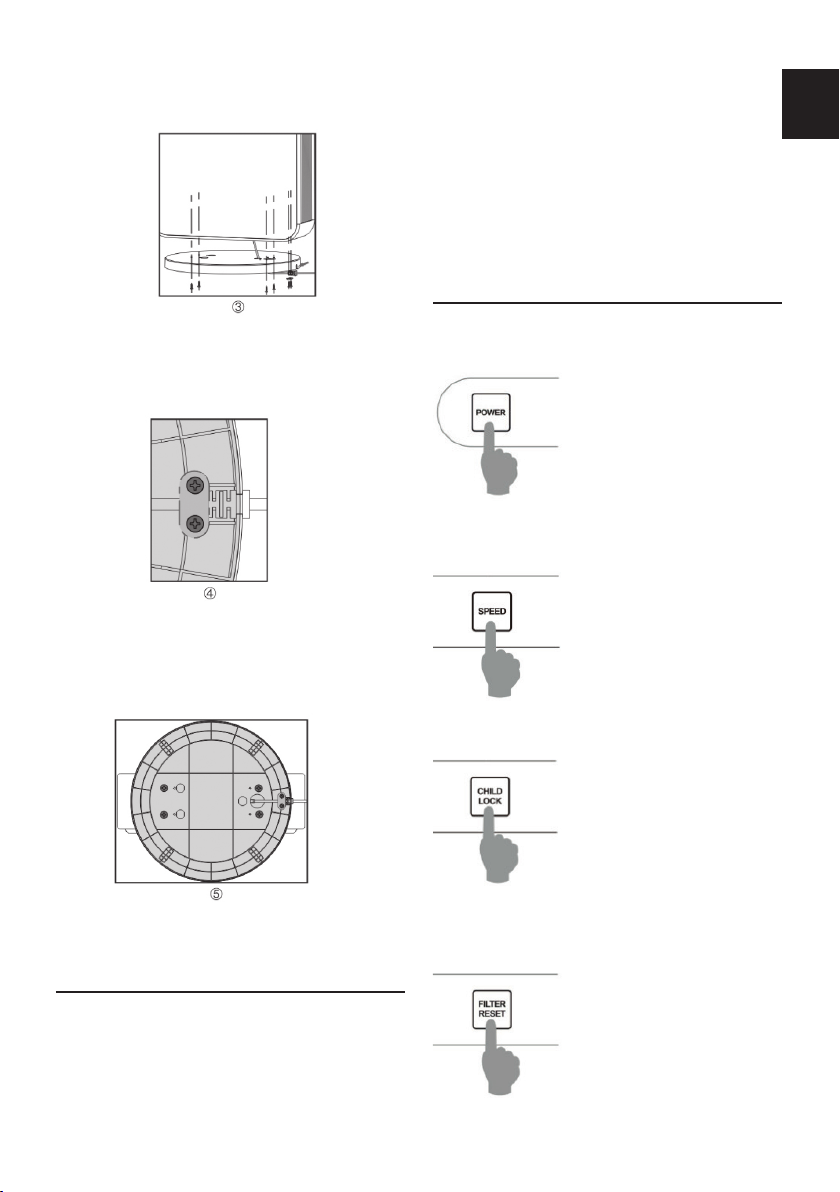
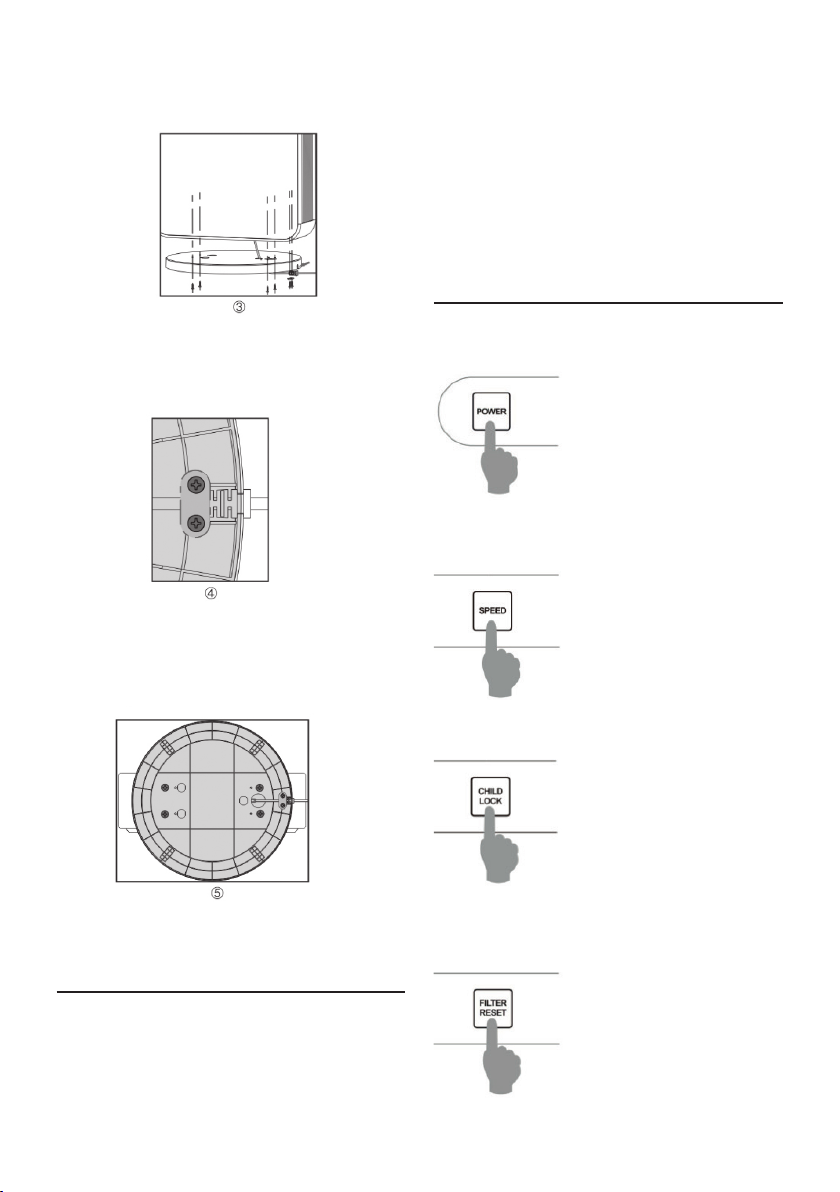
5. Installation von Bodenplatte
und Netzkabel
Nur für die Modelle: LF 2030 / LF 2040 /
LF 2050 / LF 2060 / LF 2070
1) Überprüfen Sie das Zubehör.
2) Führen Sie das Netzkabel durch das
Loch der Bodenplatte.
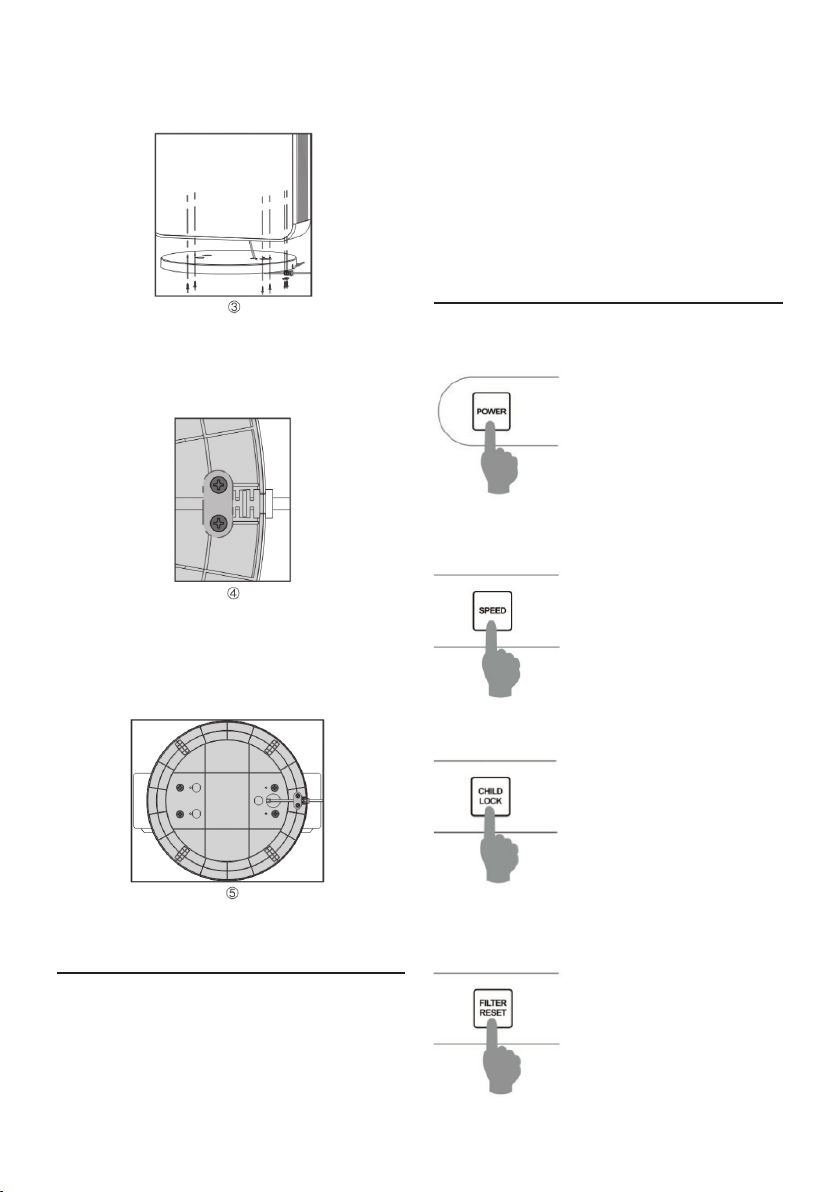
4
4) Die Kabelführung in die Bodenplatte
drücken und die Kabelxierung mit
der Bodenplatte verschrauben.
5) Überprüfen Sie, ob die Abbildung mit
der Bodenplatte und der Kabel-
führung Ihres Gerätes übereinstimmt.
6. Aufstellungsort
Um die Leistung des Luftreinigers voll zu
nutzen, sollte das Gerät mit einen Mindestab-
stand von 10-15cm von Wänden o.ä. aufge-
stellt werden. So wird sichergestellt das über
die Rückseite des Gerätes ausreichend Luft
ansaugt werden kann.
Die Lüftergeschwindigkeit
kann in vier Stufen ein-
gestellt werden.
7.2. Lüftergeschwindigkeit (Speed)
7. Inbetriebnahme
Einmal drücken zum Ein-
schalten, erneut drücken
zum Ausschalten.
7.1. An- und Ausschalten
Drücken Sie kurz die Tas-
te, um alle Bedientasten
zu sperren.
Drücken Sie für drei
Sekunden, um alle
Bedientasten wieder
zu entsperren.
7.3. Kindersicherung (Child Lock)
Die max. Laufzeit der Fil-
ter beträgt 1.500 Stunden.
Wenn die Restlaufzeit
der Filter ca. 60 Stunden
beträgt, blinkt das Display
und zeigt „FILTER REMAI-
NING TIME“. In diesem
Zeitraum muss der Filter
getauscht werden.
7.4. Filter-Timer (Filter Reset)
3) Verschrauben Sie die Bodenplatte
mit den im Bild markierten Löchern im
Boden des Luftreinigers.
Wenn Sie den Luftreiniger verwenden, wird
empfohlen, die Türen und Fenster zu schlie-
ßen, um einen besseren Reinigungseekt zu
erzielen.
Um Wackeln oder Kippen des Gerätes zu ver-
hindern, stellen Sie sicher, dass das Gerät auf
einem ebenen und rutschfesten Untergrund
aufgestellt wird.

5
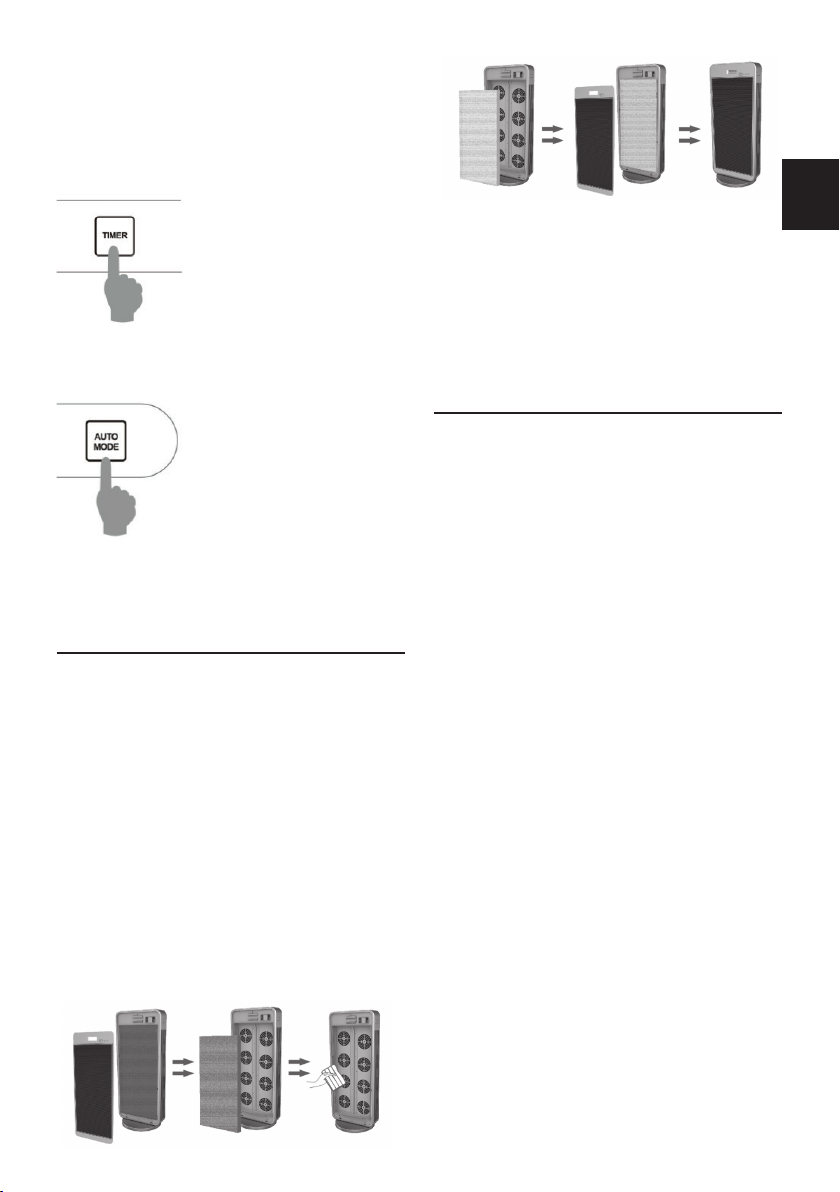
7.5. Ausschalt-Timer
7.6. Automatikmodus (Auto Mode)
Das Gerät lässt sich über
den Timer in 12 Stufen (0-
12 Stunden) ausschalten.
Die Geschwindigkeit der
Lüfter (und somit der
Luftdurchsatz) wird je
nach gemessener Luft-
qualität automatisch
geregelt.
Jede Lüfterstufe weniger
reduziert den Luftdurch-
satz um 25%.
(Stufe 4 = 100%/ Stufe 3=75%/
Stufe 2= 50%/ Stufe 1 =25%)
D
Nach dem Filtertausch drücken Sie die Taste
„FILTER RESET“ 3 Sekunden lang, um das
Zählwerk zurück zusetzen.
8. Filterwechsel
1. Gerät ausschalten, Netzstecker ziehen und
die Rückabdeckung von Hand abziehen.
2. Entfernen Sie den gebrauchten Filter; der
Filter kann im Hausmüll entsorgt warden.
3. Reinigen Sie das Innengehäuse mit einem
weichen Tuch.
4. Installieren Sie den neuen Filter mit der
blauen Seite nach Aussen.
5. Schließen Sie den Deckel.
6. Die Installation ist abgeschlossen.
Hinweis: Drücken Sie nach dem Filterwechsel
die Taste "FILTER RESET".
Die max. Laufzeit von 1.500 Stunden des
getauschten Filters wird dadurch korrekt be-
rechnet.
Die Laufzeit der Filter hängt u.a. von der
Belastung der angesaugten Luft und der
Drehzahl der Lüfter ab und wird im Display
angezeigt.
9. Sicherheitshinweise
9.1. Um Schäden durch Überhitzung des Luft-
reinigers zu vermeiden, stellen Sie sicher,
dass sowohl der Lufteinlass als auch der
Luftauslass nicht verdeckt sind.
9.2. Stellen Sie das Gerät nicht neben eine
Heizung, es besteht Brandgefahr oder
Verformung des Gehäuses durch Hitze-
einwirkung.
9.3. Ziehen Sie den Netzstecker heraus, wenn
Sie das Gerät reinigen, den Filter tauschen
oder es längere Zeit nicht benutzen.
9.4. Bewegen Sie den Luftreinger nur, wenn er
vorher ausgeschaltet wurde.
9.5. Benutzen Sie das Gerät nicht, wenn das
Anschlußkabel des Netzteiles beschädigt
ist. Wenden Sie sich in diesem Fall an Ihre
Verkaufsstelle.
9.6. Um Wackeln oder Kippen des Gerätes
zu verhindern, stellen Sie sicher, dass das
Gerät auf einem ebenen und rutschfesten
Untergrund aufgestellt wird.

6
1. Please note
Thank you for choosing a Nevoox air purier.
Illustrations in this manual are for illustrative
purposes only.
Beforeyoustartuptheunit,makesureto
removetheplasticfoilofthelterscreenin
the unit.
Toensurethatyouusethisproductcorrect-
ly,pleasereadtheseinstructionscarefully.
2. Accessories
The air puriers are supplied with the follo-
wing accessories:
- 1 x manual
- 1 x remote control
Additional, only for the models LF 2030 /
LF 2040 / LF 2050 / LF 2060 / LF 2070
- 1 x screw package
- 1 x round base.
If the parts mentioned do not match after
opening the packaging, please contact your
specialist consultant immediately.
3. LCD display
Green screen PM2.5 <75UG / m³
The air quality is excellent.
green blue red
An infrared remote control is included.
The remote control sensor (receiving hole) is
located below the front display and must not
be covered. The range of the remote control is
max. 5 metres.
4. Remote control / Control panel
5. Installation of base plate and
power cable
Only for Models: LF 2030 / LF 2040 /
LF 2050 / LF 2060 / LF 2070
1) Check the accessories.
2) Pass the power cord through the hole in
the base plate.
7
EN
4) Press the cable guide into the base plate
and screw the cable xing to the base
plate.
5) Check that the illustration corresponds
to the base plate and cable guide of
your appliance.
6. Place of installation
To make full use of the air purier‘s perfor-
mance, the unit should be placed at a mini-
mum distance of 10-15cm from walls or similar.
This ensures that sucient air can be sucked
in through the back of the unit.
The fan speed can be set
in four stages.
7.2. Fan speed (Speed)
7. Commissioning
Press once to switch on,
press again to switch o.
7.1. Switch on and o
Briey press the key to
lock all control keys.
Press for three seconds to
return all the control keys
to the unlock modus.
7.3. Child Lock
The maximum running
time of the lters is 1,500
hours. When the remai-
ning running time of the
lters is approx. 60 hours,
the display ashes and
shows „FILTER REMAI-
NING TIME“. During this
period the lter must be
7.4. Filter Timer (Filter Reset)
3) Screw the base plate to the holes in the
bottom of the air purier marked in the
picture.
If you use the air purier, it is recommended
that you close the doors and windows to
achieve a better cleaning eect.
To prevent the appliance from wobbling or
tilting, ensure that the appliance is placed on a
level and non-slip surface.

8
7.5. O Timer
7.6. Automatic mode (Auto Mode)
The unit can be switched
o in 12 steps (0-12 hours)
using the timer.
The speed of the fans
(and thus the air ow) is
automatically controlled
according to the measu-
red air quality.
Each fan stage less redu-
ces the airow by 25%.
(Level 4 = 100%/ Level 3=75%/
Level 2= 50%/ Level 1 =25%)
replaced.
After changing the lter, press the „FILTER
RESET“ key for 3 seconds to reset the counter
to 1500 hours.
8. Filter change
1. switch o the unit, pull out the mains plug
and remove the back cover by hand.
2. remove the used lter; the lter can be
disposed of in the household waste.
3. clean the inner housing with a soft cloth.
4. install the new lter with the blue side facing
outwards.
5. close the lid.
6. the installation is complete.
Note: After changing the lter, press the
„FILTER RESET“ key.
The maximum running time of 1,500 hours of
the replaced lter is thus correctly calculated.
The running time of the lters depends,
among other things, on the load of the air
sucked in and the speed of the fans and is
shown on the display.
9. Safety Instructions
9.1. To prevent damage due to overheating
of the air purier, make sure that both the
air inlet and the air outlet are not covered.
9.2. Do not place the unit next to a heater, as
there is a risk of re or deformation of the
cabinet due to heat.
9.3. Unplug the power cord when cleaning the
machine, replacing the lter or when not
using it for a long period of time.
9.4. Do not move the air purier unless it
has been previously switched o.
9.5. Do not use the unit if the power supply
cable is damaged. In this case contact
your point of sale.
9.6. To prevent the appliance from wobbling or
tilting, ensure that the appliance is placed
on a level and non-slip surface.

9
F
1. Veuillez noter que
Merci d‘avoir choisi un puricateur d‘air Nevoox.
Les illustrations contenues dans ce manuel ne
sont données qu‘à titre indicatif.
Avantdedémarrerl‘unité,assurez-vousde
retirerlafeuilledeplastiquedel‘écranltrant.
Pourvousassurerquevousutilisezceprodu-
itcorrectement,veuillezlirecesinstructions
avec soin.
2. Accessoires
Les puricateurs d‘air sont fournis avec les
accessoires suivants :
- 1 x manuel
- 1x télécommande
Supplémentaire, uniquement pour les modèles
LF2030 / LF2040 / L 2050 / LF 2060 / LF2070
- 1 x paquet de vis
- 1 x base ronde.
Si les pièces mentionnées ne correspondent
pas après l‘ouverture de l‘emballage, veuillez
contacter immédiatement votre revendeur
spécialisé.
3. Écran LCD
Écran vert PM2,5 <75UG / m³
La qualité de l‘air est excellente.
vert bleu rouge
Une télécommande infrarouge est incluse.
Le capteur de la télécommande (trou de
réception) est situé sous l‘écran frontal et
ne doit pas être recouvert. La portée de la
télécommande est maximale. 5 mètres.
4. Télécommande / Panneau de contrôle
5. Installation de la plaque de
base et du câble électrique
Uniquement pour Models: LF 2030 / LF 2040 /
LF 2050 / LF 2060 / LF 2070
1) Vériez les accessoires.
2) Faites passer le cordon d‘alimentation par
le trou de la plaque de base.
10
4) Enfoncez le guide-câble dans la plaque
de base et vissez la xation du câble sur la
plaque de base.
5) Vériez que l‘illustration correspond à la
plaque de base et au guide de câble de
votre appareil.
6. Lieu d‘installation
Pour exploiter pleinement les performances
du puricateur d‘air, l‘appareil doit être placé
à une distance minimale de 10 à 15 cm du mur
ou d‘une paroi . Cela permet d‘aspirer su-
samment d‘air par l‘arrière de l‘appareil.
La vitesse du ventilateur
peut être réglée en quatre
étapes.
7.2. Vitesse du ventilateur
7. Mise en service
Appuyez une fois pour
allumer, une autre fois
pour éteindre.
7.1. Allumé et éteint
Appuyez brièvement sur
la touche pour verrouiller
toutes les touches de con-
trôle. Appuyez pendant
trois secondes pour re-
mettre toutes les touches
de contrôle en fonction.
7.3. Sécurité enfant
La durée maximale de
fonctionnement des ltres
est de 1 500 heures. Lors-
que la durée de fonction-
nement restante du ltre
est d‘environ 60 heures,
l‘écran clignote et ache
„FILTER REMAINING TIME“.
Pendant cette période, le
7.4. Filter Timer (réinitialisation du ltre)
3) Vissez la plaque de base aux trous dans
le fond du puricateur d‘air indiqués sur
la photo.
Si vous utilisez le puricateur d‘air, il est
recommandé de fermer les portes et les
fenêtres pour obtenir un meilleur eet de
nettoyage.
Pour éviter que l‘appareil ne vacille ou ne
bascule, veillez à ce qu‘il soit placé sur une
surface plane et non glissante.
11
F
7.5. Minuterie d‘arrêt
7.6. Mode automatique (Auto Mode)
L‘appareil peut être éteint
en 12 étapes (0-12 heures)
grâce à la minuterie.
La vitesse des ventilateurs
(et donc le débit d‘air) est
automatiquement con-
trôlée en fonction de la
qualité de l‘air mesurée.
Chaque étape réduit le
débit d‘air de 25 %.
Niveau 4 = 100%/ Niveau 3=75%/
Niveau 2= 50%/ Niveau 1 =25%)
ltre doit être remplacé.
Après avoir changé le ltre, appuyez sur la
touche „FILTER RESET“ pendant 3 secondes
pour remettre le compteur à 1500 heures.
8. Changement de ltre
1. éteignez l‘appareil, débranchez la prise de
courant et retirez le couvercle arrière à la
main.
2. retirer le ltre usagé ; le ltre peut être jeté
dans les ordures ménagères.
3. nettoyer le boîtier intérieur avec un chion
doux.
4. installer le nouveau ltre avec la face bleue
tournée vers l‘extérieur.
5. Fermez le couvercle.
6. l‘installation est terminée.
Note : Après avoir changé le ltre, appuyez sur
la touche „FILTER RESET“.
La durée de fonctionnement maximale de
1 500 heures du ltre remplacé est donc cor-
rectement calculée.
9. Instructions de sécurité
9.1. Pour éviter tout dommage dû à une
surchaue du puricateur d‘air, assurez-
vous que l‘entrée et la sortie d‘air ne sont
pas couvertes.
9.2. Ne placez pas l‘appareil à côté d‘un
chauage, car il y a un risque d‘incendie
ou de déformation de l‘armoire par la
chaleur.
9.3. Débranchez le cordon d‘alimentation
lorsque vous nettoyez l‘appareil,
remplacez le ltre ou lorsque vous ne
l‘utilisez pas pendant une longue période.
9.4. Ne déplacez pas le puricateur d‘air, sauf
s‘il a été préalablement éteint.
9.5. N‘utilisez pas l‘appareil si le câble
d‘alimentation électrique est endommagé.
Dans ce cas, contactez votre point de
vente.
9.6. Pour éviter que l‘appareil ne vacille ou ne
bascule, veillez à ce qu‘il soit placé sur une
surface plane et non glissante.

12
Nevoox Europe · Dynamostraße 13
68165 Mannheim · Germany
welcome@nevoox-europe.com
Tel. +49 621 438 55-277
This manual suits for next models
5
Table of contents
Languages:
Other Nevoox Air Cleaner manuals


