New Age 66961 Operating instructions
IM-GLE.10A-02
INSTALLATION AND OPERATION GUIDE
ATTENTION:Is your Grill Cart damaged?
Need help or spare parts? For fastest service,
contact NewAge Products at 1-877-306-8930;
Do not return to the retailer.
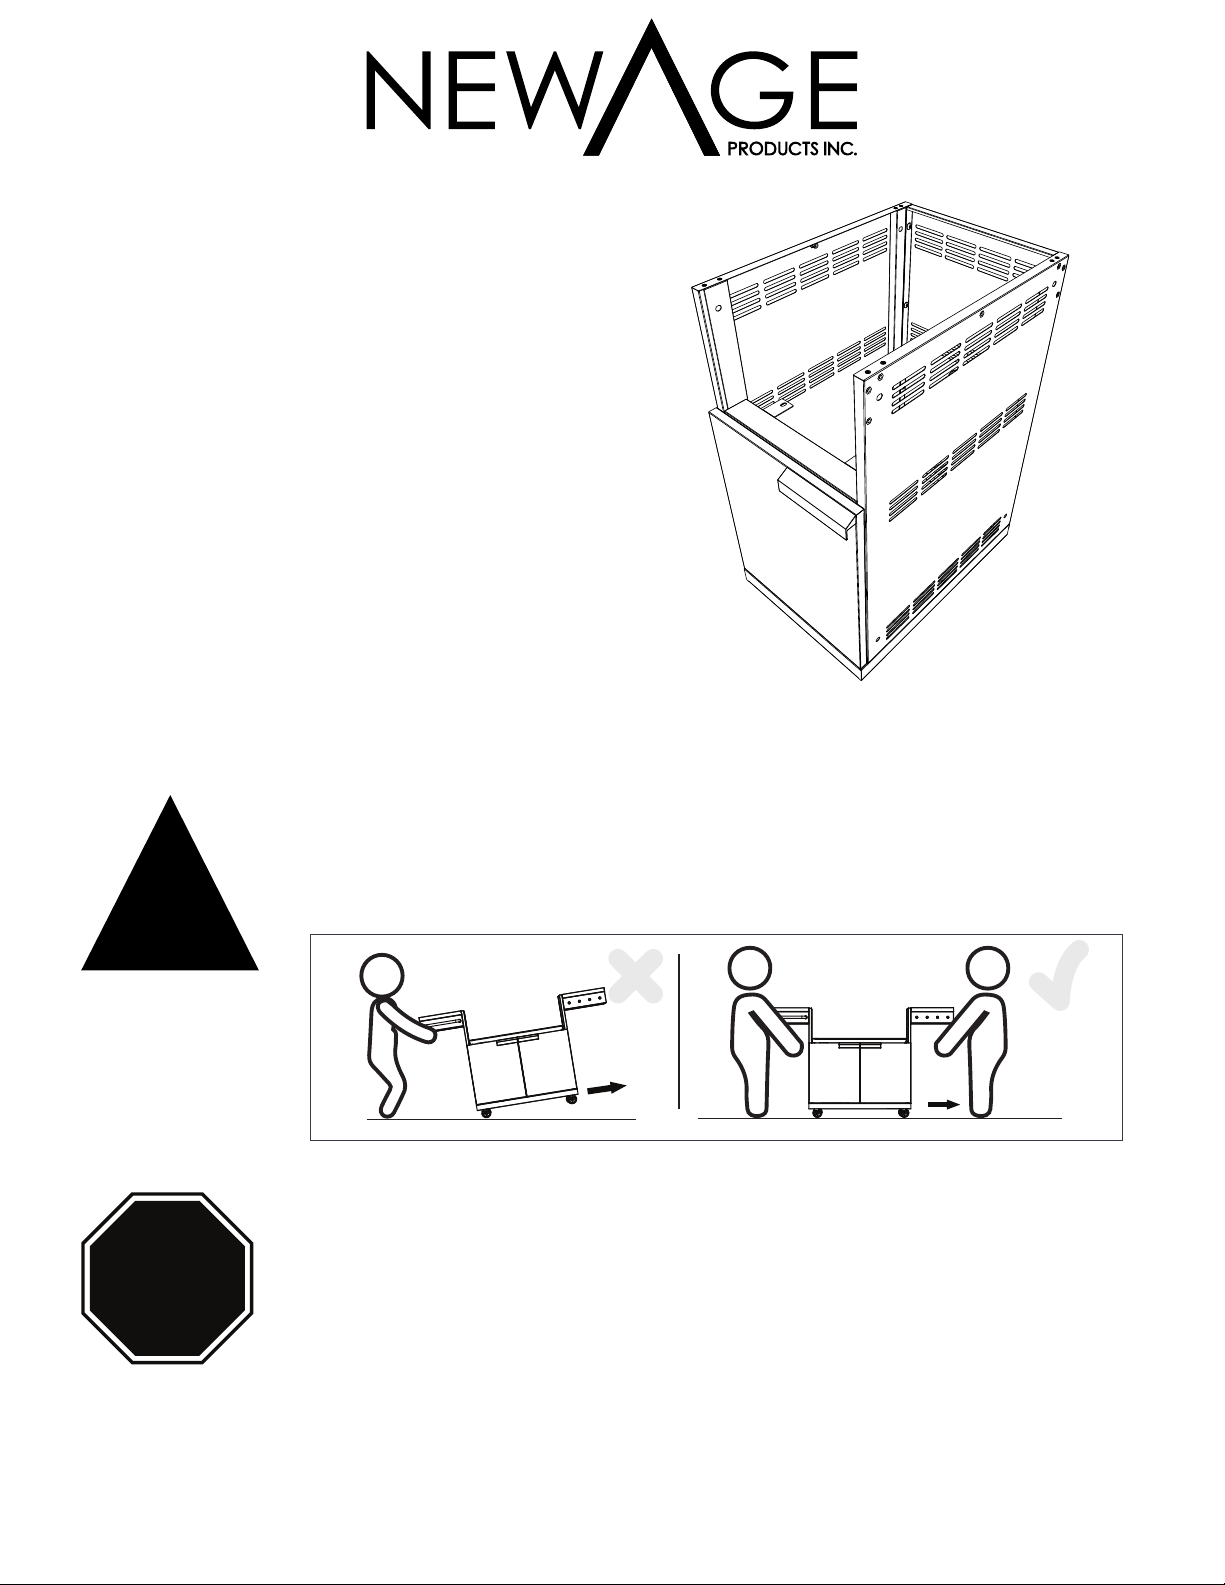
STOP
Use two or more people to move, assemble, or install the grill cart to avoid
back injury. Do not leave children unattended near the grill or cabinets.
THIS INSTRUCTION MANUAL CONTAINS IMPORTANT INFORMATION NECESSARY FOR THE PROPER ASSEMBLY AND SAFE USE OF
THE APPLIANCE.
READ AND FOLLOW ALL WARNINGS AND INSTRUCTIONS BEFORE ASSEMBLING AND USING THE APPLIANCE.
FOLLOW ALL WARNINGS AND INSTRUCTIONS WHEN USING THE APPLIANCE. FAILURE TO OPERATE THIS PRODUCT IN A WELL
VENTILATED AREA CAN CAUSE PROPERTY DAMAGE, INJURY OR DEATH.
Warning: Excessive weight hazard!
!
NEWAGE
SIDE BURNER CART
SKU#66961
For the online installation manual and videos regarding this product, please check out our support hub via:
https://NewAgeproducts.com/support-hub/

Index
MANUFACTURER WARRANTY 3
Unpacking 4
Product Inspection 4
Tools Needed 4
Parts Supplied 6
Installing the Casters 7
Installing Side Panels 8
Installing Back Panel 9
Installing Cart Support Panel & Brackets 10
Installing Cart Doors 12
Attaching two Appliance Carts (Optional) 14
Installing Side Burner on NewAge Side Burner Cart 19
Spare Parts List 21
3
Scan this QR code with the camera
on your mobile device to visit the
NewAge Products Support Hub
www.newageproducts.com/support-hub/
NEWAGE PRODUCTS INC. GRILL CART
MANUFACTURER WARRANTY
PROOF OF PURCHASE IS REQUIRED
TO OBTAIN WARRANTY SERVICE.
Please have the following information available when you call our
customer service team:
• Name, address and telephone number
• Product Name / SKU Number
• A clear, detailed description of the problem
• Proof of purchase including order number
Register your NewAge Products purchase online for quicker customer
assistance and access to exclusive benefits
Visit www.newageproducts.com/register/
Warranty Claim
For warranty service please contact NewAge Products at
Please review all warranty details below, prior to contacting NewAge Products for a claim.
Scan the QR code on the right to access our support page or
visit www.newageproducts.com/contact-us/
The 304 stainless steel material used in the construction of NewAge Outdoor Kitchen Cabinets is highly rust resistant, however, chlorine in the air from swimming
pools or the salt from sea air may cause surface rust to appear and even create some pitting corrosion if left on the product. We suggest cleaning all stainless steel
surfaces at least every two weeks to keep your cabinets in prime condition. The chemical reaction from salt is easy to prevent however it is more dicult when left
on the surface.
WHAT IS COVERED
When this product is installed, operated and maintained according to the instructions attached to or furnished with the product, NewAge Products Inc. will replace
the defective product or parts if the part fails as a result of defective materials or workmanship for the warranty duration from the purchase date of the product.
1. Service calls to correct the installation of any NewAge products or to instruct you how to use or install them.
2. Damage resulting from products caused by accident, misuse, abuse, fire, flood, improper installation, acts of God, neglect, modification or
mishandling.
3. Products damaged by improperly loading beyond the specified maximum weight capacity outlined in the instructions provided with the product.
4. Repairs or replacement when your product is used in other than normal, residential use, such as a commercial environment, or handled in anyway
inconsistent with the installation instructions included with the product.
5. Cosmetic damage that occurs after customer purchasing the product, including scratches, dings, dents, corrosion, or stains in the material that does
not aect the structural or functional capability of the product.
6. Surfaces damaged due to improper use of chemicals, and detergents.
7. Discoloration due to the high heat, for example beside a grill, is a trait of stainless steel.
8. Surface rust
9. Resulting from acid rain or environmental chemicals
10. Replacement parts for NewAge products outside Canada and the United States.
11. Loss due to theft.
12. Damage resulting from use of the product contrary and not in accordance to the instruction manual.
13. Any labor costs during the warranty period.
WHAT IS NOT COVERED
DISCLAIMER OF IMPLIED WARRANTIES
IMPLIED WARRANTIES, INCLUDING TO THE EXTENT APPLICABLE WARRANTIES OF MERCHANTABILITY OR FITNESS FOR A PARTICULAR PURPOSE, ARE EXCLUDED
TO THE EXTENT LEGALLY PERMISSIBLE. ANY IMPLIED WARRANTIES THAT MAY BE IMPOSED BY LAW ARE LIMITED TO ONE YEAR, OR THE SHORTEST PERIOD
ALLOWED BY LAW. THIS WARRANTY IS LIMITED TO THE ORIGINAL BUYER. Some states and provinces do not allow limitations on the duration of implied warranties of
merchantability or fitness, so this limitation may not apply to you. This warranty gives you specific legal rights, and you also may have other rights that vary from state to
state or province to province.
LIMITATION OF REMEDIES; EXCLUSION OF INCIDENTAL AND CONSEQUENTIAL DAMAGES
YOUR SOLE AND EXCLUSIVE REMEDY UNDER THIS LIMITED WARRANTY SHALL BE PRODUCT REPAIR OR REPLACEMENT AT OUR DISCRETION AS PROVIDED HEREIN.
NEWAGE SHALL NOT BE LIABLE FOR INCIDENTAL OR CONSEQUENTIAL DAMAGES. Some states and provinces do not allow the exclusion or limitation of incidental or
consequential damages, so these limitations and exclusions may not apply to you. This warranty gives you specific legal rights, and you also may have other rights that vary
from state to state or province to province.
LIMITED WARRANTY
5 Years
2 Years Casters and Hinges
Cart overall construction
Warranty Covered ItemsLength of Warranty Cost to NewAge Cost to Customer
NewAge is proud to oer a complete product warranty for a period of (Five Years from the date of purchase.) Subject to the limitations and disclaimers set forth
below or in other product documentation, NewAge Provides the following additional warranties to the initial customer;
Materials
Materials
Shipping
Shipping

4
Unpacking
• Begin by placing the package on a covered at surface.
• Remove all cardboard, foam packaging material and nylon bags.
• Dispose / recycle all packaging materials.
• Verify all the contents in the box and gather the required tools. See “Tools Needed” in the list on
next pages.
Product Inspection
• Check to see all parts are received as per the
order placed.
• Contact NewAge Products at 1-877-306-8930;
for any missing parts.
• Inspect the products for any damages before
starting the installation.
• Go through the installation instructions carefully
before starting the installation.
• Two or more persons are required to install the appliance Carts shown in this Installation Manual.
• The illustrations shown in this Install Manual are for representation purpose only. Actual sizes of
the parts supplied in the package can be slightly dierent by appearance. Appearance of
hardware sizes are enlarged for ease of understanding for the customer.
Tools Needed
IMPORTANT NOTES
1 x Box Cutter
2 x 6mm
Open Wrench
1 x #2 Phillips head
screwdriver
5
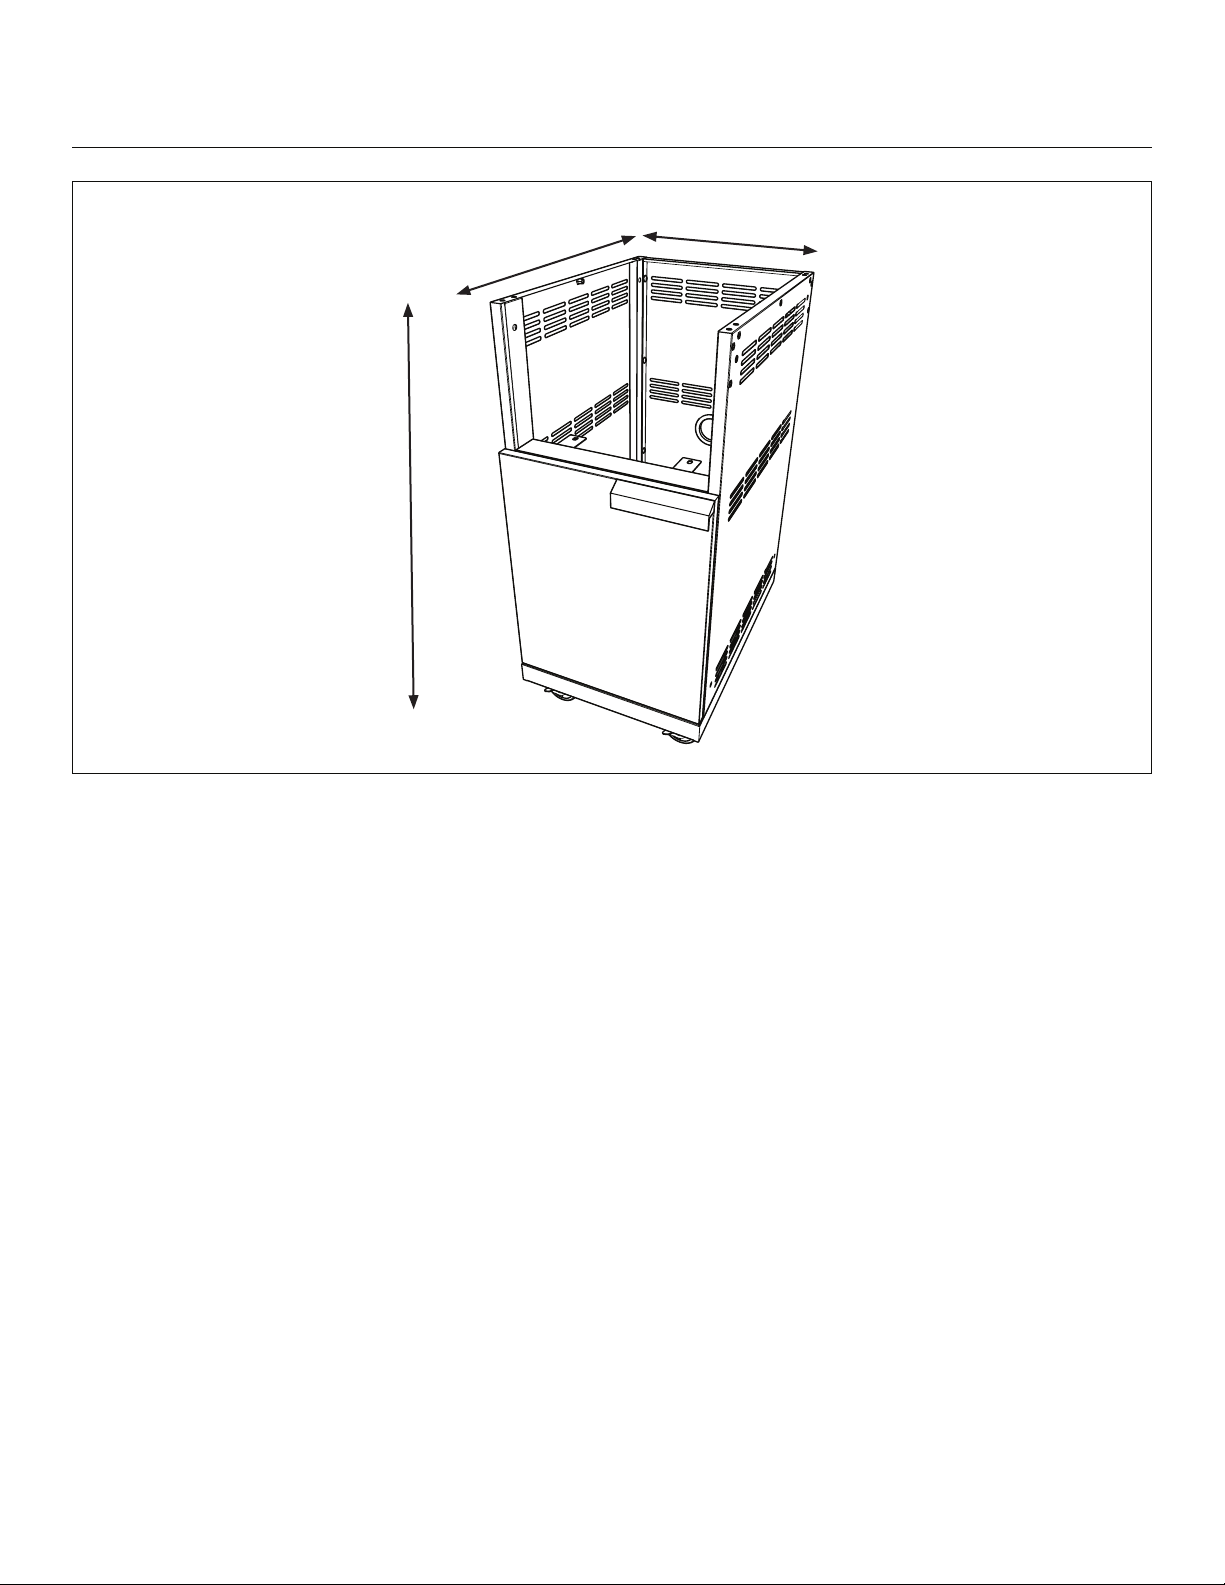
NewAge Side Burner Cart
Product Specications
16”
23.82”
34.19”
6
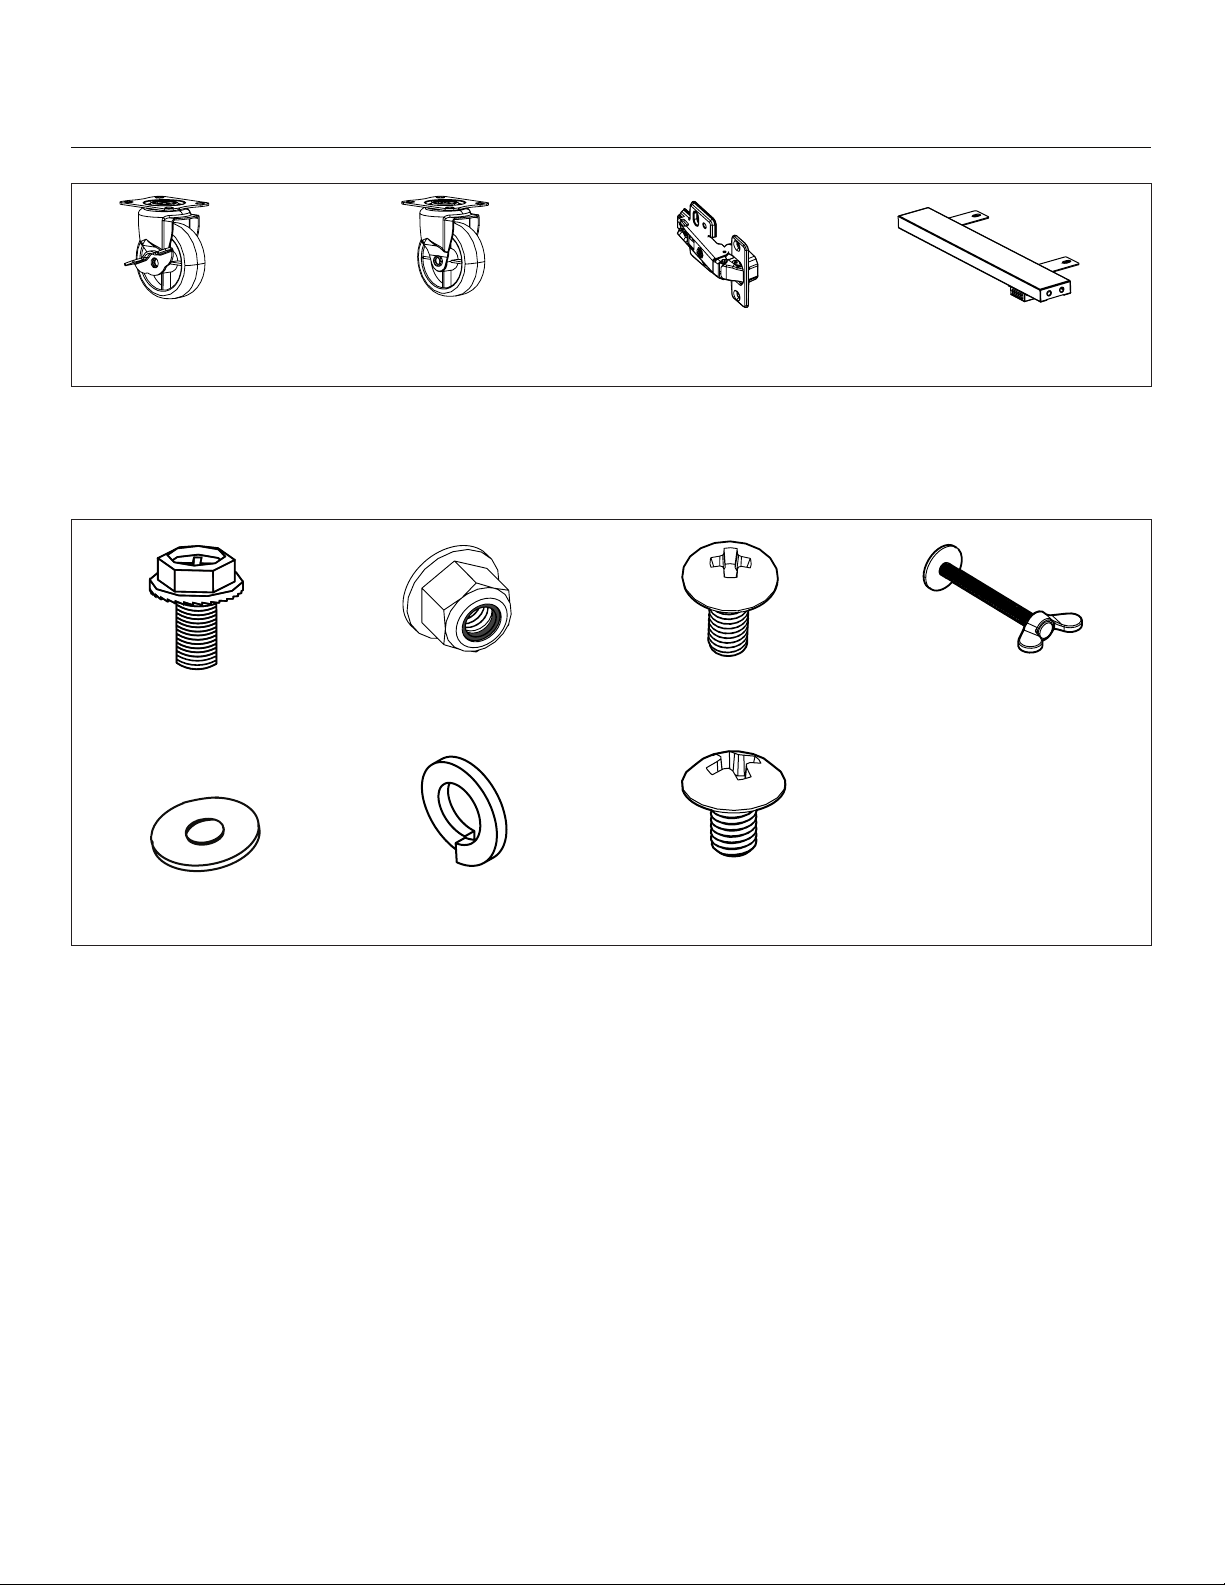
Parts Supplied
2x Door Hinge 1x Cart Support Panel
2x Cart wheel
(Without Lock)
2x Cart wheel
(With Lock)
6x Hex Head Bolt-
M6X12L
4x M6 Flange Nut 16x Phillips Head Screw-
M4X10L
1x Wing Head Thumb
Screw - M6 with Stop
(Pre-installed)
Hardwares
16x Split Washer M6 36x Phillips Head
Screw - M6x15L
16x Plain Washer M6
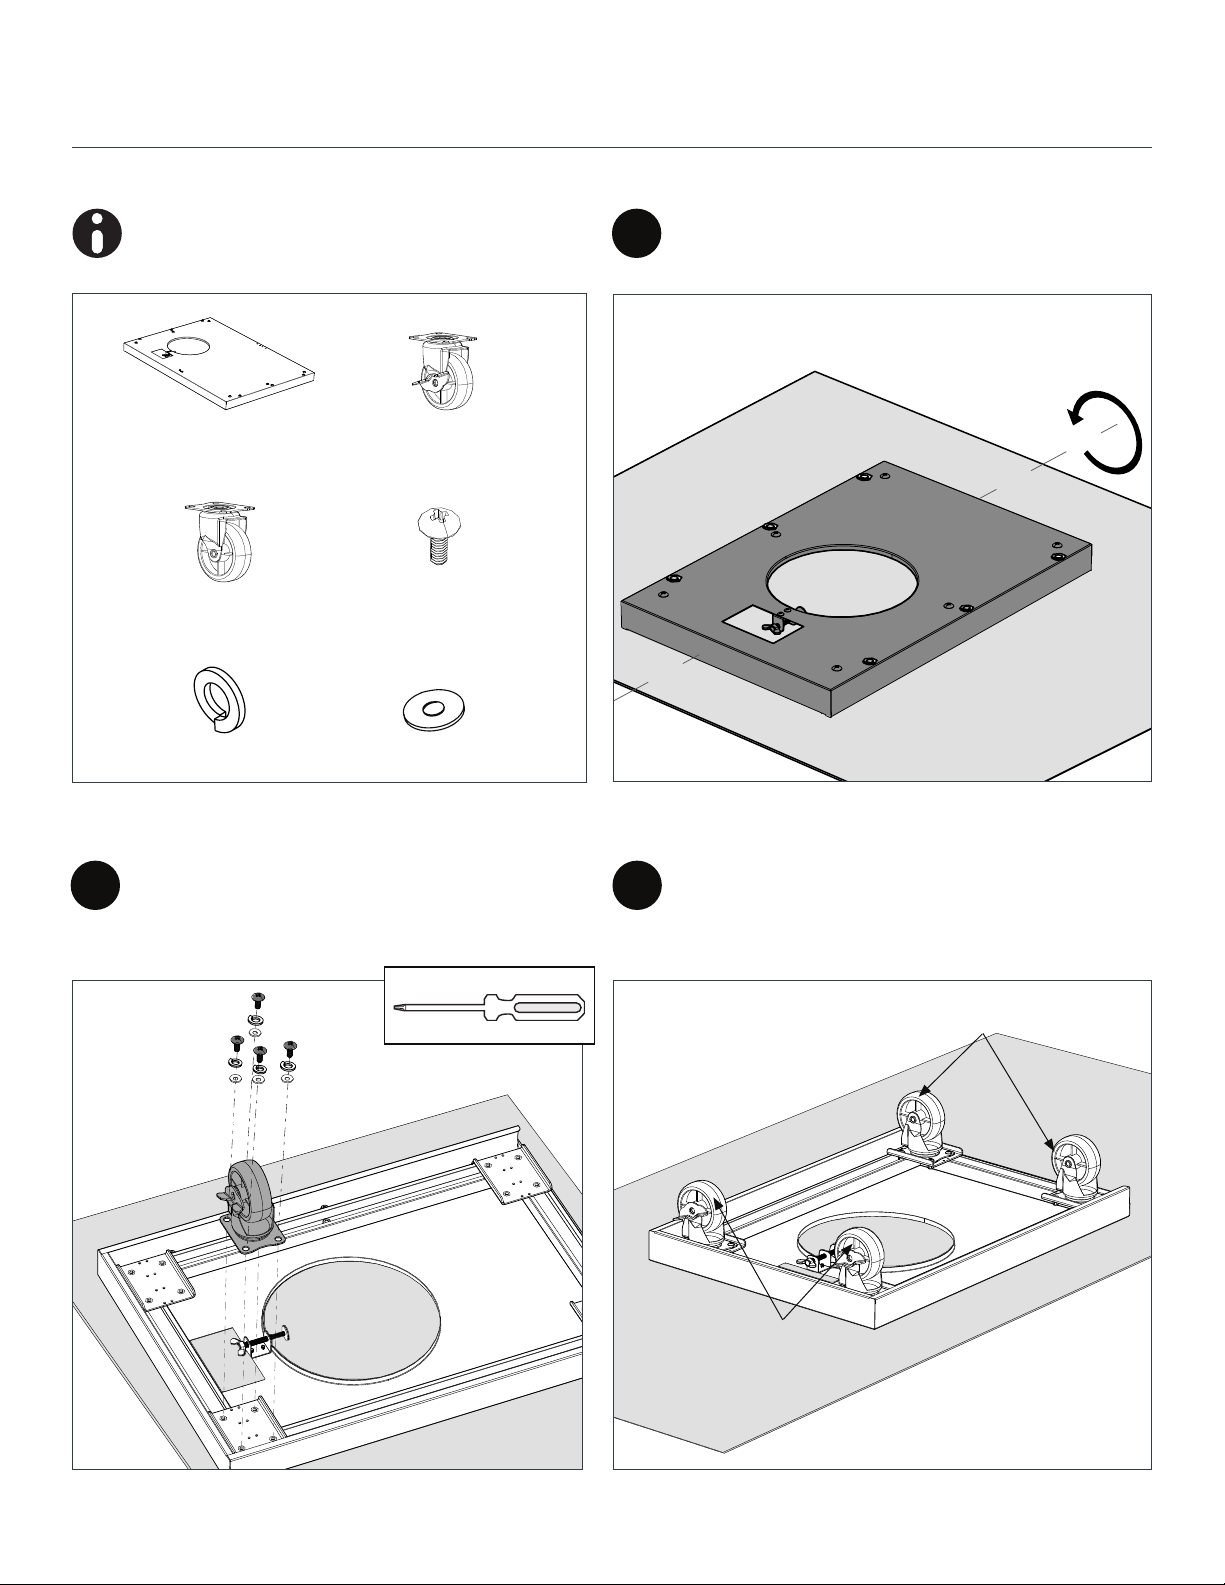
7
Installing the Casters
Begin by placing the Base Panel Assembly
on a cushioned and covered at surface.
Rotate the Base Panel Cover Frame
Assembly.
Using a screw driver, align the front side
caster with the support, then tighten the
Plain Washer, Split Washer & Phillips Head
Screw as shown.
Repeat and install the Casters onto all
the given pre-installed plates on the Base
frame Support.
NOTE: The front sides casters are
equipped with built-in locking.
1
2 3
Parts Required.
2x Cart Wheel
without Lock
16x Phillips Head
Screw-
M6X15L
2x Cart Wheel with
Lock
1x Base Panel
Assembly
Casters (with Lock)
Casters (without Lock)
16x Split Washer M6 16x Plain Washer M6

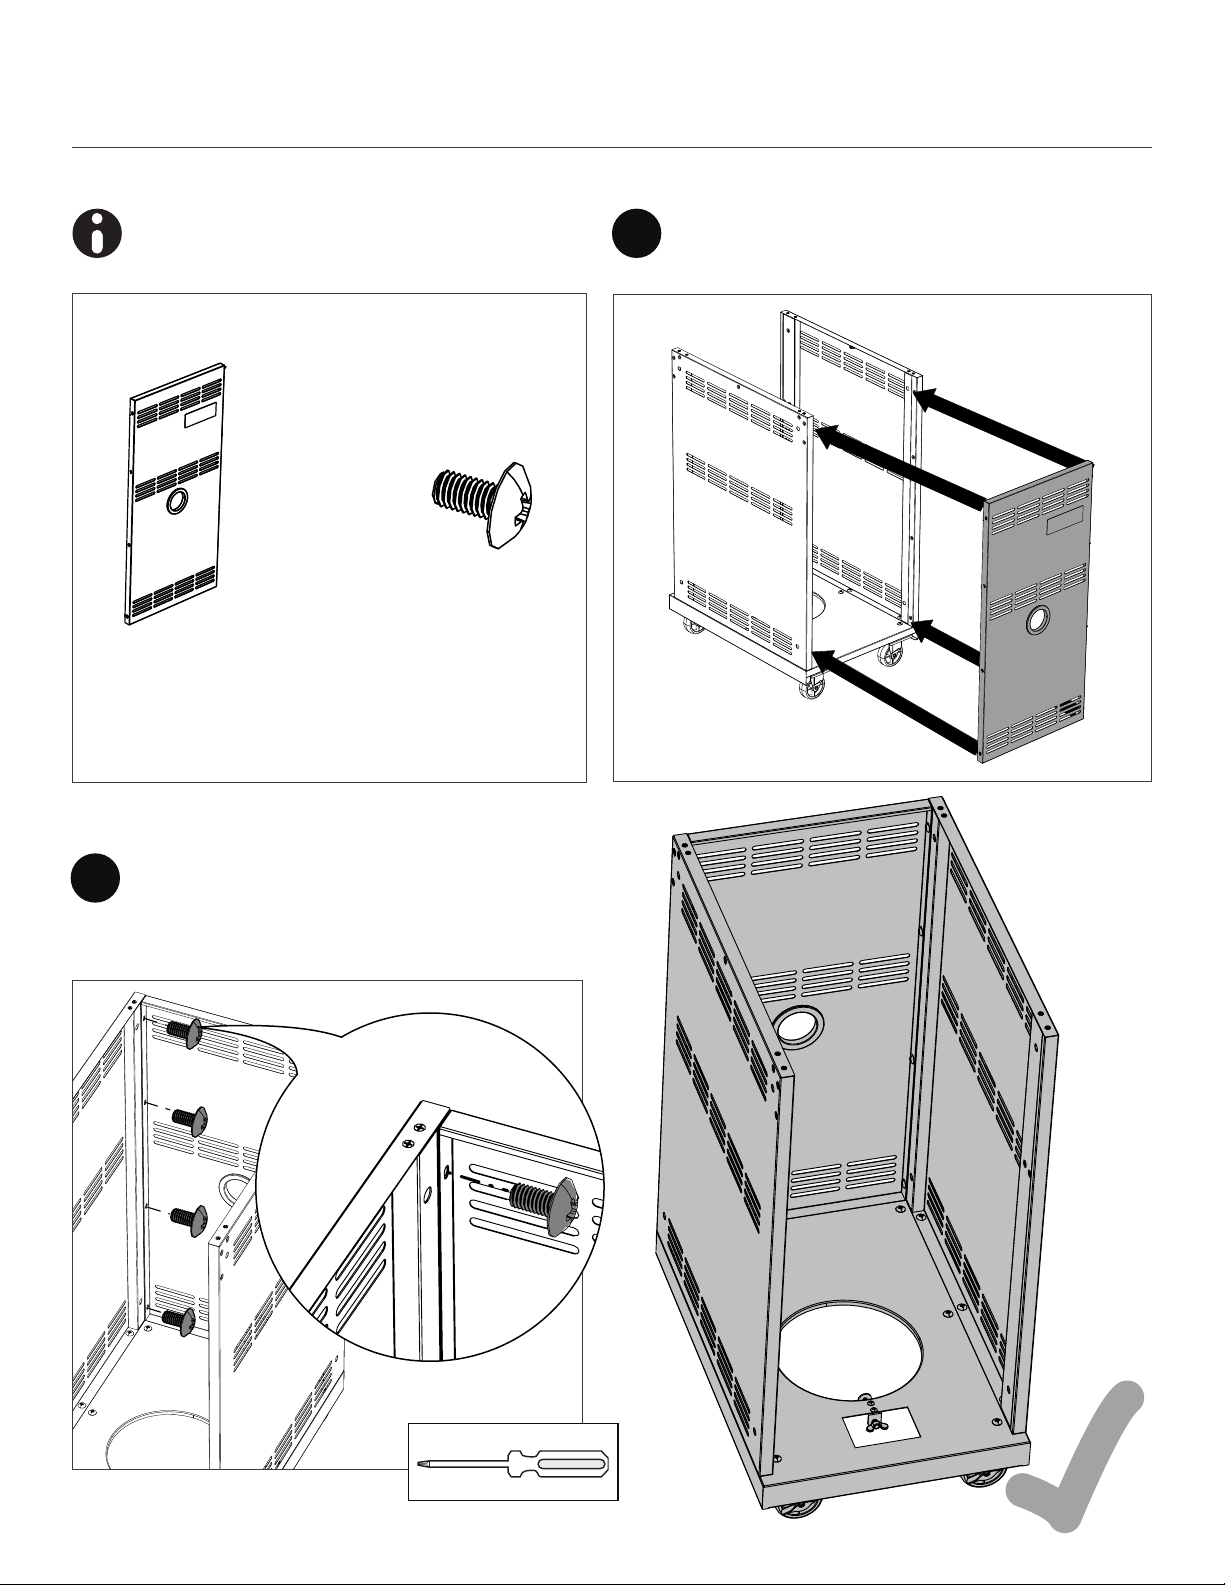
8
Installing Side Panels
Rotate the Base Panel assembly to the
position shown.
Now place the Side Panel LH Assy screw
holes onto the rivet nuts of Base Frame
Cover Panel Assembly.
Tighten three Phillips Head Screw as
shown. Repeat the similar steps and install
the Side Panel RH Assemblies.
1
2 3
Parts Required.
6x Phillips Head
Screw- M6X15L
1x Side Panel RH1x Side Panel LH
9
Installing Back Panel
Place the Back Panel Assembly onto
base frame with support of side panels
as shown. NOTE: Keep the hold of inner
panel untill it is screwed on the Side
Panels.
Match the holes with LH Side Panel, and
tighten four Phillips Head Screw as shown.
Repeat the similar steps and install the
Phillips Head Screw into Side Panel RH
Assembly.
1
2
Parts Required.
8x Phillips Head
Screw- M6X15L
1x Back Panel
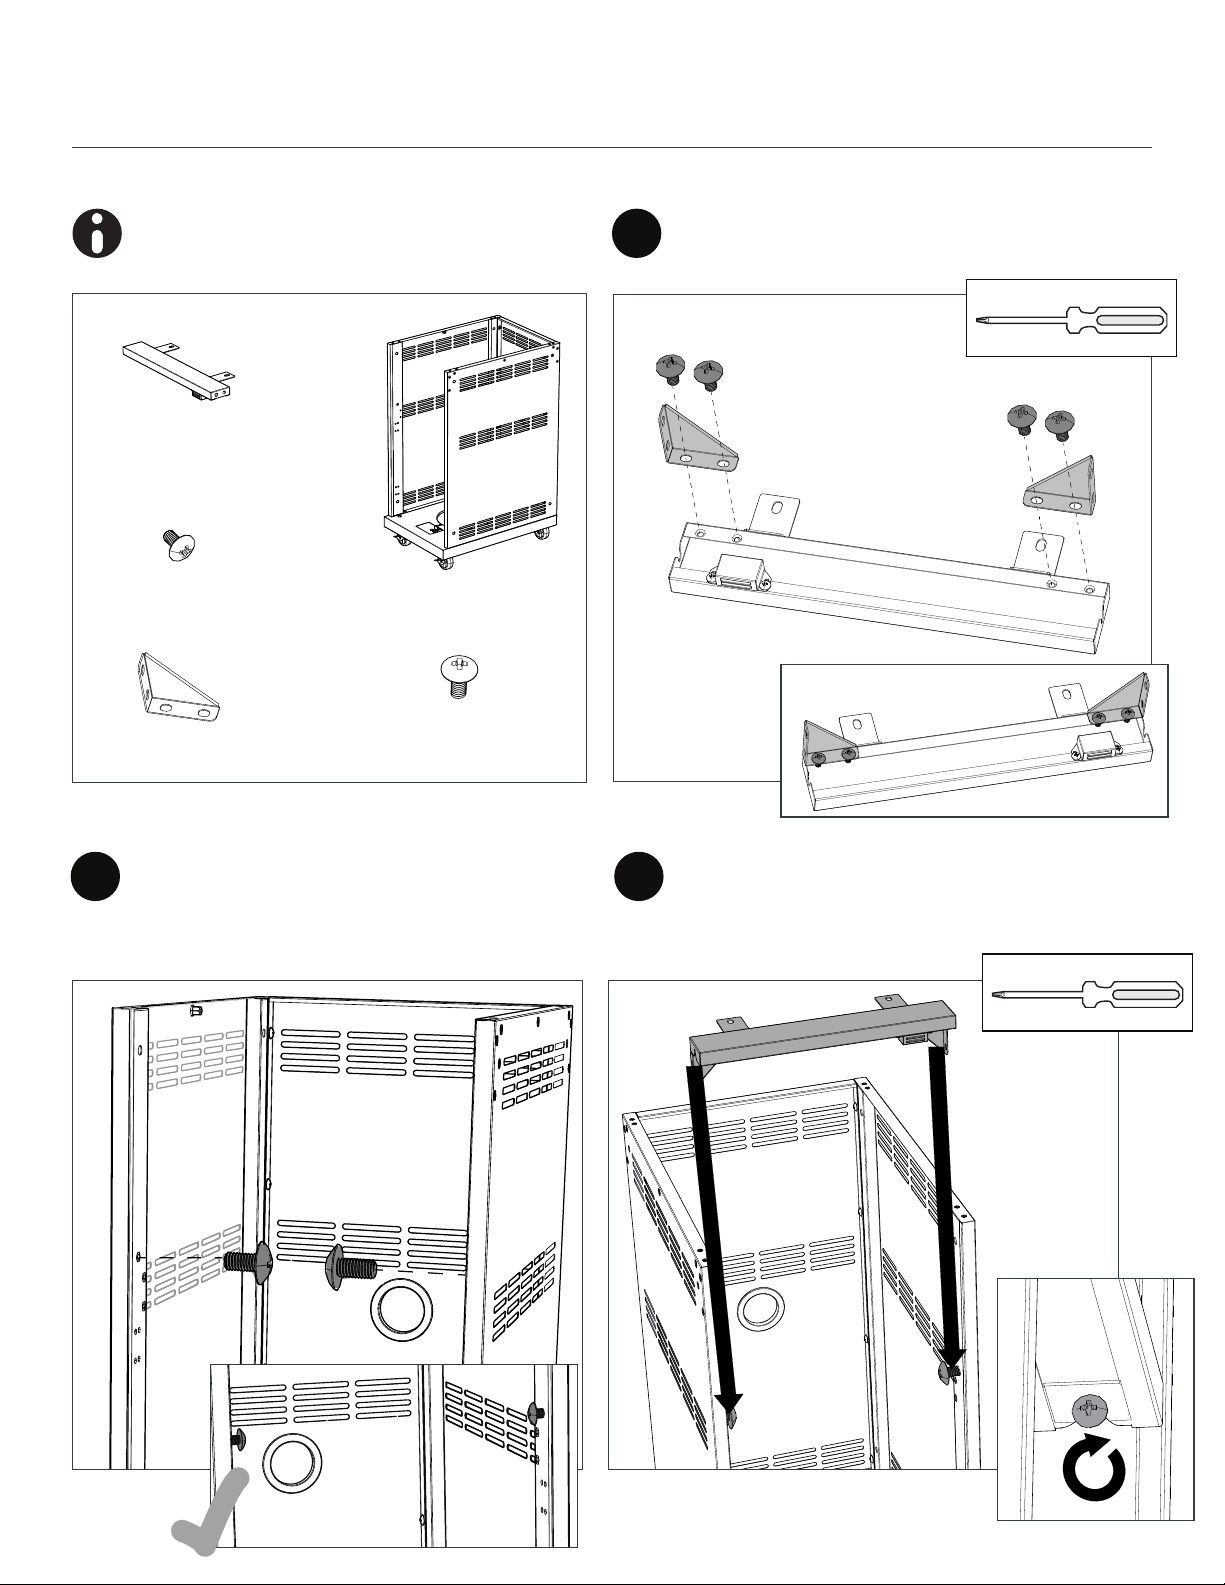
10
Installing Cart Support Panel & Brackets
Place the Support Bracket onto the shown
location on Support Panel. Using a screw
driver, tighten Phillips Head Screw - M4.
Pre-tighten the Phillips Head Screws to
install the Support Panel. Do not install
these completely yet.
1
2
Parts Required.
1x Grill Cart Sub
Assembly
4x Phillips Head
Screw - M4x10L
6x Phillips Head
Screw- M6X15L
2x Support Bracket
1x Support Panel
Now place the support panel assembly on
partially tightened Phillips Head Screws.
Then tighten the Phillips Head Screw
using a screw driver.
3
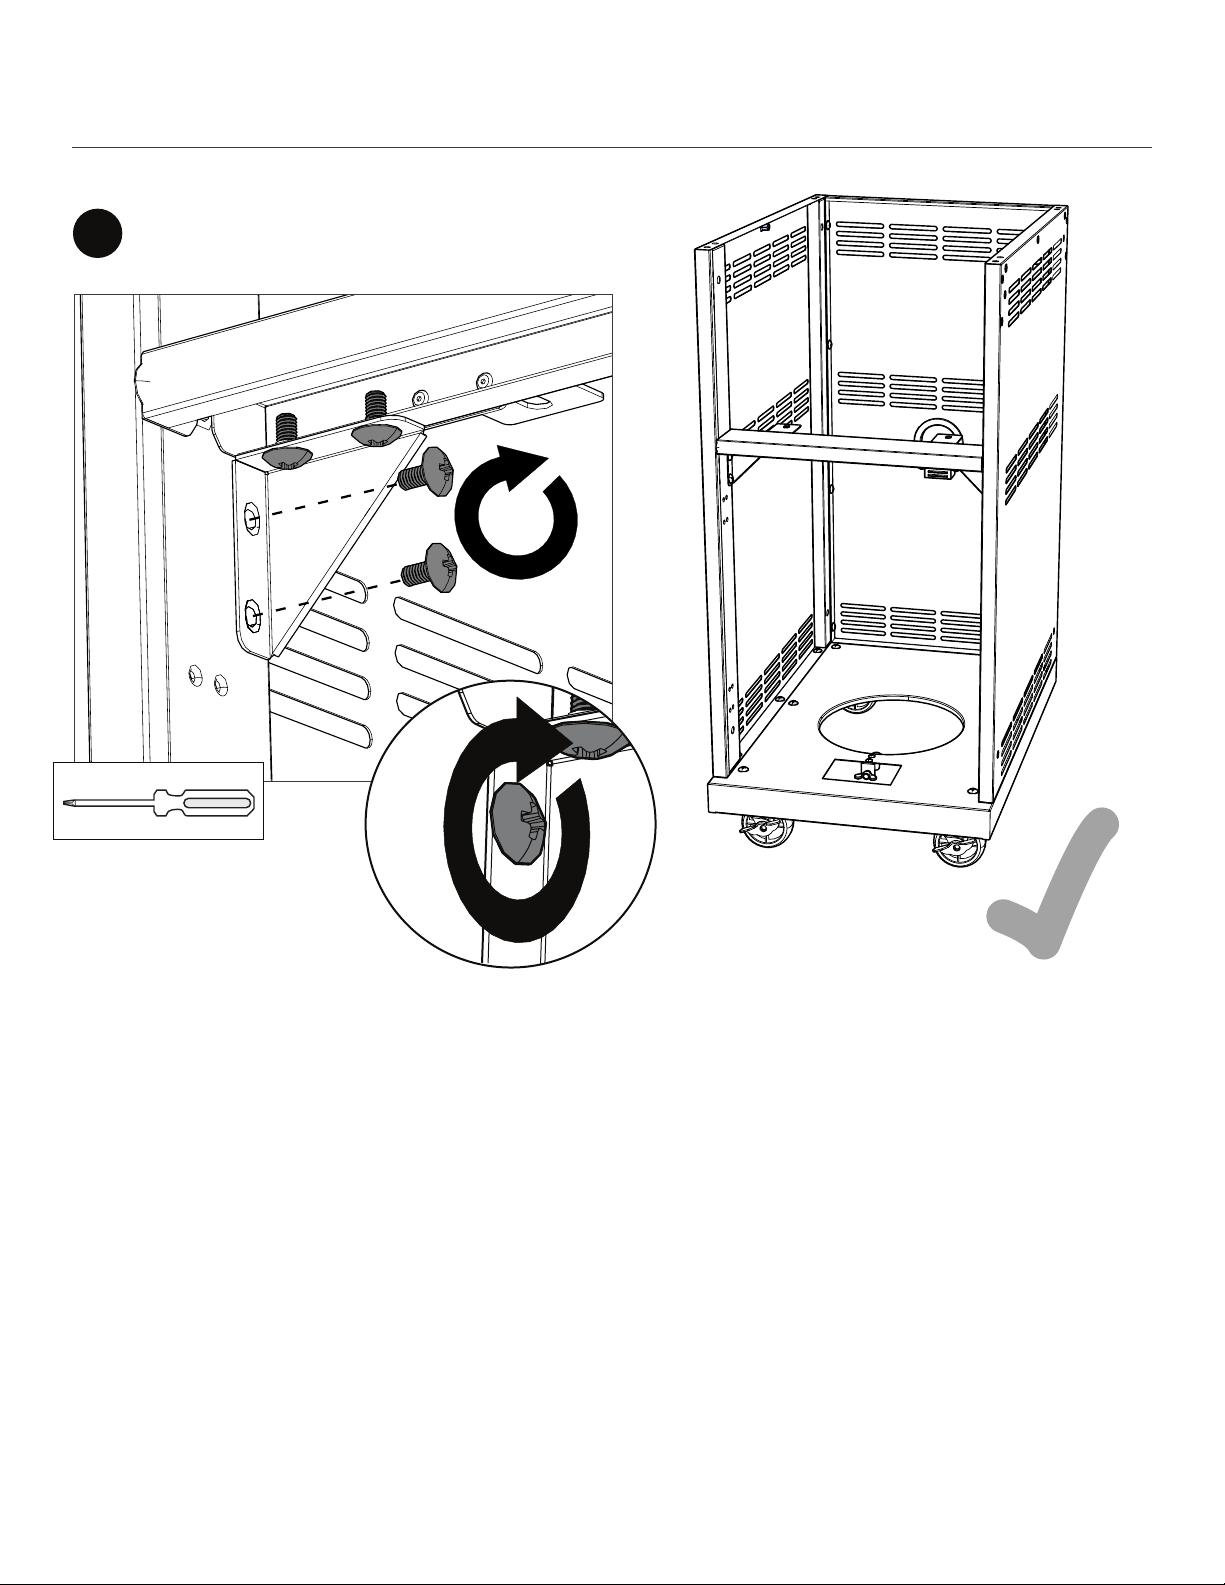
11
12.00 mm
Tighten the Phillips Head Screw and x the
bracket. Repeat the same steps for bracket
on other side.
4
Installing Cart Support Panel & Brackets
12
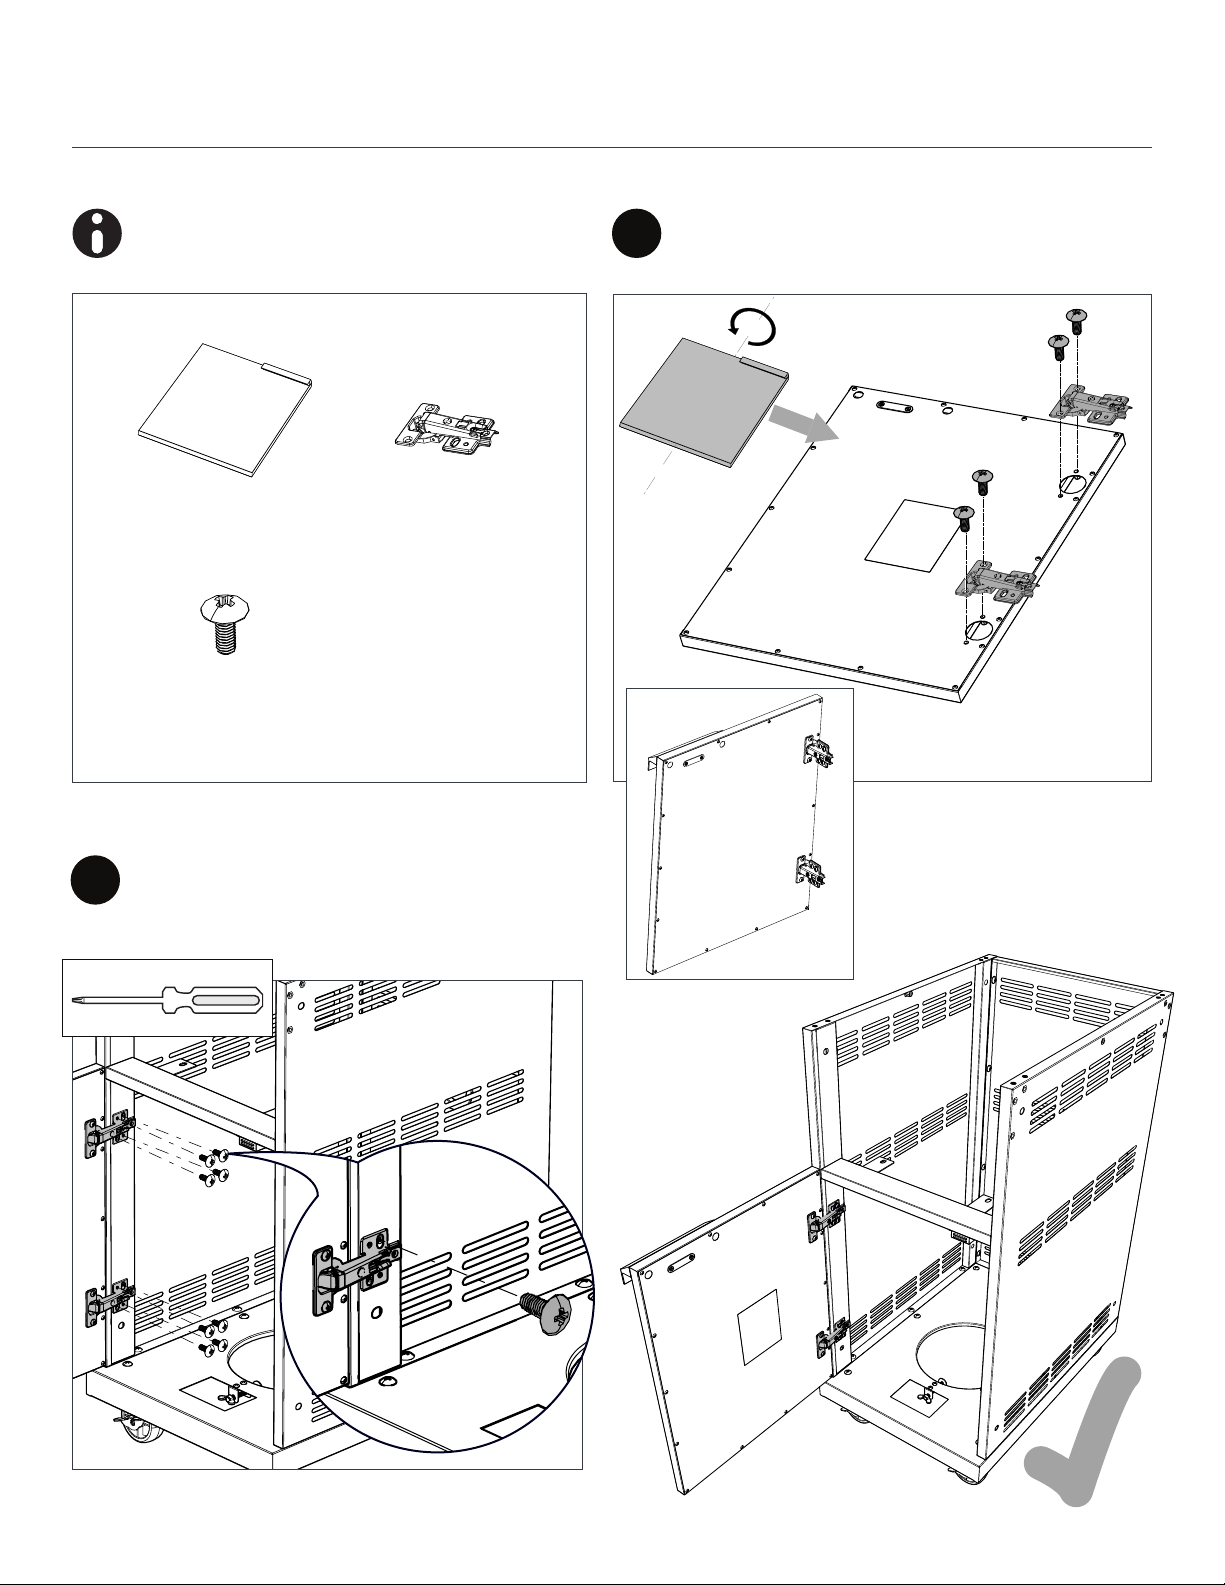
Installing Cart Doors
Flip the Door Assembly. Place the Hinges
onto the door rivet nuts as shown, and
install the Phillips Head Screw.
Align the Hinges with the RH vertical post,
rivet holes are provided onto it. Tighten
the Phillips Head Screw as shown below.
1
2
Parts Required.
12x Phillips Head
Screw - M4X10L
2x Door Hinges
1x Door
13
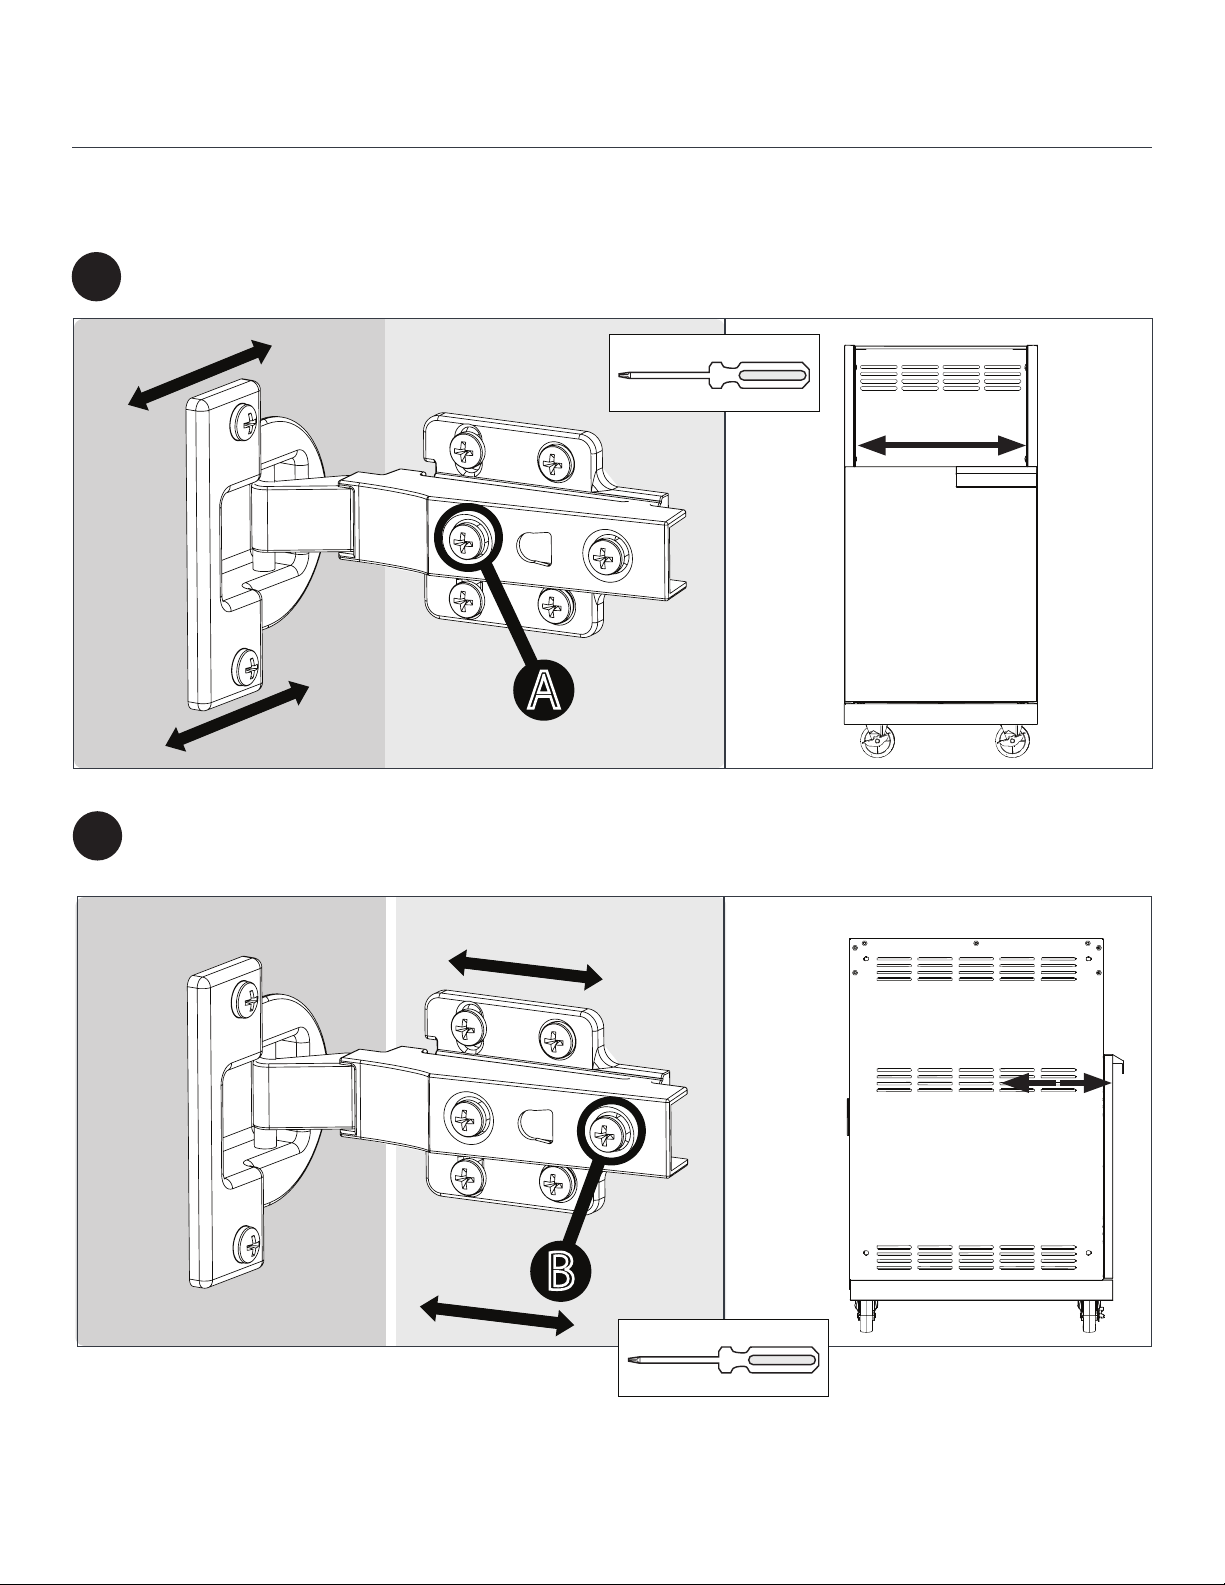
1
Using a Philips screwdriver, the doors can be adjusted: Left, right, forwards and backwards.
To adjust the doors left or right, turn the screw (A) clockwise or counterclockwise.
To adjust the gap between the doors and frame, turn the screw (B) clockwise or counter-clockwise.
2
Adjusting The Door Hinges
A
B

14
• Side burner cart should be on the left-hand side of the Grill Cart
IMPORTANT NOTES
Attaching two Appliance Carts (Optional)
Locate the pre-slotted hole at the RH Side Panel of the DSB Cabinet & LH Side Panel of
Grill Cabinet for passing through gas hose connections.
1
DSB Cart RH
Side Panel
Grill Cart LH
Side Panel
Knock-Out
Location of Knock-Outs
15
Attaching two Appliance Carts (Optional)
Using tin snips to cut small webs to release the knockouts on RH Side Panel of the DSB Cabinet
& LH Side Panel of Grill Cabinet.
2

16
Unscrew the Phillips Head Screw and
unmount the LH Side Table Assembly.
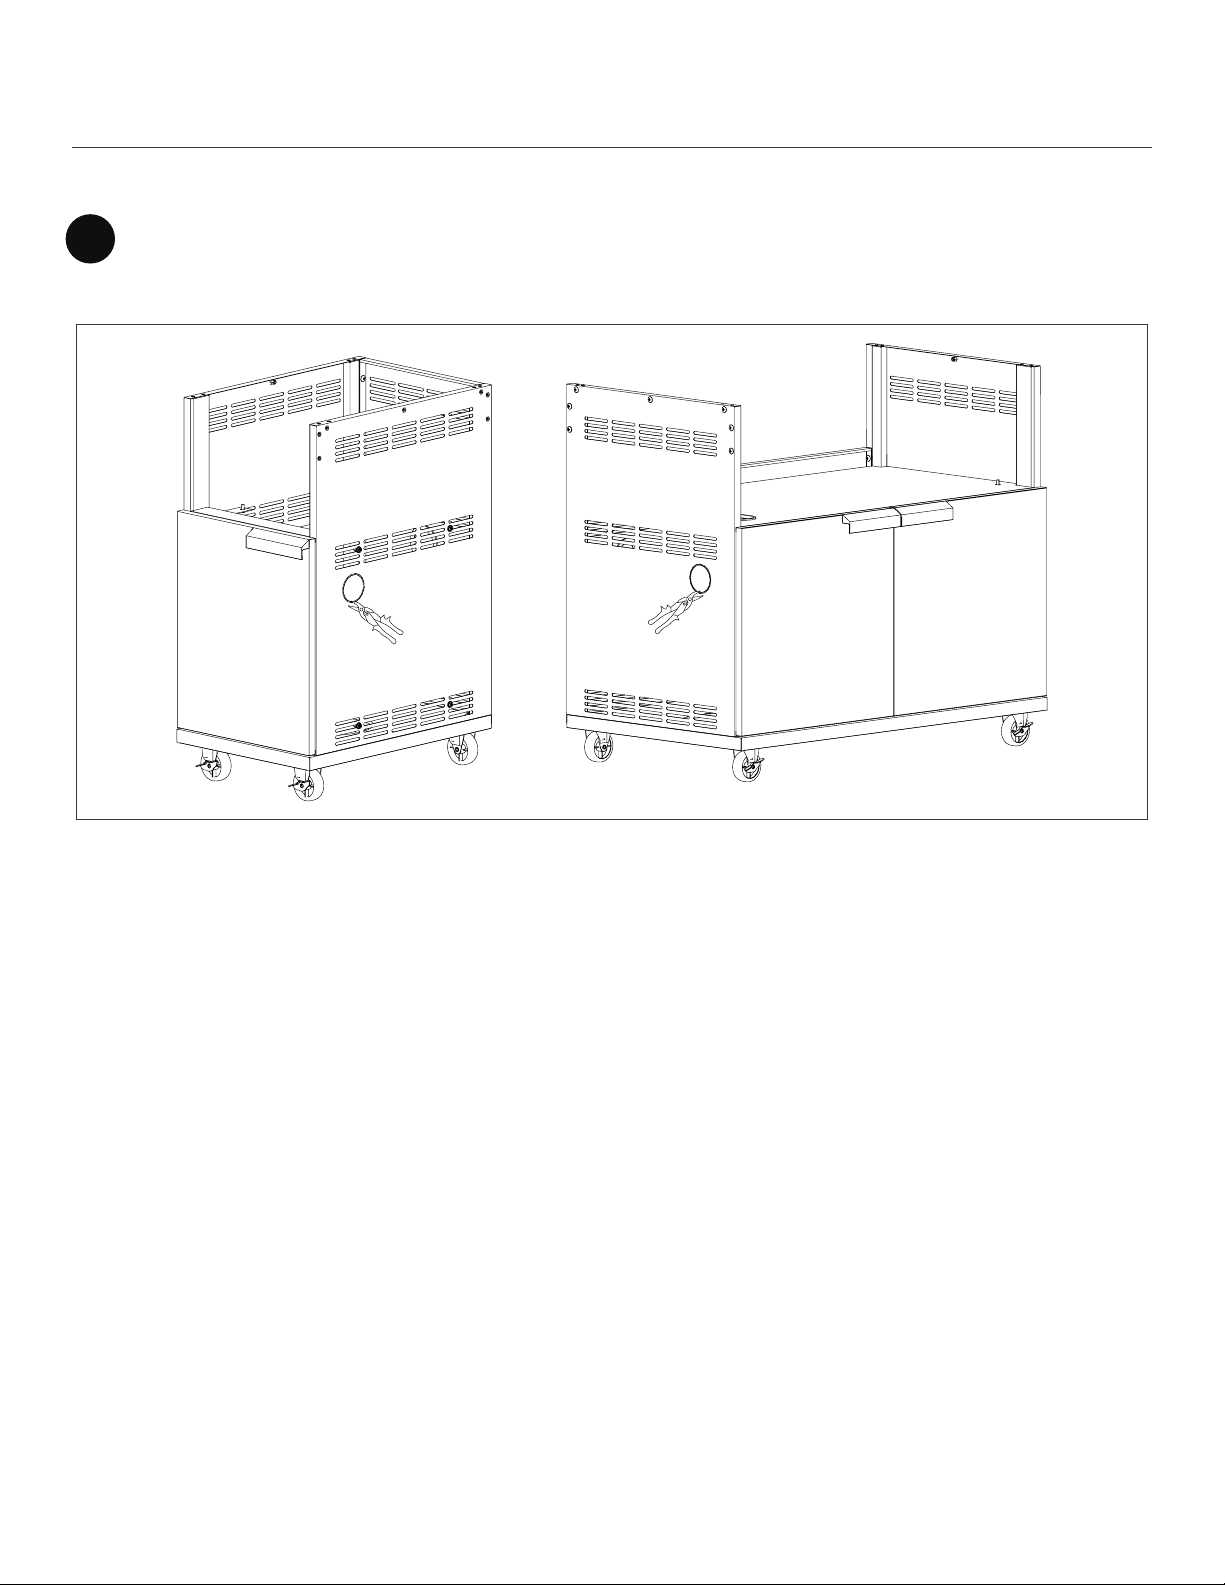
Place the carts closer with reference to Side Panels as shown. Then align the slot cut-outs
(refer highlighted slot cut-outs below).
1
4
Parts required.
4x Hex Head Bolt
M6x12L
(Supplied with
Side Burner Cart)
4x M6 Flanged Nut
(Supplied with
Side Burner Cart)
1x Appliance Cart
(i.e., Side Burner Cart)
1x Appliance Cart
(i.e., 33”Grill Cart)
IMPORTANT NOTES
Attaching two Appliance Carts (Optional)
Unscrew the Phillips Head Screw and
unmount the LH Side Table Assembly.
3
17
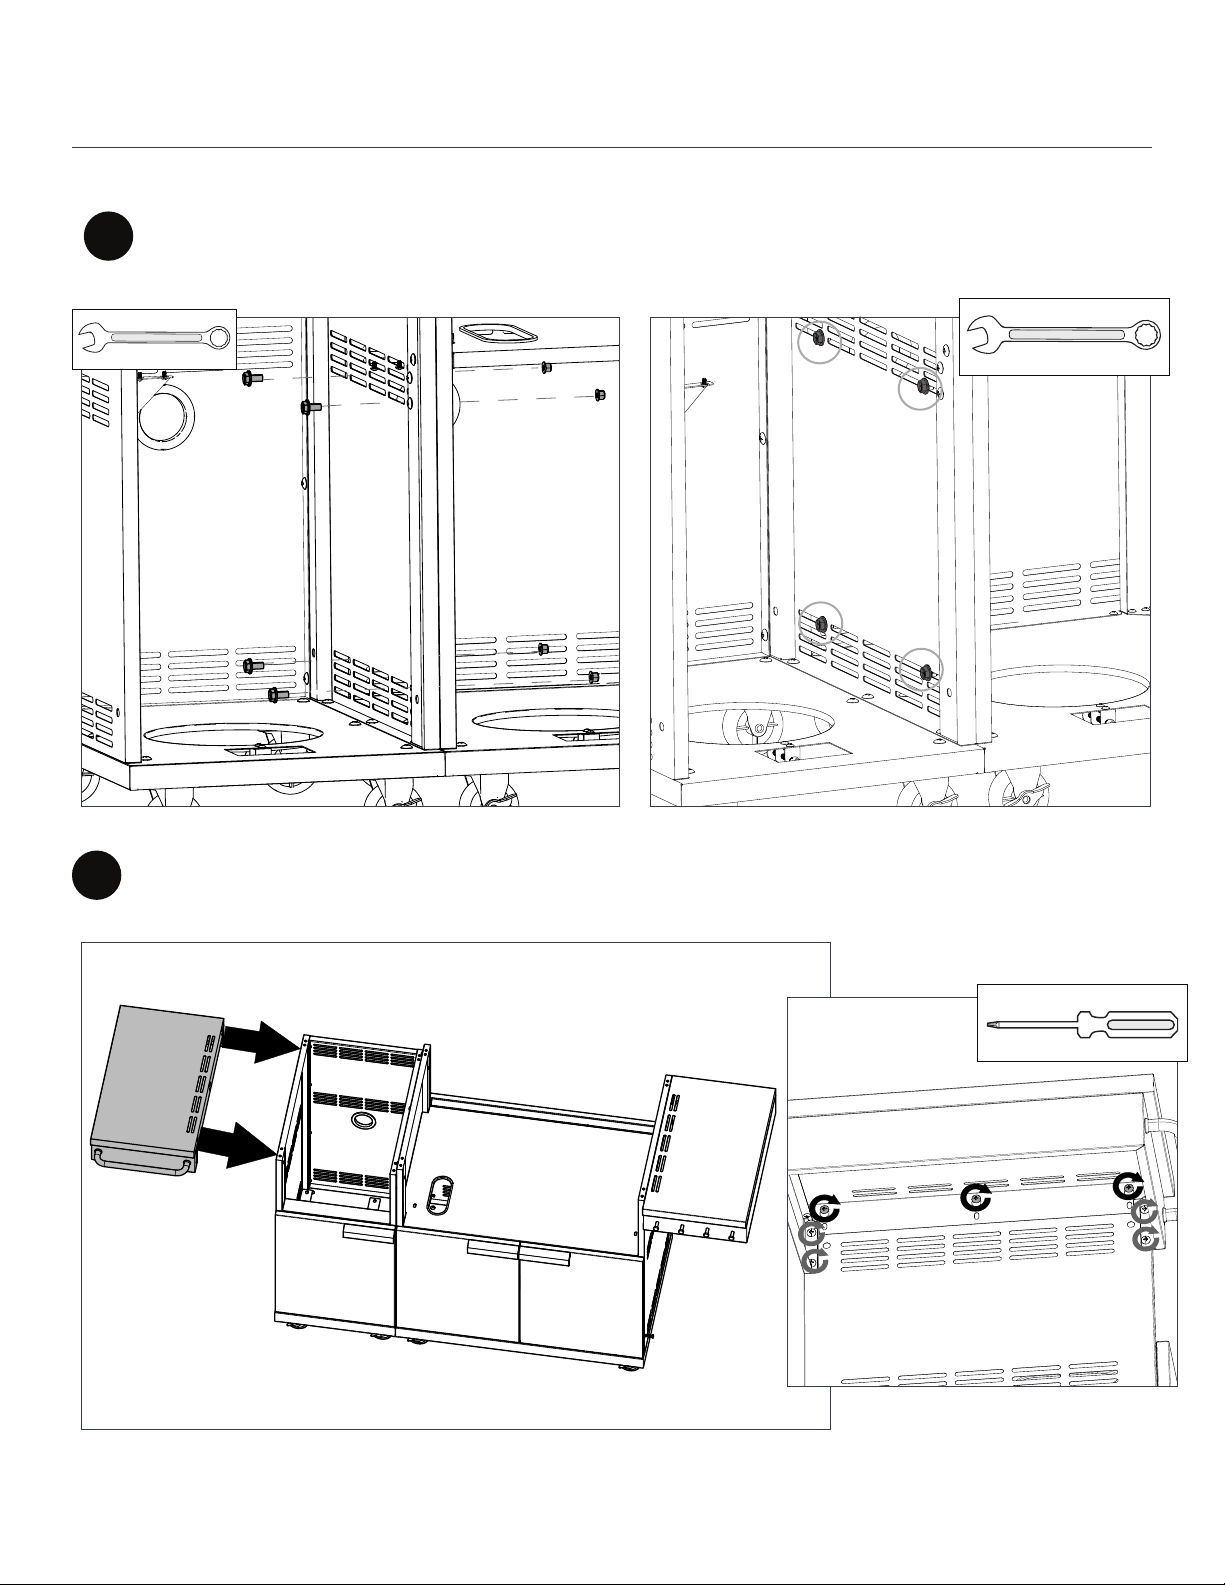
Attaching two Appliance Carts (Optional)
Now close the Cart doors. Install back the LH side table assembly to the Side Burner Cart
Assembly by screwing-in to the same location onto the Side Burner Cart.
6
Open the Carts doors and keep open until install is done. Now insert bolt through the given
vent holes in Side Panels of the carts, and then tighten using nuts onto it. Repeat this step to
install the nuts and bolts onto all four locations. Refer gure A.
5
Figure A

18
Attaching two Appliance Carts (Optional)
Insert Rubber Grommet over the Knock-outs as edge protection to protect the gas hose from
any cuts or damage and to prevent any gas leak due to abrasion of the gas hose.
7
NOTE: Push the Rubber Grommet so that it covers both the Side Panels Knock-out cuts.
NOTE:
Rubber Grommet is supplied with the DSB Cart placed inside the Hardware box.

19
Installing Side Burner on NewAge Side Burner Cart
Lock the Casters. Pick the appliance from
the box, and place it onto the cart directly.
Place the Side Burner onto the cart.
Partially loosen the screw mounted onto
the brackets (A). Adjust height of the
bracket and level the Side Burner base so
that it rest properly on bracket (B). Then
tighten the Screws.
1
23
A B
Bracket
Parts required.
2x Hex Head Screw
-M6x12L
(Supplied with Cart)
1x Grill Appliance
(i.e., NewAge
Side Burner)
1x Appliance Cart
(i.e., Side Burner Cart)
NOTE: When you are ready to install the
appliance, place it directly onto the Cabinet.
DO NOT place the appliance on oor or at
surface.

20
Secure Side Burner to Side Burner Cart by
inserting two M6x12mm screw from the
bottom. Hex Head Screws are provided
with the Side Burner Cart.
4
Installing Side Burner on NewAge Side Burner Cart
• If installing appliance Grill only on one appliance Cart, then follow step 3 and step 4 as shown.
IMPORTANT NOTES
Table of contents
Languages:
Popular Outdoor Cart manuals by other brands


Tricam
Tricam Country Tuff CT400 manual

Williams-Sonoma
Williams-Sonoma Truman Round Bar Cart Assembly instructions

Manhattan
Manhattan 462334 instructions

A.M.Leonard
A.M.Leonard WB6 quick start guide

Sun Mountain
Sun Mountain Speed Cart V2 user guide

ABC WORLDWIDE
ABC WORLDWIDE Trolley-C Assembly instructions