New Home NH1722S User manual
www.toews.com
New Home 1722S
Instruction Manual
NH1722S
NH1722S Instruction Manual
www.toews.com
1722S Owners Manual/ User Guide

www.toews.com
WARNING– To reduce the risk of burns, fire, electric shock or injury to persons:
1. Do not allow to be used as a toy. Close attention is necessary when this sewing machine is used by or near children.
2. Use this appliance only for its intended use as described in this owner’s manual.
Use only attachments recommended by the manufacturer as contained in this owner’s manual.
3. Never operate this sewing machine if it has a damaged cord or plug, if it is not working properly, if it has been dropped or
damaged, or dropped into water.
Return this sewing machine to the nearest authorized dealer or service center for examination, repair, electrical or
mechanical adjustment.
4. Never operate the appliance with any air opening blocked. Keep ventilation openings of this sewing machine and foot
controller free from accumulation of lint, dust and loose cloth.
5. Never drop or insert any object into any opening.
6. Do not use outdoors.
7. Do not operate where aerosol (spray) products are being used or where oxygen is being administered.
8. To disconnect, turn all controls to the off (“O”) position, then remove plug from outlet.
9. Do not unplug by pulling on cord. To unplug, grasp the plug, not the cord.
10.Keep fingers away from all moving parts. Special care is required around the sewing machine needle.
11. Always use the proper needle plate. The wrong plate can cause the needle to break.
12.Do not use bent needles.
13.Do not pull or push fabric while stitching. It may deflect the needle causing it to break.
14.Switch this sewing machine off (“O”) when making any adjustment in the needle area, such as threading the needle,
changing the needle, threading the bobbin, changing the presser foot, and the like.
15.Always unplug this sewing machine from the electrical outlet when removing covers, lubricating, or when making any
other adjustments mentioned in this owner’s manual.
SAVE THESE INSTRUCTIONS
Designs and specifications are subject to change without prior notice.
DANGER – To reduce the risk of electric shock:
1. An appliance should never be left unattended when plugged in. Always unplug this sewing machine from the electric
outlet immediately after using and before cleaning.
2. Always unplug before replacing a sewing machine bulb. Replace bulb with same type rated 15 Watts.
IMPORTANT SAFETY INSTRUCTIONS
When using an electrical appliance, basic safety precautions should always be followed, including the following:
Read all instructions before using this appliance.
NH1722S Instruction Manual
www.toews.com
1722S Owners Manual/ User Guide

www.toews.com
1
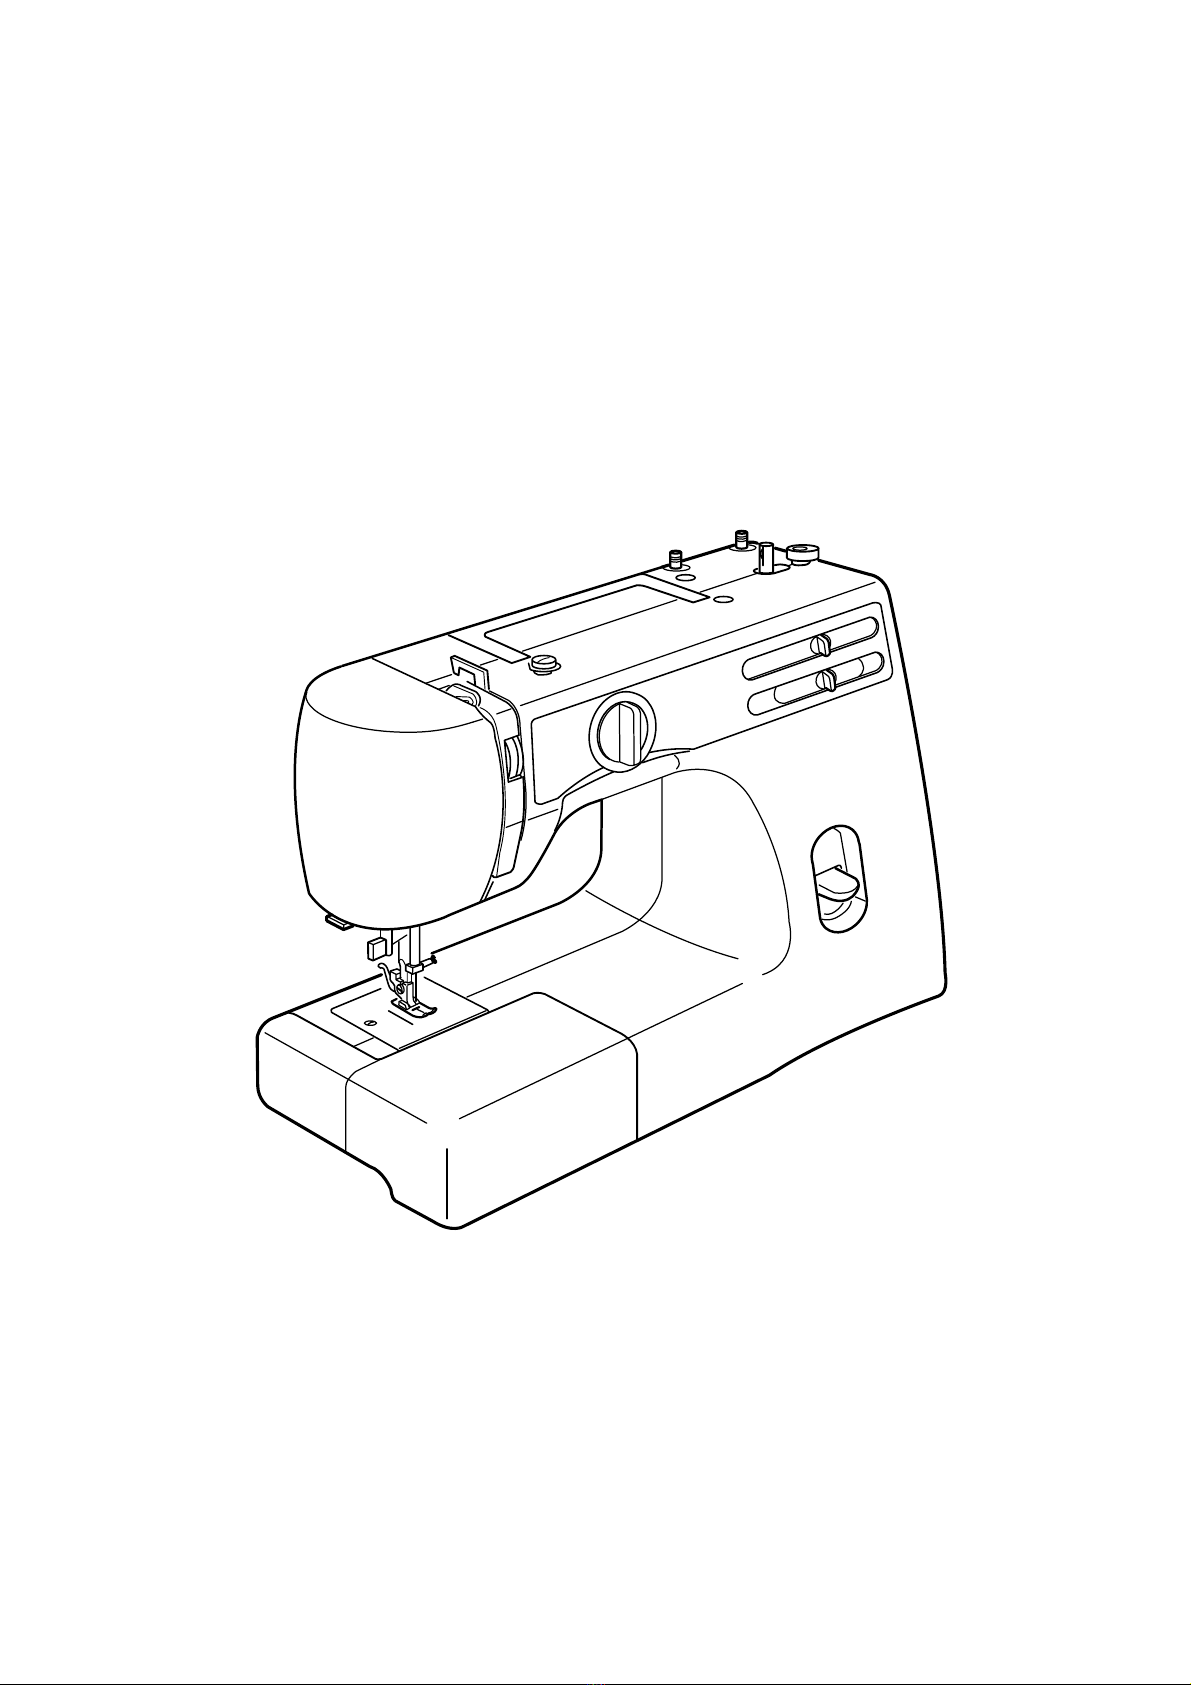
SECTION 1. NAMES OF PARTS
Names of Parts ........................................................................ 2
Standard Accessories .............................................................. 3
SECTION 2. GETTING READY TO SEW
Connecting Machine to Power Supply ..................................... 4
Before Using Your Sewing Machine......................................... 4
For Your Safety ........................................................................ 4
Polarized Plug .......................................................................... 4
Controlling Sewing Speed........................................................ 4
Setting Spool Pins.................................................................... 5
Presser Foot Lifter ................................................................... 5
Thread Cutter ........................................................................... 5
Accessory Box ......................................................................... 5
Extension Table........................................................................ 6
• Detaching the table................................................................ 6
• Attaching the table ................................................................. 6
Changing Needle ..................................................................... 6
To Remove and Attach the Foot Holder ................................... 6
• To remove .............................................................................. 6
• To attach ................................................................................ 6
Changing Presser Foot ............................................................ 7
• To remove .............................................................................. 7
• To attach ................................................................................ 7
Presser Foot Types .................................................................. 7
• Zigzag foot ............................................................................. 7
• Automatic buttonhole foot ...................................................... 7
• Zipper foot.............................................................................. 7
• Straight stitch foot .................................................................. 8
• Satin stitch foot ...................................................................... 8
Selecting Needle and Fabric .................................................... 9
Bobbin Winding ...................................................................... 10
• Removing bobbin case ........................................................ 10
• Bobbin winding .................................................................... 10
• Inserting bobbin ................................................................... 12
Threading the Machine .......................................................... 13
• Threading the machine ........................................................ 13
• Needle threader ................................................................... 13
• Drawing up bobbin thread.................................................... 14
Adjust the Needle Thread Tension for a
Straight Stitch......................................................................... 14
• Correct tension .................................................................... 14
• Tension is too tight ............................................................... 14
• Tension is too loose ............................................................. 15
Adjust bobbin tension............................................................. 15
Adjust the Needle Thread Tension for a Zigzag Stitch .............
15
• Correct tension .................................................................... 15
• Tension is too tight ............................................................... 15
• Tension is too loose ............................................................. 15
Stitch Pattern Selector ........................................................... 16
Stitch Length Control ............................................................. 16
Stitch Width Control ............................................................... 16
Reverse Stitch Control ........................................................... 16
SECTION 3. STRAIGHT STITCH SEWING
Straight Stitch......................................................................... 17
• Starting to sew ..................................................................... 17
• Finishing sewing .................................................................. 17
Use the Seam Guides ............................................................ 17
Turn a Square Corner ............................................................ 17
Variable Needle Position ........................................................ 18
Topstitching ............................................................................ 18
Zipper Sewing ........................................................................ 18
• Fabric preparation................................................................ 18
• To sew.................................................................................. 19
To Drop or Raise the Feed Dogs ........................................... 20
Darning................................................................................... 20
SECTION 4. ZIGZAG STITCH SEWING
Basic Zigzag........................................................................... 21
Satin Stitching ........................................................................ 21
Monogramming ...................................................................... 22
Applique ................................................................................. 22
Bar Tacking ............................................................................ 23
Button Sewing ........................................................................ 32
Overcasting Stitch .................................................................. 24
SECTION 5. UTILITY AND DECORATIVE STITCHES
Blind Hem Stitch..................................................................... 25
Lace Work .............................................................................. 25
Shell Stitch ............................................................................. 26
Multiple Zigzag Stitch ............................................................. 26
• Seam finishing ..................................................................... 26
• Mending ............................................................................... 26
Box Stitch ............................................................................... 27
Decorative Stitch Patterns ..................................................... 27
SECTION 6. STRETCH STITCHES
Straight Stretch ...................................................................... 28
Rick-rack Stretch.................................................................... 28
Overcast Stretch Stitching ..................................................... 29
• Starting to sew ..................................................................... 29
Smocking ............................................................................... 29
• To sew.................................................................................. 29
Serging................................................................................... 30
Elastic Stretch Stitch .............................................................. 30
Decorative Stretch Patterns ................................................... 31
SECTION 7. BUTTONHOLE
Buttonhole .............................................................................. 32
• Preparation for sewing......................................................... 32
• To sew.................................................................................. 32
• To adjust buttonhole stitch density ....................................... 34
Corded Buttonhole ................................................................. 34
SECTION 8. CARE OF YOUR MACHINE
Replacing the Light Bulb ........................................................ 35
Cleaning the Feed Dogs ........................................................ 35
Cleaning the Shuttle Race ..................................................... 36
• Cleaning the shuttle area..................................................... 36
• Replacing shuttle assembly ................................................. 36
Oiling the Machine ................................................................. 37
• Oil behind the face cover ..................................................... 37
• Oil the shuttle area............................................................... 37
Troubleshooting ..................................................................... 38
TABLE OF CONTENTS
NH1722S Instruction Manual
www.toews.com
1722S Owners Manual/ User Guide

www.toews.com
2
SECTION 1. NAMES OF PARTS 87
1
10
11
12
9
5
3
4
2
6
14
15 16
17
18
19
22
20
25
21
23
24
27
1
2
3
4
5
6
7
9
8
10
11
12
13
14
15
16
17
18
19
20
21
22
23
24
25
26
Names of Parts
Stitch pattern selector
Reverse stitch control
Stitch width control
Stitch length control
Bobbin winder spindle
Spool pins
Bobbin winding tension disc
Upper needle thread guide
Thread take-up lever
Thread tension dial
Face cover
Thread cutter
Needle threader
Needle plate
Extension table (Accessory box)
Carrying handle
Handwheel
Power switch
Machine socket
Free-arm
Presser foot lifter
Presser foot holder
Thumb screw
Presser foot
Needle clamp screw
Needle
Foot control
27
26
13
NH1722S Instruction Manual
www.toews.com
1722S Owners Manual/ User Guide

www.toews.com
3
Standard Accessories
1 Bobbins
2 Needles
3 Automatic buttonhole foot
4 Straight stitch foot
5 Satin stitch foot
6 Zipper foot
7 1/4” seam foot
8 Even foot
9 Quilting guide for even foot
10 Seam ripper (buttonhole opener)
11 Screwdriver
13 Screwdriver
14 Foot control
15 Hard cover
12 3
45 67
8910
11 12 13
14 15
NH1722S Instruction Manual
www.toews.com
1722S Owners Manual/ User Guide
Table of contents
Other New Home Sewing Machine manuals


