NEW POL XD900DG Manual

I
LAVASTOVIGLIE
Manuale uso
e manutenzione
DISHWASHER
Use and maintenance
handbook
GESCHIRRSPÜLAUTOMAT
Bedienungs- und
Wartungshandbuch
LAVE-VAISSELLE
Livret d’instructions
et d’entretien
GB
D
F
LAVAVAJILLAS
Manual de uso y
manutención
E
EL

1234567890
1
23456789
0
1
23456789
0
1
23456789
0
1
23456789
0
1
23456789
0
1234567890
LV
76

12345678901
12345678901
12345678901
12345678901
12345678901
12345678901
1
GB
BEFORE USING THE APPLIANCE
1
Norms and regulations to be respected
• The dishwasher may only be used to clean household dishes. If the appliance is used for other
purposes or in a wrong manner, the manufacturer declines all responsibilities for possible damages.
• For safety reasons, no modifications must be carried out on the appliance.
• Before connecting the appliance to the electric power supply system, check that the power supply at
the place of installation is compatible with the electric data indicated on the data tag.
• The installation must be carried out by qualified personnel.
Before running the appliance for the first time
• Make sure the dishwasher was not damaged during transport.Do not hook up the appliance if there
is any damage. In case of damage, contact the vendor.
For the safety of children
• Do not allow children to play with the appliance.
• Detergents can cause permanent damage to eyes, mouth and throat.
They should therefore be kept outside the reach of children.
• The water in the dishwasher is not drinkable.Any residues of detergent in the appliance constitute a
source of danger for children.They must therefore be kept away from the open dishwasher.
Daily use
• Do not turn on the dishwasher if the electric cable, or the water supply or water drainage pipes are
damaged, or if the control board, the work surface or the base are in very bad condition.
• In case of a malfunction, shut off the water supply, then turn off the appliance and pull the electric
plugfrom theoutlet.Ifthereis a permanent electric connection, turn off the service switch (if present)
or remove the fuse (or fuses).
• To remove the plug from the electric outlet, hold the plug itself and pull;never pull the cable.
• Allrepairs ofthe dishwasher mustbecarried outbyspecialisedpersonnel.Inappropriaterepairs can
create a severe danger for the user.For repairs, you should therefore contact our technical customer
assistance service or a specialised vendor.
• The replacement of the supply cable must be carried out only by the technical service staff.
• If the pipes and tubes are deteriorated, substitute them with new original parts before hooking up
the appliance.
• Do not use detergent substances that could lead to an explosion.
• Do not sit or lean on the open door.The appliance might otherwise tilt over.
• Before adding special dishwasher salt, detergent and rinse aid, make sure that the manufacturer of
these substances recommends their use for household dishwashers.
• Always shut off the water supply when the dishwasher is not in use for longer periods of time, e.g.,
during your vacations.
1.1 SAFETY INSTRUCTIONS

1234567890
1
23456789
0
1
23456789
0
1
23456789
0
1
23456789
0
1
23456789
0
1234567890
GB
2
UNPACKING – DISPOSAL
2
Remove the external plastic packaging material, the corner re-enforcements, and the styrofoam base.Open
the door and remove the styrofoam blocks from the inside baskets.
Collectand recycle thepackagingmaterials.Thiswill preserveprimary materialsand helpreduce the amount
of waste.
Take the packaging materials to specialised recycling centres .
When the appliance eventually has to be disposed of, it should be made non-functional before eliminating it.
Attention! Some packaging materials (e.g., plastic bags, styrofoam) can be
dangerous for children. Children should therefore be kept away from them.
At the end of its life span, the appliance must be eliminated by a specialised company, respecting all
existing laws and regulations.
This will make it possible to dispose of the old appliance while at the same time recuperating and
sorting syntheticmaterialsthat are fitforrecycling,thus contributingtotheprotectionoftheenvironment.
2.2 FINAL DISPOSAL OF APPLIANCE
2.1 UNPACKING
3.1 WASHING DISHES IN AN ECONOMIC AND ECOLOGICAL WAY
GENERAL ADVICE
3
• Don’t rinse your dishes under running water before placing them in the dishwasher
• Run the appliance only when it is full, because only like this the process becomes economical and
respects the environment.
• Always choose a programme that is adequate for the kind of dishes you want to wash and that
corresponds to how dirty they are
• You should avoid to use too much detergent, dishwasher salt, and rinse aid. Refer to the dosages
recommended in the usage instructions provided by the manufacturers of these substances.
• Make sure that the water softness regulator is set correctly.
3.2 DISHES NOT TO BE WASHED IN THE DISHWASHER
You must not wash in this appliance:
- Cutting boards or small containers in wood
- Plastic objects that are not heat resistant
- Lead crystal
- Objects made from tin or copper
- Dishes or cutlery with glued components
- Old cutlery with heat sensitive glue
- Steel objects that are oxidised easily
- Cutlery with handles in wood, horn, antler, porcelain, or mother of pearl.
When purchasing dishes, cutlery, or glasses, make sure that they are
dishwasher resistant.
12345678901
12345678901
12345678901
12345678901
12345678901
12345678901
3
GB
0,05 - 1MPa Model. ......................
....A
MAX .......W
........V.....Hz
Made in EU
...................
12
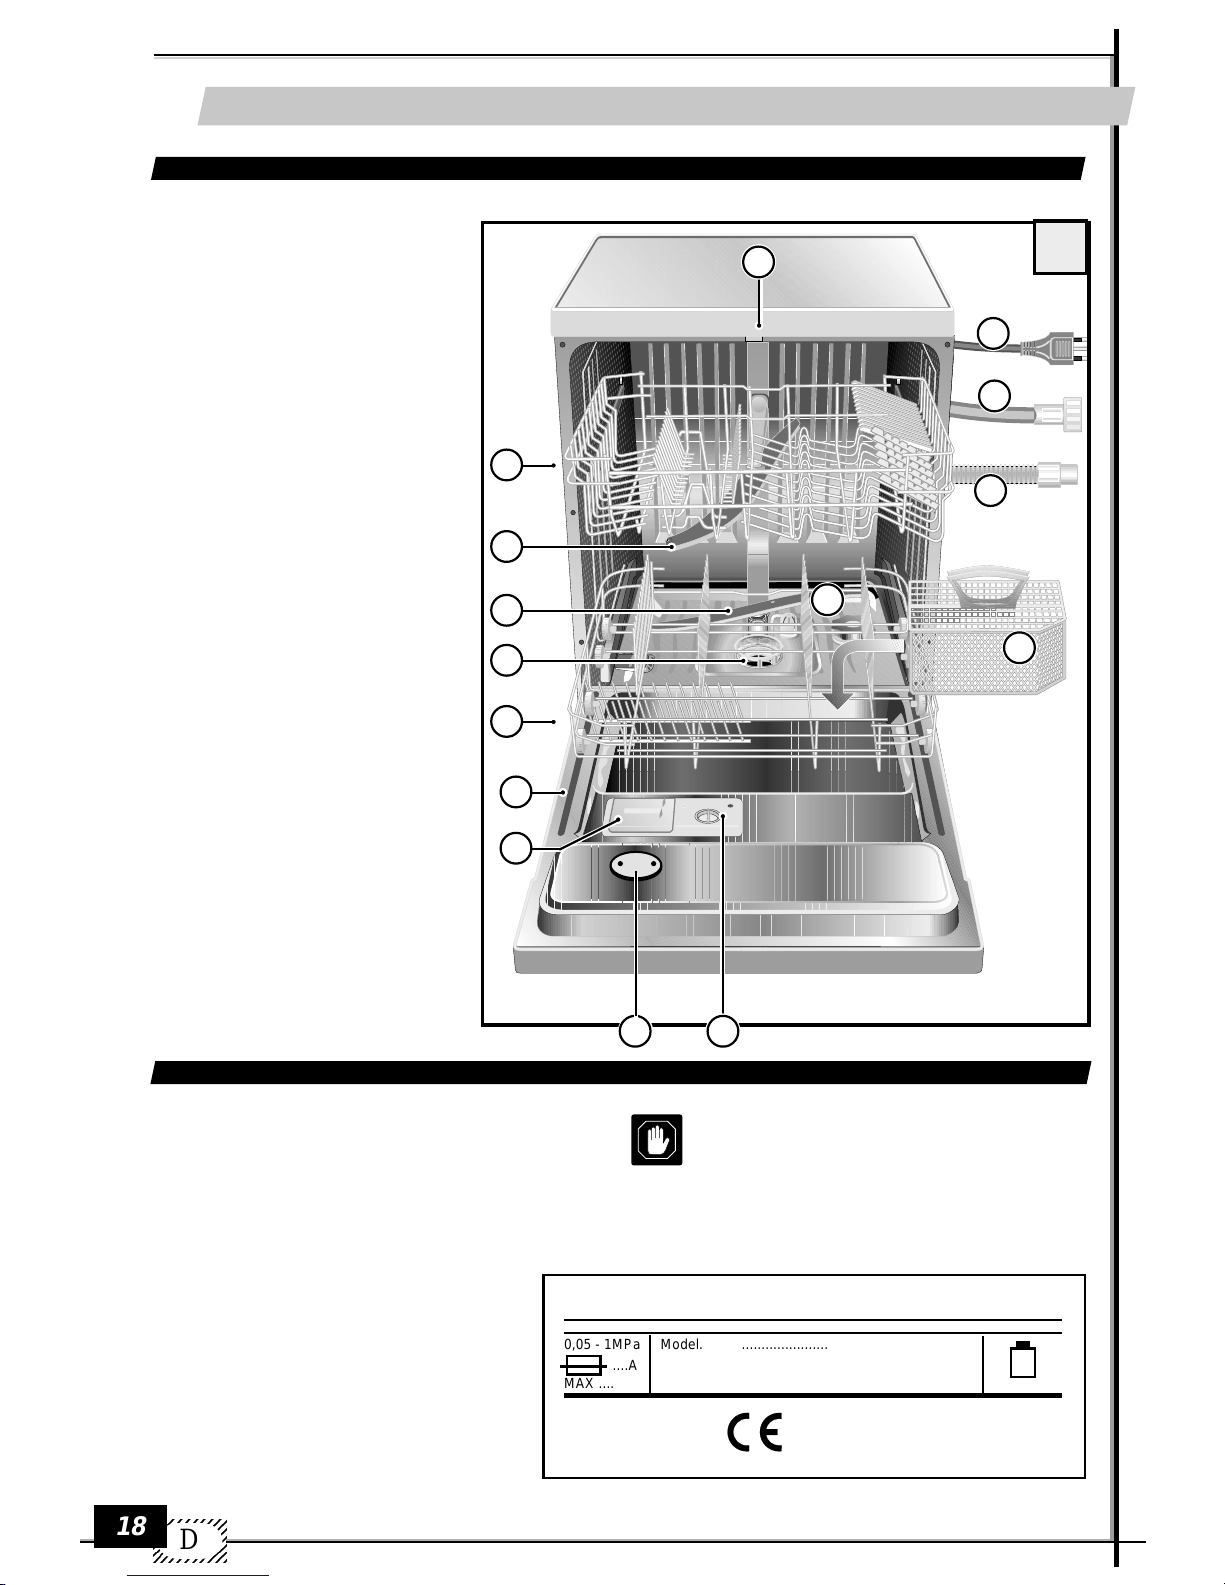
DESCRIPTION OF THE APPLIANCE
4
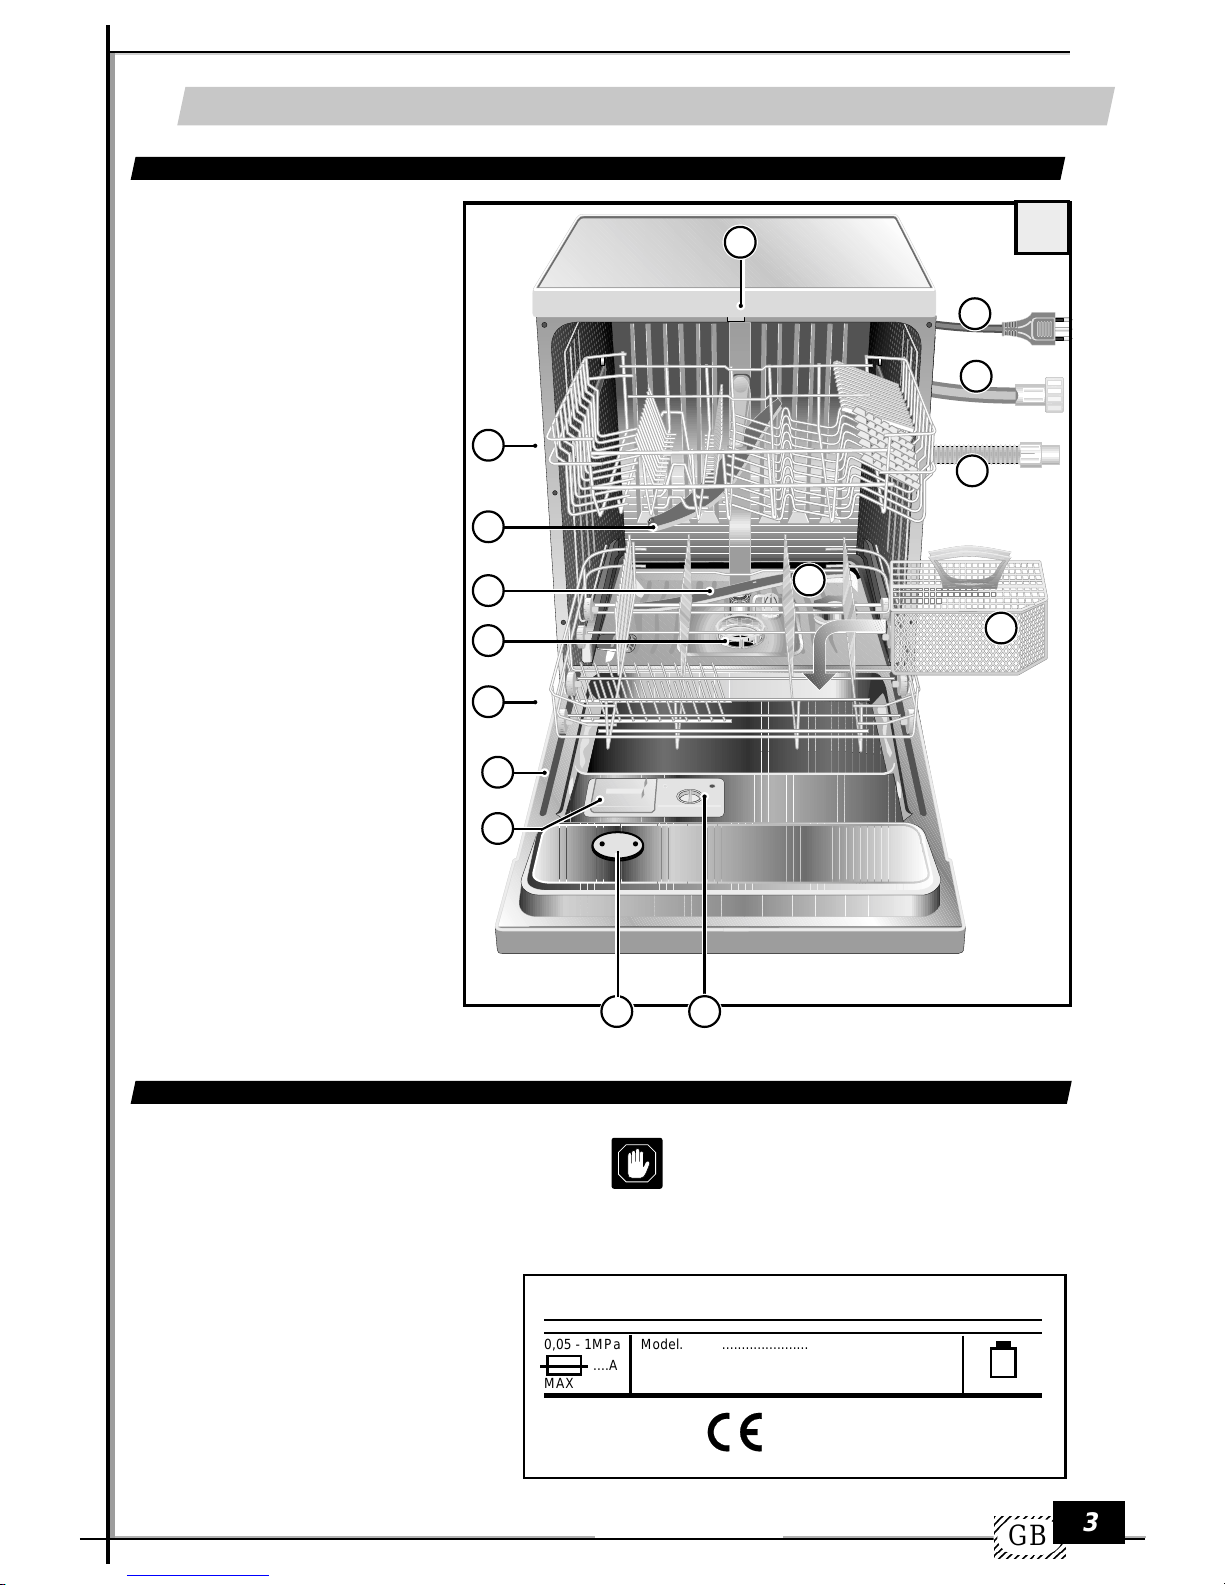
4.1 GENERAL PARTS
4.2 TECHNICAL DATA
capacity (standard settings): 12
pressure of water supply system
minimum pressure:0.05 Mpa
maximum pressure: 1 Mpa
Attention: the necessary characteristics
of the electric supply grid are indicated
on the data tag.
1) salt container
2) rinse aid container
3) drying ventilator (if included)
4) container for detergent
5) data tag
6) filters
7) lower spray-rotor
8) upper spray-rotor
9) electric cable
10) water supply tube
11) water drainage tube
12) lower basket
13) upper basket
14) cutlery container
15) hook for door closing mechanism
LA2505-020/1
1
1
9
10
11
14
5
8
13
15
6
12
3 2
7
4
1234567890
1
23456789
0
1
23456789
0
1
23456789
0
1
23456789
0
1
23456789
0
1234567890
GB
4
3
2
LA2505-030
LA2505-040
A
P
C
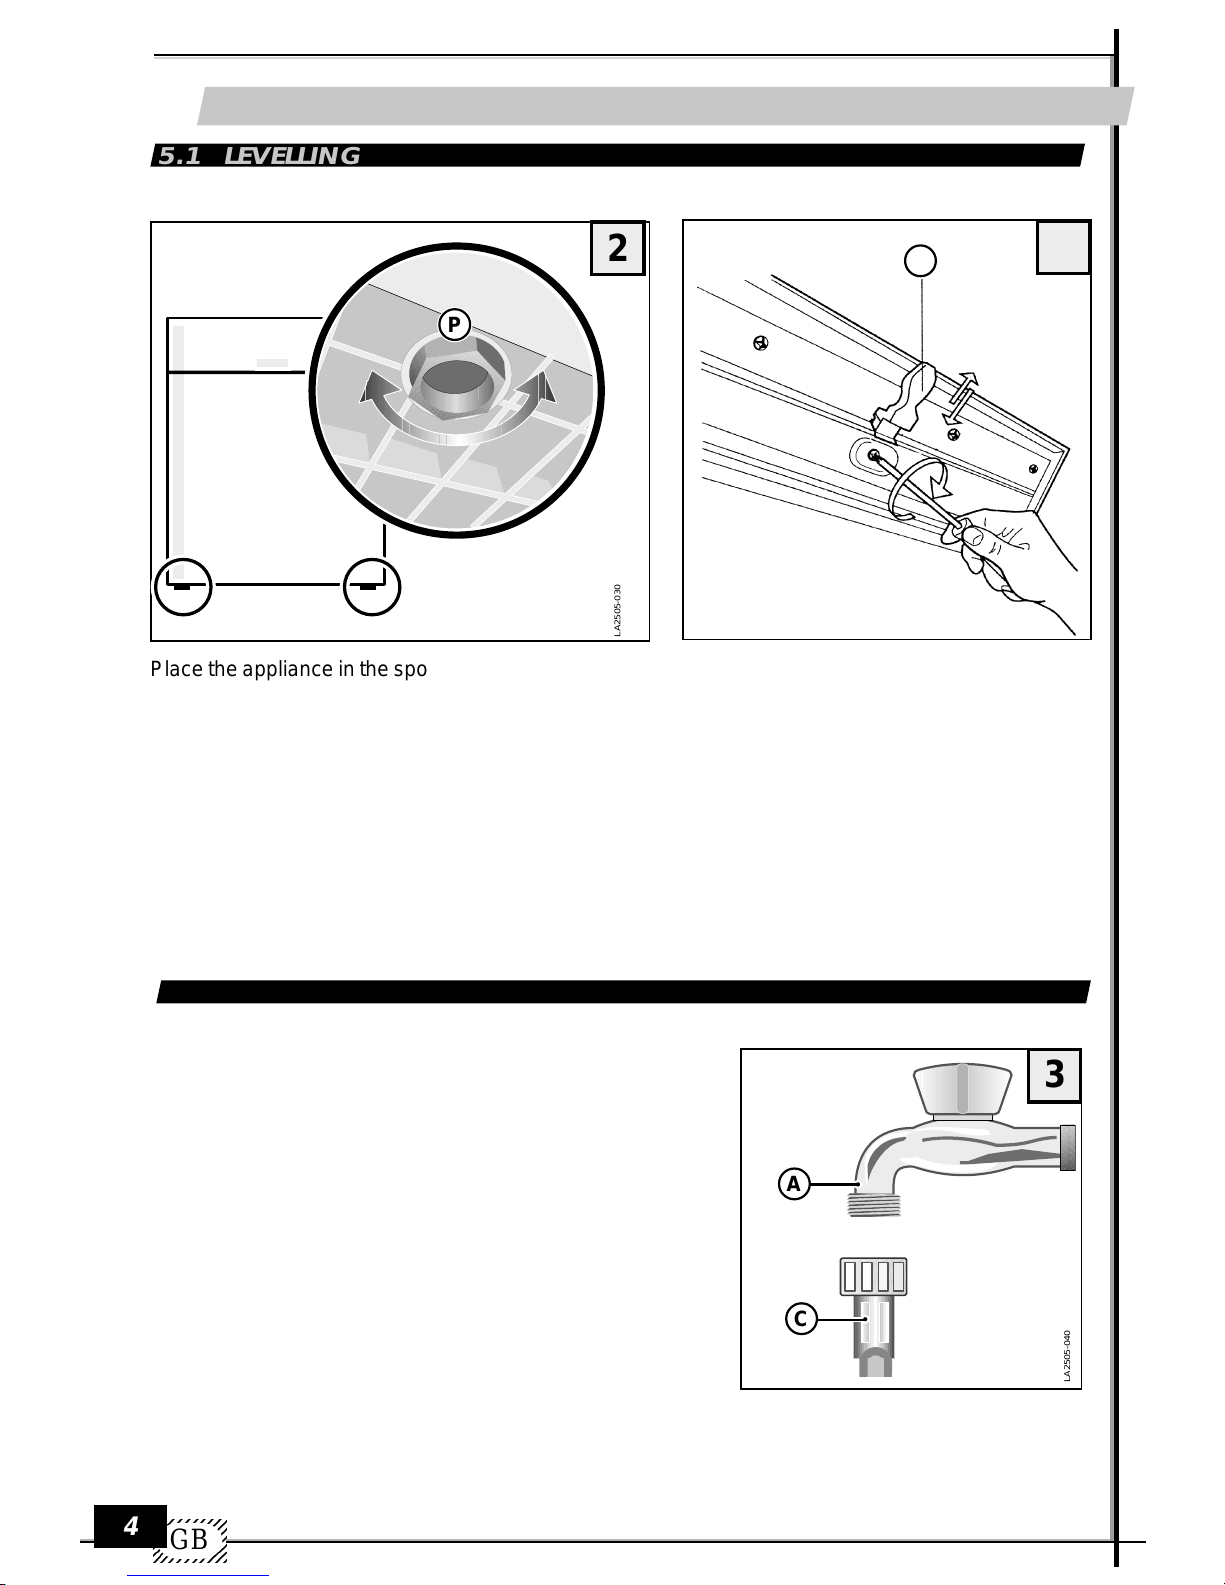
5.1 LEVELLING
Place the appliance in the spot where you want to install it.Use feet P (unscrew or screw in) to regulate
(if necessary) the height of each foot to assure that the appliance is in a fully level position.
If the appliance is positioned in a level position, its correct functioning is assured.
Maximum error = 2 degrees
After levelling the appliance, regulate the hook of the door closing mechanism, to assure that the door
closes perfectly.
Inorder to obtaina perfectseal adjust thedoor lockingdevicebutonlyafter havinglevelled themachine
in its final installation position.
INSTALLATION
5
5.2 WATER CONNECTION
The water supply tube C, which accompanies the
dishwasher, makes it possible to connect the appliance to
a faucet with a 3/4” attachment.
During the installation, the following instructions must be
followed:
• Attach tube Cto the cold water faucet A.
• If the tube is being attached to new pipes that have not
been used for a long time, you should let the water run
for some time before attaching the tube in order to make
sure that dirt and rust residues are eliminated.
• Make sure that the water pressure corresponds to the
range indicated on the data tag.
The appliance may be connected to the cold water sys-
tem.It must not be connected to the hot water system.
2.1
M
12345678901
12345678901
12345678901
12345678901
12345678901
12345678901
5
GB
min 32 cm
max 80 cm
4
LA2501-050
T
T
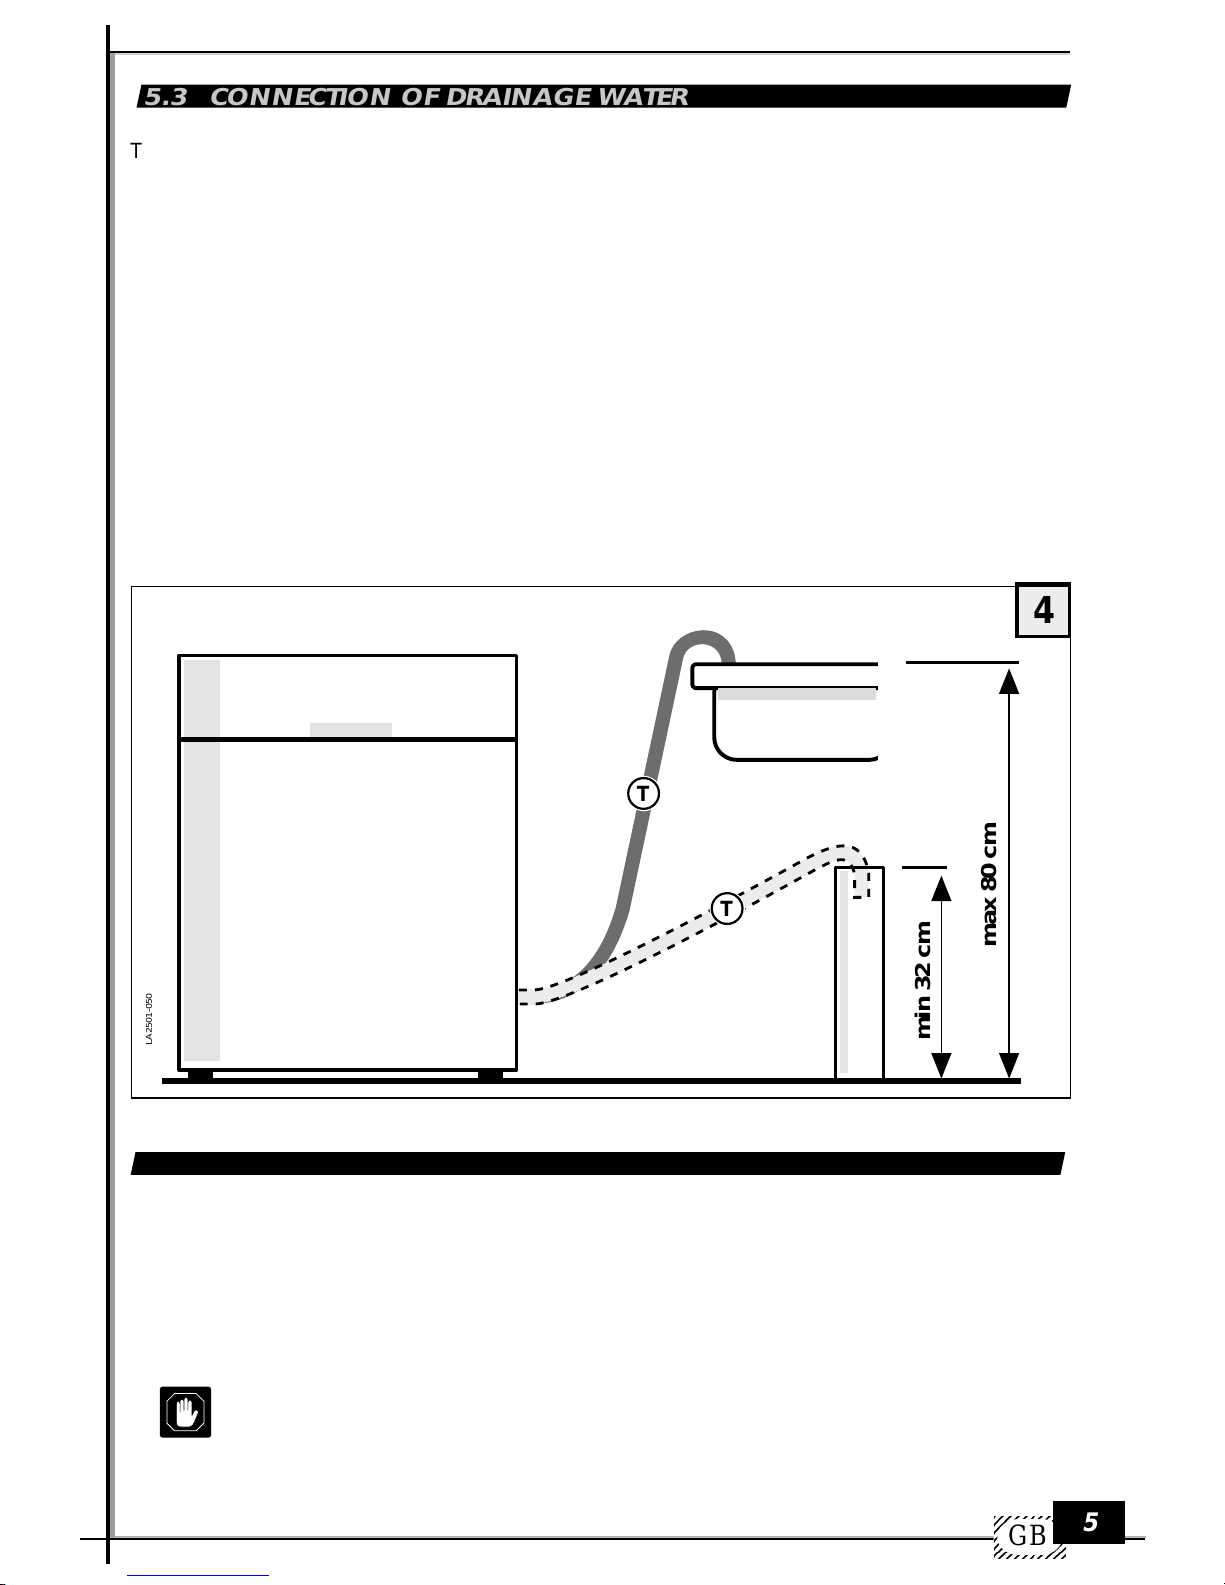
5.3 CONNECTION OF DRAINAGE WATER
The curved end of drainage tube T, which is being supplied with your appliance, should be hooked
onto the edge of a sink or into a drainage pipe.
A special siphon should be used to prevent bad odours.
During the assembly, the following precautions should be taken:
- the drainage tube must not be bent to avoid blockages;
- the tube’s end, relative to the top surface of the dishwasher (fig. 4), must be placed at a height
between 32 and 80 cm;
- the end of the tube must never be immersed in water;
- the drainage tube must not be extended to more than a maximum length of 1 metre.The extension
must have the same internal diameter. Furthermore, the maximum height at which the tube’s end
can be placed (in the case of an extended tube) must be reduced from 80 to 50 cm.
- If you use a drainage pipe, make sure its internal diameter is not inferior to 4 cm.
5.4 ELECTRIC CONNECTIONS
The appliance may only be connected to a properly installed electric outlet with
an earth (ground) contact.The connection must be carried out in correspondence
with existing laws and regulations and supplementary rules issued by the supplier
of electric power.
The tension shown on the data tag must correspond to the power tension of the electric
grid at the site of installation.
See data tag for the size and format of the electric outlet to be used.

1234567890
1
23456789
0
1
23456789
0
1
23456789
0
1
23456789
0
1
23456789
0
1234567890
GB
6
USE
6
6.1 BEFORE USING THE APPLIANCE
Before turning on the appliance, make sure that the plug attached to the electric cable is
connected to the electric outlet, the water supply tube is connected to the faucet, the faucet
is turned on, the drainage tube has been connected according to the instructions.
Use only special dishwasher salt.Other types of salt
(e.g., regular household salt) often contain sub-
stances that do not dissolve completely in water and
can therefore obstruct the water softener,thus mak-
ing it unusable.
Opening of the door
Pullthe handle forward.Thedoor should open without effort.Ifyoupullthehandle whilethe dishwasher
is running, a safety mechanism will turn off the appliance.
Positionof
regulation
device
French
degrees
°fH
German
degrees
°dH
d1
d2
d3
d4
d5
d6
<15
>15 <25
>25 <40
>40 <60
>60 <80
>80 <90
<8,4
>8,4 <14
>14 <22,4
>22,4 <33,6
>33,6 <44,8
>44,8 <50,4
>=higher/<=lower
LA2505-060
5
L
Regeneration levels
Adding special dishwasher salt
• Open the door and take out the lower basket.
• Remove the lid of the salt container by turning it anticlock-
wise.
Only during the first time you carry out this operation:
fill about 1/2 litre of water into the salt container.
• Use funnel Lto fill the special dishwasher salt into the
container (use about 1.0-1.5 kg of salt).
• Remove possible salt residues from the opening of the
container.
• Put the lid of the container back in its place by turning it
clockwise.
• If you don’t use the dishwasher immediately after filling
the salt container, run the programme
pre-wash
to rinse
away the water and salt particles that spilled over from the
container.
* The water softening system is equipped with an electric
instrument that indicates the salt content level.
Acontrol lightwill beilluminated onthe frontpanel (fig. 18,
) of your dishwasher to indicate when it is necessary
to add more dishwasher salt.
Regulation of the water softener system
For the washing process it is better to use soft water (with a
lowcalciumcontent),to avoid calciumdepositson the dishes
and on the inside of the dishwasher.
To find out the degree of hardness of your water contact
your town administration or use a commercial testing kit.
To reach an optimal regeneration setting, keep the button
DELAY 9(fig. 6) pressed when turning on the appliance.
Now, the current setting is being displayed (e.g., d5). To
modify the setting (within 5 seconds),press the same button
again until the desired level is reached (see table).
Wait for 6 seconds without modifying the setting. A buzzer
sound will indicate that the new setting was accepted. On
the display, the request select programme will appear.
6
6
9
12345678901
12345678901
12345678901
12345678901
12345678901
12345678901
7
GB
7
LA2505-080
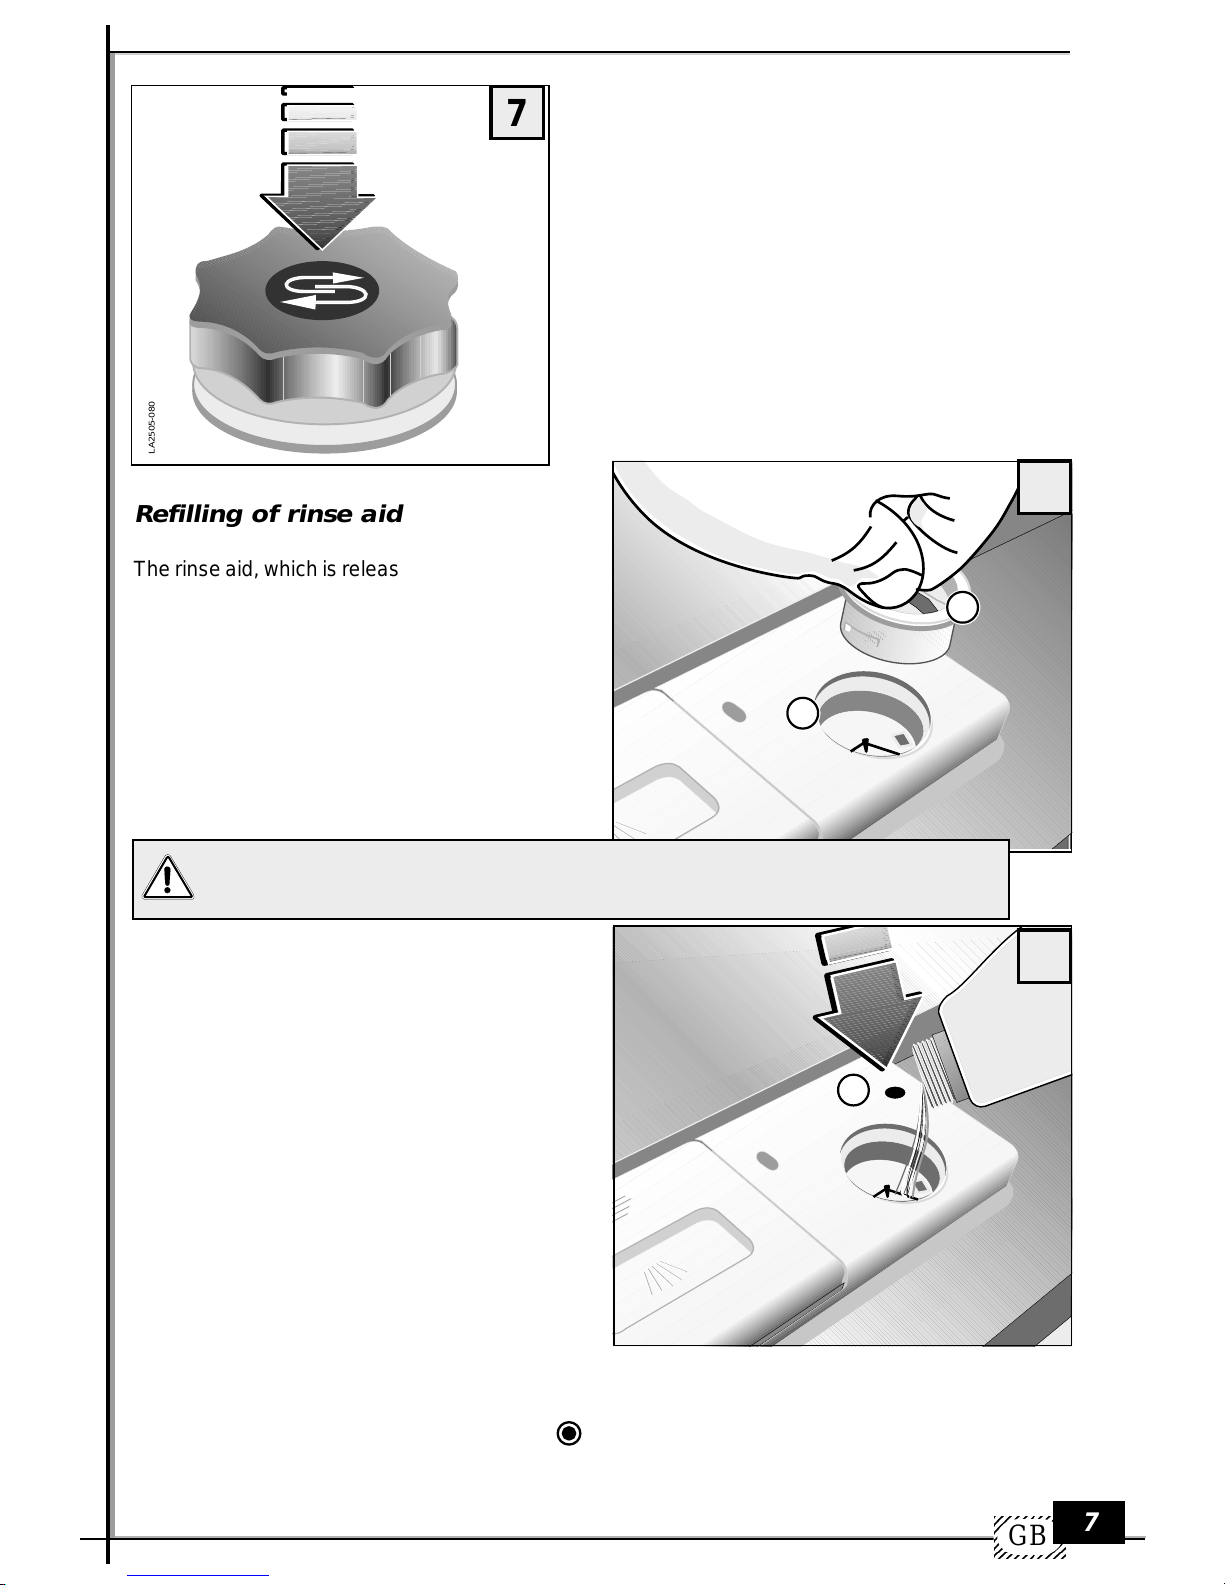
Refilling of rinse aid
Therinse aid,which isreleased automatically dur-
ing the final phase of the wash cycle, guarantees
that the dishes dry quickly and prevents the for-
mation of stains and calcium sediments.
Indication of salt level (if present)
Thegreenmarkunderthecapindicatesthat there
is still enough salt in the container. If the green
mark is nolonger visible,thesalt container needs
to be refilled with special dishwasher salt.
8
9
LA2505-092
LA2505-096
Only use rinse aids for dishwashers. Other products won’t obtain the desired
effect.
The rinse aid container Sis located on the inside
of the door.
•RemovethecontainercapTbyturning it 1/4 revo-
lution anticlockwise.
•Fill container with rinse aid up to the broken line.
Maximum quantity:about 140 ml.
•Put the cap back in its place.
•Clean off possible residues of rinse aid with a
cloth, otherwise too much foam might be pro-
duced during the rinsing process.
Indication of rinse aid level
• Electric (fig. 18-18.1)
The appliance is equipped with a level indicator
for the rinse aid. When it lights up, more rinse
aid needs to be added.
• Mechanical (fig. 9)
More rinse aid needs to be added when the
indicator(located on the containerF)is clear ( ).
When the container is full, the indicator has a dark
coloration.
S
T
F

1234567890
1
23456789
0
1
23456789
0
1
23456789
0
1
23456789
0
1
23456789
0
1234567890
GB
8
LA2505-094
1
2
3
4
1
2
3
4
LA2505-090
LA2505-100
11
12
10
R
P
V
Regulation of rinse aid dosage
The regulation Rof the quantity of rinse aid that is
released can be found in the refill opening of the
rinse aid container.
It can be adjusted with a screwdriver.The possible
settings range from 1 to 4,1corresponds to a
release of one ml of rinse aid, 4to four ml, etc.The
appliance has been set on 2 (two ml) by the
manufacturer.
A full rinse aid container is sufficient for about 50
washcycles.Thequantityofrinseaidtobereleased
should be adjusted when the result of the wash
process is not satisfactory.
•Always wipe off with a cloth any rinse aid that
spilled over from the container.
It is important to check the level of rinse aid in
the container periodically – if possible every
31 wash cycles.
Adding the detergent
IMPORTANT! Do not use detergents in this
dishwasher that are made for dish washing by
hand! These substances produce large quantities
of foam but they do not clean the dishes in a
dishwasher.Theycanevenlead to a malfunctioning
of the appliance.
You should therefore only use detergents that are
specifically made for household dishwashers.
Keep your detergent containers closed and in a
dry place.
Only when you use the pre-wash programme no
detergent is needed.
During aprogramme the detergentis automatically
taken from the detergent container.
We recommendthe use ofabout 25g of detergent.
Detergents vary in their strength and efficiency.
You should therefore pay attention to the dos-
age recommendations of each manufacturer.
The container for the detergent is located on the
inside of the door.
If the lid is closed:
•Push forward closing mechanism P.The lid will
open with a “click”.
•Fill the detergent into the containerV.
•To close the lid, press until you hear a closing
“click”.
If your dishes are exceptionally dirty, you can also
fill some detergent into the indentationQof the lid.
In this case, fill the indentation up to the edge.This
detergent will be available and active during the
pre-wash phase.
Q
12345678901
12345678901
12345678901
12345678901
12345678901
12345678901
9
GB
13
LA2505-110
14
LA2505-112
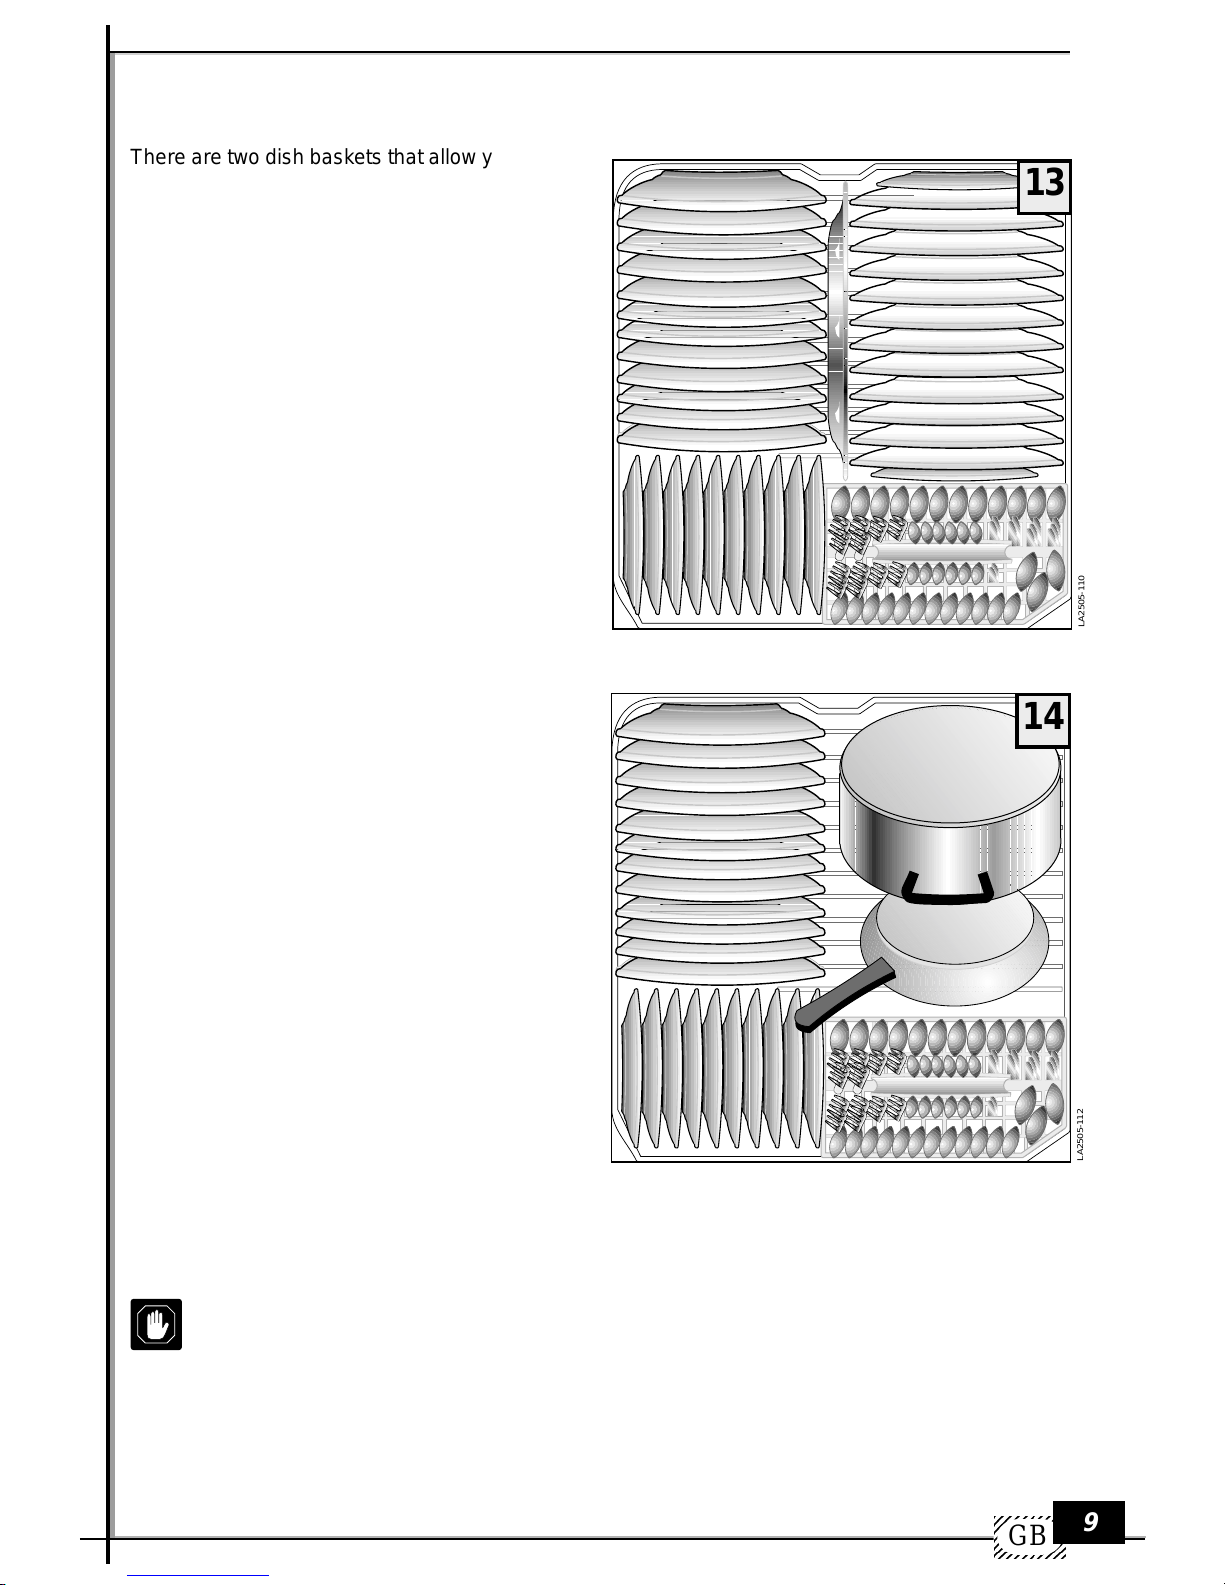
There are two dish baskets that allow you to store
all different kinds of dishes.
•Remove from the dishes any larger pieces of
food to avoid an obstruction of the filter and the
development of bad odours.
•If pots and pans are particularly dirty and con-
taincrusts of food (after frying or roasting), soak
them in a water bath before washing them in the
dishwasher.
Use of the lower basket
The lower basket is intended to hold dishes that
are more difficult to clean, as well as the cutlery
basket.
Thelowerbasketholds regular plates,soup bowls,
pans, soup tureens, lids, and serving dishes. Flat
and deep plates must be placed in a way that
leaves some space between the individual plates.
All plates must be in a vertical position so that the
water can pass freely.
Pansandpotsmustalwaysbeplacedupsidedown.
You can choose any kind of loading configuration,
but you should make sure that the dirtiest surface
of dishes, pots and pants faces the water spray
andthat thewatercan flow off without hindrances.
Cutlery
For best cleaning results, cutlery should be inserted with its handles facing down.Spoons, forks, and
knifes must be placed in the specific areas of the cutlery basket that are designed for them.
How to load and unload the dishwasher
ATTENTION:
Particularly long cutlery, specifically“long knives”, should not be positioned pointing upwards but
should be placed horizontally in the top tray or washed by hand.

1234567890
1
23456789
0
1
23456789
0
1
23456789
0
1
23456789
0
1
23456789
0
1234567890
GB
10
15
LA2505-120
LA2505-130
LA2505-134 LA2505-132
16
1
2
Use of the upper basket
The upper basket can be pulled out all the way.
It holds small and medium sized dishes such
as glasses, small plates, tea and coffee cups,
smallsalad bowls,andsmallpansand potsthat
are not very dirty.
Desert plates must always be placed vertically;
glasses, cups, pots and pants must be placed
upside down.
Light dishes should be held by a support
structure so that they don’t get thrown around
by the water jet.
An optimal arrangement of dishes inside the
dishwasherwillguarantee best washingresults,
allowing the appliance will be able to develop
its full effectiveness.
Height regulation of the upper basket
Use the handle on the side (only on left) to regulate the
basket’s height and inclination.
1 regulation of horizontal position
2 regulation of inclination
Because of the elevated temperature of the water used to wash the dishes and of
potential chemical reactions with the detergent, it is recommended not to wash
copperoraluminium dishes,cutlery withwoodorhorn handles,delicateporcelains,
or non heat resistant glass or plastic dishes in the appliance.
If you possess decorated porcelain,you should test one single piece to make sure
that the décor is not being damaged or altered.

12345678901
12345678901
12345678901
12345678901
12345678901
12345678901
11
GB
Start
After checking the quantities of regeneration salt and of rinse aid, open the water faucet completely,
place the dishes in the baskets, fill detergent into the detergent container and add also detergent for
the pre-wash (if necessary) then close the front door.
Now proceed as follows:
•Use the On/Off button . On the display the words programme selection will appear.
•Use the programme selection button to select the desired programme
•Press the start/pause programme button .After a sound signal, which indicates the initiation of
the programme, the appliance will run the wash cycle automatically.
Note: On the display, the duration of the chosen programme will be shown.
Pulling out the upper basket
The upper basket can be pulled out and removed
as shown in the figure.
17
Description of control buttons and
indication lights
LA2505-160
Led Display
1) Indication of delayed start (Delay)
2) Indication of half load
3) Indication of pre-wash cancel
4) Indication of drying
5) Indication of low salt level
6) Indication of low rinse aid level
Control buttons
7) On/Off
8) Programme selection
9) Delayed start selection
(Delay)
10) Half load selection
11) Pre-wash cancel selection
12) Drying selection
13) Start/Stop/Pause programme
14) Multifunction display
15) Door opening handle
714
813
EL0510-010
18
15
714
1234
6
5
8910
13
12
11
It is advisable not to open the dishwasher during the wash.
1234567890
1
23456789
0
1
23456789
0
1
23456789
0
1
23456789
0
1
23456789
0
1234567890
GB
12
Options
(Note: the various options must be selected before initiating the wash cycle)
•Delayed start : time delays for the initiation of the wash cycle can be set ranging from 1 to 16 hours.
On the display, the delay period that was selected will be shown.The LED display will be blinking during the
entire delay period.
The selection of this setting option is confirmed when the number of the pre -selected programme appears
on the display.
•Half load : when choosing this wash cycle option, the following indication will appear on the display:
(¯=wash superior basket,_=wash inferior basket).The corresponding LED indication will be illuminated.
The selection of this setting option is confirmed when the number of the pre-selected programme appears
on the display.
•Pre-wash cancel :This option is only available for programmes that include a pre-wash.
When pressing the button, the corresponding LED indication will be illuminated.
The selection of this setting option is confirmed when the number of the pre-selected programme appears
on the display.
•Drying : this programme option is carried out automatically by the programmes in whose cycle it is
included (see programme table).To modify the dryer setting, the drying button must be pressed before
initiating the chosen programme.On the display, the following information will appear:AO = no drying;A1=
Drying 20’; A2 = Drying 35’; A3 = Drying 45’.
The corresponding LED indication will be illuminated.
The selection of this setting option is confirmed when the number of the pre -selected programme appears
on the display.
• Note: In the models without the drying ventilator, this option is to be considered as waiting time at the end
of the cycle.
• Description of Start/Stop/Pause button
•It initiates the wash programme cycle (the buzzer sound indicates that the cycle has started).
•When you turn on the machine, using the ON/OFF button, the display indicates the number of the last
program that has been carried out. In cases where the previous program has not yet finished, the display
will flash the number of this program.In order to re-start it you must simply press the“START”button ,
the remaining time that is necessary in order to finish the cycle will appear automatically on the display.
(Situations such as this will occur each time that you open the machine when it is carrying out a program).
•If pressed during the wash for less than 5”the machine will pause, the number of the program will be seen
flashing on the display, (in this case it is possible to add or remove dishes etc.)
In order to proceed with the washing program, close the door and press the button again.
• Programme settings by mistake (change programme)
•Reset by using the start/stop/pause button : keep the button pressed until the buzzer stops beeping (it
produces a series of beeps).
•Repeat the select programme operation.
Note: If the programme has been initiated and has run beyond the water fill phase, the display indicates
““, Then, the appliance will discharge all water, and (after a prolonged buzzer sound) the display will
indicate the pre-selected programme setting.
Now, the appliance is ready for a new setting.
•Note:Once you have opened the door, always press the Start button in order to restart the dishwasher.
•Activation / Elimination of the buzzer
b0 = Buzzer DEACTIVATED
b1 = Buzzer ACTIVATED
In order to access the setting of the BUZZER, keep the PROGRAM button pressed down when you
turn on the machine. The current setting “b1” will be visualised on the Display. In order to change this
setting, press the same button until you have selected the status of the buzzer that you desire. Wait for
approximately6 seconds,withoutchanging yourchoice,followingthis,thesound of theBUZZERwill confirm
that the setting has been memorised.
•End of cycle
Once the washing cycle is finished , the program number will appear lit up and still on the display, if it
is flashing wait for the end of the cycle.
•Checking the functions
During the washing phase it is possible to visualise the various functions in the following manner:
By pressing the program selection button , the number of the pre-set program will be visualised on the
display.
By pressing the half load button , the upper or lower washing area will be seen.
By pressing the drying button , the level of drying will be seen.
Stop
After the wash cycle, the dishwasher stops automatically, then unit will emit a long buzz to indicate the end of
the wahing cycle.To turn it off, press the button on/off .After each wash cycle, the water faucet must be
closed to insulate the appliance from the water supply system.
9
10
11
12 12
13
13
7
8
7
14
13
13
13
8
10
12
12345678901
12345678901
12345678901
12345678901
12345678901
12345678901
13
GB
MAINTENANCE
7
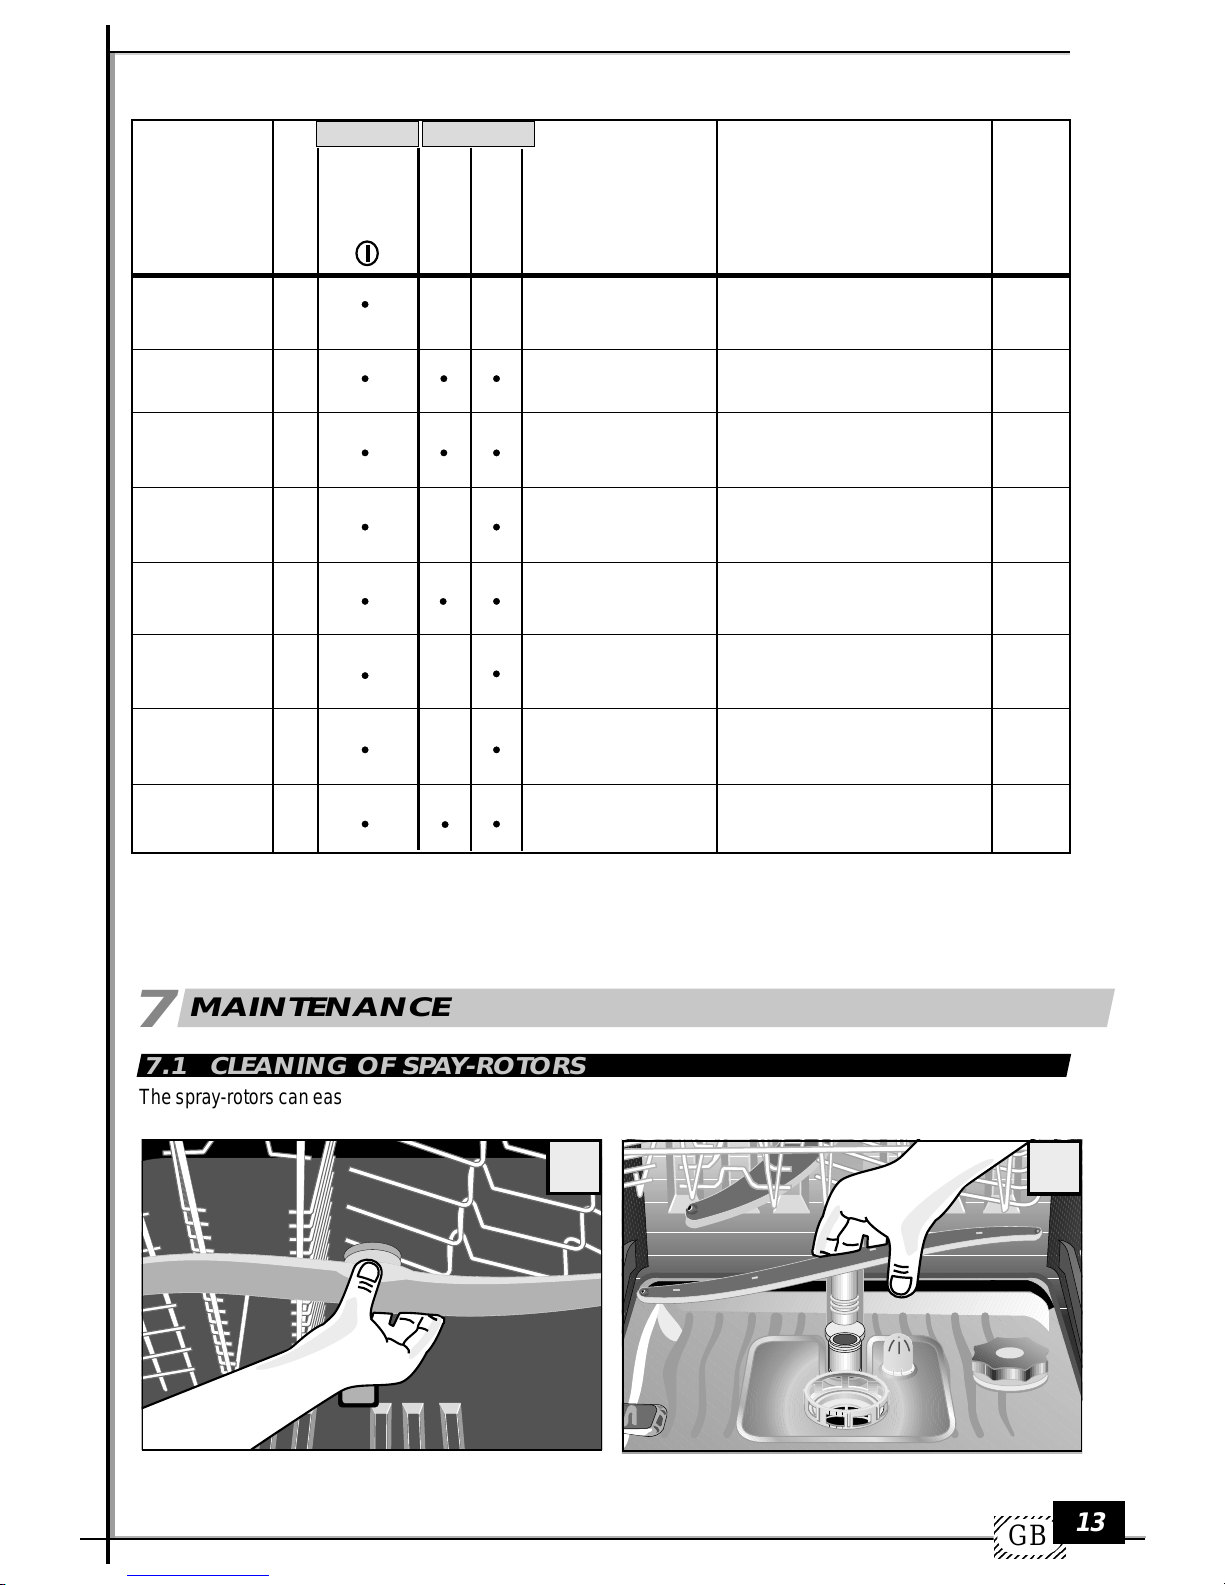
7.1 CLEANING OF SPAY-ROTORS
Thespray-rotors can easily be removed for the periodic cleaning ofthe jetsin orderto preventpossibleobstructions.
Wash them thoroughly under running water and put them back in their correct position.
LA2505-210
LA2505-220
19 20
To remove the upper spray-rotor:
Unscrewanticlockwisethe supportofthespray-rotor.
To remove the lower spray-rotor:
Pull the spray-rotor upwards and take it out.
Table of wash programmes
Programmes
Programme
number
P1
P2
P3
P4
P5
P6
P7
P8
Rinse
Intensive 70 º C
Normal 60º C
(EN 50242)
Delicate 60º C
Normal 40º C
Rapid 40º C
Biological 60º C
Strong 70º C
ON
OFF
pre-wash
wash
Dishes
and
degree of dirt
Pans and dishes until
the next wash cycle
Very dirty dishes (except
delicate pieces)
Medium dirty dishes
(except delicate parts)
Very dirty pans and dishes
Normally dirty dishes
Very dirty dishes
Pans and dishes
Pans and dishes
very dirthy
Short cold wash to prevent food residues from
drying up and forming crusts on the dishes
1 warm Pre-wash –Main wash
3 rinse (2 cold –1 warm) Drying
1 cold pre-wash –Main wash
2 rinse (1 cold –1 warm) Drying
Main wash
2 rinse (1 cold –1 warm) Drying
1 cold pre-wash –Main wash
2 rinse (1 cold –1 warm)
Main wash
2 rinse (1 cold –1 warm)
Main wash
3 rinse (2 cold –1 warm) Drying
1 warm Pre-wash –Main wash
3 rinse (2 cold –1 warm) Drying
Programme
descriptions
Duration*
(1)
11’
2h
2h 17’
1h 40’
49’
39’
1h 38’
2h 11’
(1) N.B. Indicative duration of the washing times including the duration of the drying times in the programs where
drying is included.
Drying time “setting of the defaults in A2=35”.
(*) In the P1 program it is possible to have a drying setting (see options paragraph); in this way you will have a
warm rinse program with a drying feature (PLATE WARMER) with the following settings:
A1 washes at 65°C it dries for 20’– A2 washes at 60°C and dries for 35’– A3 washes at 50° C and dries for 45’.
Turn on &
Select Prog.
* Add Detergent
1234567890
1
23456789
0
1
23456789
0
1
23456789
0
1
23456789
0
1
23456789
0
1234567890
GB
14
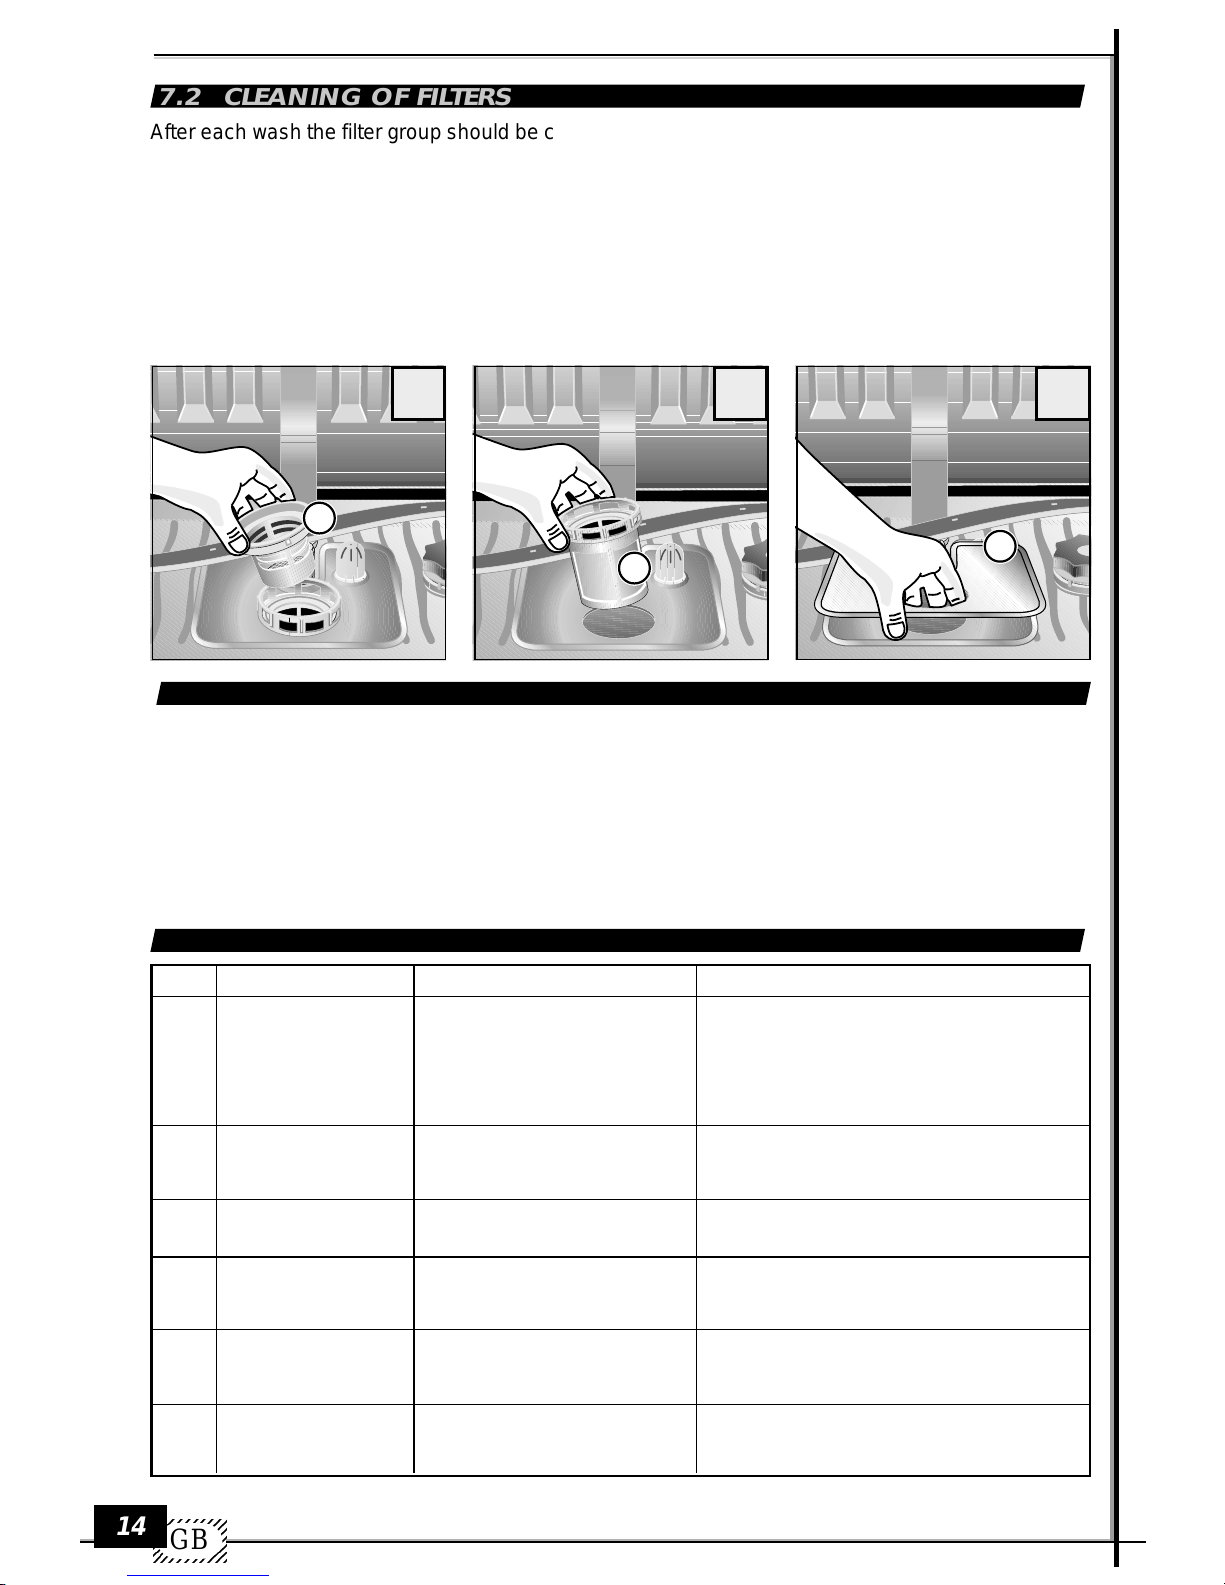
7.2 CLEANING OF FILTERS
After each wash the filter group should be checked in order to remove possible dirt residues.Proceed
as follows:
•take out the central filter 1.
•remove the external water filter 2.
•take out mobile grid 3.
Clean all these components under running water.It is important to clean all filters thoroughly because
the dishwasher cannot function properly with obstructed filters.
We recommend to put the cleaned filters back in their positions immediately to avoid damage to the
wash pump.
LA2505-180
21
LA2505-190
22
LA2505-200
23
23
1
7.3 CLEANING OF THE DISHWASHER’S EXTERNAL SURFACES
The dishwasher’s surfaces (made of metal, and in the front of plastic) must be cleaned periodically.
Use a clean and soft piece of fabric. Never use acids or abrasive detergents.
If you don’t use the appliance for long periods of time
If the dishwasher is not being used for extended periods of time, you should proceed as follows:
•run the pre-wash programme twice
•remove the electric plug from the outlet
•disconnect the water supply tube
•leave the door slightly open to avoid the formation of bad odours.
7.4 TABLE OF ERROR CODES
Action to be taken
- Reset the dishwasher
- Check
- Reset the dishwasher
- Call the authorised assistance centre
- Reset the dishwasher
-Verify the water pressure
- If the same problem reoccurs, contact the authorised
technical assistance centre immediately communica-
ting to them the type of error that is shown.
-Verify the water pressure
- Call the authorised assistance centre
- Check
- Check
- Call the authorised assistance centre
- Clean the filter grills
- Check at the end of the cycle, position the pots
correctly during the next wash
-
If the same problem reoccurs, contact the authorised
technical assistance centre immediately communica-
ting to them the type of error that is shown.
Checks to carry out
-Tap closed
- Filter of loading tube blocked
- Drainage tube flat
- Drainage tube broken
-Water supply tube bent
- Insufficient water pressure
-
Repeat the washing cycle
- Insufficient water pressure
-The litre counter valve is not working
-The drainage tube is bent
-The siphon is blocked
-The drainage pump is blocked
-The filter grills are blocked
- A pot is placed up side down
-
Repeat the washing cycle
When this occurs
During the water cycle
(the program stops)
At the end
of the cycle
At the end
of the cycle
At the end
of the cycle
At the end
of the cycle
At the end
of the cycle
Error
E1
E2
E4
E5
E6
E7
N.B.: Upon contacting the authorised technical assistance centre always communicate the type of error encountered.

12345678901
12345678901
12345678901
12345678901
12345678901
12345678901
15
GB
WHAT TO DO IN CASE OF MALFUNCTIONS
8
You should first check whether it is possible to rectify some minor problems yourself. Follow these
instructions.If you are unable to identify or remove the problem, you should contact the technical client
assistance service.
• The programme does not start
- Are the internal fuses broken? Is the dishwasher connected to the electric supply system?
- Is the door closed properly? Press on the door to close it completely.
• No water enters the appliance
- Is the water faucet open?
- Is the filter between the faucet and the water supply tube obstructed? If so, clean the filter.
- Is the water supply tube obstructed? Check the tube.
• The programme indicator does not move on from its starting position
- Is the water faucet completely open?
- Is the filter between the faucet and the water supply tube obstructed? If so, clean the filter.
- Is the water pressure lower than 0.05 Mpa?
• The used water is not removed from the dishwasher
- Is the waste disposal tube obstructed? Check the tube.
- The siphon is obstructed? Check the siphon.
• The dishes are not clean after washing them
- Did you choose an appropriate programme for the type of dishes and the degree of dirt you are
dealing with?
- Are the dishes arranged in a way that allows the water-jet to reach all their surfaces?
- Are the dishwasher’s baskets overloaded?
- Are the spray-rotors blocked by a dish or some cutlery?
- Are all filters at the bottom of the dishwasher clean? Are they all in their correct position?
- Did you add the correct amount of detergent?
- Is the water discharge tube connected properly?
- Is there still any special dishwasher salt in the appropriate container? Without salt the water is not
being softened.
- Was the water softening system adjusted according to the local amount of calcium in the water?
• The dishes do not dry or they remain opaque
- Is there any rinse aid left in the appropriate container?
• Glasses and dishes show the formation of lines, spots, and stains or a shiny blue coloration
- During the rinse process too much rinse aid is being released.Adjust the rinse aid release.
• Glasses and dishes show stains of dried water
- During the rinse process too little rinse aid is being released.Adjust the rinse aid release.
Please note:
The appliance was tested and checked by the manufacturer. As a consequence, you may find
some traces of water inside.These will disappear after the first use.

1234567890
1
23456789
0
1
23456789
0
1
23456789
0
1
23456789
0
1
23456789
0
1234567890
D
16
VOR DER BENUTZUNG DES GERÄTS
1
Vorschriftsmäßige Benutzung
• Der Geschirrspüler darf nur zur Reinigung von Haushaltsgeschirr verwendet werden. Sollte das
Gerät für andere Zwecke oder unzweckmäßig gehandhabt werden, so kann die Herstellerfirma
keinerleiVerantwortung für eventuelle Schäden übernehmen.
• Aus Sicherheitsgründen ist es nicht erlaubt, am Geschirrspüler Umbauten oder Änderungen
vorzunehmen.
• BevordasGerätandaselektrische Stromnetz angeschlossen wird, prüfen,obdieaufdemDatenschild
angegebenen Spannungs- und Stromdaten mit denWerten, die am Aufstellort gegeben sind über-
einstimmen.
• Die Installation hat durch qualifiziertes Personal zu erfolgen.
Handhabungen vor dem ersten Starten
• Prüfen Sie, ob der Geschirrspüler beimTransport Schäden erlitten hat.Keinesfalls ein beschädigtes
Gerät anschließen.Wenden Sie sich bei Schäden an IhrenVertragshändler.
Zur Sicherheit Ihrer Kinder
• Erlauben Sie Kindern nicht, mit dem Gerät zu spielen.
• DieReinigungsmittelkönnen unwiderruflicheSchädenanAugen,amMund und imHalsverursachen.
Reinigungsmittel deshalb außerhalb der Reichweite von Kindern aufbewahren.
• Das Wasser im Geschirrspüler ist kein Trinkwasser. Sollten sich im Gerät noch Reste des
Reinigungsmittels befinden, besteht für Kinder weiterhin eine Gefahrensituation. Kinder müssen
vom geöffneten Geschirrspüler ferngehalten werden.
Zum täglichen Gebrauch
• Setzen Sie denGeschirrspülerniemals in Funktion,wenndasStromkabel,derWasserzulaufschlauch
oder der Wasserabflussschlauch beschädigt sind, oder wenn die Schalterblende, die Arbeitsplatte
oder die Leiste in einem schlechten Zustand sind.
• Bei Störungen zuerst denWasserhahn abdrehen, dann das Gerät ausschalten und den Stecker aus
der Steckdose ziehen. Bei Festinstallation, den jeweiligen Schalter ausstellen oder die Sicherung
(oder die Sicherungen) herausdrehen.
• Den Stromstecker stets am Kopf und niemals am Kabel aus der Dose herausziehen.
• Die Reparaturen des Geschirrspülers dürfen nur durch geschultes Personal durchgeführt werden.
Unsachgemäße Reparaturen können den Benutzer in große Gefahr bringen. Wenn Sie sich des-
halb für eventuelle Reparaturen an unseren Kundendienst oder an Ihren eigenenVertragshändler.
• Das Austauschen des Speisekabel muß nur vom spezialisiertem Personal ausgeführt werden.
• Im Falle, dass die Schläuche in einem schlechten Zustand sind, müssen sie, um das Gerät anzu-
schließen, mit Originalschläuchen ersetzt werden.
• Geben Sie keine Lösungsmittel in den Geschirrspüler.Sie können Explosionen auslösen.
• Setzen oder lehnen Sie sich nicht auf die geöffneteTür: das Gerät könnte umkippen.
• Bevor Sie Spezialsalz, Reinigungsmittel oder Klarspüler einfüllen, müssen Sie sich vergewissern,
dass ihr Gebrauch vom Hersteller dieser Mittel für die Verwendung in Haushaltsgeschirrspülern
empfohlen wird.
• Drehen Sie stets denWasserhahn zu, wenn der Geschirrspüler für längere Zeit, wie z.B.im Urlaub
nicht benutzt wird.
1.1 HINWEISE ZUR SICHERHEIT

12345678901
12345678901
12345678901
12345678901
12345678901
12345678901
D
17
AUSPACKEN - VERPACKUNGSBESEITIGUNG
2
Entfernen Sie die äußereVerpackung aus Plastik, die Eckverstärkung sowie dieTeile aus Styropor.
Tür öffnen und die Styroporblöcke der Körbe herausnehmen.
Das Sammeln und Recycling von Verpackungsmaterial trägt zum Sparen von Rohmaterial und zur
Verringerung des Müllvolumens bei.
Geben Sie dieVerpackung bei den Sammelstellen für Recyclingmaterial ab.
Wenn das Gerät einesTages endgültig entsorgt werden muss, machen Sie es vor seiner Entsorgung
gebrauchsunfähig.
WARNUNG! Einige Verpackungsmaterialien (z.B. Plastiktüten, Styropor) kön-
nen für Kinder eine Gefahrenquelle darstellen.Halten Sie deshalb diese Mate-
rialien von Kindern fern.
Am Ende der Lebensdauer des Geräts muss es unter Einhaltung der gültigen Rechtsvorschriften von
spezialisierten Firmen verschrottet werden.
Auf diese Weise kann durch die Entsorgung eines alten Geräts, eine Wiederverwertung der für das
Recyclingbestimmten synthetischenMaterialiendurchgeführtwerdenund somit die Umweltgeschont
werden.
2.2 ENTSORGUNG DES ZU VERSCHROTTENEN GERÄTS
2.1 AUSPACKEN
3.1 SPARSAMES UND ÖKOLOGISCHES SPÜLEN
ALLGEMEINE HINWEISE
3
• Setzen Sie den Geschirrspüler nur in Betrieb, wenn er vollbeladen ist. Nur so kann sparsam und
umweltbewusst gespült werden.
• Wählen Sie stets ein Spülprogramm, das demTyp des Geschirrs und seinem Grad der Verschmut-
zung entspricht.
• Überdosierung von Reinigungsmittel, Spezialsalz und Klarspüler unbedingt vermeiden. Befolgen
Sie die empfohlenen Dosierungsmengen in den Gebrauchsanweisungen und Angaben der Herstel-
lerfirma dieser Produkte.
• Prüfen Sie, ob dieWasserenthärteranlage korrekt eingestellt ist.
3.2 UNGEEIGNETES GESCHIRR
Für die Reinigung im Geschirrspüler nicht geeignet sind:
- Holzschneidebretter oder kleine Holztabletts
- Plastikgegenstände, die nicht hitzebeständig sind
- Bleikristall
- Gegenstände aus Zinn oder Kupfer
- Geschirr oder Besteck mit zusammengeklebtenTeilen
- Relativ altes Besteck, dessen Klebstoff hitzeempfindlich ist
- Gegenstände aus Stahl, die leicht rosten
- Besteck mit Griffen aus Holz, Horn, Porzellan oder Perlmutt.
Beim Kauf von Geschirr, Gläsern und Besteck darauf achten, dass sie
geschirrspülmaschinenfest sind.
1234567890
1
23456789
0
1
23456789
0
1
23456789
0
1
23456789
0
1
23456789
0
1234567890
D
18
0,05 - 1MPa Model. ......................
....A
MAX .......W
........V.....Hz
Made in EU
...................
12
BESCHREIBUNG DES GERÄTS
4
4.2 TECHNISCHE DATEN
4.1 ALLGEMEINE ÜBERSICHT
Fassungsvermögen
(internationales Maßgedeck ) : 12
Druck in der Hydraulikanlage
Mindestdruck: 0,05 MPa
Höchstdruck: 1 MPa
ACHTUNG: die elektrischen
Eigenschaften werden auf dem
Datenschild angegeben.
1) Salzfach
2) Fach für den Klarspüler
3)
Trocknungsbelüfter (falls vorgesehen)
4) Fach für das Reinigungsmittel
5) Datenschild
6) Filter
7) Unterer Sprüharm
8) Oberer Sprüharm
9) Stromkabel
10) Wasserzulaufschlauch
11) Abwasserschlauch
12) Unterkorb
13) Oberkorb
14) Besteckkorb
15) Verschlusshaken derTür
LA2505-020/1
1
1
9
10
11
14
5
8
13
15
6
12
3 2
7
4
This manual suits for next models
1
Table of contents
Languages:
Other NEW POL Dishwasher manuals

NEW POL
NEW POL NW456W User manual

NEW POL
NEW POL NWD605DX User manual

NEW POL
NEW POL LVB 1040 User manual

NEW POL
NEW POL NWD3606DX User manual

NEW POL
NEW POL XD500 Manual

NEW POL
NEW POL NW3605DX User manual

NEW POL
NEW POL NWD605W User manual

NEW POL
NEW POL LVP 1030 User manual

NEW POL
NEW POL LVP1040 User manual

NEW POL
NEW POL LVG 2040 User manual


