New Vetec Provetscan SL-2S User manual

Provetscan SL-2S
High resolution and frequency
ultrasound wifi probe
User Manual

2
Introduction
provider to be connected by the main unit.
operating the device.
Different from traditional veterinary ultrasound scanners with a cable
connecting from probe to main unit, no cable appears at the end of the
SL-2S is the last generation instruments for ultrasonography for
Veterinaria with the outstanding feature of wireless.
probe of SL-2S Scanners.
The SL-2S Probe Scanner is highly integrated with ultrasound
image processing, power management and a wireless signal
The main units different with traditional devices are now changed to be
any mobile device. The probe acts as a Wi-Fi Access Point and can be
connected by mobile device. With the probe be connected
through Wi-Fi and the WirelessUSG App running, enjoy your days of
working without the trouble making cables.
This manual is intended to provide a through overview of the
SL-2S Scanner and should be carefully read before starting

3
1. Features
Display: iOS or Android mobile device
Scanning: Lineal
Probe: Transducer de 3,5 / 5MHz
Depth: 20-55 mm
Display mode: B mode
Gray levels: 256 levels
Battery life: 3 hours
Size: 155mm x 67mm x 20mm
Weight: 300g

2. Inicio
2.1 Desempaquetando
Incluidos
Artículos
4
For your protection please read these safety instructions completely before
applying power to, or operating the system.
fi
Items should be checked in order to ensure that all ordered items have been
received. The following table lists the items which should be received with each
particular system.
SL-2S wifi Ultrasound probe
USB Cable for charging
Transport suitcase
Wrist strap
Each item should be examined for any noticeable defects or damage that may have
occurred during shipment although it is packed carefully. If any defect or damage
exists, please contact to your local representative immediately to report the
problem.
2.2 Instaling APP
If the WirelessUSG App is not installed in your mobile device, open App Store or
Google Play and search “WirelessUSG”, when the App comes, it is free to install
the App.
The SL-2S Scanner is carefully packed to prevent damage during shipment. Before
unpacking, please note any visible damage to the outside of the shipping containers.

5
2.4 Conexión Wi-Fi
2.3 Conecting the probe
Seconds after the probe turned on, the Wireless Connection Indicator will be light and
blinking to notice that the probe is ready for a wireless connection from the mobile device.
The Wireless Connection Indicator and the Battery Capacity Indicator on the probe
may be invisible before the probe is turned on.
Theletters of the password must be entered in lower case.
Once connected to the WiFi network, start the SmartVus app. When you start working
with the probe, the WiFi signal indicator will no longer ash in the same way.
Press the button ON/OFF to turn on the probe. The battery capacity Indicator will be light to
indicate the capacity of the battery. The four grids of the indicator imply the battery
capacity.
The probe can be turned o by hold down the button for 3 seconds. When the probe is off, the
indicators will be turned off.
When the probe is waiting for a wireless connection as described in previously, launch the
Settings of mobile device, turn on the Wi-Fi (if not on), Find the SSID of the probe. The
SSID is like: “SL-2S GMBFLA001”, the prefix “SL-2S” is a code generated from Serial
Number. Connect to the SSID with the password same as the Serial Number. Password
could be like “wapbfla001”
6
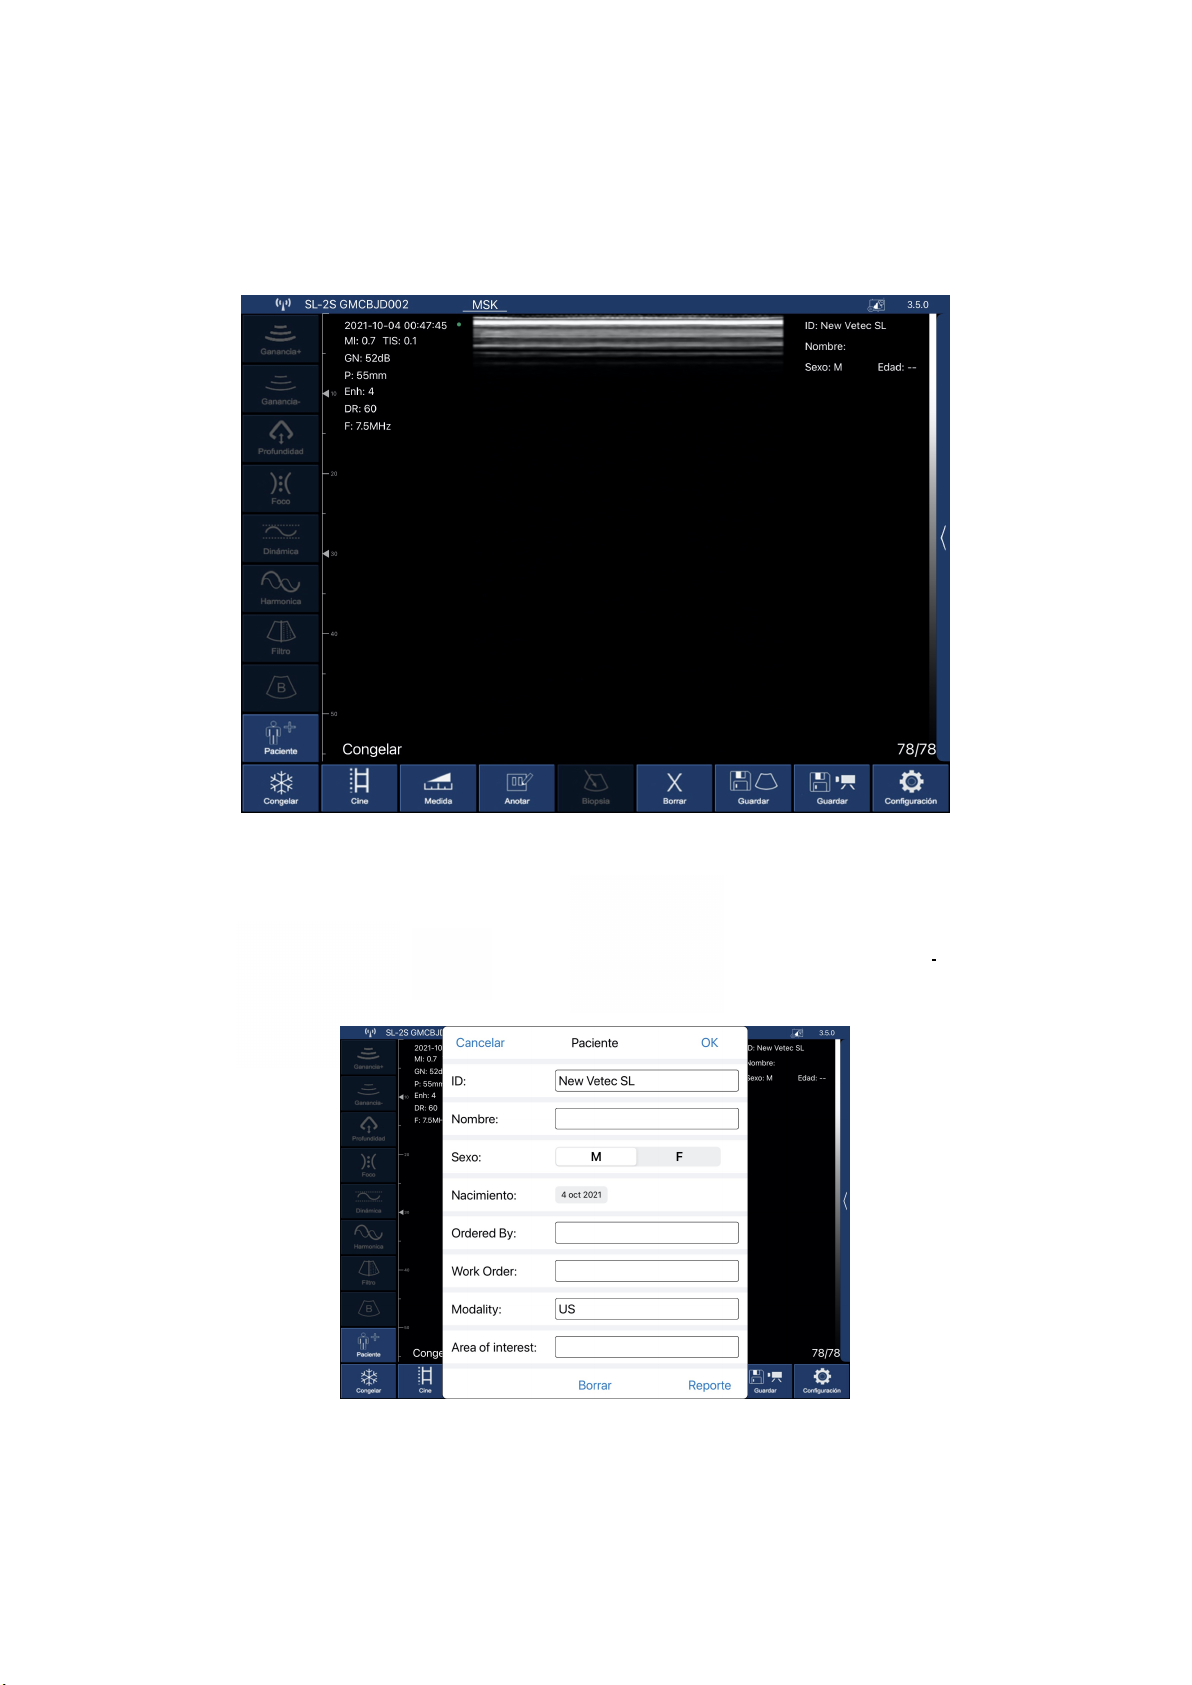
3. APP Operations
Once the probe is connected, start up the app and the main screen will appear.
No image is shown when you open the app for the first time.
3.1 Ultrasound scan
When you press the “Animal” button, a window pops up to enter the type of animal and the following fields:
The connected probe’s network is shown on the upper left.
Description of the buttons in the app:

7
GAIN is the ability to modify the ultrasound’s amplitude (magnitude of the ultrasound), changing the brightness of
the image. General gain changes affect the entire image equally.
Gain +: Raises scan gain up to 105 dB.
Gain - : Lowers scan gain down to 30 dB.
Depth
You can work with greater or lesser depth. Press the following button.
Focus
This is the maximum concentration of lines inside the ultrasound beam. This means
you must place the focus in the area of interest.
Adjusts the focus to obtain the best image, raising or lowering it on the screen.
Dinamic range
This process raises or reduces the difference between ultrasounds of greater or
lesser amplitude. With the Dynamic Range, you vary the amplitude of the signal
shown in grey scale. At a low setting, the image has greater contrast. When
increased, the image is softened.
The value range goes from 40 to 110. Lower settings increase the image’s contrast.
Changes the scan frequency from 7,5 to 10 MHz
Selects the 4 zooms available: 20, 30, 40 and 55 mm.
You can also adjust this by swiping your finger in the
middle of the screen, up or down.
Harmonic / Frequency
You must select the suitable frequency for the examination. With greater frequency,
there is lesser penetration, and vice-versa. With the Harmonic Image, the return signal
not only includes the base frequency, but also the frequency matching its double. The
ultrasound processes both signals separately, eliminating the basic frequency with its
noise.

8
Denoise
It’s an algorithm to eliminate spotting, to soften the image of the organs and to make
the edge of tissue softer. Lower settings increase image noise, and high settings
reduce it.
Reducing image grain. Range of value from 0 to 3.
B Mode
Two-dimensional representation of the ultrasounds, shown as light-up dots with
variable clarity, depending on frequency and depth.
Press this button to show the ultrasound options with modes BM
Freeze
Put the probe on stand-by by freezing the image to examine aspects more
thoroughly. The probe’s consumption is less than half of LIVE mode consumption.
Freeze and unfreeze (live) the image.
Play
This equipment permanently records a video sequence (Cine Loop) of the last 100,
200, 500 or 1000 frames. As new photograms are recorded, the previous ones are
deleted. To change the Cine Loop’s size, go to the settings button.
Once the image is frozen, this plays the saved Cine Loop.
Measurements
You have 5 measurement modes: length, angle, area/circumference, trace and
depth. Once the method is selected, take the measurement with your finger on the
screen, placing the cursors where you wish to measure for length mode, or by
drawing the desired area for area, circumference, and trace modes.
Press this button to drop-down the menu that shows length, area/ circumference and
trace measurements.
Annotations
You can make notes anywhere on the screen. You may input alphanumeric characters. If,
after leaving a comment on the screen, you save the image, then the note will be included.
This creates a window at the location on the screen where you pressed with your finger,
and the keyboard pops up to write.

Press this button to clear all measurements and annotations on the
screen.
Clear
SaveImage
Once the image is frozen, you have saved the 100, 200, 500 or 1000 images in the
Cine Loop that may be saved in the film roll. Swipe your fingers in the middle of the
screen to the left or the right to select the image you wish to save.
Save Video
When you freeze the image, like in the previous case, the Cine Loop stops recording,
and the entire photogram sequence can be saved. Videos will last 10, 20, 50 or 100
seconds.
This saves in the Cine Loop you were storing until you pressed Freeze in the
film roll.
Settings
Shows the settings you can adjust on the equipment.
Press this button for a pop-up window to modify the following parameters:
- Adjusting WiFi, 2.4 GHz channels. In the event of conflict with other WiFi network
channels nearby, the channel can be changed to prevent interference. If you change the
channel, you will lose the probe password and you will need to enter it again. See point 2.4
of this manual.
9
Finally, if you press the vertical bar on the right-hand side, you
can drop down the 8 sections of the TGC to adjust gain as
desired for each zone.
If you slide each one of the buttons to the right, you increase
gain at that screen height. Sliding it to the left decreases gain. If
you press RESET, you return the factory TGC settings.
- Show information: shows or hides information on screen parameters.
- Cine Loop: temporary recording made as you conduct the ultrasound. The last 100, 200,
500 or 1000 photograms will be saved.

10
4. Maintenance
4.1 Charging the probe
When the charger is connected to the USB cable, the platform’s LED light turns
green.
We recommend using a2A charger and the original cable for the wireless
charging base.
When the battery is being charged, the indicator levels will blink until charging is
complete. At this point, the four levels will be visible, without blinking. Charging
the battery can take up to 4 hours.
When the battery runs out, you must recharge it. You can do this with a wireless
charger. Not included as part of the series is the loading platform. Connect its USB
cable to it, and the mobile device charger.
The battery duration is 3 hours under constant operation.
The iPad lasts around 9 hours, depending on ambient light. If there is much light, the
iPad’s brightness will turn up to offset it, leading to higher consumption.

,
11
4.2 Tablet resistance
To prevent the tablet from becoming dirty from dust or getting moist or wet, a
water- proof cover is included. It is splash- and dust-resistant.
As aparticular recommendation, we suggest purchasing an IP68 cover for iPad
mini, which is also fall-resistant up to 1.2 m.
4.3 Cleaning
4.4 Storage
While storing the probe, we highly recommend that the temperature be no lower than 15°C.
If the probe or the mobile device’s temperature is lower, you must warm them before use.
The probe must periodically be cleaned. The part of the probe that is inserted into the
rectum has IP68 water- and dust-protection, meaning it resists dust and water, but the
(beige) electronic part cannot be submerged. You may use a damp cloth or paper to
clean it.
Another recommendation: regarding battery charge, if the probe and the tablet will not be
used for along period, we recommend storing them with afull charge.

New Vetec, S.L.
CIF: B42834465
Moises de León, 52 Bajo - León (España)
www.newvetec.com www.provetscan.com
Table of contents
Popular Medical Equipment manuals by other brands

BC Biomedical
BC Biomedical PS-2105 user manual

Drive
Drive DeVilbiss Healthcare Vacu-Aide 7325 Series Instruction guide

Asskea
Asskea proVisio M28 Instructions for use

HemoCue
HemoCue Glucose 201 operating manual

Moog
Moog Infinity Operator's manual

Fukuda Denshi
Fukuda Denshi Dynascope 8000 Series Operation manual

Rhythm Healthcare
Rhythm Healthcare P2 Getting started guide

Dräger
Dräger Secor 7000 Instructions for use

Otto Bock
Otto Bock 1S49 SACH Instructions for use

VQ OrthoCare
VQ OrthoCare BIONICARE OACTIVE Application Instructions

Otto Bock
Otto Bock 3R60 Instructions for use

Plinth 2000
Plinth 2000 502OPE Service manual


