Newgen 345 User manual

1
THE 345 & 345 LITE
EN15194:2017

2
CONTENTS
important Symbols 3
INTRODUCTION 4
Intended Use 5
Register your 345 6
Local Regulations 6
ABOUT YOUR BIKE 7
Unboxing & assembly 8
preparation for riding 10
Operating your 345 11
Battery 12
General safety 15
Display 16
Pre-Ride safety Checklist 20
Maintenance 21
Repairs & Maintenance-
Schedule 23
Declaration of conformity 24

3
IMPORTANT SYMBOLS
Please be aware of the following symbols used throughout the manual.
Tools required
Important Information
Warning
Newgen team Tip

4
INTRODUCTION
Thank you for purchasing The 345 from NewGen Bikes.
This manual contains information, warnings and cautions concerning the safe
operation of this bike. All information in the manual should be carefully reviewed
and if you have any questions you should contact NewGen Bikes immediately.
Keep this manual with your bike for future reference at any time, please note, the
content of this manual is subject to change or withdrawal without notice, for the
most up to date version please see www.newgenbikes.com. While this manual is
intended as a guide, it is not a comprehensive guide to cycling or bicycle
maintenance.
Before setting out on your first ride please make sure you have carefully read and
understood your owner’s manual, and that you are familiar with the 345’s
components and operation. We recommend that you familiarise yourself with your
new bike in a safe environment before heading out on the open road.
There are risks associated with the use of any bike which cannot be predicted or
avoided, and which are the sole responsibility of the rider.
Note: The 345 (Pedelec or electric bicycle) is refered to in this manual as
a bike, bicycle, NewGen Bike, 345, unless otherwise noted.

5
INTENDED USE
The 345 is designed for use on roads and well-made paths, carrying a
maximum load of 120kgs (rider, luggage). The 345 is not intended for
stunts, off road, racing or extreme sports. Your 345 should be used for its
intended purpose only.
The manufacturer is not liable for any direct or consequential damages.
Misuse may lead to failure of some components, void your warranty and
risk injury or death to the rider.
Knowledge Centre
For the most up to date manual and information on your 345 please visit our
knowledge centre.
www.newgenbikes/knowledgecentre.com
Contact Us
Email: Info@newgenbikes.com
Tel: +44 (0) 20 7193 3920
Web: www.newgenbikes.com
Social: Instagram.com/newgen_bikes

6
REGISTER YOUR 345
After purchasing your 345 it is important to register your bike. You will be asked to
enter your serial number which can be found on the frame sticker located under the
Cargo shelf.
Register your 345 with our online form to validate your warranty.
https://www.newgenbikes.com/345-registration
This will also keep you in the loop of any upcoming special promotions or product
updates.
LOCAL REGULATIONS
The EU recognises your 345 as an ‘electrically assisted pedal cycles’ (EAPCs). In the
UK, you do not need a driver’s licence to operate an electric bike nor do you need to
have it registered, taxed or insured, but you must be over the age of 14.
Electric bike laws and regulations vary from country to country so please make sure
you check your local country regulations. In most countries, you can ride an electric
bike in the bike lanes and on bike paths as you would a regular push bike.
It is illegal in the UK to cycle on a public road after dark without lights and reflectors.
Before riding at night be sure to check the battery power level, to ensure there is
sufficient charge to power the front and rear light for the duration of your ride.
When riding in the dark, it is advised to wear reflective clothing and you must use
lights (front and rear). For lights purchased by third parties, it is important to check
that they comply with local laws.

7
ABOUT YOUR BIKE

8
UNBOXING & ASSEMBLY
You should be confident that you have the skills required to safely
prepare your bike before use. If you have concerns about
assembling the bike safely please consider taking it to a bike shop
where a professional can assemble it for you.
We recommend asking a friend to help unpack and assemble your bike.
1. With two people lift your bike from the box it arrived in and set it
down using the kick stand to steady the bike.
2. Remove the box from underneath the cargo shelf. In the box you
will find:
1 x 5mm Allen Key
2 x Pedal
1 x 15mm Pedal Spanner
1 x Battery Charger
1 x 36v 14.5ah Battery
1 x Bell
1 x User Manual
1 x Set of reflectors
2 x Key & Carabiner
3. First take out the 5mm Allen key as you will now need this for
installing the handle bars.
4. Remove all protective packaging from the bike apart from the
handle bars.
5. Using the 5mm Allen Key remove all 4 bolts and plate from the
front stem.
6. Now release the handlebars from the protective packaging and
place them on the stem. Loosely screw the bolts and plate back
onto the stem making them finger tight.
9
7. Working in a diagonal sequence tighten each bolt by a half turn
before moving on to the next allowing each bolt to be tightened
evenly, until all are tight and the handlebar will not rotate in the
stem. Ensure the handlebars are perpendicular to the front wheel.
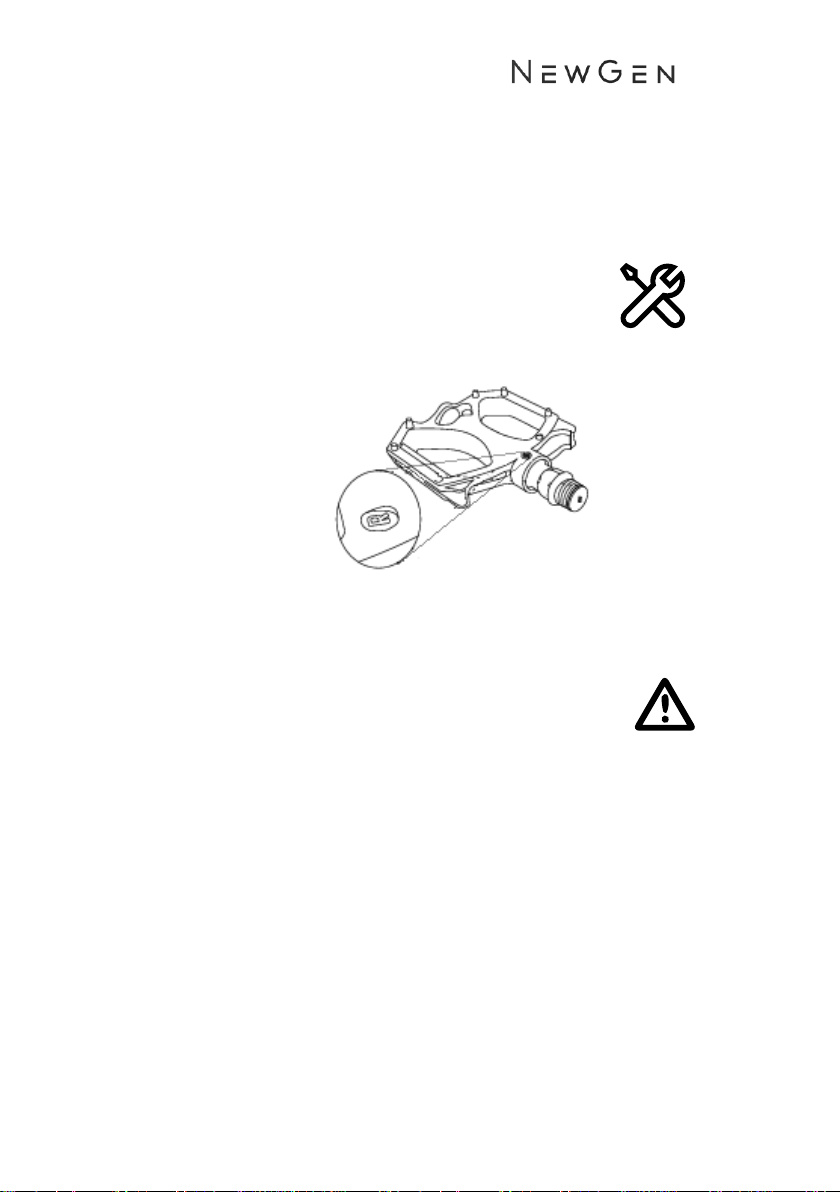
8. To avoid damage during shipping pedals are not pre-
installed onto the cranks, so you will need the 15mm
spanner and pedals from the box.
9. The pedals will look similar but one is intended for the
Right crank and one for the Left crank. Each pedal
will either have an R for Right and L for left.
10. Using the 15mm spanner attach the pedals to the crank arms:
-The Right pedal should be tightened in a clockwise
direction.
-The Left pedal should be tightened anticlockwise
direction.
11. The thread on the pedals should easily be found. If not
remove the pedal, realign and try again. Never use
force to engage the thread.

10
PREPARATION FOR RIDING
We recommend having your 345 checked over by a reputable bike store
before taking it out for its first ride.
Extreme care should be taken when using the pedal assistance sensor and throttle
on this product. Ensure you understand and are prepared for the power assistance
to engage as soon as pedalling is underway.
Users must understand the operation of the pedal assistance sensors and thumb
throttle (sold separately) before using the bike and take ample care in their usage in
respect to traveling at speeds appropriate for the usage area, riding conditions, and
user experience level. Always use the lowest assist level until you are comfortable
with the bike and feel confident in controlling the power.
Check the following before riding:
ELECTRICAL SYSTEM
Make sure you are familiar with the information on your bike’s display and fully
understand the function of the buttons. Please consult the Display section of the
manual if you are unsure before operating the bike.
WHEELS
Check the tyre pressure and make sure it is the correct value. Tyre pressure
requirements can be found on the sidewall of the tyre. Lift the font tyre off the
ground and spin the tyre to make sure they rotate smoothly, are true and do not rub
significantly against the brake pads. If the wheel is not true or rubs heavily on the
brake pads take the bike to a reputable bike shop to have the wheel checked out.
HEADSET
To check the headset is properly secure stand in front of your bike with the front
wheel firmly between your legs. Turn the handle bars to check for movement. If
movement occurs, realign your handlebar and tighten the headset and headpost.
BRAKES
Check the brakes by pulling both brake levers. You should feel an obvious pressure
point. Standing next to the bike rock it back and forth making sure the brakes stay
locked and the bike does not roll forward of back. The break levers should not touch
the handlebar.

11
OPERATING YOUR 345
1. Before heading out check your battery is fully charged!
2. Insert the battery into the rear of the bike. For instruction on how to insert and
remove the battery please refer to the Battery section (Pg.13) of this manual.
3. Make sure the Battery is firmly locked in place!
4. If you have a SW102 Display, hold down the power button on the top of the
display for 3 seconds. If you have a 850c display hold the power button on the
controls module for 3 seconds. (For information about what display you have
and how to operate the display please see the Display section of the manual.)
5. Select the Pedal Assist level by toggling the up ↑and down ↓arrows on the
display or controls module.
Always set the assist level to the lowest level (level 1) when you set
off to ensure you have full control of the bike. Then when you feel
comfortable increase the assist level. Pull the brake levers before
mounting the bike to avoid any unintentional movement.
6. If your 345 is fitted with the 850c display it will automatically turn on your
front light when it senses low light. On either display switch on your front light
by simply holding the ↑arrow on your display or control module for 3
seconds. A headlight icon will appear on your display indicating the front light
is on. To switch on your rear LED light simply push the rear light button found
on your handle bars.
7. After your ride turn off the bike by holding down the power button on the top
of the display if you have a SW102 Display for 3 seconds, if you have a 850c
display hold the power button on the controls module for 3 seconds. Switch off
the rear light by depressing the rear light button on the handle bars.
It’s always good practice to finish your ride in the lowest gear so
that next time you head off you have a nice and easy take off.
12
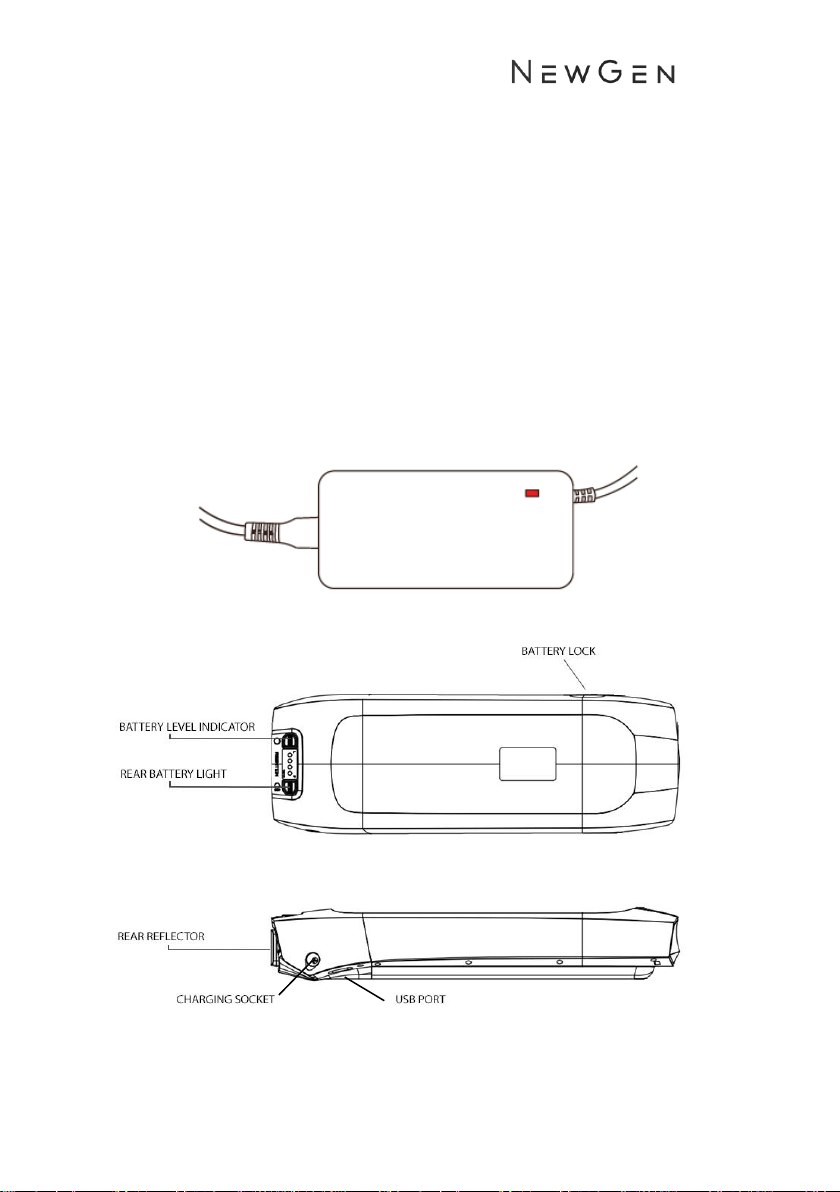
BATTERY
Charging
The 345 is equipped with a high-capacity Lithium Ion rechargeable battery. Charge
the battery fully before your first use. The battery will take around 5 hours to fully
charge to 100%. The charger that comes with your e-bike recognizes the battery
pack’s initial charge and will automatically cease charging when the battery is fully
charged. Follow the instruction contained on the label affixed to the battery charger.
The charger light will change from red to green when the battery is fully charged.
Always ensure the rubber charging port on the battery is properly closed and always
keep the battery and charge out of direct sunlight.
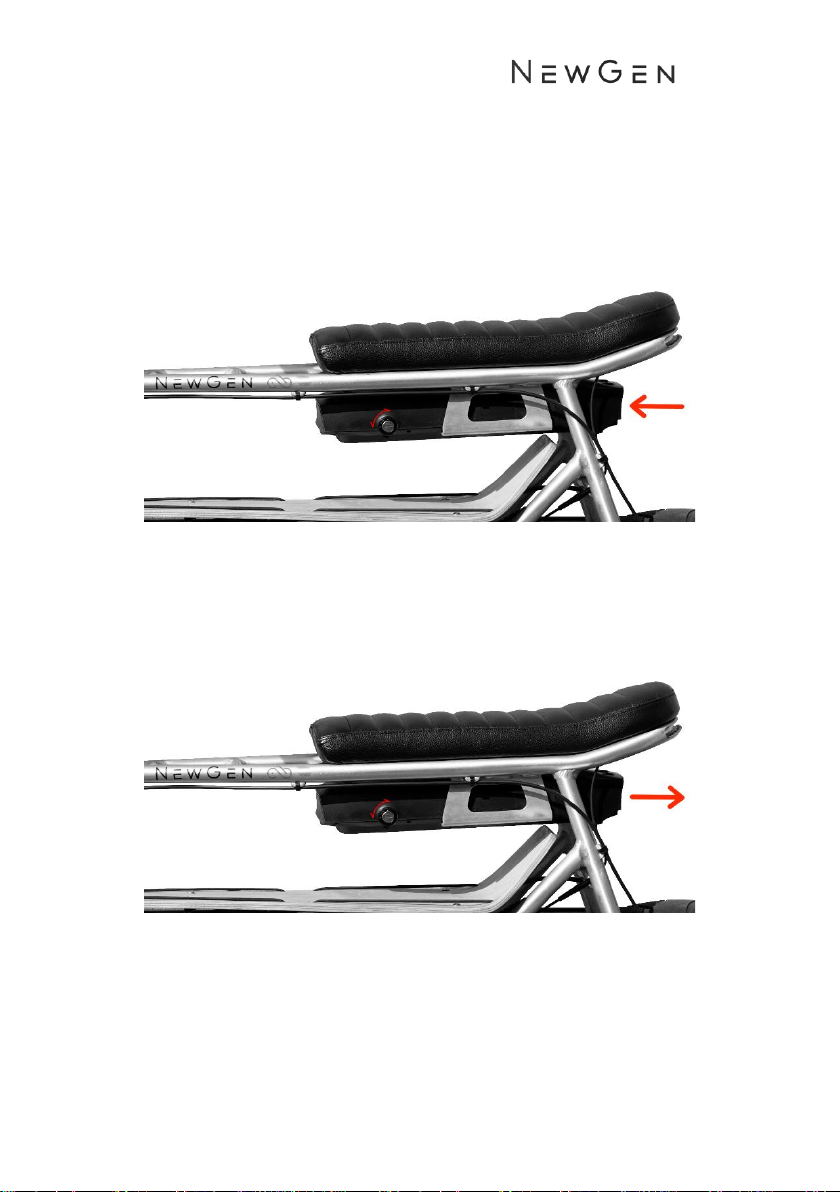
13
TO INSERT THE BATTERY, slide the battery into the rack under
the seat with both hands, the battery will not go all the way in and will be blocked
by the lock. With your other hand push the key into the lock and turn anti-clock
wise, this will open the lock and you can slide the battery home. Once in place turn
the key back clock wise and remove the key. To make sure the battery is locked in
place try pulling the battery back out.
TO REMOVE THE BATTERY push in and turn the key fully anti-
clockwise to unlock the battery from its case. With your other hand hold the rear of
the battery and pull it out from the rack. The battery pack can be charged while
connected on-board the bike and it can also be charged when removed off of the
bike.

14
Important safety information
regarding your battery& Charger
In order to maximise the life from your battery you should take care to use, store
and recharge it correctly. Over time the capacity of the battery will reduce,
eventually the battery my need replacing. The service life of the battery will vary
according with usage. The old battery should be disposed of responsibly, in
accordance with local regulations.
•The battery should be charged indoors in dry conditions and at room
temperature.
•Never use a battery that shows any signs of damage, leaks, dents in the
housing or that has been dropped.
•Only use the battery for your e-bike and do not attempt to use it for other
purposes.
•Do not leave your battery on the charger unattended.
•Charge your battery on a fire-resistant surface and/or in a safe place.
•Only use the original battery for your 345
•Keep the battery away from heat sources and fire.
•Do not expose your battery to liquids or water.
•Do not store your battery at very low temperatures (below 5 degrees Celsius)
•Remove the battery before transporting your bike
•Keep the battery out of reach of children and animals.
•Never temper with the battery. Do not open the case or try to repair the
battery. Do not attempt to modify the battery connector in any way.
•Do NOT touch damaged or defective batteries or cells as this may lead
to acid injuries or electric shocks.
•Remove the charger from the battery after charging
•Unplug your charger while not used
•Do not subject the battery in impact, throw or shock the battery. Protect your
battery against falling over or falling down.
•Do not park your vehicle over long periods with an installed battery
•If the charger or charging cable becomes damaged, do not use the charger.

15
GENERAL SAFETY
Riders should pay special attention to all general safely points below
before operating their 345. Neglecting these precautions may affect your
warranty and personal safety!
Road safety:
-When riding obey the applicable road laws in your local area.
-Ride predictably, in a straight line, and with the flow of traffic. Never ride
against traffic.
-Use hand signals to indicate turning and stopping
-Maintain a comfortable stopping distance from all other objects, riders, and
vehicles. Safe braking distances can change depending on the road surface,
light and weather conditions among other variables.
-It is not recommended to ride in wet weather. Your 345 is not is not meant for
use in heavy rain, puddles, streams or rivers.
-If riding in wet conditions Take extra care including decreasing speed and
increasing braking distances. Feet or hands can slip in wet conditions and lead
to serious injury and/or death.
-Avoid potholes, gravel, wet or oily roads, wet leaves, curbs, train tracks, speed
bumps, drain gates, thorns, broken glass and other obstacles, hazards and
puncture risks.
-Avoid hard bumps, impacts and shocks as these may damage the electronics,
frame battery and connectors.
-When riding on public roads, make sure you have front and rear lights and
reflectors in working conditions.
-If you note strange sounds or vibrations have you bike checked by a reputable
bike shop.
-Maintain a comfortable stopping distance from all other objects
-Secure any loose clothing while riding to prevent it getting caught in the any of
the bike’s moving parts.
-Do not carry passengers or cargo that will interfere with your ability to control
the bicycle.
-Squeezing the brake Lever too fast can lead to unintended sudden stopping
and cause you to crash or get rear ended.
-Make sure to test the braking power before heading into traffic. It can be
much more powerful than what you are used to.
16
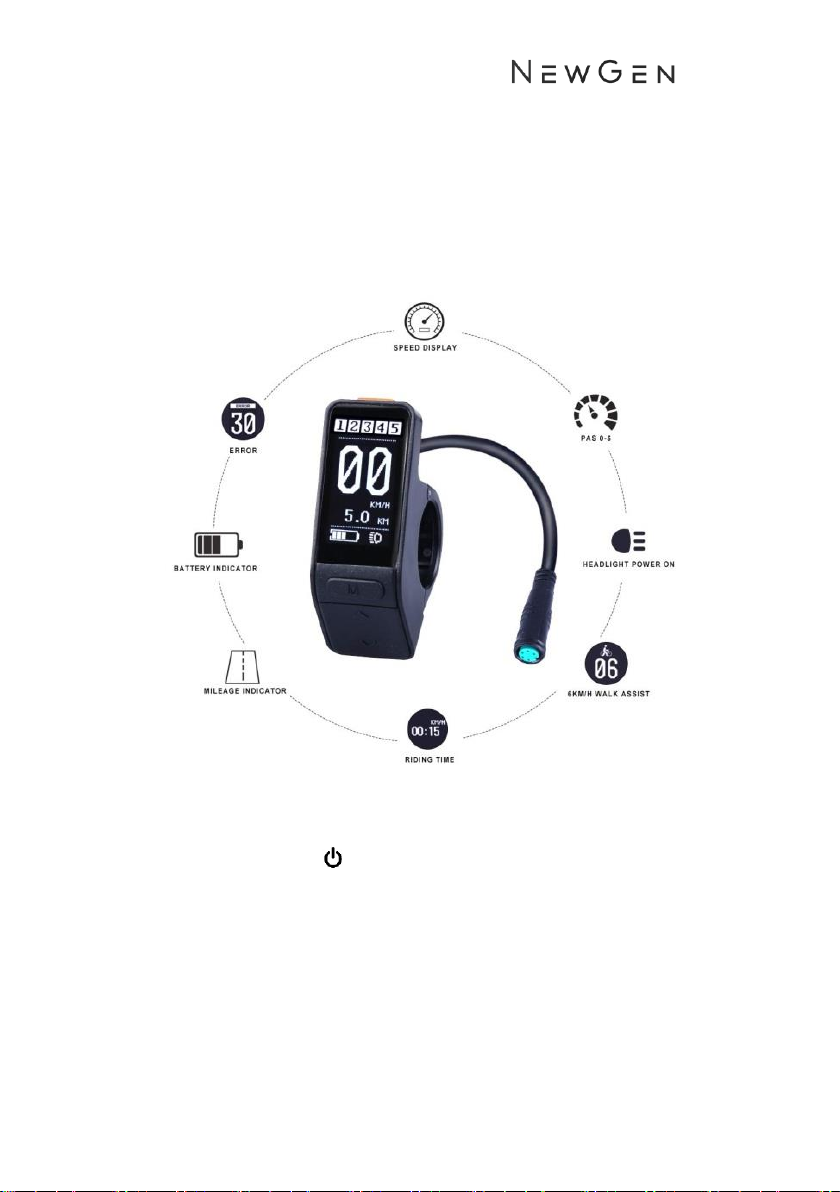
DISPLAY
The 345 and 345 Lite come fitted with either the stealth SW102 display or the full
colour 850c LCD Display. Do no attempt to operate the display while riding.
SW102 Display
Operation
1. Turning On/Off
•Long press the orange power button on the top of the display
for 3 seconds. The boot logo will appear followed by the
display interface.
•To switch off, long press the orange power button for 3
seconds.
2. Power Assist levels
•There are 5 levels of pedal assist. 1 being the lowest and 5
being the highest level of assist.

17
•The assist level is displayed at the top of the screen.
•Press ↑or ↓to select the level of assist required. The assist
level will always default to level 1 on start up.
3. Display Information
•To switch display information short press M to loop the
following information.
•Trip Miles (TRIP) →Riding Time (TRIP TIME) →Average Speed
(AVG) →Maximum Speed (MAX) →Total Mileage (ODO)
4. Walk Assist Mode
•Long press ↓for 2 seconds and the bike will
enter into walk mode assist. This will engage
the motor and accelerating the bike to a
walking pace (6km/h). Hold the ↓button to
maintain the walk mode. Walk mode will
disengage when the ↓is not pressed.
5. Headlight on/off
•Long press ↑for 2 seconds to turn the front utility light on.
The headlight icon will be displayed on the screen.
•Long press↑for 2 seconds to turn the front light off.
•Always remember to have both the front and rear lights on
when riding at night or in low light conditions.

18
850c LCD Display
Operation
1. Turning On/Off
•Long press the power button in the middle of the control
module for 3 seconds.
•To switch off, long press the middle power button for 3
seconds. The display can be set to automatically shut down
after a specified period of inactivity.
2. Power Assist levels
•There are 5 levels of pedal assist. 1 being the lowest and 5
being the highest level of assist.
•The assist level is show in the middle of the display.
•Press ↑or ↓on the control module to select the level of
assist required. The assist level will always default to level 1
on start up.
3. Display Information
•To switch display information short press the power button to
loop the following information.
•speed and mileage mode, AVG Speed->MAX Speed->RT
Speed-> Trip->ODO-> Time.
4. Walk Assist Mode

19
•Long press ↓for 2 seconds and the bike will enter into walk
mode assist. This will engage the motor and accelerating the
bike to a walking pace (6km/h). Hold the ↓button to
maintain the walk mode. Walk mode will disengage when the
↓ is not pressed.
5. Headlight on/off
•Long press ↑for 2 seconds to turn the front utility light on.
The headlight icon will be displayed on the screen.
•Long press↑for 2 seconds to turn the front light off.
•Always remember to have both the front and back
lights on when riding at night or in low light
conditions.
6. Charge other devices
•Under the display a USB charging port can be found to charge
other mobile devices such as your phone.
•The port provides 5V 500mA.
This manual suits for next models
1
Table of contents
Other Newgen Bicycle manuals


