Newgen 345-S Quick guide

ASSEMBLY &
MAINTENANCE
OWNER’S MANUAL
www.newgenbikescom
345-S

INDEX
INDEX ------------------------------------------------------------------------------------------------------------------------------------- 2
IMPORTANTSYMBOLS ------------------------------------------------------------------------------------------------------ 3
INTRODUCTION ---------------------------------------------------------------------------------------------------------- 4
INTENDED USE ------------------------------------------------------------------------------------------------------------------ 5
REGISTER YOUR 345 -------------------------------------------------------------------------------------------------------- 6
LOCAL REGULATIONS -------------------------------------------------------------------------------------------------------- 6
ABOUT YOUR BIKE --------------------------------------------------------------------------------------------------- 7
UNBOXING & ASSEMBLY ------------------------------------------------------------------------------------ 7
PREPARATION FOR RIDING -------------------------------------------------------------------------------------- 11
OPERATING YOUR345 ---------------------------------------------------------------------------------------------- 12
BATTERY ------------------------------------------------------------------------------------------------------------------------------- 13
GENERAL SAFETY ---------------------------------------------------------------------------------------------------------- 16
DISPLAY ------------------------------------------------------------------------------------------------------------------------------ 17
PRE-RIDE SAFETY CHECKLIST ----------------------------------------------------------------------------------- 19
MAINTENANCE ------------------------------------------------------------------------------------------------------------ 20
REPAIRS & MAINTENANCE-SCHEDULE ------------------------------------------------------------ 22
02
345

Please be aware of the following symbols used throughout the manual.
TOOLS REQUIRED
IMPORTANT INFORMATION
WARNING
NEWGEN TEAM TIP
IMPORTANT SYMBOLS
03
345

INTRODUCTION
Thank you for purchasing your 345-S from NewGen Bikes.
This manual contains information, warnings and cautions concerning the safe operation of
your bike. All information in this manual should be carefully reviewed and if you have any
questions, please contact NewGen Bikes immediately.
Keep this manual with your bike for future reference. Please note, the content of this manual
is subject to change or withdrawal without notice, for the most up to date version please see
www.newgenbikes.com. While this manual is intended as a guide, it is not a comprehensive
guide to cycling or bicycle maintenance.
Before setting out on your rst ride please make sure you have carefully read and understood
your owner’s manual, and that you are familiar with the 345’s components and operation.
We recommend that you familiarise yourself with your new bike in a safe environment
before heading out on the open road.
There are risks associated with the use of any bike which cannot be predicted or avoided,
and are the sole responsibility of the rider.
Note: The 345-S (electric bicycle) is referred to in this manual as a bike, bicycle, NewGen
Bike, 345, unless otherwise noted.
04
345

Knowledge Centre
Contact Us
The 345-S is designed for O Road or Private Land use in the UK and EU, carrying a
maximum load of 120kgs (rider, luggage). The 345-S is not intended for public roads,
stunts, racing or extreme sports. Your 345-S should be used for its intended purpose
only. No liability or warranty shall be accepted if the use of the 345-S deviates from
the intended use.
The manufacturer is not liable for any direct or consequential damages. Misuse may
lead to failure of some components, void your warranty and risk injury or death to
the rider.
For the most up to date manual and information on your 345-S please visit our knowledge
centre.
www.newgenbikes/knowledgecentre.com
: +44 (0) 20 7193 3920
: www.newgenbikes.com
: instagram.com/newgen_bikes
INTENDED USE
05
345

LOCAL REGULATIONS
After purchasing your 345-S it is important to register your bike. You will be asked to enter
your serial number which can be found on the top of your bottom bracket.
Scan the below QR code to register your 345-S with our online form to validate your warranty.
The 345-S in only permitted for Off Road and Private Land use in the UK and Europe.
Electric bike laws and regulations vary from country to country so please make sure you
check your local country regulations.
Alternatively visit our website www.newgenbikes.com/345-registration
Registration will keep you in the loop of any upcoming special promotions or product
updates.
REGISTER YOUR 345
06
345

UNBOXING & ASSEMBLY
You should be condent that you have the skills required to safely prepare your bike
before use. If you have concerns about assembling the bike safely please consider taking
it to a bike shop where a professional can assemble it for you.
We recommend asking a friend to help unpack and assemble your bike.
ABOUT YOUR BIKE
07
345

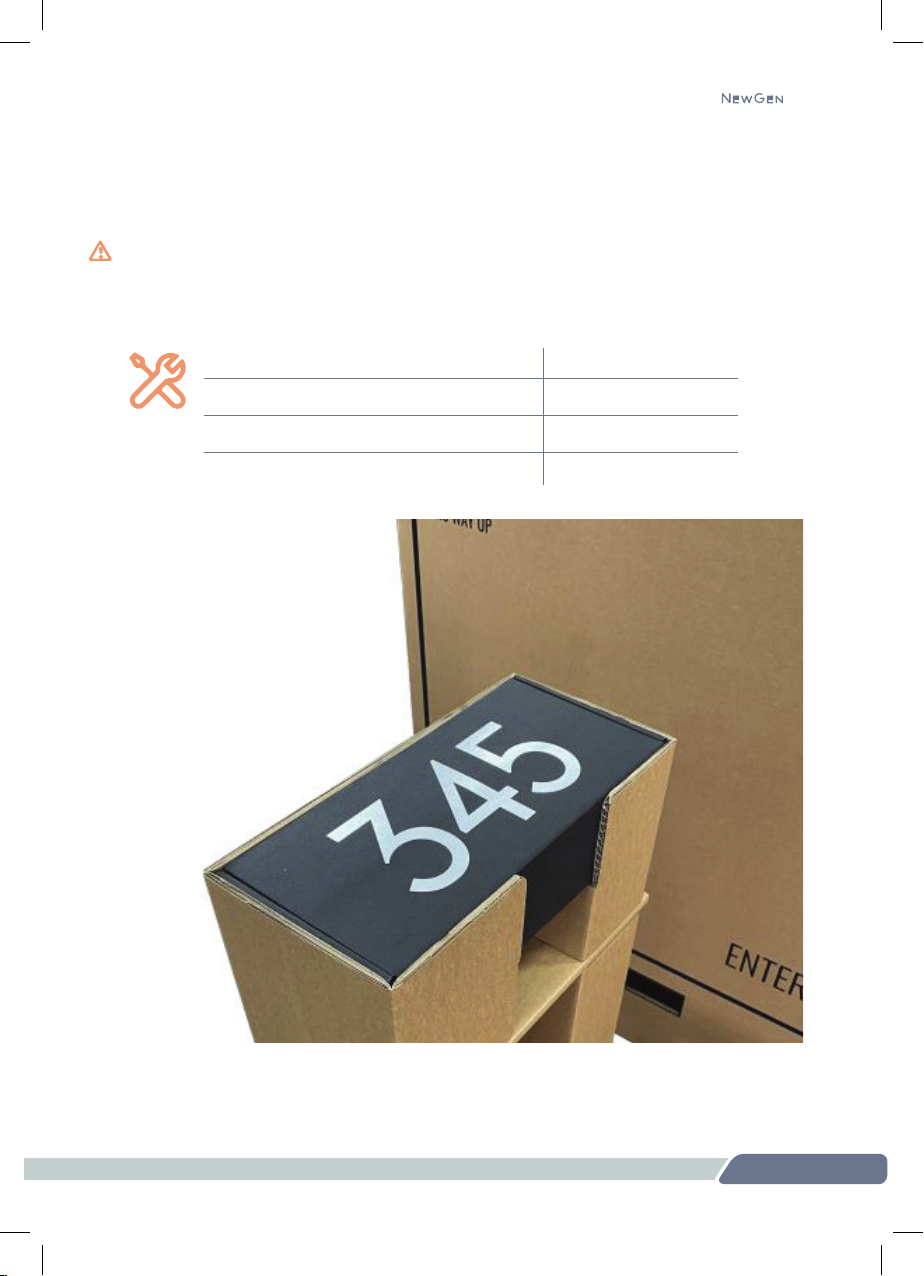
1. Remove the 4 plastic inserts around the bottom of the box and then with two people lift
the top box off and set it down next to the bike.
Make sure not to lift the bike from the front light as it is not designed to hold the weight of the bike.
2. Remove the box from the tower to the rear of the bike. In the box you will nd:
3. Slide out the tower on the opposite side of the box allowing you to roll out your 345-S
from its channel. Use the bike stand to prop up the bike whilst you complete the rest of
the assembly.
1 x 6mm Allen Key 2 x Pedal
1 x 15mm Pedal Spanner 1 x Battery Charger
1 x User Manual 1 x Bell
2 x Key (Also attached to handle bars)
08
345

3. Now release the handlebars from the protective packaging and place them on the
stem. Loosely screw the bolts and plate back onto the stem making them nger tight.
4. Working in a diagonal sequence tighten each bolt by a half turn before moving on to
the next allowing each bolt to be tightened evenly, until all are tight and the handlebar
will not rotate in the stem. Ensure the handlebars are perpendicular to the
front wheel.
5. To avoid damage during shipping, pedals are not pre-installed onto the
cranks, so you will need the 15mm spanner and pedals from the box.
THE 345 HANDLE BAR AND PEDAL ASSEMBLY
1. First take out the 6mm Allen key as you will now need this for installing the
handle bars.
2. Using the 6mm Allen Key remove all 4 bolts and plate from the front stem.
09
345

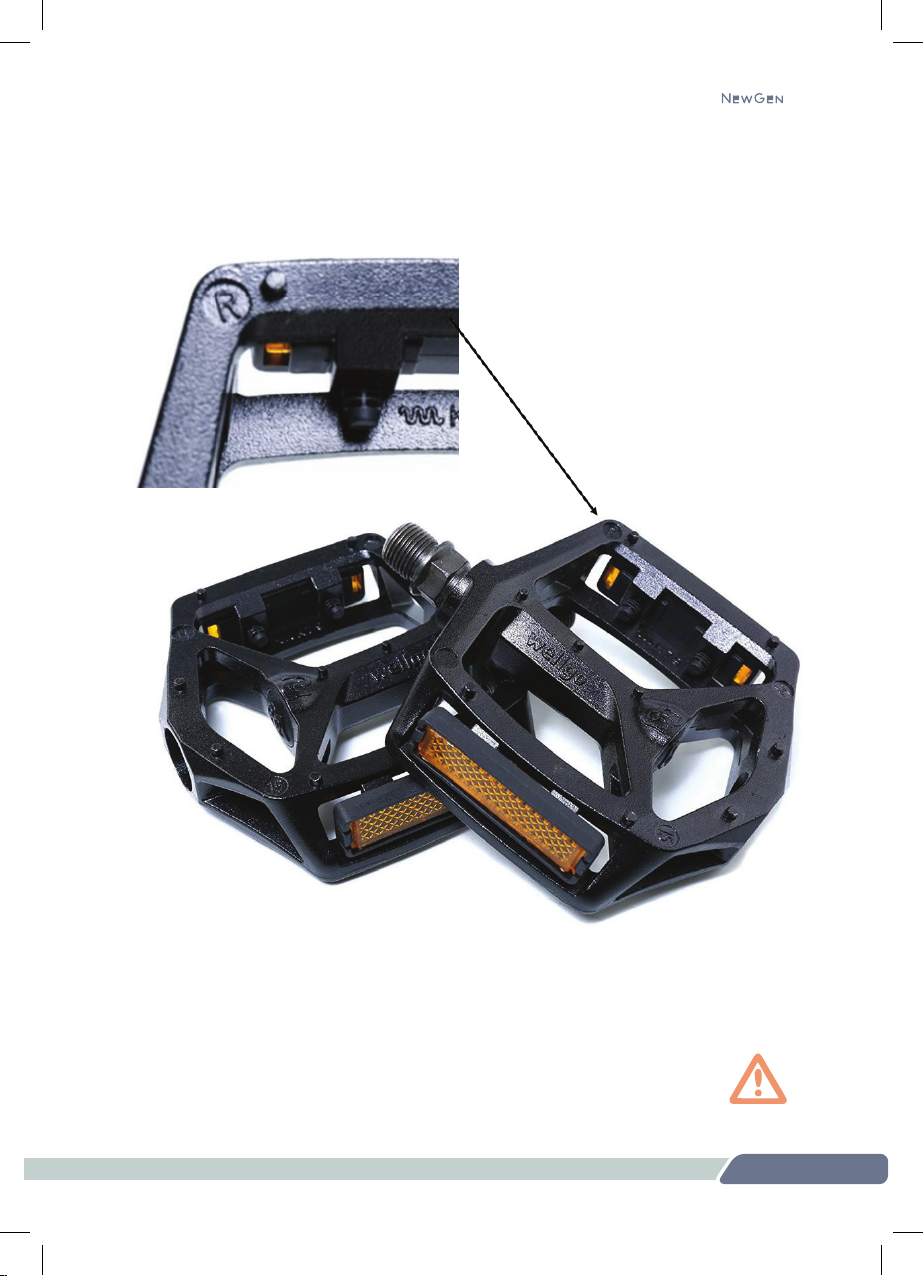
7. Using the 15mm spanner attach the pedals to the crank arms:
• The Right pedal should be tightened in a clockwise direction.
• The Left pedal should be tightened anticlockwise direction.
8. The thread on the pedals should easily be found. If not remove the
pedal, realign and try again. Never use force to engage the thread.
6. The pedals will look similar but one is intended for the Right crank and one for the Left
crank. Each pedal will either have an R for Right and L for left. The right and left side
of the bike are from the perspective of the rider.
10
345

We recommend having your 345-S checked over by a reputable bike store before
taking it out for its rst ride.
Extreme care should be taken when using the pedal assistance sensor and throttle on this
product. Ensure you understand and are prepared for the power assistance to engage as
soon as pedalling is underway.
Users must understand the operation of the pedal assistance sensors and thumb throttle (sold
separately) before using the bike and take ample care in their usage in respect to traveling
at speeds appropriate for the usage area, riding conditions, and user experience level.
Always use the lowest assist level until you are comfortable with the bike and feel condent
in controlling the power.
Check the following before riding:
ELECTRICAL SYSTEM
Make sure you are familiar with the information on your bike’s display and fully understand
the function of the buttons. Please consult the Display section of the manual if you are unsure
before operating the bike.
WHEELS
Check the tyre pressure and make sure it is the correct value. Tyre pressure requirements
can be found on the sidewall of the tyre. Lift the front tyre off the ground and spin the tyre
to make sure they rotate smoothly, are true and do not rub signicantly against the brake
pads. If the wheel is not true or rubs heavily on the brake pads take the bike to a reputable
bike shop to have the wheel checked out.
HEADSET
To check the headset is properly secure, stand in front of your bike with the front wheel rmly
between your legs. Turn the handle bars to check for movement. If movement occurs, realign
your handlebar and tighten the headset and headpost.
BRAKES
Check the brakes by pulling both brake levers. You should feel an obvious pressure point.
Standing next to the bike, rock it back and forth making sure the brakes stay locked and
the bike does not roll forward of back. The brake levers should not touch the handlebar.
PREPARATION FOR RIDING
345

1. Before heading out check your battery is fully charged!
2. Insert the battery into the rear of the bike. For instruction on how to insert and remove
the battery please refer to the Battery section (Pg.17) of this manual.
3. Make sure the Battery is rmly locked in place!
4. To switch on the bike, hold down the power button on the underside of the display for
3 seconds. (For information about how to operate the display please see the Display
section of the manual.)
5. Select the Pedal Assist level by toggling the up + and down - buttons on the display.
Always set the assist level to the lowest level (level 1) when you set off to ensure you have full
control of the bike. Then when you feel comfortable increase the assist level. Pull the brake
levers before mounting the bike to avoid any unintentional movement.
It’s always good practice to nish your ride in the lowest gear so that next time you head off
you have a nice and easy take off.
6. To switch on your front and rear light simply hold down the + button on your display 3
seconds. A headlight icon will appear on your display indicating the front light is on.
Switch off the lights by holding down the + button on the display for 3 seconds.
7. After your ride turn off the bike by holding down the power button on the underside of
the display for 3 seconds.
OPERATING YOUR 345
12
345

BATTERY
The 345-S is equipped with a high-capacity Lithium Ion rechargeable battery. Charge
the battery fully before your rst use. The battery will take around 5 hours to fully charge.
The charger that comes with your e-bike recognizes the battery pack’s initial charge and
will automatically cease charging when the battery is fully charged. Follow the instruction
contained on the label afxed to the battery charger. The charger light will change from red
to green when the battery is fully charged. Always ensure the rubber charging port on the
battery is properly closed and always keep the battery and charger out of direct sunlight.
345
13

TO INSERT THE BATTERY, slide the battery into the rack under the seat with both hands, the
battery will not go all the way in and will be blocked by the lock. With your other hand
push the key into the lock and turn anti-clock wise, this will open the lock and you can slide
the battery home. Once in place turn the key back clockwise and remove the key. To make
sure the battery is locked in place try pulling the battery back out.
TO REMOVE THE BATTERY, push in and turn the key fully anti-clockwise to unlock the battery
from its case. With your other hand hold the rear of the battery and pull it out from the rack.
The battery pack can be charged while connected on-board the bike and it can also be
charged when removed from of the bike.
14
345

Important safety information regarding your battery & Charger
In order to maximise the life from your battery you should take care to use, store and
recharge it correctly. Over time, the capacity of the battery will reduce and eventually the
battery may need replacing. The service life of the battery will vary according with usage.
The old battery should be disposed of responsibly, in accordance with local regulations.
• The battery should be charged indoors in dry conditions and at room temperature
• Never use a battery that shows any signs of damage, leaks, dents in the housing or
that has been dropped
• Only use the battery for your e-bike and do not attempt to use it for other purposes
• Do not leave your battery on the charger unattended
• Charge your battery on a re-resistant surface and/or in a safe place
• Only use the original battery for your 345-S
• Keep the battery away from heat sources and re
• Do not expose your battery to liquids or water
• Do not store your battery at very low temperatures (below 5 degrees Celsius)
• Remove the battery before transporting your bike
• Keep the battery out of reach of children and animals
• Never tamper with the battery. Do not open the case or try to repair the battery. Do not
attempt to modify the battery connector in any way
• Do NOT touch damaged or defective batteries or cells as this may lead to acid
injuries or electric shocks
• Remove the charger from the battery after charging
• Unplug your charger when not used
• Do not subject the battery to impact, throw or shock the battery. Protect your battery
against falling over or falling down
• Do not park your vehicle over long periods with an installed battery
• If the charger or charging cable become damaged, do not use the charger
345
15

GENERAL SAFETY
Riders should pay special attention to all general safety points below before
operating their 345. Neglecting these precautions may affect your warranty
and personal safety!
Road safety:
• When riding obey the applicable road laws in your local area
• Ride predictably, in a straight line, and with the ow of trafc. Never ride against trafc
• Use hand signals to indicate turning and stopping
• Maintain a comfortable stopping distance from all other objects, riders, and vehicles.
Safe braking distances can change depending on the road surface, light and weather
conditions among other variables
• It is not recommended to ride in wet weather. Your 345 is not is not meant for use in
heavy rain, puddles, streams or rivers
• If riding in wet conditions take extra care including decreasing speed and increasing
braking distances. Feet or hands can slip in wet conditions and lead to serious injury
and/or death
• Avoid potholes, gravel, wet or oily roads, wet leaves, curbs, train tracks, speed bumps,
drain gates, thorns, broken glass and other obstacles, hazards and puncture risks
• Avoid hard bumps, impacts and shocks as these may damage the electronics, frame
battery and connectors
• When riding on public roads, make sure you have front and rear lights and reectors in
working conditions
• If you note strange sounds or vibrations have you bike checked by a reputable bike shop
• Maintain a comfortable stopping distance from all other objects
• Secure any loose clothing while riding to prevent it getting caught in the any of the bike’s
moving parts
• Do not carry passengers or cargo that will interfere with your ability to control the bicycle.
• Squeezing the brake Lever too fast can lead to unintended sudden stopping and cause
you to crash or get rear ended
• Make sure to test the braking power before heading into trafc. It can be much more
powerful than what you are used to
16
345

The 345-S comes tted with the 500c high contrast 2.2 inch IPS screen. Do no attempt to
operate the display while riding.
DISPLAY
345
17

Operation
1. Turning On/O
• Long press the power button on the underside of the display for 3 seconds. The
boot logo will appear followed by the display interface
• To switch off, long press the power button for 3 seconds
2. Power Assist levels
• There are 5 levels of pedal assist. 1 being the lowest and 5 being the highest level
of assist
• The assist level is displayed at the bottom right of the screen.
• Press +or --- to select the level of assist required. The assist level will always default
to level 1 on start up
3. Display Information
• To switch display information press Mto loop the following information
• Trip Miles (TRIP) → Riding Time (TRIP TIME) → Average Speed (AVG) → Maximum
Speed (MAX) →Total Mileage (ODO)
4. Walk Assist Mode
• Long press ---- for 2 seconds and the bike will enter into walk mode assist. This will
engage the motor and accelerate the bike to a walking pace (6km/h). Hold the
----- button to maintain the walk mode. Walk mode will disengage when the --- is
not held down
5. Headlight on/o
• Long press + for 2 seconds to turn the front utility light on. The headlight icon will
be displayed on the screen
• Long press+for 2 seconds to turn the front light off
• Always remember to have both the front and rear lights on when riding
at night or in low light conditions
18
345

Before riding your 345-S for the rst time, and periodically thereafter, please pay close
attention to the following:
• We recommend the use of an approved cycling helmet, even in countries like the UK
where their use is not mandatory
• Before heading off, please take the time to familiarize yourself with the operation of the
bike and pedal assist system in a safe environment away from hazards
• Ensure your battery is locked securely in place, do so by pushing the battery into the
holder until it clicks into place. Remove the key from the lock and pull the battery to
check it’s locked in place
• Check the brakes by pulling both brake levers. You should feel an obvious pressure
point. The break levers should not touch the handlebar
• Check brakes and Tyres (including Tyre pressure) regularly
• Check that all wheel nuts and brake screws are properly tightened
• Take extra care while riding in wet conditions including decreasing speed and
increasing braking distances. Feet or hands can slip in wet conditions and lead
to serious injury and/or death
PRE-RIDE SAFETY CHECKLIST
345
19

Follow these basic guidelines and see a certied, reputable bike mechanic at regular
intervals to ensure your bike is safe for use. Performing regular maintenance on your 345-
S can improve the bike’s riding efciency and extend the bike components life. When
carrying out any maintenance on your 345-S make sure the bike is turned off, it’s securely
positioned and the battery is removed. This will reduce the potential for damaging the bike
or injuring yourself.
BRAKES
GEARS
Brakes are one of the most important parts of your bike and require regular attention. Your
345-S is tted with Hydraulic Disc brakes.
Hydraulic brakes require specialist equipment to carry out certain adjustments and
maintenance. We would recommend this is carried out by a professional, most local bike
shops will be able to perform this service for you. After a while (depending on use) the
pads in the callipers get warn down and should be replaced. Replacements can be found
at most local bike shops.
Disc brakes generally take a little time to settle in and it’s more than likely they will squeak
a little on your rst few rides as they adjust.
The 345-S uses Magura MT4 eSTOP brakes optimised for e-bikes. For any manufacturing
problems or questions related to Magura brakes please contact the manufactures. www.
magura.com/en/components/techcenter/
Poor and noisy gear changes can often be a result of chain misalignment. To check alignment
put the bike in the highest gear and look from the back of the bike. The rear derailleur cogs
should be in line with the smallest sprocket on the cassette. Rotate the adjuster clockwise
and anticlockwise until the derailleur cog is aligned with the sprocket. If the gear changes
are still poor, we recommend taking your 345-S to a local bike shop for a service.
MAINTENANCE
20
345
This manual suits for next models
1
Table of contents
Other Newgen Bicycle manuals