Newport N37B User manual
N
N3
37
7B
B
R
Ru
ug
gg
ge
ed
d
H
Ha
an
nd
dh
he
el
ld
d
R
Re
ea
ad
de
er
r
U
Us
se
er
r
M
Ma
an
nu
ua
al
l
(Version:V3.1)

2
NewportDigitalTechnologies
Oct.‐2009
About This Manual
Thismanualexplainshowtoinstall,operateandmaintaintheN37BRugged
HandheldReader.Nopartofthispublicationmaybereproducedorusedinanyform,
orbyanyelectricalormechanicalmeans,withoutpermissioninwritingfromthe
manufacturer.Thisincludeselectronicormechanicalmeans,suchasphotocopying,
recording,orinformationstorageandretrievalsystems.Thematerialinthismanual
issubjecttochangewithoutnotice.
NewportDigitalTechnologieshasmanyyearsexperienceindesigningcomputersto
meetsevereenvironmentalapplications.Theseapplicationsincludethosefoundby
militaryaswellasindustrialusers.TheN37Bhasbeendesignedtocomplywiththe
relevantrequirementsofMIL_STD‐810F,MIL‐STD‐461FandIP67.Theseinclude
EMC,EMI,temperature,Shock,vibration,humidity,dustandwater.Inadditionthe
N37Bhasbeendevelopedtobereliableunderalloperationalconditionsthatmaybe
encounteredbymilitaryservicesthroughouttheworld..
©Copyright2009NewportDigitalTechnologies,Inc.Allrightsreserved.
Microsoft,WindowsandActiveSyncareeitherregisteredtrademarksortrademarks
ofMicrosoftCorporation.Otherproductnamesmentionedinthismanualmaybe
trademarksorregisteredtrademarksoftheirrespectivecompaniesandarehereby
acknowledged.

3
Regulatory Compliance Statements
FCC Statement
ThisdevicecomplieswithPart15oftheFCCRules.Operationissubjecttothe
followingtwoconditions:
(1)thisdevicemaynotcauseharmfulinterference,and
(2)thisdevicemustacceptanyinterferencereceived,includinginterferencethat
maycauseundesiredoperation.
CAUTION!ExposuretoRadioFrequencyRadiation.Theradiatedoutputpowerof
thisdeviceisfarbelowtheFCCradiofrequencyexposurelimits.Forbodyworn
operation,thisdevicehasbeentestedandmeetstheFCCRFexposureguidelinesfor
usewithanaccessorythatcontainsnometalandthepositionsthehandseta
minimumof1.5cmfromthebody.Useofotherenhancementsmaynotensure
compliancewithFCCRFexposureguidelines.
Federal Communications Commission Notice
ThisequipmenthasbeentestedandfoundtocomplywiththelimitsforaClassB
digitaldevice,pursuanttoPart15oftheFCCRules.Theselimitsaredesignedto
providereasonableprotectionagainstharmfulinterferenceinaresidential
installation.Thisequipmentgenerates,uses,andcanradiateradiofrequencyenergy.
Ifthisequipmentdoescauseharmfulinterferencetoradioortelevisionreception,
whichcanbedeterminedbyturningtheequipmentoffandon,theuseris
encouragedtotryandcorrecttheinterferencebyoneormoreofthefollowing
measures:
•Reorientorrelocatethereceivingantenna.
•Increasethedistancebetweentheequipmentandthereceiver.
•Connecttheequipmenttoanoutletonacircuitdifferentfromthattowhich
thereceiverisconnected.
•Consultthedealeroranexperiencedradio/TVtechnicianforhelp.
ThemaximumSARvaluereportedis0.231W/kg.
Changesormodificationsnotexpresslyapprovedbythepartyresponsiblefor
compliancecouldvoidtheuser‘sauthoritytooperatetheequipment.
zTheantenna(s)usedforthistransmittermustnotbeco‐locatedoroperatingin
conjunctionwithanyotherantennaortransmitter.

4
Safety
UsethefollowingsafetyguidelinestohelpprotectyourselfandtheN37B.
•DonotattempttoservicetheN37Byourself.Alwaysfollowinstallationinstructions
closely.
•BesurethatnothingrestsontheACadapter'spowercableandthatthecableis
notlocatedwhereitcanbetrippedoverorsteppedon.
•DonotcovertheACadapterwithpapersorotheritemsthatwillreducecooling;
also,donotusetheACadapterwhileitisinsideacarryingcase.
•UseonlytheACadapter,powercord,andbatteriesthatareapprovedforusewith
thisN37B.UseofanothertypeofbatteryorACadaptermaycauseriskoffireor
explosion.
•IfyouuseanextensioncablewiththeACadapter,ensurethatthetotalampere
ratingoftheproductspluggedintotheextensioncabledoesnotexceedtheampere
ratingoftheextensioncable.
•WhenyoumovetheN37Bbetweenenvironmentswithverydifferenttemperature
and/orhumidityranges,condensationmayformonorwithintheN37B.Toavoid
damagingtheN37B,allowsufficienttimeforthemoisturetoevaporatebeforeusing
theN37B.
•Whenyoudisconnectacable,pullonitsconnectororonitsstrainreliefloop,not
onthecableitself.Asyoupullouttheconnector,keepitevenlyalignedtoavoid
bendinganyconnectorpins.Also,beforeyouconnectacablemakesureboth
connectorsarecorrectlyorientedandaligned.
Battery Safety
•Thereisariskofexplosionifthebatteryisreplacedbyanincorrecttype.
•Disposeofusedbatteriesaccordingtotheinstructions.
•Donotdisposeofbatteriesinafire.Theymayexplode.Checkwithlocalauthorities
fordisposalinstructions.
Notices
Thisunitisequippedwithabatterypackandbackupbattery.Itispossiblethatthe
HENDHELDmaynotpower‐onduetobatterydischargeasaresultofstorage.
Rechargetheunitfor3hoursinordertofullychargeitsbattery.Thebackupbattery
willrechargefromexternalpowerwhentheACadapterisconnected.

5
Battery charge notice
Itisimportanttoconsidertheenvironmenttemperaturewheneveryouarecharging
theLithium‐Ionbatterypack.Theprocessismostefficientatnormalroom
temperatureorslightlycooler.Itisessentialthatyouchargebatterieswithinthe
statedrangeof0°Cto50°C.chargingbatteriesoutsideofthespecifiedrangecould
damagethebatteriesandshortentheircharginglifecycle.
Storage and safety notice
AlthoughchargedLithium‐Ionbatteriesmaybeleftunusedforseveralmonths,their
capacitymaybedepletedduetobuildupofinternalresistance.Ifthishappensthey
willrequirerechargingpriortouse.Lithium‐Ionbatteriesmaybestoredat
temperaturesbetween‐20°Cto50°C,howevertheymaybedepletedmorerapidlyat
thehighendofthisrange.Itisrecommendedtostorebatterieswithinnormalroom
temperatureranges.

6
TableofContents
Chapter ONE.................................................................................................................8
1.1. Introduction.................................................................................................................. 8
1.1.1. Features.................................................................................................................................8
1.1.2. Package Contents................................................................................................................10
1.1.3. Optional Accessories...........................................................................................................10
1.2. Familiarize with the N37B......................................................................................... 11
1.2.1. Front View..........................................................................................................................11
1.2.2. Right View..........................................................................................................................12
1.2.3. Bottom View.......................................................................................................................13
1.2.4. Left View............................................................................................................................13
1.2.5. Back View...........................................................................................................................14
1.2.6. Top View ............................................................................................................................14
Chapter TWO............................................................................................................15
2.1. Getting Started........................................................................................................... 15
2.2. Connecting the N37B................................................................................................. 15
2.2.1. Installing the battery............................................................................................................15
2.2.2. Charging the Battery...........................................................................................................17
2.2.3. Charging the Battery with the Adapter Charger..................................................................17
2.3. Powering up for the First Time................................................................................. 18
2.4. Calibrating the touch screen..................................................................................... 18
2.5. Setting the Time and Date......................................................................................... 19
2.6. Adjusting the Screen Brightness............................................................................... 20
Chapter THREE........................................................................................................21
3.1. Using the Hardware................................................................................................... 21
3.2. Keypads and Function Buttons................................................................................. 21
3.2.1. Entering Characters with the Keypad .................................................................................21
3.3. Using the Stylus.......................................................................................................... 22
3.4. Inserting an Micro SD Memory Card...................................................................... 22
3.5. Removing a Storage Card ......................................................................................... 23
3.6. WWAN SIM Card Set Up......................................................................................... 23

7
3.7. Connecting Devices to the N37B............................................................................... 24
3.7.1. Connecting USB .................................................................................................................24
3.7.2. Connecting a Serial Device.................................................................................................26
3.7.3. Connection to a LAN..........................................................................................................26
3.7.4. Connecting Headphones and a Microphone........................................................................27
Chapter FOUR..........................................................................................................28
4.1. Getting Connected...................................................................................................... 28
4.2. Installing Microsoft ActiveSync................................................................................ 28
4.2.1. Connecting to Your Computer............................................................................................28
4.3. Connecting GPS ......................................................................................................... 30
4.4. Connecting WWAN ................................................................................................... 32
Chapter FIVE ............................................................................................................34
5.1. Advance Settings........................................................................................................ 34
5.2. Checking the Battery Status...................................................................................... 34
5.3. Optimizing Battery Life............................................................................................. 34
5.3.1. Changing the Automatic Power Settings ............................................................................34
5.3.2. Adjusting Backlight Settings...............................................................................................35
5.4. Performing a System Reset ....................................................................................... 36
5.5. Changing the Screen Resolution............................................................................... 37
5.6. Rotate Screen..............................................................................................................38

8
Chapter ONE
1.1. Introduction
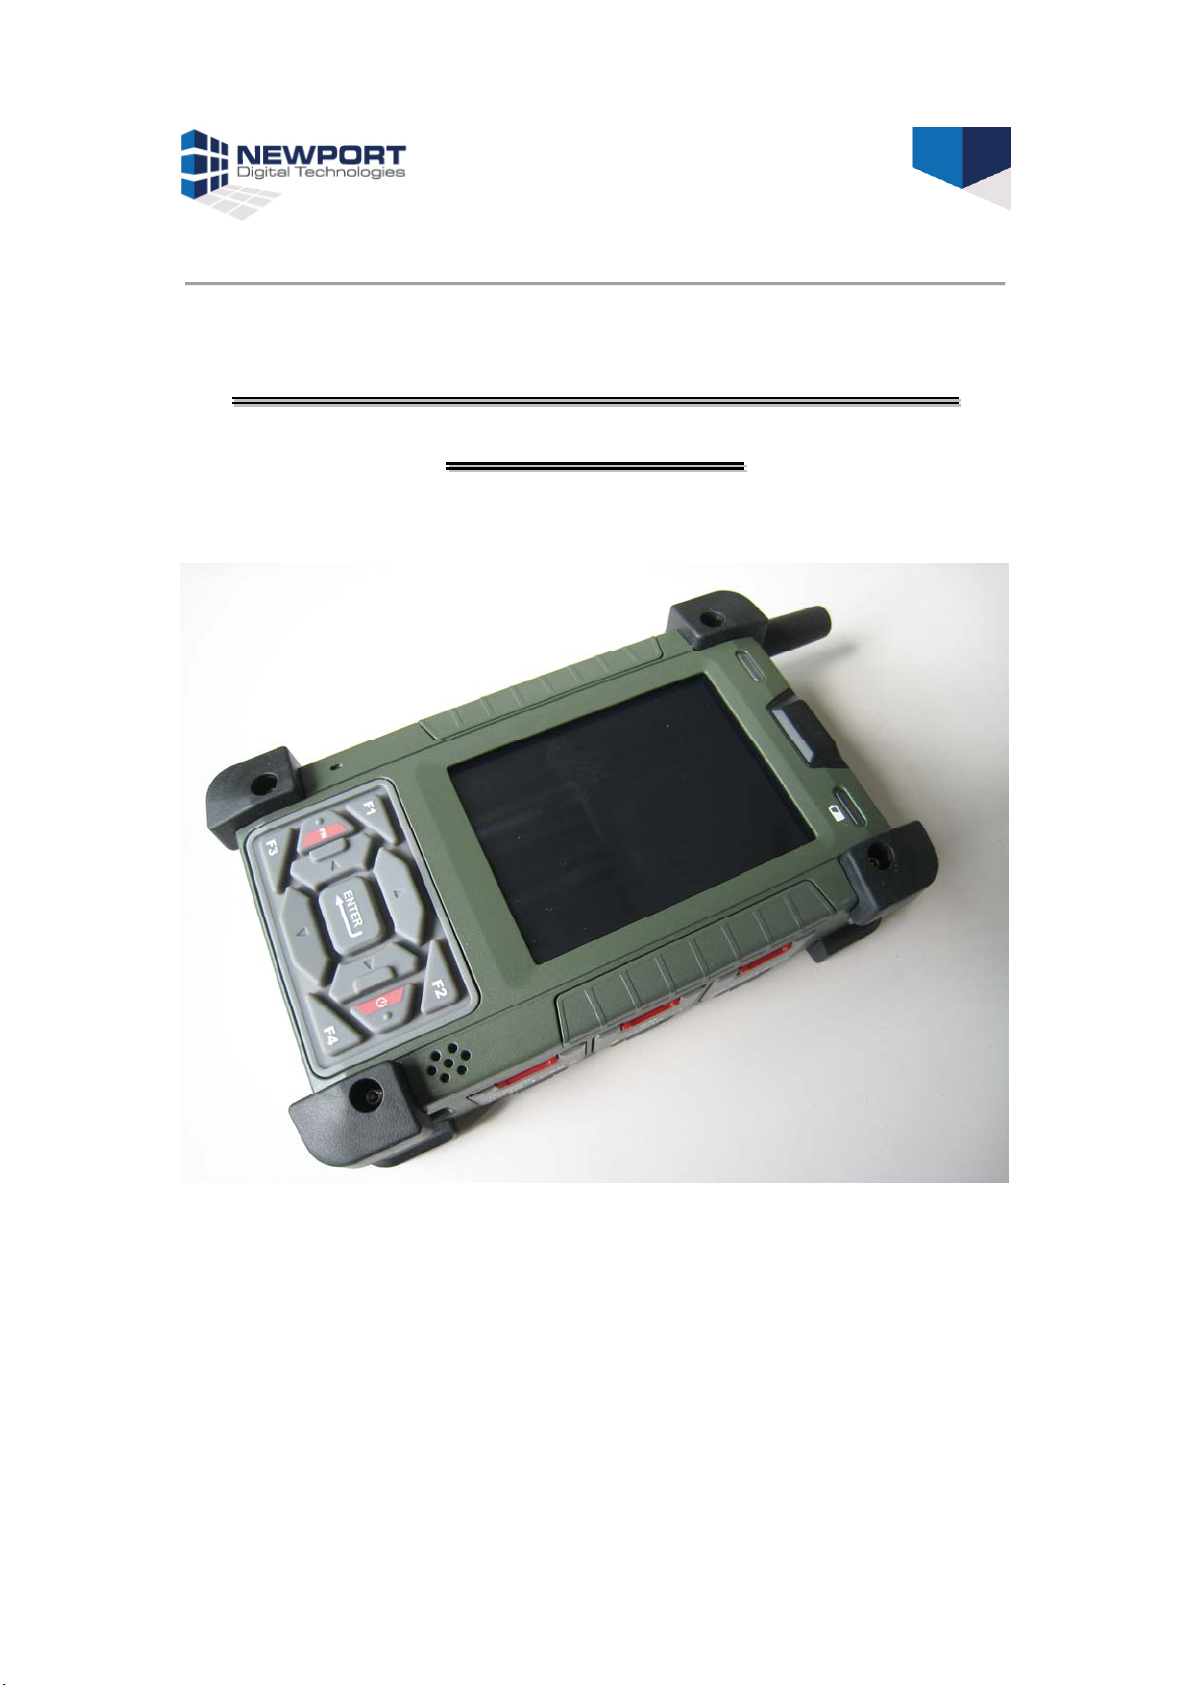
ThankyouforpurchasingtheN37BRuggedHandheldReader.
TheN37Bisanultraruggedcomputerdesignedtomilitarystandards.Thedesign
incorporatesthepowerfulIntelPXA270624MHzCPUwithMicrosoftWindowsCE5.0
operatingsystem.TheN37Bprovidesthehighestperformanceandreliability
whilstminimizingtheTotalCostofOwnership(TCO).TheN37Bincorporatesa
transflectiveLCDwithtouch‐screen,keypad,WWANcommunicationcapabilityand
handsfree ability.CurrentlyavailableoptionincludeGPS.
TominimizetheTotalCostofOwnershiptheN37BissealedtomeetIP67standards
andcomplieswithIEC68‐2‐325footdroptoconcrete.
1.1.1. Features
TheN37Bisasmartconfigurablehandheldterminalwhichhasbeendesignedto
meettherequirementsofawiderangeofapplicationsincluding:
•Military&LawEnforcement
•Industrial&Manufacturing
•Emergencyservicesandconstruction
N37BbeendevelopedtocomplywithMIL‐STD‐461F,MIL‐STD‐810FandIP67
standards,themainspecificationsareasdetailedbelow.

9
N37BRuggedHandheldReaderSpecification
ItemsDescription
OSWindowsCE5.0
CPUIntelPXA270624MHz
Memory256MBSDRAMonboard
256MBupto1GBFlashROMonboard
Display3.7”transflectiveTFTLCD,VGAresolution(640X480)/QVGAresolution(320X240)
Touchscreen4‐wireResistivetouchscreen
AudioSystemAC‐97,Internalmicrophoneandonespeaker(stereosupportedviaearphonejack)
Onepoweron/suspendbutton
Onesoftwareresetswitch
NavigationKey+FunctionKey(4functionkeysinfront)
OneHWresetkeylocatedrightsidedoor
Application
Buttons
OneButtonforbacklighton/off(usingpoweron/suspendbutton)
GSM/GPRS/WCDMA/HSDPAinternalmodule(fordatatransmissiononly)Communication
GPS&GALILEOreceivermodulewithantennabuilt‐in(optional)
StatusIndicatorPowerLED(twocolorLEDx1)(atrightside)
LEDontheuppersideforlightingusage
OneLEDforGPRS(wirelessconnection)(atleftside)
TwoUSBtypeAconnectors,USB1.1Host(**TwoUSBTypeAatLeftSide)
OneUSBminitypeBconnector,USB1.1Slave(atRightSideDoor)
OneRS‐232(full)
OneRS‐232/422/485(OPTION)
OneRJ‐45for10/100Methernet(USBtype)
One15connectorslot
Onestereoheadphonejack
Onemicrophonejack
OneDC‐Inconnector(Attherightside)
I/OPorts
OneMicroSDSlot
MainBatteryRechargeableLi‐ionsmartbattery,7.4V,1880mAh,2S1P,59X38X25mm
PowerAdapterUniversalAC100V~260V,47~63Hzinput,12V,3.5Aoutput.
Physical155x96x42mm,650g(BASICCONFIGURE)
OperatingTemperature:‐20to+60C
StorageTemperature‐40to+70C
Environment
ChargingTemperature0to+50C
OperatingHumidity5%~95%nonecondensing
Rugged
Specification
IP67
5ftdroptoconcrete

10
MIL‐STD‐810F
MIL‐STD‐461F
CertificationFCC
1.Case:standardnylon(waterproof)casewithbeltloop;
2.Mount:Vehiclemount(usingRAMmount)
3.elastichandstrap:preventaccidentaldrop
4.Styluswithtetherkit
Accessories
5.Power:DC‐Adapter&powercord
12VVehiclechargerwith12Vcable(option)
1.1.2. Package Contents
ThestandardN37Bincludesthefollowingitems:
1. N37BHENDHELDunit
2. powercord&Adapter
3. battery
4. stylus&string
5. Handstrap
6. USBconnectingcable
1.1.3. Optional Accessories
Inadditionthefollowingoptionalaccessoriesmaybeincluded:
•VehicleMount
Pleasecarefullycheckthedeliverydocumentstoensurethatallitemsarepresent.
Intheunlikelyeventofadiscrepancypleasecontactyoursupplier.
11
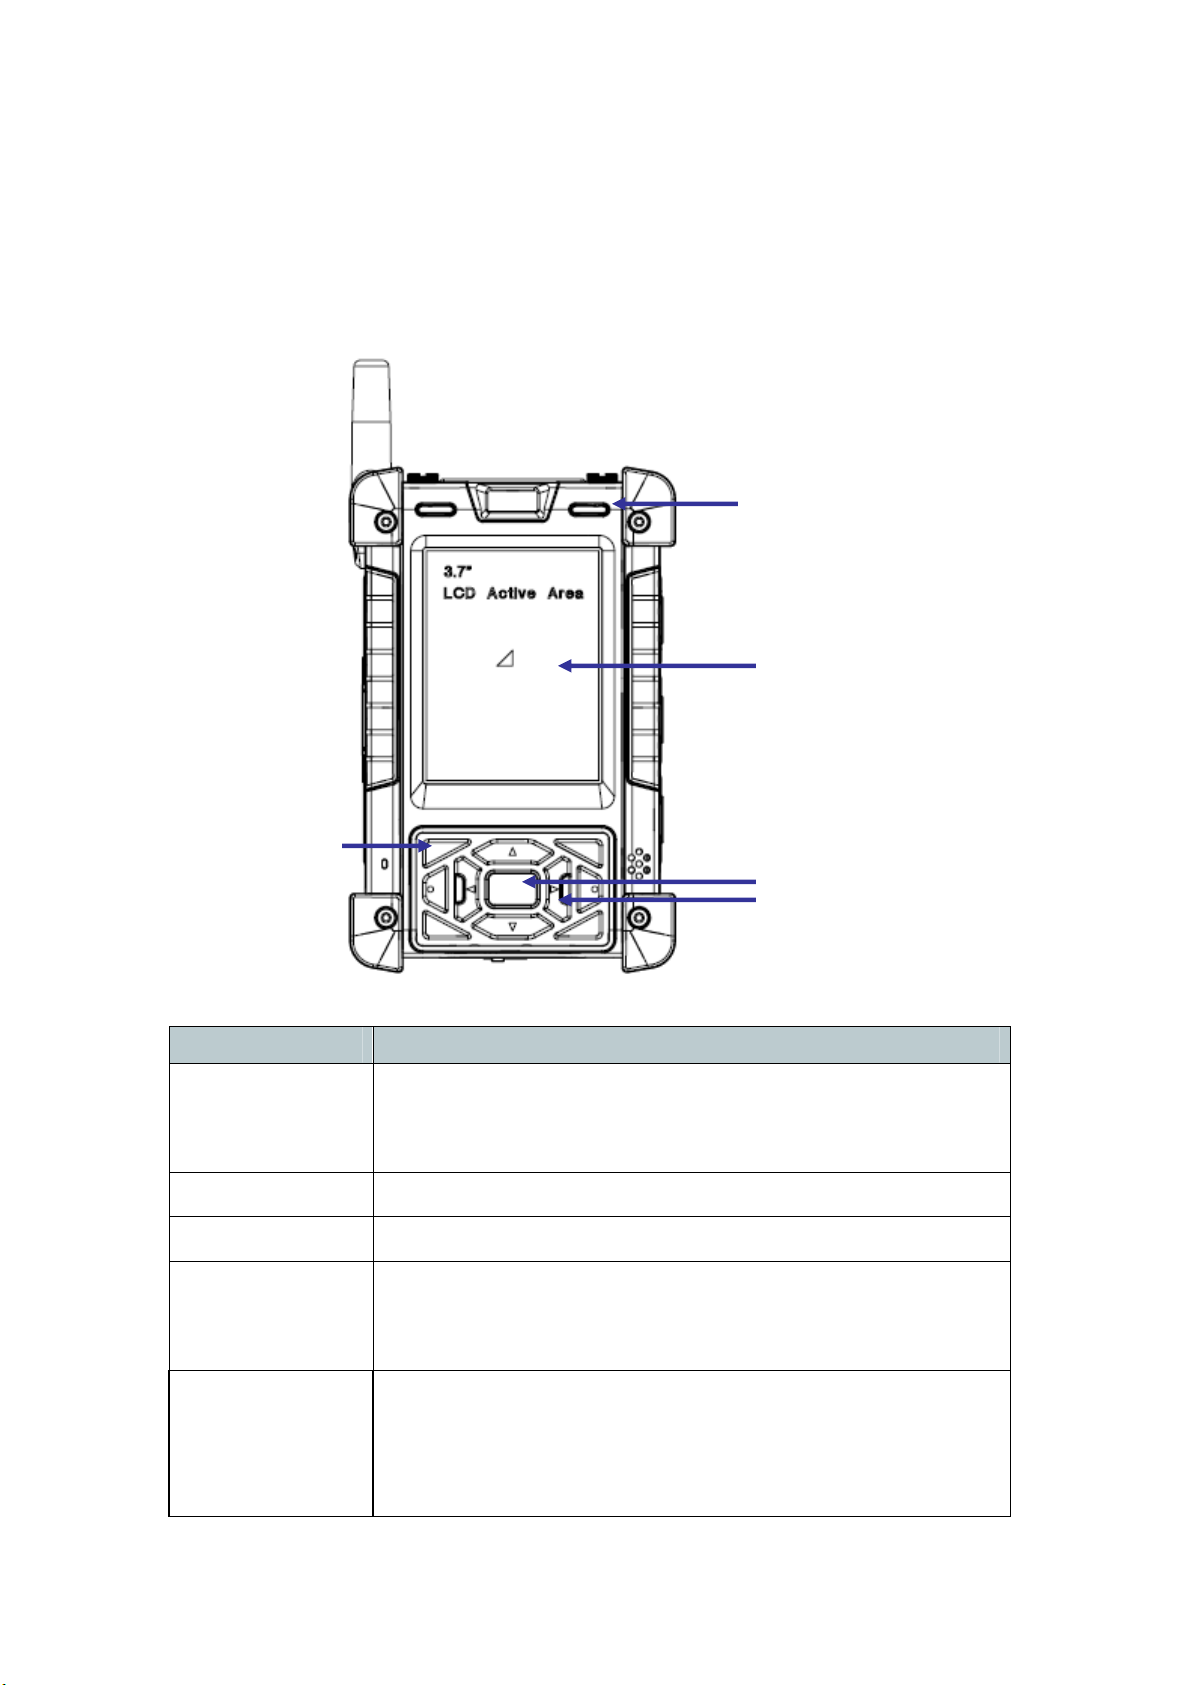
1.2. Familiarize with the N37B
ThefollowingsectionsdescribethemaincomponentsandfeaturesoftheN37B.
1.2.1. Front View
ItemDescription
LCDtouchscreenDisplaystheapplicationsanddatastoredtheN37B.Itisa
touch‐sensitivescreenandcanbeoperatedusingthestylusor
finger.
NavigationKeys PressthesekeystonavigateintheN37Binterface.
FunctionKeys ProgrammablekeypadinterfaceforcontrollingtheN37B.
Powerbutton ¾Ifthedeviceisoff,pressthisbuttontoturniton.
¾Whentheunitison,pressthisbuttonfor3secondsto
turntheN37Boff.
PowerLED Indicatesthebatterychargingpowerstatus.
Green‐Batteryisfullychargedorthedeviceisrunningonbatterypower.
WhenLEDflashes,thebatterychargeisat13%.Thebatteryshouldbe
rechargedimmediately.
Battery Light
Power LED
LCD Touch Screen
NavigationKeys
Power Button
Function Keys
12
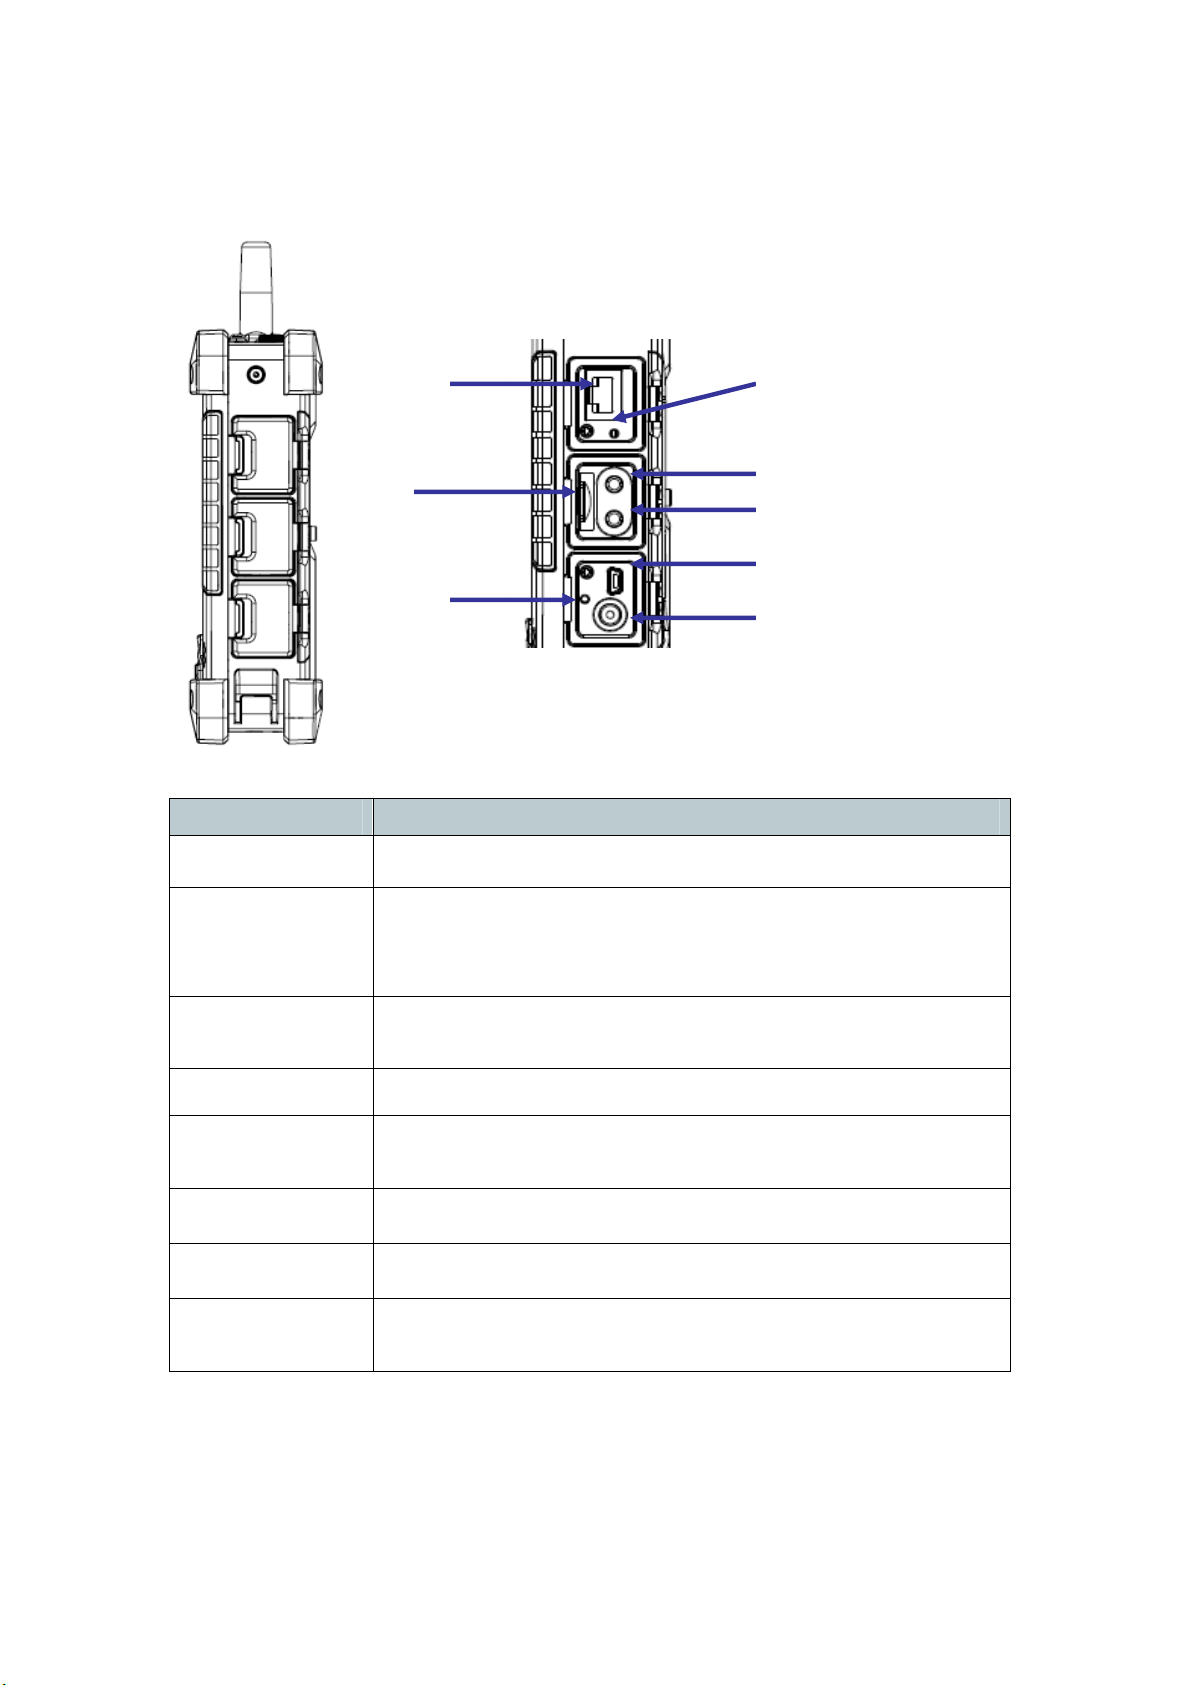
1.2.2. Right View
ItemDescription
RJ45PortConnectstotheLAN.
SWResetSwitchPresstheendofthestylusintothebuttontoresettheN37B.A
resetallowsyourdevicetogetafreshstart,similartowarm
rebootingacomputer.
EarphonePlugConnectstoaudioline‐outdevices(earphonesorheadphones)
foruseinnoisyenvironments.
MicrophonePlugEnablestherecordingofvoiceusinganexternalmicrophone
USBminitypeB
port
USBminitypeBport(client).
MicroSDSlotAccommodatesMicroSecureDigitalmemorycards.
HWResetSwitchPresstheendofthestylusintothebuttontoresetN37B.
DCINJackConnecttheACadaptertothisjacktosupplypowertocharge
theN37Bbattery.
RJ45 SW Reset
Microphone Plug
Earphone Plug
USB mini B Port
DC IN
Micro SD Slot
HW Reset

13
1.2.3. Bottom View
ItemDescription
BatteryCover
Latch
Unlockthelatchtoopenthebatterycompartmentcover,to
placeorremovebattery.
1.2.4. Left View
ItemDescription
RS232SerialPortConnectsusingamini9wayDtypeconnectorforthisportfor
serialcommunications.
USBtypeAport ConnectstoUSBtypeAport(host)tothisport.
Battery Cover Latch
USB A Port
RS 232 Serial Port
RS 232 Serial Port

14
1.2.5. Back View
ItemDescription
StylusEnablesyoutointeractwiththeoperatingsystem.Removethe
stylusfromtheholderandholdanduseitthesamewayyou
wouldapenorpencil.Forusewiththetouchscreen..
Battery
Compartment
Housestheremovableandrechargeablebatterypack.
1.2.6. Top View
ItemDescription
15pinconnector
Slot
AdditionalfunctionalitycanbeprovidedbyusingoptionalReader
cards.
SIMCardSlotAdditionalfunctionalitycanbeprovidedbyusingSIMcards.Only
withWANmoduleincluded.
Stylus
Battery Compartment
SIM Card Slot 15 pin
connector

15
Chapter TWO
2.1. Getting Started
Thischapterexplainshowtoinstallandchargethebattery,howtocheckthebattery
status,howtoturnontheN37B,andhowtocalibratethescreen.
2.2. Connecting the N37B
2.2.1. Installing the battery
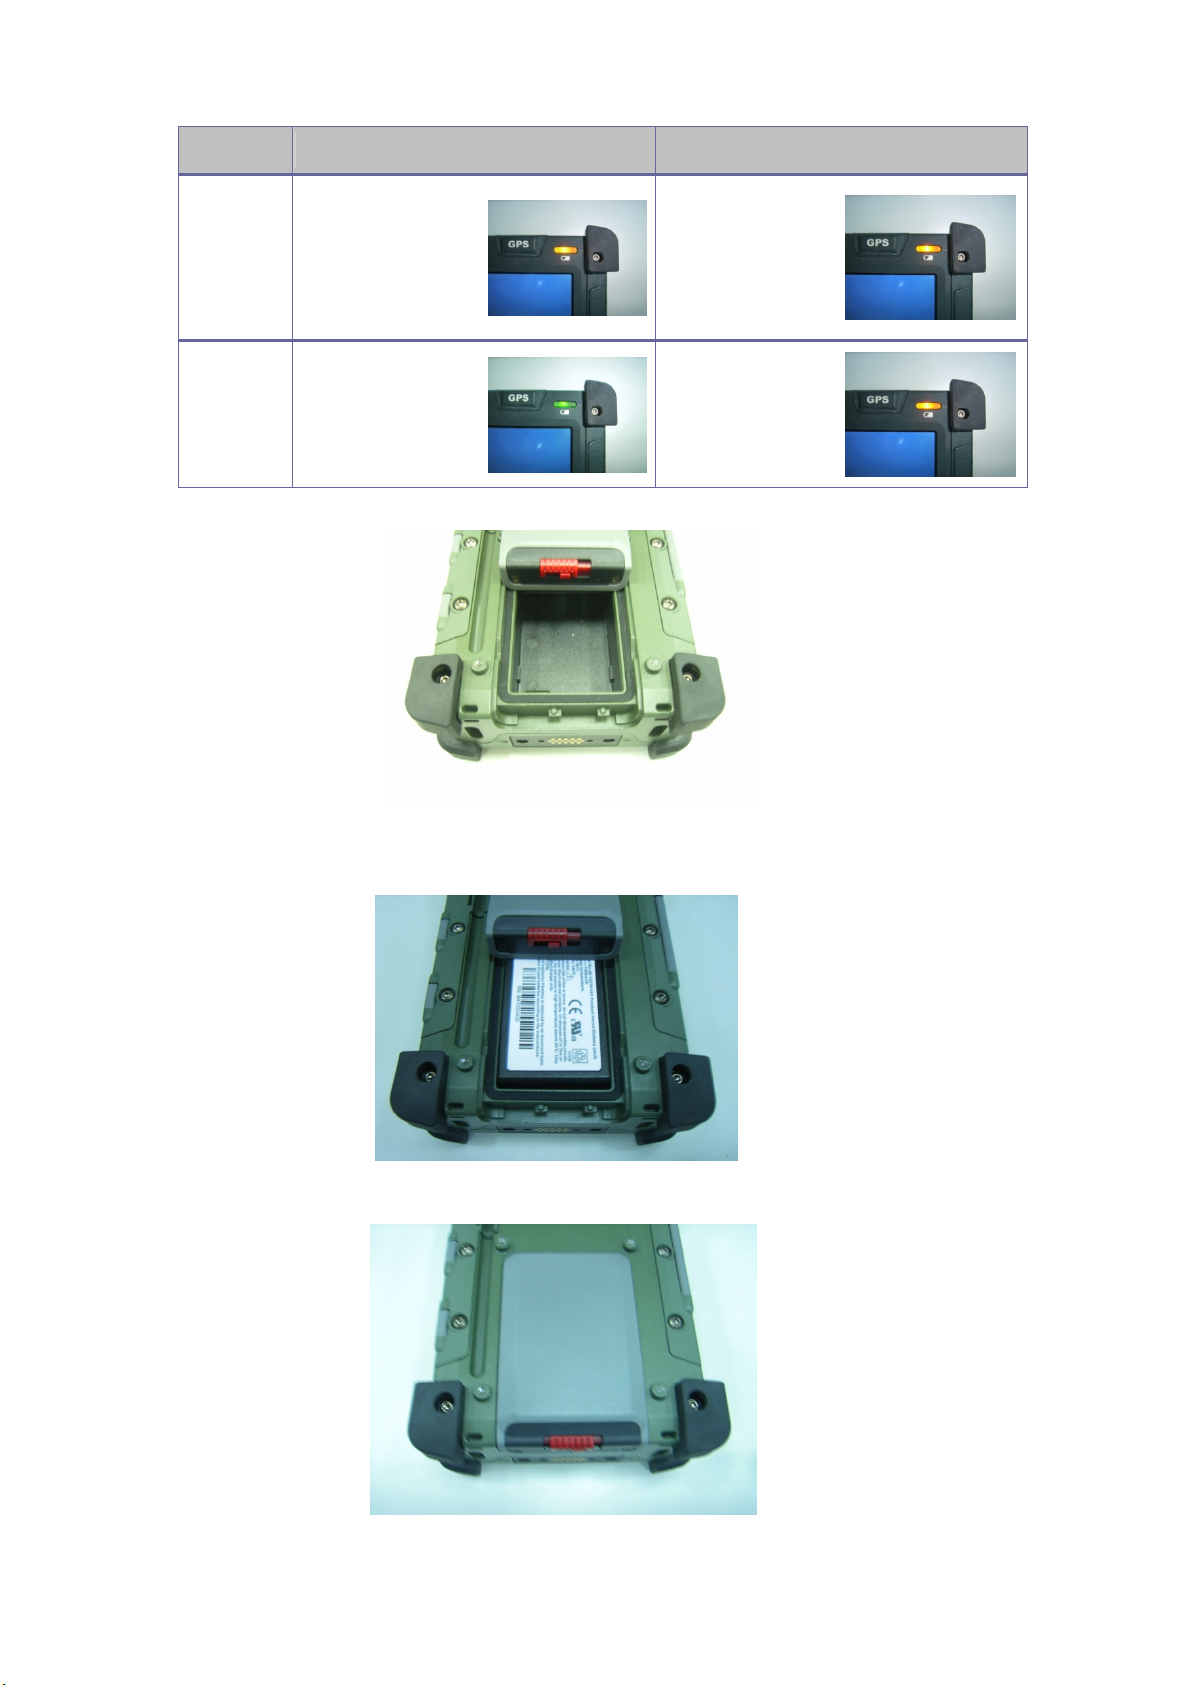
Thispartexplainshowtoinstallthebattery.
WARNING!Thereisariskoffireandburnsifthebatterypackishandled
improperly.DONOTdisassemble,crush,puncture,shortexternalcontacts,or
disposethebatterypackinfireorwater.DONOTattempttoopenorservice
thebatterypack.
Disposeofusedbatteriesaccordingtolocalrecyclingguidelinesinyourarea.
Abackupbatterycellisembeddedintoyourdevicetopreventdatalossin
instanceswhentheremovablebatterypackisremovedorcompletely
discharged.Thisbackupbatterycellwillonlysupportthesystemfora
maximumof10minutes.Firsttimeuse,pleasechargeHandheldovernight
(8Hours)toensurebackupbatteryisfullycharged.
16
StatusCharging Ready
PowerOFF.Amberflashinglight
.Amberlight
PowerON
.Amberflashingwith
Greenlight
.Amberlight
1.Removethebatterycompartmentcover.
2.Alignthebatterycontactswiththecontactsinthecompartmentandplacethe
batteryinthecompartmentasshownbelow.
3.Replacethebatterycompartmentcover,andlockthebatterylatch.
17
2.2.2. Charging the Battery
BeforeusingtheN37Bforthefirsttimeitwillneedchargingforabout4hoursat
least.TheN37Bcanbechargedusingthepoweradaptor.
NOTE:Whenthebatterypowerisbelow10%,theN37Bwillentersuspend
mode.
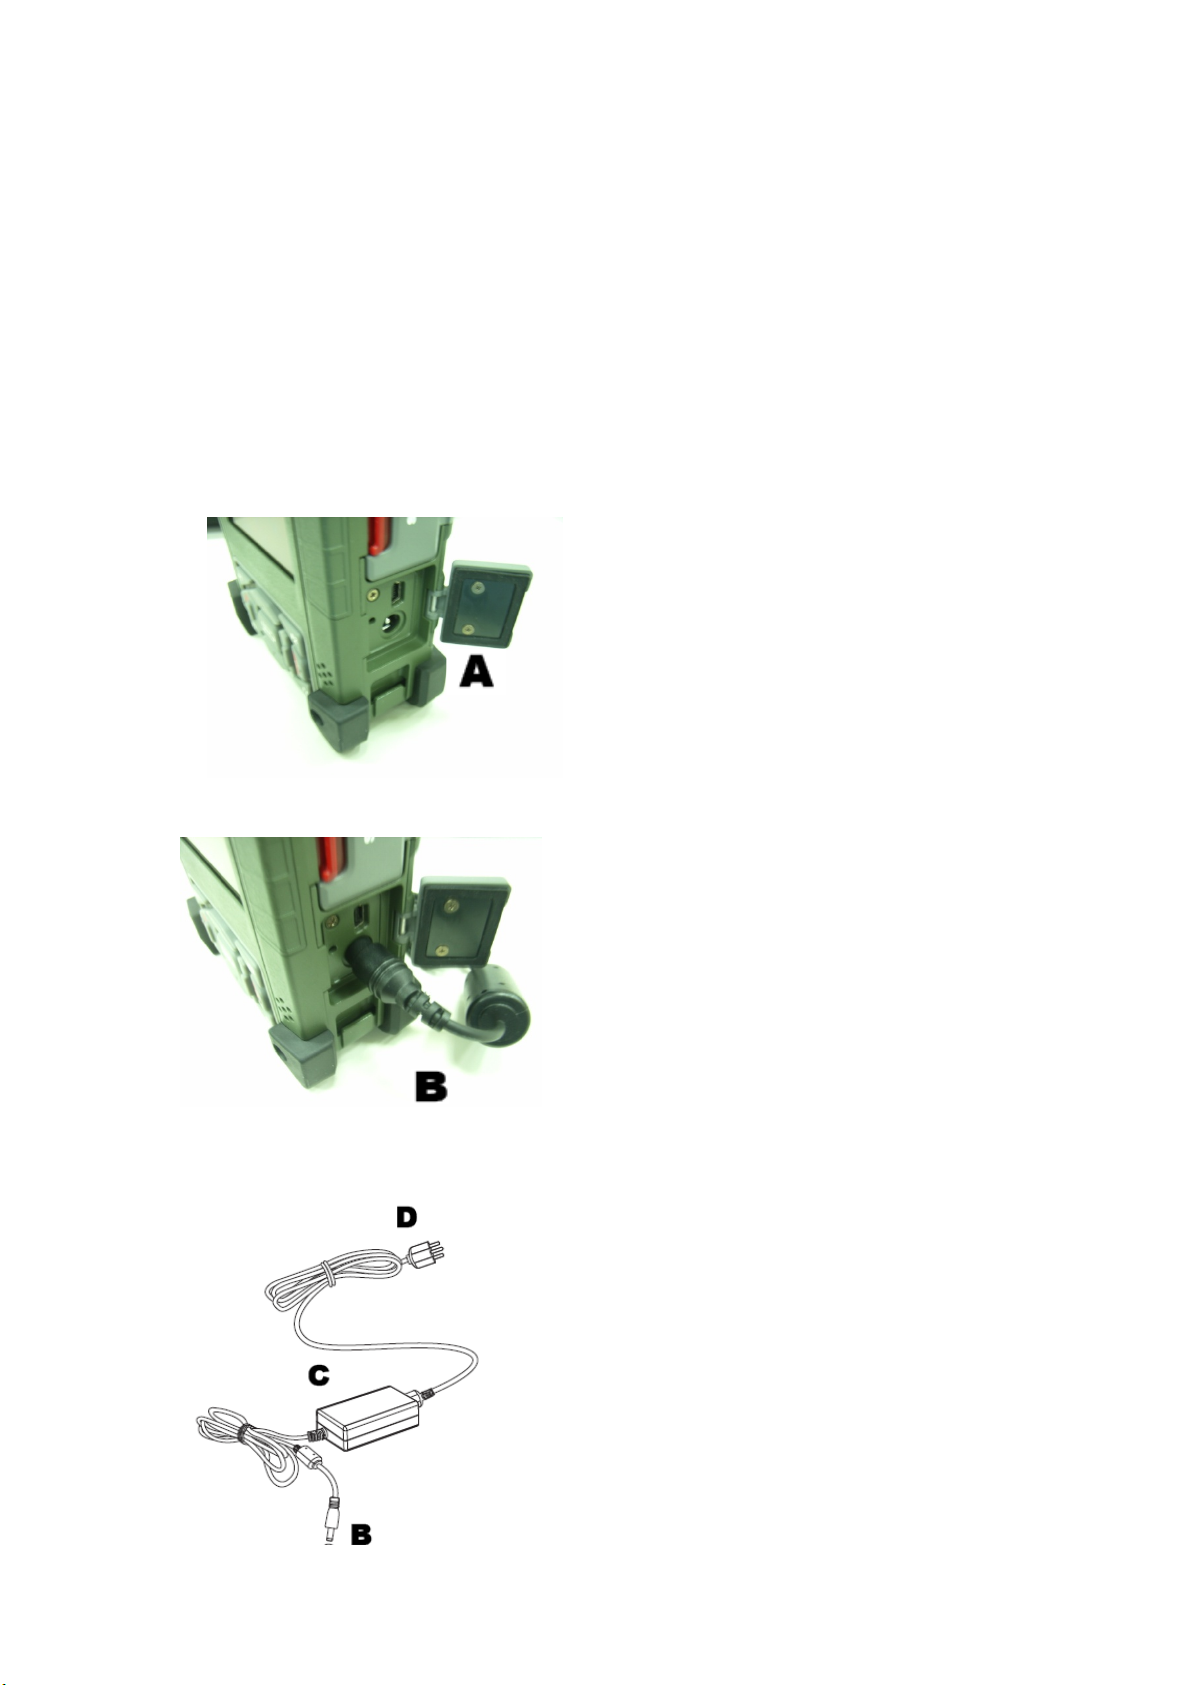
2.2.3. Charging the Battery with the Adapter Charger
1.OpenthesidedoorontherightbottomoftheN37B.
2.Plugtheadaptercharger(B)intothesidedoor(A).
3.PlugthepowercordintotheACadapter(C).
4.PlugtheACadapter(D)intoanelectricaloutlet.

18
2.3. Powering up for the First Time
AfteryouhavechargedtheN37Bforabout4hoursthedeviceisreadytobeused.
YoucannowstartuptheN37Bwhenyoucancalibratethetouchscreen,practice
withthestylusandsetthedate,timeandzone.Turnonyourdevicebypressingthe
powerbuttononthefrontpanel.
2.4. Calibrating the touch screen
Thecalibrationscreenautomaticallyappearswhentheunitispoweredonforthe
firsttimeorafterthesystemisreset.
1.Tapthecentercrosshairfirmlyandaccuratelywiththestylus.Thecrosshair
movestothenextlocation.
2.Followthecrosshairandcontinuetappinguntilthescreenhasbeencalibrated.
3.Aftercalibrationisfinished,presstheEnterkeytosavethesettingsorpressEscto
reverttotheprevioussettings.
NOTE:Torecalibratethescreenatanytime,tapStart→Settings→ControlPanel.

19
Thendouble‐tapStylus.TaptheCalibrationtab,andtapRecalibrate.
2.5. Setting the Time and Date
1.TapStart→Settings→ControlPanel.
2.Double‐tapDate/Time.
3.Tapthearrowsnexttothemonthtoselectthecorrectmonth.
4.Selectafieldinthetimeboxandtapthearrowsnexttothetimetochangethe
valueofthefield.
5.Tapthedrop‐downarrownexttoTimeZonetoselectthecorrecttimezonefor
yourarea.
6.ChecktheboxnexttoAutomaticallyadjust...tohavetheOSautomatically
uHendheldtethetimefordaylightsaving.

20
7.TagApplytosavethesettings.
2.6. Adjusting the Screen Brightness
1.TapStart→Settings→ControlPanel.
2.Double‐tapOEMsUtility.
3.ClicktheDisplayManagertab.
4.UnderBacklightControl,clicktheDarkarrowtomakethescreendarker,orclick
theBrightarrowtomakethescreenbrighter.
5.ClickOKtosaveandexittheutility.
Table of contents


