Next Sight NEXY User manual

NEXY
USER GUIDE AND
TRAINING
1Nexy user guide 2018-11-08Rev. 02

Dear Customer,
Thank you for purchasing Nexy robotic retinal imaging
system.
This guide includes a theoretical section followed by a
practical part.
During the theoretical part, explanations are
accompanied with illustrations.
During the practical part the subject who underwent
the training performs the operations of normal use of
the Nexy device.
NEXY
USER GUIDE AND TRAINING
Now, let’s start!
Next Sight Team
2Nexy user guide 2018-11-08Rev. 02

Table of contents
UNPACK AND INSTALL YOUR NEXY 4
NEXY POWER ON 7
1ST ACCESS PROCEDURE 8
TABLET POWER ON 10
USE OF TABLET 11
PERFORM AN EXAM 14
NEXY ACCOUNTS 28
IMAGE PRINTING 29
NEXY AND TABLET POWER OFF 30
NEXY WEB FEATURES 31
TELEMEDICINE 33
NEXY
USER GUIDE AND TRAINING
3Nexy user guide 2018-11-08Rev. 02
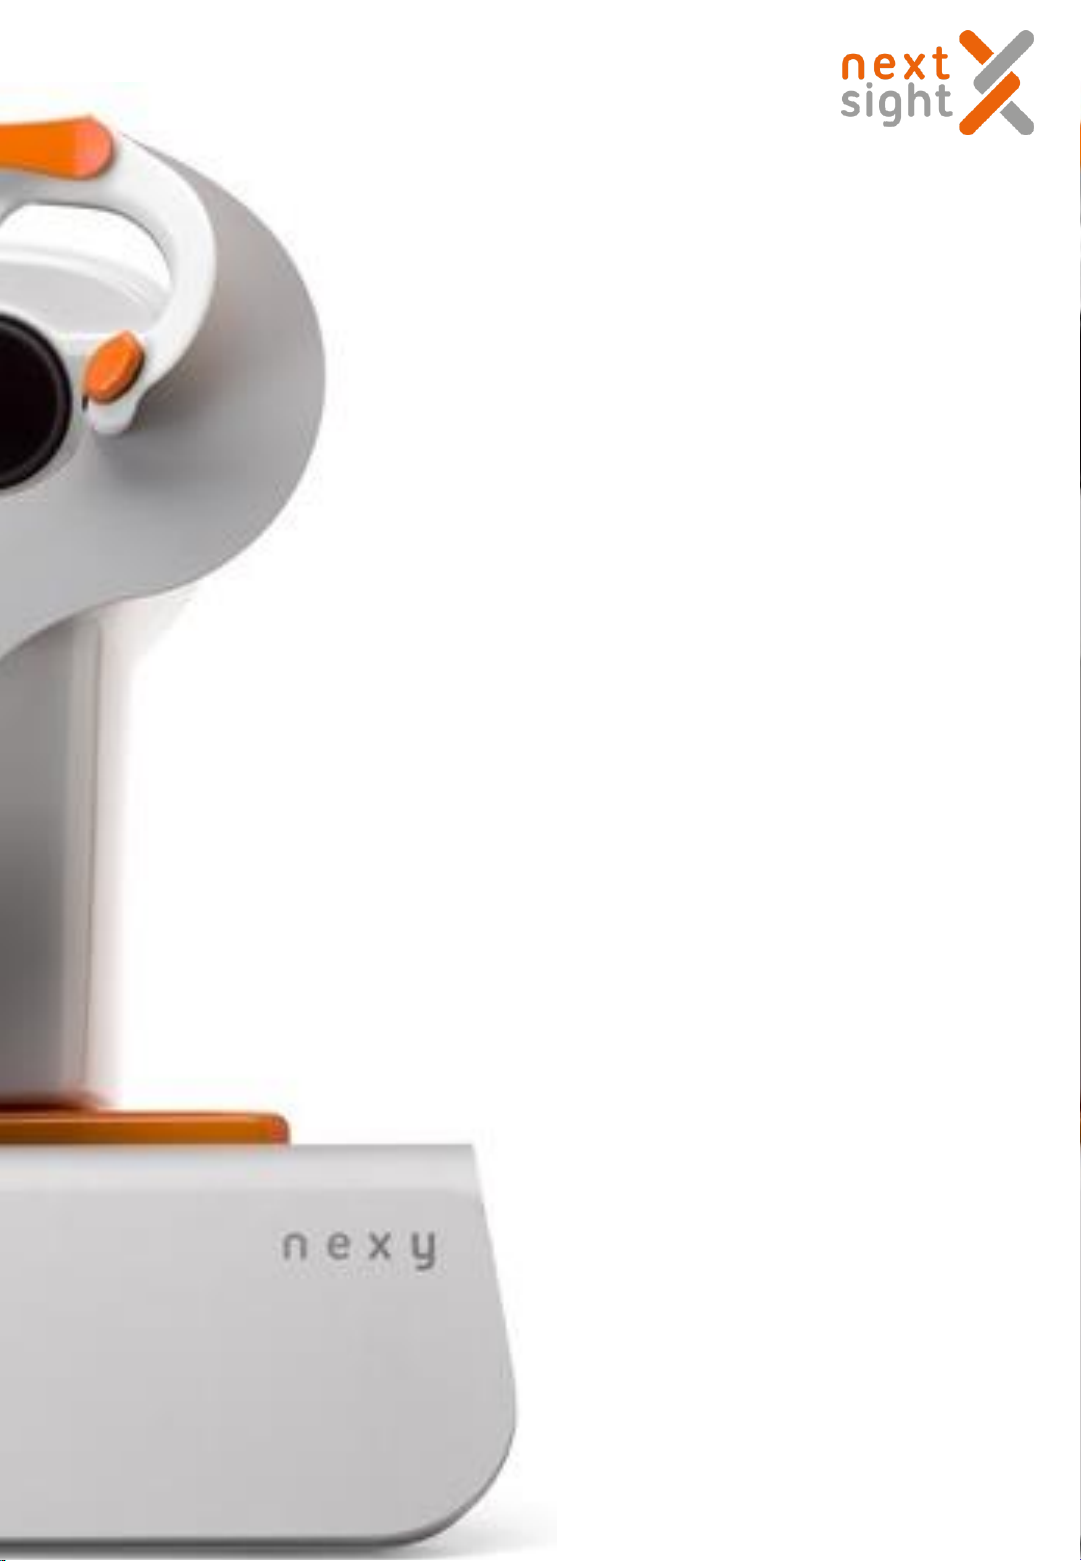
Table of contents
EMAIL SENDING FUNCTIONALITY 37
FUNCTIONALITY OF SHARING IMAGES FOR THIRD-PARTY 41
A.I. SOFTWARE
OPTIONAL FUNCTIONALITY OF TEAMVIEWER FOR 43
REMOTE SUPPORT
NEXY ADAPTER –OPTIONAL ACCESSORY (NOT AVAILABLE FOR US) 45
LANGUAGE CHANGE ON THE TABLET KEYWORD 49
SHARED FOLDER 51
NEXY
USER GUIDE AND TRAINING
4Nexy user guide 2018-11-08Rev. 02

UNPACK AND INSTALL YOUR NEXY
This is how the Nexy and all the components are packed
Tablet
Nexy + AC/DC adaptor
5
User
Manual
Nexy user guide 2018-11-08Rev. 02
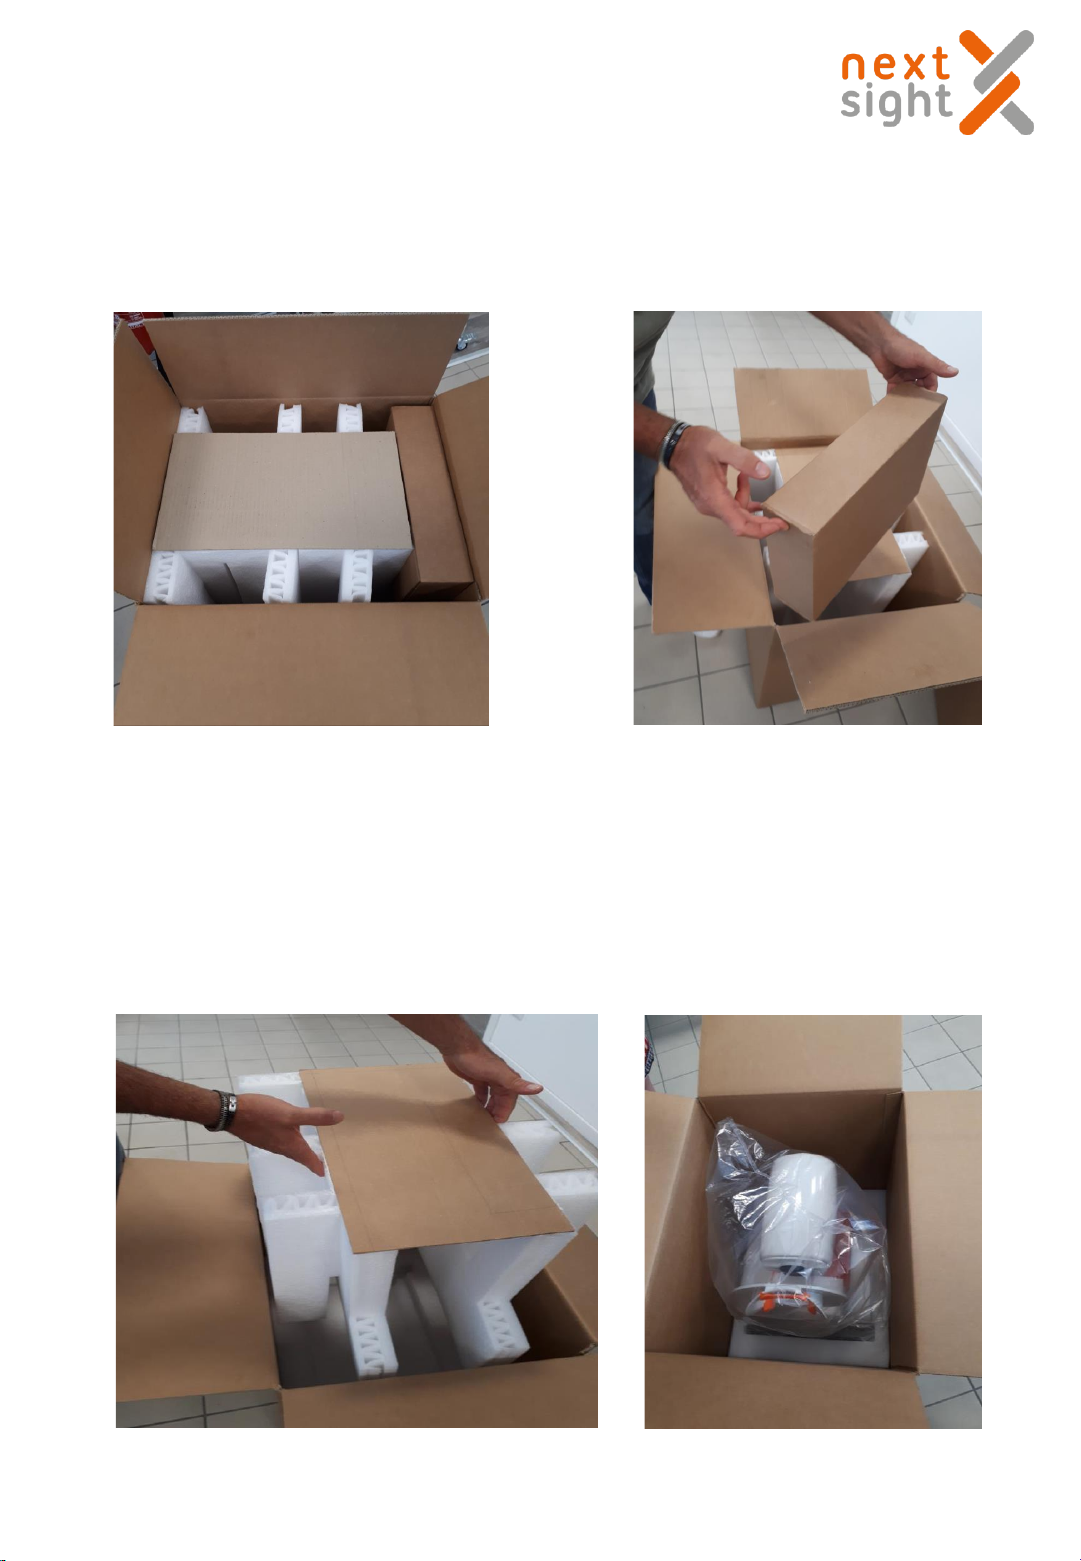
PLEASE FOLLOW STEP BY STEP THE PROCEDURE HEREAFTER:
3. Remove the 1st center
upper foam
1. Open the box 2. Remove the Tablet box and
Accessories box
4. Device in the right
position
6Nexy user guide 2018-11-08Rev. 02
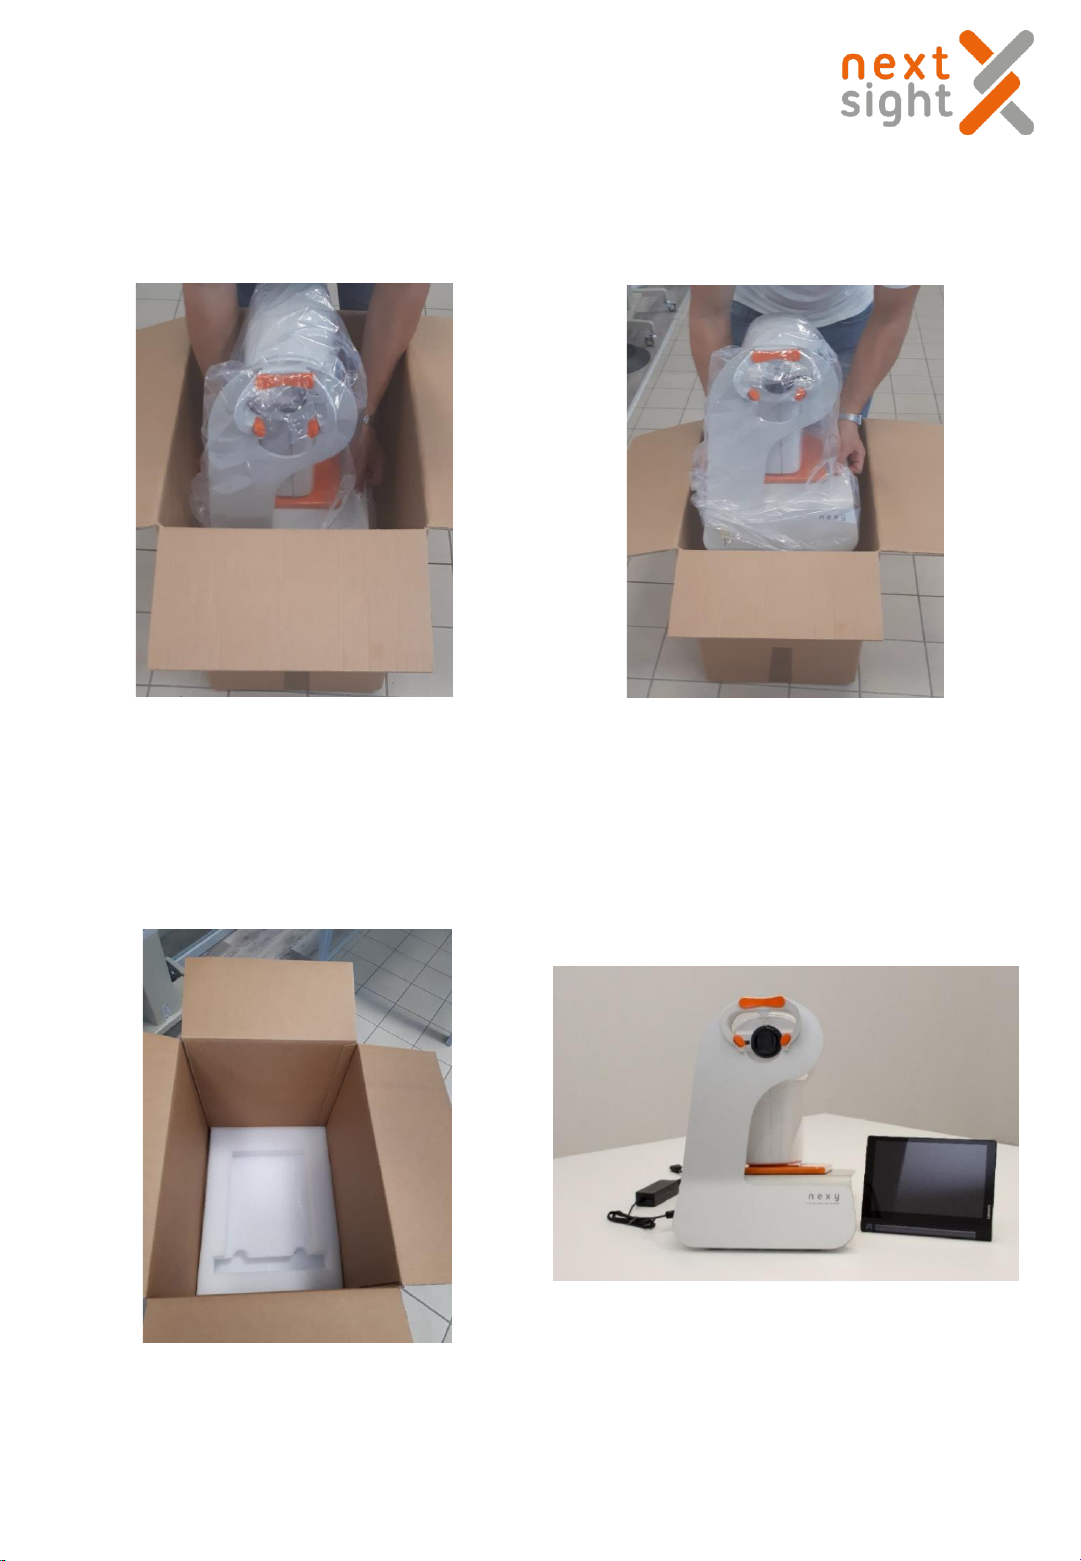
7. Please make sure all material and
components are on flat surface
7
5. Hold the device at its base and pull it up carefully
6. Keep the box and all
foam parts in a safe
and dry place
Nexy user guide 2018-11-08Rev. 02
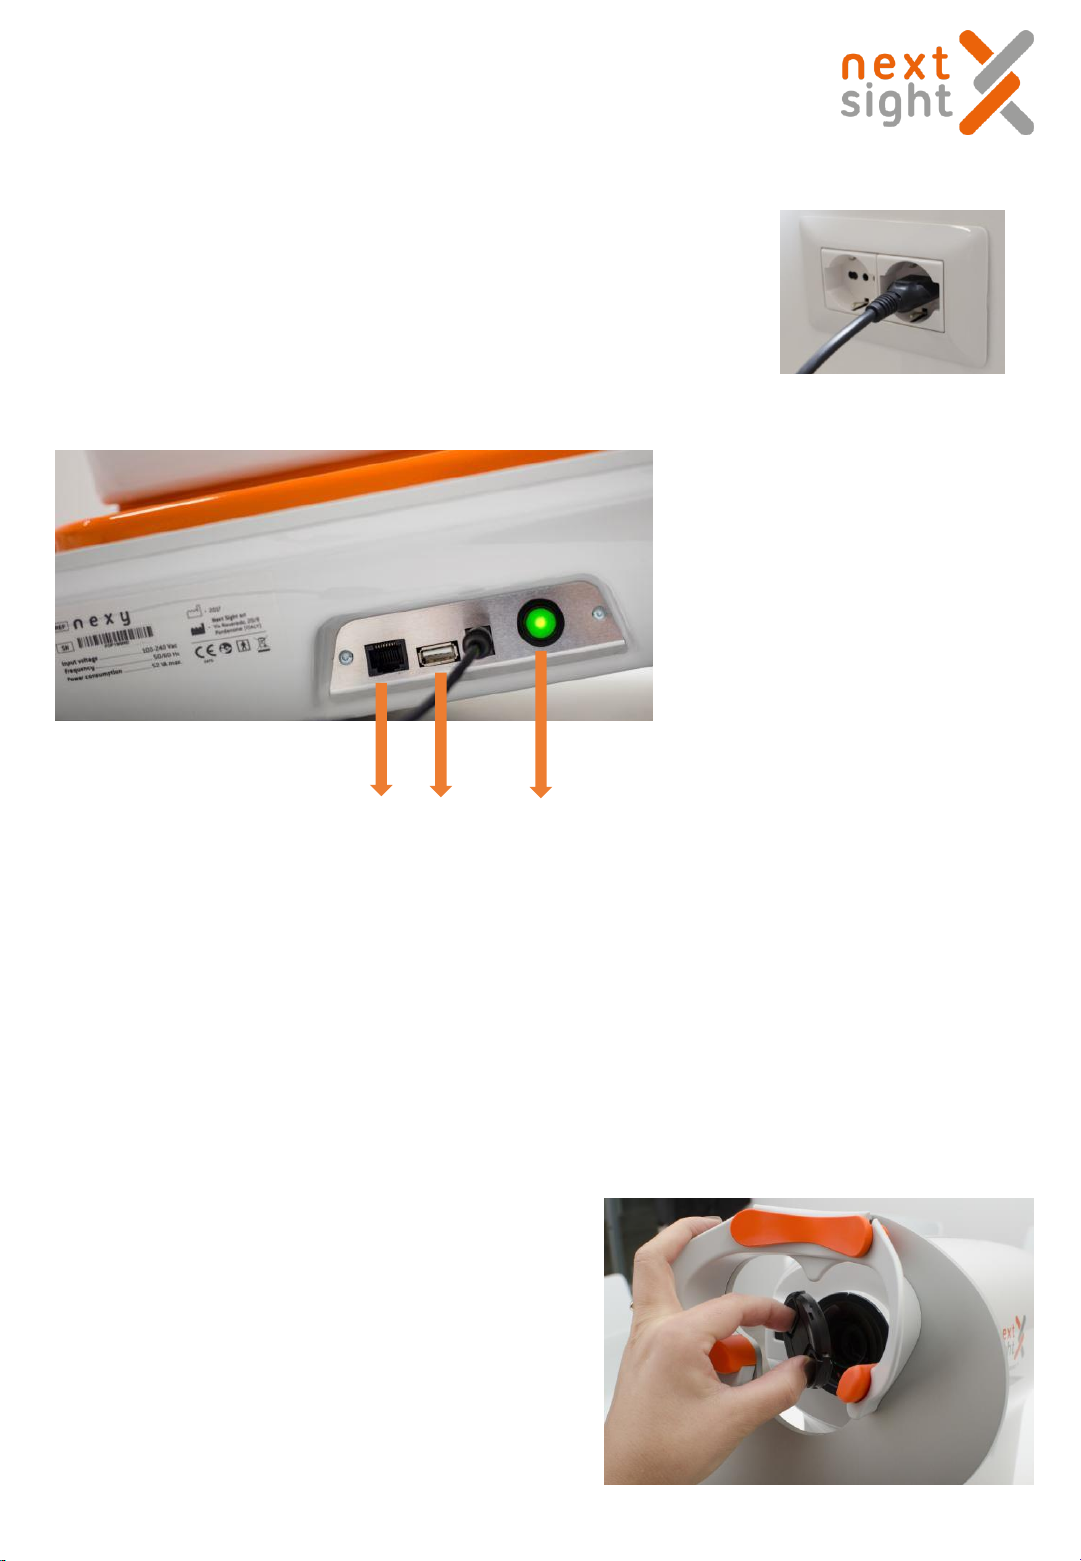
NEXY POWER ON
1. The ethernet socket is used only in case of technical assistance from Next Sight personnel.
2. The USB socket next to the power button Ethernet socket is used to charge the tablet.
3. After 30 seconds from switching on, Nexy's head will move automatically.
4. This signal indicates that the machine is ready.
Insert the power supply into the wall socket and switch the Nexy on
by pushing for 3 seconds the on/off green button located on the side
1. Ethernet socket
2. USB socket
3. Power ON/OFF button
1 2 3
Remove the cap from the Nexy front lens. Make sure the
lens is free of dust. Do not touch the lens with your
fingers. If cleaning is needed, please use “Berkshire
Bluesorb® 750 cloth moistened with 95% neutral pure
ethyl alcohol.
8
Nexy user guide 2018-11-08Rev. 02
9
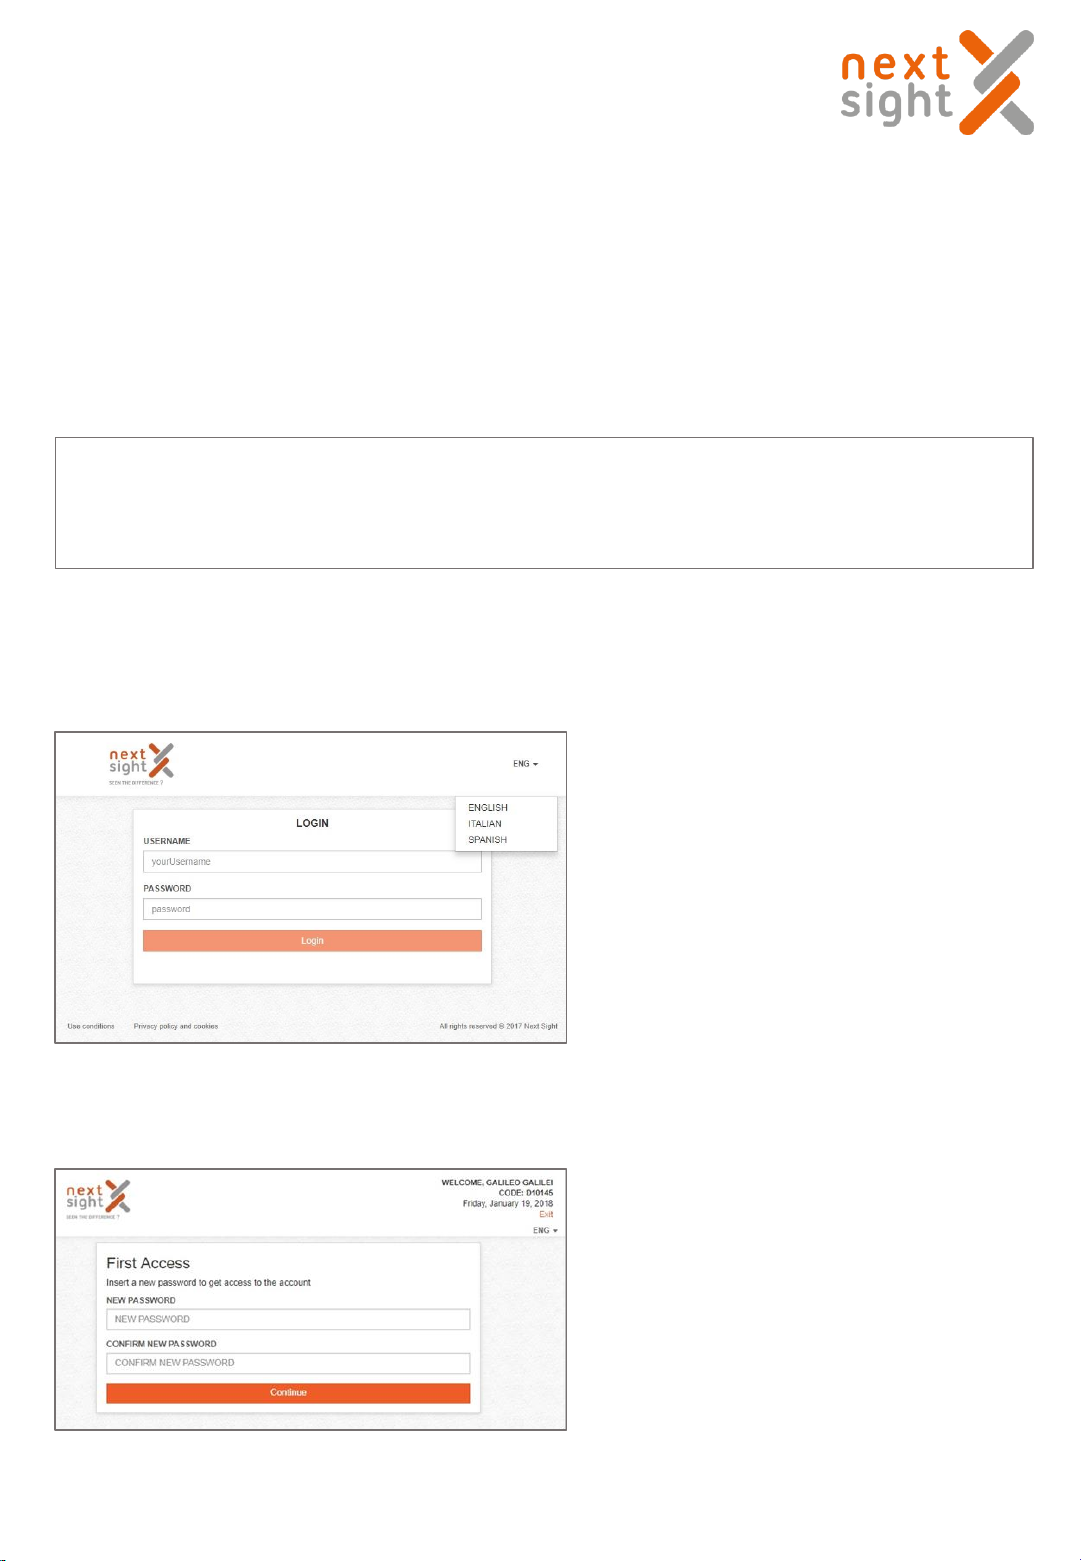
1st ACCESS PROCEDURE
Before delivering the Nexy, Next Sight provides to the Customer the credentials to use for the 1st access.
Credentials are:
•Username: generated automatically by Next Sight
•Temporary Password: password
IMPORTANT
The USER must run the 1st access on the Reserved Ares of Next Sight
website - https://web.nextsight.info/#/login
During the 1st access the user is required to create their own password
Insert the username and the temporary
password
Create your own password
Nexy user guide 2018-11-08Rev. 02
10
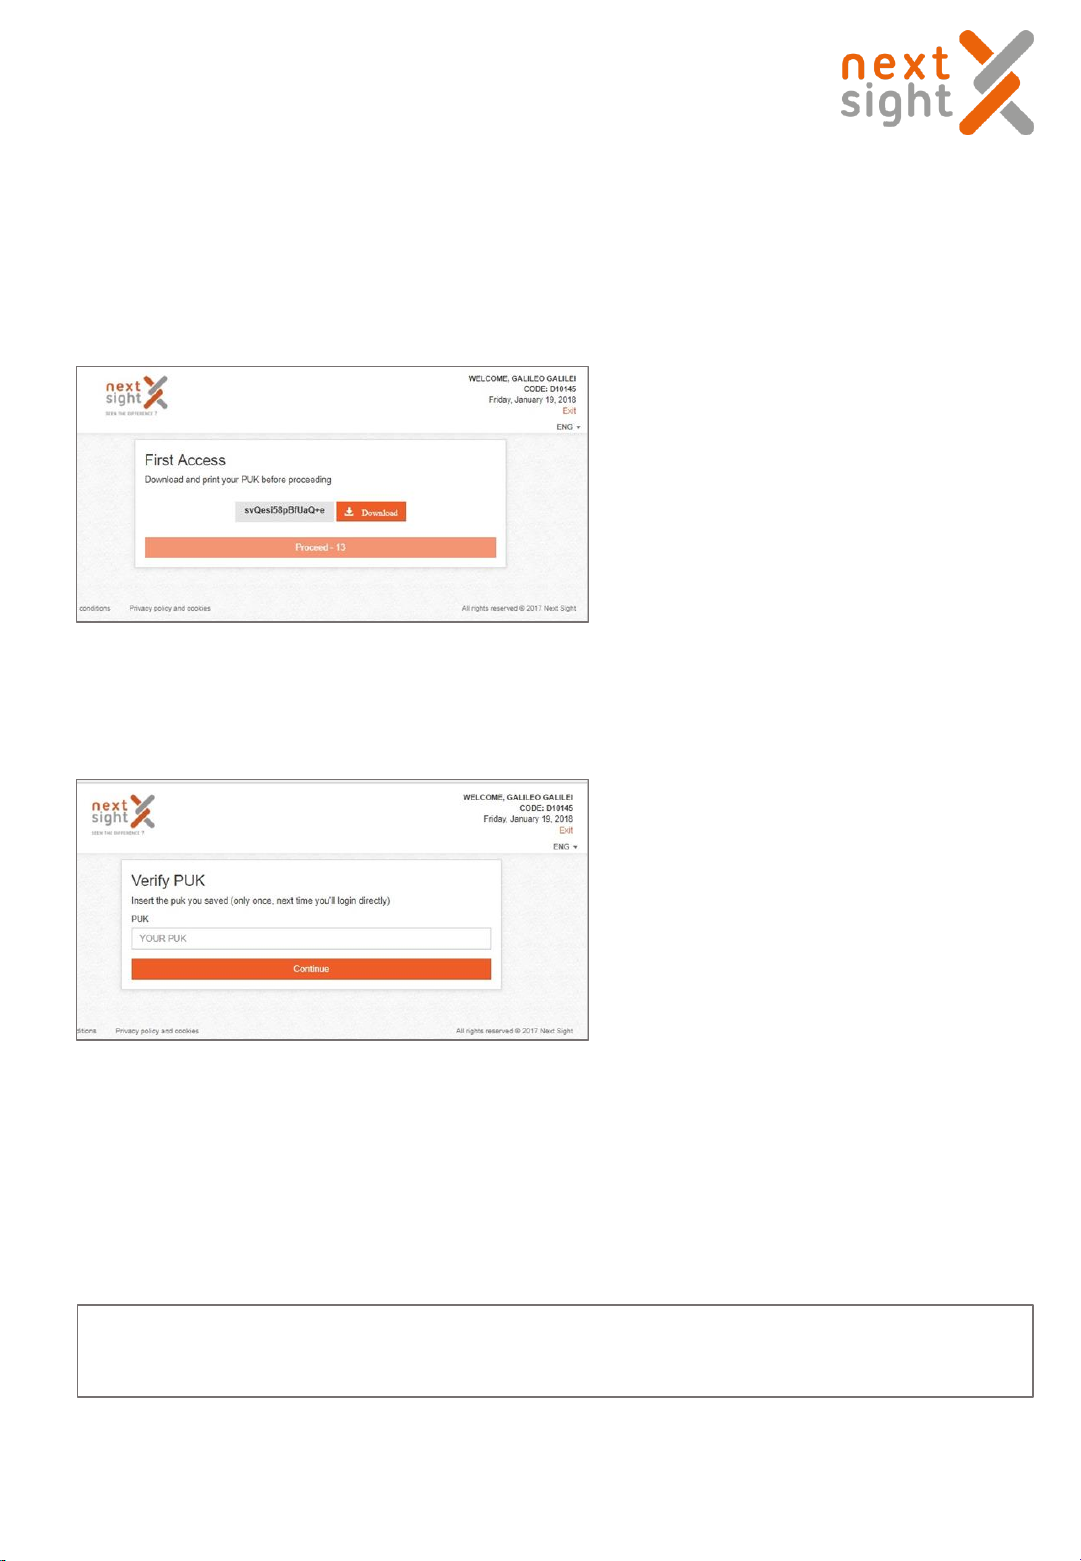
A PUK is automatically generated –
Please save the PUK in a safe place.
Insert the PUK
Now the procedure is done, you can enter with your credential directly from the Tablet.
IMPORTANT
For the 1st time access the Tablet must be connected to internet.
Nexy user guide 2018-11-08Rev. 02

Remove the tablet from the packaging and press on the
circular button on the left
Charger and micro USB cable.
Click on the orange NEXY icon and enter the login and password assigned to you in on the screen
below:
TABLET POWER ON
After switching on, a screen like this will appear.
11
Nexy user guide 2018-11-08Rev. 02
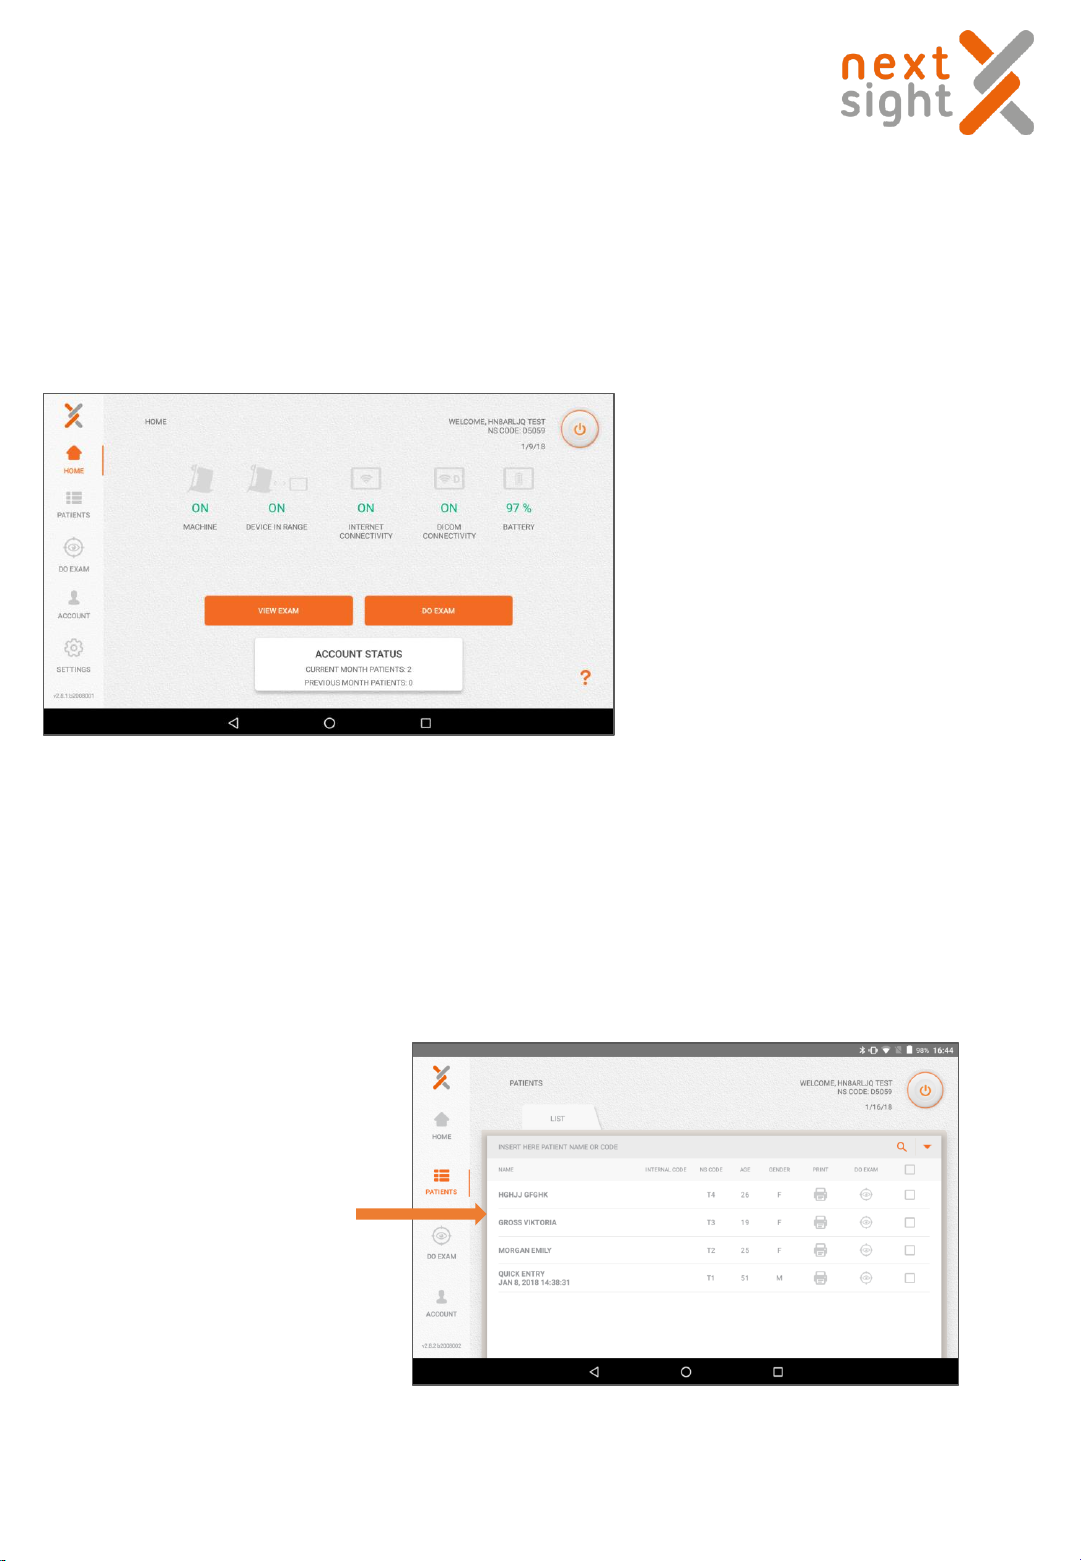
HOME SCREEN
After entering with your login and password the home screen will appear:
•MACHINE: indicates if the Nexy is on or
off.
•DEVICE IN RANGE: indicates if the
Bluetooth communication between tablet
and device is active (if OFF, enable the
Tablet's Bluetooth communication and /
or bring the tablet closer to the device).
•INTERNET CONNECTIVITY: indicates the
status of the tablet WI-FI.
•DICOM CONNECTIVITY: indicates if there
is a connection to a DICOM server.
•BATTERY: indicates the charge status of
the tablet battery.
USE OF THE TABLET
CONFIGURE PATIENT DATA
A. IF REGISTERED PATIENT
Search on Patients list
12Nexy user guide 2018-11-08Rev. 02
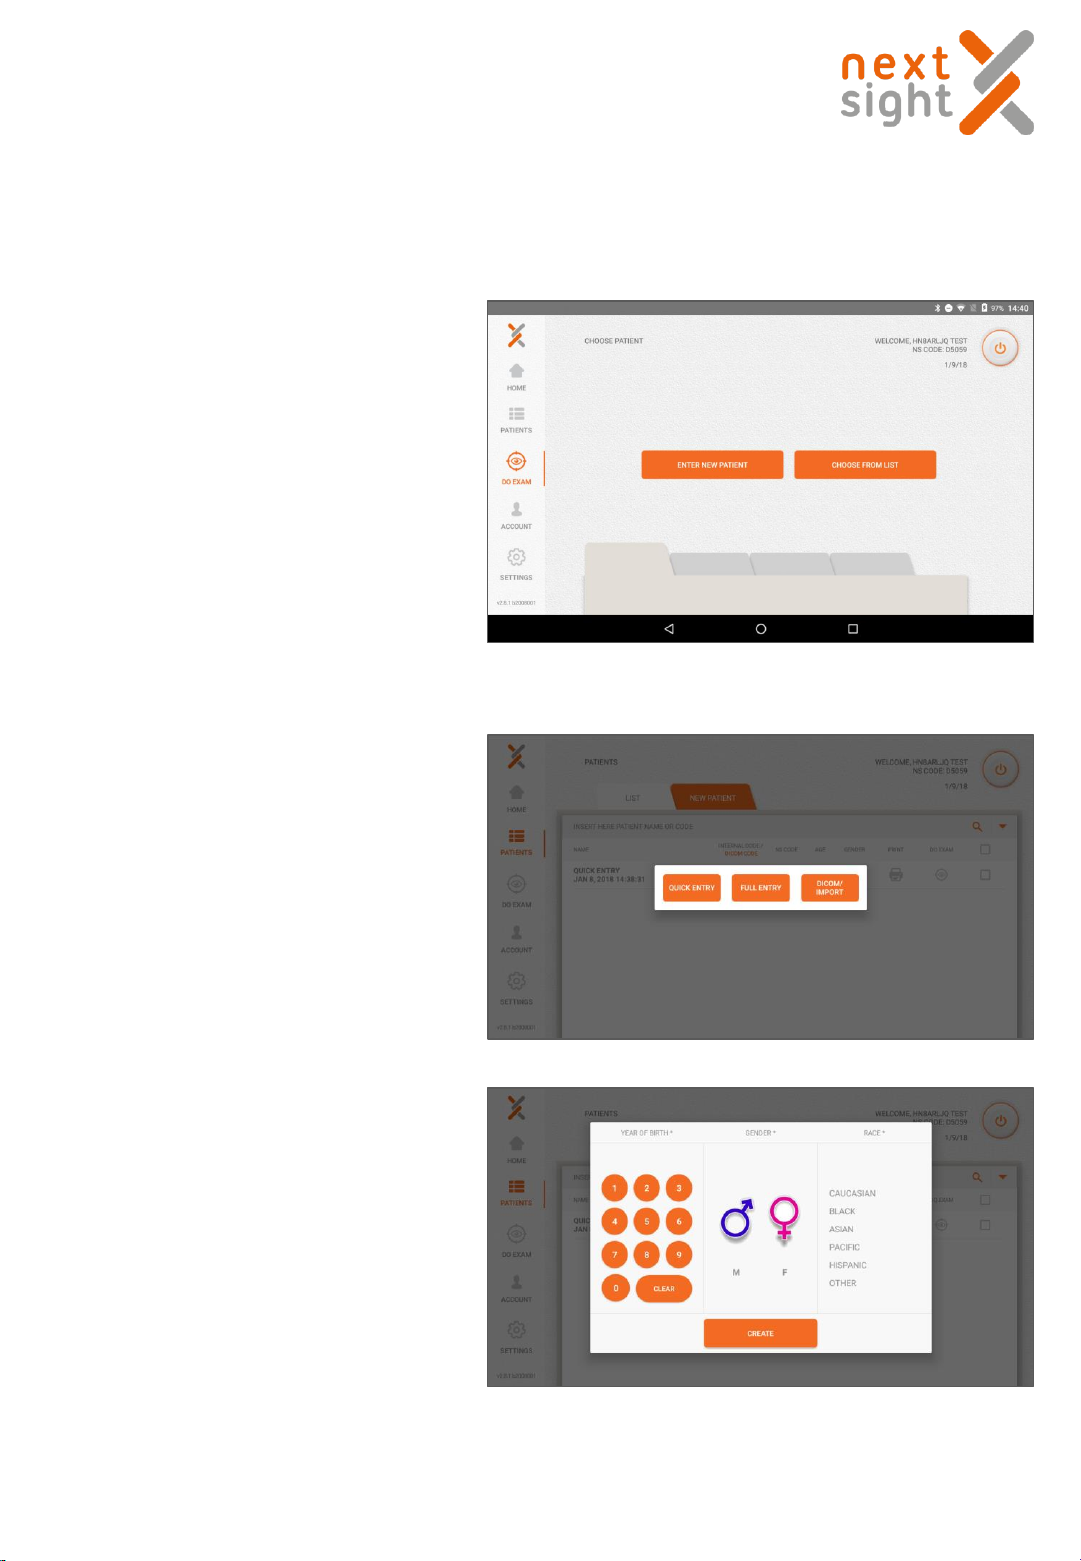
B. IF NEW PATIENT
•Choose: Quick Entry
•Enter following information:
•Year of birth
•Sex
•Race
Once patient details are completed click on CREATE
•To enter the patient’s information click
on DO EXAM.
•From here select and click on ENTER
NEW PATIENT
Quick Entry Procedure
13
Nexy user guide 2018-11-08Rev. 02
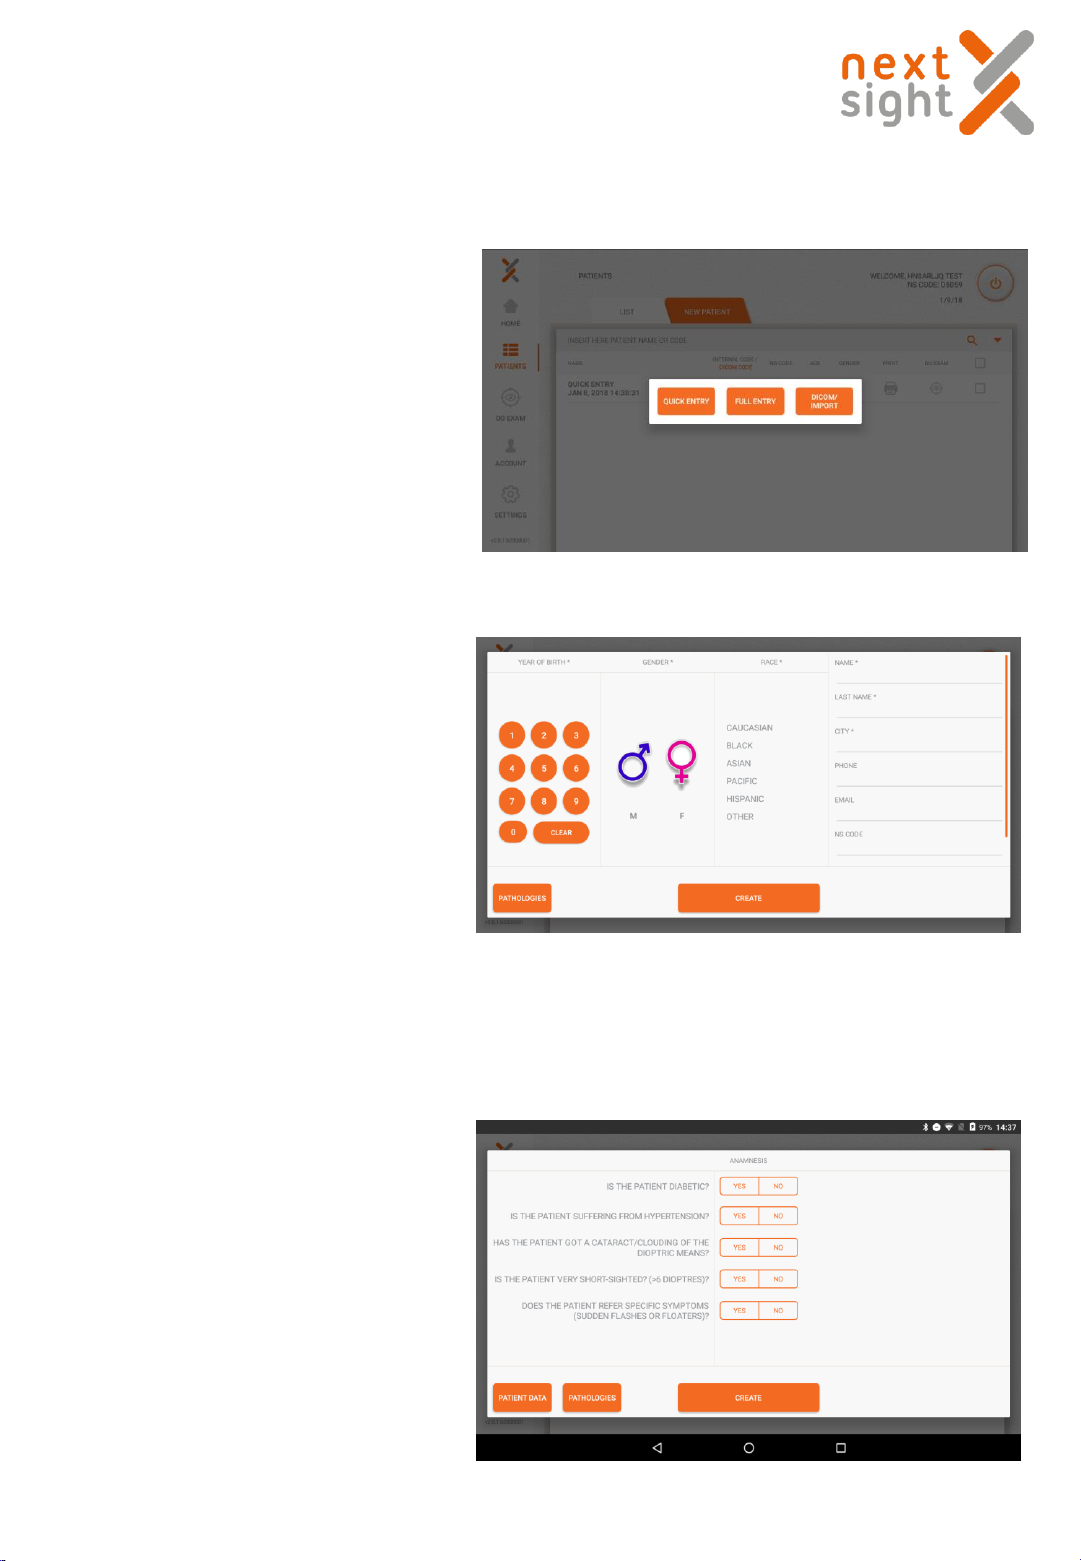
•Enter the patient’s information into
corresponding fields.
Full Entry Procedure
•Choose: Full Entry
Once patient details are completed click on CREATE
14
•Both in quick and full entry
procedure you can add Patient’s
anamnesis.
Nexy user guide 2018-11-08Rev. 02

HEADREST
CHEEKBONES RESTS
Before proceeding to do an exam, please ensure that patient does not have active eye disease, injury
or eye abnormality affecting the cornea, conjunctiva or eyelids. Confirm not being allergic to silicone
(cleats).
Please observe the following steps :
•Make sure the environment is dim or dark.
•Make sure the front lens cap has been removed
•Ensure the cleats are disinfected before eye exam. Use appropriate tissues.
•Position the patient comfortably in front of the Nexy. Adjust the table height and chair height so
the patient feel at ease placing his front and his cheekbones on the orange cleats.
•For patients with small pupil, please bring them inside the dark room and wait a few minutes
for the pupil to naturally become larger. With elderly it can take more time.
•Fixation: using an eye patch to cover the other eye will help with the fixation.
•Instruct the patient to position himself facing the machine by first placing the cheekbones on
the orange cleats and then the forehead on the orange band. The face should rest well on both
the band and the cleats. The tail of the eye should be positioned about halfway up the gray
template (as indicated by the orange line in the figure below).
•Use artificial tears for patients with Dry Eye, because it is hard for them to keep the eye open
for long.
PERFORM AN EXAM
CORRECT POSITION OF PATIENT’S HEAD
15Nexy user guide 2018-11-08Rev. 02

Once patient is well positioned, tell him/her that during the
exam he/she has to fixate on the green light.
If the patient does not see it, ask the patient to stare straight
ahead.
If the patient says he sees red lights (actually present in the
machine) ask the same to fixate on the green light and not the
red ones.
Ask the elderly patient to close the eye and rest between
taking retinal photo of the left and right eye.
Sometimes with old patients, it) is necessary to help support
or hold the head in a stable position.
Patient should fixate on the green light and without blinking the eye. During this process 2 red lights
are flashing. The patient should not fix on red lights. It is just to calibrate the measurement. Once all
parameters are ok, a single white flash will record patient’s retina. After the first eye exam is finished,
the exam will start on the other eye. Patient should observe the same rules.
Make sure the front lens cap has been removed.
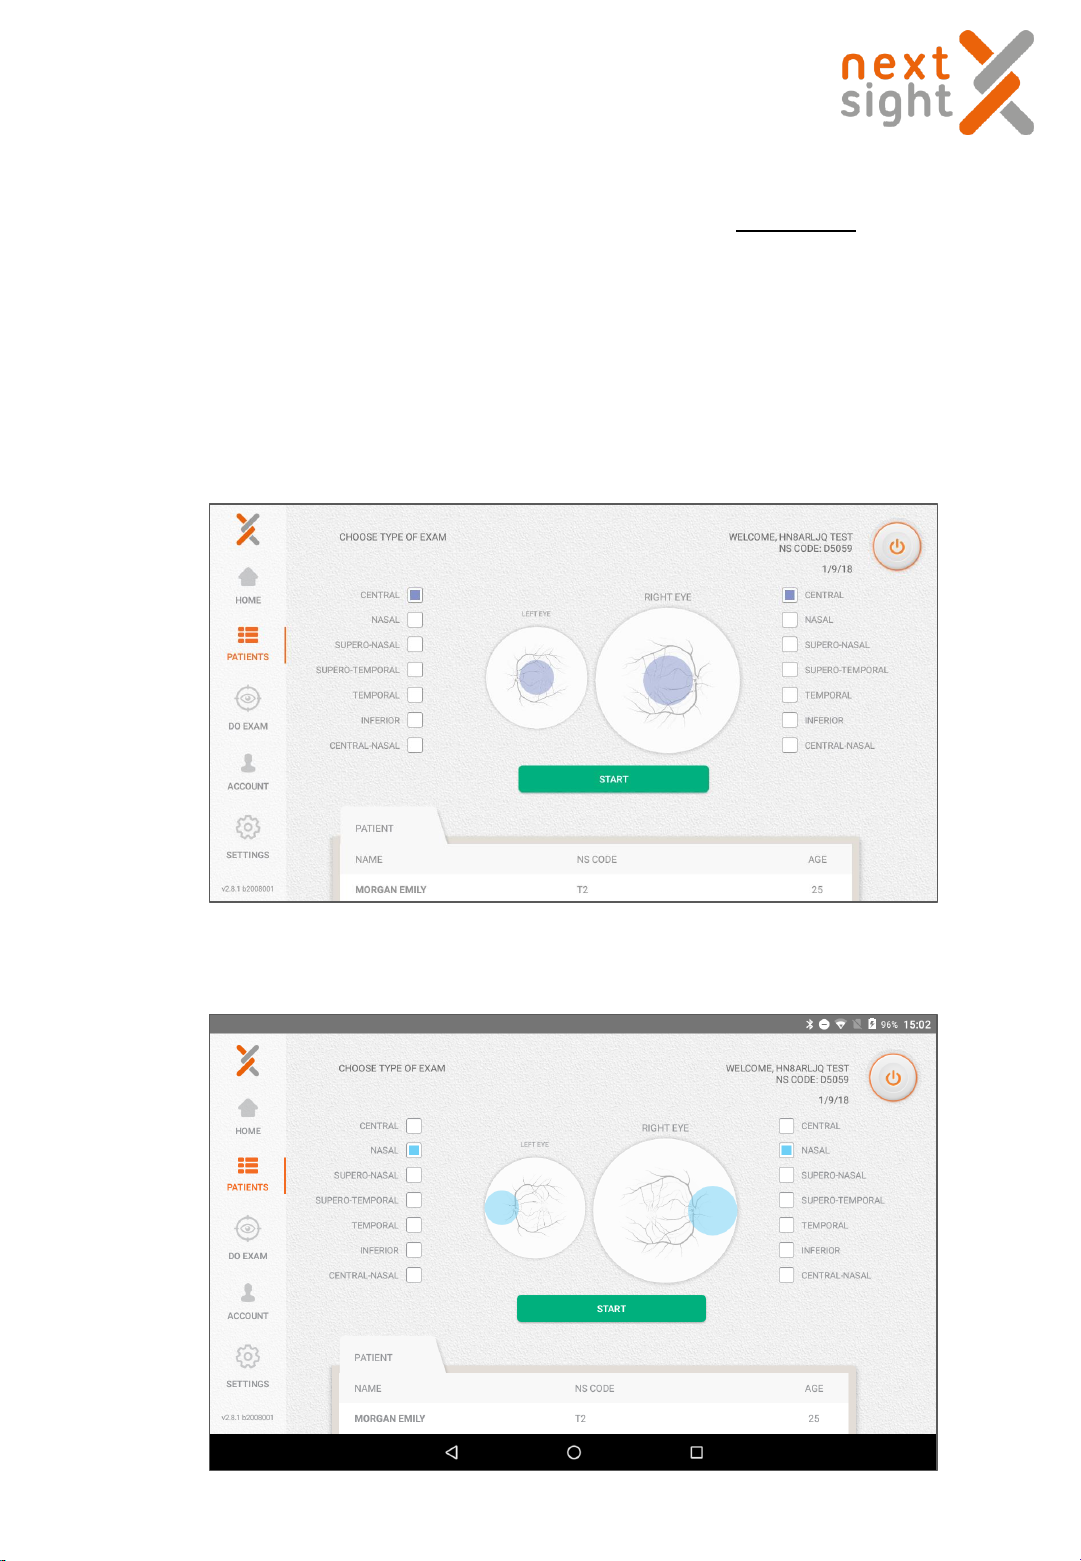
At this point a screen appears to choose the fields available.
Click on START EXAM select the eye (Left or Right) and the type of fixation desired.
16
Nexy user guide 2018-11-08Rev. 02
Nota: For a better picture quality, we suggest running the exam on the right eye first, wait 1 minute to
allow the patient's pupil to naturally dilate and then repeat the procedure on the left eye.
Nexy allows using 7 different fixations
The machine will move by itself.
Patient MUST keep looking straight at the green light without blinking the eye.
1. Select the Central fields for the right eye and the left eye as illustrated and click the START button
2. Select the Nasal fields for the right eye and the left eye as illustrated and click the START button
17
Nexy user guide 2018-11-08Rev. 02
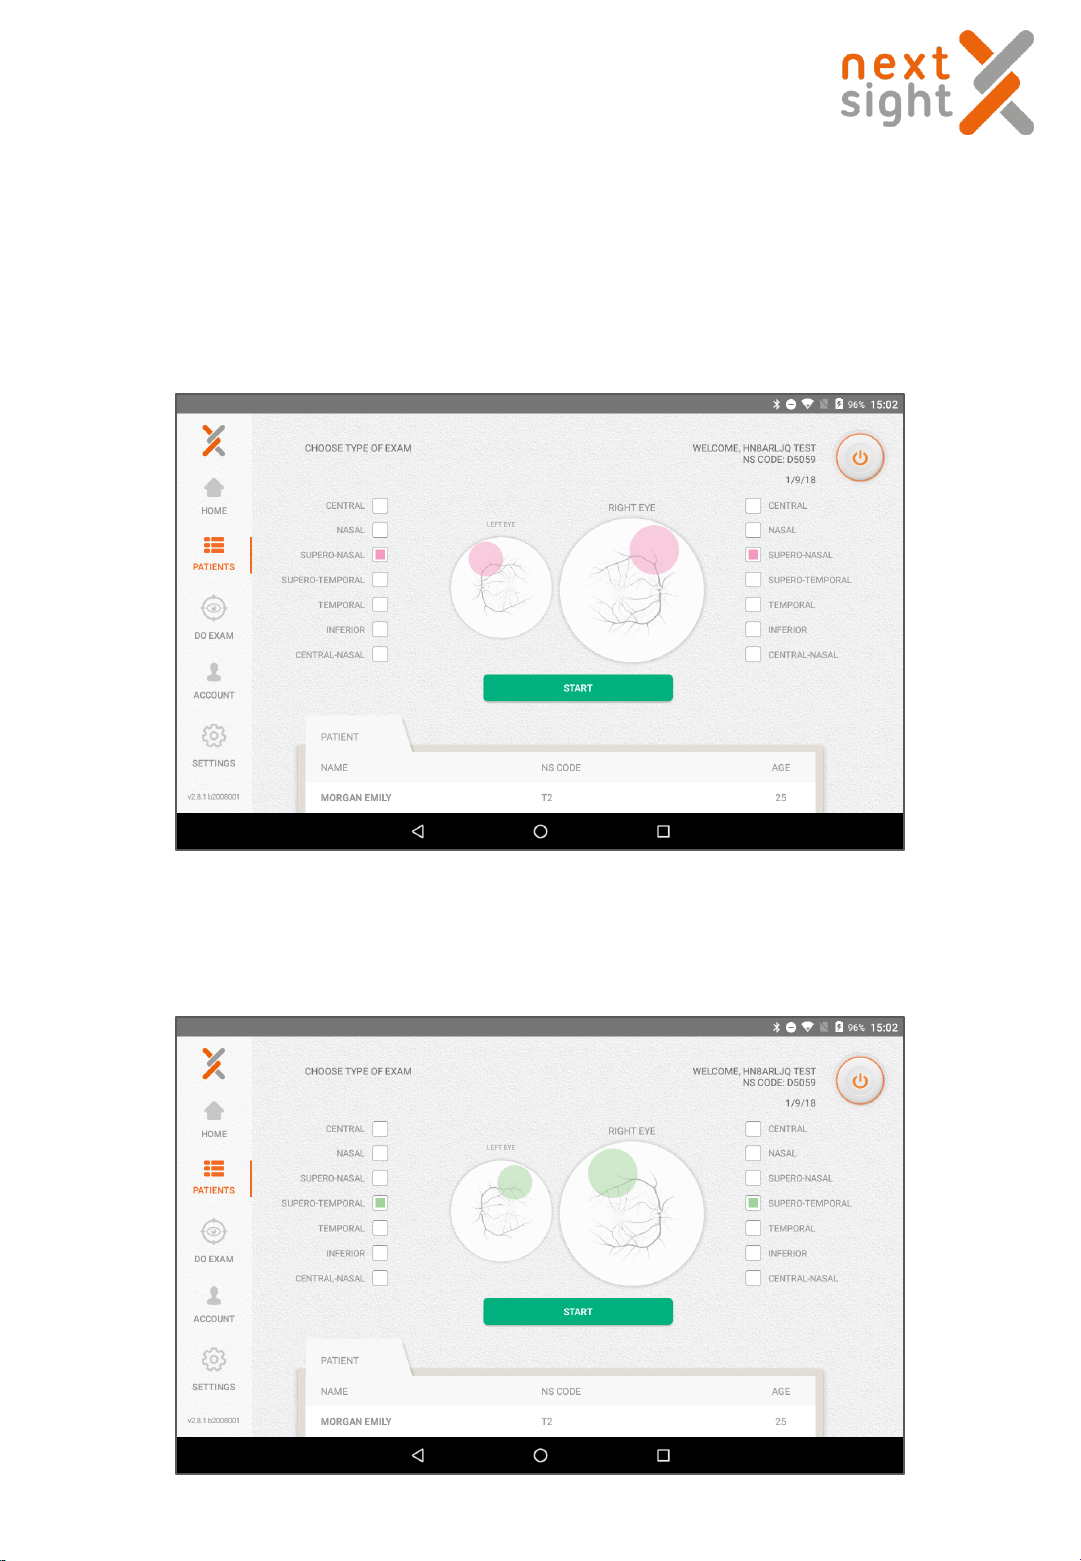
3. Select the Superonasal fields for the right eye and the left eye as illustrated and click the START
button
4. Select the Superotemporal fields for the right eye and the left eye as illustrated and click the START
button
18
Nexy user guide 2018-11-08Rev. 02
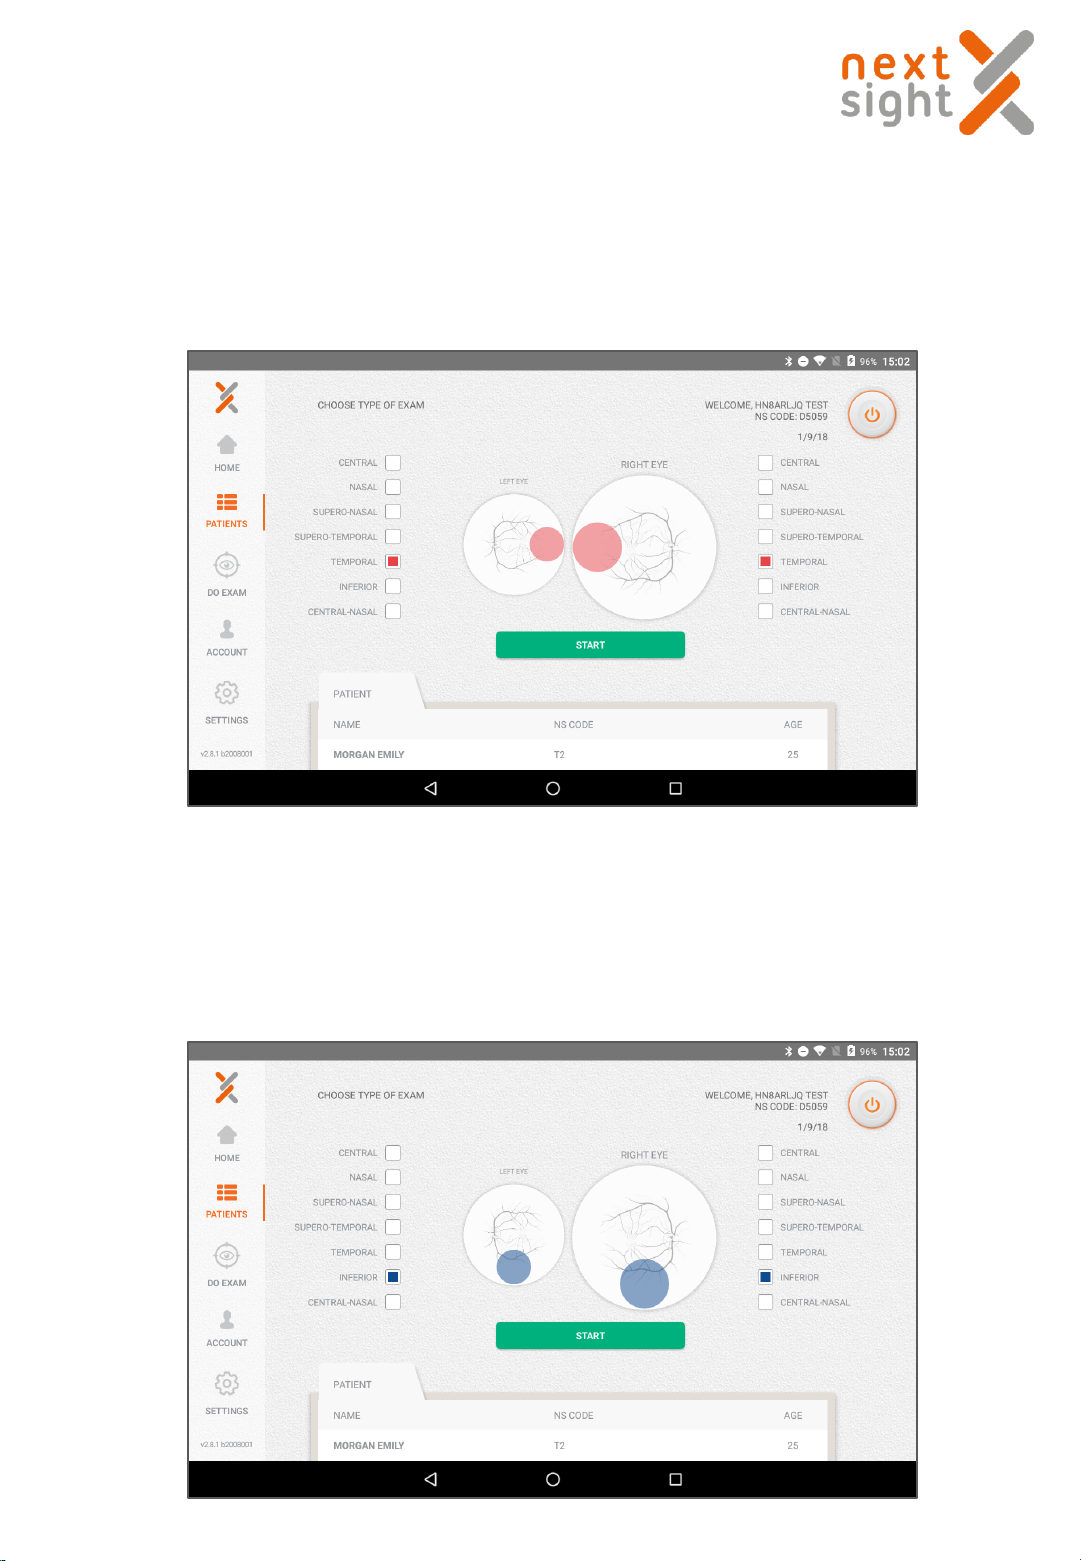
5. Select the Temporal fields for the right eye and the left eye as illustrated and click the START button
6. Select the Inferior fields for the right eye and the left eye as illustrated and click the START button
19
Nexy user guide 2018-11-08Rev. 02
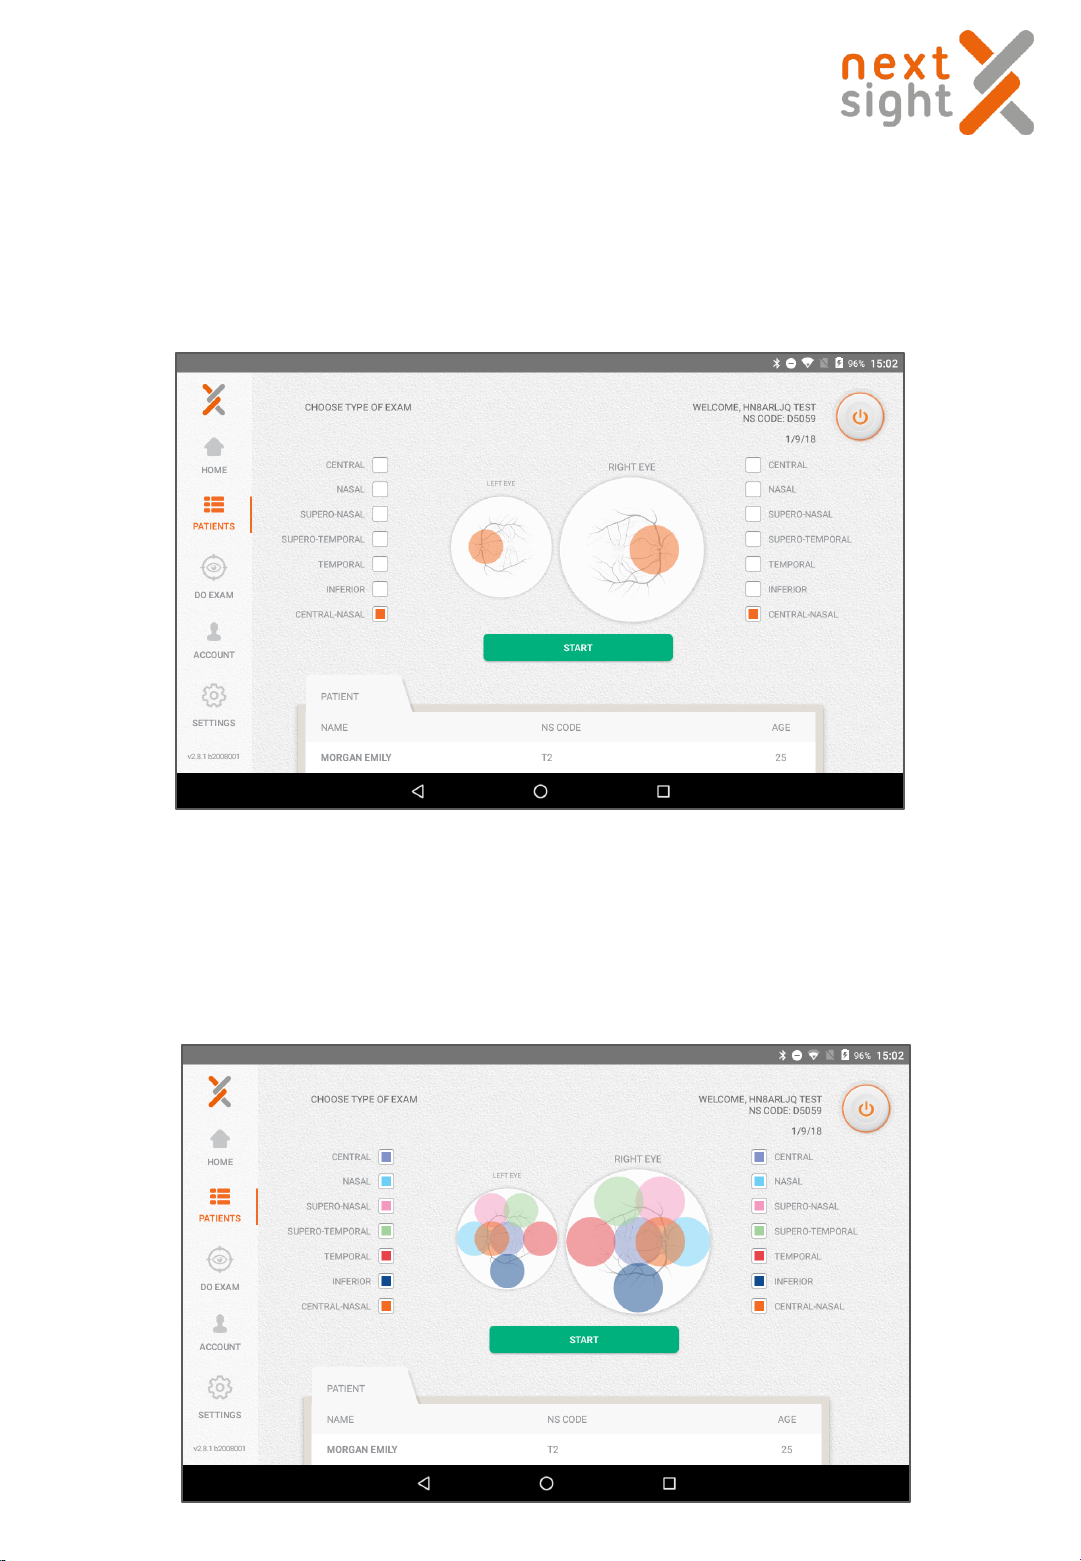
7. Select the Central Nasal fields for the right eye and the left eye as illustrated and click the START
button
Select the All fields for the right eye and the left eye as illustrated and click the START button
Capture all 7 fixations is useful to have a widefield view of the retina, however the process should take a
long time and each eye must be flashed 7 times.
20
Nexy user guide 2018-11-08Rev. 02
Table of contents
Popular Industrial Equipment manuals by other brands

BOLDAN
BOLDAN Extruder ProSeries 550 manual

Vessel
Vessel STAT CLEAN C-40 instruction manual

Nordson
Nordson ColorMax Customer product manual

Rockwell Automation
Rockwell Automation Allen-Bradley ControlNet Ex Media Planning and installation manual

Conquip
Conquip Concrete Column Skip with Bale Arm 500 user guide

Castex
Castex FP-1600 Operator and parts manual


Siemens
Siemens 3VA9137-0HA 0 Series operating instructions

Grundfos
Grundfos TPE 2 Series instructions

Thiele
Thiele Streamfeeder Reliant 3700 Product guide

Kendrion
Kendrion INTORQ BFK470 Translation of the original operating instructions

ABB
ABB HT842192 Operation manual

Siemens
Siemens SITOR 3NH5023 quick start guide