Nexxt Solutions Smart Wi-Fi aroma diffuser User manual

WARRANTY
nexxtsolutions.com/warranty
YEAR
2
Smart Wi-Fi aroma diffuser

English
User guide
Thank you for purchasing the Smart Wi-Fi aroma diuser
from Nexxt Solutions. We are excited to be part of making
your life easier, safer and bringing peace of mind inside and
outside your home.
Carefully read this manual prior to setting up and using this
product.
Package content
• Smart Wi-Fi aroma diuser (1)
• Power adapter (1)
• Quick start guide (1)
Product overview
This aroma diuser uses ultrasonic waves to instantly
vaporize water and essential oil to produce a cool, dry
fragrant mist.
1
2
5
4
3
6
10 11
12
79
8
1. Mist vent
2. Cover
3. Water tank
4. Light button
5. Mist button
6. Max. water level line
7. Drainage outlet
8. Light pipe
9. Main body
10. Air intake
11. Rubber feet
12. DC socket

Manual operation of the smart
diffuser
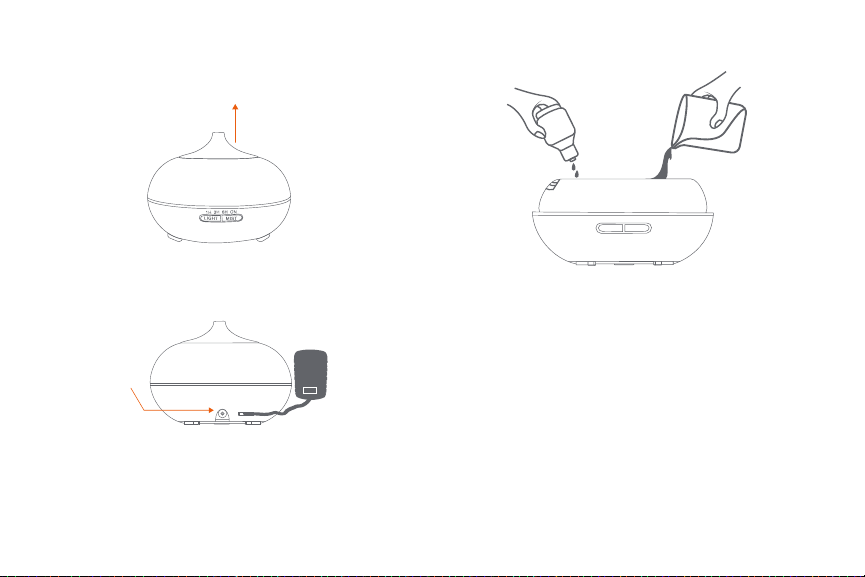
1. Place the aroma diuser upright on a rm, level surface
and remove the upper cover.
2. Insert the power adapter into the DC socket on the
aroma diuser and then plug the AC end into a standard
wall outlet.
3. Fill the aroma diuser with water. Use the MAX line as a
guide and do not overll. We recommend adding 2-3 drops
of essential oil per 100ml of water into the tank.
The rst time the unit will automatically be in pairing
mode, in which case the LED will blink rapidly. Otherwise,
follow the instructions below in Add device step 2.
Notes:
- Do not add water while the product is on.
- Never pour hot or boiling water into the tank.
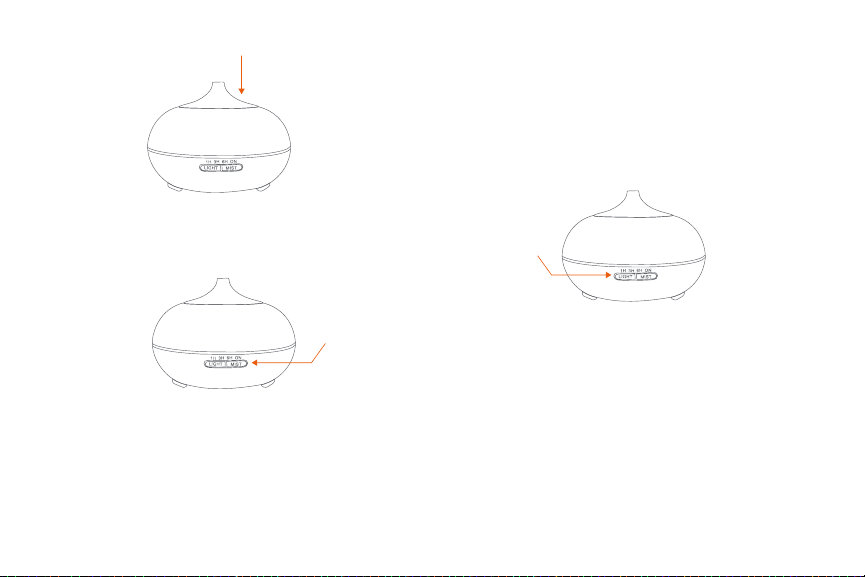
Light
MIST
1H 3H 6H ON

4. Replace the cover and adjust the direction of the spray.
5. Press and hold the Mist button to turn the unit on and
o.
6. Briey press the Mist button to choose the operation
time: 1H, 3H, 6H (H=hours), ON for continuous spray time
or OFF to cancel.
7. The mist intensity is adjusted by holding and pressing
the Mist button until a beep is heard. One beep will
produce the highest intensity, while two beeps will set the
intensity to its lowest level.
8. Press the Light button to turn the LED on. The brightness
level is adjusted by pressing the Light button several times
to cycle through the available settings (running eect,
bright color, soft color or o ).
9. The unit will stop misting and the light will turn o
automatically when water level becomes too low.
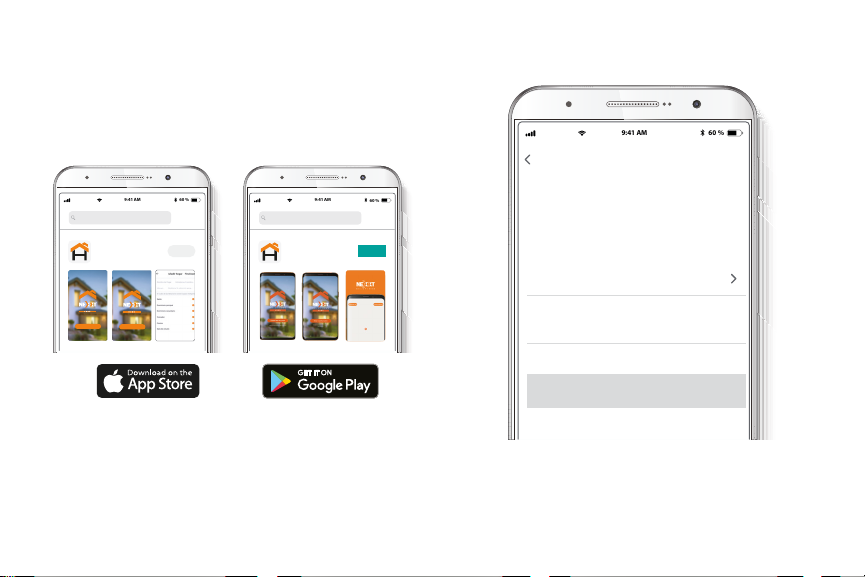
Step 1
Register by email. If you want to register by phone, select
Register by phone on the upper right-hand corner of the
screen.
Installing the Nexxt Solutions
Home App
Download Nexxt Home app from Google Play or the Apple
App Store.
60 %
9:41 AM
Register by phone
Register by email
United States of America
Email
Get authentication code
60 %
9:41 AM
Nexxt Home
Nexxt Solutions Home App
Cancel
GET
Accvent LLC
Login with existing account
Create New Account
SOLUTIONS
Iniciarsesión con cuenta existente
Crear Cuenta Nueva
SOLUTIONS
60 %
9:41 AM
Nexxt Home
Nexxt Solutions Home App
Cancel
INSTALL
Accvent LLC

Step 3
Create a new password and then select Completed.
Step 2
Enter the verication code you received.
60 %
9:41 AM
Enter verication code
Verication code has been sent to your
60 %
9:41 AM
Set Password
Completed
6-20 characters, including letters and numbers

Step 4
The Nexxt Solutions Home account has been successfully
set up.
Step 5
Assign a Home Name and Family Location.
Select Add another room and name each room as needed.
Select Save to store your settings.

Add device
Step 1
Select Add device, followed by the smart aroma diuser.
60 %
9:41 AM
60 %
9:41 AM
Step 2
1. The device will boot
into pairing mode
automatically when
powered on for the rst
time. Manually pair the
device if it fails to go into
pairing mode
automatically or if the
aroma diuser was
paired before.
2. Press and hold the
Light button for 5
seconds or until a beep
is heard.
3. Press and hold the Light button again for 3 seconds or
until you hear another beep, and then release it. Wait until
the LED starts blinking, this indicates that the device has
entered into the pairing mode.
60 %
9:41 AM
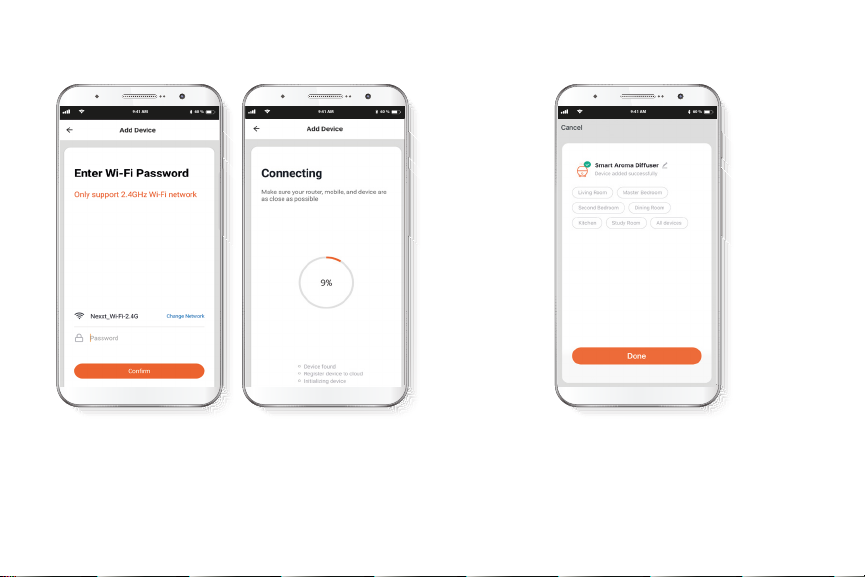
Step 3
You must connect to a 2.4GHz WiFi network. Enter your
network password. Make sure you enter the correct
password, otherwise the device will not connect.
Step 4
Device added successfully will be displayed. Click on
Done. Once the pairing is complete, the LED will turn o.
60 %
9:41 AM
60 %
9:41 AM
60 %
9:41 AM
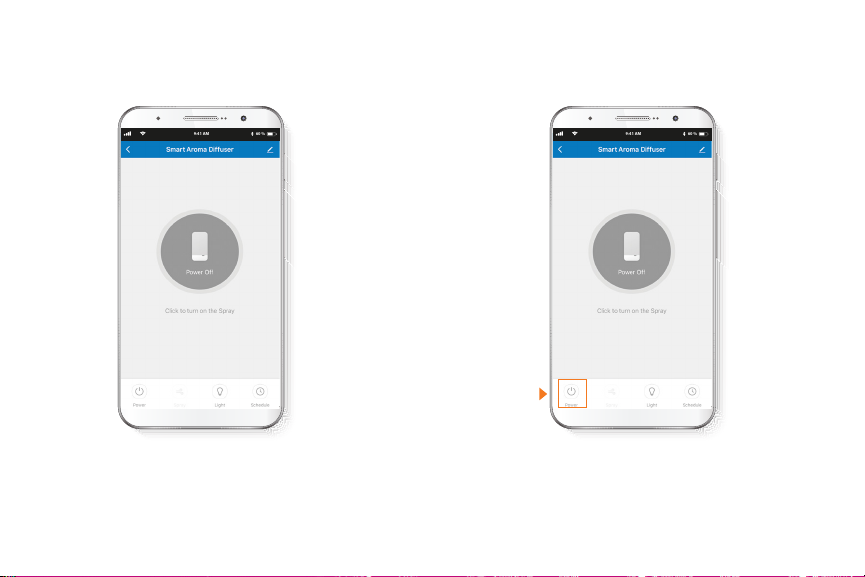
Device configuration
Once the initial setup is complete, the control interface of
the device will be displayed.
Main functions
Power: allows you to switch the device on and o.
60 %
9:41 AM
60 %
9:41 AM

Spray: enables the setting of the spray countdown timer.
The available selections are: 1Hr, 3Hr, 6Hr or Cancel.
60 %
9:41 AM
60 %
9:41 AM
60 %
9:41 AM
60 %
9:41 AM
Intensity: enables the spray intensity setting from high to
low by pressing on the selection wheel.

Light: use this option to turn the light on and o, to select
the gradient eect or xed color.
60 %
9:41 AM
60 %
9:41 AM
60 %
9:41 AM
Allows you to set a schedule to start the spray process and
to control the lighting eects.
Add schedule
60 %
9:41 AM
60 %
9:41 AM

To remove a schedule on iOS, slide item to the left, and for
Android, press and hold the selected Schedule, followed by
Delete.
Delete a schedule
60 %
9:41 AM
Settings
Click on the pencil icon on the upper right-hand corner.
Device name: changes the name of the Wi-Fi aroma diuser.
Device information: will show the data related to the Wi-Fi
aroma diuser.
60 %
9:41 AM

Tap-To-Run and Automation: links the Wi-Fi aroma diuser
with other smart products to automatically control them
through a customized command.
Third-party control: enables the voice recognition feature
through Alexa and Google Assistant .
Oine notication: provides a selection button to
enable/disable this feature.
Share device: allows sharing the Wi-Fi aroma diuser with
family and friends.
Create group: makes management of devices easier by
selecting and arranging multiple components under a single
group.
Feedback: let us know if you have any issues setting up the
product.
Check network: test your network to make sure you have a
good signal.
Check for rmware upgrade: we will sometimes add new
features or provide updates with a new rmware upgrade.
Remove device: allows you to delete the Wi-Fi aroma diuser
from the application.
Share device
Click on Share devices then tap Add sharing. Enter the
mobile number/e-mail address of family and friends. Tap on
Done. The newly congured users will now have access to
your smart aroma diuser.
Note: family or friends will need their own Nexxt Solutions
Home Account to access the device.

Delete user
To remove a user, on Android press and hold the name you
want to eliminate. On iOs, slide to the left the user you want
to remove. Click on Delete. A notication conrming you
don’t want to share the device with this user will be
displayed. Click on Conrm.
Product care and maintenance
Clean the product regularly. Ideally every 3 to 5 days or if
used 6 times or more. To do so follow the steps below:
1. Unplug the AC-adapter from the main unit and the
power socket .
2. Empty the water tank and use a damp clean cloth to
wipe the base.
3. Do not immerse the unit in water. Use a cotton swab to
remove excess oil residues.
4. Do not use harsh cleansers or alcohol.
Note: refer to this illustration to correctly empty the tank.

Recommendations
• Do not ll tank with over 10.1oz water.
• The maximum operation time is 10 hours.
• Use exclusively natural essential oils. Any chemicals or
other additives that they may contain can damage the unit.
• The mist intensity and the amount produced may vary. This
is normal, and should not be considered as a fault.
• Do not switch on power when the tank is empty.
• Do not touch the ultrasonic vibration plate during use.
• Unplug the unit before maintenance and clean regularly
with a damp clean cloth.
• If smoke or burning smell is detected, unplug the unit
immediately.
Nexxt Solutions® is a registered trademark. All rights reserved.
Amazon, Alexa and all related logos are trademarks of Amazon.com,
Inc. or its aliates. Google, Android and Google Play are trademarks of
Google Inc. All other brand names and trademarks are the property
of their respective owners. Made in China.
FCC ID: X4YHAAD600

Español
Guía del usuario
Gracias por adquirir el Difusor de aroma inteligente con
conexión Wi-Fi de Nexxt Solutions. Nos complace ser
parte de la solución destinada no sólo a simplicar su vida,
sino que además poder brindar más seguridad y
tranquilidad al interior de su hogar.
Lea detenidamente este manual antes de instalar y utilizar
el producto.
Contenido del empaque
• Difusor de aroma inteligente con conexión Wi-Fi (1)
• Adaptador de corriente de CA (1)
• Guía de conguración rápida (1)
Descripción del producto
Este difusor de aroma utiliza ondas ultrasónicas para
evaporar instantáneamente una preparación compuesta
por agua y aceites aromáticos, con el n de dispersar un
vapor fragante, fresco y seco.
1
2
5
4
3
6
10 11
12
79
8
1. Boquilla rociadora
2. Cubierta superior
3. Depósito de agua
4. Botón de iluminación Light
5. Botón del nebulizador Mist
6. Marcador de máx. nivel de
agua
7. Salida del drenaje
8. Tubo luminoso
9. Estructura principal
10. Toma de aire
11. Patas de goma
12. Conjuntor para CC
Operación manual del difusor de
aroma
1. Coloque el difusor de aroma en posición vertical sobre
una supercie rme y lisa, y proceda a retirar la cubierta
superior.
2. Inserte el adaptador en el conjuntor ubicado en el
difusor de aroma y a continuación, conecte el extremo de
CA en un tomacorriente de pared estándar.
3. Llene el difusor de aroma con agua. Use la línea de MÁX.
marcado. Recomendamos agregar entre 2 y 3 gotas de
aceite aromático por cada 100ml de agua dentro del
depósito.
Cuando utiliza la unidad por primera vez, automáticamente
se inicia en el modo de emparejamiento, en cuyo caso la luz
LED parpadea rápidamente. De los contrario, siga las
instrucciones que aparecen en la sección siguiente,
Agregar dispositivo - paso 2.
Notas:
- No agregue agua mientras el producto esté encendido.
- Nunca vierta agua caliente o hirviendo en el depósito.
Light
MIST
1H 3H 6H ON
5. Mantenga presionado el botón del nebulizador para
encender y apagar la unidad.
6. Pulse brevemente el botón del nebulizador con el n de
elegir la duración del ciclo: 1H, 3H, 6H (H=horas), ON para
nebulización continua u OFF cuando desee cancelar dicha
función.
7. La intensidad del atomizador se ajusta manteniendo el
botón del nebulizador Mist presionado hasta generar un
tono breve. Un solo tono producirá la máxima intensidad,
mientras que dos tonos pondrán su regulación en el nivel
más bajo.
8. Presione el botón de iluminación con el n de encender
la luz LED. El nivel de brillo se ajusta presionando el botón
de iluminación Light varias veces con el n de alternar
entre los efectos disponibles (luz intensa, luz tenue o
apagada).
9. La unidad deja de vaporizar y la luz se apaga en forma
automática cuando el nivel de agua disminuye por debajo
de los límites aceptables.
4. Vuelva a colocar la cubierta y ajuste la dirección del
atomizador.

60 %
9:41 AM
Register by phone
Register by email
United States of America
Email
Get authentication code
60 %
9:41 AM
Nexxt Home
Nexxt Solutions Home App
Cancel
GET
Accvent LLC
Login with existing account
Create New Account
SOLUTIONS
Iniciarsesión con cuenta existente
Crear Cuenta Nueva
SOLUTIONS
60 %
9:41 AM
Nexxt Home
Nexxt Solutions Home App
Cancel
INSTALL
Accvent LLC
Instalación de la aplicación
Nexxt Solutions Home App
Descargue directamente la aplicación
Nexxt Home de Google Play o de Apple App Store.
Paso 1
Registro por email. Si desea registrarse por teléfono,
seleccione Registro por teléfono en el borde superior
derecho de la pantalla.
This manual suits for next models
1
Table of contents
Languages:
Other Nexxt Solutions Accessories manuals


