NGTeco NG-D500 Series User manual

Due to the regular upgrades of systems and products, NGTeco could not guarantee exact consistency between the
actual product and the written information in this manual.
Model: NG-D500 Series
Version: 1.0
Quick Start Guide
English

1.
2.
If you have any problems, please read this manual carefully or
contact Customer Care.
The device can only connect to 2.4GHz Wi-Fi networks. If you
have a dual-band router with separate 2.4GHz and 5GHz
networks, make sure your phone is connected to the 2.4GHz
network.
3. Make sure the entered Wi-Fi password is correct when adding a
new device.
4. Please make sure the device is close to the router for a stable
network connection.
5. Before mounting the device on the wall for the first time use,
fully charge the battery. Make sure that the power adapter
provides a DC 5V/1A output.
6. We couldn't guarantee the exact consistency between the
actual product and the written information in this manual due
to the regular app and product updates.
1
Important Notes

2
Table of Contents

What’s in the Box
Doorbell
USB Charging
Cable
Reset Pin Wrench
Note: The power plug of doorbell chime may vary in different regions.
3
Quick Start
Guide
Mounting Plate ChimeRechargeable
Battery
Screw Kit
(mounting screws,
anchors)
Bottom Screw
Due to the regular upgrades of systems and products, NGTeco could not guarantee exact consistency between the
actual product and the written information in this manual.
Model: NG-D500 Series
Version: 1.0
Quic k Start Gu ide
English

Product Overview
Micro-SD
Card Slot
Battery
Slot
Lens
PIR
(Motion Sensor)
Microphone
Light Sensor
Status LED
Doorbell Button
Speaker
Micro-USB
Charging Port
Reset Button
Charging
Status LED
4
Solid Blue
Doorbell pressed
Rapid Blinking Blue
In pairing mode
Solid Red to Solid Blue
Movement detected
Solid Red
Network error
Status LED Description:

Connecting the Device to NGTeco Home App
Step 1: Download the App and Register Your Account
Search for the NGTeco Home App in Apple App Store or Google
Play Store and download the App to your mobile phone.
Open the NGTeco Home App and log in with your account. If you
do not have an account, create an account with your phone
number or Email ID.
Step 2: Power on the Device
Setup
Use the provided wrench to remove off the bottom screws, and
then separate mounting plate.
2
1.
Open the battery cover and insert the provided rechargeable
battery. Wait for a few seconds until you hear the audio prompt
“The camera is now ready to begin paring”, which indicates
that Pairing Mode is active.
2
2.
Note: If you did not hear the audio prompt, press and hold the Reset
Button for 5 seconds until you hear the prompt “System reset”.
5

Step 3: Add the Device to the App
Open the app, tap the "+" button on the top right corner of the
interface, and then select the ”Add Device” option. Select the
“Video Doorbell” option and then choose the corresponding
model purchased.
1
Tick "Next" if you have fi nished the above steps on the
interface. Select the desired Wi-Fi and enter the correct
password. Then tap the "Next" button.
2
1.
2.
Show the QR code towards the device lens, and the device will
scan the QR code. Once you hear the audio prompt “Pairing
information received”, tap the "I Heard a Prompt" button on
your mobile, the App will connect the device automatically.
2
3.
Note: Please hold the phone about 15-20 cm (6–8 inches) away
from the device. You can slightly move your mobile device
forward and backward for better scanning.
You can manually change the name of the device once you see
the message "Added successfully" on the mobile app. To finish
the setting, tap the "Done" button.
2
4.
Note: If you failed to connect your device to Wi-Fi, press and hold
the RESET Button for 5 seconds until you hear the audio prompt
“System reset”, then repeat the above steps.
Pair the Doorbell Chime
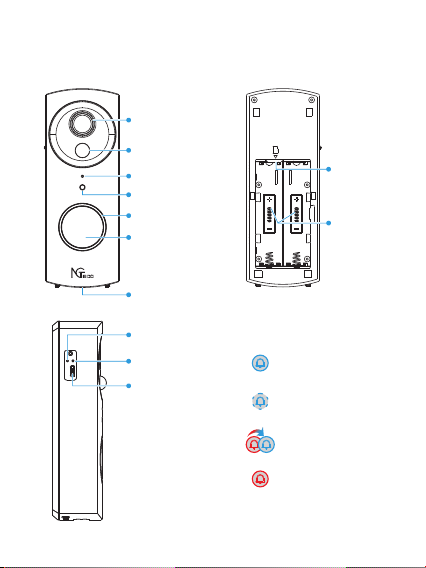
Music Button
Volume Button
6

Insert the chime into the outlet to power on.
Press the Music Button once to change the music and then
choose one. The indoor chime offers 36 different kinds of music
for options.
2
1.
2.
Press and hold the Volume Button until you hear one short beep.
2
3.
Finally, press the Doorbell Button to match the indoor chime.
Now, the music is changed.
2
4.
Volume Settings: Press the Volume Button once to trigger one
time. There are 4 volume levels you can choose from low to high.
Vi s i t and t h e n s e l e c t the h tt p s :/ / ip c - us . is m ar t l i fe .m e ,
corresponding data server on the top right corner of the interface.
Use NGTeco Home App to scan the QR code to login to your
account.
Watching the Videos from Browser
1.
2.
Click the corresponding device to watch the live videos.
3.
7

*Connecting the Device to Amazon Alexa
or Google Assistant
Tap the EDIT Button in the upper right corner of the device
interface after successfully connecting the device to the NGTeco
Home App. To link your NGTeco Home Account to Amazon Alexa or
Google Assistant, select the Amazon Alexa or Google Assistant
icon and follow the on-screen instructions.
After completing the setup, you can use the supported voice
commands that include:
Echo, show me <device name>.
Hey Google, show me <device name>.
Every time you change the name of a linked device, you must
discover it again to update the name.
2
1.
This voice control feature is optional, only the model NG-
D5XXA can support.
2
2.
Note:
Installation
After confirming a successful Wi-Fi connection and smooth live
video, you can select the required position to mount the device.
The recommended mounting height is 1.2m from the ground.
The installation steps are as follows:
Drill four holes in the wall according to the hole positions of
mounting plate, and then insert the plastic anchor into the
holes.
2
1.
Fix the mounting plate onto the wall with four screws.
2
2.
Install the doorbell to the mounting plate.
2
3.
8

Use the provided wrench to lock the bottom of the doorbell by
the screws.
2
4.
Recharging the Battery
Charge the doorbell with universal power adapter that deliver DC
5V/1A output. The red LED will light up when the device is
charging. You could check the remaining battery level in the App.
9

Product Features
Image Quality
Battery Level Sound
Fullscreen
Screenshot Speak
Record
Image Quality: To switch the image quality between HD and SD.
Battery Level: Check the remaining battery level and the charging
status.
Sound: To mute or unmute the sound from the device.
Fullscreen: Tap it to switch to the full screen.
Screenshot: Capture a picture to the photo album in App.
Speak: Tap it to talk to people in front of the device.
Record: Manually record a video to the photo album in App.
Main Interface:
10

Gallery: Review the recorded photos when detecting the motion.
Theme Color: Change the UI theme to light mode or dark mode.
Anti-Flicker: Disable the anti-flicker mode or set as 50Hz or 60Hz.
PIR: The PIR can be set to Off or High/Medium/Low sensitivity
modes as required.
Messages: Check the specific logs of all the motion detection or
video call.
*Cloud: This Video Cloud Storage service is needed to pay for the
monthly or annually subscription. You could check the video from
cloud storage with App anytime, anywhere. The cloud storage only
supports recording the events video clips.
Smart: Manage the related smart automation settings.
Playback: Watch the recorded videos in the Micro-SD Card.
More Settings:
Basic Settings:
Flip Screen: Rotate the current monitoring image at 180
degrees.
Time Water m a rk : Choose w h e t h e r the m o n i t o r i n g
interface displays the real time watermark.
Talk Mode: To fit the actual requirements, select the one-
way or two-way talk mode.
Power Management: Check the remaining battery level and the
power source, or set the threshold of the low battery alarm.
Storage Settings: After inserting the Micro-SD card, you could
check the status of storage capacity.
11

*Voice Control: To see live video from the Amazon Echo or Google
Home device, use Amazon Alexa or Google Assistant voice
commands. This feature is optional.
Offline Notication: I t enables to receive the offline push
message of the device.
Remove Device: Remember to REMOVE the device from the
current account when the owner of the device changes.
12

Modelo: Serie NG-D500
Guía Rápida
Versión: 1.0
Español
Debido a las ac tualizaciones periódicas de los sistemas y productos, NGTeco no puede garantizar la consistencia
exacta entre el producto real y la información escrita en este manual.

1.
2.
Lea atentamente este manual o comuníquese con atención al
cliente para cualquier consulta.
Este dispositivo sólo trabaja con redes Wi-Fi de 2.4GHz. Si
tiene un enrutador doble banda con redes de 2.4 GHz y 5 GHz,
asegúrese de que su teléfono esté conectado a la de 2.4 GHz.
3. Asegúrese de que la contraseña Wi-Fi ingresada sea correcta al
agregar un nuevo dispositivo.
4. Para una conexión de red estable, asegúrese de que el
dispositivo esté colocado cerca del enrutador.
5. Antes de montar el dispositivo en la pared por primera vez,
cargue la batería al 100%. Asegúrese de que el adaptador de
corriente proporcione una salida de DC de 5V/1A.
6. Debido a las actualizaciones periódicas de la aplicación y los
productos, no podemos garantizar la coherencia exacta entre
el producto real y la información escrita en este manual.
1
Notas Importantes

2
Tabla de Contenidos

Nota: El enchufe de corriente del timbre del videoportero puede
variar en diferentes regiones.
3
Contenido
Videoportero Timbre
Interior
Placa de Montaje Batería Recargable
Cable de
Carga USB
Kit de Tornillos
(anclajes, tornillos
de la placa
de montaje)
Guía Rápida
Llave InglesaPasador de
Reinicio
Tornillo Inferior
Modelo: Serie NG-D500
Guía Rápida
Versión: 1.0
Español
Debido a las actualizaciones periódicas de los sistemas y productos, NGTeco no puede garantizar la consistencia
exacta entre el producto real y la información escrita en este manual.

Lente
PIR (Sensor de
Movimiento)
4
Azul Sólido
Videoportero Presionado
Azul Intermitente
Modo Paridad
Rojo Sólido a Azul Sólido
Movimiento Detectado
Rojo Sólido
Error de Red
Descripción del Producto
Micrófono
Sensor de Luz
Botón de Timbre
LED de Estado
Altavoz
Botón de Reinicio
Puerto de Carga
Micro USB
LED de Estado
de Carga
Ranura para
Tarjeta
Micro-SD
Ranura para
Batería
LED Indicador de Estado:

Paso 1: Descargue la App y Registre su Cuenta
Busque la aplicación NGTeco Home en Apple App Store o Google
Play Store y descargue la aplicación en su teléfono móvil.
Abra la aplicación NGTeco Home e inicie sesión con su cuenta. Si
no tiene una cuenta, cree una cuenta con su número de teléfono o
correo electrónico.
Paso 2: Encienda el Dispositivo
Utilice la llave provista para quitar los tornillos inferiores y
luego separe la placa de montaje.
2
1.
Abra la tapa de la batería e inserte la batería recargable provista.
Espere unos segundos hasta que escuche el mensaje de audio
"La cámara está lista para comenzar a emparejarse", lo que
significa que está en modo de emparejamiento.
2
2.
5
Configuración
Conexión del Dispositivo con la App NGTeco
Home

Paso 3: Añada el Dispositivo a la App
Abra la aplicación, toque el botón "+" en la esquina superior
derecha de la interfaz y luego seleccione la opción "Agregar
dispositivo". Seleccione la opción "Video Doorbell" y luego
elija el modelo correspondiente comprado.
1
Marque "Siguiente" si ha terminado los pasos anteriores en la
interfaz. Seleccione el Wi-Fi deseado e ingrese la contraseña
correcta. Luego toque el botón "Siguiente".
2
1.
2.
Muestre el código QR hacia la lente del dispositivo y el
dispositivo escaneará el código QR. Una vez que escuche el
mensaje de audio "Información de emparejamiento recibida",
toque el botón "Oír el tono de aviso" en su móvil, la aplicación
conectará el dispositivo automáticamente.
2
3.
Nota: Sostenga el teléfono a unos 15-20 cm de distancia de el
dispositivo. Puede mover ligeramente su dispositivo móvil
hacia adelante y hacia atrás para escanear mejor.
Una vez que vea el mensaje "Se agregó con éxito" en la
a p l i c a c i ó n , p u e d e e d i t a r e l n o m b r e d e l d i s p o s i t i v o
manualmente. Toque el botón "Finalizado" para completar la
configuración.
2
4.
Nota: Si no pudo conectar su dispositivo a Wi-Fi, mantenga
presionado el Botón de Reinicio durante 5 segundos hasta que
escuche el mensaje de audio "Reinicio del sistema", luego repita
los pasos anteriores.
6
Nota: Si no escuchó el mensaje, mantenga presionado el Botón de
Reinicio durante 5 segundos hasta que escuche el mensaje
"Reinicio del sistema".
Table of contents
Languages:
Popular Accessories manuals by other brands

Datalogic
Datalogic S8-PH M53 Series instruction manual

Nederman
Nederman TL2M instruction manual

Vega
Vega VEGAPULS SR 68 operating instructions

FRIEDHELM LOH
FRIEDHELM LOH Rittal 3302.3 Series Assembly and operating instructions

Gigaset
Gigaset N870 IP PRO Installation, configuration and operation

Stahl
Stahl SolConeX 8573/15 Series operating instructions