NI PXIe-4081 Use and care manual

CALIBRATION PROCEDURE
PXIe-4081
PXIe, 7½-Digit, ±1,000 V, Onboard 1.8 MS/s Isolated Digitizer, PXI
Digital Multimeter
This document contains the verification and adjustment procedures for the PXIe-4081. Refer
to ni.com/calibration for more information about calibration solutions.
Contents
Required Software.....................................................................................................................1
Related Documentation.............................................................................................................2
Password................................................................................................................................... 2
Calibration Interval................................................................................................................... 2
Test Equipment..........................................................................................................................2
Calibration Procedures..............................................................................................................3
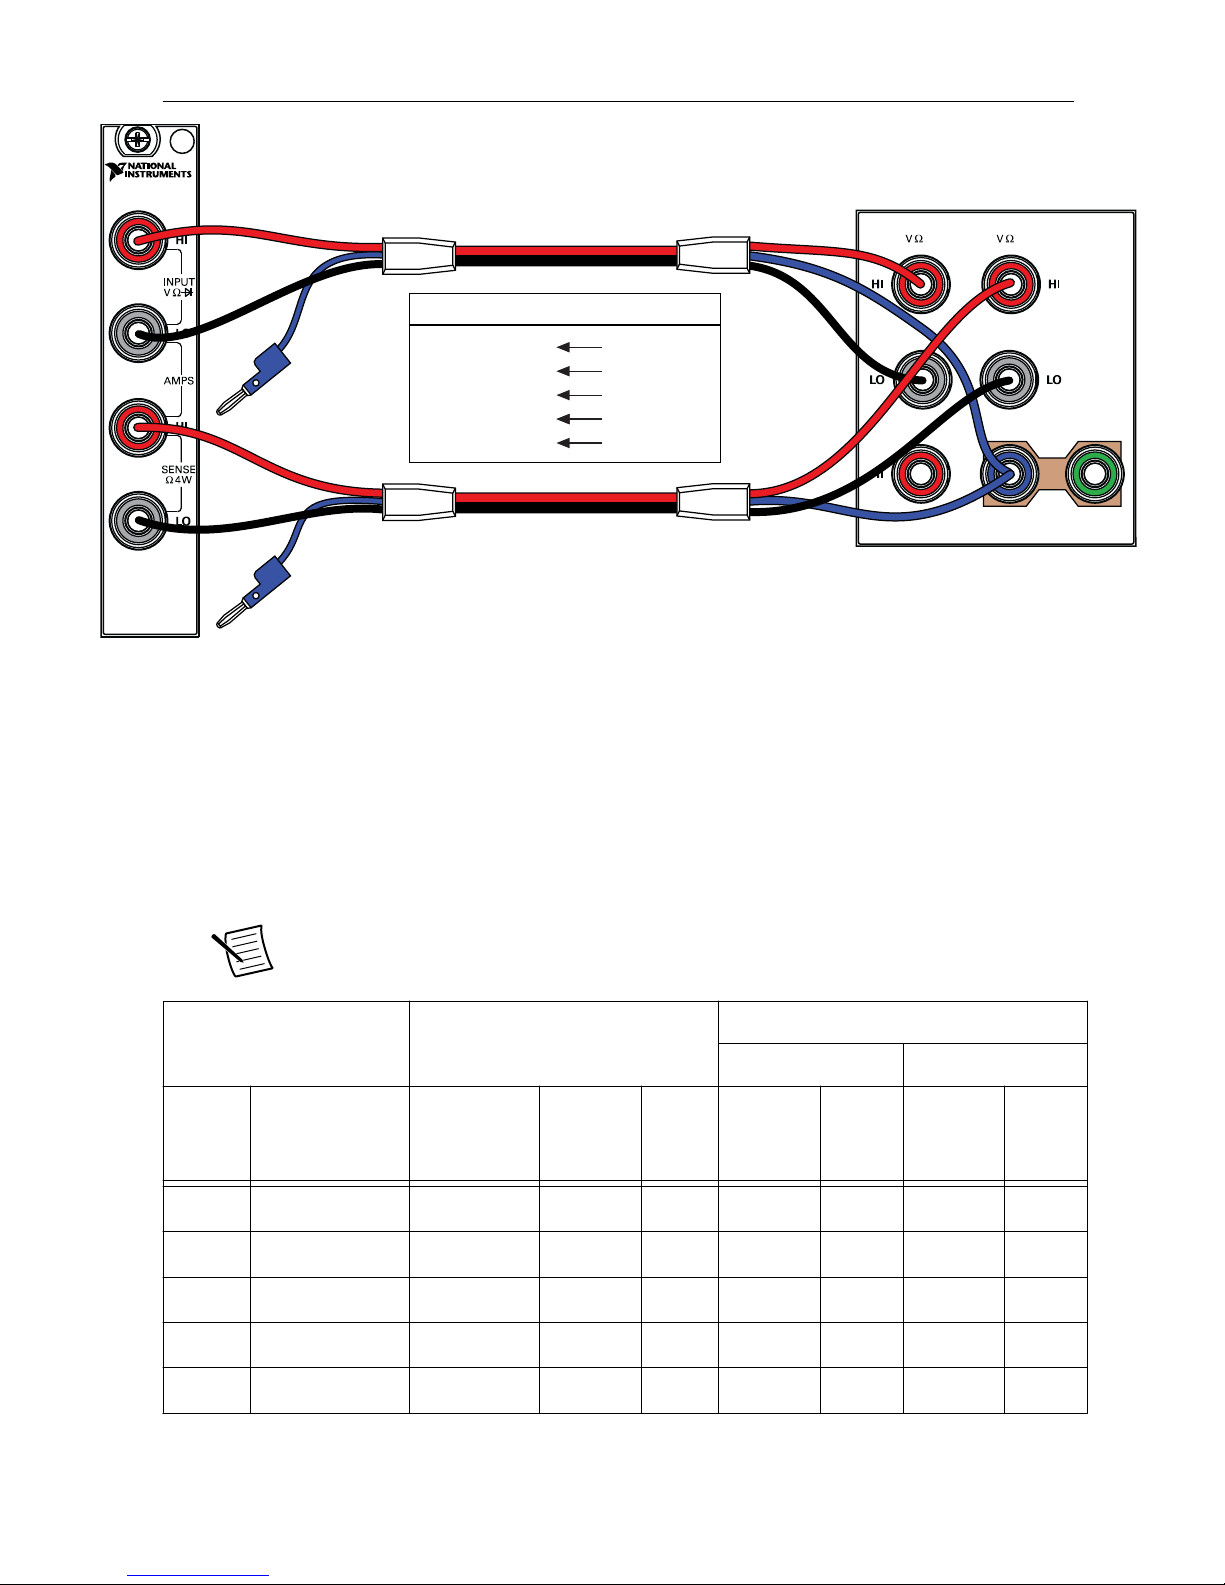
Initial Setup............................................................................................................................... 3
Test Conditions..........................................................................................................................4
As-Found and As-Left Limits................................................................................................... 4
Verification................................................................................................................................5
Verifying DC Voltage........................................................................................................5
Verifying AC Voltage........................................................................................................7
Verifying 4-Wire Resistance............................................................................................. 9
Verifying 2-Wire Resistance........................................................................................... 11
Verifying DC Current......................................................................................................14
Verifying AC Current......................................................................................................17
Adjustment.............................................................................................................................. 19
Adjusting DC Voltage..................................................................................................... 19
Adjusting Resistance.......................................................................................................20
Adjusting AC Voltages....................................................................................................23
Adjusting Current............................................................................................................25
Completing the Adjustment Procedures......................................................................... 27
Reverification..........................................................................................................................27
Worldwide Support and Services............................................................................................ 28
Required Software
Calibrating the PXIe-4081 requires you to install the following software on the calibration
system:
• NI-DMM version 15.2 or later

You can download all required software from ni.com/downloads.
Related Documentation
For additional information, refer to the following documents as you perform the calibration
procedure:
•NI Digital Multimeters Help
•NI PXIe-4080/4081/4082 Getting Started Guide
•NI PXIe-4081 Specifications
Visit ni.com/manuals for the latest versions of these documents.
Password
The default password for password-protected operations is NI.
Calibration Interval
Recommended calibration interval 2 years
Test Equipment
The following table lists the equipment required for calibrating your device. If you do not have
the recommended instruments, use these specifications to select a substitute calibration
standard.
Equipment Recommended
Models
Where Used Minimum Requirements
Multifunction
calibrator
Fluke 5720A or
Fluke 5730A
Voltage, Current,
Resistance
Maintained at 90 day
specifications
Three sets of low
thermal
electromotive force
(EMF) copper
cables
Fluke 5440 Voltage and
>1 mA Current
(1 set),
Resistance (2
sets), ≤1 mA
Current (3 sets)
Shielded twisted pair copper
cables with copper or gold-
plated copper banana plugs
Banana shorting bar Pomona 5145 DCV, 2-Wire
Resistance
≤ 40 mΩ resistance
2| ni.com | PXIe-4081 Calibration Procedure

Equipment Recommended
Models
Where Used Minimum Requirements
Double banana plug
with binding posts
Pomona 5405 2-Wire
Resistance
Gold-plated copper
Two insulated low
thermal EMF spade
lugs
Pomona 2305 2-Wire
Resistance
Gold-plated copper
Ammeter Keysight 3458A ≤1 mA DC
Current
• ≤ 40 ppm uncertainty
(100 µA and 1 mA
ranges)
• Optional:
– ≤ 160 ppm
uncertainty (10 µA
range)
– ≤ 300 ppm
uncertainty (1 µA
range)
Calibration Procedures
The calibration process includes the following steps:
•Initial Setup - Set up the test equipment.
•Verification Procedures - Verify the existing operation of the device. This step confirms
whether the device is operating within its specified range prior to calibration.
•Adjustment Procedures - Perform an external adjustment of the device that adjusts the
calibration constants with respect to standards of known values.
•Reverification - Repeat the verification procedure to ensure that the device is operating
within its specifications after adjustment.
Initial Setup
Note Ensure that both the calibrator and the PXIe-4081 are warmed up for at least
60 minutes before you begin this procedure.
To set up the test equipment, complete the following steps:
1. Remove all connections from the four inputs on the PXIe-4081.
2. Verify that the calibrator has been calibrated within the time limits specified in the Test
Equipment section, and that DC zeros calibration has been performed within the last 30
days. Consult the calibrator user documentation for instructions.
PXIe-4081 Calibration Procedure | © National Instruments | 3

Test Conditions
The following setup and environmental conditions are required to ensure the PXIe-4081 meets
published specifications:
• Ensure that the PXI Express chassis fan speed is set to HIGH and that the fan filters are
clean.
• Use PXI Express filler panels in all vacant slots to allow proper cooling.
• Plug the PXI Express chassis and the calibrator into the same power strip to avoid ground
loops.
• Power on and warm up both the calibrator and the PXIe-4081 for at least 60 minutes
before beginning this calibration procedure.
• Maintain an ambient temperature of 23 ±1 °C.
• Maintain an ambient relative humidity of less than 80%.
• Allow the calibrator to settle fully before taking any measurements. Consult the calibrator
user documentation for instructions.
• Allow the thermal EMF enough time to stabilize when you change connections to the
calibrator or the PXIe-4081. The suggested time periods are stated where necessary
throughout this document.
• Keep a shorting bar connected between the V-GUARD and GROUND binding posts of
the calibrator at all times.
• Clean any oxidation from the banana plugs on the cables before plugging them into the
binding posts of the calibrator or the connectors of the PXIe-4081. Oxidation tarnishes
the copper plugs so that they appear dull rather than shiny and leads to greater thermal
EMF.
• Prevent the cables from moving or vibrating by taping or strapping them to a
nonvibrating surface. Movement or vibration causes triboelectric effects that can result in
measurement errors.
As-Found and As-Left Limits
The as-found limits are the published 2-year specifications for the device. NI uses these limits
to determine whether the device meets the device specifications when it is received for
calibration.
The as-left limits are based on the published 24-hour specifications for the device, with
consideration for measurement uncertainty. NI uses these limits to determine whether the
device will meet the device specifications over its calibration interval.
Where a TUR of less than 4:1 was determined, a guardband technique was applied to the test
limits to maintain the same Probability of False Accepts (PFA) as if it was 4:1. The method
selected was the ANSI/NCSL Z540.3 method 6: Guard Bands Based on Test Uncertainty
Ratio.
4| ni.com | PXIe-4081 Calibration Procedure

Verification
The performance verification procedures assume that adequate traceable uncertainties are
available for the calibration references.
You can use the verification procedures described in this section for both pre-adjustment and
post-adjustment verification. You can omit sections (for example, the Verifying AC Current
section), however, any function not verified during post-adjustment will no longer be traceable
and should not be used for measurements.
Note Self-calibrate the PXIe-4081 before performing the verification procedures.
Verifying DC Voltage
Complete the following steps to verify DC voltage:
1. Plug in the shorting bar between the HI and LO terminals of the PXIe-4081.
2. Wait two minutes for thermal EMF to stabilize.
3. Reset the PXIe-4081.
4. Initialize the PXIe-4081 for DC voltage with a range of 100 mV and resolution of
7.5 digits.
5. Verify the accuracy for each configuration in the following table:
a) Acquire the measurement at each specified range and input resistance.
b) Compare to the specified limits.
DMM Settings As-Found Limits As-Left Limits
Range Input Resistance Lower Upper Lower Upper
100 mV >10 GΩ / 10 MΩ -2.80 µV 2.80 µV -2.50 µV 2.50 µV
1 V >10 GΩ / 10 MΩ -4.5 µV 4.5 µV -2.8 µV 2.8 µV
10 V >10 GΩ / 10 MΩ -7 µV 7 µV -7 µV 7 µV
100 V 10 MΩ -0.25 mV 0.25 mV -0.20 mV 0.20 mV
1000 V 10 MΩ -0.5 mV 0.5 mV -0.5 mV 0.5 mV
6. Remove the shorting bar from the PXIe-4081.
7. Set the calibrator to Standby.
8. Connect the PXIe-4081 to the calibrator using low thermal EMF cables according the
following figure.
PXIe-4081 Calibration Procedure | © National Instruments | 5

Figure 1. Voltage Connection Configuration
OUTPUT
A
SENSE
AUX
CURRENT
V-GUARD GROUND
NI DMM Calibrator
HI
LO
Not Connected
HI
LO
V-GUARD
9. Wait two minutes for thermal EMF to stabilize.
10. Set the PXIe-4081 and Calibrator configuration as shown in the following table.
11. Acquire the specified measurements and record them for use as the offset nulls in the
following steps.
DMM Settings Calibrator Settings
Range Input Resistance Range DCV Amplitude
100 mV >10 GΩ 2.2 V 0 V
100 mV 10 MΩ 2.2 V 0 V
12. Verify the accuracy for each configuration in the following table:
a) Set the PXIe-4081 to the specified configuration and commit.
b) Set the calibrator to the listed configuration and allow it to settle.
c) Acquire the specified measurement.
d) Subtract the appropriate offset null you recorded previously and compare the result
to the limits.
e) Repeat for each listed Input Resistance.
f) Set the Calibrator to Standby.
6| ni.com | PXIe-4081 Calibration Procedure

DMM Settings Calibrator
Settings
As-Found Limits (V) As-Left Limits (V)
Range Input
Resistance
DCV
Amplitude1
Lower Upper Lower Upper
100 mV >10 GΩ / 10 MΩ 100 mV 0.09999651 0.10000349 0.09999814 0.10000186
-100 mV -0.10000349 -0.09999651 -0.10000186 -0.09999814
1 V >10 GΩ / 10 MΩ 1 V 0.9999795 1.0000205 0.9999915 1.0000085
-1 V -1.0000205 -0.9999795 -1.0000085 -0.9999915
10 V >10 GΩ / 10 MΩ 10 V 9.999875 10.000125 9.999966 10.000034
-10 V -10.000125 -9.999875 -10.000034 -9.999966
100 V 10 MΩ 100 V 99.99715 100.00285 99.99887 100.00113
-100 V -100.00285 -99.99715 -100.00113 -99.99887
1000 V 10 MΩ 1000 V 999.9647 1000.0353 999.9811 1000.0189
-1000 V -1000.0353 -999.9647 -1000.0189 -999.9811
You have completed verifying the DC voltage mode of the PXIe-4081. Select one of the
following options:
• If you want to continue verifying other modes, go to the Verifying AC Voltage section.
• If you do not want to verify any additional modes, and you are performing a pre-
adjustment verification, close the session.
• If you do not want to verify any additional modes, and you want to update the verification
time stamp, complete the following steps:
1. Open a new calibration session to the instrument (with correct calibration password).
2. Close the calibration session with the Action set to Save.
Verifying AC Voltage
1. Set the calibrator to Standby.
2. Connect the PXIe-4081 to the calibrator using low thermal EMF cables according to the
configuration shown in Figure 1. on page 6.
3. Reset the PXIe-4081.
4. Initialize the PXIe-4081 for AC Voltage with a range of 50 mV and resolution of
6.5 digits.
5. Verify the accuracy for each configuration in the following table:
a) Set the PXIe-4081 to the listed configuration and commit.
b) Set the Calibrator to the listed configuration and allow it to settle.
c) Acquire the specified measurement and compare the results to the limits.
1For the ±100 mV test points, lock the calibrator range to 2.2 V.
PXIe-4081 Calibration Procedure | © National Instruments | 7

d) Repeat for each listed coupling.
e) Set the Standby.
DMM Settings Calibrator Settings 2-Year Limits (V)
Range Function Amplitude Frequency Lower Upper
50 mV AC / DC 5 mV 1 kHz 0.0049883 0.0050117
DC 50 mV 30 Hz 0.04994 0.05006
AC / DC 50 mV 50 Hz 0.049966 0.050034
50 mV 1 kHz 0.049966 0.050034
500 mV 50 mV 1 kHz 0.04995 0.05005
50 mV 50 mV 20 kHz 0.049966 0.050034
50 mV 50 kHz 0.049958 0.050042
50 mV 100 kHz 0.04984 0.05016
50 mV 300 kHz 0.049575 0.050425
500 mV DC 500 mV 30 Hz 0.499475 0.500525
AC / DC 500 mV 50 Hz 0.499725 0.500275
500 mV 1 kHz 0.499725 0.500275
5 V 500 mV 1 kHz 0.4995 0.5005
500 mV 500 mV 20 kHz 0.499725 0.500275
500 mV 50 kHz 0.49965 0.50035
500 mV 100 kHz 0.49895 0.50105
500 mV 300 kHz 0.49575 0.50425
5 V DC 5 V 30 Hz 4.99475 5.00525
AC / DC 5 V 50 Hz 4.99725 5.00275
5 V 1 kHz 4.99725 5.00275
50 V 5 V 1 kHz 4.992 5.008
5 V 5 V 20 kHz 4.99725 5.00275
5 V 50 kHz 4.9965 5.0035
5 V 100 kHz 4.9895 5.0105
5 V 300 Hz 4.9575 5.0425
8| ni.com | PXIe-4081 Calibration Procedure

DMM Settings Calibrator Settings 2-Year Limits (V)
Range Function Amplitude Frequency Lower Upper
50 V DC 50 V 30 Hz 49.9475 50.0525
AC / DC 50 V 50 Hz 49.965 50.035
50 V 1 kHz 49.965 50.035
700 V 50 V 1 kHz 49.9 50.1
50 V 50 V 20 kHz 49.965 50.035
50 V 50 kHz 49.915 50.085
50 V 100 kHz 49.675 50.325
50 V 300 kHz 48.425 51.575
700 V DC 219 V 30 Hz 218.746 219.254
AC / DC 700 V 50 Hz 699.51 700.49
700 V 1 kHz 699.51 700.49
219 V 20 kHz 218.799 219.201
219 V 50 kHz 218.387 219.613
219 V 100 kHz 217.336 220.664
70 V 300 kHz 66.85 73.15
You have completed verifying the AC voltage mode of the PXIe-4081. Select one of the
following options:
• If you want to continue verifying other modes, proceed to the Verifying 4-Wire Resistance
section.
• If you do not want to verify any additional modes and you are performing a pre-
adjustment verification, close the session.
• If you do not want to verify any additional modes, and you want to update the verification
time stamp, complete the following steps:
1. Open a new calibration session to the instrument (with correct calibration password).
2. Close the calibration session with the Action set to Save.
Verifying 4-Wire Resistance
Complete the following steps to verify 4-wire resistance:
1. Set the calibrator to Standby
2. Connect the PXIe-4081 to the calibrator using low thermal EMF cables, as shown in the
following figure.
PXIe-4081 Calibration Procedure | © National Instruments | 9

Figure 2. 4-Wire Resistance Connection Configuration
OUTPUT
A
SENSE
AUX
CURRENT
V-GUARD GROUND
NI DMM
HI
LO
HI SENSE
LO SENSE
Not Connected
Calibrator
HI
LO
HI SENSE
LO SENSE
V-GUARD
3. Wait two minutes for thermal EMF to stabilize.
4. Reset the PXIe-4081.
5. Configure the PXIe-4081 for 4-wire resistance measurements with a resolution of
7.5 digits.
6. Verify the accuracy for each configuration in the following table:
a) Acquire the measurement at each specified configuration.
b) Compare to the specified tolerances.
Note Tolerances are provided instead of absolute limits because your
calibrator will have different discrete resistance values.
DMM Settings Calibrator Settings Tolerances
As-Found As-Left
Range Offset
Compensated
Ohms (OCO)
Resistance External
Sense
Comp ppm of
Reading
ppm
of
Range
ppm of
Reading
ppm
of
Range
10 MΩ Off 0 Ω On None - 10 - 2
1 MΩ Off 0 Ω On None - 1 - 1
100 kΩ Off 0 Ω On None - 4.5 - 3
10 kΩ On 0 Ω On None - 1.5 - 0.7
1 kΩ On 0 Ω On None - 1.5 - 0.7
10 | ni.com | PXIe-4081 Calibration Procedure

DMM Settings Calibrator Settings Tolerances
As-Found As-Left
Range Offset
Compensated
Ohms (OCO)
Resistance External
Sense
Comp ppm of
Reading
ppm
of
Range
ppm of
Reading
ppm
of
Range
100 Ω On 0 Ω On None - 11.3 - 6.8
10 MΩ Off 10 MΩ On None 130 10 86 2
1 MΩ Off 1 MΩ On None 60 1 16 1
100 kΩ Off 100 kΩ On None 45 2.5 9 1
10 kΩ On 10 kΩ On None 45 1.5 8 0.7
1 kΩ On 1 kΩ On None 45 1.5 12 0.7
100 Ω On 100 Ω On None 55.7 11.3 16 6.8
Note Apply an offset null to the 100 kΩ measurement by subtracting the
corresponding 0 Ω measurement in the 100 kΩ range.
You have completed verifying the 4-wire resistance mode of the PXIe-4081. Select one of the
following options:
• If you want to continue verifying other modes, go to the Verifying 2-Wire Resistance
section.
• If you do not want to verify any additional modes and you are performing a pre-
adjustment verification, close the session.
• If you do not want to verify any additional modes, and you want to update the verification
time stamp, complete the following steps:
1. Open a new calibration session to the instrument (with correct calibration password).
2. Close the calibration session with the Action set to Save.
Verifying 2-Wire Resistance
Complete the following steps to verify 2-wire resistance:
1. Plug the shorting bar between the HI and LO terminals of the PXIe-4081.
2. Wait two minutes for thermal EMF to stabilize.
3. Reset the PXIe-4081.
4. Verify the accuracy for each configuration in the following table:
a) Acquire the measurement at each specified configuration.
b) Compare to the specified tolerances.
PXIe-4081 Calibration Procedure | © National Instruments | 11

DMM Settings Tolerances (ppm of range)
As-Found As-LeftRange OCO
100 MΩ Off 10 6
10 MΩ Off 10 2
1 MΩ Off 1.2 1.2
100 kΩ Off 6.5 5
10 kΩ On 21.5 20.5
1 kΩ On 201.5 200.5
100 Ω On 2012 2005
5. Remove the shorting bar from the PXIe-4081.
6. Set the calibrator to Standby.
7. Connect the PXIe-4081 to the calibrator using low thermal EMF cables, as shown in
Figure 1. on page 6.
8. Wait two minutes for thermal EMF to stabilize.
9. Verify the accuracy for each configuration in the following table:
a) Acquire the measurement at each specified configuration.
b) Compare to the specified tolerances.
DMM Settings Calibrator Settings Tolerances
As-Found As-Left
Range2OCO Resistance External
Sense
Compensation ppm of
Reading
ppm
of
Range
ppm of
Reading
ppm
of
Range
1 MΩ Off 0 Ω Off None - - - -
100 kΩ Off 0 Ω Off None - - - -
100 MΩ Off 100 MΩ Off None 3000 10 500 6
10 MΩ Off 10 MΩ Off None 130 10 86 2
1 MΩ Off 1 MΩ Off None 60 1 16 1
100 kΩ Off 100 kΩ Off None 45 2.5 7 1
Note For the 1 MΩ and 100 kΩ measurements, subtract the corresponding
0 Ω measurement as an offset null.
10. Connect the PXIe-4081 to the calibrator using low thermal EMF cables according to the
2-wire compensated configuration shown in the following figure.
2For the 1 MΩ and 100 kΩ measurements, subtract the corresponding 0 Ω measurement as an
offset null.
12 | ni.com | PXIe-4081 Calibration Procedure

Figure 3. 2-Wire Resistance Low Range Connection Configuration
OUTPUT
A
SENSE
AUX
CURRENT
V-GUARD GROUND
NI DMM
HI
LO
HI
LO
Not Connected
Calibrator
HI
LO
HI SENSE
LO SENSE
V-GUARD
11. Wait two minutes for thermal EMF to stabilize.
12. Verify the accuracy for each configuration in the following table:
a) Acquire the measurement at each specified configuration.
b) Compare to the specified tolerances.
DMM
Settings
Calibrator Settings Tolerances
As-Found As-Left
Range OCO Resistance External
Sense
Compensation ppm of
Reading
ppm
of
Range
ppm of
Reading
ppm
of
Range
10 kΩ Off 10 kΩ On 2-Wire 45 21.5 7 20.5
1 kΩ Off 1 kΩ On 2-Wire 45 201.5 7 200.5
100 Ω Off 100 Ω On 2-Wire 55 2012 9 2005
You have completed verifying the 2-wire resistance mode of the PXIe-4081. Select one of the
following options:
• If you want to continue verifying other modes, go to the Verifying DC Current section.
• If you are performing a pre-adjustment verification, close the session.
• If you do not want to verify any additional modes, and you want to update the verification
time stamp, complete the following steps:
1. Open a new calibration session to the instrument (with correct calibration password).
2. Close the calibration session with the Action set to Save.
PXIe-4081 Calibration Procedure | © National Instruments | 13

Verifying DC Current
Complete the following steps to verify DC current:
1. Unplug all cables from the PXIe-4081.
2. Reset the PXIe-4081.
3. Initialize the PXIe-4081 for DC current with a range of 1 µA and a resolution of
6.5 digits.
4. Verify the accuracy for each configuration in the following table:
a) Acquire the measurement at each specified range.
b) Compare to the specified limits.
DMM Settings As-Found Limits As-Left Limits
Lower Upper Lower Upper
1 µA -0.120 nA 0.120 nA -0.060 nA 0.060 nA
10 µA -0.45 nA 0.45 nA -0.06 nA 0.06 nA
100 µA -2.0 nA 2.0 nA -1.0 nA 1.0 nA
1 mA -0.020 µA 0.020 µA -0.010 µA 0.010 µA
10 mA -0.20 µA 0.20 µA -0.10 µA 0.10 µA
100 mA -2.0 µA 2.0 µA -1.0 µA 1.0 µA
1 A -0.020 mA 0.020 mA -0.010 mA 0.010 mA
3 A -0.06 mA 0.06 mA -0.02 mA 0.02 mA
5. Set the calibrator to Standby.
6. Connect the PXIe-4081 to the calibrator with the ammeter in series as shown in the
following figure.
14 | ni.com | PXIe-4081 Calibration Procedure

Figure 4. DC Current Low Range Connection Configuration
OUTPUT
A
SENSE
AUX
CURRENT
V-GUARD GROUND
NI DMM
HI SENSE
LO
Ammeter
HI
LO
V-GUARD
Calibrator
I
LO
HI
LO
Guard
Guard
Open
To LO
HI
Sense
(4 Wire)
Input
(2 Wire)
I
LO
Guard*
*Set Guard Switch to Open
7. Verify the accuracy for each configuration in the following table:
a) Set the PXIe-4081 and the ammeter to the listed configuration and commit.
Configure the ammeter for a single acquisition.
b) Set the Calibrator to the listed configuration and allow it to settle.
c) Acquire the specified measurement and compare the difference between the
PXIe-4081 and the ammeter to the limits.
d) Set the calibrator to Standby if you have completed all testpoints in a DMM range.
PXIe-4081 Calibration Procedure | © National Instruments | 15

DMM/Ammeter
Settings
Calibrator
Output
Tolerances
As-Found As-Left
ppm of
reading
ppm of
range
ppm of
reading
ppm of
range
1 µA 0.9 µA 1050 120 144 60
1 µA -0.9 µA
10 µA 9 µA 600 45 108 6
10 µA -9 µA
100 µA 90 µA 175 20 27 10
100 µA -90 µA
1 mA 0.9 mA 170 20 27 10
1 mA -0.9 mA
8. Connect the PXIe-4081 to the calibrator using low leakage cables according to the
configuration shown in the following figure.
Figure 5. DC Current Connection Configuration
OUTPUT
A
SENSE
AUX
CURRENT
V-GUARD GROUND
NI DMM Calibrator
HI SENSE
LO
Not Connected
HI
LO
V-GUARD
9. Verify the accuracy for each configuration in the following table:
a) Set the PXIe-4081 to the listed configuration and commit.
b) Set the calibrator to the listed configuration and allow it to settle.
c) Acquire the specified measurement and compare to the limits.
d) Set the calibrator to Standby if you have completed all testpoints in the DMM
Range.
16 | ni.com | PXIe-4081 Calibration Procedure

DMM
Settings
Calibrator
Output
Tolerances (ppm)
As-Found As-Left
ppm of
reading
ppm of
range
ppm of
reading
ppm of
range
10 mA 9 mA 170 20 39 10
10 mA -9 mA 170 20 39 10
100 mA 90 mA 180 20 43 10
100 mA -90 mA 180 20 43 10
1 A 450 mA 350 20 70 10
1 A -450 mA 350 20 70 10
3 A 450 mA 350 20 70 5
3 A -450 mA 350 20 70 5
1 A 1 A 425 20 138 10
1 A -1 A 425 20 138 10
3 A 2.2 A 713 20 445 5
3 A -2.2 A 713 20 445 5
You have completed verifying the DC current of the PXIe-4081. Select one of the following
options:
• If you want to continue verifying other modes, go to the Verifying AC Current section.
• If you do not want to verify any additional modes and you are performing a pre-
adjustment verification, close the session.
• If you do not want to verify any additional modes, and you want to update the verification
time stamp, complete the following steps:
1. Open a new calibration session to the instrument (with correct calibration password).
2. Close the calibration session with the Action set to Save.
Verifying AC Current
Complete the following steps to verify AC current:
1. Set the calibrator to Standby.
2. Connect the PXIe-4081 to the calibrator using low leakage cables according to the
configuration shown in Figure 5. on page 16.
3. Reset the PXIe-4081.
4. Initialize the PXIe-4081 for AC current with a range of 100 µA and resolution of 6.5
digits.
PXIe-4081 Calibration Procedure | © National Instruments | 17

5. Verify the accuracy for each configuration in the following table:
a) Set the PXIe-4081 to the listed configuration and commit.
b) Set the calibrator to the listed configuration and allow it to settle.
c) Acquire the specified measurement and compare to the limits.
d) Set the calibrator to Standby if you have completed all testpoints in a DMM
Range.
DMM Settings Calibrator Settings 2-Year Limits
Amplitude Frequency Lower Upper
100 µA 9 µA 1 kHz 8.9757 µA 9.0243 µA
100 µA 90 µA 1 kHz 89.9215 µA 90.0785 µA
1 mA 90 µA 1 kHz 89.769 µA 90.232 µA
1 mA 900 µA 1 kHz 899.494 µA 900.506 µA
10 mA 900 µA 1 kHz 0.89769 mA 0.90232 mA
10 mA 9 mA 1 kHz 8.99490 mA 9.00510 mA
100 mA 9 mA 1 kHz 8.9764 mA 9.0236 mA
100 mA 90 mA 55 Hz 89.9440 mA 90.0560 mA
100 mA 90 mA 5 kHz 89.9170 mA 90.0830 mA
100 mA 90 mA 1 kHz 89.9440 mA 90.0560 mA
1 A 90 mA 1 kHz 89.737 mA 90.263 mA
1 A 900 mA 1 kHz 899.201 mA 900.799 mA
3 A 300 mA 1 kHz 0.29916 A 0.30084 A
3 A 2.2 A 1 kHz 2.19764 A 2.20236 A
You have completed verifying AC current for the PXIe-4081. Select one of the following
options:
• If you are performing a pre-adjustment verification, close the session.
• To update the verification time stamp, complete the following steps:
1. Open a new calibration session to the instrument (with correct calibration password).
2. Close the calibration session with the Action set to Save.
18 | ni.com | PXIe-4081 Calibration Procedure

Adjustment
This section explains how to adjust the PXIe-4081. You can choose to perform these
adjustment procedures with or without performing the verification procedure first.
Note Repeat the verification procedures after you perform these adjustment
procedures. NI recommends that you perform a post-adjustment verification to
ensure that the device you have calibrated is operating within specifications after
adjustments.
Caution Do not skip any of the steps within a section of the adjustment
procedures.
Adjusting DC Voltage
Complete the following steps to adjust DC voltage:
1. Disconnect all inputs from the PXIe-4081 .
2. Reset the calibrator.
3. Initialize an external calibration session to the PXIe-4081.
4. Self-calibrate the PXIe-4081.
5. Connect the PXIe-4081 to the calibrator using low thermal EMF cables according to the
configuration shown in Figure 1. on page 6.
6. Wait two minutes for thermal EMF to stabilize.
7. Adjust the voltage gain with each configuration in the following table:
a) Output the specified voltage from the calibrator.
b) Call the niDMM Cal Adjust Gain VI or the niDMM_CalAdjustGain function
with the specified DMM settings.
Calibrator Settings DMM Settings
Function Range Input Resistance Expected Value
10 V DC Volts 10 V >10 GΩ 10 V
-10 V -10 V
8. Disconnect the cables from the PXIe-4081, leaving the other end of the cable connected
to the calibrator binding posts.
9. Plug in the banana shorting bar across the HI and LO terminals on the PXIe-4081.
10. Wait two minutes for thermal EMF to stabilize.
11. Call the niDMM Cal Adjust Misc VI or the niDMM_CalAdjustMisc function with
Type set to NIDMM_EXTCAL_MISCCAL_VREF_DC_VOLTAGE.
12. Self-calibrate the PXIe-4081.
PXIe-4081 Calibration Procedure | © National Instruments | 19

13. Call the niDMM Cal Adjust Offset VI or the niDMM_CalAdjustOffset function
with the following parameters:
• Function: DC Volts
• Range: 100 mV
• Input Resistance: >10 GΩ
You have completed adjusting the DC voltage mode of the PXIe-4081. Proceed to one of the
following sections:
•Adjusting Resistance
•Adjusting AC Voltage
•Adjusting Current
If you are not performing additional adjustments, proceed to the Completing the Adjustment
Procedures section to commit the calibration constants.
Adjusting Resistance
Note You must adjust DC voltage before you adjust resistance.
Note If you do not use the resistance modes for any measurements or the accuracy
of these modes is irrelevant, you can skip this section and go directly to the
Adjusting AC Voltages (AC- and DC-coupled) section.
Complete the following steps to adjust the resistance of the device:
1. Connect the PXIe-4081 to the calibrator using low thermal EMF cables as shown in
Figure 2. on page 10.
2. Wait two minutes for thermal EMF to stabilize.
3. Adjust the resistance calibration with each configuration in the following table:
a) Commit the PXIe-4081 to the specified range.
b) Configure the calibrator as specified.
c) Wait the specified settling time.
d) Call niDMM Cal Adjust Gain VI or the niDMM_CalAdjustGain function with
the specified parameters.
20 | ni.com | PXIe-4081 Calibration Procedure
Table of contents
Other NI Multimeter manuals
Popular Multimeter manuals by other brands

Tenma
Tenma 72-8150 operating manual

VOLTCRAFT
VOLTCRAFT VC265 - V06-10 Bedienungsanleitung

Mastech
Mastech MAS345 Operator's instruction manual

Extech Instruments
Extech Instruments 430 user guide

Beckman Industrial
Beckman Industrial Circuitmate DM23 Operator's manual

Greenlee
Greenlee DM-200 instruction manual