Nictemaw AF-120AD User manual

1
AIR FRYER OVEN
USER MANUAL
For family use only
Model No.
Voltage
Power
Capacity
Temperature
Display
AF-120AD
AC 220-240V, 50Hz
1500W
12L
65°C-200°C
LED Display
When using electrical appliances, basic safety precautions should always be followed. Do not use
The Air Fryer Oven until you have read this manual thoroughly.

2
The air fryer oven uses the principle of turbo hot air combined with high-speed air
circulation (rapid air exchange), and is equipped with a variety of baking accessories,
which is convenient for you to cook a variety of delicious foods in a healthy, fast and
simple way. It will provide all-round heating for your ingredients at once, so for most
ingredients, there is no need to add oil for cooking. With the help of an additional
roaster, there is a more convenient way to make French fries, chicken wings, egg tarts
and other foods easily.
Parts & Accessories:
NOTE: Some accessories may not be included with purchase.
1~4
5
6
7
8
9
1. Main Unit
The door can be removed from the Main Unit for cleaning
2. Control Panel
Allows you to control the functions of the Unit
3. Air inlet
Pls do not cover it when cooking.
4. Air outlet
Pls do not cover it when cooking, be careful with the hot air.
5. Rotisserie Shaft, Forks & Set Screws
Use for roasts and whole chicken. Force Shaft lengthwise through meat and center.
PRODUCT INTRODUCTION

3
Slide Forks onto shaft from either end into meat, then lock in place with Set Screws.
There are indentations on the shaft for the set screws. You can adjust the screws
closer to the middle if needed but never but never outward towards the ends.
6. Rotisserie Fetch Tool
Use to remove cooked roasts and chicken that have been prepared using the
rotisserie or skewer methods. Place under Rotisserie Shaft and lift then gently
extract the food.
7. Air fryer Rack
Can be used not only for dehydration but also to cook crispy snacks or reheat
items like pizza.
8. Drip Tray
Cook with the Drip Pan in place for easy clean-up.
9. Wire Rack
Can be used for bigger size of food like chicken wings, sweet potatoes.

4
Using the rotisserie fork
1. Align the roasting shaft with one side and place it into
the fork. Use the crew to lock it.
2. Stab the fork into chicken or meat, and then align it with
the other side of fork.
3. lock the screw on the other side.
Put the rotisserie fork in/out the machine
1. Open the door, and use the fetch tool to place the rotisserie
fork into the machine.
2. Insert the shaft (L end) into the left hole in the
machine.
3. Put the roasting shaft (R end) on the right track.
4. After use, take out the rotisserie fork by the fetch tool.
Before first use
1. Remove all packaging materials, including plastic bags, labels, stickers, foam, etc.
2. Please read all the information before use: user manual, warning stickers, warranty
cards and labels.
3. Please wipe the inside and outside of the product with a damp cloth (do not spray
detergent directly on the inside), and use mild detergent to clean the accessories
4. Before using it for the first time, it is recommended to adjust the temperature to
the highest and burn it for 15 minutes to evaporate any residue and reduce the
smell of the new machine.
NOTE: To avoid scratching your hands, please wear gloves to clean
5. If a little white smoke or odor is emitted during heating, it is caused by the
protective material on the heating element. This is a normal.
Preparation before use
1. Place the product on a stable and flat surface. Do not place the product on a
surface that is not heat resistant.
2. Do not pour large amounts of oil or other liquids into the machine or any cooking
container. This product can only be cooked with hot air.
3. Do not place objects on top of the product, which will block the airflow and affect
Product operation and use instructions

5
the effect of hot air heating.
4. Select the necessary accessories and put them in correctly, then start the machine.
Instructions
Operation
1. Place the ingredients on the crispy plate, wire rack or other accessories.
2. Put the accessories containing the ingredients into the machine along the track, or
insert the rotating hole and close the door.
3. Press the power button to activate the touch panel.
4. Select the menu required for cooking ingredients, or manually adjust the cooking
temperature and time.
5. Press the power button to start the program.
NOTE:During the cooking process, you can open the door to confirm the cooking
progress, but please use heat insulation to avoid burns.
NOTE:Please refer to this manual or recipe book to determine the correct setting.
Settings
To help you choose the correct settings for the ingredients you want to cook, please
refer to the menu instructions.
NOTE:Please remember that these settings are for reference only. Due to the different
sources, sizes, shapes, and brands of ingredients, we cannot guarantee the best
settings for your ingredients. Because this product's rapid ventilation technology will
immediately reheat the air in the product, when using this product, quickly open and
close the oven door, it will not affect the cooking process.
Suggestions
1. Compared with larger-volume ingredients, smaller-volume ingredients require
slightly shorter cooking time.
2. When the amount of ingredients is large, increase the cooking time a little, and
when the amount of ingredients is small, decrease the cooking time a little.
3. During the cooking process, turning over larger foods in the middle can improve
the final cooking effect and help make the ingredients get even baking.
4. It is recommended to add a little oil to make the food more crispy (for example:
fresh potatoes). After adding oil, the ingredients should be left for a few minutes
before baking.
10. When baking cakes or pies, put a suitable baking tin or baking tray in this product.

6
Display and Buttons
①Power/Start–Stop Button - Once the Unit is plugged in, the Power Button will light
up. Selecting the Power Button once will cause the full panel to be illuminated.
Selecting the Power Button a second time will activate the cooking process at the
default temperature of 190 ° C and time of 15 mins.
Selecting the Power Button at any time during the cooking process will shut down the
Unit, causing the display to go dark immediately the running light to go dark within
20 secs. The fan will continue running for 20 secs. to cool down the Unit.
②Menu –Press this button to choose the initial function that you will use.
③Rotation Button - Select this button when cooking anything using the Rotisserie
Mode. Function can be used with any preset. The icon will blink while in use.
④Temperature Control Buttons, These buttons enable you to raise or lower cooking
temperature by 5℃intervals ranging from 65-200 ° C. Dehydration 30- 80 ° C.
⑤Time Control Buttons - These buttons enable you to select exact cooking time to
the minute, from 1 min. to 90 mins. in all modes except when dehydrating, which uses
30-min. intervals and an operating time of 2–24 hrs.
⑥Digital display
The Digital Numeric Display will switch between Temperature and Time Remaining
during the cooking process.
⑦- ⑯:Cooking Presets –Press Menu button to selecting any Preset function, and
then press Power/start button to start cooking. You may override these presets with
Time and Temperature Buttons.
⑰Fan Icon - This icon will blink in sequence while cooking is in progress and continue
blinking up to 20 secs. Once you shut Unit down.

7
Overheating protection:
If the internal temperature control system is abnormal, the overheating protection
system will be activated and the product will stop working. If this happens, please
unplug the power cord. Please allow time for the equipment to cool down before
restarting or saving the machine.
Cooking table for reference:
Function
Temperature
Cooking time
Fries
400° F (200° C)
15 mins
Steak
350° F (180° C)
25 mins
Fish
325° F (165° C)
15 mins
Shrimp
320° F (160° C)
12 mins
Pizza
360° F (180° C)
15 mins
Chicken
370° F (185° C)
40 mins
Baking
320° F (160° C)
30 mins
Rotisserie
375° F (190° C)
30 mins
Dehydrator
90° F (30° C)
2 hrs(2-24hrs)
Reheat
240° F (115° C)
12 mins
Cleaning
Clean the Air Fryer Oven after each use. The Round Basket and other accessories are
made of durable stainless steel and are dishwasher safe. Never use abrasive cleaning
materials or utensils on these surfaces. Caked-on food should be soaked for easy
removal in warm, soapy water. Remove the power cord from the wall socket and be
certain the appliance is thoroughly cooled before cleaning.
1. Wipe the outside of the appliance with a warm, moist cloth and mild detergent.
Cleaning & Storage

8
2. To clean glass, open the door of the Unit. Push the button on the bottom side of the
door to push the glass through the top of the door. Grab the tab at the top of the glass
and carefully remove the glass from the door.
3. Clean the inside of the appliance with hot water, a mild detergent, and a nonabrasive
sponge.
4. If necessary, remove unwanted food residue from the upper screen with a cleaning
brush.
Storage
1. Unplug the appliance and let it cool thoroughly.
2. Make sure all components are clean and dry.
3. Place the appliance in the clean, dry place.
Attention
Before using this product, please read this manual carefully and reserve it well.
Danger
1. Do not immerse the unit in water or wash it under a tap, because it contains
electronic components and heating elements
2. Do not let water or other liquids enter the product to avoid electric shock.
3. Make sure to place the ingredients in the accessories for baking, so as not to
touch the heating element, and do not place excessive ingredients.
4. When the product is running, please do not cover its air inlet and outlet.
5. This product is heated by hot air. Do not pour large amounts of edible oil or
grease into this product, otherwise there will be a risk of fire.
6. Do not touch the inside when the product is running.
7. If other electrical appliances overload the circuit, this product may not operate
normally, and this product should be operated on a separate circuit.
8. This product complies with all relevant electromagnetic field standards. If used
properly and in accordance with the instructions in this manual, this product is safe
to use according to national safety standards.
9. Note: hot surface.
Warning
1. This appliance is not intended to be used by users (including children) with
insufficient physiological perception, mental abilities, experience or knowledge,
unless it is used safely under the supervision or guidance of persons responsible for
its safety. Keep this product in a safe place and store it out of the reach of children
and people who are not capable of judging nearby dangers. When the product is in

9
operation, you need to be especially careful and extra careful.
2. Before connecting the product to the power supply, please check whether the
voltage marked on the product is consistent with the local power supply voltage.
3. When the power cord or plug is damaged, please do not use the machine; in order
to avoid danger, non-professionals such as consumers are prohibited from replacing
and repairing, please contact or hand it to the distributor, manufacturer or
authorized salesperson who sells this product. Professionals from the service
department come to replace and maintain.
4. Children should be supervised to ensure that children do not play with electrical
appliances.
5. When the product is energized or cooling down, the product and its power cord
should be kept out of the reach of children.
6. Do not touch the power cord to hot surfaces.
7. When inserting the product plug or operating the touch panel, keep your hands
dry.
8. The product must be plugged into a grounded socket, and be sure to plug it in
correctly.
9. Electrical appliances must not be operated by external timers or separate
remote control systems.
10. Do not place the product on or near flammable materials such as tablecloths
and curtains.
11. Do not place the product near the wall or lean against other products. Leave a
space of at least 10 cm at the top of the back of the product and on both sides, and
do not place objects on top of the product.
12. Do not use this product for any purpose other than those described in this
manual.
13. The product must be supervised during use.
14. During baking with hot air, high temperature steam will be released from the air
outlet. Keep your hands and face a safe distance from the steam and the air outlet,
and pay attention to the high temperature steam and hot air when removing the
basket from the machine.
15. The surface of the product will become hot during use, please do not touch it to
prevent burns.
16. If the product emits black smoke, unplug the power immediately, and take the
frying basket out of the machine after the product stops smoking.
17. It is necessary to check whether the power cord is damaged regularly, please do
not use the machine when the power cord is damaged.

10
Attention
1. When using this product, it should be placed on a stable and heat-resistant desktop.
2. This product is only suitable for ordinary household use, not for any commercial,
retail, or outdoor use.
3. Be sure to unplug the product after use.
4. After use, before handling or cleaning the product, be sure to let the product cool
for about 30 minutes.
Automatically SHUT OFF
This product is equipped with a timer function. When the timer counts down, the
product will ring and automatically shut down. To manually turn off the product,
press the power button.
11
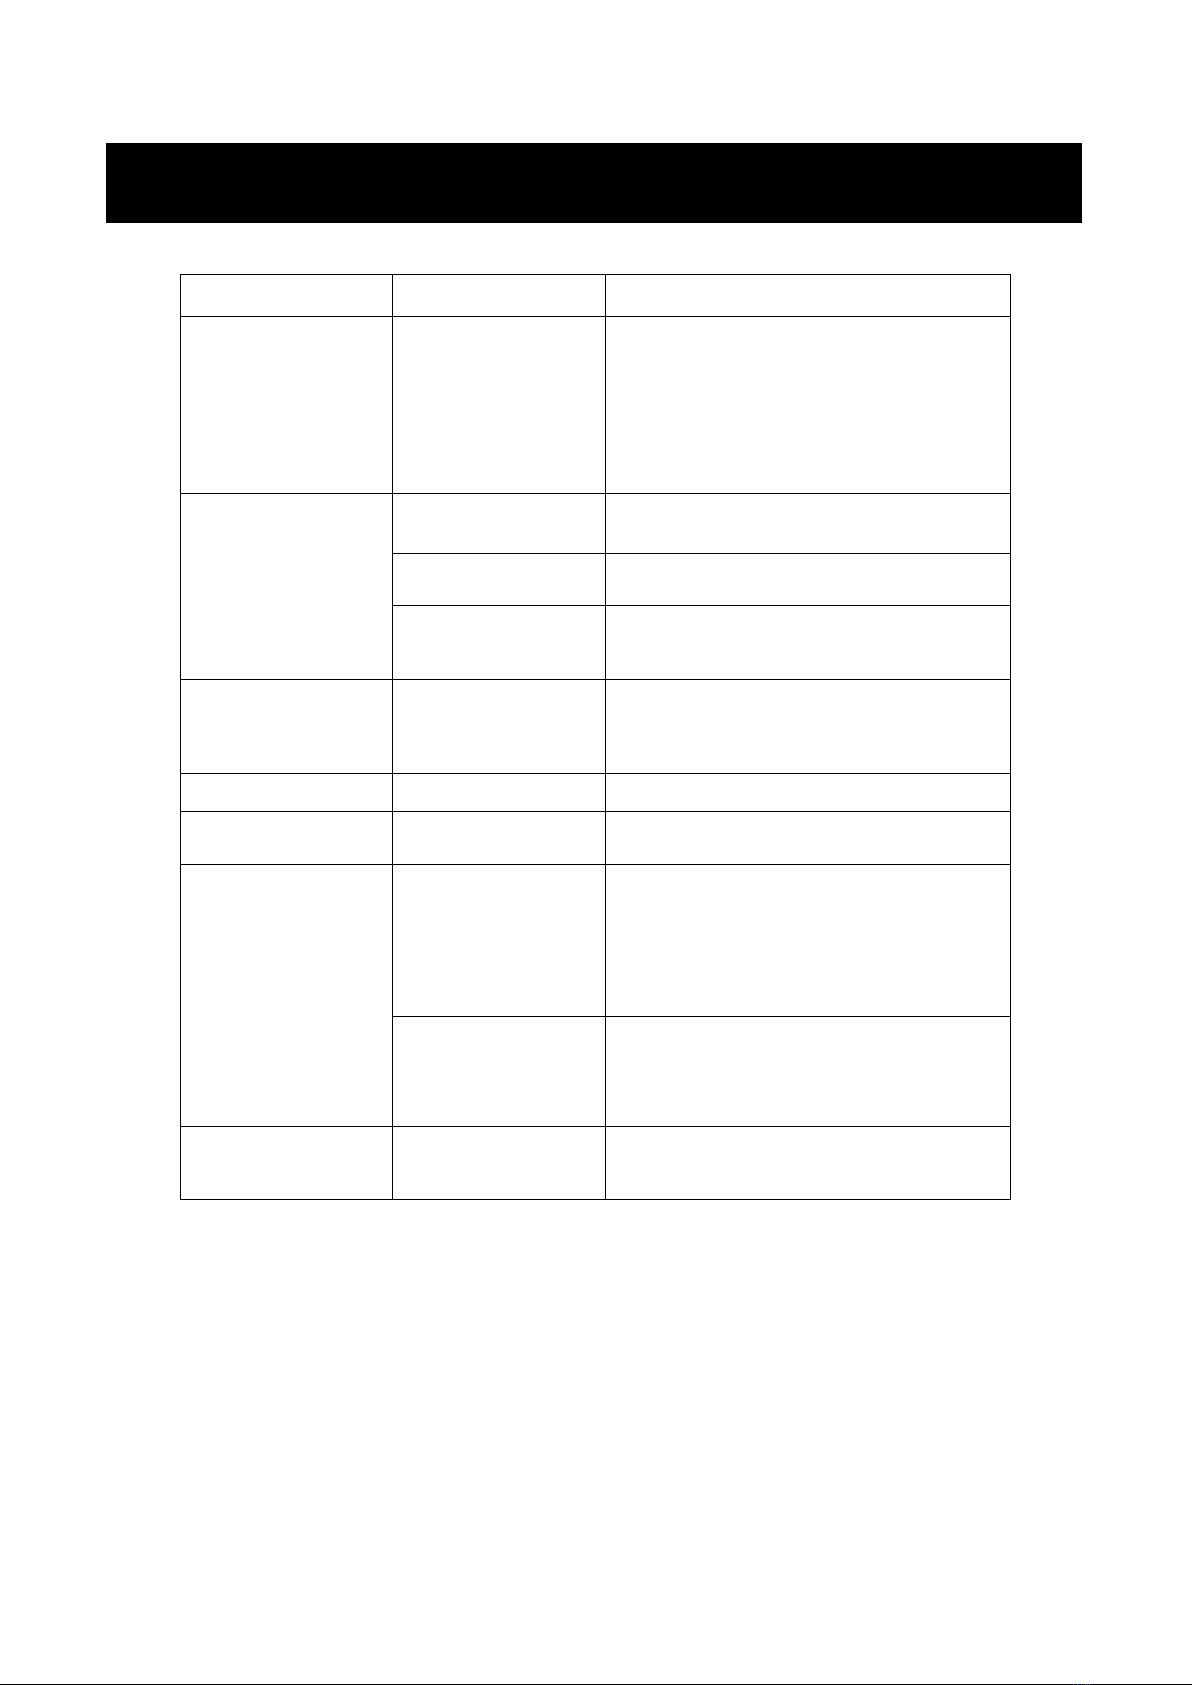
Problem
Possible Cause
Solution
The Air Fryer Oven
does not work
1. The appliance is
not plugged in.
2. You have not
turned the Unit
on by setting the
preparation time
1. Plug power cord into wall socket
2. Set the temperature and time.
Check that door is closed.
Food not cooked
Too much food
Use smaller batches for more even
frying.
The temperature is set
too low
Set a higher temperature
The cooking time is
too short
Set longer cooking time
Food is not fried
evenly
Some foods need to
be turned during the
cooking process
Some foods need to be turned during the
cooking process
Display shows E1
Short circuit
Contact service center
Display shows E2
Short circuit
Contact service center
Some white smoke
from the unit
during the cooking
The food you are
cooking is with
much fat/oil
When cooking the food with much
oil/fat, it’s normal there will be some
smoke, it will not affect the cooking
result.
There are some
oil/fat left in the
oven from last use
Make sure clean the oven after usage
Fries are not crispy
Raw fries have too
much water.
Soke for 30 mins at least, then dry it.
MADE IN CHINA
Troubleshooting
Table of contents
Other Nictemaw Fryer manuals


