Magnani MI-HA-AF4-B User manual

User Manual
Model: MI-HA-AF4-B


USER MANUAL:
MAGNANI DIGITAL AIR HEALTH FRYER 10L
MODEL: MI-HA-AF4-B
English
EN 01
2) SAFETY INSTRUCTIONS
The following precautions must always be taken into consideration before using the “Magnani – Digital air
health fryer 10L”, hereinafter referred to as the ‘device’.
General information
• Read the instructions for use carefully and keep them safe. If you give this device to other people, please also
pass on this manual.
• Only use this device in accordance with the instructions in this user manual.
• This device can be used by children aged 8 and over and people with restricted physical, sensory or mental
capacity or a lack of experience and expertise, provided they are under supervision or have been given
instructions about safely using the device and are aware of the potential hazards. Children must not play with
the device. Cleaning and maintenance must not be done by children unless they are over the age of 8 and
under supervision.
• This device is intended for domestic or similar use, not for professional use.
• WARNING! Do not leave packaging material lying around carelessly. This may become dangerous
playing material for children. Risk of suffocation!
Electricity and heat
• Prior to use, check that the mains voltage is the same as the mains voltage stated on the name plate of the
device.
• Make sure your hands are dry before touching the device, power cord or plug.
• Plug the power plug into an earthed electrical outlet that is easily accessible at all times.
• WARNING! Never cover the power plug or cable with cloths, curtains or any other material in order to
prevent overheating and potential re hazards.
TABLE OF CONTENT
1) Package contents
2) Safety instructions
3) Installing and using the product
4) Cleaning and maintenance
5) Specications
6) Storage & transportation
1) PACKAGE CONTENTS
• Digital air health fryer 10L (bowl)
• Accessories (Dual rack – fork - rolling cage – tong)
• User manual
Some of this machine’s parts can become hot. Do not touch these
parts to avoid burning yourself.
WARNING !

EN 02
• Make sure that the device and power cable do not come into contact with heat sources, like a hot hob or
naked ame.
• The device must be able to dispel its heat in order to prevent the risk of re. So make sure the device has
sufficient free space around it (at least 10 cm from all sides) and do not place the device in contact with
combustible materials and/or on or near combustible materials.
• The device and/or the air inlet and/or air outlet must not be covered.
• Regularly check the power cord for damage.
• Never use the device if the power cord shows signs of damage, if the device has fallen on the ground or
shows any other signs of damage.
• Switch OFF the device and remove the power plug if you discover any faults during use, nd any signs of
damage, are not using the device or are cleaning it.
• Make sure the power cord cannot be trodden on or pinched.
• Do not allow the power cord to hang over sharp edges and keep it away from hot objects and naked ames.
• When plugging in the power plug, make sure people cannot accidentally pull it out or trip over it.
• Remove the power plug from the power socket during lightning storms or if unused for long periods of time.
• Use a 10 amp cable if an extension cable is required. Cables with a lower amp rating may burn out.
• When using an extension cable, make sure it is completely extended.
• WARNING! To reduce the risk of re or electric shock, protect the device from dripping or splashing
water and keep away from objects lled with liquids, such as vases. These objects should not be placed
on or near the device.
Use
• Do not use the device in the vicinity of ammable materials.
• Do not leave the device unattended when it is in use.
• Never move the device when it is switched ON or still warm. First switch OFF the device and only move it
once it has cooled down.
• Only use tools featuring a handle that is well insulated against heat, or use the tong while wearing oven
gloves.
• Do not use sharp objects in the bowl and inner pan or grill pan. These damage the non-stick coating.
• Do not spill hot oil on the heating element. This will create smoke and cause unpleasant smells.
• Clean the device thoroughly after use (see “cleaning and maintenance”).
• It is advisable to place a heat -resistant covering between the table or sink counter and the device, to prevent
the heat leaving marks on your table or worktop.
• Avoid locations subject to vibrations, cold or humidity.
• Do not expose the device to direct sunlight, heat sources, excessive humidity or corrosive environments.
• Do not place the device under any mechanical stress.
• Improper use of the device could damage the product.
• Please handle the device carefully. Impacts or falls, even from a low height, can damage the device.
• Do not open the casing as this may result in electric shock.
• Do not attempt to disassemble or repair the device or modify it in any manner.
• The device must be serviced if it has been damaged in any way, i.e. the power supply cord/plug is damaged;
liquid has been spilled; objects have fallen into it; it has been exposed to rain or moisture; it has been dropped
or does not operate properly.
• Do not use abrasive cleaning solvents to clean the device.
• Do not use foreign objects to clean the device.
Important information, follow these instructions
• This device can be used by children aged 8 and over and people with restricted physical, sensory or mental
capacity or a lack of experience and expertise, provided they are under supervision or have been given
instructions about safely using the device and are aware of the potential hazards. Children must not play with
the device. Cleaning and maintenance must not be done by children unless they are over the age of 8 and
under supervision.
• Only use the device indoors, in dry areas and not in the vicinity of water, other liquids or humidity.
• Do not use the device if it, the cable or power plug has fallen into water or any kind of uid.
• Never immerse the device, cable and power plug in water or any kind of uid.
• Do not pick up the device if it has fallen into water or any kind of uid. Remove the plug from the power socket
immediately. Do not use the device again.
• Place the device on a at and stable surface, in a place where it cannot fall over.
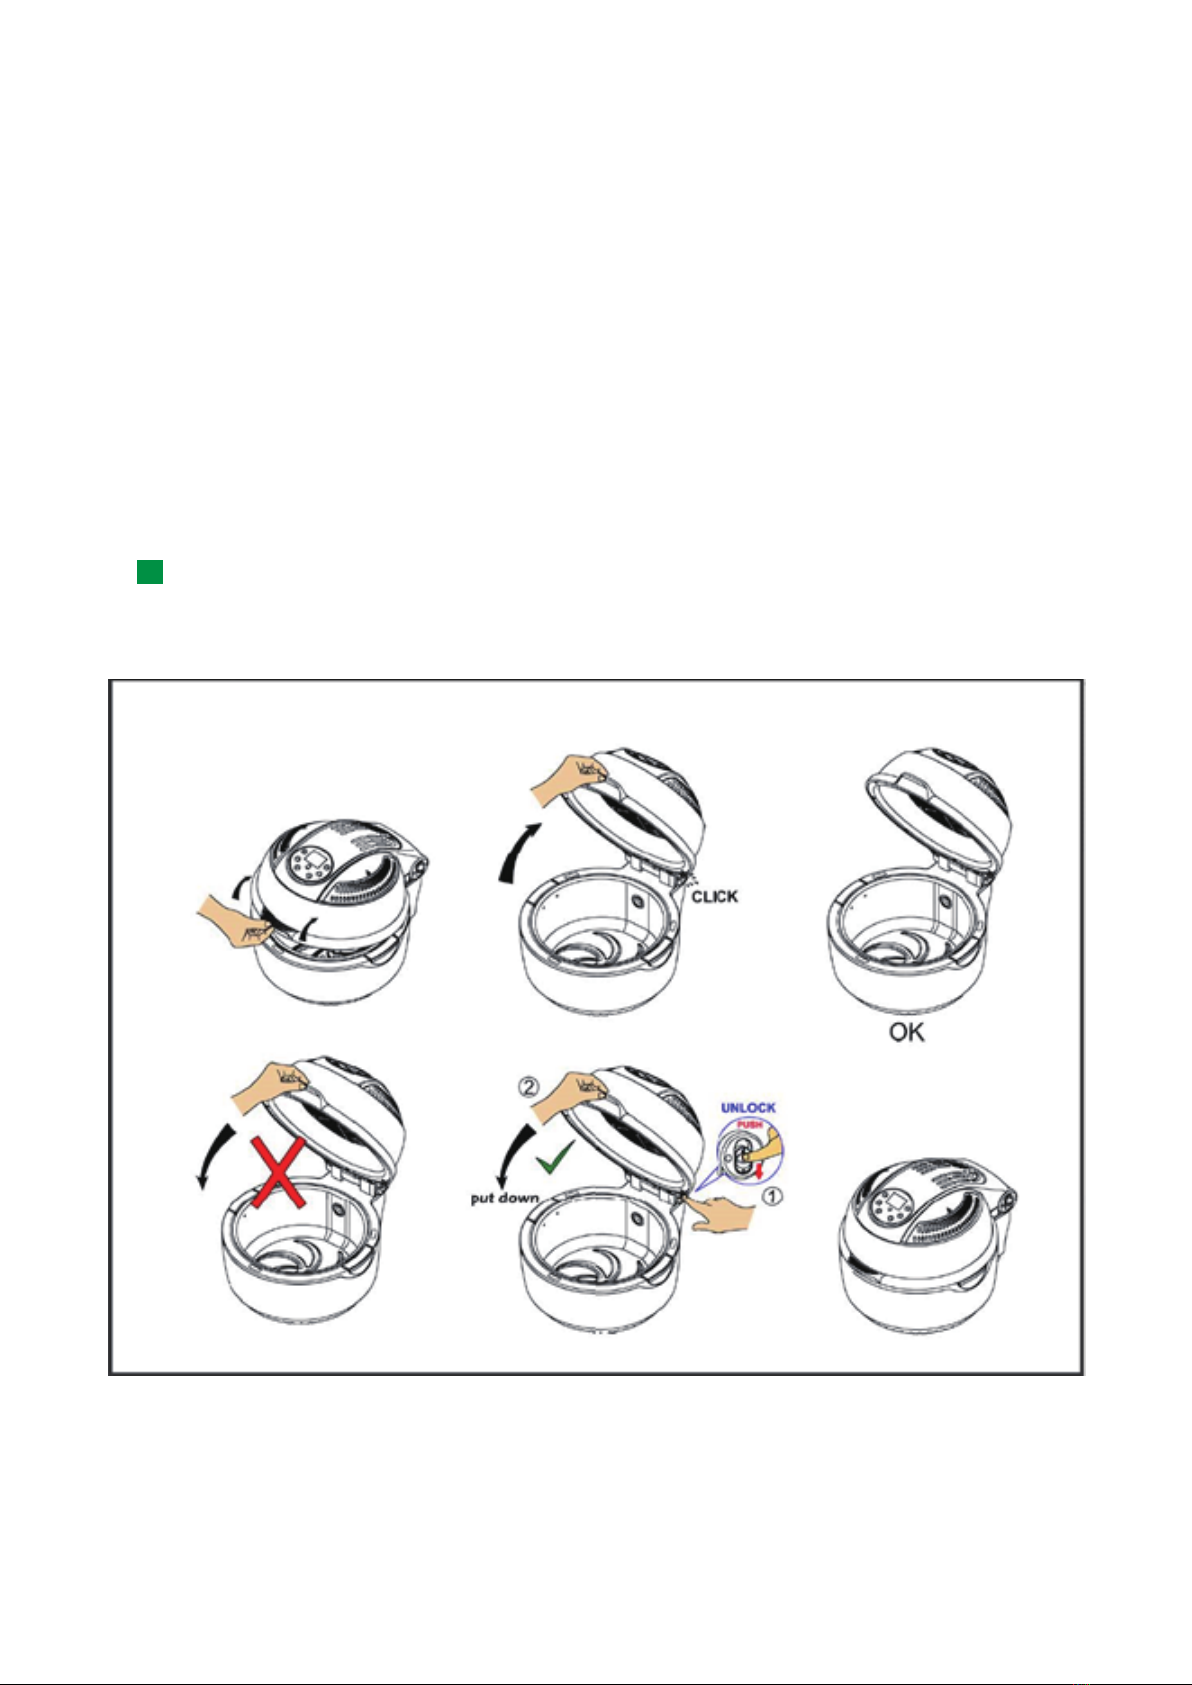
• Do not switch ON the device until all of the accessories have been properly installed and make sure the lid is
closed before you plug the device into the mains and switch it ON.

• Parts of the device can become hot. Do not touch these parts to avoid burning yourself.
• Only hold the bowl by its plastic handles. The metal section with which the handles are attached to the bowl
can become very hot.
• Never use or ll the bowl with oil; this may cause a re hazard!
• The device is equipped with an overheating safety feature. This is activated if the temperature becomes
too high. If this is the case, you must let the device cool down before it can be used again. Switch OFF the
device and then remove the plug from the power socket. Allow the device to fully cool down. The device needs
approximately 30 minutes to fully cool down.
• Remove the power plug from the power socket if the device is unused for long periods of time.
• When removing the plug from the power socket, pull the plug itself, not the cable.
• Do not operate the device using an external time switch or a separate remote control system.
3) INSTALLING AND USING THE DEVICE
Open the packaging carefully before taking out the device. Make sure the device is complete and undamaged.
If any components are missing or damaged, contact the vendor and do not use the product. Retain the
packaging or recycle it in accordance with local regulations.
EN 03
ACESSORIES
Tong
Dual rack (high/low)
Rolling cage / Frying basket
Fork Note: the pivot is used for both 10 + 11)
OPTIONAL ACCESSORIES
Steak rack
Skewer rack
Grill pan
Steamer
Parts & features device
Master ON/OFF switch (side of unit)
Safety lock (side of the unit)
Air in & outlet (Caution! HOT do not touch or cover)
Lid handle
Base with non-slip feet
Bowl handle (left & right) Removable inner bowl
Glass top
Digital control panel:
The device is operated via a touch panel. Gently
press the desired function with the tip of your nger.
Description of buttons:
1) LCD display showing temperature, time and
selected cooking program.
2) Temperature / time adjustment minus [-]
Temperature:
Decrease the temperature by pressing this button.
Each press will increase or decrease the temperature
by 10°C. Keeping the button pressed will rapidly
decrease the temperature.
1
2
3
4
5
6
7
8
9
10
11
12
13
14
15
8 9 10 11
12 13 14 15
1
5
6
7
2
3
4
1
5
28
3
7
46

Time:
Decrease the time by pressing this button.
Each touch will decrease the time by 1 minute. Keeping the button pressed will rapidly decrease the time.
3) GUIDE (7 Preset cooking programs)
Press this button to choose from the 7 preset cooking modes programs. The selected preset function icon will
start ashing on the LCD display (1) after it has been selected using the guide button.
4) ROTOR
Press to activate the rotisserie spindle. Press again to stop the rotisserie spindle.
5) START / POWER ON/OFF
Touch the power button to switch the device ON or OFF. Press once to switch the device ON. Once a mode has
been selected, or when in User Mode, press the power button to start the frying process. Press the button again
to switch OFF the device. If no selection is made, the device will switch OFF automatically after approximately 1
min.
6) DELAY
If you wish to start a cooking program automatically at a later time, you can set the device to start up
automatically with a delay of up to 9 hours and 59 minutes; follow these steps to set your delay time:
- The master switch ON/OFF must be switched ON [I]
- Press START (5) to activate the device
- Press delay timer and use the + (8) or – (2) buttons to set the future start point. A single press of either
button equates to 1 minute, a long press equates to 20 minutes.
- Press START (5) again and then press GUIDE (3) to select your preset cooking program; adjust the
time or temperature and press START (5) again. The device will start automatically with the selected
cooking program after the selected delay time has elapsed.
7) TEMP/TIMER
Selection button for temperature or time adjustment.
- The time icon will ash when the time is being set.
- The temperature icon will ash when the temperature is being set.
8) Temperature / time adjustment plus [+]
Temperature:
Increase the temperature by pressing this button. Each press will increase the temperature by 10°C. Keeping
the button pressed will rapidly increase the temperature.
Time:
Increase the time by pressing this button.
Each touch will increase the time by 1 minute. Keeping the button pressed will rapidly increase the time.
Note: A beep sound will be heard when making the selections described above.
Automatic switch-OFF
The device features a built-in timer that automatically shuts OFF the device after the cooking program has
nished or if no selections are made when the device is switched ON.
First use:
• Remove the device and accessories from the box. Remove any stickers, protective lm or plastic from the
device.
• Before you use the device for the first time, wipe all the removable parts with a damp cloth. Wash the
accessories and bowl in warm soapy water, rinse well and dry thoroughly before rst use. Never use aggressive
or abrasive cleaning materials, a scouring sponge or steel wool; this damages the device, the inner bowl and
inner pan.
• Place the device on a at, stable surface, in a place where it cannot fall over.
• Install the bowl and accessories.
• Connect the device to the mains power and switch the master ON/OFF switch [1] to ON.
• On the control panel, press START (5) and use GUIDE (3) to select the desired preset and press START (5)
again.
• Allow the device to warm up for 15 minutes without any food inside.
• You will encounter a small amount of smoke and a specic smell the rst time you use the device. This is
normal and will soon disappear. Make sure there is adequate ventilation.
Cooking / Frying
Before using the device, you must decide if you will be cooking with the dual rack, fork or rolling frying basket.
- Use the dual rack if you are using the device as a regular halogen hot air oven.
Low rack position: good for cooking larger food items such as roast poultry (full size), rice casserole,
vegetables, etc.
EN 04
1
5
5
5
28
3
5 53
1
1

EN 05
High rack position: suitable for cooking medium-sized food, such as chicken wings and pizza.
- Use the fork for rotary cooked food such as rotisserie chicken or large steaks.
- Use the rolling frying basket for chips (fresh or frozen) and other small items such as chicken nuggets
and stir fry suitable for tumbling and cooking in (halogen) air fryers.
- Use the tong when carrying food or plates or when inserting or removing the rolling frying basket in
and from the device.
ALWAYS COOK WITH THE BOWL IN PLACE.
ALWAYS COOK ON A RACK OR WITH THE PROVIDED ACCESSORIES.
ALWAYS USE BOTH BOWL HANDLES, WITH BOTH HANDS, WHEN REMOVING THE BOWL
FROM THE DEVICE.
PLACE THE DEVICE ON A FLAT, STABLE SURFACE, IN A PLACE WHERE IT CANNOT FALL
OVER
OPENING AND CLOSING THE LID WITH THE SAFETY LOCK
Make sure the device is cool. If it has already been used, please note that the device and accessories can be
hot! Use the correct method to open and close the device because it is equipped with a safety lock.
Raise the lid until you hear a click. The lid will now stay open and is locked. DO NOT force the lid down; this will
cause damage beyond repair and invalidate the warranty. Press the safety lock on the right-hand side of the
unit [2], while slightly pushing the lid up; the lid will unlock and can then be closed.
Fit the dual rack (choose a side for high or low position), fork or rolling frying basket. NEVER COOK WITHOUT
one of these accessories in place.Assemble the rotisserie forks; the forks can be placed using the tightening
Using the chicken spit rotisserie:
Make sure rotation is not impaired when the lid is closed and that food cannot come into contact with the heat
source or the guard inside the lid. NEVER cook if rotation is impaired or if food narrowly clears the guard inside
the lid (when closed) – this will lead to uneven cooking and shorten the life span of your device (food spatter will
damage the halogen heater; not covered by the warranty).
2

EN 06
Assemble the rotisserie forks; the forks can be placed using the tightening key on either side of the spindle.
Spear the food (typically chicken) on the forks; tighten the forks accordingly. Tie the thighs and wings of the
chicken together to prevent them from touching the fan cover.
Then t into the device; (see pictures below).
First insert the pointed end into and through the hole on the bowl (1) (near the lid hinge). Square the blunt end
with the groove at the opposite side of the bowl (2) and make sure it ts ush with the groove tting (3).
Using the Rolling Frying Basket:
Insert the spindle through the middle opening on the rolling frying basket; centre it and x it in place using the
tightening key. Then t it in the device; (see pictures below).
First insert the pointed end into and through the hole on the bowl (1) (near the lid hinge). Square the blunt end
with the groove at the opposite side of the bowl (2) and make sure it ts ush with the groove tting (3).
2
2
2
2
1
1
1
1
3
3
3
3

Grip the lid handle, lift the lid fractionally and, with your other hand, push down the safety
lock (at the hinge) to release the lid so it can be closed. Always use the lid handle to
support the weight.
If you’re cooking with the rotisserie, make sure the lid does not touch – or narrowly miss –
the rotisserie food (also remember to check during rotation).
Set the master power ON/OFF switch to ON [I]. Press START (5) (Note: nothing will
happen until you select and set a guide menu or press START (5) again after manually
setting the cooking duration and temperature).
The GUIDE menu (Preset cooking programs):
The guide menu features several preset cooking temperatures and times, although both time and temperate
can be adjusted. Firstly, select the guide menu that is most suited to your preferred means of cooking or the
temperature/time you require.
An indicator for each of the guide menus is shown on the LCD display (1). Each press of the guide menu button
takes you through the presets described below. The table below will help you to select preset settings for the
device depending on the type of food you are preparing. When one of these presets is selected, the time and
temperature indicated in the below table will be used, unless you later adjust the time and/or temperature.
Frying times are an indication and are determined by the quantity, temperature, weight etc. of the prepared
food. Note: Frozen food can take longer depending on the weight and it is recommended to keep the total
weight of food below 5Kg.
Once you have selected a cooking program, use the temperature / time selector (7) to choose the parameter
you want to adjust. These icons are highlighted using an LCD and will blink when selected. Then use the + (8)
and – (2) buttons to increase or decrease the time or temperature.
You must press +/- shortly after selecting temperature / time otherwise the device will reset itself to the default
program or will switch off if no selections are made.
MENU TEMPERATURE TIME ICON
RAPID 230ºC 15 minutes
ROAST 230ºC 25 minutes
FRIES 230ºC 25 minutes
BAKE 230ºC 15 minutes
PIZZA 230ºC 10 minutes
GRILL 230ºC 15 minutes
SKEWER 230ºC 12 minutes
ROTOR - -
EN 07
1
5
5
1
2
8
7

If you want to program cooking at a later time, use the DELAY button (6) as described earlier in this manual.
When you’re ready with your selections and additional settings...press START (5) to start cooking.
The device will quickly reach the set temperature. Once a certain temperature is reached, the halogen heating
element will pause and the light will go out. The halogen heating element will restart once the temperature
drops below the temperature set for the cooking program. This process repeats until the end of the cooking
program.
- To stop cooking, press that START button (5) again.
- To pause cooking, lift the lid –the rotor function will remain active; heating will only be paused (heating element
will be switched off) and the selected cooking program will resume once the lid is correctly closed (remember to
use the safety latch). During the pause, you can add ingredients, pour sauce over the food or add other food to
the cooking process. Only the START and ROTOR buttons can be used when the lid is open. All other buttons
on the digital control panel are disabled.
Once the cooking process has nished.
• Caution: Prevent burn injuries. Do not touch the frying accessories or the bowl; these are very hot.
When removing ingredients (e.g. beef, chicken, meat or other ingredients with natural oil or juices),
excess oil or juices will have collected at the bottom of the bowl. DO NOT turn the bowl over, otherwise oil
or juices collected at the bottom of the bowl will leak out onto the surface. Please use tongs to pick up these
ingredients one by one in order to prevent hot oil or juice spillages and possible burn injuries.
• The alarm will activate once the set time has elapsed and a beep will be heard. The device will stop heating
after approx. 60 seconds and all indication lights will switch OFF.
• Open the lid and latch it in the safety lock position.
• Take care when handling your food after cooking; the device will be hot and will remain hot for some time
afterwards. When removing the bowl or frying accessories, use a heatproof stand or coaster and use oven
gloves for extra support to prevent burn injuries.
• Use safety tongs to lift the rolling / frying basket out of the device. First lift it at the front , then pull towards you.
• Use oven gloves to open the rolling / frying basket. Then remove the food from the basket and place it on a
plate or dish.
Caution: Prevent burn injuries. Do not touch the frying basket; it is very hot.
• Do not use metal items to remove food from the bowl. This will prevent the non-
stick coating from being damaged.
• Excess oil, liquids or food residues will be collected in the bottom of the bowl.
These must be removed immediately after use, so they do not remain until the
device is used next.
• Switch the device OFF if you are not going to continue using it and remove the
plug from the power socket.
Tips:
• Small ingredients usually require a slightly shorter cooking time than larger ingredients.
• Add a little bit of oil to fresh potatoes for a crispy result. Cook potatoes in the device once oil has been added
to fresh potatoes.
• Do not use the device to prepare very fatty ingredients, such as sausages.
• Snacks that can be prepared in an oven can also be prepared in this device.
• Use products that are specially made for ovens or air health fryers.
• Cooking temperatures for conventional ovens (fan-assisted) tend to be similar to this device, but the overall
time can be reduced by the pre-heating time of regular ovens (provided you allow room for hot air to circulate
around the bowl and food).
• You can also use the device to heat up ingredients. If you want to heat up ingredients, set the temperature to
150°C for a maximum of 10 minutes.
EN 08
5
5
6

Ingredient Minutes as Fresh
ingredient
Minutes as Frozen
ingredient
Temperature
(°C)
Comments
Beef Ribs 20 min per pound 35 min per pound 210 Low rack, baste well
Steak 10-20 min 26-35 min 210 High rack, turn half way [+]
Meat loaf 15 min per pound 30 min per pound 180 Low rack
250gr burgers 10-15 min 18-20 min 210 High rack, turn half way [+]
Salmon steak 10 min 20 min 210 High rack, turn half way [+]
Leg of lamb** 20-25 min per pound 30-38 min per pound 200 Rotisserie
Lamb chops 10-15 min 18-24 min 210 High rack, turn half way [+]
Breaded sh* N/A Approx. 5 min less
than info on package 180 High rack, turn half way [+]
Chicken nuggets* N/A Approx. 5 min less
than info on package 180 Rotor Frying Basket
Chicken breast 15-20 min 25-35 min 230 High rack, turn half way [+]
¼ Chicken 20-25 min 35-40 min 200
Rotisserie or Low rack, baste
well. Allow to stand outside
of device for 15 min before
carving and serving
½ Chicken 30-35 min 45-53 min 210
Rotisserie or Low rack, baste
well. Allow to stand outside
of device for 15 min before
carving and serving
Chicken 30 min per pound 45 min per pound 190
Rotisserie or Low rack, baste
well. Allow to stand outside
of device for 15 min before
carving and serving
Pork joints** 30 min per pound 45 min per pound 180 Rotisserie or Low rack
Backed potato 90-120 min N/A 210 Lower Rack
French fries / Chips 20-25 min 15-25 min 210 Rotor Frying Basket
• Experiment during rst use and ALWAYS check that food is well cooked. Always select the thickest part and
make sure the insides are properly cooked!
• If in doubt, follow the fan-assisted oven times shown on frozen and pre-packaged food and ignore any
references to pre-heating (because this device is so efcient and fast, it does not need time to pre-heat).
• To improve succulence, crispness and ease of cleaning, we suggest that you add 400ml of cool tap water
to the bottom of the bowl. Then cook as normal, even when using the rotisserie. This creates a steamy
atmosphere that signicantly improves the preparation of bread and pastries.
The benets:
o Makes meat extra succulent, while still getting the lovely color of a proper roast.
o Makes your fries, chips and roast potatoes even crispier.
o Reduces cooking odors.
o Makes cleaning up even easier. Simply rinse and wash with hot soapy water: no need to soak or scrub.
Follow these steps to prepare homemade chips:
1) Peel the potatoes and cut them to the required size (e.g. 8 x 8mm).
2) Thoroughly wash them and dry them with kitchen roll or a tea towel.
3) Pour 1/2 a tablespoon of olive oil into a bowl, place the chips in the bowl and mix until the chips are covered
in oil.
4) Remove the chips from the bowl with your ngers or a kitchen utensil and shake them so excess oil remains
in the bowl.
5) Place the chips in the device’s rotating frying basket .
6) Cook the chips based on instructions in this section, until they are nice and crisp.
* always check thoroughly – select thickest part and test. If it’s pink...continue cooking!
** use the minutes/pound plus 30-minutes extra cooking time; allow to rest outside the oven for 15 minutes
[+] use optional steak rack for even rotor cooking (ignore high rack reference).
EN 09
10

4) CLEANING AND MAINTENANCE
Clean the frying basket and device after use.
• Remove the plug from the power socket and allow the device to fully cool down (± 30 minutes).
• Never immerse the device in water or any other liquid.
• Clean the device after use.
• Once the bowl has been removed, clean the casing and the insides with a damp cloth and perhaps a bit of
washing up liquid.
• Use a cloth to clean the metal perforated grid on the underside of the lid. However, you MUST make sure no
liquid falls on components that are shielded by the metal grid. The metal grid will become discolored during use.
This is normal and is not a cause for concern or return.
• Clean the casing and insides with a damp cloth and perhaps a bit of washing up liquid.
• First wipe the bowl with a soft cloth or kitchen towel; then use a plastic washing-up brush to clean in warm
water and washing-up liquid.
• Never use aggressive or abrasive cleaning materials, a scouring sponge or steel wool; these damages the
device and inner bowl and will scratch and damage non-stick surfaces.
• Dry the base and bowl thoroughly.
• Re-assemble the device so the bowl is back inside the device.
• DO NOT store the metal accessories inside the bowl; this will damage the non-stick coating.
• Store the device in a dry place.
• Only the bowl, tong, frying basket and rotisserie can be washed in the dishwasher. However, to retain
the service life of non-stick layers and to avoid potential discoloration of materials, we recommend
hand washing these parts in warm soapy water. If the non-stick coating has been damaged by the
accessories, do not wash in a dishwasher because this will only exacerbate the problem.
• The device itself CANNOT be cleaned in the dishwasher.
Self-cleaning process:
1) Open the lid of the device.
2) Fill the bowl with approximately 1 cm of mild soapy water.
3) Set the temperature to 60ºC.
4) Set the timer to 15 minutes.
5) Allow food residues that have baked onto the bowl to soften during the heating process.
6) The device will stop after 15 minutes. Allow it to cool down.
7) Remove the bowl from the device using both hands.
8) Remove the contents of the bowl and remove any loose food residue using a damp cloth.
9) Dry the bowl thoroughly.
5) SPECIFICATIONS
• Voltage input: 220-240Vac – 50/60 Hz
• Power: 1300W
• Temperature range: 50-230 ºC
• Timer range: 1-60 min
• Capacity bowl: 10 L
• Dimensions: 33 x 33 x 45 cm (W x L x H)
• Weight: 5.7 kg.
6) STORAGE & TRANSPORTATION
• When storing the device, it should rst be cleaned in accordance with this user manual. The device should be
stored in its original packaging.
• Always store the device in a dry and well-ventilated room and beyond the reach of children.
• Protect the device against vibrations and shocks during transport.
All contents and specications mentioned in this manual are subject to change without prior notice.
EN 10
NO OK

Your product has been manufactured using high quality materials and components
which can be recycled and used again. At the end of its life span, this product cannot be
disposed of in normal domestic waste, but must be taken to a special collection point for
recycling electrical and electronic equipment. This is indicated in the user manual and in
the packaging by the waste container marked with a cross symbol. Used raw materials
are suitable for recycling.
By recycling used appliances or raw materials, you are playing an important role in protecting our
environment. You can ask your local council about the location of your nearest collection point.
INSTRUCTIONS FOR PROTECTING THE ENVIRONMENT
(WEEE, the waste electrical and electronic equipment directive)
EN 11

GEBRUIKSHANDLEIDING:
MAGNANI GEZONDE DIGITALE AIRFRYER 10 LITER
MODEL: MI-HA-AF4-B
2) VEILIGHEIDSINSTRUCTIES
Neem altijd de volgende voorzorgsmaatregelen in acht wanneer u gebruik maakt van de ‘Magnani - gezonde
digitale airfryer 10 liter’, hierna te noemen het 'apparaat'.
Algemene informatie
• Lees de gebruiksaanwijzingen zorgvuldig en bewaar ze op een veilige plek. Als u dit apparaat aan iemand
anders geeft, geef deze handleiding daar dan bij.
• Gebruik dit apparaat uitsluitend volgens de instructies in deze gebruikshandleiding.
• Dit apparaat kan worden gebruikt door kinderen van 8 jaar en ouder, personen met beperkte fysieke,
zintuigelijke of mentale vermogens of personen met gebrek aan ervaring en kennis, mits ze onder toezicht
staan of instructies hebben gekregen over het veilige gebruik van het apparaat en op de hoogte zijn van de
mogelijke gevaren. Laat kinderen nooit met het apparaat spelen. Reiniging en onderhoud dienen niet te worden
uitgevoerd door kinderen, tenzij ze ouder zijn dan 8 en onder toezicht staan van een volwassene.
• Dit apparaat is uitsluitend bedoeld voor huishoudelijk gebruik, niet voor professioneel gebruik.
• WAARSCHUWING! Laat verpakkingsmateriaal niet onbeheerd rondslingeren.
Het kan gevaar opleveren wanneer kinderen ermee spelen. Kans op verstikking!
Elektriciteit en warmte
• Controleer vóór gebruik of de netspanning gelijk is aan de spanning vermeld op het typeplaatje van het
apparaat.
• Zorg ervoor dat uw handen droog zijn voordat u het apparaat, het stroomsnoer of de stekker aanraakt.
• Steek de stekker in een geaard stopcontact dat op elk moment gemakkelijk bereikbaar is.
• WAARSCHUWING! Bedek de stekker of het snoer nooit met doeken, gordijnen of enig ander materiaal
om oververhitting en mogelijk zelfs brand te voorkomen.
• Zorg ervoor dat het apparaat en het stroomsnoer niet in aanraking komen met hittebronnen, zoals een hete
kookplaat of open vuur.
INHOUDSOPGAVE
1) Inhoud verpakking
2) Veiligheidsinstructies
3) Het product installeren en gebruiken
4) Reiniging en onderhoud
5) Specicaties
6) Opslag en transport
1) INHOUD VERPAKKING
• Gezonde digitale airfryer 10 liter (kom)
• Accessoires (Dubbel rek - vork - draaiende kooi - tang)
• Gebruikshandleiding
Sommige onderdelen van dit apparaat kunnen heet worden. Raak
deze niet aan om te voorkomen dat u zich verbrandt.
WAARSCHUWING!
Nederlands
NL 01

• Het apparaat moet zijn warmte kwijt kunnen om brandgevaar te voorkomen. Zorg er daarom voor dat het
apparaat wordt omringd door voldoende vrije ruimte (ten minste 10 cm aan alle kanten) en dat het apparaat niet
in de buurt van of op brandbare materialen ligt.
• Het apparaat en/of de luchtinlaat en/of de luchtuitlaat mogen niet worden afgedekt.
• Controleer het stroomsnoer regelmatig op beschadigingen.
• Gebruik het apparaat niet als het snoer of de stekker beschadigingen vertoont of als het apparaat op de grond
is gevallen of andere sporen van schade vertoont.
• Schakel het apparaat uit en haal de stekker uit het stopcontact als u tijdens het gebruik fouten ontdekt,
tekenen van beschadiging aantreft, het apparaat niet gebruikt of het schoonmaakt.
• Zorg ervoor dat niemand op het stroomsnoer kan staan of dat het snoer anderszins kan worden bekneld.
• Laat het stroomsnoer niet over scherpe randen hangen en houd het uit de buurt van warme objecten en open
vuur.
• Wanneer u de stekker in het stopcontact steekt, moet u ervoor zorgen dat anderen deze niet per ongeluk los
kunnen trekken of over het stroomsnoer kunnen struikelen.
• Haal de stekker uit het stopcontact als het onweert of als u het apparaat gedurende langere tijd niet gebruikt.
• Gebruik een stroomsnoer van 10 ampère als er een verlengsnoer nodig is. Snoeren met lager amperage
kunnen doorbranden.
• Wanneer u een verlengsnoer gebruikt, rol dit dan volledig uit.
• WAARSCHUWING! Om de kans op brand of een elektrische schok te verminderen moet u het apparaat
beschermen tegen druppelend of opspattend water en uit de buurt houden van met water gevulde voorwerpen,
zoals vazen. Dergelijke voorwerpen mogen niet op of in de buurt van het apparaat worden geplaatst.
Gebruik
• Gebruik het apparaat niet in de buurt van brandbare materialen.
• Laat het apparaat nooit onbeheerd achter als het in gebruik is.
• Verplaats het apparaat nooit als het ingeschakeld of nog warm is. Schakel het apparaat eerst uit en verplaats
het pas als het is afgekoeld.
• Gebruik alleen keukengerei met een hittebestendig handvat of gebruik een tang en draag ovenhandschoenen.
• Gebruik geen scherpe voorwerpen in de kom, binnenpan of grillpan. Deze kunnen de antiaanbaklaag
beschadigen.
• Mors geen hete olie op het verwarmingselement. Hierdoor ontstaat rook en kunnen onaangename luchtjes
worden veroorzaakt.
• Maak het apparaat na gebruik grondig schoon (zie 'Reiniging en onderhoud').
• Het is aan te raden een hittebestendige laag tussen de tafel of het aanrechtblad en het apparaat te leggen,
zodat er geen sporen ten gevolge van de warmte op uw tafel of aanrechtblad achterblijven.
• Vermijd locaties die blootstaan aan trillingen, vrieskou of vochtigheid.
• Bescherm het apparaat tegen direct zonlicht, warmtebronnen, overmatige vochtigheid en corrosieve
omgevingen.
• Zorg ervoor dat het apparaat niet wordt blootgesteld aan enige mechanische belasting.
• Het apparaat kan beschadigd raken als het verkeerd wordt gebruikt.
• Ga voorzichtig met het apparaat om. Het apparaat kan beschadigd raken door een stoot of val, zelfs van een
geringe hoogte.
• Open de behuizing niet, omdat u dan kans loopt op een elektrische schok.
• Probeer het apparaat niet te demonteren, te repareren of anderszins aan te passen.
• Het apparaat moet worden gerepareerd als er sprake is van enige vorm van schade, wanneer bijvoorbeeld het
stroomsnoer of de stekker is beschadigd, er vloeistof op het apparaat is gemorst, voorwerpen op het apparaat
zijn gevallen, het apparaat is blootgesteld aan regen of vocht, het apparaat is gevallen of het apparaat niet
normaal functioneert.
• Gebruik geen schurende schoonmaakmiddelen om het apparaat te reinigen.
• Gebruik geen vreemde voorwerpen om het apparaat te reinigen.
Belangrijke informatie – volg deze instructies op.
• Dit apparaat kan worden gebruikt door kinderen van 8 jaar en ouder, personen met beperkte fysieke,
zintuigelijke of mentale vermogens of personen met gebrek aan ervaring en kennis, mits ze onder toezicht
staan of instructies hebben gekregen over het veilige gebruik van het apparaat en op de hoogte zijn van de
mogelijke gevaren. Laat kinderen nooit met het apparaat spelen. Reiniging en onderhoud dienen niet te worden
uitgevoerd door kinderen, tenzij ze ouder zijn dan 8 en onder toezicht staan van een volwassene.
• Gebruik het apparaat uitsluitend binnenshuis, in droge gebieden en niet in de buurt van water, andere
vloeistoffen of vocht.
NL 02

• Gebruik het apparaat niet als het apparaat, het stroomsnoer of de stekker in water of een andere vloeistof is
gevallen.
• Dompel het apparaat, het snoer of de stekker nooit onder in water of een andere vloeistof.
• Pak het apparaat niet op als het in het water of een andere vloeistof is gevallen. Trek onmiddellijk de stekker
uit het stopcontact. Gebruik het apparaat niet meer.
• Plaats het apparaat op een stabiele en vlakke ondergrond, op een plek waar het niet kan vallen.
• Zet het apparaat pas AAN wanneer alle accessoires correct zijn geïnstalleerd. Zorg ervoor dat het deksel is
gesloten voordat u de stekker van het apparaat in het stopcontact steekt en het apparaat aanzet.
• Onderdelen van het apparaat kunnen heet worden. Raak deze niet aan om te voorkomen dat u zich verbrandt.
• Houd het apparaat altijd vast bij de speciale handgrepen. Het metalen deel waarmee de handgrepen aan de
kom zijn bevestigd, kan zeer heet worden.
• Gebruik of vul de kom nooit met olie; dit kan brandgevaar veroorzaken!
• Het apparaat is voorzien van een beveiliging tegen oververhitting. Deze wordt ingeschakeld wanneer de
temperatuur te hoog oploopt. In dit geval moet het apparaat eerst afkoelen voordat u het weer kunt gebruiken.
Schakel het apparaat uit en trek daarna de stekker uit het stopcontact. Laat het apparaat volledig afkoelen. Het
duurt ongeveer 30 minuten voordat het apparaat volledig is afgekoeld.
• Haal de stekker uit het stopcontact als u het apparaat gedurende langere tijd niet gebruikt.
• Als u de stekker uit het stopcontact trekt, moet u aan de stekker zelf trekken en niet aan het snoer.
• Gebruik het apparaat niet met een externe tijdschakelaar of een afzonderlijke afstandsbediening.
3) INSTALLATIE EN GEBRUIK VAN HET APPARAAT
Open de verpakking voorzichtig en haal het apparaat eruit. Controleer of het apparaat volledig en onbeschadigd
is. Mochten er onderdelen beschadigd zijn of ontbreken, neem dan contact op met de verkoper en gebruik het
product niet. Bewaar de verpakking of recycle deze zoals voorgeschreven door lokale regelgeving.
ACCESSOIRES
Tang
Dubbel rek (boven/onder)
Draaiende kooi / frituurmand
Vork Opmerking:
de spil wordt gebruikt voor 10 + 11)
OPTIONELE ACCESSOIRES
Steak-rek
Spies-rek
Grillpan
Stomer
Onderdelen en functies van het apparaat
AAN-/UIT-schakelaar (zijkant van het apparaat)
Veiligheidsvergrendeling (zijkant van het apparaat)
In- en uitlaat lucht
(Pas op! HEET niet aanraken of afdekken)
Handgreep van het deksel
Onderkant met antislip-voeten
Handgrepen van de kom (links en rechts)
Verwisselbare binnenkom
Glazen bovenkant
NL 03
1
2
3
4
5
6
7
8
9
10
11
12
13
14
15
8 9 10 11
12 13 14 15
1
5
6
7
2
3
4

Digitaal bedieningspaneel:
Het apparaat wordt bediend via een paneel met
aanraaktoetsen. Druk zachtjes met uw vingertoppen
op de gewenste functie.
Beschrijving van de toetsen:
1) LCD-scherm waarop de temperatuur, de tijd
en het geselecteerde bereidingsprogramma wordt
weergegeven.
2) Temperatuur-/tijdinstelling min [-]
Temperatuur:
Verlaag de temperatuur door te drukken op
deze toets. Elke keer dat u hierop drukt, gaat de
temperatuur 10°C omhoog of omlaag. Wanneer u
de toets ingedrukt houdt, gaat de temperatuur snel
omlaag.
Tijd:
Verlaag de tijd door op deze toets te drukken.
Elke keer dat u hierop drukt wordt de tijd met 1 minuut verlaagd. Wanneer u de toets ingedrukt houdt, gaat de
tijd snel omlaag.
3) BEGELEIDING (7 voorgeprogrammeerde bereidingsprogramma's)
Druk op deze toets om een keuze te maken uit de 7 voorgeprogrammeerde bereidingsprogramma's. Het
pictogram van de geselecteerde preset-functie begint te knipperen op de LCD-display (1) nadat het is met de
begeleidingstoets is geselecteerd.
4) ROTOR
Druk hierop om de as van het draaispit te activeren. Druk hier nogmaals op om de as van het draaispit te
stoppen.
5) START / AAN-/UITSCHAKELAAR
Druk op de aan/uitschakelaar om het apparaat AAN of UIT te zetten. Druk eenmaal om het apparaat AAN
te zetten. Zodra een modus is geselecteerd, of wanneer u in Gebruikersmodus bent, drukt u op de aan-/
uitschakelaar om de bereiding te starten. Druk nogmaals op de toets om het apparaat UIT te zetten. Als er geen
selectie wordt gemaakt, schakelt het apparaat automatisch na ongeveer 1 minuut UIT.
6) VERTRAGING
Als u een bereidingsprogramma op een later tijdstip automatisch wilt laten starten, kunt u het apparaat zo
instellen dat het automatisch opstart met een vertraging van maximaal 9 uur en 59 minuten; ga als volgt te werk
om de vertragingstijd in te stellen:
- De AAN-/UIT-schakelaar moet zijn ingeschakeld [I]
- Druk op START (5) om het apparaat te activeren.
- Druk op de timer voor de vertraging en gebruik de + (8) of – (2) toets om een toekomstig startpunt
in te stellen. Een enkele druk op een van de knoppen komt neer op 1 minuut, een lange druk komt
neer op 20 minuten.
- Druk opnieuw op START (5) en druk op BEGELEIDING (3) om uw preset bereidingsprogramma te
selecteren; stel de tijd of temperatuur in en druk nogmaals op START (5). Het apparaat start nu
automatisch het geselecteerde bereidingsprogramma nadat de geselecteerde vertragingstijd is
verstreken.
7) TEMP/TIMER
Selectietoets voor het instellen van de temperatuur of tijd.
- Het tijd-pictogram knippert wanneer de tijd wordt ingesteld.
- Het temperatuur-pictogram knippert wanneer de temperatuur wordt ingesteld.
8) Temperatuur-/tijdinstelling plus [+]
Temperatuur:
Verhoog de temperatuur door te drukken op deze toets. Elke keer dat u hierop drukt, gaat de temperatuur 10°C
omhoog. Wanneer u de toets ingedrukt houdt, gaat de temperatuur snel omhoog.
Tijd:
Verhoog de tijd door op deze toets te drukken.
Elke keer dat u hierop drukt wordt de tijd met 1 minuut verhoogd. Wanneer u de toets ingedrukt houdt, gaat de
tijd snel omhoog.
Opmerking: Wanneer u de hierboven beschreven selecties maakt, hoort u een pieptoon.
NL 04
1
5
28
3
7
46
1
5
5
5
28
3
1

NL 05
Automatische UITSCHAKELING
Het apparaat heeft een ingebouwde timer die het apparaat automatisch uitschakelt wanneer het
bereidingsprogramma is voltooid of als er geen selecties worden gemaakt wanneer het apparaat is
ingeschakeld.
Eerste gebruik:
• Haal het apparaat en de accessoires uit de doos. Trek eventuele stickers, beschermfolie en plastic van het
apparaat.
• Voordat u het apparaat voor het eerst gebruikt, veegt u alle afneembare onderdelen af met een vochtige
doek. Was de accessoires en de kom af in een warm sopje. Spoel ze goed af en droog ze grondig voordat u ze
gebruikt. Gebruik nooit agressieve of schurende schoonmaakmiddelen, een schuurspons of staalwol. Dit kan
het apparaat, de binnenkom en de binnenpan beschadigen.
• Plaats het apparaat op een stabiele en vlakke ondergrond, op een plek waar het niet kan omvallen.
• Installeer de kom en accessoires.
• Steek de stekker van het apparaat in het stopcontact en zet de AAN-/UIT-schakelaar [1] op AAN.
• Druk - op het bedieningspaneel - op START (5) en gebruik BEGELEIDING (3) om het gewenste preset-
programma te selecteren en druk weer op START (5).
• Laat het apparaat gedurende 15 minuten zonder etenswaren opwarmen.
• De eerste keer dat u het apparaat gebruikt, zult u wat rook en een specieke geur bemerken. Dat is normaal
en zal vanzelf verdwijnen. Zorg dat er voldoende ventilatie is.
Bakken/frituren
Voordat u het apparaat gebruikt, moet u beslissen of u het dubbele rek, de vork of de draaiende frituurmand
gaat gebruiken.
- Het dubbele rek gebruikt u wanneer u het apparaat gebruikt als een gewone halogeen heteluchtoven.
Het onderste rek is geschikt voor het bereiden van grotere etenswaren zoals gebraden gevogelte (hele
vogel), ovenschalen met rijst, groenten, enz.
Het bovenste rek is geschikt voor het bereiden van middelgrote etenswaren, zoals kippenvleugels en
pizza.
- De vork kunt u gebruiken voor gegrilde etenswaren zoals gegrilde kip of grote steaks.
- De draaiende frituurmand kunt u gebruiken voor frieten (vers of diepvries) en andere kleine
etenswaren kipnuggets en roerbakgerechten die kunnen worden bereid in een (halogeen) airfryer.
- De tang kunt u gebruiken om etenswaren of schalen te verplaatsen of om de draaiende frituurmand te
plaatsen in of verwijderen uit het apparaat.
ZORG ERVOOR DAT DE KOM ALTIJD IS GEPLAATST TIJDENS HET GEBRUIK.
GEBRUIK ALTIJD EEN REK OF EEN VAN DE MEEGELEVERDE ACCESSOIRES.
HOUD DE KOM ALTIJD MET BEIDE HANDEN AAN BEIDE HANDGREPEN VAST WANNEER U
DE KOM UIT HET APPARAAT VERWIJDERT.
PLAATS HET APPARAAT OP EEN STABIELE EN VLAKKE ONDERGROND, OP EEN PLEK
WAAR HET NIET KAN OMVALLEN
OPENEN EN SLUITEN VAN HET DEKSEL MET DE VEILIGHEIDSVERGRENDELING
Zorg ervoor dat het apparaat volledig is afgekoeld. Houd er rekening mee dat het apparaat en de accessoires
heet kunnen zijn na gebruik! Gebruik de juiste methode voor het openen en sluiten van het apparaat. Het is
uitgerust met een veiligheidsvergrendeling.
Til het deksel op tot u een klik hoort. Het deksel blijft nu open en is vergrendeld. Forceer het deksel NIET
naar beneden; hierdoor wordt onherstelbare schade veroorzaakt en vervalt de garantie. Druk op de
veiligheidsvergrendeling aan de rechterkant van het apparaat [2], terwijl u het deksel zachtjes omhoog duwt.
Het deksel wordt nu ontgrendeld en kan daarna worden gesloten.
Plaats het dubbele rek (kies een kant voor het bovenste of onderste rek), de vork of de draaiende frituurmand.
Zorg er ALTIJD voor dat één van deze accessoires is geplaatst.
5
5
3
1
2

NL 06
Gebruik van het draaispit voor kip:
Controleer of de rotatie niet wordt geblokkeerd wanneer het deksel is gesloten en of etenswaren niet in contact
kunnen komen met de warmtebron of de afscherming in het deksel. Stop de bereiding wanneer de rotatie
wordt geblokkeerd of wanneer etenswaren maar net langs de afscherming in het deksel bewegen (wanneer dat
gesloten is) - dit leidt tot een ongelijkmatige bereiding en verkort de levensduur van het apparaat (spatten van
etenswaren beschadigen de halogeen verwarming; dit valt niet onder de garantie).
Monteer de vorken van het draaispit; de vorken kunnen worden vastgeklemd met de speciale sleutels aan
beide zijden van de draaias. Prik de etenswaren (meestal kip) op de vorken; klem de vorken daarna vast. Bind
de dijen en de vleugels van de kip bij elkaar om te voorkomen dat ze de afdekplaat van de ventilator aanraken.
Plaats het daarna in het apparaat (zie onderstaande afbeeldingen).

NL 07
Plaats eerst het puntige uiteinde door het gat in de kom (1) (in de buurt van het scharnier van het deksel).
Breng het botte uiteinde op één lijn met de andere kant van de kom (2) en zorg ervoor dat het op één lijn zit
met de bevestigingsgroef (3).
Gebruik van de draaiende frituurmand:
Plaats de draaias door de middelste opening in de draaiende frituurmand; centreer de as en klem deze vast
met de speciale sleutel. Plaats het geheel daarna in het apparaat (zie onderstaande afbeeldingen).
Plaats eerst het puntige uiteinde door het gat in de kom (1) (in de buurt van het scharnier van het deksel).
Breng het botte uiteinde op één lijn met de andere kant van de kom (2) en zorg ervoor dat het op één lijn zit
met de bevestigingsgroef (3).
2
2
1
1
3
3
Pak de handgreep van het deksel vast en til het deksel een klein stukje omhoog. Duw
tegelijkertijd met uw andere hand de veiligheidsvergrendeling omlaag (bij het scharnier)
om het deksel te ontgrendelen, zodat het kan worden gesloten. Gebruik altijd de
handgreep van het deksel om het gewicht te ondersteunen.
Wanneer u het draaispit gebruikt, moet u ervoor zorgen dat het deksel niet tegen – of bijna
tegen – de etenswaren aankomt (controleer dit ook tijdens het draaien).
Zet de AAN-/UIT-schakelaar op AAN . Druk op START (5) (Opmerking: er gebeurt niets
totdat u een begeleidingsmenu selecteert en instelt of nogmaals op START (5) drukt nadat
handmatig de duur en temperatuur van de bereiding is ingesteld).
Het BEGELEIDINGSMENU (voorgeprogrammeerde bereidingsprogramma's):
Het begeleidingsmenu biedt verschillende voorgeprogrammeerde bereidingstemperaturen en -tijden. Deze
kunnen beide worden aangepast. Selecteer eerst het begeleidingsmenu dat het beste past bij uw gewenste
bereidingsmethode of de benodigde temperatuur/tijd.
Voor elk begeleidingsmenu wordt een indicatielampje weergegeven op het LCD-scherm (1). Elke druk op
de toets van het begeleidingsmenu leidt u door de hieronder beschreven presets. Aan de hand van de
onderstaande tabel kunt u de beste voorgeprogrammeerde instellingen kiezen voor de etenswaren die u wilt
bereiden. Wanneer u een van deze presets selecteert, worden de in de onderstaande tabel vermelde tijd en
temperatuur gebruikt, tenzij u deze later aanpast.
2
2
1
1
3
3
5
5
1
1
Table of contents
Languages:
Other Magnani Fryer manuals
Popular Fryer manuals by other brands

MasterChef
MasterChef AMZ919101880 user manual

Silvercrest
Silvercrest SHF 1800 A2 operating instructions

Alto-Shaam
Alto-Shaam FryTech ASF-60E Installation, operation and maintenance

Silvercrest
Silvercrest SHFR 1450 A1 operating instructions

Universal Blue
Universal Blue CRISPY 4015B user manual

BLUE STONE
BLUE STONE AFB-5876 user manual

Silvercrest
Silvercrest SKF 2300 operating instructions

EUROPRO
EUROPRO PROFESSIONAL COOL TOUCH DEEP FRYER F2015 owner's manual

HOMEDEPOT
HOMEDEPOT FH-6138 Manual and Operating Instruction

H.Koenig
H.Koenig fry800 instruction manual

Euro Chef
Euro Chef FRYER-1TANK user manual

StarMax
StarMax 530TF Series Installation & operation instructions