Niethammer LPZ 211 D User manual

NIETHAMMER
LPZ 211 D and LPZ 215 D
Niethammer LPZ 211 D and HPZ 215 D Seite 1
Instruction Manual
LPZ 211 D
LPZ 215 D
E.211.215. 201910

NIETHAMMER
LPZ 211 D and LPZ 215 D
Niethammer LPZ 211 D and HPZ 215 D Seite 2
Advice before Use
• Read this instruction carefully.
• As soon as the equipment is delivered, open the packing and inspect the equipment carefully. If you notice
any damage, contact the transport company immediately and register your complaint in due form listing the
defects.
• We can assure you, that this equipment left our factory in perfect condition.
• Check it the received equipment is consistent with the delivery notice and if the delivery notice is consistent
with your order. If it is not, immediately contact your supplier.
• Electrical connection from the spotlight : 1. First Spotlight <-> PSU (Harting (square plug)
2. Second PSU <-> power supply (Powercon True1® (round plug))
General Remarks
This luminaire is lighting equipment designed for professional indoor use in theaters and televison- or film studios.
Designed and build in accordance with EN 60950 and EN 60598-17 regulations, it must imperatively be connected
to earth by means of its earth wire.
To prevent any electrical shock, this equipment should not be opened when it is powered.
Nevertheless:
• Any parts or lenses need to be replaced if they are visibly damaged and their efficiency might be reduced, e.g.
in case of deep cracks or scratches.
• The luminaire must be maintenained if some unexpected failrs are lamp must be changed if damaged or
distorted by heat.
If internal access is needed for control, service or repair purposes, always refer to qualified personnel. Always be
sure to unplug the power supply cable before opening the fixture.
ATTENTION: LETHAL VOLTAGE PRESENT INSIDE !
It is the user responsibility to use the luminaire for intended purpose and to check the equipment that might be
connected to it.
The luminaire can under no circumstances be modified. Niethammer Lichttechnik GmbH will not assume any
responsibility in case of damage resulting from modifications made to the luminaire.
This luminaire is a piece of professional equipment designed for easy and simple use. Always refer to qualified
personnel for any using, installation or repair work. Avoid installing the luminaire near inflammable matters.
Minimum distance between luminaire and inflammable matters is 3,2m.
Important Remark:
Power supply cables and other connections are essential for your equipment and contribute greatly to a safe and
trouble free operation.
• Always pull the plug from the PSU cable when disconnecting a cable, never pull the cable.
• Never use cables and connectors in bad conditions, check them before installation and periodically thereafter
• Never tie power supply and data cables together.

NIETHAMMER
LPZ 211 D and LPZ 215 D
Niethammer LPZ 211 D and HPZ 215 D Seite 3
Installation and Overviews
The luminaire can be used in hanging and upright position, the PSU
only in hanging position, beside the yoke or with the bracket on a
bar (needed clamp not included).
The Yoke (12) has five fixing holes (4x11mm, 1x13mm diameter).
1. Lamp Housing
2. Rear section Screw’s to open the lamphouse
3. Accessory slot
4. Beam Shaper
5. Iris
6. Friction point 180
7. Focus
8. Front lenses tube
9. Filter Frame Holder
10. Zoom
11. Tilt locking handle
12. Yoke
13. Friction adjustment Lamp housing
14. Handle
15. Axial fan
This luminaire can be suspended from a bar by a hook clamp; it can also be
mounted on a stand.

NIETHAMMER
LPZ 211 D and LPZ 215 D
Niethammer LPZ 211 D and HPZ 215 D Seite 4
If necessary, a DIN type BN155 plate can be screwed to the yoke.
With the help of the base plate BN155, the fixture can be mounted on special tripods or other system parts according to
DIN 15560. The center hole can be used for attachment hooks or spigots of a standard fixture.
If the fixture is changed from the standing mounting position to a hanging position (or vice versa), the yoke can be swung
backwards over the lamp housing by releasing the tilt lock. Never use the headlight with its top side down.
Electrical Connection and fitting the PSU
1. Always follow local electrical codes
2. ENILED must not be put into operation on a dimmed output. It has to be continious voltage.
3. This luminaire is designed for operating at a nominal voltage of 80-264 VAC, 47-63 Hz.
4. The fixture is equipped with a 2.5m long rubber cable with 4x1,5qmm cores and a square connector incl. earth
connection contact, this connector is to be used only on the designated PSU.
5. The power supply is enclosed with a 2.5m long cable, which is provided with a detachable connection of the
Powercon True 1 type. The power supply can be attached to the side of the yoke and secured to the eyelet with a
safety rope, also provides an angle, so that the PSU can also be attached to a hook or the like, the safety cable
must also be attached. The PSU MUST be operated vertically (connectors must face down) and must not be
placed or placed on the ground, or fastened above a heat source.
6. The lightsource is a COB (Chip on board) with 490W power. The color temperatures are 3,000K and 5,000K, as
indicated on the nameplate of the fixture. The fixture is equipped with temperature-controlled, low-noise axial
fans.
7. The lamp housing (see drawing point 1) is provided with a hinge and can easily be opened by loosening the screw
(-s) (see drawing point (-s). 2). To open the lamp house is first pulled away from the heat sink and can then be
tilted.
8. Disconnect the fixture completely from the electrical supply before opening the lamp housing. Disconnect the
connecting lead from the power supply AND the connecting lead from the fixture. The lamp house contains both
the control and power electronics, the LED and the condenser lenses.
9. The LED and temperature sensor are attached to the heat sink, which is factory-mounted in the rearmost position
(furthest away from the tube (equipped with the zoom and focus lens)). Be sure to properly position the heat sink
after maintenance / cleaning, otherwise the light output and quality will be reduced.
Since the optical system is factory-set, no adjustments need to be made to it. If, however, the optical system is blocked
for any reason, please contact our service team.
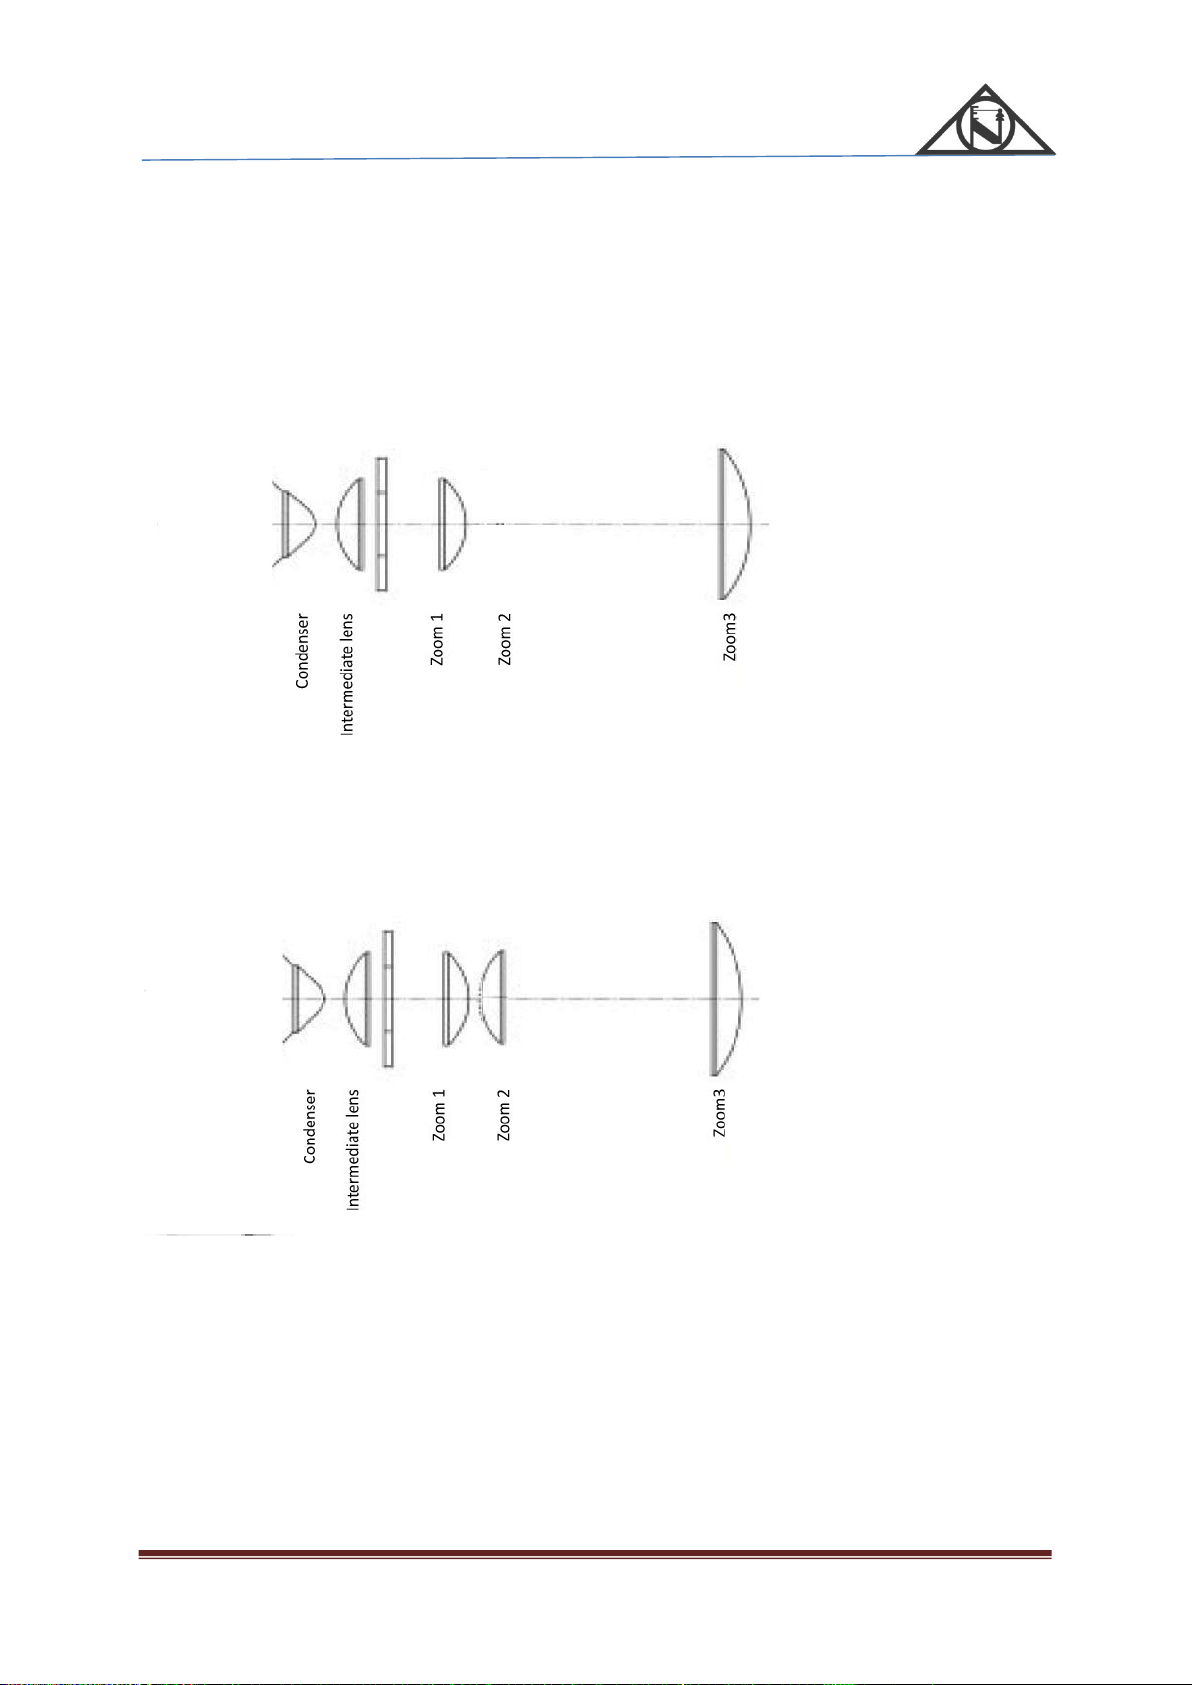
Parts of the optical system
The plane of projection, you can find between lamp housing (1) and the
front lenses tube (8). Here you can find the Iris (5), the accessory slot (3)
and the beam shaper (4). To put the Iris in and out, you must loosen the
M3 screw. With the Iris it is possible to modify the diameter of the light.
The beam shapers are mounted on 4 different levels, which make it
possible to create different shapes, e.g. a triangle.
The both zoom lenses are used to create the light output. With the zoom lens (10)
you assign the light diameter, moving the lens back and forward. With the focus lens (7) you can sharpen the light output.
Die beiden Zoom-Linsen geben das gewünschte Lichtbild. Die Frontlinse (10) wirkt auf die Abbildungsgröße durch Vor- und
Zurückbewegen, während die Fokuslinse (7) die gewünschte Bildschärfe beeinflusst.

NIETHAMMER
LPZ 211 D and LPZ 215 D
Niethammer LPZ 211 D and HPZ 215 D Seite 5
Remarks
• The smallest picture you get, moving the two lenses the longest way away from each other.
To have the biggest picture, move the two lenses nearby each other in the middle of the lens tube
• If you want to defocus the light, you can use the zoom lenses. Move the one lens out of the sharpness or
moving both lenses together.
• Be aware, that it is only allowed to use this method for a maximum moving the lenses +/- 30mm (outside the
sharpness). There is the risk to have the focal point in the filter frame and destroy the filter, if you move the
lenses in the front of the front lenses tube.
Please use high temperature Filter Frames (like ROSCO-Supergel).
Operation with Color Scrollers
Color Scroller can be used with a special adapter or mounted directly to the luminaire instead of the Filter Frame
Holder (9). Be aware, using accessory in the Filter Frame Holder shift the balance point of the luminaire.
Programming and operation oft he spotlight on site
DMX in DMX out Mini USB (for updates)
Display
(DMX receive)
DMX startadress
Temperature
Software version
Installation Intensity
DMX connection
1. The DMX In- and Output is located on the backside from the lamphouse. If no additional DMX fixture is used, the
DMX outlet must be terminated with a 120 Ohm resistor, to avoid disturbances in the DMX network.
NIETHAMMER
LPZ 211 D and LPZ 215 D
Niethammer LPZ 211 D and HPZ 215 D Seite 6
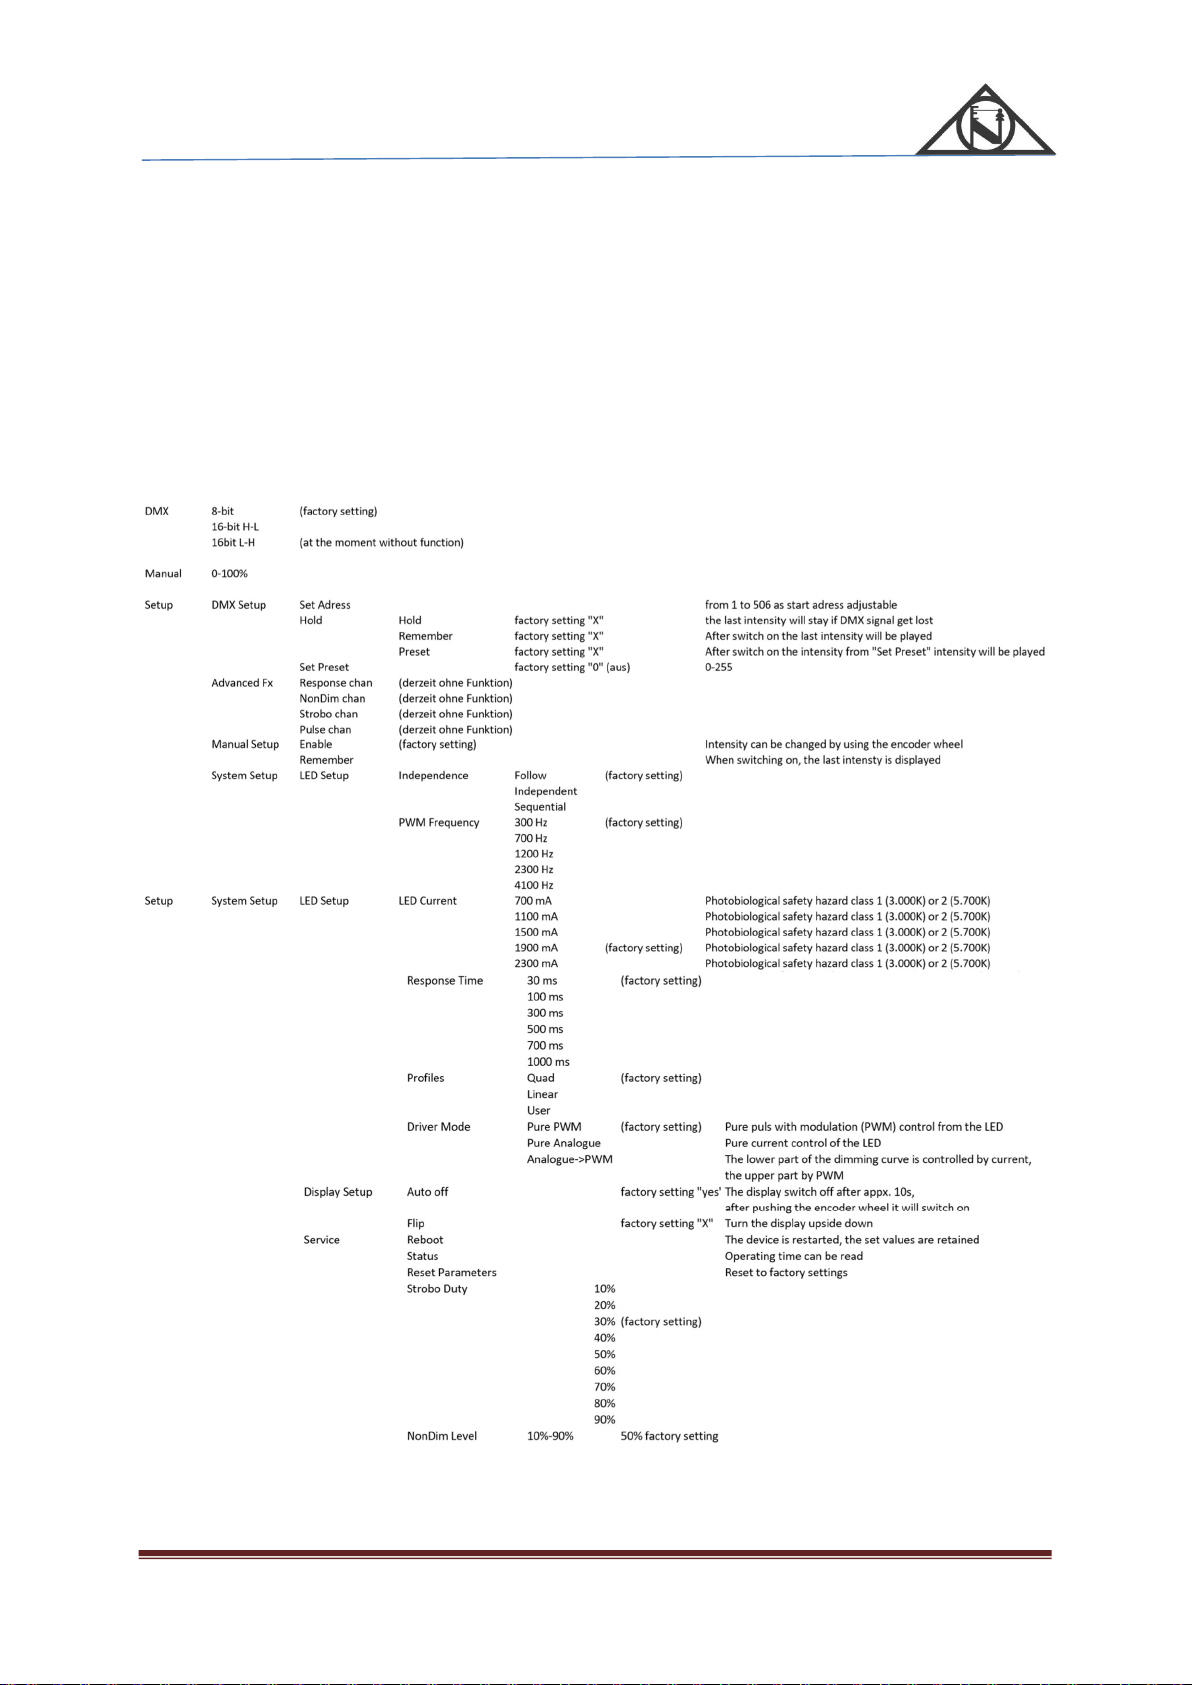
Setting the device with the encoder wheel with integrated push bottom
ENILED is activated by pressing the encoder wheel, selected by turning and confirmed by pressing the wheel.
The individual menu items are displayed either by a white cross in the red circle (function deselected) or by a white check
mark in the green circle (function active). The settings are accepted with Exit in the corresponding menu. If different
settings are available within the menu, they are selected by turning the encoderwheel and confirmed by pressing the
wheel.
The following are the different menu options, please note that some of the functions are currently not available, so there is
no claim to the functions.

NIETHAMMER
LPZ 211 D and LPZ 215 D
Niethammer LPZ 211 D and HPZ 215 D Seite 7
Maintenance and Servicing
1. Zoom Profiler do not need any maintenance. But dust deposits normally are unpreventable, so it is necessary
to clean the optical parts of the luminaire frequently.
Lenses must be clean with a clean and soft cloth soaked with alcohol. Please, don´t use chemical or other
cleansing material. It is forbidden to touch the optical parts bare handed. The LED should only be cleaned
with a fine brush, which can not damage the surface coating of the LED. The aspheric lenses must be changed
every 2 to 3 years, to guarantee a maximum light output. To clean the zoom lenses, please open the door of
the front lenses tube (2 screws).
2. The electronics are installed in the lower part of the lamp house, this can be cleaned with a vacuum cleaner
with a brush attachment of dust.
3. DO NOT clean the fans with a vacuum cleaner as this can induce a voltage and damage the electronics, a soft
brush is suitable for this purpose and then the fan blades of the fans are to be fixed for cleaning with a
vacuum cleaner.
4. For the Iris, please don´t use fat or oil.
5. Please check frequently all electrical cables, electrical and mechanical parts of the luminaire. Tighten the
screws if needed. If you are not sure what to do, please contact our service team.
6. Maintenance and Servicing are the guaranty for a long economic life time and an optimum in light output.
First Time Use
Using the luminaire the first time, do it in the following way:
• Open the Iris and pull out the beam shapers as far as possible
• Give full light for app. 15 minutes
• Close the iris for 1 minute, open it for 5 minutes, close it again for 1 minute , …
• Same procedure for the shutters
• Doing this several times, please
NIETHAMMER
LPZ 211 D and LPZ 215 D
Niethammer LPZ 211 D and HPZ 215 D Seite 8
Optical System
LPZ 211 D
LPZ 215 D

NIETHAMMER
LPZ 211 D and LPZ 215 D
Niethammer LPZ 211 D and HPZ 215 D Seite 9
HPZ 215D
HPZ 211D

NIETHAMMER
LPZ 211 D and LPZ 215 D
Niethammer LPZ 211 D and HPZ 215 D Seite 10
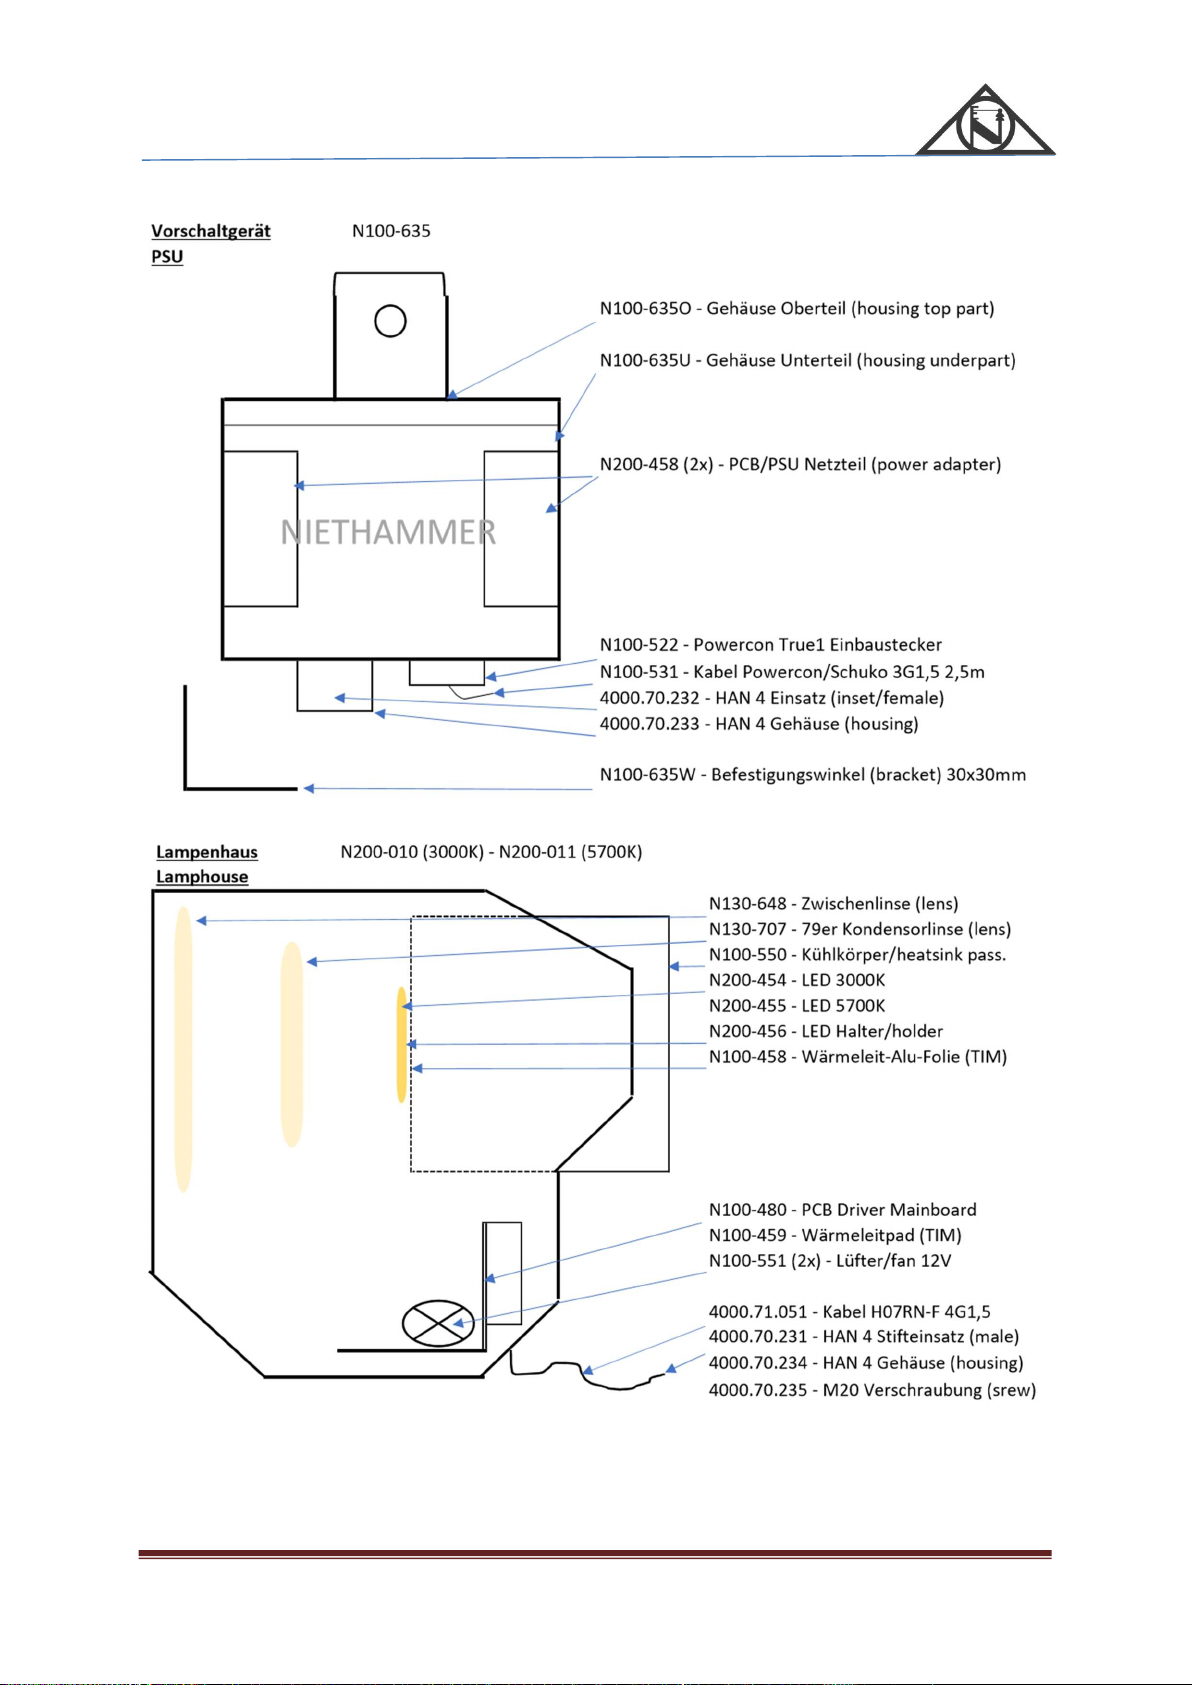
Important spareparts
Find more information about spareparts on our webpage: www.emil-niethammer.de
Spareparts for LPZ 211 D Standardversion
N200-454 LED 3.000K
N200-456 LED 5.700K
N100-551 Fan 12V
N130-707 Asphercal Condensorlens
N130-648 Intermediate lens114mm diameter
N215-600 Iris diaphragm 80mm diameter
N215-440 Beam shaper unit 175mm diameter
N130-642 Zoom input lens 114mm diameter
N130-647 Zoom output lens 203mm diameter
N43-216 Rotary locking knob compl.
N215-900 Colour filter cassette
N70-459 Zoom focus knob
N215-520-ET-L Complete mounting for asphercal condensorlens
N130-744 Neigungsfeststellgriff M10
N215-100L Cover lamp house complete
N70-194 Handle lamphouse
N70-326 Knurled knob lamphouse M6
Nxx-xxx Knurled knob lamphouse side Mx
Spareparts for LPZ 215 D Standardversion
N200-454 LED 3.000K
N200-456 LED 5.700K
N100-551 Fan 12V
N130-707 Asphercal Condensorlens
N130-648 Intermediate lens114mm diameter
N215-600 Iris diaphragm 80mm diameter
N215-440 Beam shaper unit 175mm diameter
N130-641 Zoom input lens 114mm diameter
N130-641 Zoom intermediate lens 114mm diameter
N130-648 Zoom output lens 203mm diameter
N43-216 Rotary locking knob compl.
N215-900 Colour filter cassette
N70-459 Zoom focus knob
N215-520-ET-L Complete mounting for asphercal condensorlens
N130-744 Neigungsfeststellgriff M10
N215-100L Cover lamp house complete
N70-194 Handle lamphouse
N70-326 Knurled knob lamphouse M6
Nxx-xxx Knurled knob lamphouse side Mx
NIETHAMMER
LPZ 211 D and LPZ 215 D
Niethammer LPZ 211 D and HPZ 215 D Seite 11

NIETHAMMER
LPZ 211 D and LPZ 215 D
Niethammer LPZ 211 D and HPZ 215 D Seite 12
Electrical datas:
PSU: Spotlight:
Input: 80-264V AC, 47-63Hz Input: 96V / 48V DC
Powerconsumption: max. 550W Powerconsumption: max. 550W
Photobiological datas:
ENILED with 3.000K LED: Risk group 1
ENILED with 5.700K LED: Risk group 2
Niethammer Lichttechnik GmbH ▪ Hintergasse 30 ▪ 61239 Ober-Mörlen
Tel.: 06002/93 933-0 ▪ Fax: 06002/93 933-33 ▪ info@emil-niethammer.de
www.emil-niethammer.de
This manual suits for next models
1
Table of contents
Other Niethammer Spotlight manuals


