Nikki.Amsterdam The.Diffuser User manual

The.Diffuser User Manual
1
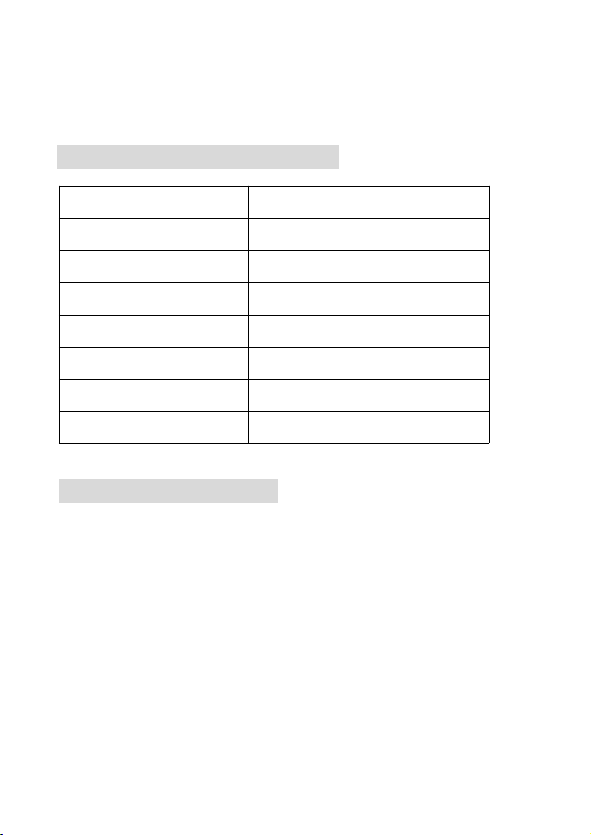
GENERAL SPECIFICATIONS
GENERAL FEATURES
Ultrasonic vapor diffuser maintains original efficacy of essential oils, instead
of destroying their original molecular structure by heating or burning them.
2.4MHz Advanced Ultrasonic Technology.
Timer : steady on, 1hour,3hours.
LED models:7colors slow color changing,fixed single color select.
Support smart phone application control.
The smart phone operating system:Android and IOS.
Compatible with Amazon Alexa, Google play.
Input voltage
AC100-240V 50/60HZ
Power consumption
Max 12(W)
Max.Noise
36(dB)
Dimensions
(ψ)154x(H)188(mm)
Water tank capacity
300(ml)
Material
PP\leather
Accessories
Power Supply,measure cup,User Manual
Ultrasonic frequency
2.4MHz
2
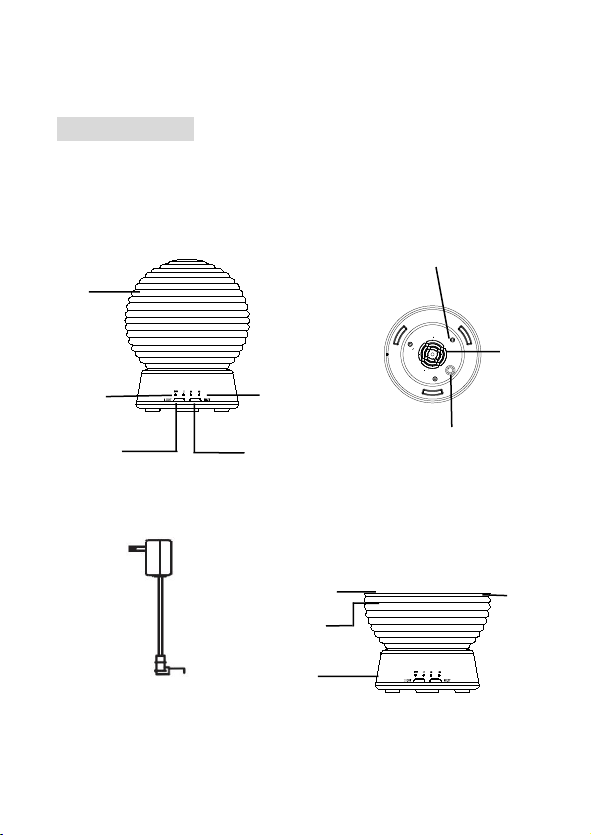
PART NAMES
LIGHT/WIFI button
Upper
MIST button
AC Adapter
Water Tank
Base
Timing Indicator
WIFI
Indicator
WIFI Indicator
Drainage Side
Air Outlet
DC Power Input
Air Inlet
Water Outlet
3
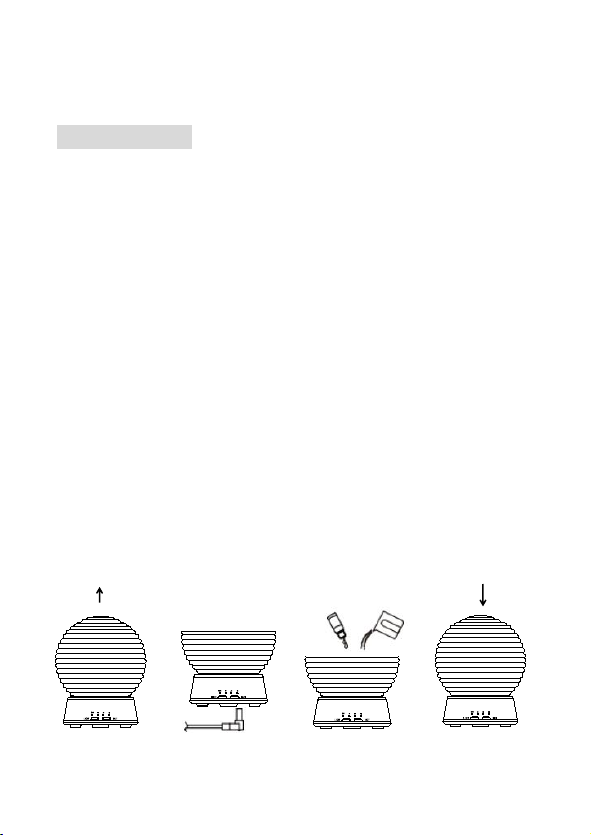
HOW TO USE
1.Put this product on a horizontal position, remove the upper vertical
direction.Fig.1.
2.Connect the AC adaptor to the DC jack on the bottom of base.
3. ①Add water to the tank. Pay attention to water level and do not exceed
maximum level on water tank(Do not use water hotter than 45 ° C, to prevent
damaging the atomizer; Do not use dirty water to prevent clogging and damaging
the atomizer).
②Drop essential oil into water tank vertically. Quantity should be about 2-3 drops
(about 0.1 – 0.15 ml. Use only water-soluble essential oils to guarantee good
aroma-diffusion effect.) Fig. 3.
4.Replace the upper to the original position. Fig. 4.
Note:
You must close the upper when you want to use the product.
Fig.1 Fig.2 Fig.3 Fig.4
4
5.Press “MIST” button to choose your desired mode.Short press the “MIST” button
to choose the timer from 1H/3H or ON. Keep pressing the “MIST” button over 5
seconds to choose the spray output between strong or small.Fig. 5.
Tips: The machine would be automatically detect water shortage and power-off protection.
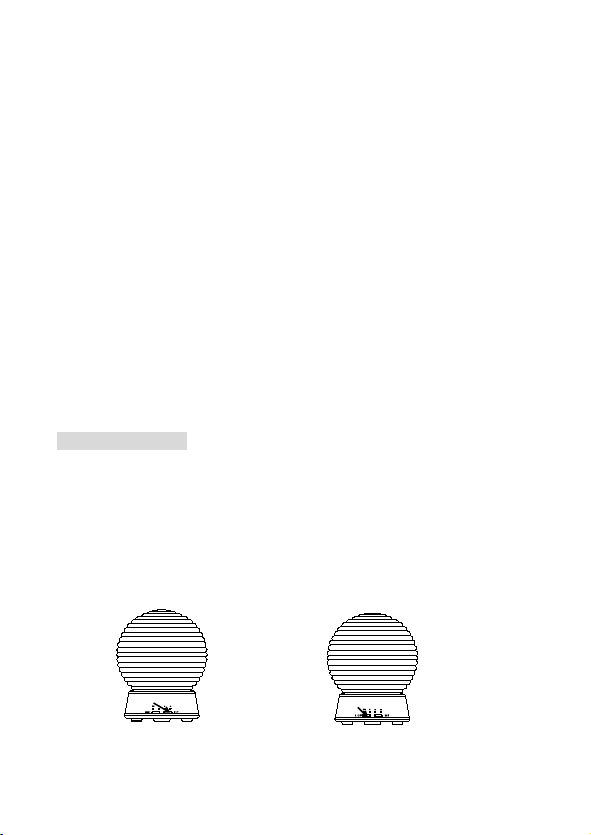
6."LIGHT" button ( WIFI paring button ).
①Press the "LIGHT" button to turn on the LED light, the color will change
automatically.Press the "LIGHT" button again to fix the color.Fig. 6.
②WIFI paring function: Press and hold down “LIGHT” button,WIFI connection
mode is on. If the WIFI indicator is always on, WIFI is in normal mode. If the WIFI
indicator flashes, WIFI is into the pairing mode.
IMPORTANT TIPS:
Mist quantity gradually increases as water level decreases. However, when water reaches 1/3
water level, mist quantity begins reducing. This is normal, and is not a device malfunction.When
water is completely depleted, the device turns off automatically and the indicator light goes out.
Fig.5 Fig.6
5
How to use the smart phone APP to control the
device
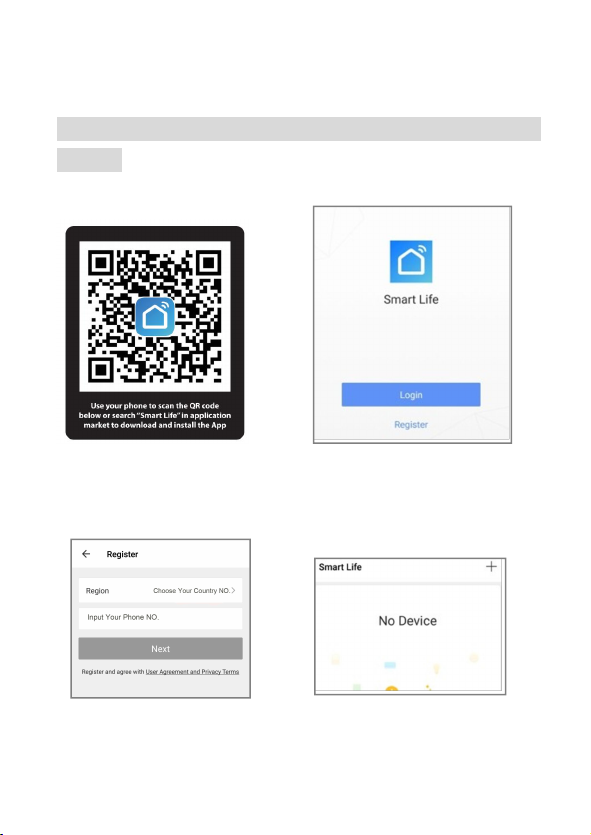
1. Download the APP
Step 1: Scan QR Code And
Step 2: Register
Download Smart Life APP
Step 3: Entry Account Step 4: Add Device
6
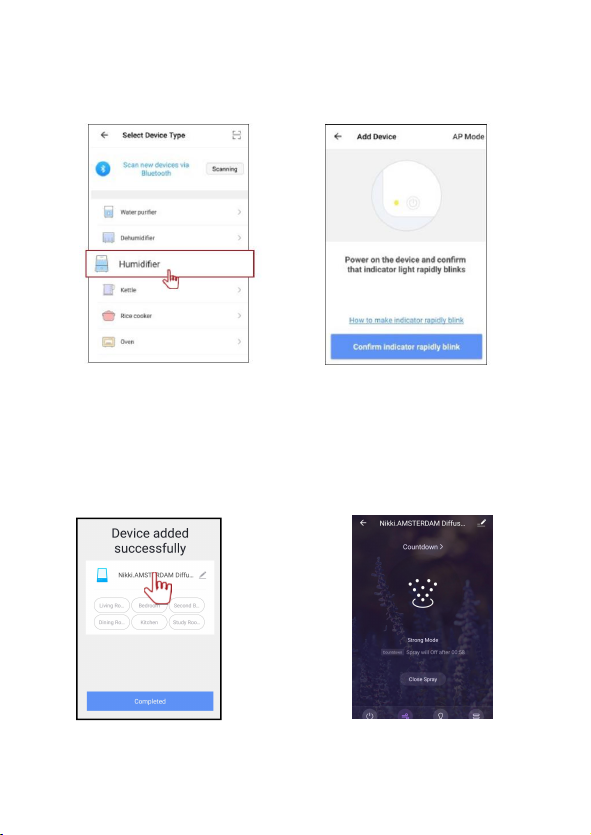
Step 5: Select Humidifier Step 6: Add Device
Attention:
1.In the registration process, the prompt “reset” button” is the “LIGHT ” button of the device.
2.In step 6,please make sure WIFI indicator light rapidly flashing and then next step.If indicator
light is not rapidly flashing, tap"How to make indicator rapidly blink" to view operation processes.
Step 7: Modify The Name Step 8: Enter The Control Page
7
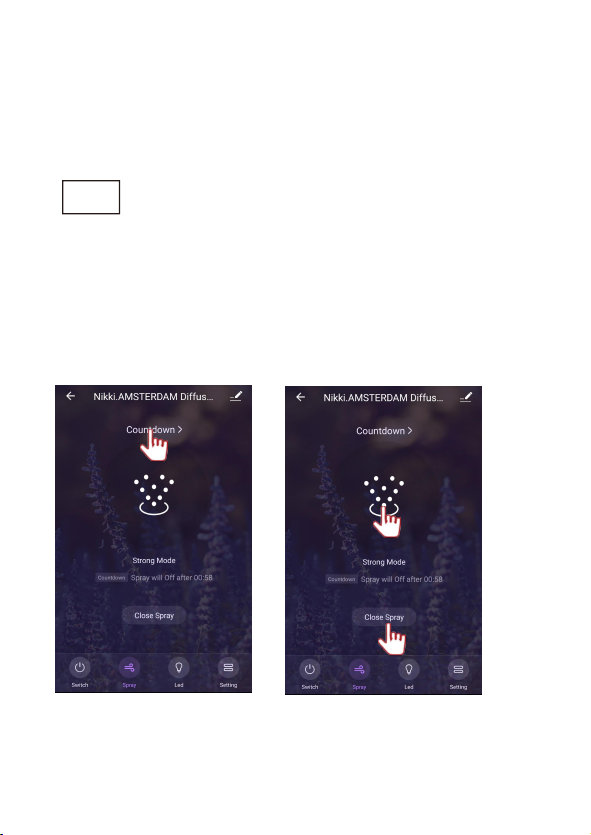
2. Entry into Smart APP Homepage
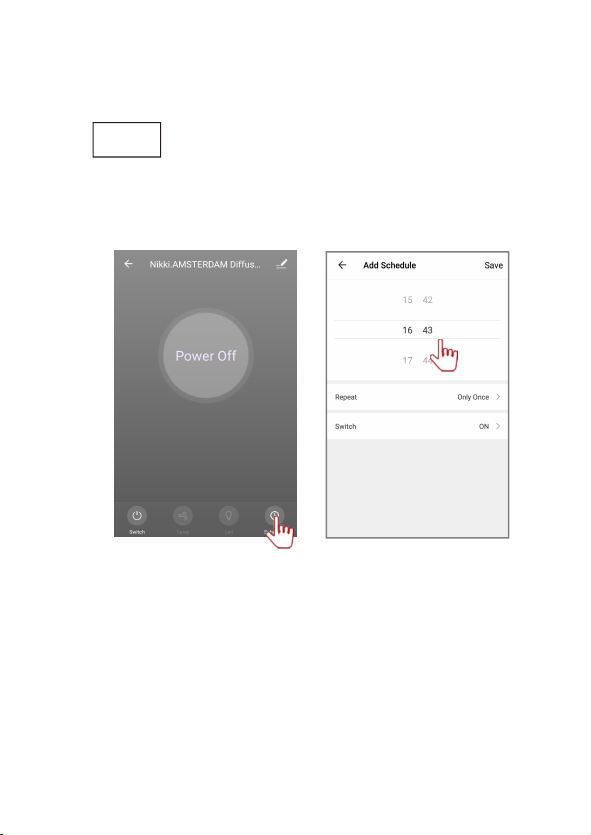
1.Settle mist working time.
2.Control spray open / close.
3.Set Spray Mode- Strong Mode / Small Mode.
Spray
8
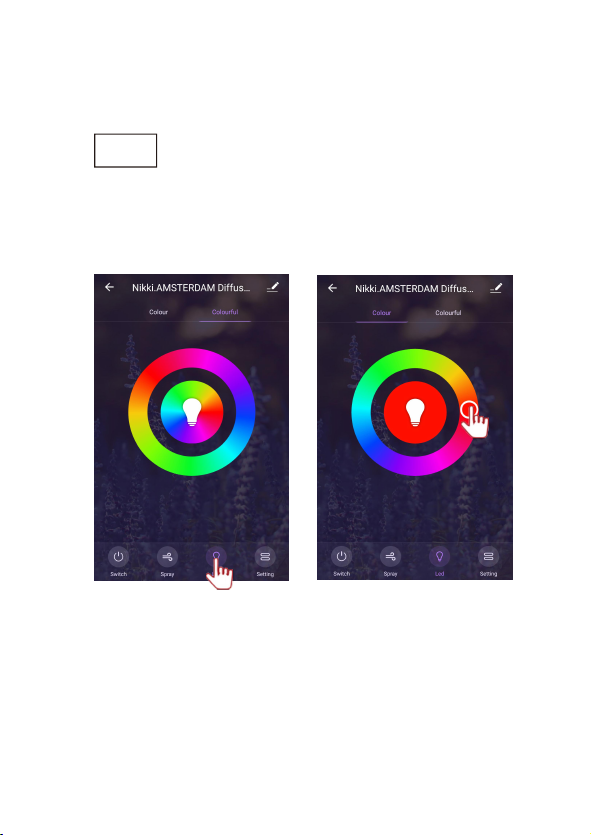
LED
1.Set LED color - color changing / select color.
2.Click the circle and select one color.
9
1.Set the mist time or light time.
2.Adjustment mist time.
Timer
10
3. Configure Amazon Echo
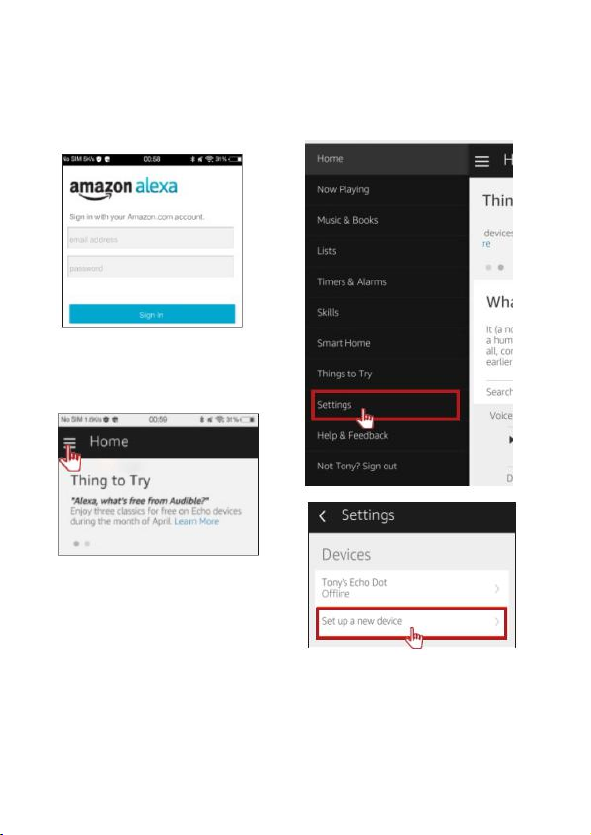
Step1: Open The Alexa APP,Entry
Amazon account and code.
Step2: Load in successfully on Homepage.
Click the settings and set up a new device to
set your Echo device.
11
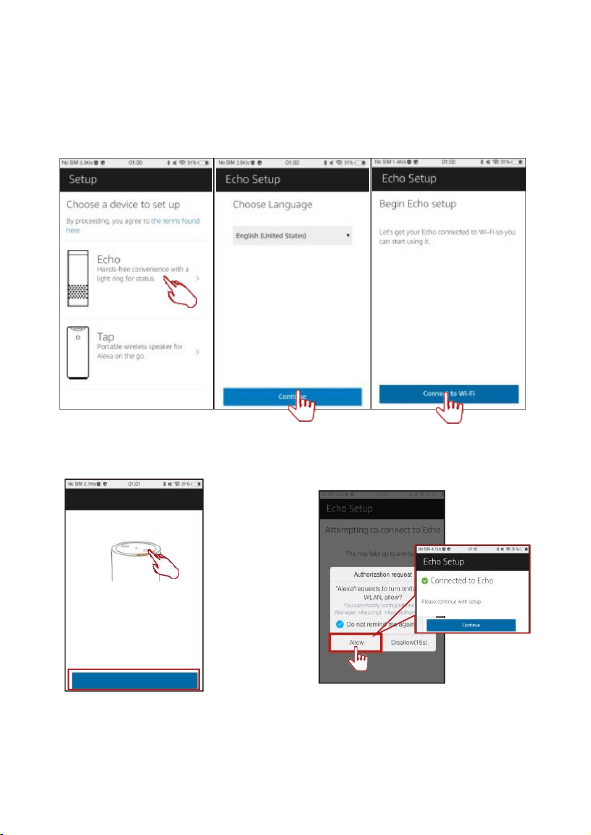
Step3: Choose Device Step4: Choose Language Step5: Connected To WIFI
Step6: Keep pressing on-off button and light
color turn to yellow.Then click Echo on-off
Step7: Select Allow, your phone will auto
connect to Echo Wlan.
Continue
Make sure your Echois plugged into a poweroutlet.
Echo Setup
12
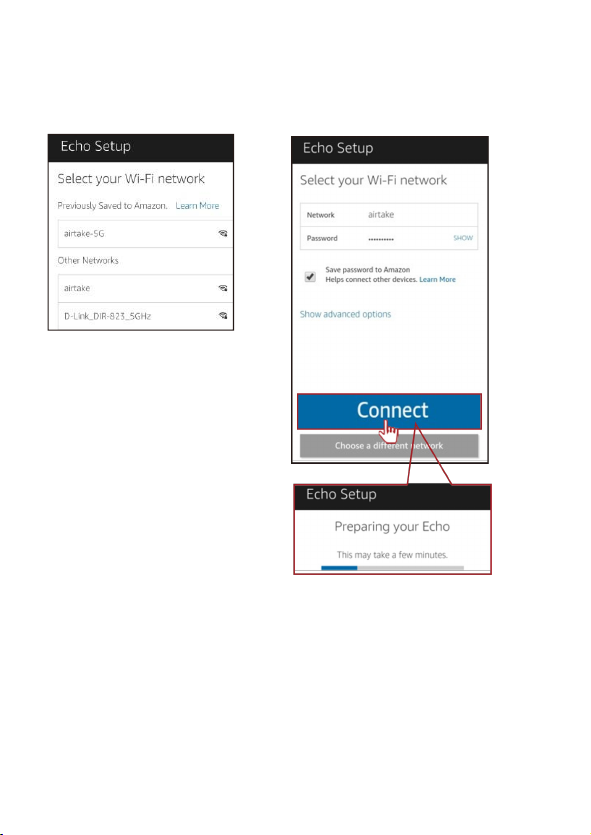
Step8: Select WIFI then connect
to Echo.
Step9: Entry WIFI code. Echo will
take a few minutes to connect to
WIFI.
13
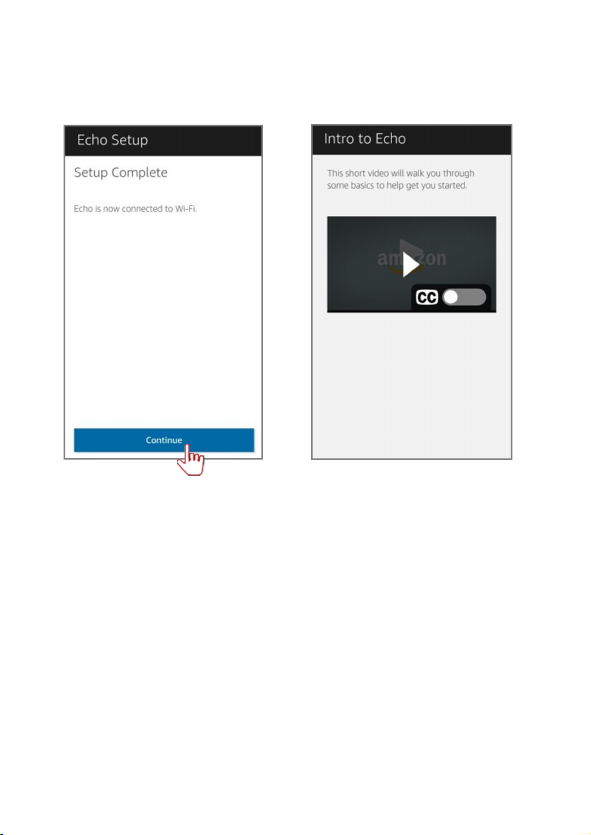
Step10: Connect to WIFI successfully,
then click continue.
Step11: After the video is finished, click
continue to Alexa Homepage.
14
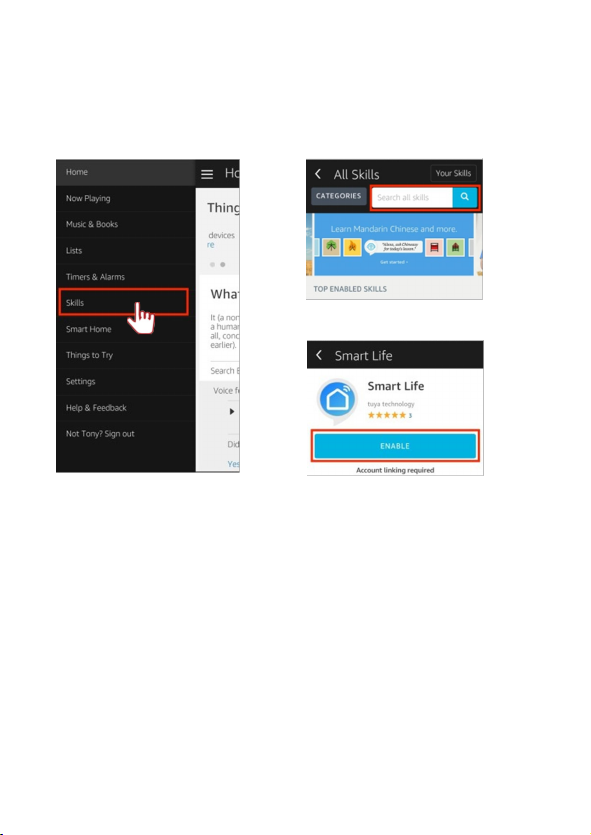
4.Binding your Echo with Smart Account
4.1 Click Skills
4.2 Search Smart Life
4.3 Click Enable To Start Skill
15
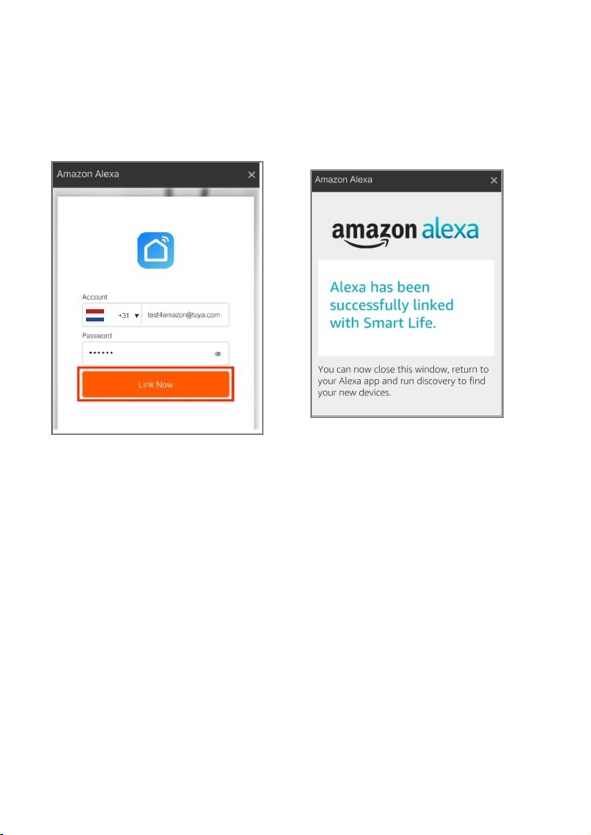
4.4
Entry App’s account and code and to
link.
4.5When App prompt “Alexa has been
successfully linked with Smart Life”,
account have been binding successfully.
Click top right corner ✘to Alexa App
16
5. Echo
-
voice control your device
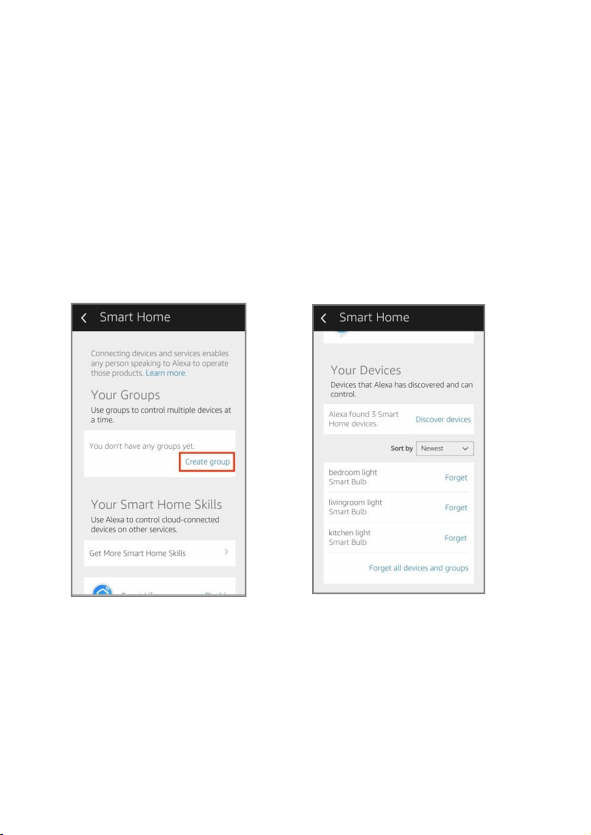
5.1 Searching Device
You can voice control your Echo"Alexa, discover device". Echo will search the
device in "Create Group". You can also check Alexa APP with Smart Home to
discover device.
5.2 Voice Control The Device
You can use Echo to control your smart device. For example:
Alexa, turn on/off diffuser.
Alexa, turn on/off light.
Alexa, set light to red/green/blue/yellow/purple.
17
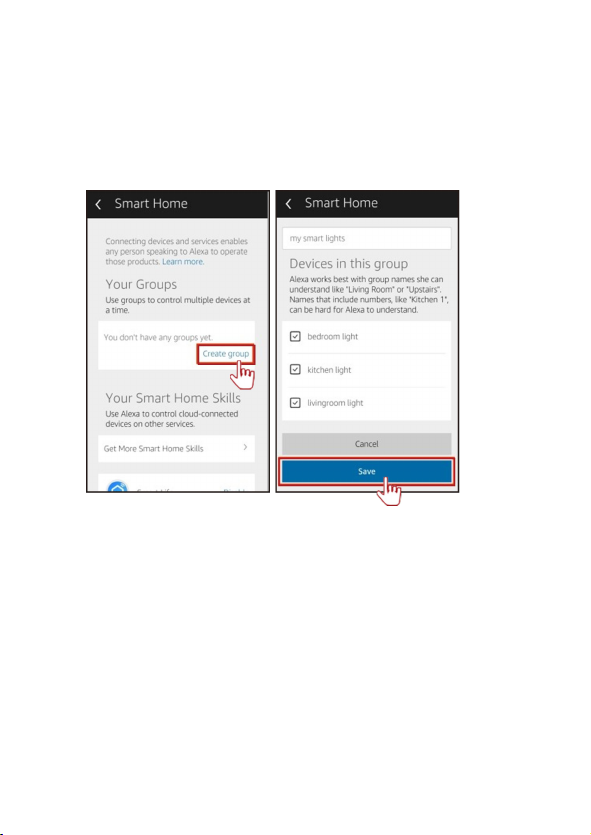
5.3 Create Group
“Create Group” means Alexa can control the all your devices they are in this group
Attention:
1.Make sure your Smart account and Alexa account are correct and have
been binding already.
2.Rename the device at Smart APP, Echo will need to reconnect the device.
3.Make sure your Echo device is connected with electricity.
4.Unobstructed WIF I for Echo device to connect.
5.Voice control all the device in “Create Group”.

18
CARE & MAINTEN ANCE
PRECAUTIONS:
Always unplug adaptor from aroma diffuser before performing any
maintenance.
1.Clean water tank before using different essential oil.Please keep to use
NKKI. AMSTERDAM the essentials oil.
2.Clean water tank and water stopper with a soft cloth if necessary.
3.Clean off any sediment (white mineral deposits and debris) from the
atomizer with a soft cloth. Do not use any metal object to scrape the
atomizer.
4.Do not rinse the device or soak the device in water.
5.Clean device surface with a soft cloth.
6.You can clean plastic case with water but avoid using any sharp object.
Table of contents


