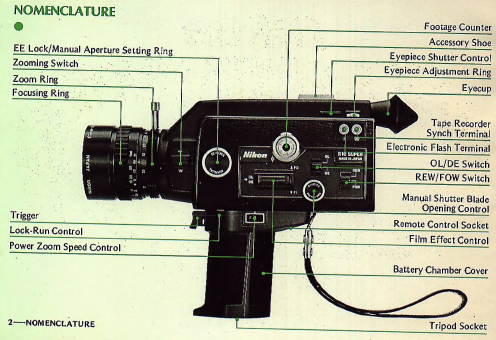
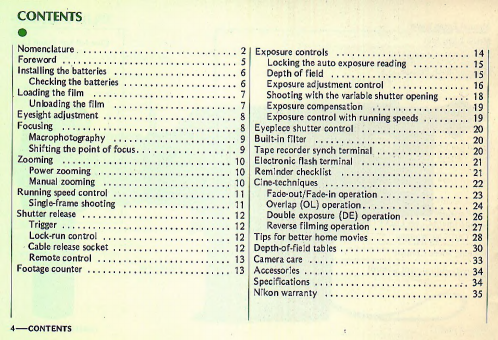
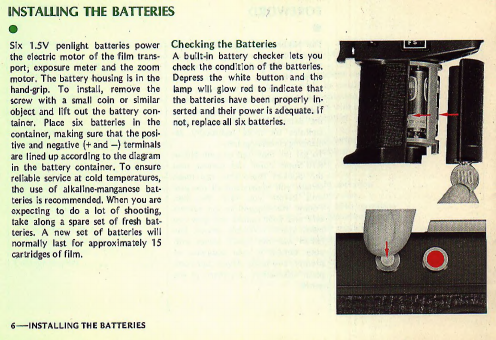
Nikon R10 Super Zoom User manual

Nikon
INSTRUCTION
MANUAL

NOMENCLATURE
EE
Lock/Manual
Aperture
Setting
Ring
Zooming
Switch
Zoom
Ring
Focusing
Ring
Trigger
_
Lock-Run
Control
Power
Zoom
Speed
Control
2-NOMENCLATURE
Eyepiece
Shutter
Control
Eyepiece
Adjustment
Ring
Tape
Recorder
Synch
Terminal
Electronic
Flash
Terminal
_
OL/DE
Switch
REW/FOW
Switch
Manual
Shutter
Blade
Opening
Control
Remote
Control
Socket
Film
Effect
Control
Battery
Chamber
Cover
Footage
Counter
Accessory
Shoe
Tripod
Socket

Manual
Zoom
Lever
Hand-Grip
Movie
Light
Slot
Battery
Check
Lamp
Film
Cartridge
Window
Running
Speed
Control
Exposure
Adjustment
Control
Battery
Check
Button
FilmCartridge
Compartmen
t
Cover
Lock
Cable
Release
Socket
Cine-Nikkor
Zoom
Lens
7mm-70mm
f/1.4
NOMENCLATURE-3

CONTENTS
Nomenclature
.
Foreword
.
Installing
the
batteries
.
Checking
the
batteries
...
Loading
the
film
.
Unloading
the
film
.
Eyesight
adjustment.
Focusing
.
Macrophotography
.
Shifting
the
point
of
focus.
Zooming
.
Power
zooming
.
Manual
zooming
.
Running
speed
control
.
Single-frame
shooting
...
Shutter
release
.
Trigger.
Lock-run
control
.
Cable
release
socket.
Remote
control
.
Footage
counter.
Exposure
controls
.
1
4
Locking
the
auto
exposure
reading
.
1
5
Depth
of
field
.
1
5
Exposure
adjustment
control
.16
Shooting
with
the
variable
shutter
opening
.18
Exposure
compensation
..19
Exposure
control
with
running
speeds.19
Eyepiece
shutter
control
..20
Built-in
filter
.20
Tape
recorder
synch
terminal
.20
Electronic
flash
terminal
.
2
1
Reminder
checklist
.
2
1
Cine-techniques
.22
Fade-out/Fade-in
operation.23
Overlap
(OL)
operation.24
Double
exposure
(DE)
operation.26
Reverse
filming
operation.27
Tips
for
better
home
movies.28
Depth-of-field
tables.30
Camera
care
.
3
3
Accessories.
3
4
Specifications.
34
Nikon
warranty
.
3
5
,
2
.
5
.
6
.
6
.
7
.
7
.
8
.
8
.
9
.
9
10
10
10
11
11
12
12
12
12
13
13
4—CONTENTS

FOREWORD
•
The
Nikon
RIO
Super
Zoom
cine
camera
combines
a
high
degree
of
handling
convenience
with
opera¬
tional
versatility.
Fully
automatic
and
electronically
controlled,
this
camera
incorporates
a
wide
range
of
features
for
basic
movie
making,
plus
the
extended
capability
of
plug-in
facilities
for
more
technically
de¬
manding
cinematography.
To
get
the
most
out
of
your
Nikon
RIO
Super
Zoom
cine
camera,
read
this
booklet
thoroughly
and
make
certain
you
understand
all
the
con¬
trols
before
you
load
the
film.
Follow
the
suggestions
on
camera
care
and
your
camera
will
give
you
many
years
of
reliable
service.
The
Nikon
warranty
which
comes
with
your
camera
is
your
assurance
of
prompt,
courteous
service
and
com¬
plete
satisfaction,
anywhere
in
the
world.

INSTALLING
THE
BATTERIES
Six
1.SV
penlight
batteries
power
the
electric
motor
of
the
film
trans¬
port,
exposure
meter
and
the
zoom
motor.
The
battery
housing
is
in
the
hand-grip.
To
install,
remove
the
screw
with
a
small
coin
or
similar
object
and
lift
out
the
battery
con¬
tainer.
Place
six
batteries
in
the
container,
making
sure
that
the
posi¬
tive
and
negative
(+
and
-)
terminals
are
lined
up
according
to
the
diagram
in
the
battery
container.
To
ensure
reliable
service
at
cold
temperatures,
the
use
of
alkaline-manganese
bat¬
teries
is
recommended.
When
you
are
expecting
to
do
a
lot
of
shooting,
take
along
a
spare
set
of
fresh
bat¬
teries.
A
new
set
of
batteries
will
normally
last
for
approximately
15
cartridges
of
film.
Checking
the
Batteries
A
built-in
battery
checker
lets
you
check
the
condition
of
the
batteries.
Depress
the
white
button
and
the
lamp
will
glow
red
to
indicate
that
the
batteries
have
been
properly
in¬
serted
and
their
power
is
adequate.
If
not,
replace
all
six
batteries.
6-INSTALLING
THE
BATTERIES

LOADING
THE
FILM
The
camera
accepts
a
Kodapak*
instant-load
cartridge
containing
50
feet
of
Super-8
movie
film.
At
a
film
speed
of
18
fps,
this
film
will
run
for
approximately
three
minutes
and
twenty
seconds.
To
load
the
camera,
turn
the
cartridge
compartment
lock
in
the
direction
of
the
arrow
and
swing
open
the
flap
from
the
top.
Place
a
cartridge
in
the
compartment
with
the
label
facing
up
and
the
cartridge
notches
toward
the
lens.
Then
push
it
forward
until
it
clicks
into
place.
The
ASA
film
speed
is
set
automatically.
The
name
of
the
film
can
be
seen
in
the
window
on
the
flap.
Caution:
To
prevent
Improper
operation
of
the
camera's
servo-EE
mechanism,
as
well
as
excessive
battery
drain,
do
not
operate
the
trigger
until
after
a
film
car-
ridge
has
been
installed.
Unloading
the
Film
When
the
red
warning
circle
appears
in
the
viewfinder
and
the
foptage
counter
reads
50,
the
end
of
the
film
cartridge
has
been
reached.
Open
the
camera
and
slip
out
the
cartridge.
The
word
"exposed"
will
appear
on
the
film
to
indicate
that
it
has
been
exposed
and
prevent
mix-ups.
If
you
load
a
partially
exposed
cartridge,
the
red
circle
in
the
viewfinder
is
the
only
indicator
to
tell
you
when
you
have
reached
the
end
of
the
film.
"'Kodapak
is
a
registered
trademark
of
the
Eastman
Kodak
Company.
Film
End
Mark
LOADING
THE
FILM-7

EYESIGHT
ADIUSTMENT
To
adjust
the
viewfinder
eyepiece
for
your
own
eyesight,
look
through
the
viewfinder
and
turn
the
eyepiece
adjustment
ring
until
the
image
circle
in
the
center
is
sharp.
The
eyepiece
should
not
require
readjustment
unless
the
camera
is
used
by
more
than
one
person.
The
rubber
eyecup
keeps
out
stray
light
and
can
be
rotated
to
allow
you
to
view
with
either
eye.
It
can
also
be
folded
back
for
those
who
wear
glasses.
FOCUSING
•
Aim
the
camera
so
that
an
edge
of
the
subject
falls
within
the
central
focusing
spot
and
turn
the
focusing
ring
until
the
two
halves
of
the
image
coincide
to
form
one
continuous
sharp
Image.
The
lens
focuses
from
infinity
(“j
down
to
5
feet
(1.5m).
For
pinpoint
focusing,
focus
with
the
lens
at
its
maximum
focal
length,
then
reduce
the
focal
length
for
the
desired
picture
composition.
8-EYESIGHT
ADJUSTMENT
/
FOCUSING

In
focus
Macrophotography
The
Cine-Nikkor
zoom
lens
incorpo¬
rates
an
override
for
macrophotogra¬
phy
without
any
accessories.
You
may
actually
focus
down
until
the
subject
comes
in
contact
with
the
front
lens
element
(a
distance
of
170mm
from
the
film
plane).
First
set
the
lens
at
infinity
(«>)
and
the
zoom
ring
to
any
focal
length
below
60mm.
Then
push
the
zoom
ring
forward.
To
focus
in
macro
mode,
turn
the
zoom
ring
instead
of
the
focusing
ring.
The
orange
numbers
uncovered
in
this
procedure
are
the
macro
distance
scale
and
serve
as
a
rough
focusing
guideline.
Do
not
use
them
for
scale
focusing.
Shifting
the
Point
of
Focus
Shifting
the
point
of
focus
rapidly
between
a
close
subject
and
a
distant
subject
can
add
interest
to
your
films.
The
procedure
for
a
shift
from
near
to
distant
is
as
follows:
1.
Secure
the
camera
to
a
tripod
or
other
firm
support
to
prevent
camera
shake.
2.
Focus
the
camera
on
the
distant
subject,
using
the
focusing
ring.
3.
Without
disturbing
the
focusing
ring
setting,
push
the
zoom
ring
all
the
way
forward
for
macro
mode.
4.
Focus
on
the
near
subject
using
the
zoom
ring,
as
explained
previously.
5.
Begin
filming
of
the
near
subject
now
in
focus.
6
.
While
continuing
to
depress
the
trigger,
pull
back
the
zoom
ring
to
its
normal
position.
The
distant
subject
will
now
be
in
focus.
7.
Continue
depressing
the
trigger
until
the
desired
amount
of
footage
has
been
exposed.
Important:
In
macrophotography
or
focal-
shift
filming,
camera
shake
is
magnified
many
times
and
results
in
blurred
Images.
For
best
results,
always
mount
the
camera
on
a
tripod
or
other
firm
support.
FOCUSING—9

ZOOMING
Power
Zooming
Look
through
the
viewfinder
and
push
the
zooming
switch
upward
(T)
for
telephoto
or
downward
(W)
for
wideangle
until
the
picture
includes
as
much
or
as
little
as
you
wish.
A
white
line
opposite
the
9
position
scale
on
the
zoom
ring
indicates
the
set
focal
length.
Zooming
stops
auto¬
matically
after
the
completion
of
the
zooming
cycle.
Power
zooming
is
available
at
two
different
speeds
for
even
and
jerk-
free
tracking
shots.
The
power
zoom
speed
control
offers
a
selection
of
fast
(F)
and
slow
(S)
settings.
Turn
the
knob
to
the
desired
speed
as
indicated
opposite
the
white
line.
The
duration
of
zooming
is
a
minimum
of
four
seconds
at
the
F
setting
and
seven
seconds
at
the
S
setting;
these
vaiues
will
vary,
however,
with
the
condition
of
the
batteries.
Important;
When
battery
power
Is
inade¬
quate,
the
zoom
motor
will
falter,
es¬
pecially
at
the
slow
speed
setting.
This
indicates
the
need
for
the
immediate
replacement
of
the
batteries.
Also
avoid
using
the
camera
with
the
lens
at
Its
greater
focal
lengths
without
a
tripod,
as
holding
the
camera
steady
for
telephoto
shooting
is
almost
impossible.
Manual
Zooming
You
can
override
the
power
zooming
mechanism
simply
by
turning
the
telescoping
manual
zoom
lever
pro¬
truding
from
the
lens
barrel.
Manual
zooming
is
recommended
to
pre¬
select
a
lens
focal
length
accurately,
obtain
jumps
in
focal
lengths
or
match
the
speed
of
zooming
to
that
of
an
approaching
subject.
10-ZOOMING

RUNNING
SPEED
CONTROL
•
The
camera
can
be
set
to
run
at
18,
24
or
54
frames
per
second
(fps)
plus
single
frame
(SF).
Depress
the
lock
release
button
and
turn
the
running
speed
control
dial
until
the
desired
speed
clicks
into
place
opposite
the
white
line.
Exposure
compensation
for
the
selected
speed
is
automatic.
Do
not
set
the
camera
for
inter¬
mediate
speeds
between
the
click-
stop
settings.
Avoid
the
excessive
use
and
dry
run
of
the
camera
at
54
fps.
Single-Frame
Shooting
With
single-frame
exposures
you
can
make
inanimate
obiects
come
alive
on
the
screen.
Just
move
the
object
you
are
filming
a
fraction
of
an
inch
after
each
exposure.
Single-frame
ex¬
posures
of
slow-moving
objects,
such
as
clouds,
will
be
speeded
up
greatly
when
projected.
For
example,
if
you
film
at
1
fps
and
project
at
18
fps,
objects
will
appear
to
move
18
times
their
actual
speed.
The
automatic
exposure
control
retains
its
function.
For
single-frame
shooting,
the
use
of
a
tripod
and
a
cable
release
is
recom¬
mended.
Remember
to
close
the
eyepiece
shutter
control
to
prevent
stray
light
from
entering
the
eye¬
piece.
Note:
Battery,
life
Is
greatly
shortened
when
shooting
In
single-frame
mode;
Instead
of
the
normal
battery
life
of
15
film
cartridges
(at
ISfps),
batteries
last
for
only
two
or
three
cartridges
In
SF.
The
18
fps
is
usually
recommended,
though
some
photographers
prefer
24
fps
since
the
higher
speed
tends
to
give
smoother,
less
bouncy
images
when
projected.
The
54
fps
can
be
used
for
occasional
slow-motion
ef¬
fects.
RUNNING
SPEED
CONTROL-^11

SHUTTER
RELEASE
•
Trigger
The
trigger
activates
the
exposure
meter
and
the
film
feed
electro-
magnetically.
Lightly
depressing
the
trigger
halfway
switches
on
the
meter.
Squeeze
the
trigger
all
the
way
when
you
are
ready
to
shoot.
The
camera
will
stop
without
a
trace
of
run-on
when
you
release
the
trigger.
Caution;
To
prevent
overexposure
of
the
initial
frames
of
each
shooting
sequence,
it
Is
essential
that
you
observe
these
di‘-
rections
for
a
two-step
triggering
action.
Use
an
Initial
light-pressured
squeeze
to
turn
on
the
meter;
after
the
meter
needle
has
stabilized,
apply
full
pressure
to
trigger
for
filming.
Lock-Run
Control
The
lock-run
control
locks
the
camera
in
the
running
position
for
continuous
filming.
Squeeze
the
trigger
and
depress
the
L
side
of
the
control.
To
stop
the
camera,
push
the
R
side.
If
you
want
to
get
in
the
movie
yourself,
mount
the
camera
on
a
tripod
or
other
firm
support
and
set
the
camera
for
continuous
run¬
ning.
The
lock-run
control
also
serves
to
prevent
accidental
triggering
between
takes.
Cable
Release
Socket
This
accepts
a
standard
cable
release.
It
is
recommended
for
use
in
making
critical
exposures
such
as
close-ups,
panning,
fading
or
single-frame
ex¬
posures
with
the
camera
mounted
on
a
tripod.
12—SHUTTER
RELEASE

FOOTAGE
COUNTER
•
Remote
Control
The
remote
control
socket
accepts
the
accessory
remote
control
unit
and
allows
you
to
start
and
stop
the
camera
from
remote
control
release.
This
enables
you
to
include
yourself
in
your
movie.
It
is
also
useful
for
filming
wildlife
studies
where
your
presence
might
disturb
the
natural
movements
of
the
subject.
The
camera's
electromagnetic
automatic
release
permits
shooting
at
any
speed,
including
single
frame.
Remember
to
close
the
eyepiece
shutter
control.
The
footage
counter
indicates
in
both
I
feet
and
meters
the
amount
of
film'
that
has
been
exposed.
Re\yinding
should
not
be
done
in
the
first
and
last
5ft/1.5m
zones.
The
counter
stops
just
past
the
film-end
mark'
(E)
and
resets
itself
to
zero
when
the
camera
is
opened
for
reloading.
If
you
remove
the
cartridge
before
the
entire
film
is
shot,
make
a
note
of
the
amount
of
film
that
has
been
exposed,
since
the
counter
cannot
be
set
for
intermedi¬
ate
readings.
SHUTTER
RELEASE
/
FOOTAGE
COUNTER-^13

EXPOSURE
CONTROLS
•
The
servo-controlled
through-the-lens
metering
system
automatically
con¬
trols
the
lens
diaphragm
according
to
the
scene
brightness,
the
ASA
speed
of
the
film
and
the
running
speed
of
the
camera.
To
switch
on
the
meter,
squeeze
the
trigger
halfway
to
the
first
click-stop.
The
needle
in
the
viewfinder
continuously
indi¬
cates
what
aperture
the
diaphragm
will
provide
during
exposure.
When
the
available
light
is
too
bright
or
dim,
the
needle
will
swing
into
the
red
zone
at
the
extreme
right
or
left
of
the
aperture
scale
to
warn
you
of
over-
or
underexposure.
Under
adverse
lighting
conditions,
switch
to
a
film
whose
ASA
rating
is
suitable
to
the
available
light
or
mount
a
neutral
density
(NO)
filter
on
the
lens
to
reduce
the
light.
An
alterna¬
tive
method
is
the
use
of
artificial
lighting
to
increase
luminosity.
For
manual
control,
lift
up
the
EE
lock/manual
aperture
setting
ring
and
turn
it
until
the
needle
in
the
viewfinder
swings
to
the
desired
aperture
setting.
Note:
The
following
two
conditions
should
be
considered
normal
meter
operation—not
art
Indication
of
meter
failure.
Condition
1:
when
the
trigger
is
released,
the
meter
needle
will
remain
stationary
at
the
last
Indicated
aperture.
Condition
2;
should
filming
be
started
In
low
illumination
conditions
below
the
EV
range
of
the
camera,
the
meter
needle
will
remain
stationary;
supplementary
light
should
be
added
to
obtain
meter
response.
14-EXPOSURE
CONTROLS

(
Locking
the
Auto
Exposure
Reading
The
EE
Jock/manual
aperture
set¬
ting
ring
also
locks
the
automatic
exposure
reading.
This
is
used
to
prevent
the
lens
diaphragm
from
making
undesirable
reactions
to
light
changes
while
shooting
bright
and
dark
subjects
alternately
or
while
tilting
or
panning
the
camera
through
a
high-contrast
background.
It
also
permits
you
to
hold
the
diaphragm
at
any
desired
aperture
for
deliberate
under-
or
overexposure.
To
lock
the
automatically
selected
aperture,
lift
up
the
ring
as
you
did
for
manual
override.
If
you
want
deliberate
under-
or
overexposure,
reset
the
meter
needle
inside
the
viewfinder
to
a
number
higher
or
lower
than
the
number
the
meter
indicated
on
the
scale
after
the
exposure
locking.
Depth
of
Field
Depth
of
field
is
a
zone
extending
i
front
of
and
behind
the
focuse-
distance.
Within
this
zone
blur
is
toi
slight
to
be
noticeable
and
everythin
will
appear
sharp
when
the
film
i
projected
on
a
screen.
It
extends
greater
distance
behind
the
subject
ij
focus
than
in
front.
Depth
of
fieic
depends
on
three
factors:
lens
aper
ture,
focal
length
and
lens-to-subjec
distance.
Remember,
the
smaller
thi
aperture
and
the
shorter
the
foca
length
of
the
lens,
dhe
greater
the
depth
of
field.
Also,
the
closer
th^
subject,
the
smaller
the
depth
ol
held.
Since
these
three
factors
oper
ate
interdependently,
one
may
cance
out
the
effect
of
the
others
for
greater
control
over
final
results
EXPOSURE
CONTROLS—-1^

Exposure
Adjustment
Control
When
there
are
high-contrast
lighting
conditions,
you
may
often
obtain
better
results
by
readjusting
the
indicated
exposure.
The
exposure
adjustment
control
provides
exposure
compensation
for
higher
or
lower
ieveis
than
the
indicated
exposure.
For
backlighted
subjects
or
a
dark
subject
against
a
larger
light
back¬
ground,
turn
the
milled
ring
counter¬
clockwise
so
that
the
white
indicator
line
goes
toward
the
OVER
sign
to
open
up
the
lens;
for
a
light
subject
against
a
larger
dark
background,
turn
the
ring
toward
the
UNDER
sign
to
stop
down
the
lens.
The
numbers
on
the
scale
indicate
one
whole
f/stop
while
the
white
lines
between
the
numbers
Indicate
a
half¬
stop.
The
control
can
be
set
at
any
intermediate
setting
for
more
precise
adjustment.
Remember
always
to
reset
the
ring
to
normal
(0)
after
use.
16-EXPOSURE
CONTROLS

EXPOSU
RE
CONTROLS-17

Shooting
with
the
Variable
Shut¬
ter
Opening
The
actual
amount
of
exposure
de¬
pends
on
the
angle
of
the
shutter
opening
and
on
the
speed
at
which
the
shutter
blade
travels
across
the
film.
If
the
speed
of
travel
remains
constant,
different
exposure
times
are
obtained
solely
by
variations
in
the
angle
of
the
opening.
This
camera
has
a
variable
shutter
which
can
cover
a
range
of
movement
from
fully
open
(160°)
to
totally
closed
(0°).
When
the
shutter
is
opened
at
80°,
the
effective
exposure
time
per
frame
is
thus
only
half
of
what
it
is
with
the
160°
opening.
The
closing
rate
of
the
shutter
opening
can
be
checked
in
the
viewfinder
through
the
movement
of
the
red
indicator.
The
table
below
shows
the
exposure
times
at
each
of
three
different
angles
of
the
shutter
opening
at
three
running
speeds.
Since
the
shutter
opening
can
be
varied
from
fully
open
to
fully
closed,
the
variable
shutter
provides
another
means
of
exposure
control.
It
also
permits
fading
during
filming.
Its
practical
use
is
for
cutting
the
exposure
time.
Reduced
exposure
time
gives
the
same
effect
as
in¬
creased
shutter
speeds
and
thus,
small
shutter
openings
are
used
to
arrest
fast
movement.
To
close
the
shutter
opening,
depress
the
shutter
blade
opening
control
and
turn
it-
counterclockwise
until
the
edge
of
the
red
indicator
visible
in
the
view-
©
Shutter
blade
opening
angle
(Full-opening)
160®
'
(1/2)
80°
(1/4)
40°
Running
speed
(fps)
18
1/40.Ssec.
1/81
sec.
1/162
sec.
24
1/54
sec.
1/108
sec.
1/216
sec.
54
1/121
sec.
1/243
sec.
1/486
sec.
18-EXPOSURE
CONTROLS

finder,
is
opposite
the
appropriate
mark
in
the
window.
The
first
mark
represents
the
80°
opening
setting;
the
second
the
40°
setting.
When
the
edge
of
the
red
indicator
reaches
the
bottom
end
of
the
window,
the
shut¬
ter
is
completely
closed.
The
manual
use
of
the
shutter
blade
opening
control
shpuld
be
avoided
except
for
the
80°
or
40°
setting.
Ekposure
Compensation
When
the
angle
of
the
shutter
open¬
ing
is
altered,
the
lens
aperture
must
be
adjusted
to
compensate
for
the
change.
The
table
below
gives
the
exposure
compensation
for
each
opening.
To
compensate,
turn
the
adjustment
control
until
the
white
line
is
opposite
the
appropriate
num¬
ber.
'
Shutter
blade
opening
angle
160°
,
1
80°
40°
Compensation
2J
+1
+2
Exposure
Control
with
Running
Speeds
The
different
running
speeds
of
the
camera
provide
further
hieans
of
exposure
control
since
the
exposure
time
is
inversely
proportional
to
the
camera
speed:
the
exposure
per
frame
at
18
fps
is
three
times
as
long
as
at
54
fps.
Since
films
are
usually
shot
at
18
fps,
do
not
use
this
method
of
exposure
control
except
for
special
effects.
EXPOSURE
CONTROLS-19

EYEPIECE
SHUTTER
CONTROL
•
For
remote
control
or
special
effects
the
eyepiece
can
be
closed
to
prevent
extraneous
light
from
entering
the
eyepiece.
To
close,
push
the
black
slide
at
the
top
of
the
camera
towards
the
lens.
BUILT-IN
FILTER
•
The
camera
has
a
built-in
type
A
filter
for
shooting
outdoors
with
Kodachrome*
Type
A
film,
which
is
intended
for
tungsten
(artificial)
lighting.
When
filming
indoors
under
artificial
light,
displace
the
filter
by
inserting
the
filter
key
plate
(in¬
cluded)
into
the
movie
light
slot
on
top
of
the
camera.
When
a
standard
Super-8
movie
light
is
mounted
on
the
camera,
the
filter
is
displaced
automatically.
*Kodacliromc
is
a
registered
trademark
of
the
Eastman
Kodak
Company.
TAPE
RECORDER
SYNCH
TERMINAL
•
The
tape-recorder
synch
terminal
accepts
the
accessory
tape
recorder
synch
cord.
Pressing
the
trigger
acti¬
vates
the
tape
recorder.
This
synchro¬
nizes
filming
and
taping
during
the
filming
process.
Other manuals for R10 Super Zoom
1
Table of contents
Other Nikon Camcorder manuals

Nikon
Nikon Coolpix S3700 User manual

Nikon
Nikon super zoom 8 User manual

Nikon
Nikon Key Mission 360 User manual

Nikon
Nikon KeyMission 80 User manual

Nikon
Nikon Image Converter User manual

Nikon
Nikon Key Mission 170 User manual

Nikon
Nikon KeyMission 80 User manual

Nikon
Nikon Key Mission 360 User manual

Nikon
Nikon Key Mission 170 User manual

Nikon
Nikon KeyMission 80 User manual
Popular Camcorder manuals by other brands

Sharp
Sharp ViewCam VL-WD255U Operation manual

RCA
RCA CC6151 - VHS-C Camcorder user guide

Panasonic
Panasonic AG456UP - CAMCORDER operating instructions

BEAULIEU
BEAULIEU R 16 Automatic B How to use

Panasonic
Panasonic AJSDC915 - DVC PRO CAMCORDER Brochure & specs

GRASS VALLEY
GRASS VALLEY DMC 1000 user guide