Nikon Nuvis 300 User manual

E
F
S
G
Instruction Manual (Pages 2–35)
Bedienungsanleitung (Seiten 36–69)
Manuel d’utilisation (Pages 70–103)
Manual de instrucciones (Páginas 104–137)

2
Foreword
Thank you for purchasing the Nikon Nuvis 300 camera.
Your new Nikon camera employs the Advanced Photo System (IX240 system).
The symbol T* appears on all Advanced Photo System (APS) format cameras.
Be sure to read this instruction manual thoroughly before use,
and keep it close at hand.
*The Advanced Photo System symbol is a trademark of all IX240 products.
Take some trial shots.
Before taking important pictures, be sure to take a few trial shots first
to familiarize yourself with the camera and all of its features.
E

E
3
Attaching the wrist strap
Check that you have the item shown below before using
your camera.
Accessories
Optional accessories
•Camera case CS-L22
Attach the wrist strap by inserting it through the slot as shown.
Wrist strap

4
E■Choice of three print types (C, H, P), which can be mixed on the same roll.
■The 3x power zoom lens covers the range of focal lengths from 28mm to 80mm.
■When the available light is low, the camera automatically fires the flash.
■
Photographing subjects as close as 0.7m (2.3 ft.) (at 28mm wideangle setting) is possible.
■
The lens cover automatically closes when the camera is turned off to protect the lens from dust and scratches.
C-type (classic)
Aspect ratio = 2 : 3 H-type (wide-vision)
Aspect ratio = 9 : 16
P-type (panorama)
Aspect ratio = 1 : 3
Your Nikon camera features:
P. 15
P. 21
PP. 14, 16
P. 14

E
5
Contents
Foreword .......................................................................................... 2
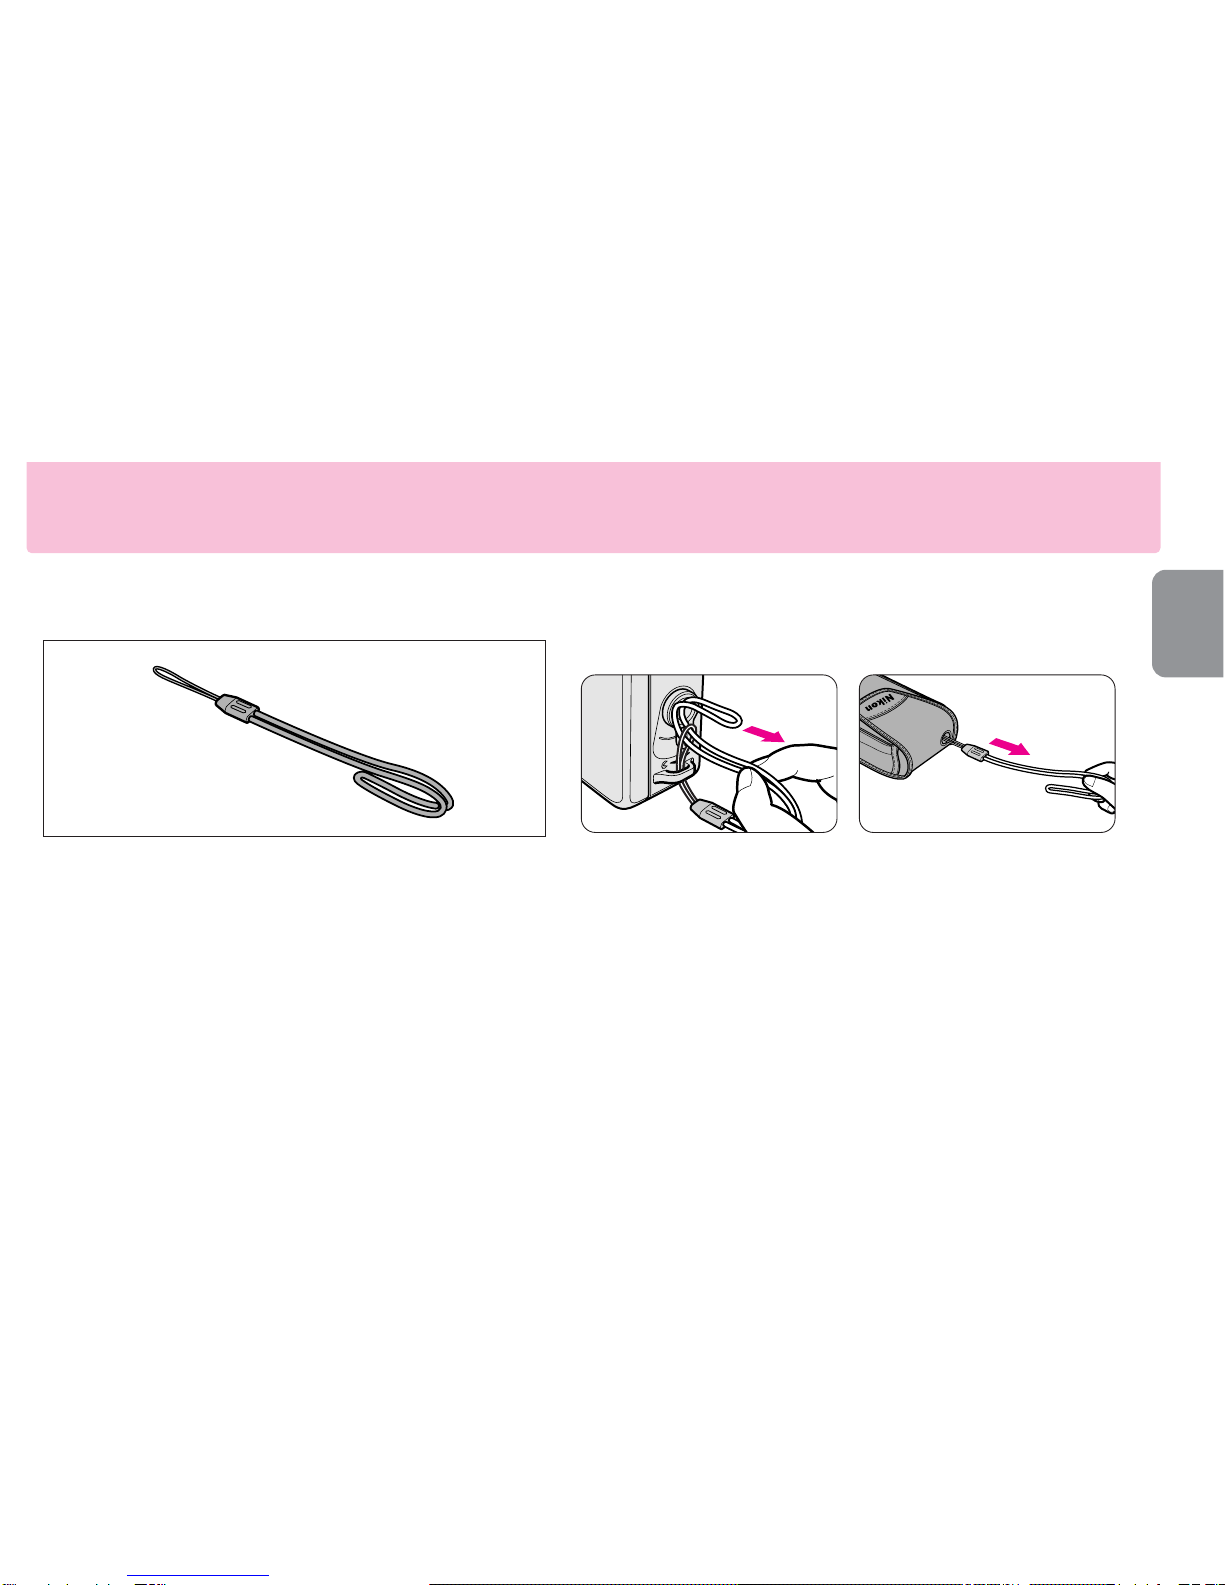
Accessories ...................................................................................... 3
Your Nikon camera features .............................................................. 4
Camera parts ................................................................................ 6-7
LCD panel indications ...................................................................... 6
Tips on using the Nuvis 300 ............................................................ 8
Getting started
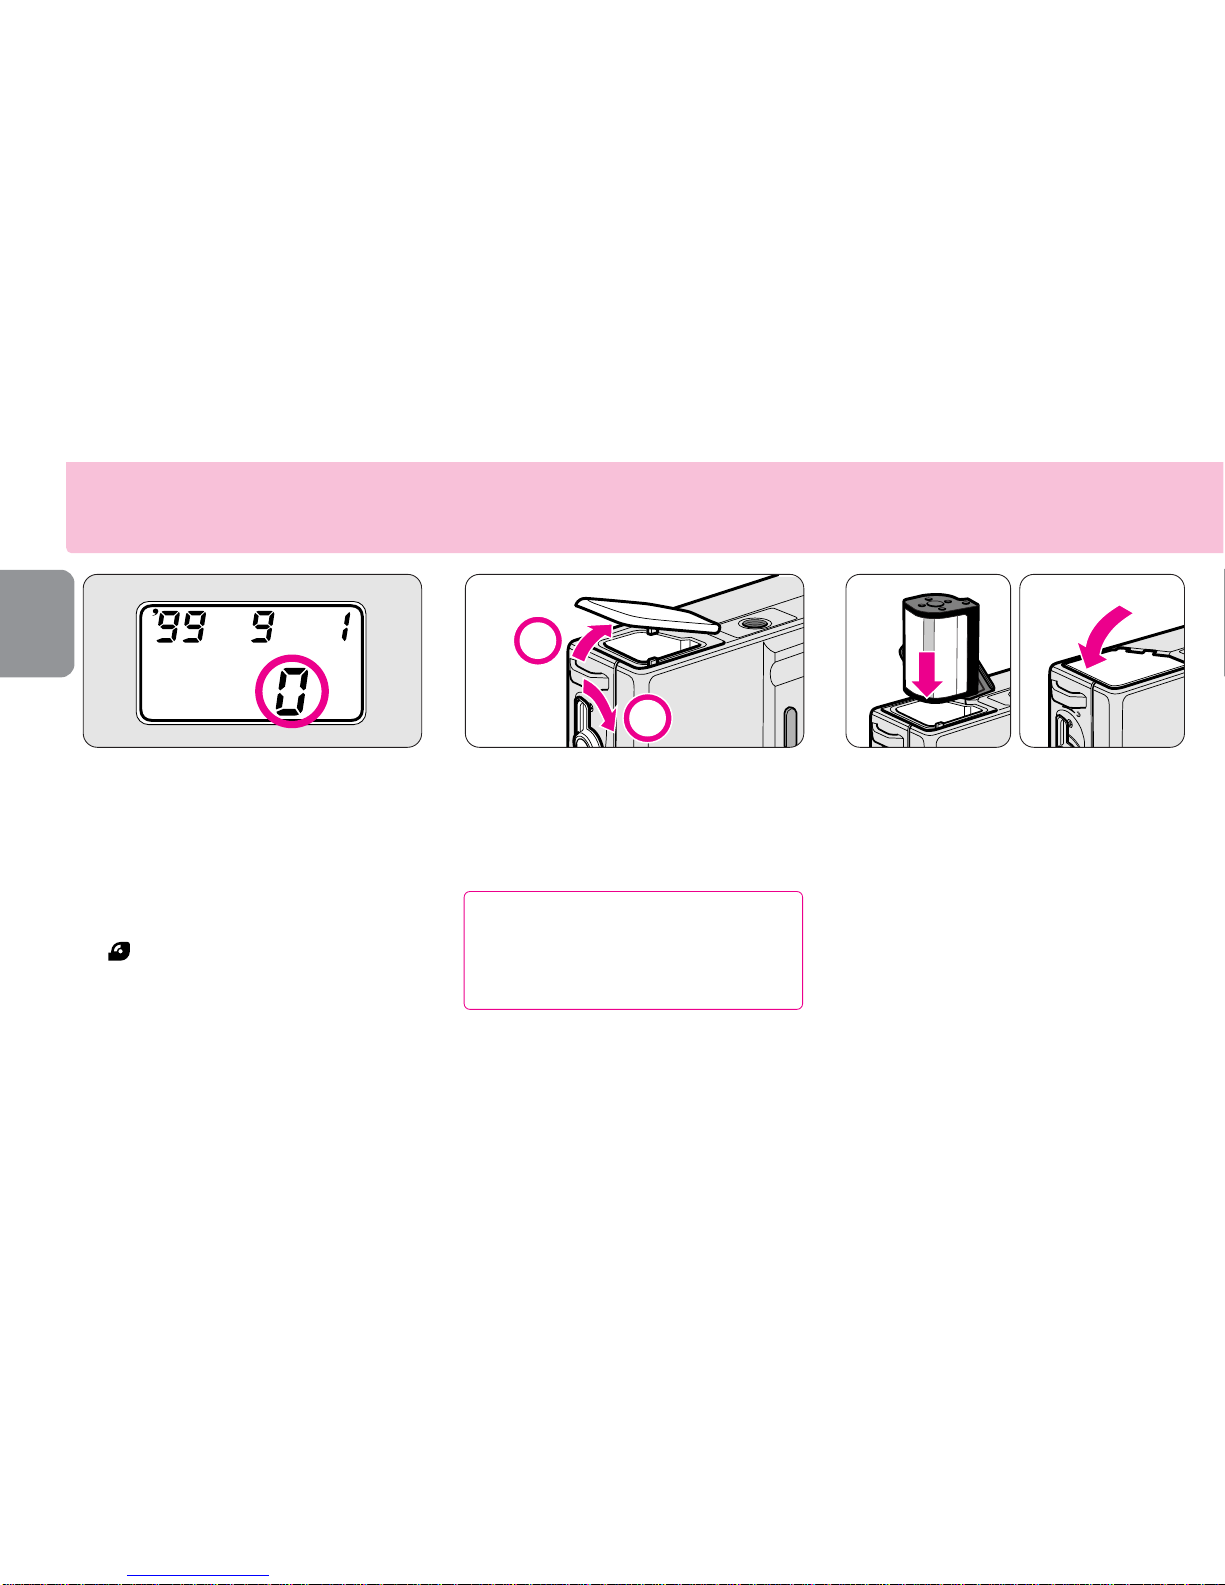
Installing the battery/Checking battery power ................................... 9
Loading the film ....................................................................... 10-11
IX240 film cartridge ....................................................................... 11
Data recording function .................................................................. 12
Basic operation
Holding the camera properly .......................................................... 13
Shutter release operation ............................................................... 13
Viewfinder indications .................................................................... 14
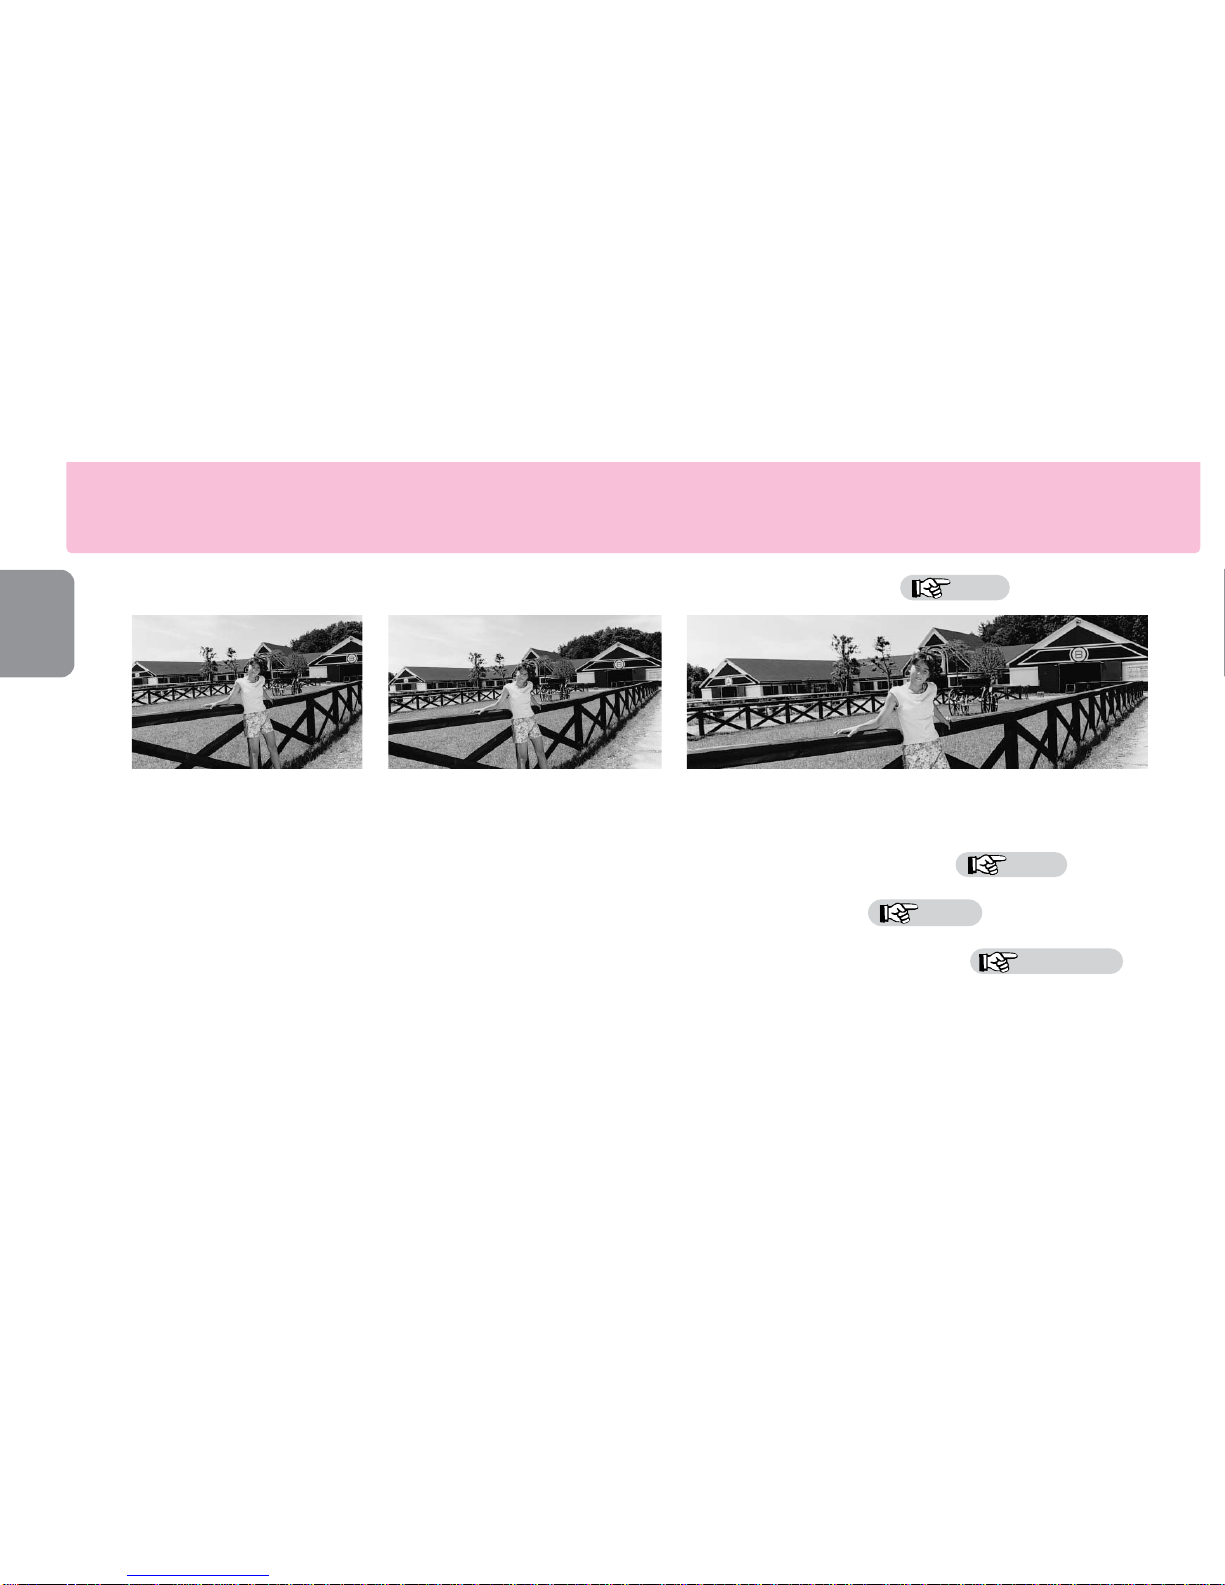
Selecting a print type ...................................................................... 14
Adjusting diopter .............................................................................15
Zooming ........................................................................................ 15
Focusing and shooting ............................................................. 16-17
Difficult-to-focus subjects .............................................................. 17
Removing the film .......................................................................... 18
Take the exposed film cartridge to a photo lab. .............................. 19
To rewind the film in mid-roll ........................................................ 19
Advanced operation
How to use focus lock .................................................................... 20
Selecting the flash mode ................................................................ 21
Auto flash photography .................................................................. 21
Anytime flash mode ....................................................................... 22
Slow sync flash mode ............................................................... 22-23
Flash cancel mode ......................................................................... 23
Red-eye reduction mode ................................................................ 24
Self-timer operation ....................................................................... 25
Infinity focus .................................................................................. 25
Title recording function ..............................................................26-27
List of user imprinted titles ............................................................ 27
Setting the date and time .......................................................... 28-29
Other information
Troubleshooting ....................................................................... 30-31
Specifications ........................................................................... 32-33
For safe handling of the camera (WARNING/CAUTION) ........... 34-35

6
E1Shutter release button (-P. 13)
2Auto exposure metering window
3Viewfinder window (-P. 14)
4Lens cover (-P. 9)
5Lens
6Autofocus windows
7
Red-eye reduction (-P. 24)/ Self-timer lamp (-P. 25)
8Battery chamber lid (-P. 9)
9Flash (-P. 21)
LCD panel indications
1Red-eye reduction indicator (-P. 24)
2Title recording indicator (-P. 26)
3Low battery power indicator (-P. 9)
4Flash mode indicator (-PP. 21-24)
5
Date and time (-P. 12)/Film speed indicator (-P. 11)
6Infinity focus indicator (-P. 25)
7Self-timer indicator (-P. 25)
8Cartridge indicator (-P. 11)
9Frame counter (-P. 11)
Camera parts
LCD panel
1
2
3
49
5
6
7
8
1
2
3
4
5
9
6
7
8

E
7
10 Viewfinder eyepiece (-P. 14)
11 Diopter adjustment dial (-P. 15)
12 Power button (-P. 9)
13 @J(red-eye reduction/flash mode) button
(-PP. 21-24)
14 (mid-roll rewind) button (-P. 19)
15
DATE MODE(date setting) button (-PP.12, 28-29)/
SEL (select) button (
-
P. 28)
16 (title) button / (title/language setting) button
(-PP. 26-27)
17 Green LED (in-focus indicator) (-P. 14)
18 CHP selector (-P. 14)
19 Zoom buttons (-P. 15)/ADJUST DATE button
(-PP. 28-29)/ button (-PP. 26-27)
20 C(self-timer) button (-P. 25)/
$(infinity focus mode) button (-P. 25)
21 LCD panel
22 Cartridge lock release lever (-P. 10)
23 Wrist strap slot (-P. 3)
24 Cartridge chamber cover (-P. 10)
25 Tripod socket (-PP. 22-25)
13
10
11
12
14
18
15
16
17
22
19
20
21
23
24
25

8
E
Tips on using the Nuvis 300
Camera care tips
•Turn the camera off when not in use. This prevents accidental
release of the shutter and resulting battery drain.
•The Nuvis 300 is not a waterproof and therefore should not be
exposed to rain or saltwater. If water gets on the camera, wipe it
off with a dry cloth immediately.
•Do not subject the camera to high temperatures such as those
encountered near a heater or stove or the interior of a car during
summer.
•Store the camera in a cool, dry, clean place. Do not expose it to
chemicals such as camphor or naphthalene. Using a desiccant
during storage is recommended.
•Firing the flash repeatedly makes the battery and camera hot.
Allow enough time for them to cool off before taking pictures
again.
•Do not drop the camera or hit it against a hard surface.
•Use a dry, soft cotton cloth or commercially available blower
brush or lens cleaner to remove dirt and smudges.
•When storing the camera for a long time, remove the battery.
Also once a month, insert a battery and fire the flash several
times to reform its capacitor.
Notes on battery
•Be sure to check battery power when taking important pictures.
Carry spare batteries when traveling abroad.
•Battery power becomes less when the temperature drops below
0°C (32°F). When taking pictures at low temperatures, keep the
battery warm. Battery power will recover when the temperature
goes back to normal.
Notes on IX240 film cartridge
•Carrying spare IX240 film cartridges is recommended when
traveling abroad where the IX240 film cartridges may not
be available.
Nikon cannot be held responsible for malfunctions caused by using the Nuvis 300 in ways not specified in this manual.

E
9
2Press the power button to
turn the camera on.
•The lens cover automatically opens and
the lens moves out to the W(wide-
angle) position. When film is loaded,
the ISO film speed and the original
number of frames appear for approx.
2 sec. on the LCD panel.
•When the camera is not used for
approx. 3 minutes, the camera turns off
automatically.
Getting started Installing the battery/Checking battery power
3Check battery power.
•Battery power
appears: Battery is nearly
exhausted. Have a fresh
set ready.
blinks: Battery is exhausted.
Replace the battery.
•If a low battery power indicator “ ”
does not appear, battery power is full.
1Install the battery.
▼Slide the battery chamber lid in
the direction of the arrow to
open.
▼Install one 3V lithium battery
CR2 inside the battery chamber.
▼Close the battery chamber lid.
•Reset the date and time, when the battery is
replaced and the current data returns to the
initial setting. (-PP. 28-29)

10
E
Loading the film
1Check that “
0
” is visible on
the LCD panel.
•If the number of frames appears on the
LCD panel, a partially exposed cartridge
is already loaded.
•If “
0
” and the cartridge indicator
“”blink on the LCD panel, a cartridge
that is fully exposed is loaded and should
be removed. (-P. 18)
2Push the cartridge lock
release lever in the direction
of the arrow to open the
cartridge chamber cover.
3Insert a film cartridge in the
cartridge chamber and
close the cover.
•Use only IX240 film cartridge. (Regular
35mm film cannot be used.)
•Check that the VEI (Visual Exposure
Indication) shows “:”(unexposed)
before loading. (-P. 11)
•Close the cartridge chamber cover until
it clicks shut.
The cartridge chamber cover locks
automatically after loading. Do not
try to open the cover until film
rewinding is completed.
2
1

E
11
=
;
:
<
*Visual Exposure Indication (VEI)
Unexposed film*
Partially exposed film*
Irreversible Processed Indicator
Fully exposed but unprocessed film*
Processed film inside the cartridge*
Lightlock door
Lightlock door drive
Data disk
Cartridge spool
•Available film cartridges: 40-exposure,
25-exposure, and 15-exposure films.
•IX240 film cartridges do not have a film
leader. The film is automatically pulled
out and set inside the camera.
•The VEI (Visual Exposure Indication)
shows the four states of the film.
Notes on handling IX240 film
cartridges
•Do not touch, disassemble or apply
strong physical shock to the Data disk,
Lightlock door or Cartridge spool.
•Do not break the Irreversible Processed
Indicator. If broken, consult your
nearest photo lab.
•Do not subject the film to direct
sunlight, high temperatures near a
heater or stove, dust and humidity, or a
strong magnetic field.
IX240 film cartridge
4Check that the available
number of frames, film
speed, and “ ” appear on
the LCD panel.
•When film is loaded, the film speed that is
set appears for approx. 2 seconds on the
LCD panel in place of the date display.
•If the number of frames does not appear,
reload the film.
•“
´
” and “ ” blink if a fully exposed film
cartridge (the VEI shows “<”), a partially
exposed film cartridge (“
;
”), or a
processed film cartridge (“
=
”) is inserted.

12
E
•Press the DATE MODE button to select one of five displays. Each time the button is
pressed, the display changes in the order indicated:
•Ask your photo lab that displays an “Authorized Photo Lab Mark” sign for the location
of the recorded data.
S
et your preferred display
mode.
▼Press the DATE MODE
button.
•The “Year” section is displayed and
printed in two digits and the “time” is in
24-hour cycle.
•“
------
” appears when “No recording”
mode is selected.
Data recording function
No recording
Day/Hour/Minute Day/Month/Year
Year/Month/Day Month/Day/Year

E
13
•When holding the camera horizontally,
keep your elbows against the body with
both hands on the camera as shown.
•To avoid camera shake, hold the
camera steady.
•When holding the camera vertically,
make sure that the flash is on top as
shown.
•Lightly press the shutter release button
to achieve focus and exposure and the
green LED will light up. While the
shutter release button is depressed
lightly, the focus is locked. (-P. 20)
Press the button all the way until you
hear a click to release the shutter.
Basic operation
Holding the camera
properly
Shutter release
operation
Do not block the lens, flash, or autofocus
windows with your fingers or hair.

14
EAvailable picture area
Areas cut off in the final print differ
depending on the print type (C/H/P).
1Parallax compensation marks
When the shooting distance is approx. 1.2 m (3.9 ft.)
(at 28mm wideangle setting) or approx. 1.5m (4.9 ft.)
(at 80mm telephoto setting), compose the scene
within the parallax compensation marks.
2Autofocus frame mark
Center this mark on the subject.
3Green LED
If the LED lights up: Focusing is complete.
If the LED blinks slowly: Slow shutter speeds are in
use, because the subject is dark. In this case, attach
the camera to a tripod to avoid camera shake.
If the LED blinks quickly: The shutter is locked,
because the camera is too close to the subject. Avoid
shooting subjects closer than approx. 0.7m (2.3 ft.)
(at 28mm) or 0.75m (2.5 ft.) (at 80mm).
Use the CHP selector to select your
desired print type before shooting.
•You can select any one of three print types
(C, H or P) by switching the CHP selector
at any time while film is loaded. (-P. 4)
Available picture area differs depending on
the print type selected.
•You can also change the type of print when
ordering extra prints at the photo lab.
CAUTION!
To prevent possible injury to your eye,
hold the camera away from your face
when you operate the CHP selector.
C-type
(classic)
Aspect ratio = 2 : 3
H-type
(wide-vision)
Aspect ratio= 9 :16
P-type
(panorama)
Aspect ratio = 1 : 3
Viewfinder indications Selecting a print type

E
15
Look through the viewfinder
and compose the picture by
pressing the zoom buttons.
▼When the desired image size
has been achieved, remove
your finger from the zoom
button.
•When the camera is not used for
approx. 3 min., the lens automatically
retracts into the body and the power
turns off.
Press the zoom button to extend the
lens to 80mm for taking telephoto
pictures.
Press the zoom button to retract the
lens to 28mm for taking wideangle
pictures.
Adjusting diopter Zooming
•Rotate the diopter adjustment dial until
the autofocus frame mark appears sharp
in the viewfinder.
CAUTION!
As you look into the viewfinder and
operate the diopter adjustment dial, make
sure not to injure your eye with your
finger or fingernail during adjustment.

16
E
Focusing and shooting
1Compose the picture.
•Center the autofocus frame mark on
the subject.
•To ensure sharp pictures, make sure
your subject is at least approx. 0.7m
(2.3 ft.) at (28mm wideangle setting)
or 0.75m (2.5 ft.) at (80mm
telephoto setting) away from the camera.
2Focus on the subject.
▼Lightly press the shutter release
button.
•The green LED lights up when focusing
is complete.
•When the shooting distance is approx.
0.7 to 1.2m (2.3 to 3.9 ft.) at 28mm or
approx. 0.75 to 1.5m (2.5 to 4.9 ft.) at
80mm, compose the scene below the
parallax compensation marks.
(-P. 14)
3Gently depress the shutter
release button all the way to
take a picture.
•If there is not enough light, the flash
fires automatically. (-P. 21)
•After shooting, the number of available
frames is reduced on the LCD panel
one-by-one.
•Pressing the shutter release button with
a jerky motion may cause camera shake.
Turn the camera off to save battery power.

E
17
Difficult-to-focus subjects:
The following subjects may be too difficult to focus.
In these cases, use focus lock (-P. 20) by
focusing on another subject equidistant from the
camera.
• Subjects too small to fully cover the autofocus
frame mark
• Subjects behind glass
• Dark subjects with no reflection
• Glossy, light-reflecting surfaces, such as shiny
cars or water
• Subjects without solid content (i.e., candle flame,
fireworks, etc.)
• Secondary subjects are closer to the camera than
the main subject.

18
E
2Make sure the blinking
“0” is visible on the
LCD panel.
•When the film is completely rewound,
“0” blinks and the camera turns
off. The cartridge chamber cover lock
mechanism is released.
•If film rewind stops midway through the
roll due to a dead battery, it resumes
automatically as soon as the battery is
replaced.
3Open the cartridge chamber
cover and remove the film.
•You cannot turn the camera on unless
the rewound film cartridge is removed.
•When opening the cartridge chamber
cover, make sure that the camera bottom
faces up, or the cartridge may fall out.
Do not open the cartridge chamber
cover until “0” starts blinking.
Removing the film
1The film starts rewinding
automatically.
•At the end of the film roll, the film
rewinds automatically.
•While the film is rewinding, the frame
counter counts down one by one.
•If you want to remove the film while the
number of available frames still appears
on the LCD panel, rewind the film
midway through the roll. (-P. 19)

E
19
To rewind the film in mid-roll
Take the exposed film
cartridge to a photo lab.
1Press the button using
the point of a ball-point pen
or the like.
•Once rewinding starts, there is no need
to continue pressing the mid-roll
rewind button.
•When rewinding is complete, “0”
starts blinking. Do not try to open the
cover until “0” starts blinking.
•We recommend bringing your film
cartridge to a photo lab that displays an
“Authorized Photo Lab Mark” sign
above for processing and printing.
•Your negatives are returned inside the
cartridge for easy storage.
•Index prints (small images of each
frame exposed on the roll of film) are
supplied with the negatives.
•For more information, consult your
photo lab.
2Remove the film.
▼Open the cartridge chamber
cover.
▼Remove the film.
Once the film has been removed in
mid-roll, it cannot be used again.

20
E
1Compose the picture.
•When the main subject is outside the
autofocus frame mark “ ”, the area
behind the subject will be in focus.
2Center the autofocus frame
mark on the main subject.
▼Lightly press the shutter
release button.
•Make sure that the green LED lights up.
3Recompose the picture
and shoot.
▼While depressing the shutter
release button lightly,
recompose the picture.
▼Then depress the shutter
release button all the way.
•As long as the shutter release button is pressed
lightly, focus is locked.
•Do not change the camera-to-subject distance
while lightly pressed the shutter release button.
When your main subject is not in the center of the frame:
Advanced operation
How to use focus lock
Table of contents
Languages:
Other Nikon Digital Camera manuals

Nikon
Nikon CoolPix S80 User guide

Nikon
Nikon D2H User manual

Nikon
Nikon CoolPix S9100 User manual

Nikon
Nikon D3300 User manual

Nikon
Nikon Coolpix P50 User manual

Nikon
Nikon FE10 User manual

Nikon
Nikon Coolpix S50c User manual

Nikon
Nikon FE User manual

Nikon
Nikon CoolPix 2200 User manual

Nikon
Nikon Coolpix 4600 User manual

Nikon
Nikon Coolpix P610 User manual

Nikon
Nikon CoolPix S70 User manual

Nikon
Nikon Coolpix S6900 User manual

Nikon
Nikon D200 User manual

Nikon
Nikon D2X User manual

Nikon
Nikon Coolpix S210 User guide

Nikon
Nikon Coolpix 5000 Use and care manual

Nikon
Nikon COOLPIX P520 User manual

Nikon
Nikon TIRF User manual

Nikon
Nikon 26134 - Coolpix S60 Digital Camera User manual