Ninka Qanto User manual
Instructions for use EN
Qanto_Id_A5_0000.50.65060_23032018 - EN
Reproduction, even in excerpts, is permitted only with the
written permission of Ninka.

2
EN
Qanto_Id_A5_0000.50.65060_23032018-EN
Contents:
1. Explanation of symbols......................................................4
2. Safety notices ....................................................................5
3. General information ...........................................................7
3.1 Designation of the device ..........................................7
3.2 Intended use..............................................................7
3.3 Versions (installation on left/right) .............................7
4. Technical data....................................................................7
5. Assembly of Qanto.............................................................8
5.1 General assembly instructions ..................................8
5.2 Delivery......................................................................8
6. Operation of Qanto ............................................................9
6.1 Electrical system........................................................9
6.2 Control element .........................................................9
6.3 Safety cut-off .............................................................11
6.4 Lighting ......................................................................12
6.5 Height adjustment of the middle tray.........................13
6.6 Height adjustment of trays.........................................14
6.7 Gap adjustment of trays ............................................15
6.8 Initialisation................................................................16

3
EN
Qanto_Id_A5_0000.50.65060_23032018-EN
Contents:
1. Explanation of symbols......................................................4
2. Safety notices ....................................................................5
3. General information ...........................................................7
3.1 Designation of the device ..........................................7
3.2 Intended use..............................................................7
3.3 Versions (installation on left/right) .............................7
4. Technical data....................................................................7
5. Assembly of Qanto.............................................................8
5.1 General assembly instructions ..................................8
5.2 Delivery......................................................................8
6. Operation of Qanto ............................................................9
6.1 Electrical system........................................................9
6.2 Control element .........................................................9
6.3 Safety cut-off .............................................................11
6.4 Lighting ......................................................................12
6.5 Height adjustment of the middle tray.........................13
6.6 Height adjustment of trays.........................................14
6.7 Gap adjustment of trays ............................................15
6.8 Initialisation................................................................16
7. Maintenance and care .......................................................17
8. Warranty and guarantee ....................................................17
8.1 Guarantee..................................................................17
8.2 Spare parts ................................................................17
8.3 Repair ........................................................................18
9. Disassembly/assembly ......................................................18
9.1 Exchange of the LED lighting....................................18
10. Recycling/disposal..............................................................19
11. Troubleshooting ..................................................................20
12. EC Declaration of Conformity ............................................21

4
EN
Qanto_Id_A5_0000.50.65060_23032018-EN
1. Explanation of symbols
Attention! Important information to warn against personal injury or
property damage.
Attention! Important information to warn against the risk of electric
shock.
Attention! Important information to warn against water damage.
Note, tip or reference
Optional
Correct assembly
Incorrect assembly
Switch ON/OFF
Electric light

5
EN
Qanto_Id_A5_0000.50.65060_23032018-EN
•The Qanto kitchen cabinet has been built according to state-
of-the-art technology and recognised safety-related regula-
tions. People can still be injured if the safety notices in these
instructions for use are not observed. Carefully store these in-
structions for use for later reference. If Qanto is passed on to a
third party, these instructions for use must be handed over as
well.
•The non-observance of instructions marked with the “Atten-
tion” pictogram can lead to considerable damage.
• During the installation and use of Qanto, sucient clearance
for the movement of the lifting system must be observed so
that no risks arise for users and other people in the vicinity.
When Qanto is extended upward and to both sides, a clear-
ance of about 200 mm to other cabinets or shelving must be
observed.
•The lifting system may be operated only with the trays in
place.
•During the installation and operation of Qanto, make sure
that no water can enter the cabinet.
•Appliances that can cause high temperatures (e.g., toast-
ers), high amounts of moisture (e.g., electric kettles) or high
dynamic movement loads (e.g., food processors) must not be
operated on the trays.
•The drive must not be overloaded; for this reason, make
sure that the maximum weight load per tray does not exceed
the total load on any account.
2. Safety notices

6
EN
Qanto_Id_A5_0000.50.65060_23032018-EN
•Qanto may be used by children 8 years of age and older,
people with limited physical, sensory or mental aptitude or
lack of experience and/or knowledge only if they are super-
vised or have been instructed in the safe use of Qanto and
understand the resulting risks.
•The drive must not be used to lift people. During operation,
do not put your weight on or lean against the system.
•Children must not play with Qanto.
•Cleaning and user maintenance must not be performed by
children without supervision.
•Downward movement is possible only if the upper trays
are in place. The trays can be moved only when the button
is pressed. If the upper trays shift/cant during the downward
movement, the system stops the downward movement imme-
diately. In this situation, the system permits upward movement
only.
• Since open ames can damage the trays and lifting system
and cause res, ambéing and unsupervised deep-frying next
to the lifting system is not permitted.
•If the mains connecting line of Qanto is damaged, it must
be replaced by the manufacturer, its customer service depart-
ment or a similarly qualied person to prevent risks.
•Qanto is alternatively equipped with a socket that has its
own mains connecting line. The socket can be used only when
the lifting system is extended. When retracted, the socket is
de-energised.

7
EN
Qanto_Id_A5_0000.50.65060_23032018-EN
4. Technical data
3.1 Designation of the device
The kitchen cabinet is called Qanto.
3.2 Intended use
Qanto is an enclosed cabinet in which trays can be lifted and
lowered using a lifting system.
3.3 Versions
Qanto is suitable for “left” and/or “right” installation.
Qanto is equipped with 2 or, alternatively, 3 trays.
Qanto is available with or without a socket.
Qanto is available with or without an LED lamp.
Mains connection 230 V / 50 Hz / 16 A
Minimum load of tray at top / in middle 10 kg each
at bottom 15 kg Max. 10 kg
Max. 10 kg
Max. 15 kg
474
Lift 500
474
3. General information

8
EN
Qanto_Id_A5_0000.50.65060_23032018-EN
5. Assembly of Qanto
1x
1x
5x
4x 1x (2x)
5.1 General assembly instructions
Anyone who performs connection or assembly work on Qanto or uses Qanto
must have access to these instructions for use. Follow these instructions.
Non-observance of the above mentioned instructions can lead to accidents
resulting in severe personal injury.
If the product is visibly damaged, it must not be installed.
During the installation of Qanto, make sure there is sucient clearance for
the movement of the lifting system. When Qanto is extended upward and to
both sides, a clearance of about 200 mm to other cabinets or shelving must
be observed.
A clearance of 300 mm must be observed between Qanto and a gas stove.
The electrical system of Qanto must be accessible (e.g., a double socket
under the cabinet near the base).
Make sure the cables are undamaged.
Before connecting Qanto to the power mains, you must check whether the
voltage on the control unit is correct.
If the control unit causes unusual noises or odours during operation, interrupt
the power supply.
5.2 Delivery
9
EN
+
Qanto_Id_A5_0000.50.65060_23032018-EN
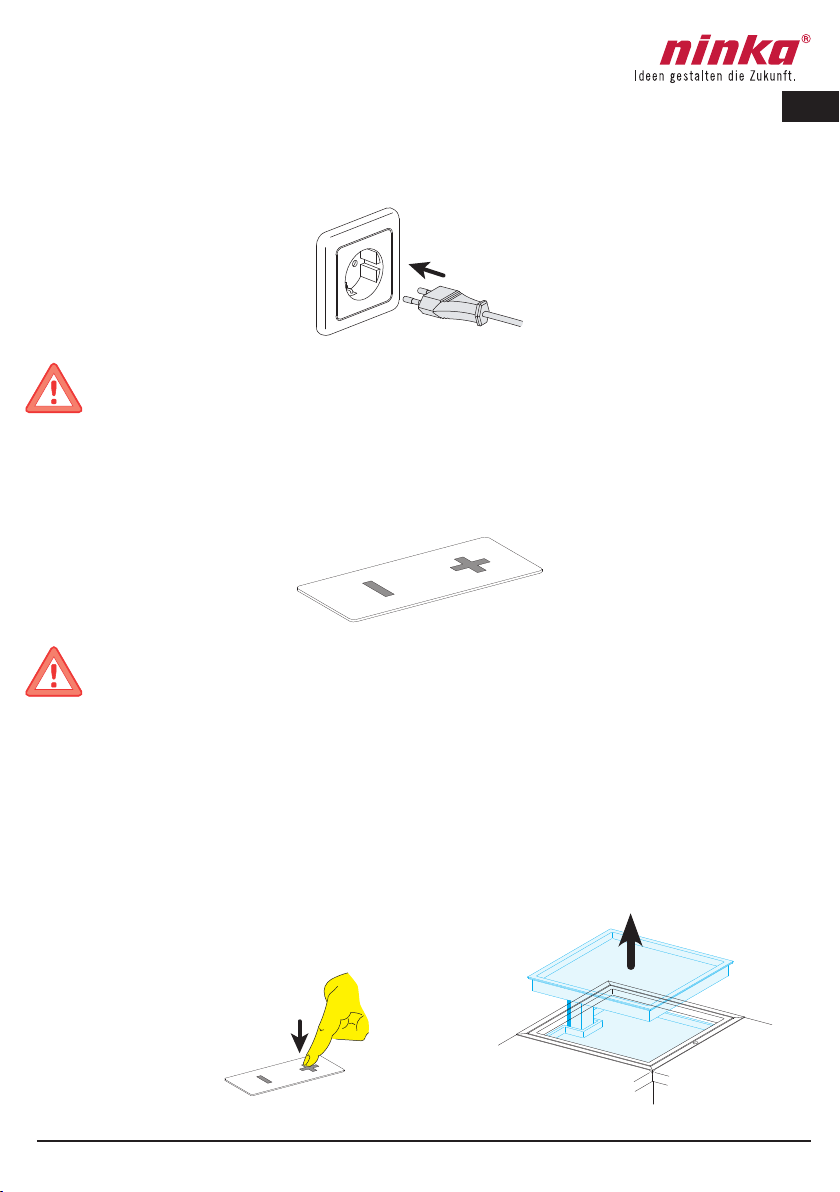
6.1 Electrical system
Before connecting the electrical drives to the in-house power mains,
compare the voltage of the power mains with the input voltage specied on
the type plate. The mains voltage and permissible input voltage must be
identical. If not, Qanto must not be connected. Please contact your spe-
cialist dealer.
PRESSING and HOLDING the button
moves the drive up.
6.2 Control element
During the installation and use of Qanto, sucient clearance for the move-
ment of the lifting system must be observed so that no risks arise for users
and other people in the vicinity.
The on-period must not exceed 6 minutes an hour or a maximum of 2
minutes in continuous operation. This can lead to an overheating of the
motor, brake and spindle nut. When the on-period is exceeded, the service
life of the lifting column can be considerably reduced.
6. Operation of Qanto

10
EN
+
-
Qanto_Id_A5_0000.50.65060_23032018-EN
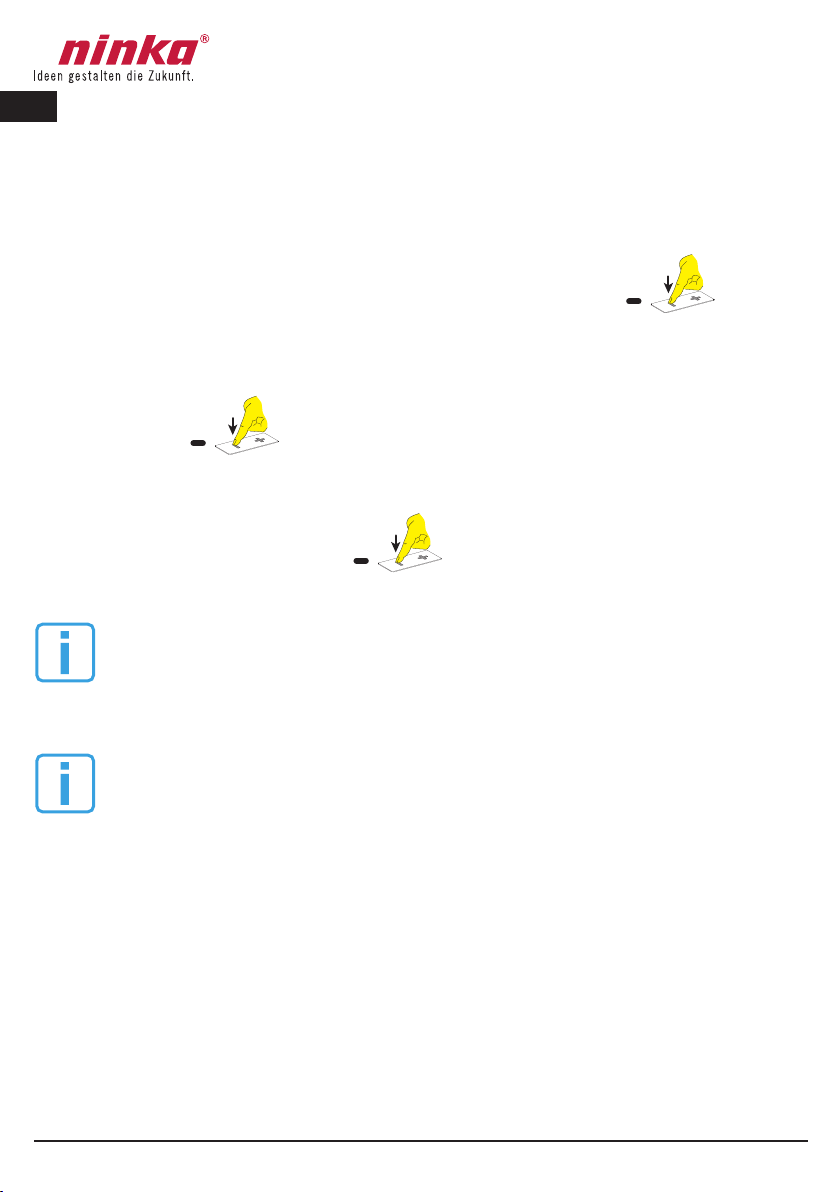
PRESSING and HOLDING the button
moves the drive up and switches to
STOP in the end position.
RELEASING the button switches the
drive to STOP. STOP
STOP
PRESSING and HOLDING the button
moves the drive down.

11
EN
-
Qanto_Id_A5_0000.50.65060_23032018-EN
6.3 Safety cut-o
Downward movement is possible only if the upper trays are in place.
The trays can be moved only when the button is pressed.
If the upper trays shift/cant or raise during the downward movement, the
system stops the downward movement immediately.
In this situation, the system permits upward movement only.
PRESSING and HOLDING the button
moves the drive down and switches
to STOP in the end position.
STOP

12
EN
Qanto_Id_A5_0000.50.65060_23032018-EN
6.4 LED lighting
The cabinet can be delivered with maintenance-free LED lighting.
When the trays are raised, the LED lighting switches “ON” automatically.
When the trays are lowered, the LED lighting switches “OFF” automatically
If a fault occurs, please contact your specialist dealer or
customer service.

1.
2.
4.
3.
SW 3
1x
360°
max.
± 50 mm
13
EN
Qanto_Id_A5_0000.50.65060_23032018-EN
6.5 Height adjustment of the middle tray

H = H 1.
2.
3.
6.
6.
TX20
6.
14
EN
Qanto_Id_A5_0000.50.65060_23032018-EN
6.6 Height adjustment of trays

=
==
=
2.
1.
3.
15
EN
Qanto_Id_A5_0000.50.65060_23032018-EN
6.7 Gap adjustment of trays
16
EN
Qanto_Id_A5_0000.50.65060_23032018-EN
6.8 Initialisation
Before and during initialisation, check and make sure that the safety switch-
es are contacted.
The lifting system is initialised by pressing and holding the button.
It must be kept pressed until the drive reaches the lower end position. As
soon as the drive stops in the lower end position, the button must be re-
leased for 2-3 seconds.
Then the button must be kept pressed for an additional 6-8 sec-
onds. After that, the initialisation procedure is completed. During initialisation,
the trays are lowered by 5 mm and then raised again.
Please do NOT release the button during initialisation.
If the button is released before the procedure has been concluded, the
initialisation procedure is interrupted and must be restarted. If an initialisation
procedure is interrupted, an upward movement of the trays is not possible.
During initialisation, the safety switches must be contacted. If the initialisa-
tion procedure cannot be concluded, the upper tray must be removed and
the two safety switches must be pressed manually during the initialisation
procedure.

17
EN
Qanto_Id_A5_0000.50.65060_23032018-EN
7. Maintenance and care
Article no.: 5602.11 Article no.: 5603.11
8. Guarantee and warranty
Before cleaning, always disconnect Qanto by pulling the mains plug or by
disconnecting the socket from the mains.
At regular intervals, remove dust and dirt from Qanto trays and make sure
it is not damaged or cracked.
Please clean with a mild household cleaner and a soft cloth. After that,
wash o the cleaner with clear water and thoroughly wipe Qanto trays dry.
For particularly stubborn stains, use undiluted household cleaner or even
glass cleaner. Do not use strongly alkaline or acidic cleaning agents.
8.1 Guarantee
If not otherwise indicated, your specialist dealer grants you a 2-year guar-
antee from the conclusion of the contract.
The guarantee covers all material and fabrication defects over a period of
2 years.
Damage arising from normal wear or improper use is not covered by the
guarantee.
The legal warranty rights are not aected by these provisions.
In case of guarantee claims, contact your specialist dealer.
8.2 Spare parts
You can order the following spare parts from your specialist dealer.

TX20
3.
2.
1.
18
EN
Qanto_Id_A5_0000.50.65060_23032018-EN
8.3 Repair
Repairs on Qanto may be performed by authorised workshops or service
personnel only as special tools must be used. Please contact your special-
ist dealer.
If parts on Qanto are opened, there is a subsequent risk malfunctions.
Such actions void all warranty claims.
9.1 Exchange of the LED lighting
9. Disassembly/assembly
Before disassembly and during assembly:
• Remove all weight from the trays
• Always disconnect Qanto before repairs by pulling the mains plug or
by disconnecting the socket from the mains.

19
EN
Qanto_Id_A5_0000.50.65060_23032018-EN
10. Recycling/disposal
The recycling or disposal possibilities for motorised systems are regulated in the country of use.
Please obtain information from your respective public authority or ask your specialist dealer.
We recommend the disassembly of our product in as many parts as possible for disposal and
recycling.
Body Wood Bulk waste
Adjusting feet Plastic feet Plastic recycling
Trays Plastic recycling
LED Electronic scrap
Socket Plastic housing Plastic recycling
Cable Electronic scrap
Metal scrap
Columns/ Spindle and motor Metal scrap
Drive Plastic housing Plastic recycling
Cable Electronic scrap
Circuit board Electronic scrap
Control unit Circuit board Electronic scrap
Plastic housing Plastic recycling
Cable Electronic scrap
Transformer Metal scrap
Control element Plastic housing Plastic recycling
Cable Electronic scrap
Circuit board Electronic scrap

20
EN
Qanto_Id_A5_0000.50.65060_23032018-EN
11. Troubleshooting
Lifting system does not work
• The lifting system does not move down. ► Check the setting of the safety switches
according to the assembly instructions.
• The trays do not sit in place properly. ► Check the position of the trays.
• No power supply. ► Check the mains plug.
• The fuse has tripped. ► Check the fuse.
• The control element does not respond. ► Clean the control element.
• The control element is defective. ► Contact the specialist dealer or customer service.
• The lifting system is defective. ► Contact the specialist dealer or customer service.
Lighting does not work
• No power supply. ► Check the mains plug.
• The fuse has tripped. ► Check the fuse.
• The cable connections are loose. ► Check the cable connections.
• The light is defective. ► Call the specialist dealer or customer service.
Socket does not work
• No power supply. ► Check the mains plug.
• The fuse has tripped. ► Check the fuse.
• The cable connections are loose. ► Check the cable connections.
• The socket is defective. ► Call the specialist dealer or customer service.
Control element does not work
• The control element does not respond. ► Clean the control element.
• No power supply. ► Check the mains plug.
• The fuse has tripped. ► Check the fuse.
• The cable connections are loose. ► Check the cable connections.
• The control element is defective. ► Call the specialist dealer or customer service.
Unusual noises or odours ► End the lifting procedure.
► Pull the mains plug.
► Call the specialist dealer or customer service.
Other manuals for Qanto
2
Table of contents
Other Ninka Indoor Furnishing manuals

Popular Indoor Furnishing manuals by other brands

Regency
Regency LWMS3015 Assembly instructions

Furniture of America
Furniture of America CM7751C Assembly instructions

Safavieh Furniture
Safavieh Furniture Estella CNS5731 manual

PLACES OF STYLE
PLACES OF STYLE Ovalfuss Assembly instruction

Trasman
Trasman 1138 Bo1 Assembly manual

Costway
Costway JV10856 manual


