Nissei DM-3000 User manual

Automatic Sphygmomanometer DM-3000
INSTRUCTIONS
<ENGLISH>
Page
This manual is intended to assist the user for the safe and efficient operation of the Automatic
Sphygmomanometer DM-3000. The product must be used in accordance with the procedures
contained in this manual and must not be used for purposes other than those described herein. It is
essential to read and understand the entire manual before use.
CONTENTS
PARTS AND PRODUCT COMPONENTS ...................3
GENERAL PRODUCT INFORMATION ....................5
WARNING, PRECAUTION, and CONTRAINDICATION......7
PREPARATION FOR USE................................9
TAKING BLOOD PRESSURE ............................11
MEMORY FUNCTION .................................15
ERROR DISPLAYS AND TROUBLESHOOTING ............16
NOTES ON BLOOD PRESSURE..........................19
CARE AND MAINTENANCE............................21
TECHNICAL DESCRIPTION FOR ELECTROMAGNETIC
DISTURBANCES ......................................23
WARRANTY AND SERVICE ............................24
Issued on 10. 27. 2021 A113727-1_7

- 2 -
POWER
100
PUMP
OFF
140
180
220
260
280
PRESET PRESSURE
LOW BATTERY
POWER
AC
MANUAL
AUTO
MAIN UNIT COLUMN LCD SEGMENT LCD
INFLATION MARK
DEFLATION
MARK
PULSE
MARK
BATTERY MARK
POWER MARK
PRESET PRESSURE CONTROL
AC INDICATOR
MODE SELECTOR
SET/MEMORY BUTTON
START/STOP BUTTON
MAIN POWER
SWITCH
: OFF
: ON
AC ADAPTOR JACK
BATTERY
COMPARTMENT
COVER
BATTERY
CONNECTOR
CUFF
HOLDER
AIR CONNECTOR AIR PLUG
ADAPTOR PLUG
CUFF
BATTERY
PLUG
2 mmHg
1 mmHg
Operation principles
This device is equipped with two types of measurement. AUTO measurement measures the systolic
blood pressure, diastolic blood pressure, and pulse rate automatically using the oscillometric method.
With MANUAL measurement, an operator uses a stethoscope to measure blood pressure using
auscultatory method. When the artery is compressed by the pressure of a cuff, the artery generates a
pulsation synchronizing with the pulse, which becomes the pulsation of the internal pressure of the cuff
(cuff pressure). The amplitude of the pulsation changes in accordance with the magnitude correlation of
the blood pressure and the cuff pressure. An oscillometric blood pressure monitor determines systolic
and diastolic blood pressures based on the change pattern of the amplitude of the pulsation that appears
when the cuff pressure is gradually changed. Furthermore, with auscultatory method, a stethoscope
is used to detect the Korotkov sounds generated when the cuff pressure is gradually changed. The
blood pressure is determined according to the pressure values at appearance and disappearance of
the Korotkov sounds.
Intended purpose and Indication for use
This product is intended for noninvasive measurement of systolic and diastolic blood pressure by
automatic measurement, with applying the cuff on patient’s upper arm, with oscillometric method
and manual measurement with auscultatory method and determination of pulse rate in professional
healthcare facility. This product is not designed for neonatal use. Please consult with the doctor or
physician to use this product to take blood pressure of person in pregnancy or under pre-eclamptic
condition. The automatic measurement of blood pressure is intended to be taken for adults only. For
taking blood pressure measurement of children with auscultatory method, please consult with the
doctor or physician.
This device is designed for medical staff use in medical institutions. The product is not intended to be
used either outside the healthcare facility, during professional transportation of a patient outside the
healthcare facility or home healthcare environment.

- 3 -
POWER
100
PUMP
OFF
140
180
220
260
280
PRESET PRESSURE
LOW BATTERY
POWER
AC
MANUAL
AUTO
MAIN UNIT COLUMN LCD SEGMENT LCD
INFLATION MARK
DEFLATION
MARK
PULSE
MARK
BATTERY MARK
POWER MARK
PRESET PRESSURE CONTROL
AC INDICATOR
MODE SELECTOR
SET/MEMORY BUTTON
START/STOP BUTTON
MAIN POWER
SWITCH
: OFF
: ON
AC ADAPTOR JACK
BATTERY
COMPARTMENT
COVER
BATTERY
CONNECTOR
CUFF
HOLDER
AIR CONNECTOR AIR PLUG
ADAPTOR PLUG
CUFF
BATTERY
PLUG
2 mmHg
1 mmHg
PARTS AND PRODUCT COMPONENTS

- 4 -
REGULAR SIZE CUFF
for arm circumference of 22 to 32 cm
AC ADAPTOR INSTRUCTION
MANUAL
RECHARGEABLE
NICKEL METAL HYBRID
(NiMH) BATTERY
LARGE SIZE CUFF
for arm circumference of 32 to 42 cm
AIR TUBE
AIR PLUG
ADAPTOR PLUG
BATTERY PLUG
AIR CONNECTOR
AIR CONNECTOR
Order No.: NPDM3000-010
CUFF SHELL : NPDM3000-030
BLADDER : NPDM3000-040
AIR PLUG : B112784-1
Order No.: NPDM3000-011
CUFF SHELL : NPDM3000-031
BLADDER : NPDM3000-041
AIR PLUG : B112784-1
Order No.: NPDM3000-001(EU)
NPDM3000-002(UK)
Order No.: NPDM3000-005
Model : DM-3000
Operating Principle : Oscillometric method (AUTO measurement) / auscultation (MANUAL
measurement)
Indicator : 300 digits column LCD and 10 digits segment LCD
Pressure Indicating Range : 0 to 300 mmHg (cuff pressure)
Measuring Range : 50 to 250 mmHg (systolic)
40 to 180 mmHg (diastolic)
40 to 160 bpm (pulse rate)
DM-3000 is an automatic sphygmomanometer intended for measurement of systolic and diastolic
blood pressure and pulse rate in adult patients, i.e., age 12 and above. This product is not designed
for neonatal use and inaccurate readings may result if it is used on children.
PRODUCT FEATURES
COLUMN LCD and SEGMENT LCD
The pressure can be read in the column LCD height and as digital value in the segment LCD.
"AUTO" and "MANUAL" Modes of Measurement
Determination of blood pressure can be made either automatically by the oscillometric method or
manually by the Auscultatory method using a stethoscope.
Regular and Large Size Cuffs
The regular size cuff will accommodate an upper arm circumference range of approximately 22 to 32
centimeters and the large size cuff will accommodate that of approximately 32 to 42 centimeters.
Operation with AC Adaptor or Rechargeable Battery
DM-3000 is powered by either an AC adaptor or rechargeable nickel metal hybrid (NiMH) battery.
PRODUCT SPECIFICATIONS
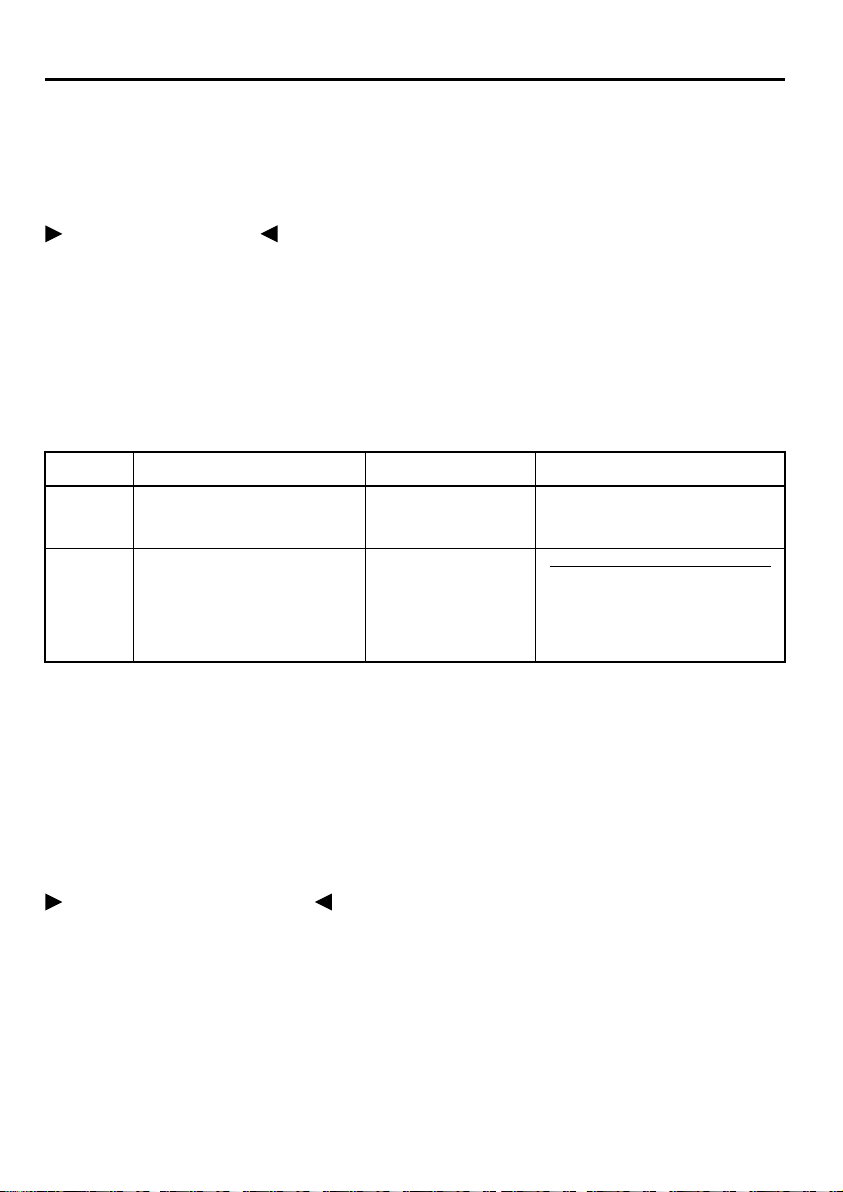
COMPARISON TABLE
MANUAL
MODE cuff inflation deflation rate saving result
AUTO maintained at 4.0 to
4.9 mmHg/sec
maintained at preset
rate: 2.5, 4.5 or 6.5
mmHg/sec
automatically performed to
preset pressure value
automatically performed to
preset pressure value or
manually performed with
inflation bulb*
seven measured results
automatically saved in memory.
* Inflation bulb is not included in the product.
PARTS AND PRODUCT COMPONENTS
- 5 -
REGULAR SIZE CUFF
for arm circumference of 22 to 32 cm
AC ADAPTOR INSTRUCTION
MANUAL
RECHARGEABLE
NICKEL METAL HYBRID
(NiMH) BATTERY
LARGE SIZE CUFF
for arm circumference of 32 to 42 cm
AIR TUBE
AIR PLUG
ADAPTOR PLUG
BATTERY PLUG
AIR CONNECTOR
AIR CONNECTOR
Order No.: NPDM3000-010
CUFF SHELL : NPDM3000-030
BLADDER : NPDM3000-040
AIR PLUG : B112784-1
Order No.: NPDM3000-011
CUFF SHELL : NPDM3000-031
BLADDER : NPDM3000-041
AIR PLUG : B112784-1
Order No.: NPDM3000-001(EU)
NPDM3000-002(UK)
Order No.: NPDM3000-005
Model : DM-3000
Operating Principle : Oscillometric method (AUTO measurement) / auscultation (MANUAL
measurement)
Indicator : 300 digits column LCD and 10 digits segment LCD
Pressure Indicating Range : 0 to 300 mmHg (cuff pressure)
Measuring Range : 50 to 250 mmHg (systolic)
40 to 180 mmHg (diastolic)
40 to 160 bpm (pulse rate)
DM-3000 is an automatic sphygmomanometer intended for measurement of systolic and diastolic
blood pressure and pulse rate in adult patients, i.e., age 12 and above. This product is not designed
for neonatal use and inaccurate readings may result if it is used on children.
PRODUCT FEATURES
COLUMN LCD and SEGMENT LCD
The pressure can be read in the column LCD height and as digital value in the segment LCD.
"AUTO" and "MANUAL" Modes of Measurement
Determination of blood pressure can be made either automatically by the oscillometric method or
manually by the Auscultatory method using a stethoscope.
Regular and Large Size Cuffs
The regular size cuff will accommodate an upper arm circumference range of approximately 22 to 32
centimeters and the large size cuff will accommodate that of approximately 32 to 42 centimeters.
Operation with AC Adaptor or Rechargeable Battery
DM-3000 is powered by either an AC adaptor or rechargeable nickel metal hybrid (NiMH) battery.
PRODUCT SPECIFICATIONS
COMPARISON TABLE
MANUAL
MODE cuff inflation deflation rate saving result
AUTO maintained at 4.0 to
4.9 mmHg/sec
maintained at preset
rate: 2.5, 4.5 or 6.5
mmHg/sec
automatically performed to
preset pressure value
automatically performed to
preset pressure value or
manually performed with
inflation bulb*
seven measured results
automatically saved in memory.
* Inflation bulb is not included in the product.
GENERAL PRODUCT INFORMATION

- 6 -
GENERAL PRODUCT INFORMATION
Accuracy : ±3 mmHg (cuff air pressure)
±5% of reading (pulse rate)
Ination :Automatic ination
Deation : Electric control valve
Exhaust : Automatic exhaust valve
Power Supply : 7.0 VDC AC adaptor (MODEL UM318-0725) or 4.8 VDC rechargeable
NiMH battery
Memory : seven measurement results
Operating Environment : +10°C to+40°C, 15% to 85% RH (noncondensing)
Storage Environment : -20°C to+60°C, 15% to 85% RH (noncondensing)
Coverage Arm Circumference
Regular Size Cuff : 22 to 32 cm
Large Size Cuff : 32 to 42 cm
Main Unit
Weight : Approx. 1350 g, without AC adaptor or battery
Size : 136 x 228 x 276 mm (W x D x H)
Protection against electric shock
:Internally powered equipment / Class II equipment, Type BF applied part
Classication of safety level when used in air/ammable anesthetic gas, oxygen, nitrous oxide/
ammable anesthetic gas.
: Not suitable for use in these environments
Mode of operation : Continuous operation
Classication : Class II / Internally powered equipment
Expected service life : 5 years
Key to Symbols : Type BF equipment
:Class II equipment
: Important; read operating instructions.
:The used electrical and electronic products are not household waste.
Follow your national/local recycling rules to dispose of them properly. In
the EU countries, please refer to waste management symbol(s) marked
on the package or the instrument.
*Accuracy is guaranteed with the measured values that are within the measuring range.
• This device complies with EN1060-1:1995+A2:2009 Non-invasive sphygmomanometers Part 1:
General requirements and EN1060-3:1997+A2:2009 Non-invasive sphygmomanometers Part 3:
Supplementary requirements for electro-mechanical blood pressure measuring system
• For the measurement in AUTO mode, the measurement accuracy of the device has been proven
according to ISO 81060-2 protocol. In the clinical study, K5 was used for the determination of diastolic
pressure values at all auscultatory measurements.
• This device is intended for use in the environment with one atmospheric pressure.
Specications are subject to change without notice due to improvements in performance.

- 7 -
WARNING, PRECAUTION, and CONTRAINDICATION
WARNINGS & PRECAUTIONS
• Please carefully check patient’s conditions in advance to the measurement if he /
she is under dialysis therapy or on anticoagulants, antiplatelets or steroids. Use of
this instrument under such conditions could cause internal bleeding.
• This product is not also intended to be used with HF surgical equipment.
• The system may fail to yield specied measurement accuracy if operated or stored
in temperature or humidity conditions outside the limits stated in the specications
section of this manual.
• Use of this product in areas near mobile phones, microwave ovens or other devices
with strong electromagnetic eld may cause malfunctions.
• Make sure that ination of the cuff is not causing prolonged impairment of blood
circulation. Also, be cautious about temporary loss of the functions of any other
medical equipment if any monitoring equipment is used on the same limb with the
blood pressure measuring cuff.
• To avoid harmful injury due to interfered blood ow from cuff ination, make sure
that AIR TUBE is not kinking or compressed before measurement. Otherwise, cuff
ination may not be conducted properly and prolonged.
• Make sure that the cuff is not causing any irregular skin condition of the patient.
In case any pain, redness, swelling, sign of allergic reaction, or any other irregular
condition on the patient’s arm, please stop using the device, and contact with the
manufacturer or the dealer.
• To avoid any possibility of accidental strangulation, keep this product away from
children and do not drape AIR TUBE around your neck.
• Because the product includes precision parts, avoid extreme temperature variations,
humidity, altitude, shock, dust, lint, and direct sunlight. The performance of the
product may be affected.
• Make sure that the operator is at the position that the patient’s condition can
carefully be monitored during measurement.
• Consult with the doctor or physician to use this product to take blood pressure of
person in pregnancy or under pre-eclamptic condition.
• In case any smoke, spark, or ignition of the device is found during the use of the
product, immediately stop using the device, and contact with the manufacturer or
the dealer.

- 8 -
140
180
220
PRESET PRESSURE
AC
MANUAL
ADAPTOR PLUG
Screw driver
BATTERY PLUG
OPERATION WITH AC ADAPTOR
Connect AC ADAPTOR PLUG to AC CONNECTOR.
Plug AC ADAPTOR in the power socket.
AC INDICATOR is lit when AC ADAPTOR is connected correctly.
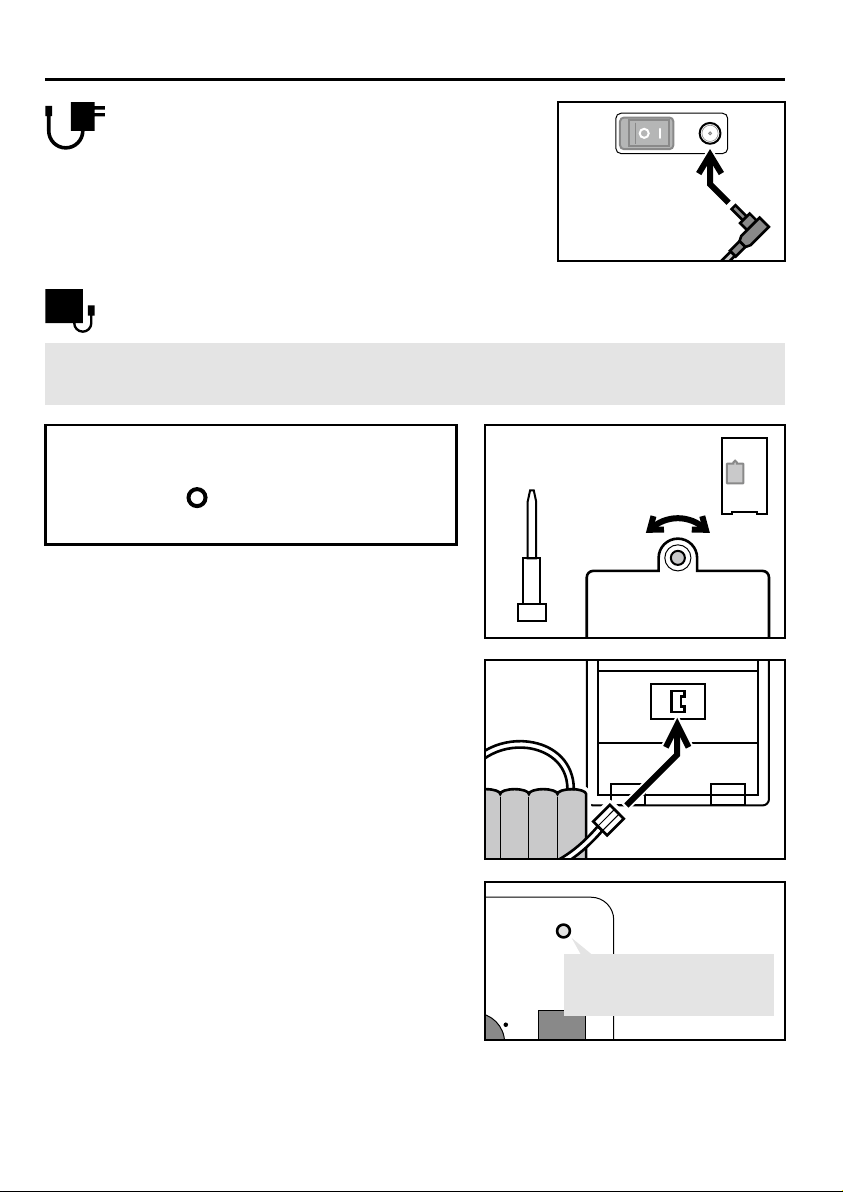
OPERATION WITH RECHARGEABLE NiMH BATTERY
The battery supplied with the product is not charged and needs to be charged for
about 4 hours before use.
Turn off the power and unplug AC
ADAPTOR before inserting the battery.
Make sure "
" side of MAIN POWER
SWITCH is pressed down.
Remove BATTERY COMPARTMENT COVER by
loosening and removing the screw.
Connect BATTERY PLUG to BATTERY
CONNECTOR inside the battery compartment
and insert the battery.
Put back BATTERY COMPARTMENT COVER and
close it by inserting and tightening the screw.
Connect AC ADAPTOR PLUG and plug AC
ADAPTOR in the power socket to charge the
battery.
The battery will be charged regardless whether the
device is turned on or off.
Orange light of AC INDICATOR indicates that
the battery is being charged.
The battery is fully charged after approximately 4 hours.
Unplug AC ADAPTOR when the light turns
green this indicates the battery is charged.
TIGHTENLOOSEN
ORANGE : charging
GREEN : charged
The color of AC INDICATOR may
fluctuate from green to orange if
DM-3000 is operated while charging
battery, this does not indicate a problem.
WARNING, PRECAUTION, and CONTRAINDICATION
CONTRAINDICATIONS
• Do not use this product along with implantable and wearable medical electrical
equipment such as pacemaker, debrillator, or electrocardiographic monitor.
• Do not use this product in an explosive environment such as near ammable
anesthetics or inside oxygen chamber.
• Do not use cuffs or accessories other than those specied by the manufacturer.
Otherwise, correct measurement readings cannot be obtained.
• Do not apply the cuff over wounded arm, arm under an intravascular access or
therapy or an arterio-venous shunt, or arm on the side of a mastectomy or lymph
node clearance. Otherwise injury may be resulted.
• Do not make measurements repeatedly to avoid harmful injury due to interfered
blood ow from cuff ination.
• Do not drop or strike the product. Make sure not to expose it to moisture. This
product is not water resistant.
• Do not press the display or place the monitor with display face down.
• Do not take out batteries or unplug the AC adaptor when the monitor is turned on.
Make sure to switch off the monitor before removing batteries or AC adaptor.
• Do not touch the output plug of AC adaptor during measurement.
• Do not disassemble or modify the product.
• Do not inate the cuff when it is not wrapped around patient’s arm.
• Do not apply the cuff on the limb which the intravenous drip infusion is implemented.
• Do not take measurement of neonate in any case. Do not take measurement of
children for automatic measurement.
- 9 -
140
180
220
PRESET PRESSURE
AC
MANUAL
ADAPTOR PLUG
Screw driver
BATTERY PLUG
OPERATION WITH AC ADAPTOR
Connect AC ADAPTOR PLUG to AC CONNECTOR.
Plug AC ADAPTOR in the power socket.
AC INDICATOR is lit when AC ADAPTOR is connected correctly.
OPERATION WITH RECHARGEABLE NiMH BATTERY
The battery supplied with the product is not charged and needs to be charged for
about 4 hours before use.
Turn off the power and unplug AC
ADAPTOR before inserting the battery.
Make sure "
" side of MAIN POWER
SWITCH is pressed down.
Remove BATTERY COMPARTMENT COVER by
loosening and removing the screw.
Connect BATTERY PLUG to BATTERY
CONNECTOR inside the battery compartment
and insert the battery.
Put back BATTERY COMPARTMENT COVER and
close it by inserting and tightening the screw.
Connect AC ADAPTOR PLUG and plug AC
ADAPTOR in the power socket to charge the
battery.
The battery will be charged regardless whether the
device is turned on or off.
Orange light of AC INDICATOR indicates that
the battery is being charged.
The battery is fully charged after approximately 4 hours.
Unplug AC ADAPTOR when the light turns
green this indicates the battery is charged.
TIGHTENLOOSEN
ORANGE : charging
GREEN : charged
The color of AC INDICATOR may
fluctuate from green to orange if
DM-3000 is operated while charging
battery, this does not indicate a problem.
PREPARATION FOR USE

- 10 -
???
???
??
??
??
BATTERY MARK flashes in the segment LCD when the battery
charge is low.
Only a few more measurements remain before the battery runs down.
Stops flashing and becomes steady. The battery is exhausted
and must be recharged.
Measurement cannot be made.
Battery life
Life of the rechargeable NiMH battery is approximately 2 years. However it may vary depending on
operating conditions. Replace the battery when BATTERY MARK is displayed often or when frequent
charging of the battery becomes necessary.
Tips on prolonging the battery life
The device is powered by AC ADAPTOR when it is connected; the installed
battery is not used if AC ADAPTOR is connected.
• Remove the battery when operating the device with AC ADAPTOR for extended
period of time or when the battery does not need to be charged.
• Avoid charging the battery if it is not completely exhausted.
Do not forcibly remove the battery or pull out the plugs holding
cords and cables.
Use manufacturers dedicated AC adaptor and battery only.
Contact your supplier if they become damaged or need replacing.
The device goes to energy saver mode when it is left turned on and not operated
for approximately 3 minutes. The mark will be displayed for an hour and then
disappear. Make sure to turn off the device by pressing "
" side of MAIN
POWER SWITCH down after each use especially when the device is powered by
the battery.
The device activates from sleeping mode when either START/STOP BUTTON or SET/MEMORY
BUTTON is pressed. It is recommended to activate the device by pressing SET/MEMORY
BUTTON since the device could start inflation if START/STOP BUTTON is pressed. Press
START/STOP BUTTON again and stop inflation if the cuff is not wrapped around arm.
BATTERY MARK
POWER MARK
BATTERY MARK
PREPARATION FOR USE

- 11 -
2~3cm
MANUAL
AUTO
100
PUMP
OFF
140 180 220
260
280
PRESET PRESSURE
Turn on the device by pressing "
" side of MAIN POWER SWITCH.
Push the MODE SELECTOR downward and set to "AUTO".
See page 13 for "MANUAL" measurement.
Set the initial inflation value with the PRESET PRESSURE CONTROL.
Select the pressure approximately 30 to 40 mmHg above expected
systolic pressure.
Pressure can be set between 100 mmHg and 280 mmHg. Cuff is not
inflated when the knob is set below 100 mmHg, "PUMP OFF".
Set the pressure at 180 mmHg if patient's systolic pressure is
difficult to predict.
The cuff will be re-pressurized to a higher value if the preset
pressure is too low for blood pressure to be taken during cuff
deflation.
Apply the cuff to patient's arm.
Choose the right size of cuff for your patient.
Find a chair and a table so that the patient can be comfortably seated with patient’s back
and arm supported. Legs should not be crossed and feet kept flat on the floor.
The lower edge of the cuff should be about 2 to 3 cm
above the inner elbow and the AIR TUBE should be on
the inner part of the arm over the brachial artery.
Press the surface of the cuff to make sure that the hook
and loop fastens securely.
The cuff should be wrapped loosely enough so that two fingers can be placed
between the cuff and patient's arm. If the cuff is wrapped more tightly or loosely
than this, inaccurate blood pressure readings may result.
If your patient is wearing a shirt that might restrict circulation in his/her upper
arm or he/she rolls his/her sleeve up over the upper arm, the blood flow could be
restricted, preventing accurate measurement.
CUFF SIZE
REGULAR
LARGE
ARM CIRCUMFERENCE
22 to 32 cm
32 to 42 cm
TAKING BLOOD PRESSURE

- 12 -
Press START/STOP BUTTON.
The cuff is inflated automatically after zero settings appear on display.
Pressurization stops when pressure reaches the preset pressure value and
pressure starts to descend.
Heart mark flashes in the segment LCD synchronizing detected pulse.
Deflation rate is displayed at the lower right corner of the segment LCD.
Press the START/STOP BUTTON if the measurement needs to
be interrupted.
The device will stop the measurement process during any course
of measurement procedure and rapidly release air from the cuff.
Residual air is rapidly exhausted from the
cuff when measurement is completed.
Blood pressure and pulse rate are displayed.
Turn off the device by pressing "
" side of MAIN POWER SWITCH.
The device will go into energy saver mode after approximately 3
minutes even if the SWITCH has not been turned off. See page 10.
Make sure your patient is relaxed, has taken at least 5 minutes of rest before
measurement and refrains from talking or moving during measurement.
Ensure that the cuff is kept at the height of patient's heart during measurement.
Do not execute repeated measurements since congestion of blood could result in
inaccurate measurements. Allow patient's arm to rest for at least 5 minutes.
deflation rate
systolic
pulse rate
diastolic
POWER MARK
100
PUMP
OFF
140 180 220
260
280
PRESET PRESSURE
MANUAL
AUTO
"MANUAL" MEASUREMENT MODE
When you want to take your patient's blood pressure using the Auscultatory method with a
stethoscope, set the device to "MANUAL" mode.
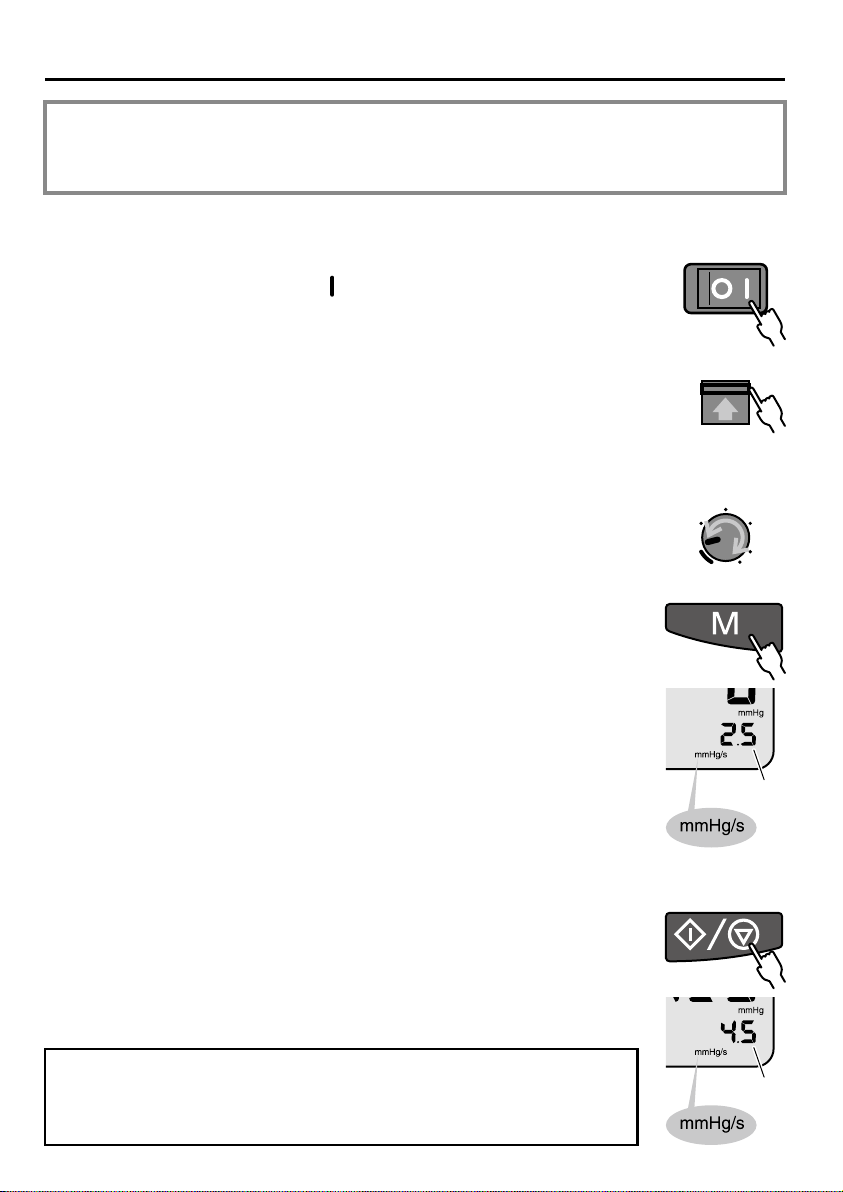
MAKING "MANUAL" MEASUREMENT
Turn on the device by pressing "
" side of MAIN POWER SWITCH.
Move MODE SELECTOR upward and set the device to "MANUAL".
Set the initial inflation value with the PRESET PRESSURE CONTROL.
Details on preset pressure … page 11
Press SET/MEMORY BUTTON to confirm and/or select the
appropriate deflation rate.
The deflation rate is displayed at the lower right corner of the segment display.
The deflation rate can be selected from 2.5, 4.5 and 6.5 mmHg/sec.
The set deflation rate returns to the default value of 4.5 when the device is turned off.
Apply the cuff and stethoscope to patient's arm in the same manner
as the usual Auscultatory method.
The patient should have the same measurement posture as the one for "AUTO"
measurement.
Press START/STOP BUTTON.
The cuff is inflated automatically after zero settings appear on display.
Pressurization stops when pressure reaches the preset pressure value and
pressure starts to descend.
Deflation rate is displayed at the lower right corner of the segment LCD.
Press the START/STOP BUTTON if the measurement needs to
be interrupted.
The device rapidly exhausts air from the cuff.
deflation rate
deflation rate
TAKING BLOOD PRESSURE
- 13 -
Press START/STOP BUTTON.
The cuff is inflated automatically after zero settings appear on display.
Pressurization stops when pressure reaches the preset pressure value and
pressure starts to descend.
Heart mark flashes in the segment LCD synchronizing detected pulse.
Deflation rate is displayed at the lower right corner of the segment LCD.
Press the START/STOP BUTTON if the measurement needs to
be interrupted.
The device will stop the measurement process during any course
of measurement procedure and rapidly release air from the cuff.
Residual air is rapidly exhausted from the
cuff when measurement is completed.
Blood pressure and pulse rate are displayed.
Turn off the device by pressing "
" side of MAIN POWER SWITCH.
The device will go into energy saver mode after approximately 3
minutes even if the SWITCH has not been turned off. See page 10.
Make sure your patient is relaxed, has taken at least 5 minutes of rest before
measurement and refrains from talking or moving during measurement.
Ensure that the cuff is kept at the height of patient's heart during measurement.
Do not execute repeated measurements since congestion of blood could result in
inaccurate measurements. Allow patient's arm to rest for at least 5 minutes.
deflation rate
systolic
pulse rate
diastolic
POWER MARK
100
PUMP
OFF
140 180 220
260
280
PRESET PRESSURE
MANUAL
AUTO
"MANUAL" MEASUREMENT MODE
When you want to take your patient's blood pressure using the Auscultatory method with a
stethoscope, set the device to "MANUAL" mode.
MAKING "MANUAL" MEASUREMENT
Turn on the device by pressing "
" side of MAIN POWER SWITCH.
Move MODE SELECTOR upward and set the device to "MANUAL".
Set the initial inflation value with the PRESET PRESSURE CONTROL.
Details on preset pressure … page 11
Press SET/MEMORY BUTTON to confirm and/or select the
appropriate deflation rate.
The deflation rate is displayed at the lower right corner of the segment display.
The deflation rate can be selected from 2.5, 4.5 and 6.5 mmHg/sec.
The set deflation rate returns to the default value of 4.5 when the device is turned off.
Apply the cuff and stethoscope to patient's arm in the same manner
as the usual Auscultatory method.
The patient should have the same measurement posture as the one for "AUTO"
measurement.
Press START/STOP BUTTON.
The cuff is inflated automatically after zero settings appear on display.
Pressurization stops when pressure reaches the preset pressure value and
pressure starts to descend.
Deflation rate is displayed at the lower right corner of the segment LCD.
Press the START/STOP BUTTON if the measurement needs to
be interrupted.
The device rapidly exhausts air from the cuff.
deflation rate
deflation rate
TAKING BLOOD PRESSURE
- 14 -
100
PUMP
OFF
140 180 220
260
280
PRESET PRESSURE
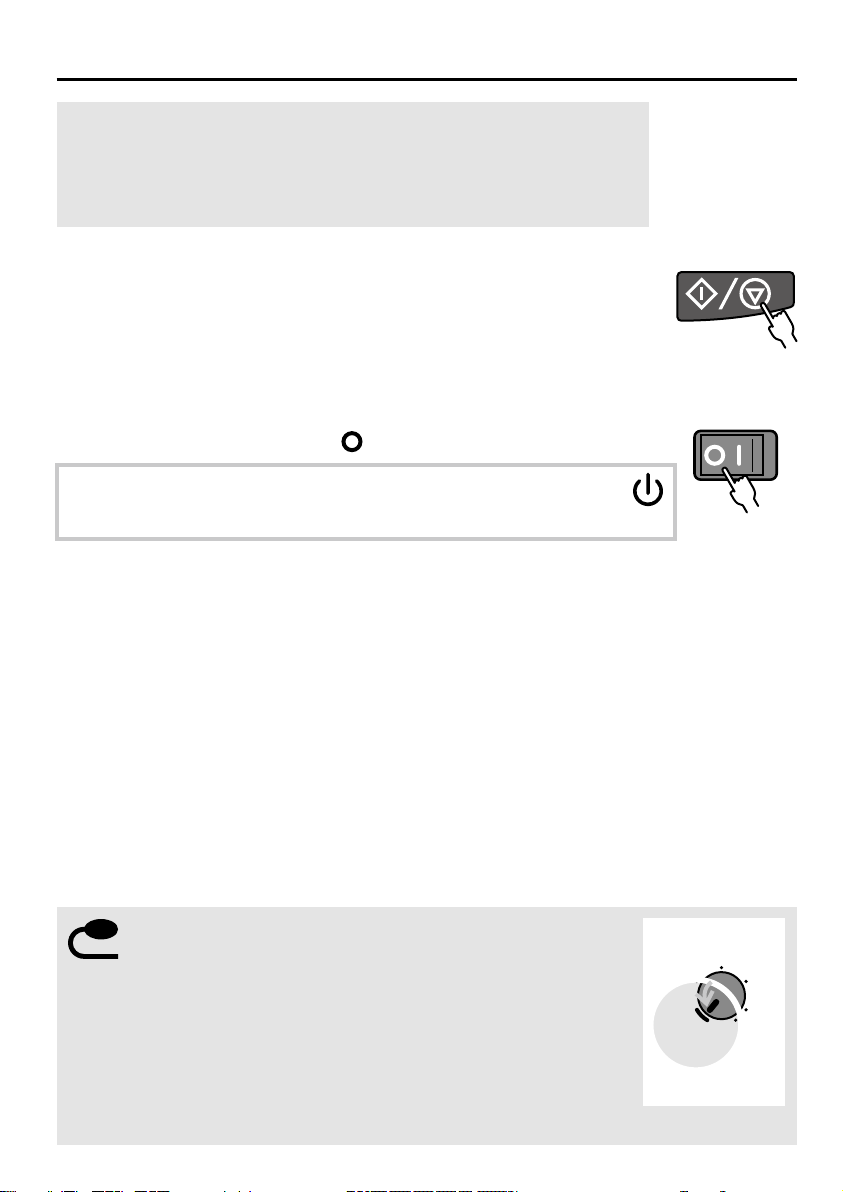
If cuff inflation was not sufficient, press and hold down
START/STOP BUTTON once deflation has started and the cuff is
pressurized again. Pressurization will continue while the button
is pressed. Pressure does not exceed 290 mmHg.
Press START/STOP BUTTON when blood pressure is taken to
exhaust residual air rapidly from the cuff.
Turn off the device by pressing "
" side of MAIN POWER SWITCH.
The device will go into energy saver mode after approximately 3
minutes even if the SWITCH has not been turned off. See page 10.
Manually pressurizing the cuff with inflation bulb
Disconnect AIR PLUG from DM-3000 original cuff and connect it to the cuff to
use. Insert AIR PLUG into AIR CONNECTOR. Push the MODE SELECTOR
upward and set to "MANUAL". Set the PRESET PRESSURE CONTROL to
"PUMP OFF" and press START/STOP BUTTON. Start measurement after
INFLATION MARK is displayed. To use control valve of the inflation bulb
most effectively, set the deflation rate at 2.5 mmHg on DM-3000.
* Inflation bulb not included with DM-3000.
POWER MARK
PUMP
OFF
TAKING BLOOD PRESSURE

- 15 -
Seven measured results and their average obtained in "AUTO" mode are
automatically saved in the memory. When the results exceed 7, the oldest data will be
deleted to record a new result.
The results are not saved when the measurements are performed in "MANUAL" mode.
Recalling measured data
1. Turn on the MAIN POWER SWITCH and set the device to "AUTO" with MODE
SELECTOR.
An average of the stored results is displayed first.
2. Press "M" button to recall stored data one by one. Figure following "No." indicates
sequence of data, the larger the number, the older the data. However, maximum
data can that be stored is 7.
Deleting stored data
Deleting a single data
1. Recall a data to be deleted.
2. Press and hold down "M" until the LCD Display starts flashing and the data
disappears subsequently.
3. New average is recalculated on remaining data and stored.
Deleting all data
1. Recall Average following Data Recalling procedure.
2. Press and hold down "M" till the LCD Display starts flashing and the data
disappears subsequently.
MEMORY FUNCTION
- 16 -
CAUSE
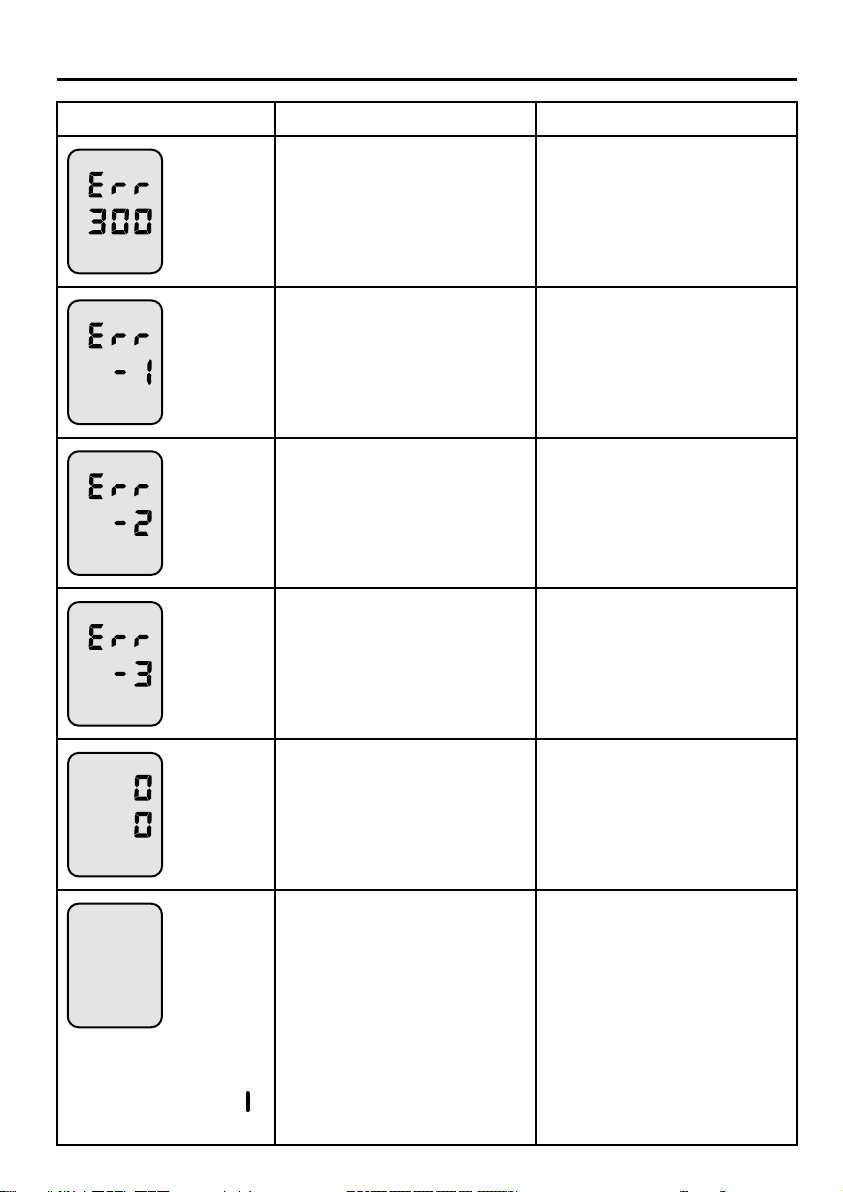
ERROR SYMBOL/SYMPTOM
REMEDY
Make sure that the patient stays
still during measurement.
Make sure the patient remains
still and quiet during
measurement.
Reinsert AIR PLUG and make
sure that it is securely inserted.
Make sure that the patient stays
still during measurement.
Make sure the patient remains still
and quiet during measurement.
Do not let the patient move
during measurement.
Turn off the device once and
then turn it on again to make
measurement.
Reinsert AC ADAPTOR and make
sure that it is securely inserted.
Charge the battery or use AC
ADAPTOR.
Turn off the device or press
START/STOP BUTTON or SET/
MEMORY BUTTON to activate
the device from sleeping mode.
OVER-PRESSURIZATION;
The cuff was inflated to the
maximum pressure because of
movement of body etc.
MEASUREMENT ERROR;
Measurement could not be
made because of moving or
talking during measurement.
INFLATION ERROR;
AIR PLUG is not correctly
inserted.
Noise was detected.
DEFLATION ERROR;
Movement or talking was
detected during measurement.
Extreme changes in pressure
occurred during measurement.
CHECKING MODE;
See page 22.
NO POWER;
AC ADAPTOR is not correctly
connected.
Battery is exhausted.
DM-3000 was left turned on but
has not been operated for over
an hour.
Nothing is displayed when
MAIN POWER SWITCH is
pressed down on its "
"
side.
CAUSE
ERROR SYMBOL/SYMPTOM
REMEDY
Charge the battery. Only a few
measurements can be made
before the battery runs down.
Charge the battery. Measurement
cannot be conducted.
Turn off the device or press
START/STOP BUTTON or
SET/MEMORY BUTTON to
activate the device from sleeping
mode.
Make sure to turn off the device
by pressing "
" side of MAIN
POWER SWITCH after use.
This does not indicate a
problem.
Make sure that the patient stays
still during measurement.
Make sure that the patient is
being measured with correct
posture.
See NOTES ON BLOOD
PRESSURE.
LOW BATTERY;
Battery is weak.
BATTERY ERROR;
Battery is exhausted.
ENERGY SAVER MODE;
The device was left turned on
and has not been operated for
over approximately 3 minutes.
When the preset pressure
value was not high enough to
make measurement or when
noise was detected, the cuff
is pressurized again to a
higher level.
Patient moved during
measurement.
Patient is not being measured
with correct posture.
Blood pressure readings
constantly vary with time of
measurement and physical and
mental condition.
Measurement is interrupted
once and the cuff is
inflated again.
Blood pressure is different
each time. The reading is
extremely low (or high).
The indication appearing at all LCD segment test,
which is performed when the unit is turned on, does
not indicate low battery or battery error.
FLASHING
STEADY
ERROR DISPLAYS AND TROUBLESHOOTING

- 17 -
CAUSE
ERROR SYMBOL/SYMPTOM
REMEDY
Charge the battery. Only a few
measurements can be made
before the battery runs down.
Charge the battery. Measurement
cannot be conducted.
Turn off the device or press
START/STOP BUTTON or
SET/MEMORY BUTTON to
activate the device from sleeping
mode.
Make sure to turn off the device
by pressing "
" side of MAIN
POWER SWITCH after use.
This does not indicate a
problem.
Make sure that the patient stays
still during measurement.
Make sure that the patient is
being measured with correct
posture.
See NOTES ON BLOOD
PRESSURE.
LOW BATTERY;
Battery is weak.
BATTERY ERROR;
Battery is exhausted.
ENERGY SAVER MODE;
The device was left turned on
and has not been operated for
over approximately 3 minutes.
When the preset pressure
value was not high enough to
make measurement or when
noise was detected, the cuff
is pressurized again to a
higher level.
Patient moved during
measurement.
Patient is not being measured
with correct posture.
Blood pressure readings
constantly vary with time of
measurement and physical and
mental condition.
Measurement is interrupted
once and the cuff is
inflated again.
Blood pressure is different
each time. The reading is
extremely low (or high).
The indication appearing at all LCD segment test,
which is performed when the unit is turned on, does
not indicate low battery or battery error.
FLASHING
STEADY
ERROR DISPLAYS AND TROUBLESHOOTING

- 18 -
If you cannot get correct measurement with the methods above, do not tamper with the internal
mechanism. Contact your supplier. If the unit malfunctions, please return it to the supplier or an
authorized service representative for servicing according to the warranty. The manufacturer provides
service data to qualified suppliers.
100
PUMP
OFF
140 180 220
260
280
PRESET PRESSURE
PUMP
OFF
CAUSE
ERROR SYMBOL/SYMPTOM
REMEDY
Make sure that the patient stays
still during measurement.
Allow your patient to rest for
more than 5 minutes.
Measurement result is saved
only when it is taken in "AUTO"
mode.
Measurement cannot be made
when BATTERY MARK is
displayed. Recharge the battery.
Air pump does not operate when
PRESET PRESSURE is set to
PUMP OFF. Turn PRESET
PRESSURE CONTROL and
select appropriate pressure
between 100 and 280 mmHg for
automatic inflation.
AC INDICATOR also indicates
whether the battery is being
charged or not.
Difference in voltages between
AC ADAPTOR and the battery
lead to differences in LCD
brightness. This does not
indicate functional problem.
Patient moved during
measurement.
There was not enough rest
taken before measurement.
Blood pressure was taken in
"MANUAL" MODE.
Battery is exhausted.
PRESET PRESSURE CONTROL
is set to "PUMP OFF".
The battery is inserted.
DM-3000 is operated with the
battery.
Pulse rate is too low (or
too high).
Measurement result
cannot be recalled or it is
not stored.
Cuff inflation does not
start.
AC INDICATOR is lit even
when DM-3000 is turned
off.
The column LCD is dim or
its brightness is not
steady.
ERROR DISPLAYS AND TROUBLESHOOTING

- 19 -
20
40
60
80
100
120
140
160
180
200
12 13 14 15 16 17 18 19 20 21 22 23 24 1 2 3 4 5 6 7 8 9 10 11
Blood pressure (mmHg)
Systolic Diastolic
Time
Blood pressure is the force exerted by the heart in pumping the blood through the arteries and the
resistance by the veins to this flow.
Blood pressure varies all the time, influenced by mental and physical factors and is
never constant.
In general, blood pressure is highest during the working hours and gradually decreases during the
afternoon and evening hours. It is low during sleep and increases at a relatively fast rate after arising
from bed.
Causes for Changes in Blood Pressure
• Body movement • Conversation • Mental Tension • Nervousness
• Emotions • Eating • Drinking Alcohol • Smoking
• Measurement posture • Recent Urination or Bowel Movement • Room temperature
• Changes in the surroundings such as movement or noise, etc.
Blood pressure measured at hospital or clinics tends to be higher than when it is
measured at one's home, this symptom is known as "White Coat Syndrome".
Being in a hospital could cause mental tension and therefore lead to higher blood pressure than that
taken under relaxed condition at one's own home.
Judgment such as a change of dosage of a drug based on measurement results
should not be made by patients on their own without professional consultation.
Blood pressure classification by WHO (1999)
Blood pressure changes shown below.
Upper arm blood pressure data
180~
160~179
140~159
130~139
120~129
~120
mmHg
Hypertension(severe)
(moderate)
(mild)
80
~
80
84
~
85
89
~
90
99
~
100
109
~
110
~
High Normal
Normal
Optimal
DIA
SYS
NOTES ON BLOOD PRESSURE

- 20 -
Blood pressure should be taken after approximately five minutes of rest, under
relaxed conditions and in a quiet environment.
Exercise, eating, drinking alcohol, smoking and other activities that effect blood
pressure should be avoided prior to measurement.
Cuff measurement position should be at the height of the heart to obtain correct
measurement results. If the cuff is lower (higher) than the heart, the measured
reading tends to become larger (smaller).
There should be no speaking or moving during blood pressure measurement.
Otherwise correct measurement results cannot be obtained.
The ambient temperature should be approximately 20˚C for blood pressure
measurement.
Any shirt or accessories that might restrict circulation in the upper arm should
be taken off for blood pressure measurement.
Sleeves rolled up over the upper arm will restrict the blood flow and lead to
inaccurate measurement.
Measurement of blood pressure should not be repeated immediately since
congestion of blood could result in inaccurate measurement. There should be at
least 5 minutes between measurements.
NOTES ON BLOOD PRESSURE
Table of contents
Other Nissei Medical Equipment manuals


Popular Medical Equipment manuals by other brands


Brainlab
Brainlab 18099-02C instruction manual

Stryker
Stryker Adel Operation and maintenance manual

ZONE Medical
ZONE Medical MEDCAPTAIN NAVI-30 Operation manual

Unicare Health
Unicare Health BackSupport Instruction & safety manual

Otto Bock
Otto Bock 1P9 Instructions for use

Orliman
Orliman Pantbrace PF009 Use and maintenance instructions


