Provizio SEM Scanner User manual
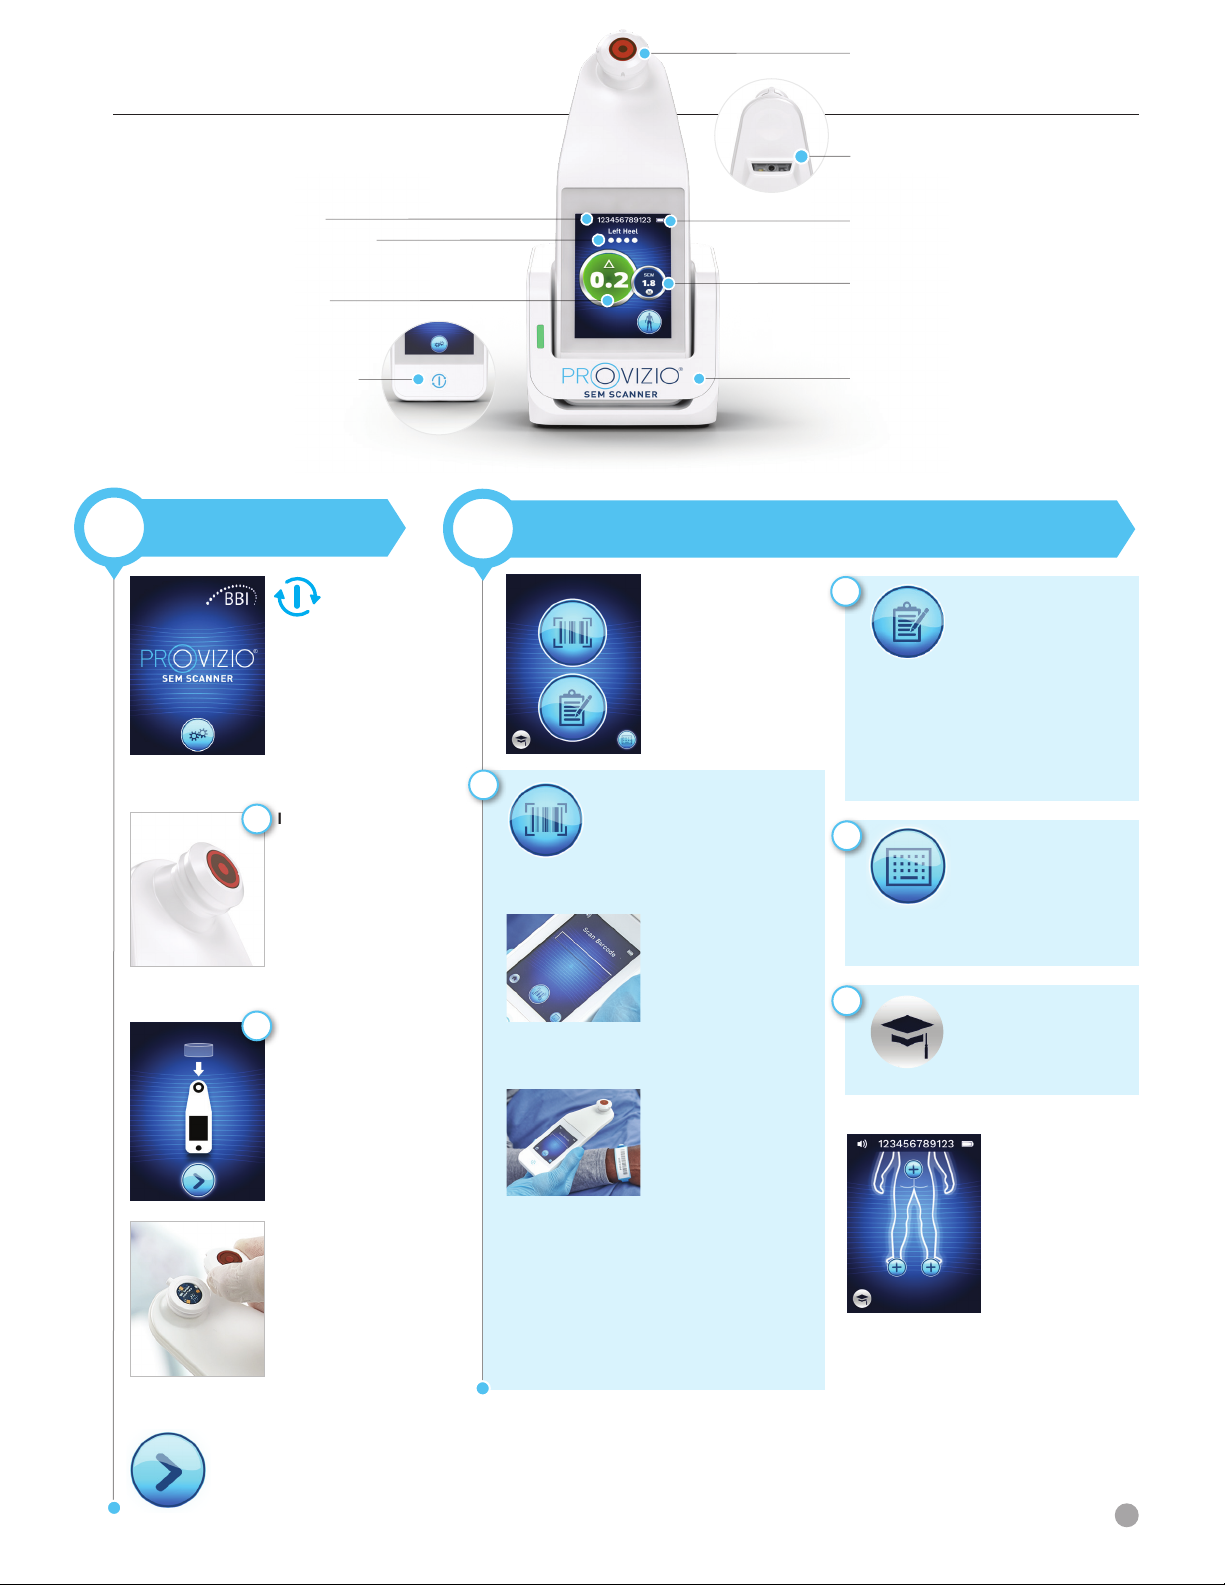
Quick Start Guide
Once the selection
is made (a-d)
the scanner will
automatically move
to the Body Location
Selection Screen
(Figure 9).
Select one of the four
options available
(Figure 6).
1START-UP 2MODE OF OPERATION
Figure 9 – Body
Location Selection
Screen
Figure 2 – Splash
Screen
Figure 6 – Mode of
Operation Screen
Figure 7 – Barcode
Scanning Screen
SEM Delta
Patient ID
Status Indicator
Charging Hub
Sensor
SEM Value
Action Button
Pressing the Barcode Button
will implement full data upload.
Use this mode if the patient has
a bar coded wrist band and the
Provizio SEM Scanner Gateway
Dashboard is installed on your
WiFi network.
Press the Barcode
Button on the Barcode
Scanning Screen
(Figure 7)
Position the scanner
and use the green light
to aim the barcode
reader at the patient
barcode. (Figure 8)
Once the scanner
has identified the
barcode, it will emit a
short audio tone and
the Body Location
Selector Screen will be
displayed. (Figure 9)
If the barcode cannot
be scanned, pressing
the Manual Patient ID
button (Option c) in the
lower right corner will
allow you to manually
enter the Patient ID.
Pressing the Manual
Charting Button will
implement the manual
operation mode.
For when the patient
does not have a bar
coded wrist band, or
you do not have the
Gateway Dashboard
installed on your
WiFi network
a
b
Pressing the Manual
Patient ID
Button in the
lower right corner
will
allow you to manually
enter the Patient ID
via a keyboard on the
scanner display screen
c
Turn on Provizio®
SEM Scanner by
either removing
from the Charging Hub
or by pressing the Action
Button until the screen
illuminates and
the Splash
Screen displays (Figure 2).
The sensor head (Figure 1)
must remain untouched
during this time.
Battery Gauge
Patient barcode scanner
Figure 1 - Provizio®SEM Scanner & Charging Hub
1
OTH-SEM250-0357 Rev D
Single-use Sensor Scanner
If using the single-
use sensor Provizio
SEM Scanner, after
approximately 4 seconds
the Install Sensor Screen
(Figure 4) will display.
Press the Next Screen Button to
continue, the scanner will test
the installation of the sensor and
then display the Mode of Operation
Screen (Figure 6).
Remove the single-use
Provizio SEM Scanner
Sensor from its packaging
and place on the sensor
head (Figure 5). You will
hear a click when the
sensor is placed correctly.
Note - each patient
scanning session requires
a new sensor.
Figure 4 - Install
Sensor Screen
Figure 5 – Installing
Provizio SEM Scanner
Sensor
b
Integrated Fixed Head
Sensor
If using the integrated
fixed head Provizio SEM
Scanner, after approximately
4 seconds the Mode of
Operation screen (Figure 6)
will then display.
Figure 3 - Integrated
Fixed Head Scanner
a
Figure 8 – Scanning a
Patient Barcode
Pressing the Training
Button in the lowerleft
corner will implement
a test mode for
training only
d
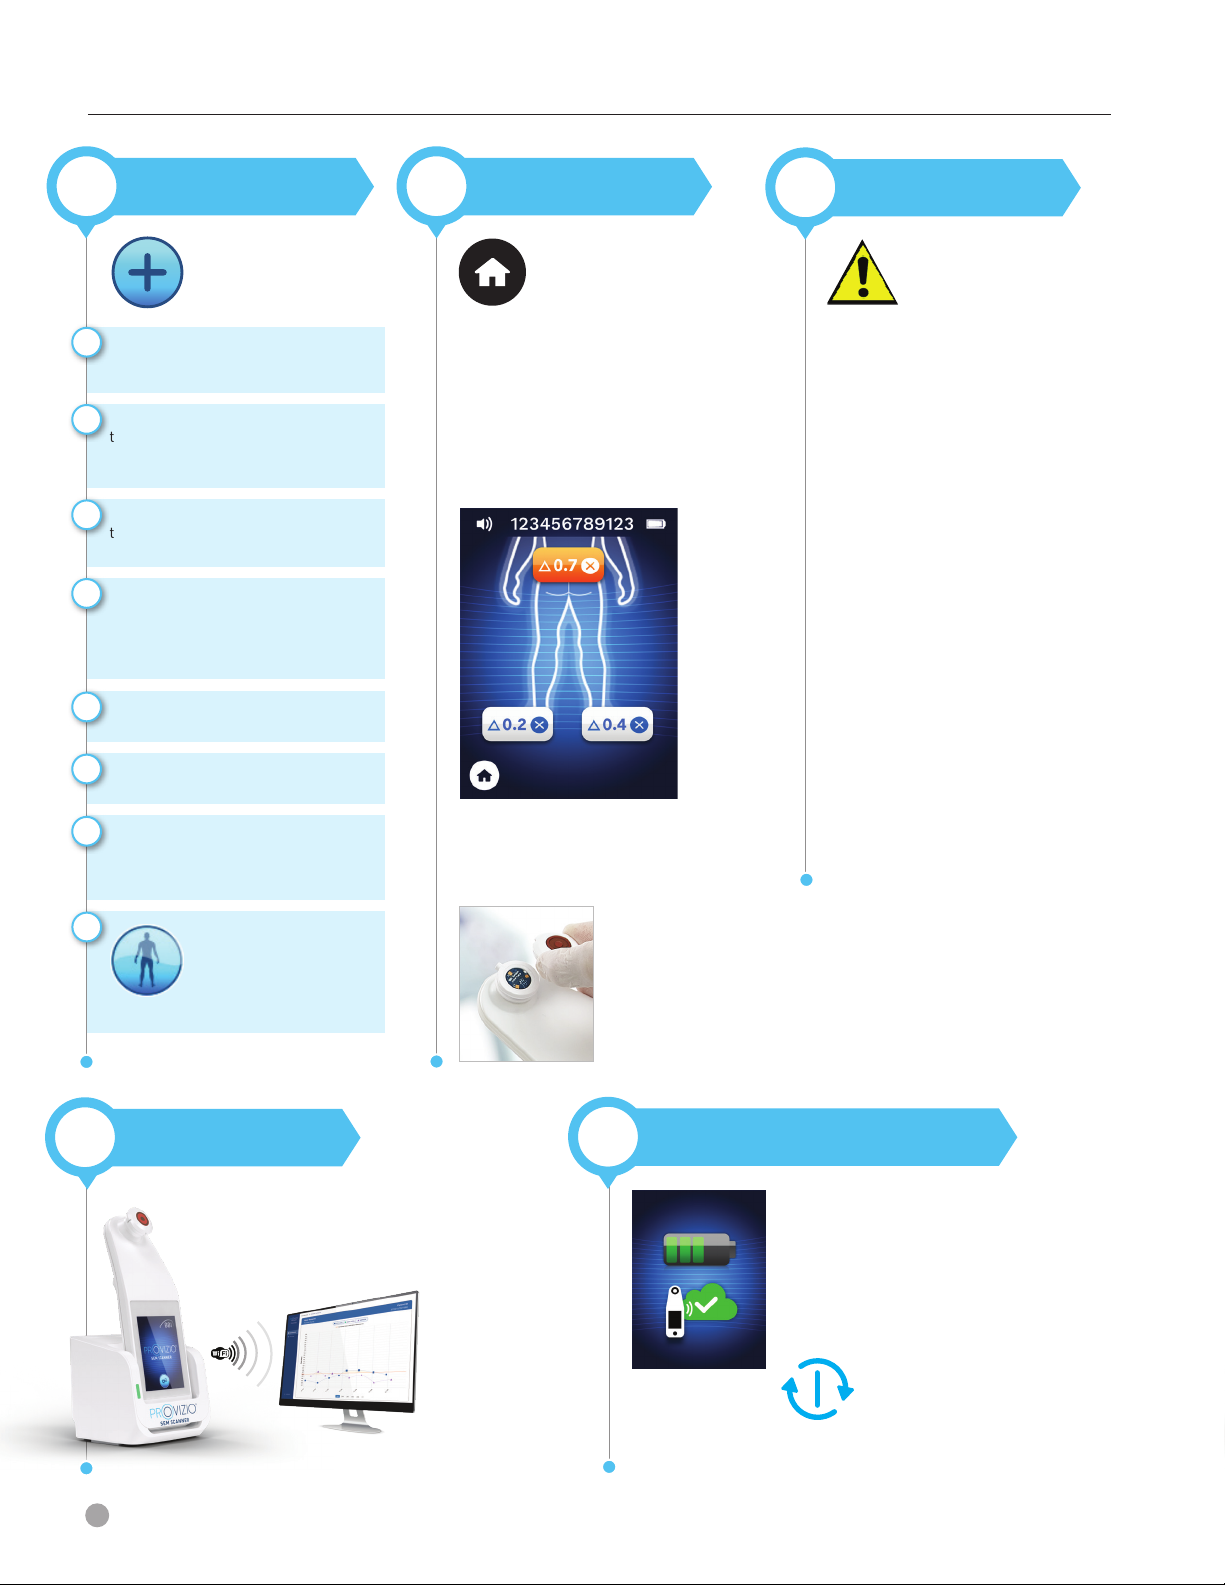
Quick Start Guide
Once all body locations are
complete and delta values
acceptable (Figure 10), press the
Home Button to return to the
Install Sensor Screen (Figure 4)
if using the single-use sensor scanner.
Or the Home Button to return to the Mode
of Operation Screen (Figure 6) - if using the
integrated fixed head scanner.
The scanner will then save and store all
readings taken in encrypted form until
uploaded on the Gateway Dashboard.
If using the Manual Charging Option
the SEM readings are deleted once the
scanning session is left.
If using the single-use sensor scanner,
remove the sensor by gently pulling
away from the sensor connector.
4RESET
Figure 10 - Body Location Selection
Screen (scans complete)
Figure 11 - Removing
the Provizio SEM
Scanner Sensor
OTH-SEM250-0357 Rev D
To charge, place the scanner in the Charging
Hub (Figure 12). The Charging Hub light will
start flashing green. Whilst the device is in the
Charging Hub, the touchscreen is disabled, the
display shows the status of the data upload and
battery charge level (Figure 13).
The scanner is fully charged when five green
bars are illuminated.
To power down, the
scanner can be turned off
by pressing and holding
the Action Button
7CHARGE & POWER DOWN
Figure 13 - Charging
Screen
2
Press the Body Location
Selection Screen Button
to return to the screen
and repeat the scanning
process for the remaining
body areas
Select the body area you
wish to scan; sacrum,
left heel or right heel,
by pressing the Select
Button.
3SCAN
Ensure that any surface moisture
or matter is removed from the
area on the skin being assessed
a
Apply the sensor head flat against
the patient’s skin in the area to be
scanned with sufficient pressure
until the scan is triggered
b
When a successful reading is taken,
the scanner will flash blue and emit
a short audio tone
c
Lift the sensor off the skin.
The session circles under the body
location will be completely filled in
when the measurement
is complete. (Figure 1)
d
The Δ symbol will display a value
after 3 readings are taken
f
Δ ≥0.6 may suggest increased
risk of PI/PU. The value should
be considered in conjunction with
clinical judgement
g
Repeat above steps to obtain a
complete set of readings
e
Clean and disinfect the
Provizio SEM Scanner
following the cleaning
and disinfection
procedure in the User
Manual, which can be
found at;
If using the single-use
sensor scanner, install a
new sensor if scanning
another patient.
https://sem-scanner.com/product/user-guides
5CLEAN
h
To upload readings taken, place the Provizio SEM
Scanner into the Charging Hub (Figure 12), the
scanner initiates wireless communications and
connects to the Gateway Dashboard, all stored,
encrypted data sessions are uploaded to the
Gateway Dashboard and deleted from the scanner.
Figure 12 - Provizio SEM
Scanner Charging Hub
6DATA UPLOAD
Popular Medical Equipment manuals by other brands

MiaoMiao
MiaoMiao MIAOMIAO2 user manual

Braun
Braun Aesculap MINOP InVent trocar 30 Instructions for use/Technical description

Mindray
Mindray BeneFusion VP5 Operator's manual

Monitex
Monitex Ti-Lite GT-1500 user manual

Graham Field
Graham Field intensa IN587WD Series Assembly and operating instructions

Bausch & Lomb
Bausch & Lomb PUREVISION Instructions for use


