Nissin AIR 10S COMMANDER User manual

Commander for wireless flash shooting
Canon / Nikon
INSTRUCTION MANUAL

Thank you for purchasing a Nissin product
Before using this commander unit, read this instruction manual
and the camera instruction manuals and NAS Flash manual to
familiarize yourself with the operations.
The commander Nissin Air 10s (Canon) is an advanced commander for
wireless flash shooting.It controls up to 8 groups of NAS (Nissin Air System)
flash (type Canon) that have a wireless multiple flash shooting function using
NAS (radio transmission). Please note that Nissin Air 10s (Canon) are not
usable with other branded cameras for TTL operation.
Please refer to Nissin’s compatibility chart shown here:
http://www.nissindigital.com/download.html
Compatible cameras
1
Changes or modifications not expressly approved by the
party responsible for compliance could void the user's
authority to operate the equipment.
This device complies with Part 15 of the FCC Rules.
Operation is subject to the following two conditions: (1) this
device may not cause harmful interference, and (2) this
device must accept any interference received, including
interference that may cause undesired operation.

Nissin Air System (NAS) is a Nissin wirelessly remote control flash light system,
designed by Nissin. It consists of a Nissin radio commander (NAS commander)
and the Nissin wireless flash (NAS flash) and Nissin radio receiver (NAS receiver)
as remote slave units.
The signal of Air 10s is transmitted by using 2.4 GHz transmission.
2
Insert Air 10s on the camera hot shoe as a NAS commander.
Transmission distance is approx. 100m (330 ft.)
(Metal/ Wire/ Wall/ another 2.4 GHz radio frequency may cause a
reduction in the NAS transmission distance)

These safety instructions refer to important information on how to use this
product safely and properly. Please read the following instructions before
using the product.
SAFETY INSTRUCTIONS
Do not touch the inside parts from the opening when the unit was dropped or broken.
Place the batteries correctly in position. Placing the batteries in wrong polarity may
cause leakage, exothermic heat or explosion.
CAUTIONS
Do not leave or store the commander unit in the temperature over 40ºC/ 104ºF, such as
in the automobile.
The commander unit is not water resistance. Keep the unit away from rain, snow and
humidity.
Do not use benzene, thinner or other alcoholic agents to clean the unit.
Do not use this commander unit with cameras which are not recommended in the
compatibility list at official website, otherwise it may damage the camera’s circuitry(*).
Remove the batteries when not in use for a longer period of time.
Do not use the Nissin Air 10s to pick up whole camera system when it installed on your
camera. To pick up the whole camera system, you should hold the handle of camera
body or the lens..
This sign refers to conditions which may cause damage or defect.
3
(*)Please refer Nissin’s compatibility chart shown here:
http://www.nissindigital.com/download.html

Names of the Components
4
Group selection button
Group on/off button
Modeling light button
(Basic/Advanced Groups button)
Shutter cable socket (2.5mm)
M/TTL Mode Button
1
2
3
4
5
6LCD panel
Select dial with buttons
Channel button
HSS button
Buzzer button
M.Zoom button
Panel Lock/Unlock button (hold 1sec.)
7
8
9
10
11
12
13
14
15
(1) The auto focus assists lamp supports the digital SLR (D-SLR) type camera
using optical focus for auto focus only. It does not support other brand cameras,
other types of Canon cameras or camera models without our compatibility test.
(2) The strap hole made for carrying the Air 10s around the neck.
Pilot button (Test flash button)
Power On/Off button
Unlock button
Micro SD card slot
(for firmware update)
Strap hole
(2)
(strap is not included)
Battery compartment door
AF-assist light
(1)
Hotshoe contacts

Inserting batteries
Before starting wireless flash shooting.
1. Open the battery compartment door and
insert 2 x size AAA batteries as shown
in the picture.
2. Make sure the + and - battery contacts are
correctly inserted in the battery compartment.
3. Close the battery compartment door and
slide it back in place.
CAUTIONS
1. It is recommended to use 2 batteries of the same brand and replace all at the same time.
2. It is recommended to use a qualified rechargeable battery due to environmental
protection and power supply reaction while using. Re-charge the battery before use
3. Wrong insertion of the battery direction or wrong versions of batteries may lead to
malfunction on electrical contacts or damage on Air 10s.
4. Remove all batteries from Air 10s is highly recommended while not in use for long time.
Applicable Battery Type - Alkaline batteries, Lithium batteries or NiMH batteries.
Preparation before use.
5
2
1
1
2
(*) Air 10s has an energy saving power off function
To save battery energy, the screen of Air 10s display dims in about 30 seconds and
turns off in about 2 minutes automatically after the setting job is terminated. While Air
10s is in the stand-by mode, a blinking signal will be shown on the Pilot Button. To
turn on Air 10s again, press any button on the Commander. In case of not in use for
over 60 minutes, Air 10s will be turned off completely. To turn on Air 10s again, press
Power button on the Commander.

Press power on to activate Nissin Air 10s,
hold the Pilot button for 5 seconds to reset to factory default setting
Default setting:
1. TTL mode: +/- 0EV
2. M Manual mode: 1/256
3. Zoom setting: Manual, 24mm
4. Channel Setting: no. 2
5. HSS mode: off
6. Buzzer: off
7. Group Mode: Basic Groups
8. Group status: all on
Default Setting reset
6

7
Basic Operation
CAUTIONS
When picking up the camera body or the lens, handle should be used. Do not use
the Air 10s as a holder to pick up the whole camera system.
Mounting Air 10s on the camera
Removing Air 10s from the camera
Turn off Air 10s.
Turn off Air 10s.
Insert the mounting foot of Air 10s into the
hotshoe of the camera.
1.
2.
2
1
A “slight click” sound will be heard when
mounting foot is completely locked.
3.
Hold the unlock button and
slide the mounting foot of Air 10s off
the hotshoe of camera.
1.
2.

8
Wireless Flash Shooting
Pairing before use.
Pairing Setting
!
Step 1: Set all NAS flashes and NAS receivers to pairing mode one by one.
To perform wireless shooting, set the Nissin Air 10s commander and
NAS slave unit with the following procedure. After pairing is completed, both of them
will memorize the data and there will be no need to pair again after the units are
switched on and off.
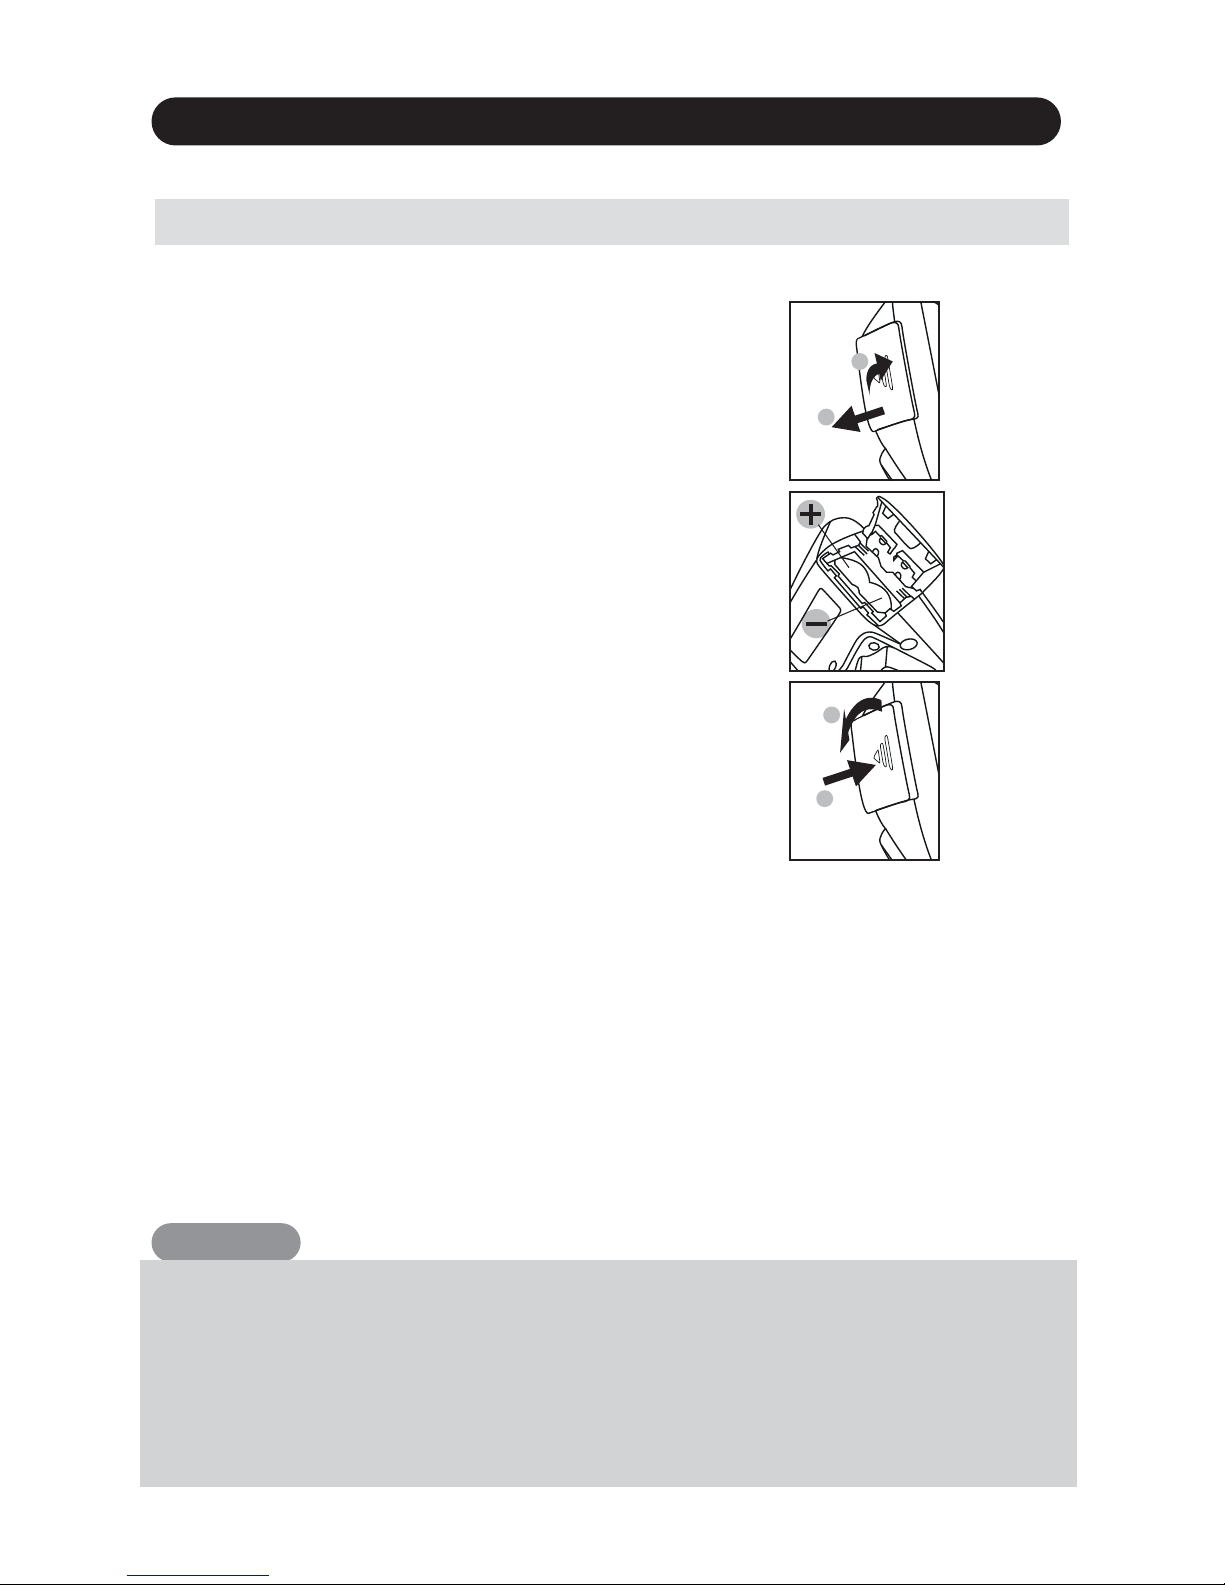
1. Make sure the Nissin Di700A is off.
2. Hold the "Set" and Power “ON/OFF” buttons for 3 seconds at the same time.
4. Nissin Di700A will automatically be changed to wireless slave mode
after Pairing completed.
Nissin flash Di700A
NAS
3. “Beep” sound persists until the Pairing signal from commander is received.
When the "beep" sound stops, the pairing is complete.
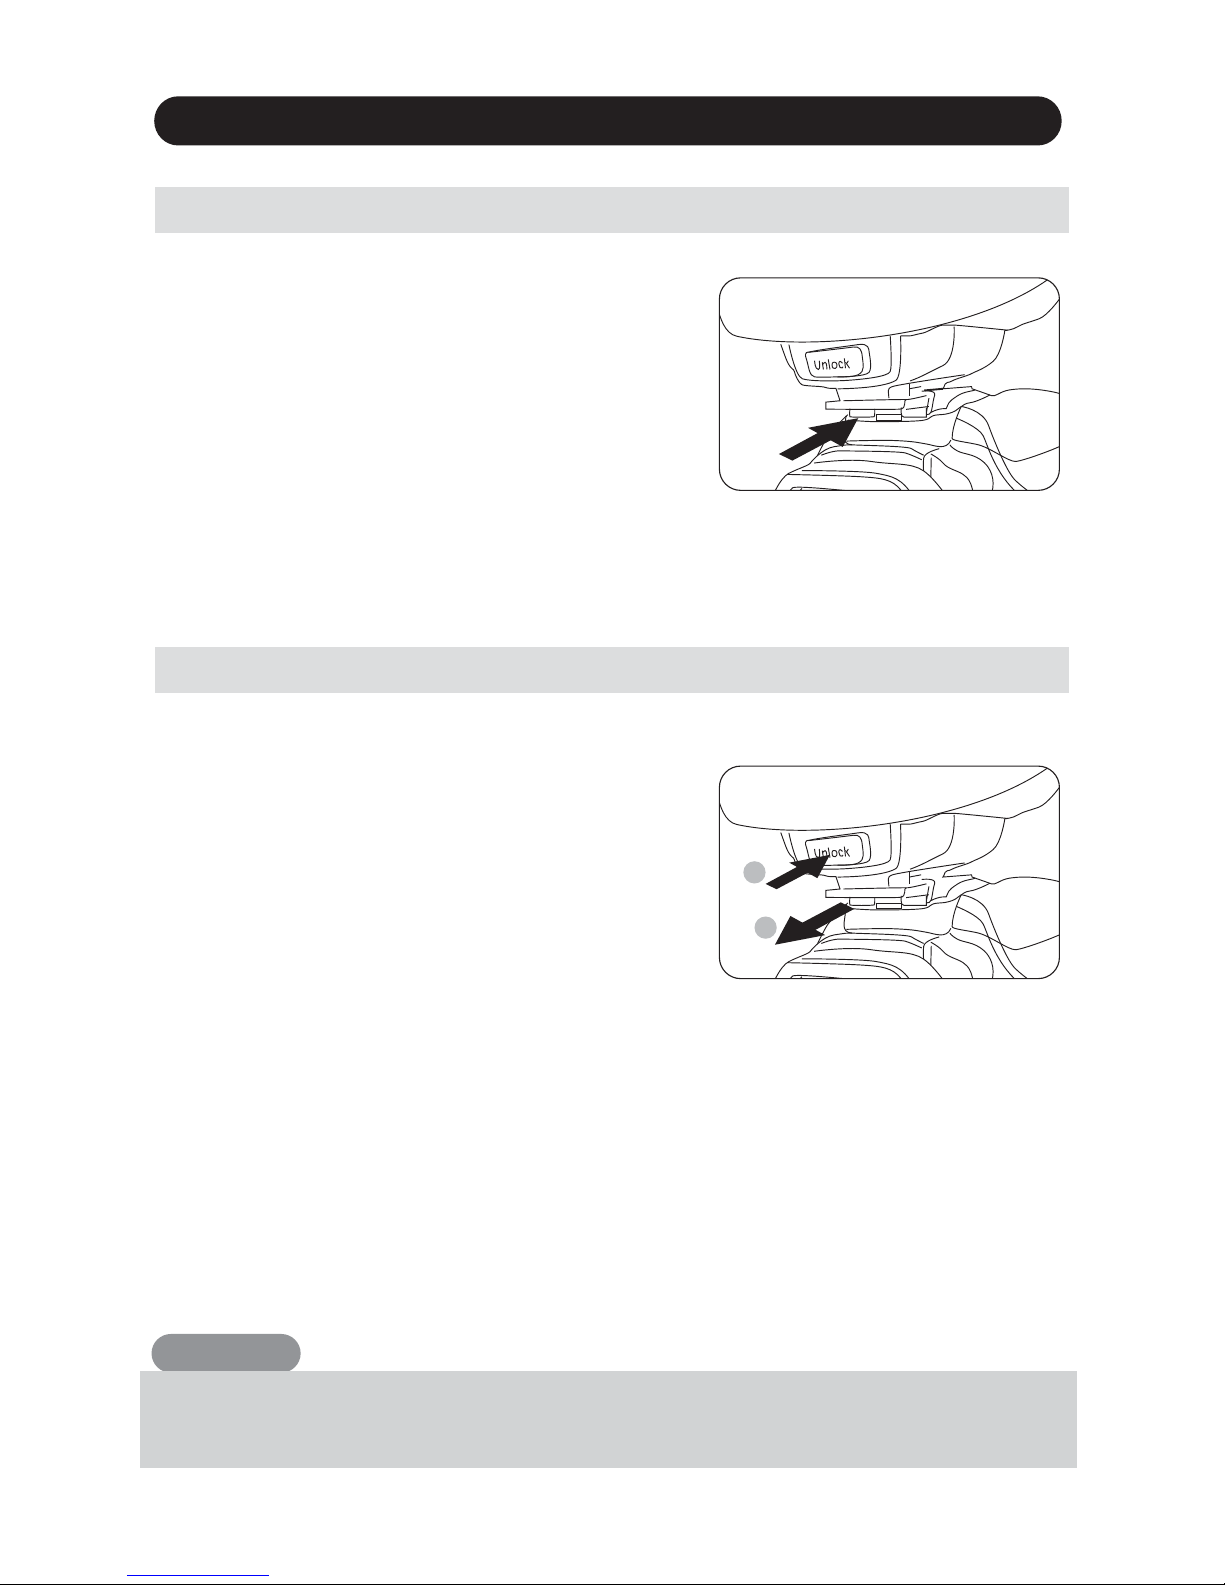
1. Switch on your Nissin i60A, hold the "Channel" button for 2 seconds to check
and make sure the channel setting in the display is in the "A" Auto channel mode.
2. Turn off the Nissin i60A.
4. “Beep” sound persists until the Pairing signal from commander is received.
When the "beep" sound stops, the pairing is complete.
Nissin flash i60A
3. Hold the Panel Lock key and the “On & Off” button of Nissin i60A
at the same time for 3 seconds..
5. After Pairing process is completed, turn the Mode Dial of Nissin i60A
to Wireless mode groups (A / B / C).
1. Make sure the Nissin MG10 is off.
2. Rotate the "Ch" channel dial to "Auto" auto channel mode.
4. “Beep” sound persists until the Pairing signal from commander is received.
When the "beep" sound stops, the pairing is complete.
Nissin flash MG10
3. Hold the "Open" button and the power button for 3 seconds.

9
Wireless Flash Shooting
NAS
Pairing before use.
!
Step 1: Set all NAS flashes and NAS receivers to pairing mode one by one.
Nissin Air R Receiver
1. Make sure the Nissin Air R is off.
2. Rotate the "Ch" channel dial to "Auto" auto channel mode.
3. Hold the power button for 3 seconds
4. “Beep” sound persists until the Pairing signal from commander is received.
When the "beep" sound stops, the pairing is complete.
5. After Pairing process is completed, turn off the Nissin Air R. Install a compatible
flash onto the Air R and make sure that both the Air R and the Flash are turned off.
Then turn on the Nissin Air R and the paired flash.
6. Set the flashgun on the Nissin Air R to TTL mode (or set the Nissin flash
to “A” fully automatic mode), Auto zoom mode and
+/- 0EV exposure compensation setting(*).
7. According to the GN value of the flash to set the GN mode of Nissin Air R
to high / low output mode (*)
(*) Please refer to the instruction manual for the model
CAUTIONS
If there are many NAS flashes and NAS receivers as slave units, you can do the
pairing one by one or several slave units at the same time by using NAS commander.

10
Wireless Flash Shooting
NAS
Step 2: Channel Setting on Nissin Air 10s commander
1. Start the Pairing mode of all slave units and the "beep" sound are constantly heard.
2. Turn off Nissin Air 10s then hold the Panel Lock key and
the power “On/Off” button for 3 seconds at the same time.
The Pilot LED will blink about ten seconds (the display will not light up while pairing).
When Nissin Air 10s Pairing mode has stopped, slave units around the commander
will also complete the pairing process one by one, and stop the "beep" sound.
3. To check the pairing between Nissin Air 10s and slave units,
press the “Pilot LED” button on Nissin Air 10s for test and let NAS flash and
the flash on NAS receiver emit a weak output test flash.
CAUTIONS
If strobes still have "beep" sound constantly after finishing the pairing process, this
means the pairing process is not complete. Please move your Air 10s towards the
Beeping strobes, then turn off the Air 10s and re-do the pairing process by holding
its Panel Lock key and the “On/Off” button again for 3 seconds.
(*) Nissin Di700A, i60A ash and Nissin Air R receiver do not support the Channel 1 in Nissin Air 10s.
Please use Channel 2 to 8 to pair with those 3 NAS slave unit models.
i60A / Di700A / Air R
MG10 Ch.2 - 8
Ch.1 - 8
Ch.1 - 8
Ch.2 - 8
Air1 Air 10s

Group Setting
11
1. Power on Nissin Di700A and switch to wireless slave mode,
press “Set ” several times until the (Group mode in the display),
then turn the to change the group number.
2. Press the key to confirm the new setting.
Air 10s, provides individual control of 4 groups (strobes), you can set
these 4 groups in different settings. Before shooting, you have to set
each strobes to be one of these 4 groups.
Set
A B C
/ /
Set
1. User can turn the Mode Dial to in changing the group setting.
A B C
/ /
1. User can turn the Mode Dial to
in changing the group setting.
1. User can turn the Mode Dial to in changing the group setting.
A B C
/ /
Nissin Di700A Flash
Nissin i60A Flash
Nissin MG10 Flash
Nissin Air R Receiver

Group On/off Setting
12
In testing or changing the flash effect of different slave units group,
you can turn on or turn off any group.
1. Press the Group Selection button on Nissin Air 10s.
While the selected group is blinking in the display, press the “Group On/Off ” button.
When the group is switched on, the exposure setting value and exposure bar
will be appeared on the right side of the group. When the group is switched off, only "---" is shown.
2. After completion of the On/Off setting of the group,
press the “Group Selection” button to stop the blinking.
Nissin Air 10s Commander
CAUTIONS
If you do not press any group selection button which means all group letters in the
display do not blink, press the group on/off button to invert the setting of the groups.
For example:
A & C: on, B & D: off
Press the group on/off button,
to switch A and C off and so on.
A & C: off, B & D: on
Air 10s
Commander

The NAS system is using an independent identity (ID) function to
access strobes, the NAS strobes will not be affected by other commanders
whenever they are using the same channel in the same location.
A slave unit of Nissin flash or Nissin receiver can only be controlled by
one and only one NAS commander with pairing in default setting.
Air 10s offers “Open Mode” ,a new function (only works with MG10),
on the pairing setting. It lets strobes paired to the NAS system to be
wirelessly controlled by two or more NAS commanders at the same time.
Turn on the open mode on all NAS strobes, then one or more commanders
can be used to wirelessly control the slave units without pairing.
13
Open Mode (only works with MG10)
1. Hold the button of Nissin Air 10s for 2 seconds,
the word “OPEN" lights up on the top of in the LCD display which means
Open Mode is on. Now hold the for 2 seconds again to turn off.
Open Mode Setting

There are basic groups and advance groups for controlling the Nissin
Air10s. They allow the user to pair an unlimited amount of slave units.
They mainly divided into two kinds of groups:
When slave units are set to be in basic groups , all groups will
use the same exposure mode settings (TTL auto mode or M manual exposure mode).
Each group can be set to a different exposure setting. When slave units are set to
be in Advanced groups, each group can be set to either TTL
automatic exposure mode OR M manual exposure mode individually. Exposure
settings of each group can also be adjusted independently.
14
Basic Groups and Advanced groups
CAUTIONS
The of Basic groups and of Advanced groups are a new
feature of the NAS system. Nissin Di700A, i60A flash and Nissin Air R receiver do not
support support the D group or the advanced group settings. User needs to use the
basic groups mode to control them. Hold for 2 seconds to shift to advance group.
Press again to turn on the modelling light.
B
C
D
A
M mode in basic group. M/TTL mode in advance group.TTL mode in advance group.
B
C
D
A
M mode in basic group
with modelling light.
TTL mode in advance group
with modelling light.

15
Flash power control
When the NAS flash is set to the wireless mode, all exposure setting
functions will be controlled by the NAS commander.
B
C
D
A
TTL and M exposure mode switch
In Basic groups mode: Press the button.
In Advanced groups mode:
To set different exposure in each group:
1. Press the Group Selection button. When the letter “A” blinks,
press M / TTL mode button to change the exposure
(the same procedure works with groups B, C, and D).
2. After completing the exposure setting,
press the Group Selection button again to stop the blinking.
CAUTIONS
TTL auto flash exposure mode of Nissin Air 10s (Canon version) only supports
Canon cameras which is finished the compatibility test. More details please refer to the
Nissin’s compatibility chart shown: http://www.nissindigital.com/download.html

16
Flash Exposure Control
TTL flash exposure compensation
1. Press the Group Selection button, the group letters blink.
2. Rotate the Operation Dial to increase or decrease the TTL flash exposure compensation.
The settings of TTL auto exposure compensation on Nissin Air 10s starts
from -2EV to + 2EV and controlled by 1 / 3EV step interval.
In addition to the bar chart, there are a number of exposure values shown:
Setting of 0EV shows in 0.0,
Setting of -2EV to -0.3EV will be displayed in -2.0 to -0.3;
Setting of +0.3EV to + 2EV will be displayed in 0.3 to 2.0.
3. When the exposure compensation setting is completed,
press the group selection button again.
CAUTIONS
TTL auto flash exposure mode of Nissin Air 10s (Canon version) only supports
Canon camera. Other brand cameras or camera models without our compatibility
test does not support.
CAUTIONS
If you do not press any group selection button which means all group letters in the
display do not blink, rotate the Operation Dial to increase/ decrease the power of all
groups. For example, A: 0EV, B: + 0.6EV, C: + 1EV, D: -1EV, do not select any
group then turn the Operation Dial clockwise in 2 click intervals, will cause to A: +
0.6EV, B: + 1.3EV, C: 1.6EV, D: -0.3EV.
TTL mode
Switching Air 10s from TTL mode to M mode, the last flash power setting
will be saved in TTL control. Flash power value will also remain unchanged in M mode.
TTL memory (exposure value memory)

17
Flash Exposure Control
M manual flash mode power control
1. Press the Group Selection button, the group letter blinks.
2. Rotate the Operation Dial to increase or decrease the flash power of the group selected.
The setting of M mode on Air 10s starts from 1/256 (minimum) to 1/1 (Full), and
controlled by 1/3 step intervals. The value digi displayed next to the group
only shows the integer step value (*).
3. When the M mode setting is completed, press the group selection button again.
CAUTIONS
TTL auto flash exposure mode of Nissin Air 10s (Canon version) only supports
Canon camera. Other brand cameras or camera models without our compatibility
test does not support.
CAUTIONS
If you do not press any group selection button which means all group letters in the
display do not blink, rotate the Operation Dial to increase/ decrease the power of all
groups. For example, A: 1/256, B: 1/8 + 0.6EV, C: 1/4, D: 1/2, do not select any
group then rotate the Operation Dial clockwise with 2 intervals, it becomes
A: 1/256 + 0.6EV , B: 1/4 + 0.3EV, C: 1/4 + 0.6EV, D: 1/2 + 0.6EV.
(*) The integer step values of Nissin Air 10s are
1/1, 1/2, 1/4, 1/8, 1/16, 1/32, 1/64, 1/128 and 1/256
B
C
D
A
M mode

18
M. Zoom
Since the different focal length of the lens are suitable for different angles
of the shooting range, the focal length is getting shorter at the same sensors size.
Which means that the smaller focal length lens with larger angle in the view,
the flash area coverage will be larger.
Zooming
Position
24mm
28mm
35mm
50mm
70mm
85mm
105mm
Full 1/2 1/4 1/8 1/16 1/32 1/64 1/128 1/256
135mm
200mm
Flash Power Level (Guide No.)
60 42 30 21 15 11 7 5 4
54 38 27 19 13 10 7 5 3
50 36 25 18 13 9 6 4 3
45 32 23 16 11 8 6 4 3
42 30 21 15 11 7 5 4 3
39 28 20 14 10 7 5 3 2
32 23 16 11 8 6 4 3 2
29 20 14 10 7 5 4 3 2
27 19 13 10 7 5 3 2 2
Nissin i60A Guide No. at manual exposure mode (ISO 100 in meters)
For the camera system we support, there are 4 main image sensor sizes:
35mm Full Frame format, APS-C format, 4/3 system format and 1” sensor format.
The effective focal length of the mounted lens varies depending on the camera’s
image sensors size. Air 10s recognizes the image sensor size of each camera sensor format
automatically , users can use auto or manual mode to adjust the optimum flash coverage of
the slave units and make the effective focal length of lens within a range of 24-200mm.

19
Zoom head setting
CAUTIONSCAUTIONS
If you do not press any group selection button, which means all group letters in the
display do not blink, rotating the Operation Dial to increase or decrease the flash
zoom head focal length will affect all groups; A, B, C and D.
Auto Zoom function of Air 10s (Canon) commander only supports Canon cameras.
Please noted that Air10s will not support another cameras brand or Canon camera
models that do not included in our compatibility test. More details please refer to the
Nissin’s compatibility chart shown: http://www.nissindigital.com/download.html
Nissin Air 10s offers "A" auto zoom mode and manual zoom mode.
1. Hold the for 2 seconds.
2. Press the group selection button until the the desired letter(s) blink.
Rotate the Operation Dial to change the Zoom head position setting.
The focal length is representing the flash angle. Rotate the Operation Dial
in anti-clockwise direction to decrease the value of the focal length of zoom head.
Keep rotating anti-clockwise to change the "A" automatic zoom mode at the end.
Rotate the Operation Dial in a clockwise direction to leave.
The “A” auto zoom mode will increase the value of the focal length value of zoom head.
Coverage range supports 24mm, 28mm, 35mm, 50mm, 70mm, 85mm,
105mm, 135mm and 200mm focal length lenses.
3. Press the group selection button again after completion of the zoom setting.
Hold for 2 seconds again when all groups zoom settings are completed.
This manual suits for next models
1
Table of contents
Other Nissin Camera Accessories manuals