Nitro MY2 User manual


contents
Index
Index
Warning
Equipment Needed
Tools Recommended
Fuel&Glow Plug
Shock Stay
Differential
Turnbuckle
Steering System
Chassis Assembly
Steering Crank
Center Diff and Brake System
Radio Tray System
Fuel Tank
Standard Setup Sheet
Setup Sheet
Exploded View
Engine
Tire & Body
Standard Parts List
Optional Parts List
Other Parts List
A
B
G
F
E
D
C
H
K
J
I
2
3
17
13
10
9
8
6
5
4
18
21
22
23
41
37
31
29
27
24
26
IJ

To prevent any serious personal injury and/or damage to property, please be responsible when operating
all remote controlled models. Extra attention is called for when operating any glow fuel powered model.
These models can exceed speeds of 31 mph (50km/h) and use highly poisonous and flammable fuels.
Choose the right place to operate your R/C model.
ΆDo not run on public streets or highways. This could cause serious accidents, personal injuries, and/or
property damage.
ΆNever run R/C models near people or animals.
ΆTo avoid injury, do not run in confined spaces.
ΆDo not run where loud noises can disturb others, such as hospitals and residential areas.
ΆNever run indoors. There is a high risk of fire and/or damage.
Inspect your model before operation
ΆMake sure that all screws and nuts are properly tightened. It is also a good idea to use removable thread glue
wherever metal screws go into metal, especially for engine mounts and the engine pilot shaft.
ΆAlways use fresh batteries for your transmitter and for your receiver to avoid losing control of the model.
ΆAlways test the brakes and the throttle before starting your engine to avoid losing control of the model.
ΆMake sure the air filter is clean and oiled. Never run your engine without an air filter.
ΆYour engine can be seriously damaged if dirt and debris get inside the engine.
ΆMake sure no one else is using the same radio frequency as you are using.
Heat,Fire,and Fuel Safety
ΆNever use gasoline in a glow model engine. Use glow fuel specifically designed for car engines. Using
non-approved fuels in your engine can cause an explosion.
ΆDo not run near open flames or smoke while running your model or while handling fuel.
ΆAlways store fuel in a well ventilated place, away from heating devices, open flames, direct sunlight,
or batteries. Keep glow fuel away from children.
ΆBe aware that some parts will be hot after operation. Do not touch the exhaust or the engine until they have
cooled. These parts may reach 275°C (527°F) degrees during operation!
Glow fuel is flammable and poisonous. Always read the warning label
for safety information. Glow fuel powered model engines emit
poisonous vapors and gasses. These vapors irritate eyes and can be
highly dangerous to you health. We recommend wearing rubber or
vinyl gloves to avoid direct contact with glow fuel. Also, be aware of
spilled or leaking fuel. Fuel leaks can cause fires or explosions.
Cautions
ij
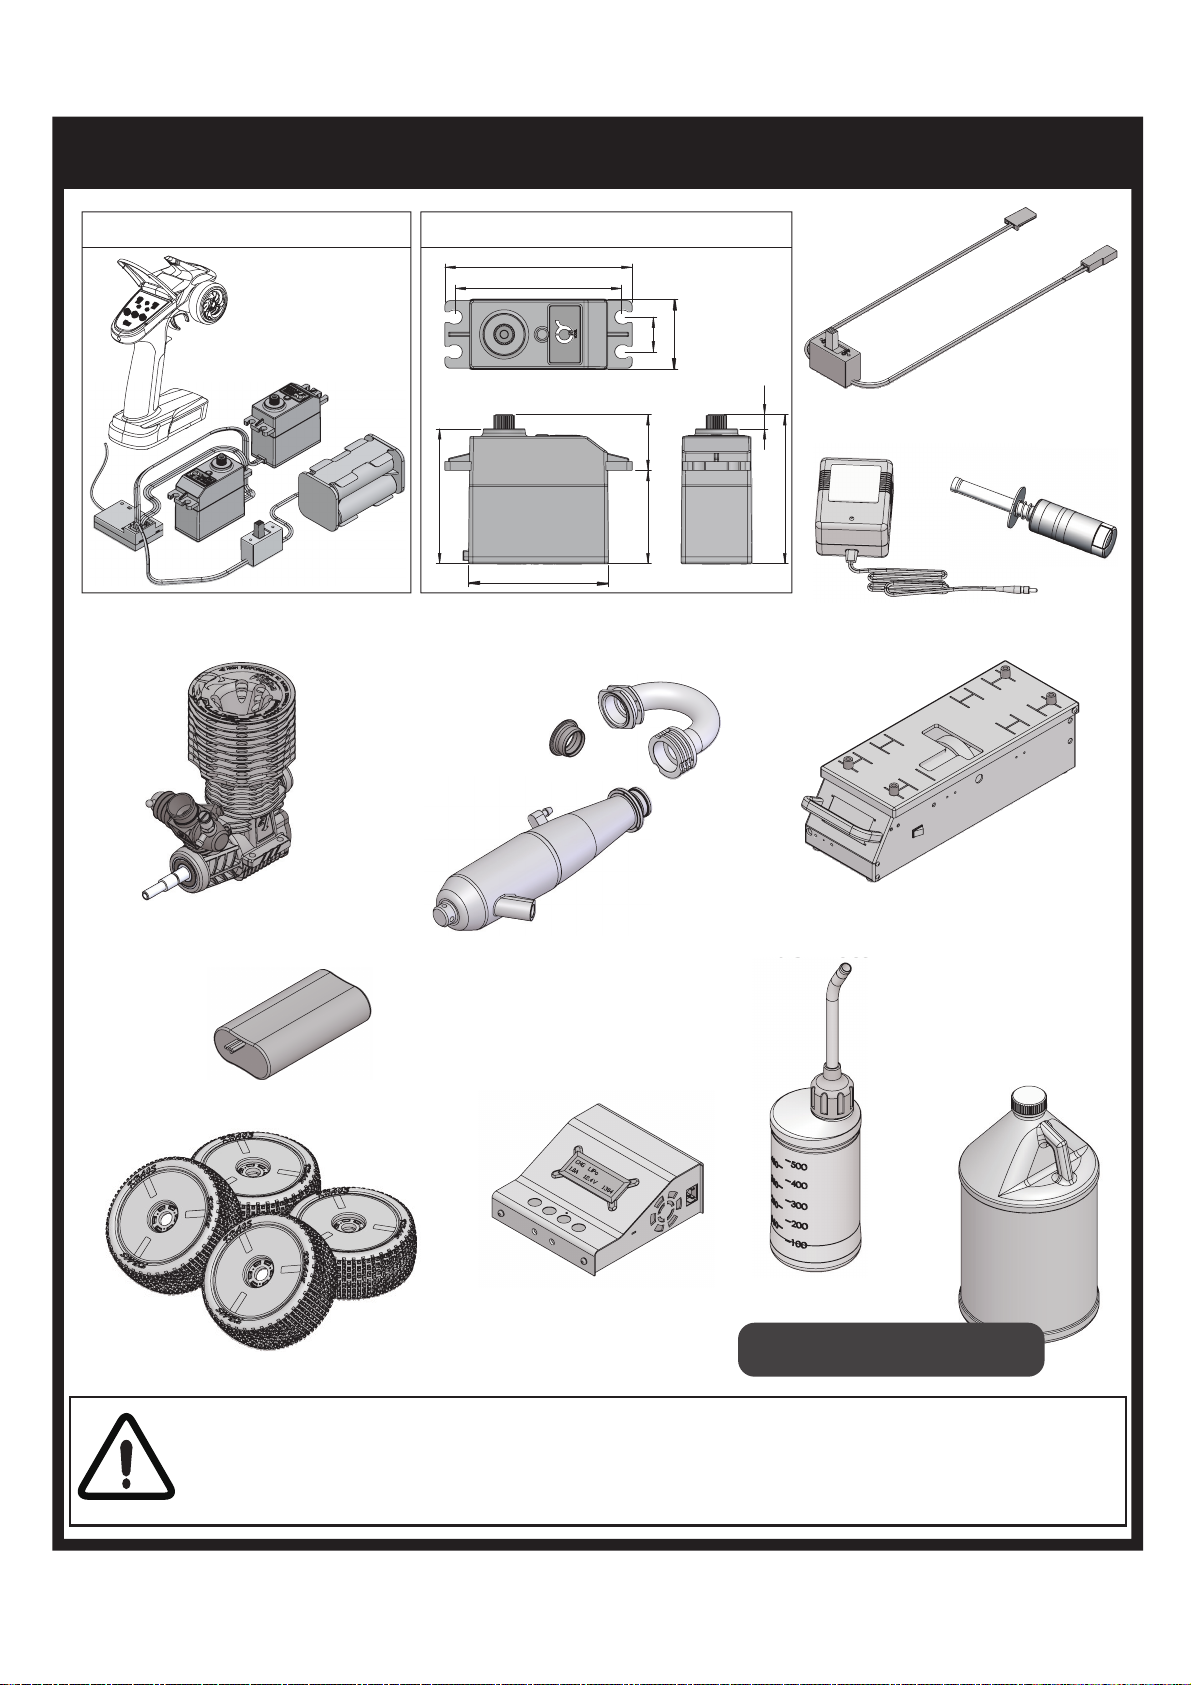
Fuel Bottle
Glow Plug lgniter
Servo
38.95
26.95 16.1
40.3
48
54
10
20.3
43.05
4.1
Needed for kit without Radio.
Equipment Needed
Receiver Switch
If you do not use a charger designed to charge Nickel Metal Hydride/LiPo batteries,
The batteries will be damaged.
Cautions
We recommend that you use
fuel containing 20~30% nitro.
Glow Fuel
Tires
Fuel Bottl
Engine
Li-Po Battery 7.4V
Starter Box
Exhaust Pipe
Charger for Receiver
Battery Pack
Ĵ

Screwdriver
Glow Plug Wrench
M5.5/M8/M10/M17
Screwdriver(small)
Screwdriver(big)
Allen Wrench
1.5mm
2.0mm
2.5mm
3mm
Tools Recommended
Thread Glue Instant Cement
Needle Nosed Pliers
Reamer
Air Filter OilPaintGrease
Front
Diff Oil #7,000
Center
Diff Oil #5,000
Rear
Diff Oil #2,000
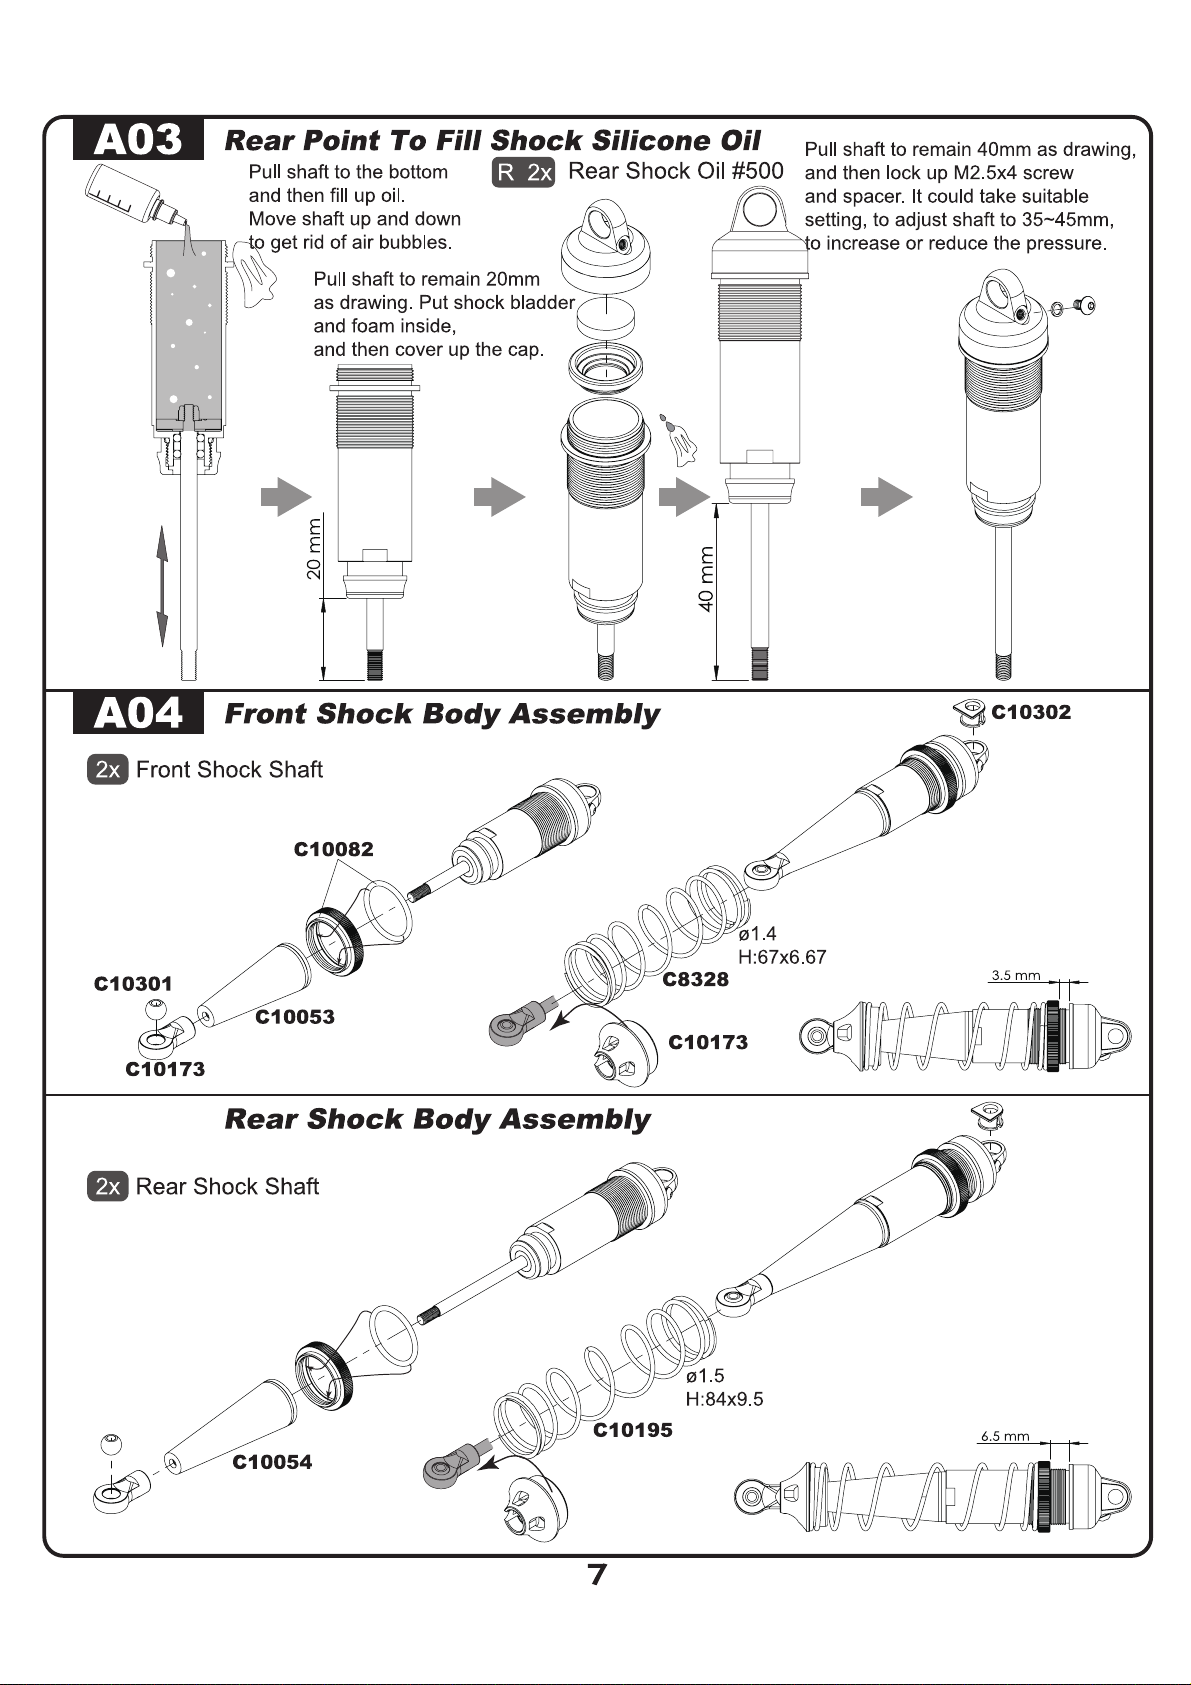
Shock
Oil #500
2x
Included Items
ĵ

Start the Engine
Flooded Engine
Glow Plug
Before using the starter, make sure the batteries in your R/C car and transmitter are fully
charged. Check the radio functions to make sure your R/C car is in proper working order.
Turn on Radio System
1.Switch on transmitter.
2.Switch on receiver.
STEP
1
STEP
2
ON
Fill tank with high quality
R/C car glow fuel.
Keep the wheels off the ground
during static break-in!
Turn the wrench counter-clockwise
to remove the glow plug.
Tilt the engine head away from face
and turn the motor over using the
starter.
Replace the glow plug and
complete the starting steps
without priming the engine.
2
34
Use a fully charged glow plug igniter to test the glow plug.
Hold the glow plug with needle nose pliers and attach to the
igniter. If the plug is good, the element will glow an orange
or red color. If the element doesn’t glow,or if it is damaged,
you will need to replace the plug. The element will be very
hot when glowing.
HOT!
Glow Plug lgniter Pliers
Element
Good Plug
Element glows when tested.
Bad Plug
Element may be damaged
or broken if it doesn’t
light up completely.
Bad Plug
Element is broken or
doesn’t light up at all.
Ķ


D03
IJIJ
Front / Rear Shock Tower Assembly
D04
CVD Assembly
C10065
2.5x13.2mm PIN*4pcs
3x22mm Screw*4pcs
3x16mm Screw*6pcs
3x16mm Screw*2pcs
3x14mm Screw*1pcs
3x12mm Screw*2pcs
Front Shock Tower Assembly
Rear Shock Tower Assembly
3x16
3x22
3x16
3x16
3x22
3x12
C10066
C10179
C10022 C10007
Step1
Step2
Step3
Step4
Step5
C10161
C10166
C10184
C10151
C10162
C10162
3x14
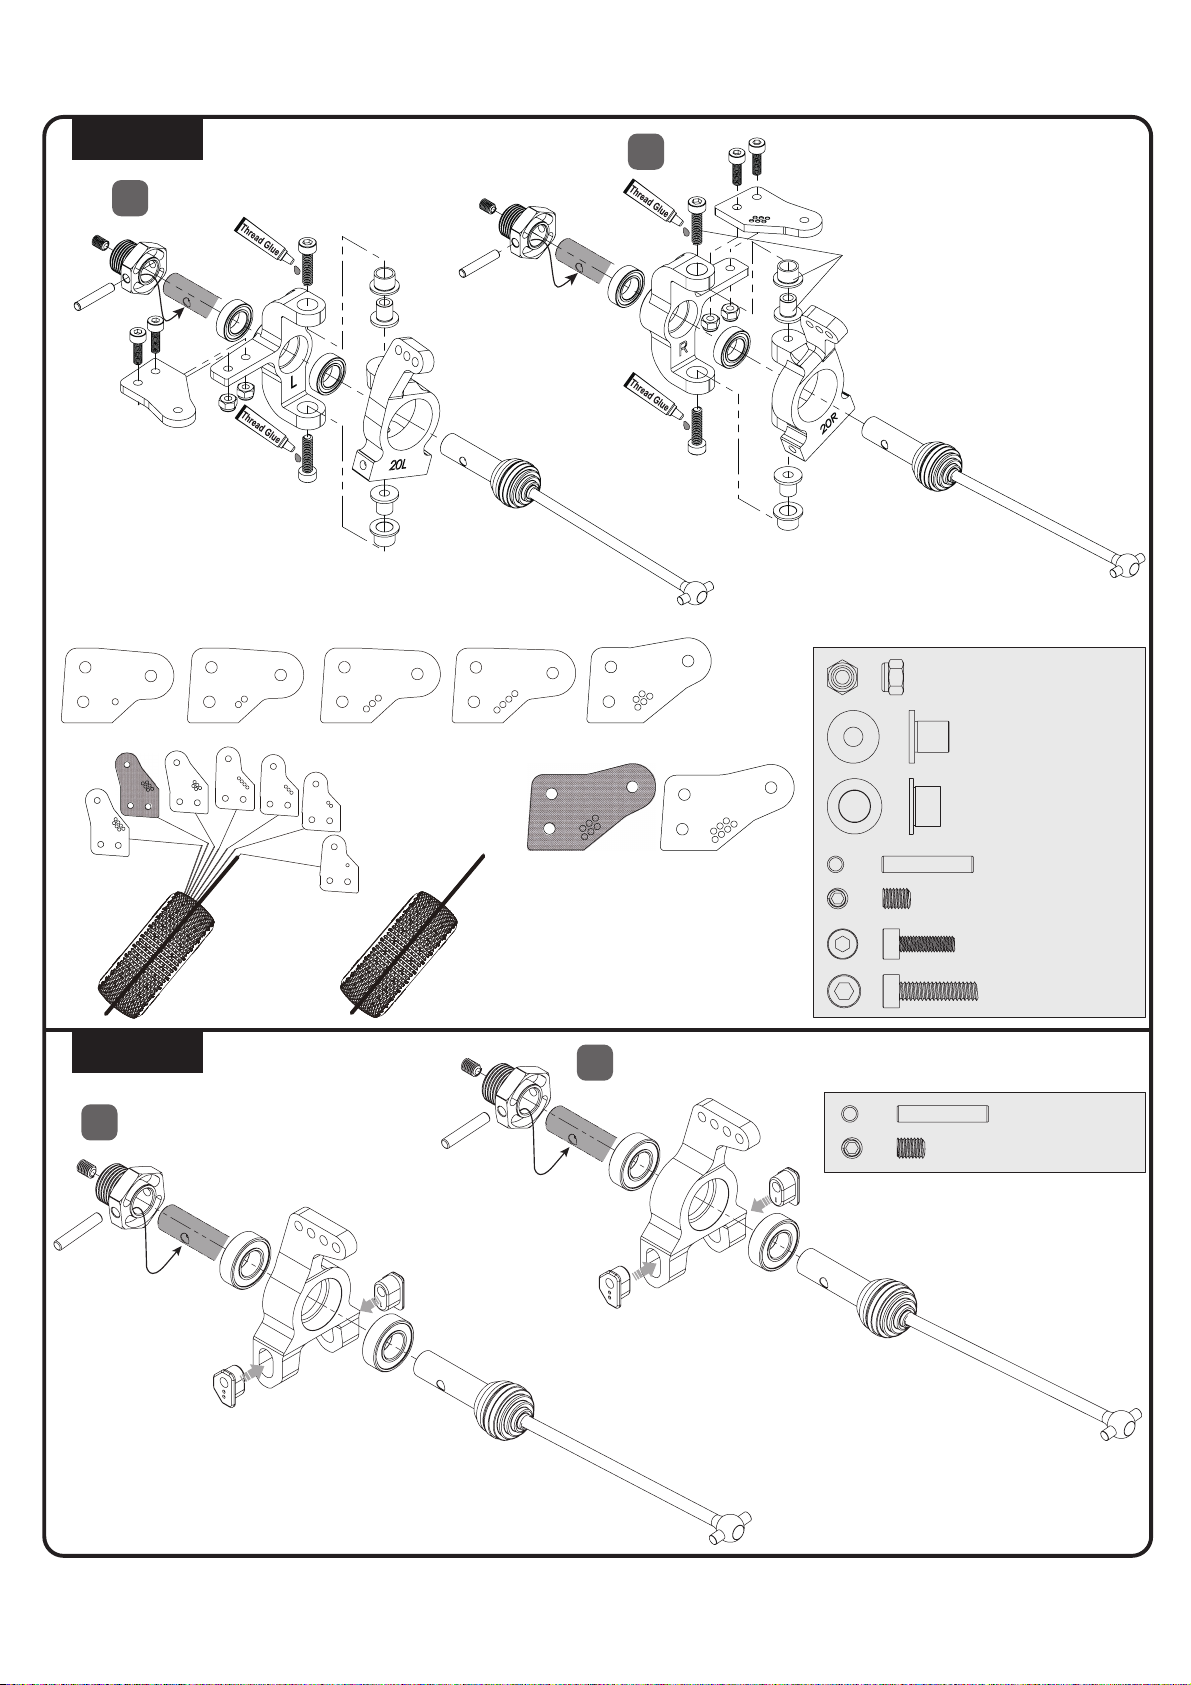
D05
Front Steering
D06
Rear Hub
3.5x14mm Screw*4pcs
4x5mm Screw*2pcs
3x16.8mmPIN*2pcs
3x10mm Screw*4pcs
Steering Block Bushing*4pcs
3mm Lock Nut*4pcs
Steering Block Bushing*4pcs
4x5mm Screw*2pcs
3x16.8mmPIN*2pcs
R
L
R
L
4x5
4x5
C10192
C10074
C10214
4x5
4x5
3x10
3x10
3.5x14
3.5x14
C10177
C10073
C10109
C10168 Type 1 C10170 Type 3C10169 Type 2 C10171 Type 4 C10306 Type 5
C10308 Type 7C10307 Type 6
C8096
C8096
C10307
IJij
(STD)
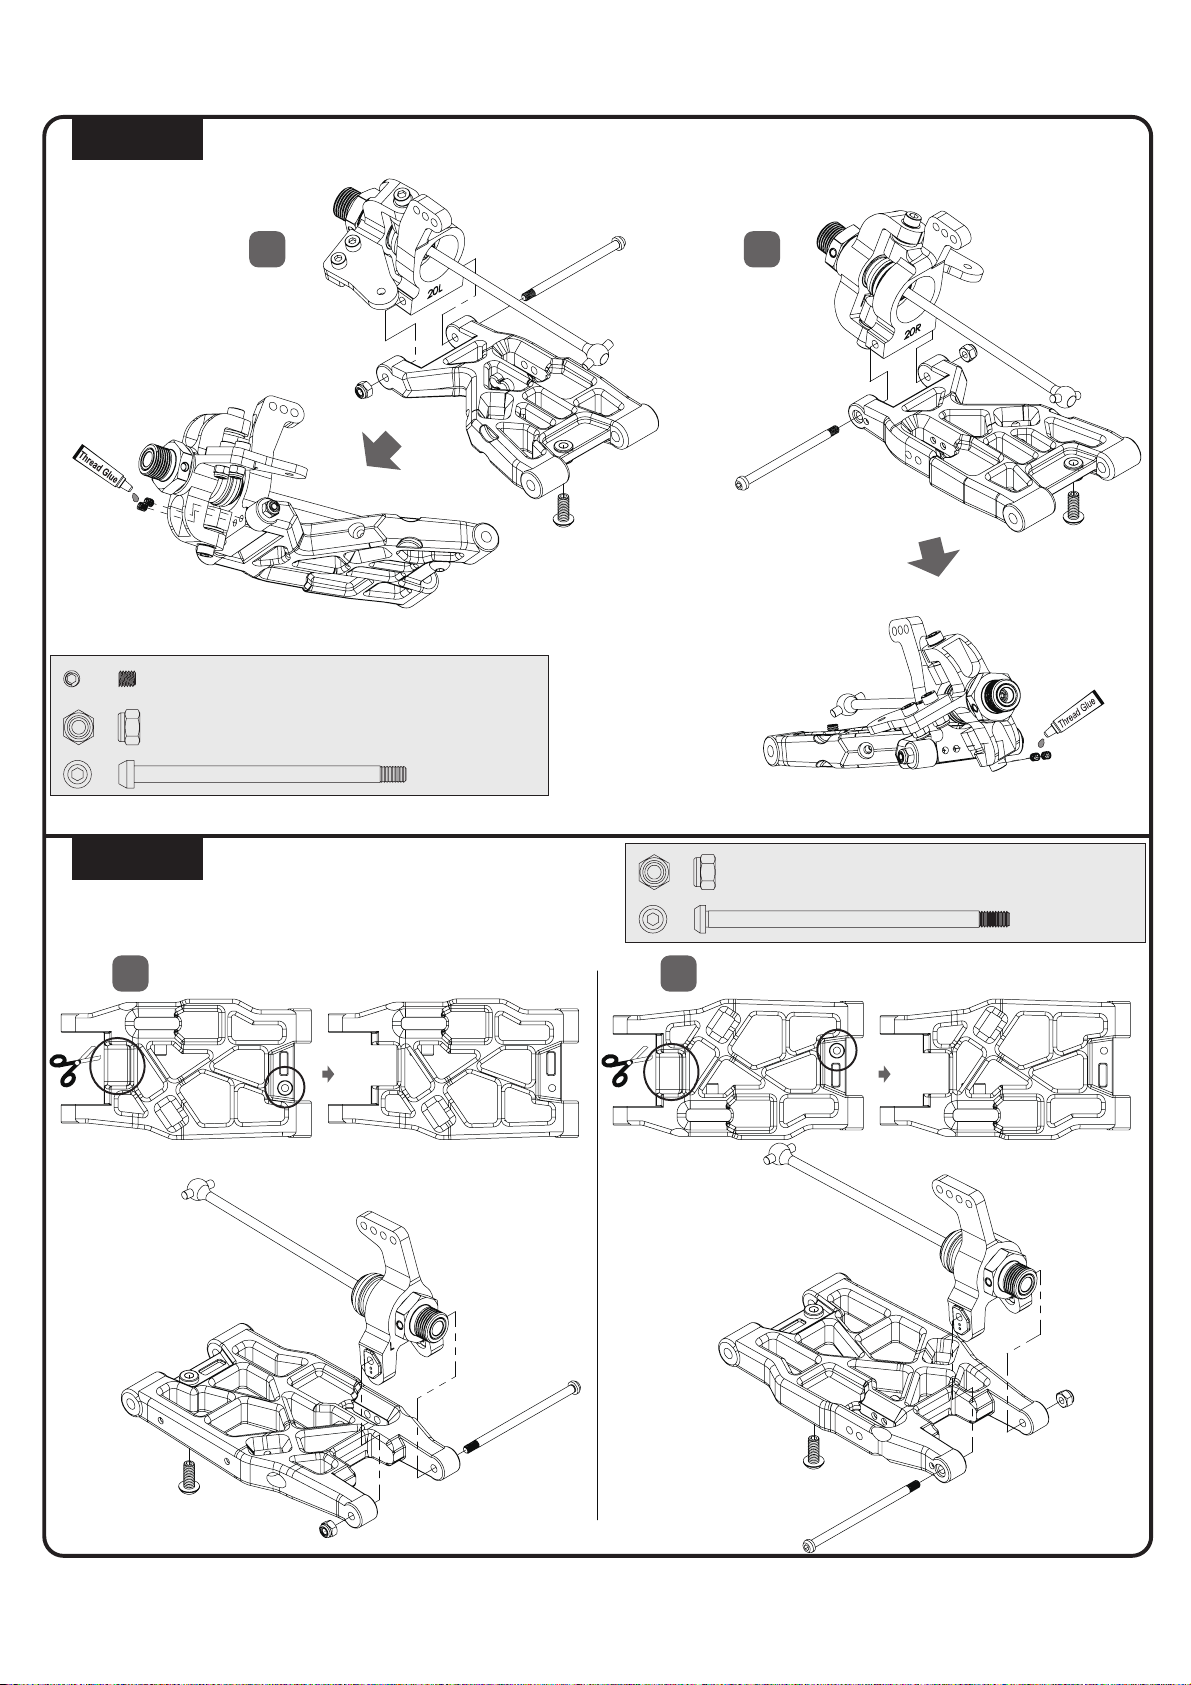
E01
Front Arm Set
E02
Rear Arm Set
3mm Lock Nut*2pcs
3x44 Shaft*2pcs
3x3mm Screw*4pcs
RL
3x3
3x3
C10186
C10087
C10309
RL
3mm Lock Nut*2pcs
3x49 Shaft*2pcs
C10309 C10088
C10186
C10186
IJĴ
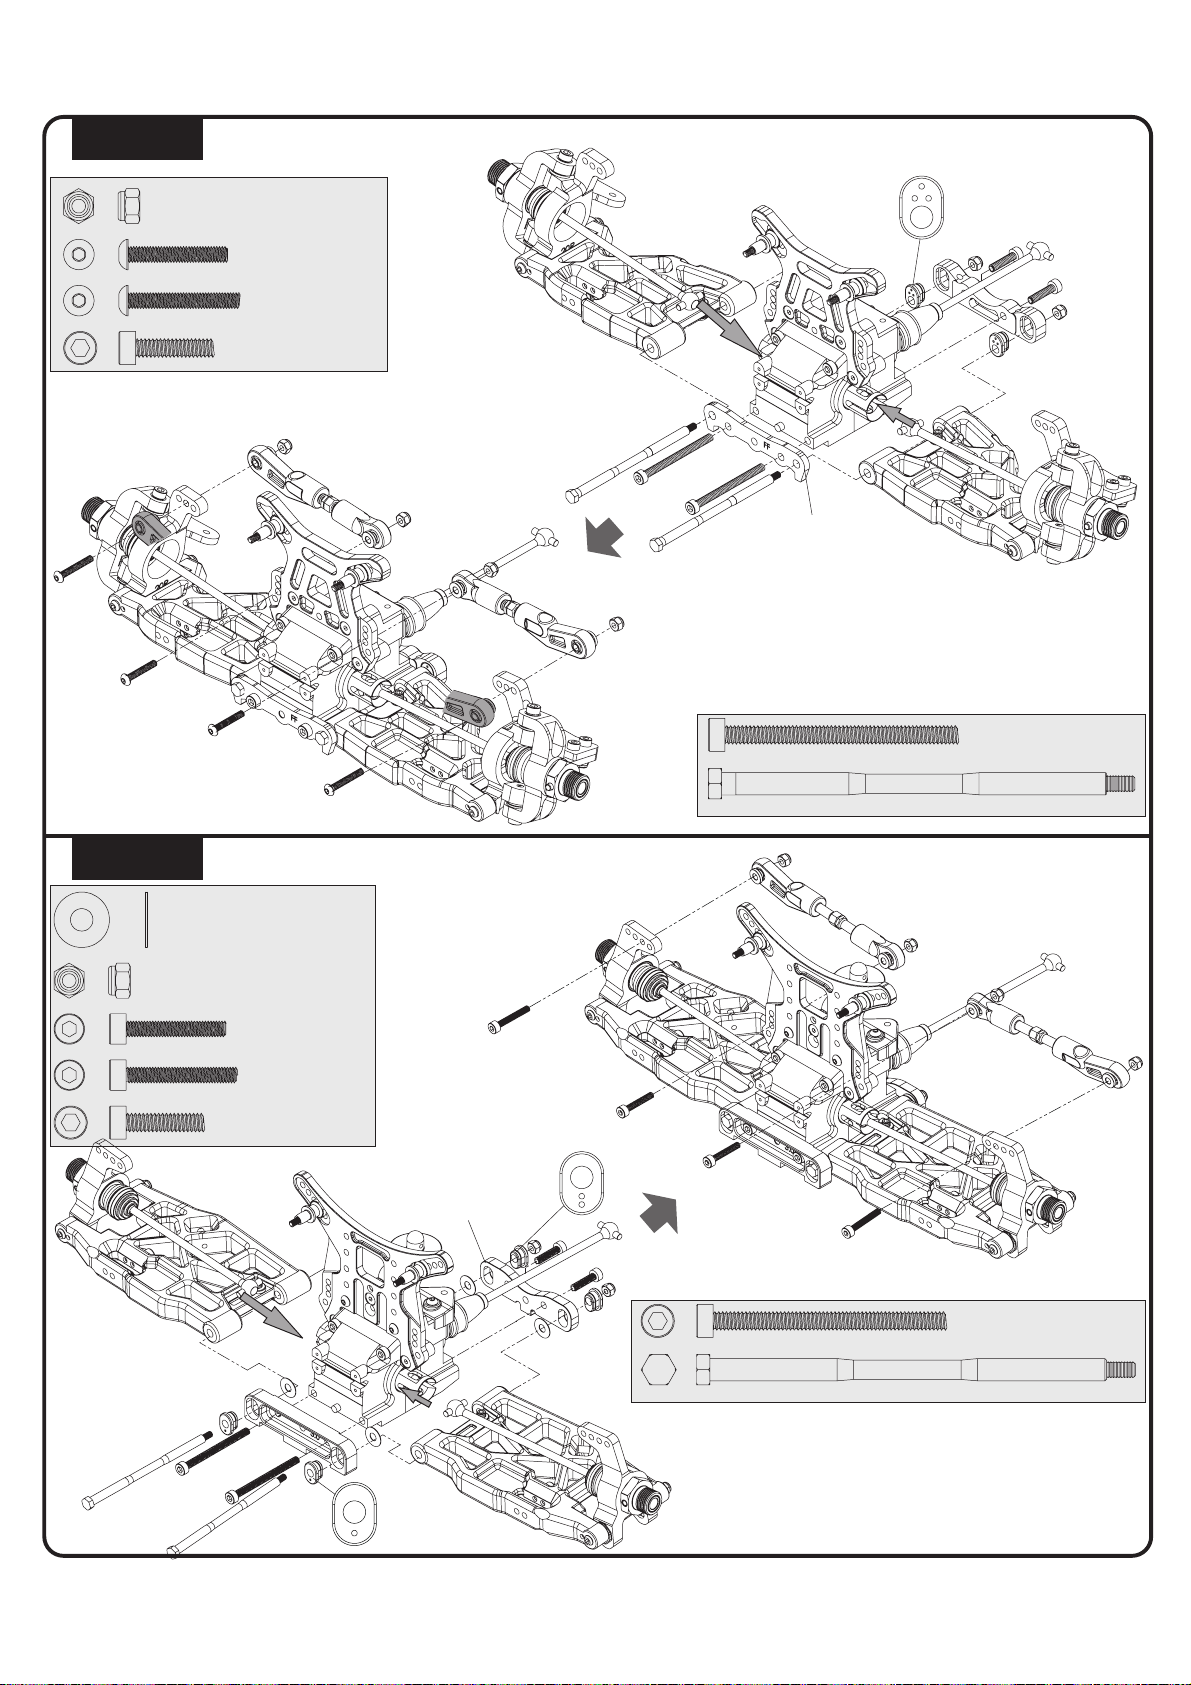
E03
Front Arm Assembly
E04
Rear Arm Assembly
C10310
3mm Lock Nut*6pcs
3.5x14mm Screw*2pcs
3x20mm Screw*2pcs
3x18mm Screw*2pcs
3.5x42mm Screw*2pcs
4x69.5 Shaft*2pcs
3x20
3x20
3x18
3x18
3.5x14
3.5x42
C10085
C10034
C10192
3mm Lock Nut*6pcs
3.5x14mm Screw*2pcs
3x20mm Screw*2pcs
3x18mm Screw*2pcs
4.05x10x0.3mm Washer*4pcs
3.5x42mm Screw*2pcs
4x71.7 Shaft*2pcs
3x18
3x20
3x18
3x20
3.5x14
3.5x42
C10086
C10070
C10068
C8367
IJĵ

E05
E06
Front Sway Bar
Rear Sway Bar
C10154
3x3
Ø2.4
C10178
3x5
2x5
2x5
3x16
3x3
2x5
3x5
Ø2.6
2x5
C10155
3x16
3x16mm Screw*2pcs
2x5mm Screw*4pcs
3x5mm Screw*2pcs
3x3mm Screw*2pcs
3x16mm Screw*2pcs
2x5mm Screw*4pcs
3x5mm Screw*2pcs
3x3mm Screw*2pcs
IJĶ

E07
E08
Front Shock Assembly
Rear Shock Assembly
E09
Wing Mount and Rear Chassis Anti Bending RodWing Mount and Rear Chassis Anti Bending Rod
3x10mm Screw*1pcs
Flanged Lock Nut M3*2pcs
Flanged Lock Nut M3*2pcs
3x10
C10007
C10181
C10181
3mm Lock Nut*7pcs
3x12mm Screw*4pcs
3x14mm Screw*1pcs
C10311
C10022
3x12
3x14
nged Lock Nut M3*2pcs
IJķ
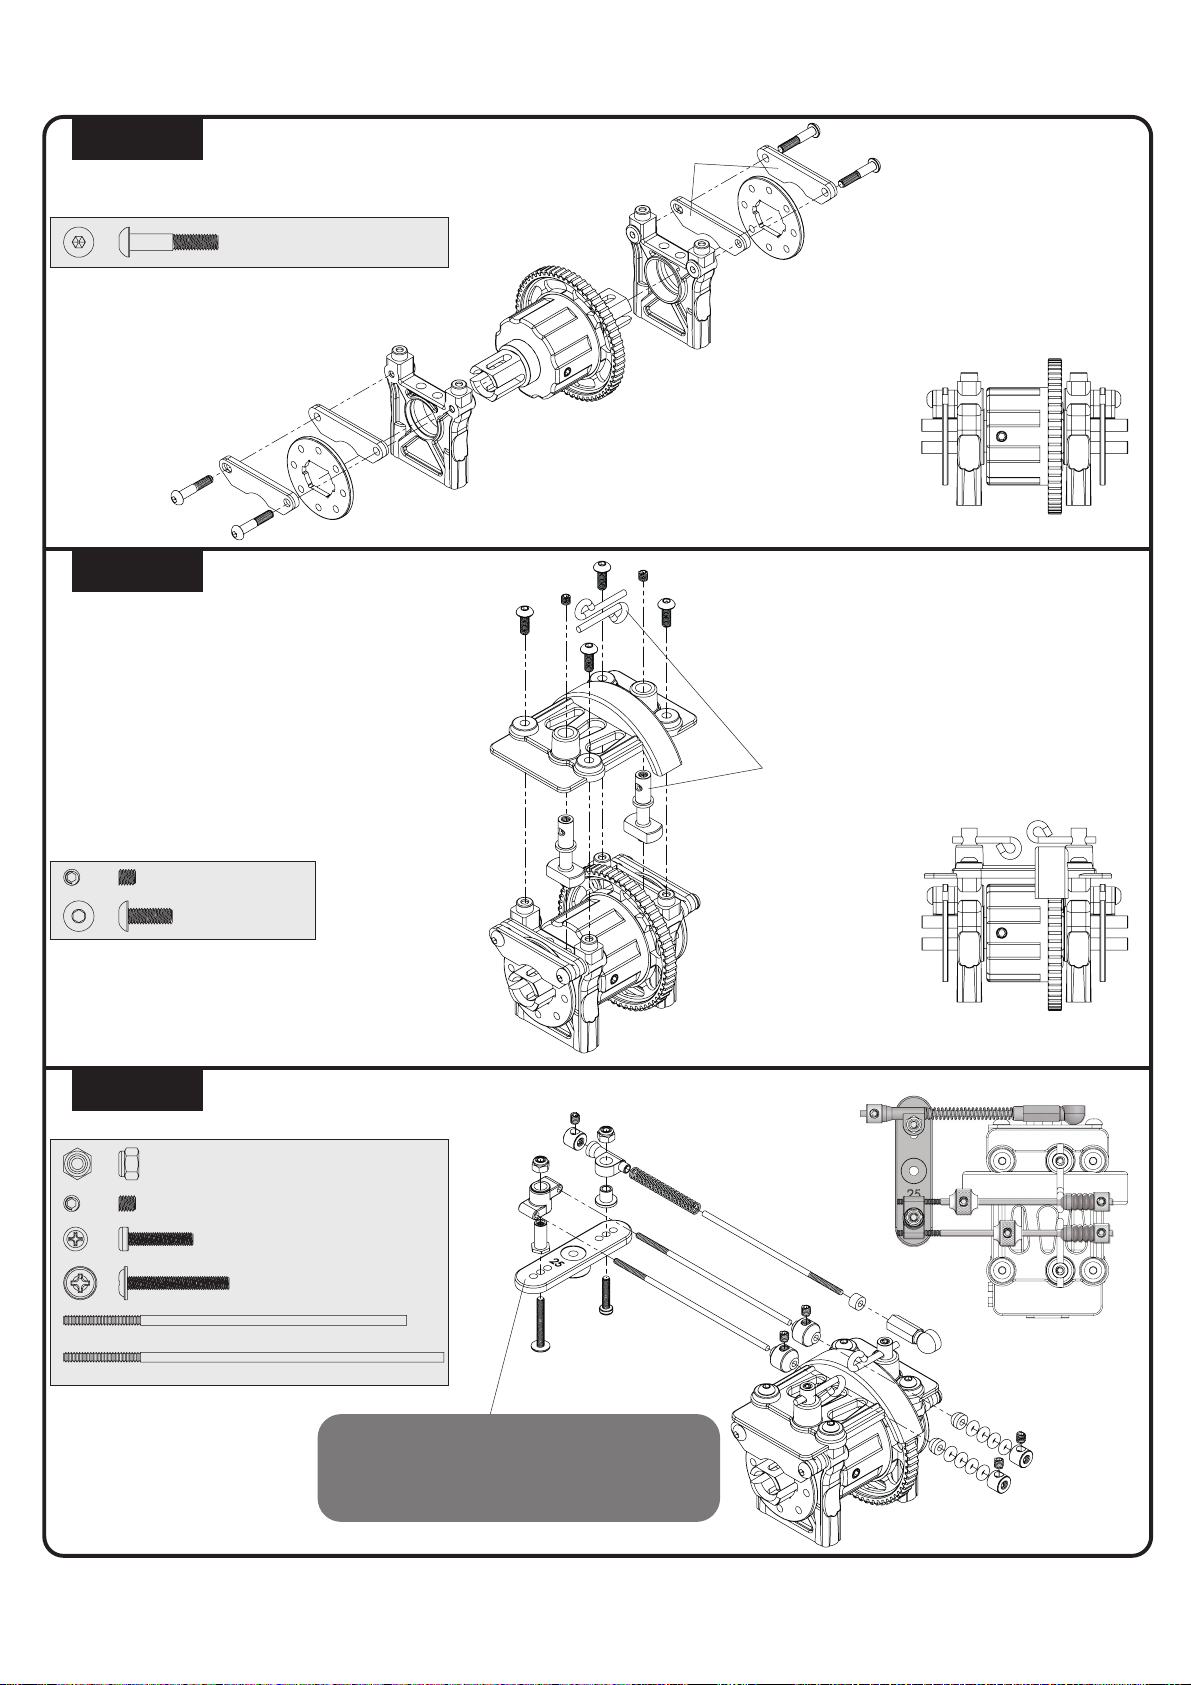
F01
IJĸ
Center Diffrential
F02
Center Diff. Plate
F03
Brake Cam
C10208
C10185
C10021
C10182
3x16mm Part Thread Screw*4pcs
C10021
C10158
3x3mm Screw*2pcs
3x8mm Screw*4pcs
C10312
62mm
68.7mm
68.7mm
2.5x18.5
2.5x12
3mm
3x3mm Screw*5pcs
68.7mm Throttle Linkage*2pcs
62mm Throttle Linkage*1pcs
2.5x18.5mm Washer Screw*1pcs
2.5x12mm Screw*1pcs
2.5mm Lock Nut*2pcs
23T ---Airtronics / JR / KO / Sanwa
24T---Hitec
25T---Futaba
C10025
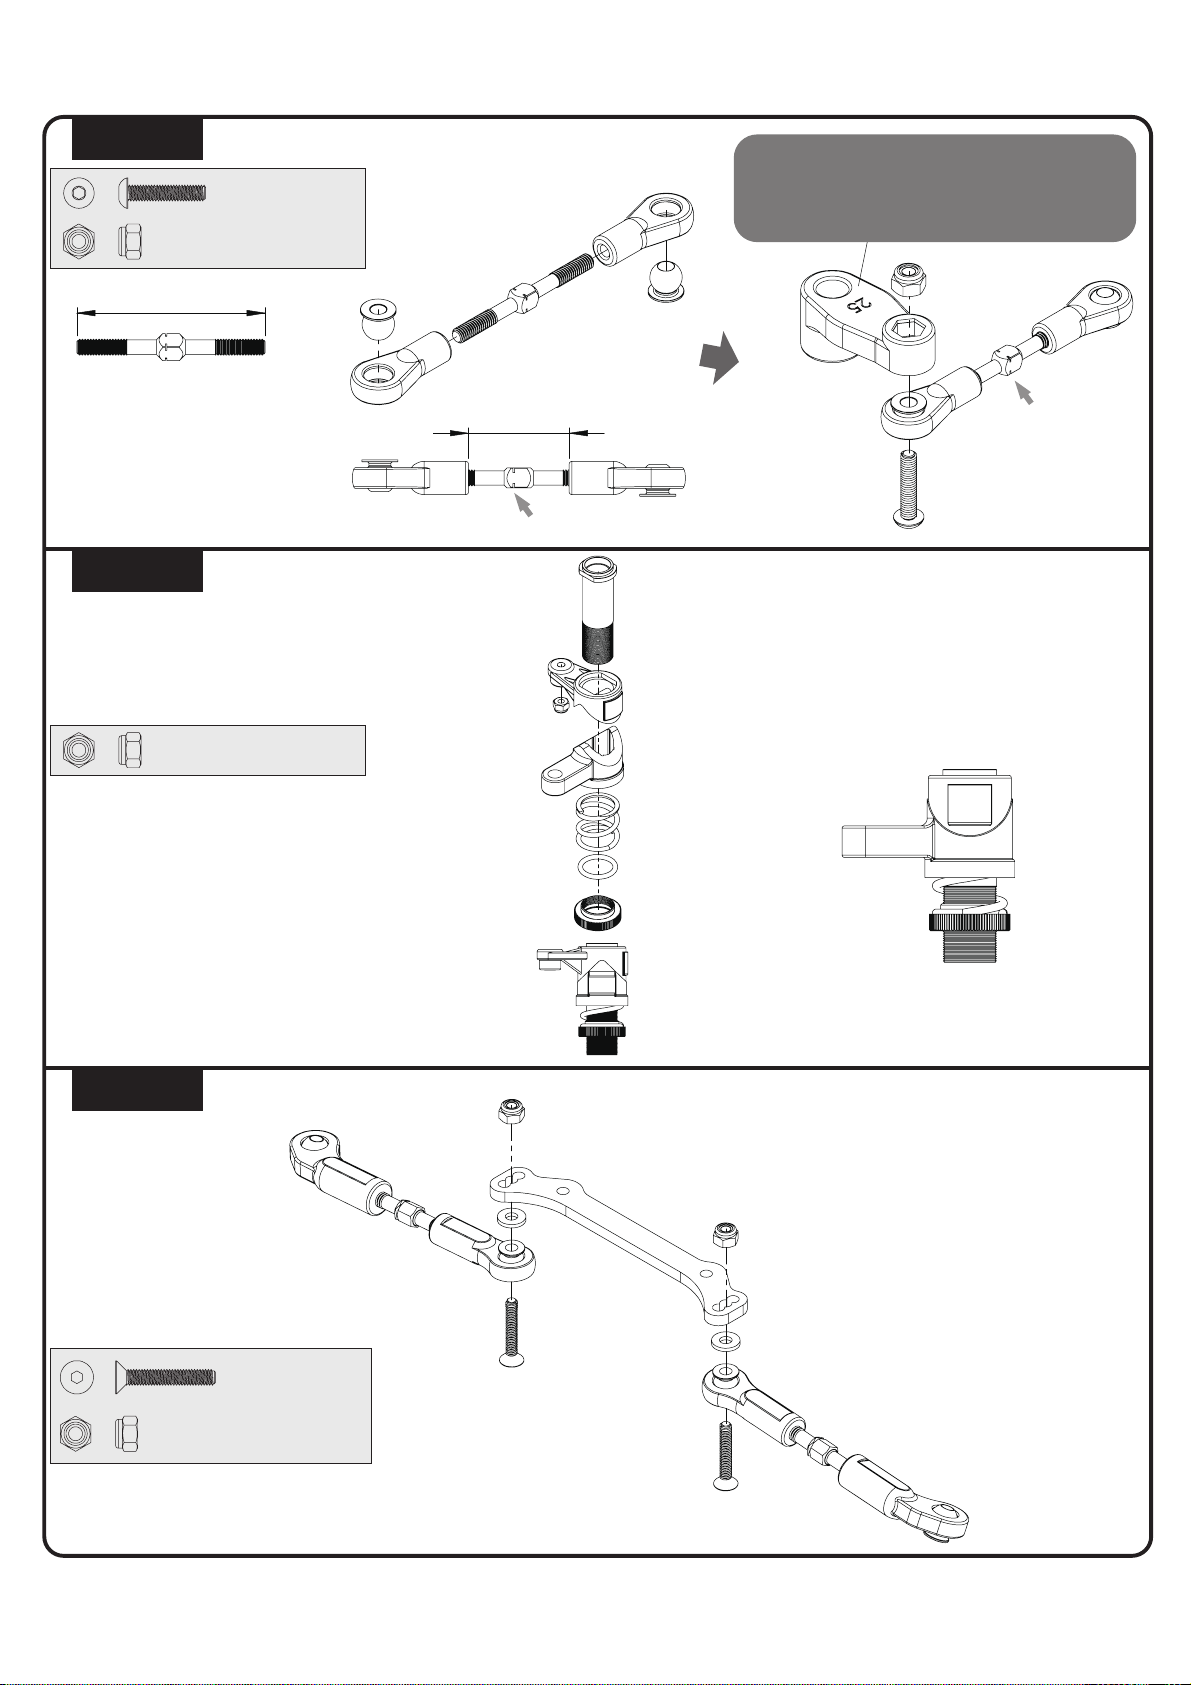
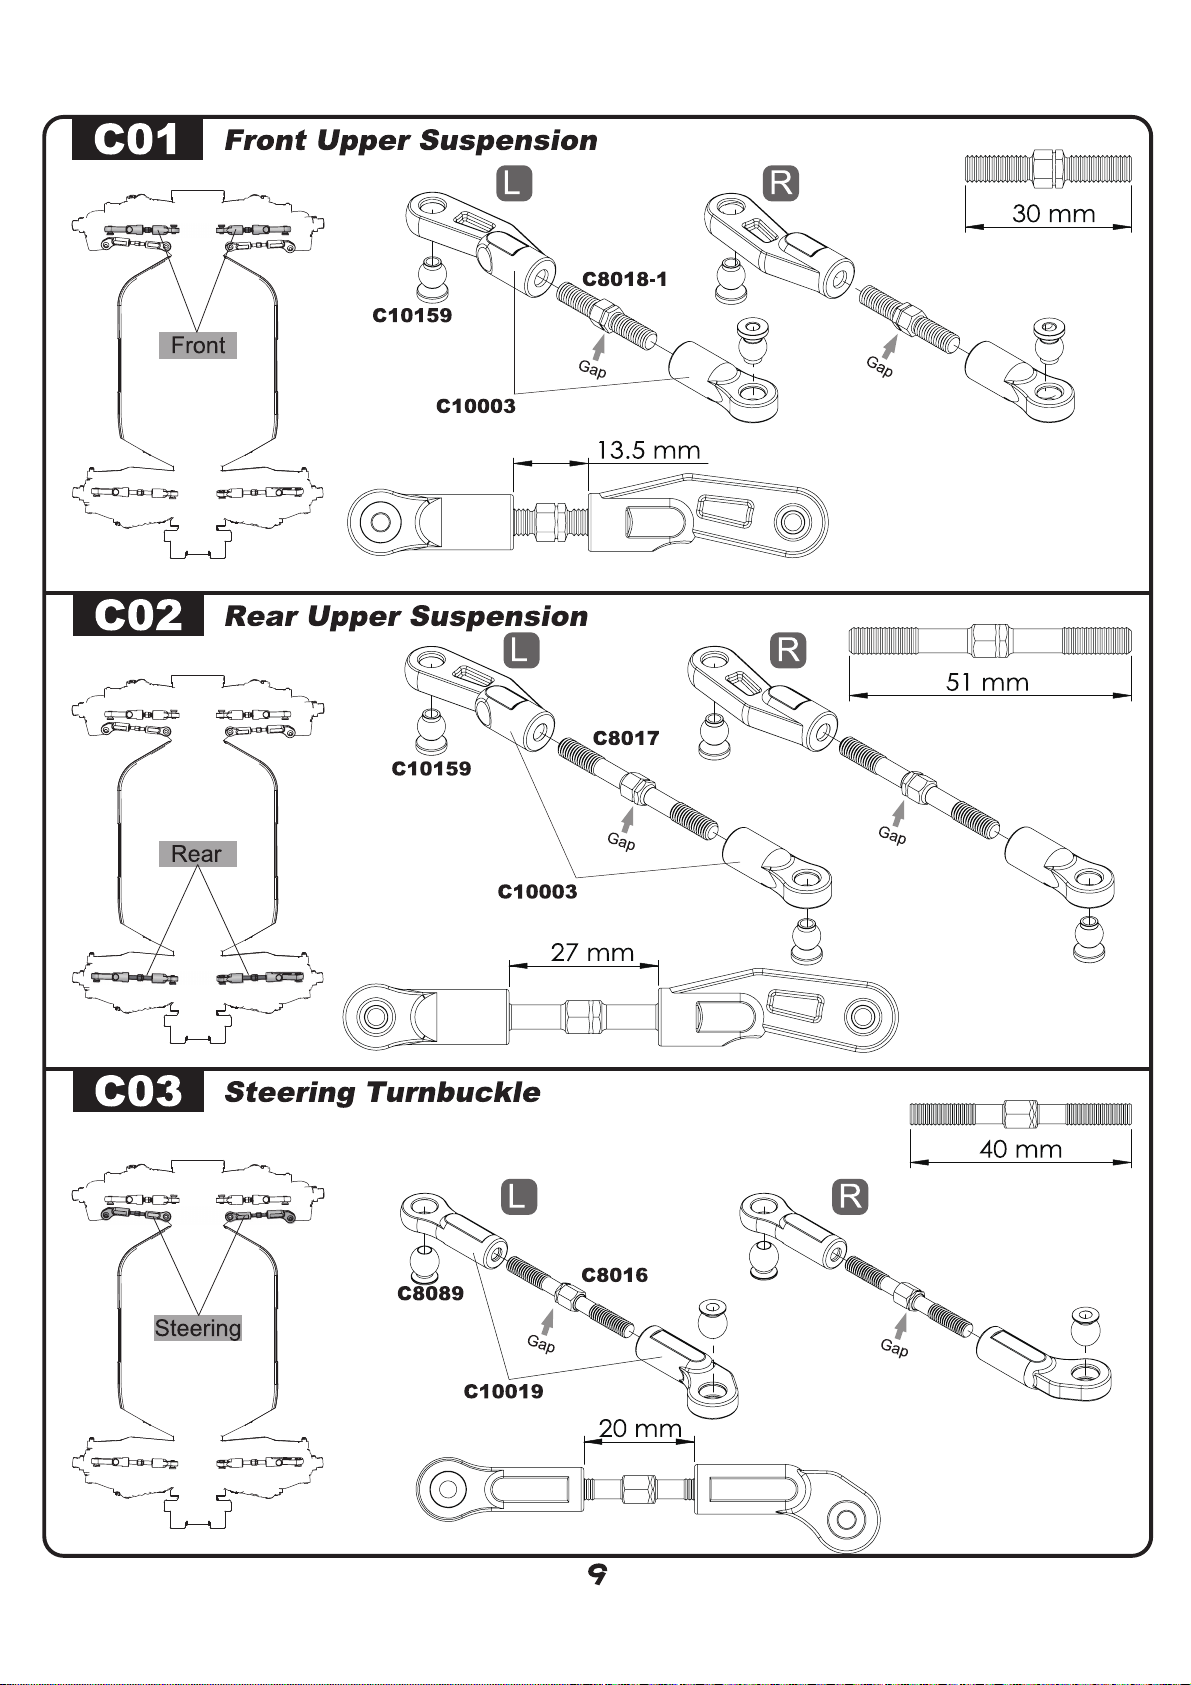
G01
G03
Steering Rod
Steering Linkage
G02
Servo Saver (Right)
18.2 mm
M3x 34 mm
3x14mm Screw*1pcs
3mm Lock Nut*1pcs
23T ---Airtronics / JR / KO / Sanwa
24T---Hitec
25T---Futaba
C10025
C10265
C10265
C10111
Gap
Gap
C10215
3mm Lock Nut*1pcs
C10313
3mm Lock Nut*2pcs
3x18mm Screw*2pcs
C10167
IJĹ
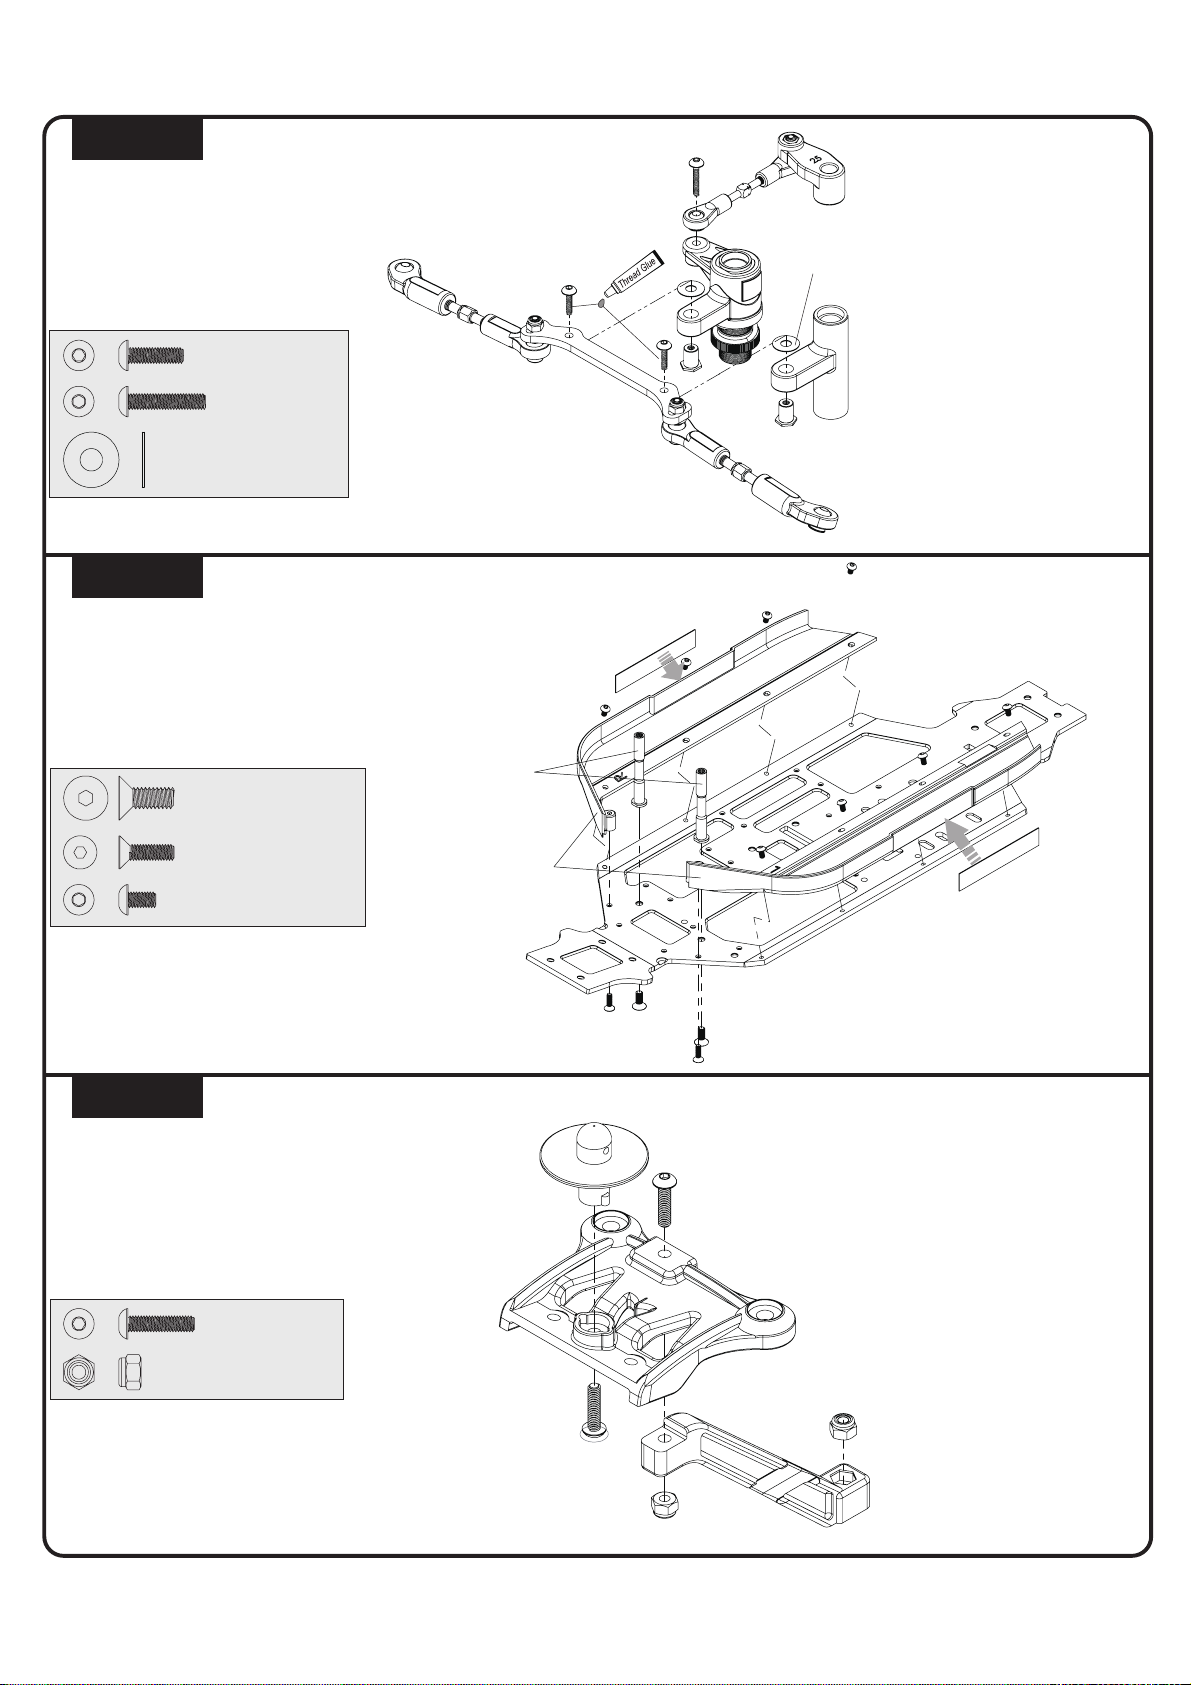
G04
Steering Control
G05
Chassis and Stone Guard
G06
Front Upper Plate
3x14
3x10
C10215
C10160
3x10mm Screw*2pcs
3x14mm Screw*1pcs
4.05x10x0.3mm Washer*2pcs
C8367
3x10
C10064
4x10
3x10
4x10
C10005
C10157
3x5
C10199
4x10mm Screw*2pcs
3x10mm Screw*2pcs
3x5mm Screw*8pcs
3mm Lock Nut*2pcs
3x12mm Screw*2pcs
C10007
C10022
C10022
IJĺ
Table of contents
Popular Motorized Toy Car manuals by other brands


Traxxas
Traxxas REVO 5411 installation instructions

Team Losi
Team Losi XXX-T Matt Francis Edition owner's manual

Agora
Agora Shelby GT500 Super Snake Build instructions

Team Losi
Team Losi mini SCT Operation manual

HOMCOM
HOMCOM LAMBORGHINI AVENTADOR SVJ owner's manual

E-flight
E-flight Nieuport 17 250 Slow Flyer Assembly manual

Maverick
Maverick Quantum quick start guide

Carrera RC
Carrera RC RC Scale Buggy Assembly and operating instructions

Traxxas
Traxxas 88086-4 owner's manual

Force1
Force1 VELOCITY X RC user manual

Associated Electrics
Associated Electrics Pro SC 4x4 Qualifier Series quick start guide

Yokomo
Yokomo BD7 2014 Assembly manual