Niveo Professional NRS-AP10 User manual

Version 2.2
NRS-AP10
750Mbps Dual-Radio Ultra Wide Range Wireless Access Point
NRS-RC1
4-port Smart router/controller PoE+ Gigabit Switch
User Manual

User Manual | 2
This manual is subject to tell users how to use this CAPWAP Broad Band Router with WLAN Controller and
PoE Switch function, suit for those familiar with basic networking knowledge and terminology,
Then this user manual including the product main features, packing content, hardware introduce and AC
Controller, Routing, Firewall, Management. Pre-reading this manual before operation is highly
recommended;
Pls note: MR series broadband router work with wireless access point mainly as the PoE ports supply max 8
PoE power for the PD equipment.

Table of Contents
User Manual | 3
Table of Contents
Chapter 1: Product Instruction, Default Data, Packing-------------------------------------------------------5
1.1 Product Instruction ---------------------------------------------------------------------------------------------------6
1.2 Default Data---------------------------------------------------------------------------------------------------------------7
1.3 Packing and Accessory----------------------------------------------------------------------------------------------7
Chapter 2: Hardware Introduce---------------------------------------------------------------------------------------------8
2.1 Hardware-------------------------------------------------------------------------------------------------------------------9
2.2 Installation----------------------------------------------------------------------------------------------------------------9
Chapter 3: Login -------------------------------------------------------------------------------------------------------------------10
Chapter 4: WEB GUI Configuration--------------------------------------------------------------------------------------12
4. 1. User Manager--------------------------------------------------------------------------------------------------------14
4. 2. AC --------------------------------------------------------------------------------------------------------------------------15
4.2.1 Device List-----------------------------------------------------------------------------------------------------15
4.2.2: Address Server--------------------------------------------------------------------------------------------17
4.2.3: Zero Config--------------------------------------------------------------------------------------------------17
4.2.4: Device Log--------------------------------------------------------------------------------------------------20
4.3 LAN Settings------------------------------------------------------------------------------------------------------------21
4.3.1 LAN Setting---------------------------------------------------------------------------------------------------21
4.3.2 Static DHCP---------------------------------------------------------------------------------------------------21
4.4. WAN------------------------------------------------------------------------------------------------------------------------22
4.4.1 WAN Setting--------------------------------------------------------------------------------------------------22
4.4.2 Advanced Setting-----------------------------------------------------------------------------------------23
4.5. URL Filter----------------------------------------------------------------------------------------------------------------23
4.6 Behaviour Control---------------------------------------------------------------------------------------------------24
4.7 Timed Reboot----------------------------------------------------------------------------------------------------------26
4.8 Upgrade Firmware--------------------------------------------------------------------------------------------------26
4.9 Advanced Settings--------------------------------------------------------------------------------------------------27
4.9.1 Common--------------------------------------------------------------------------------------------------------27
4.9.1.1: AC Setting------------------------------------------------------------------------------------------27
4.9.1.2: IP/Time Group-----------------------------------------------------------------------------------27
4.9.1.3: Behaviour------------------------------------------------------------------------------------------27
4.9.1.4: User Manager-----------------------------------------------------------------------------------27
4.9.1.5 Flow Control--------------------------------------------------------------------------------------27
4.9.1.6 Cloud Server Setting-------------------------------------------------------------------------27
4.9.2 Network-------------------------------------------------------------------------------------------------------28
4.9.2.1: LAN Settings-------------------------------------------------------------------------------------28
4.9.2.2: WAN Settings-----------------------------------------------------------------------------------28
4.9.2.3: DDNS------------------------------------------------------------------------------------------------29
4.9.3 Security -------------------------------------------------------------------------------------------------------29
4.9.3.1 URL Filter-------------------------------------------------------------------------------------------29
4.9.3.2 IP Filter----------------------------------------------------------------------------------------------30
4.9.3.3 MAC Filter-----------------------------------------------------------------------------------------30
4.9.3.4 Port Mapping------------------------------------------------------------------------------------31
4.9.3.5 DMZ---------------------------------------------------------------------------------------------------32
4.9.4 Device-----------------------------------------------------------------------------------------------------------32
4.9.4.1 Configure-------------------------------------------------------------------------------------------32
4.9.4.2 Reboot-----------------------------------------------------------------------------------------------33
4.9.4.3 Modify Password------------------------------------------------------------------------------33
4.9.4.4 Firmware Upgrade----------------------------------------------------------------------------33

Table of Contents
User Manual | 4
4.9.4.5 Device Time--------------------------------------------------------------------------------------34
4.9.4.6. Device Log---------------------------------------------------------------------------------------34

User Manual NRS-AP10 and NRS-RC1
User Manual | 5
Chapter 1:
Product Instruction, Default Data, Packing
Product Instruction
Default Data
Packing
User Manual NRS-AP10 and NRS-RC1
User Manual | 6
1.1. Product Instruction
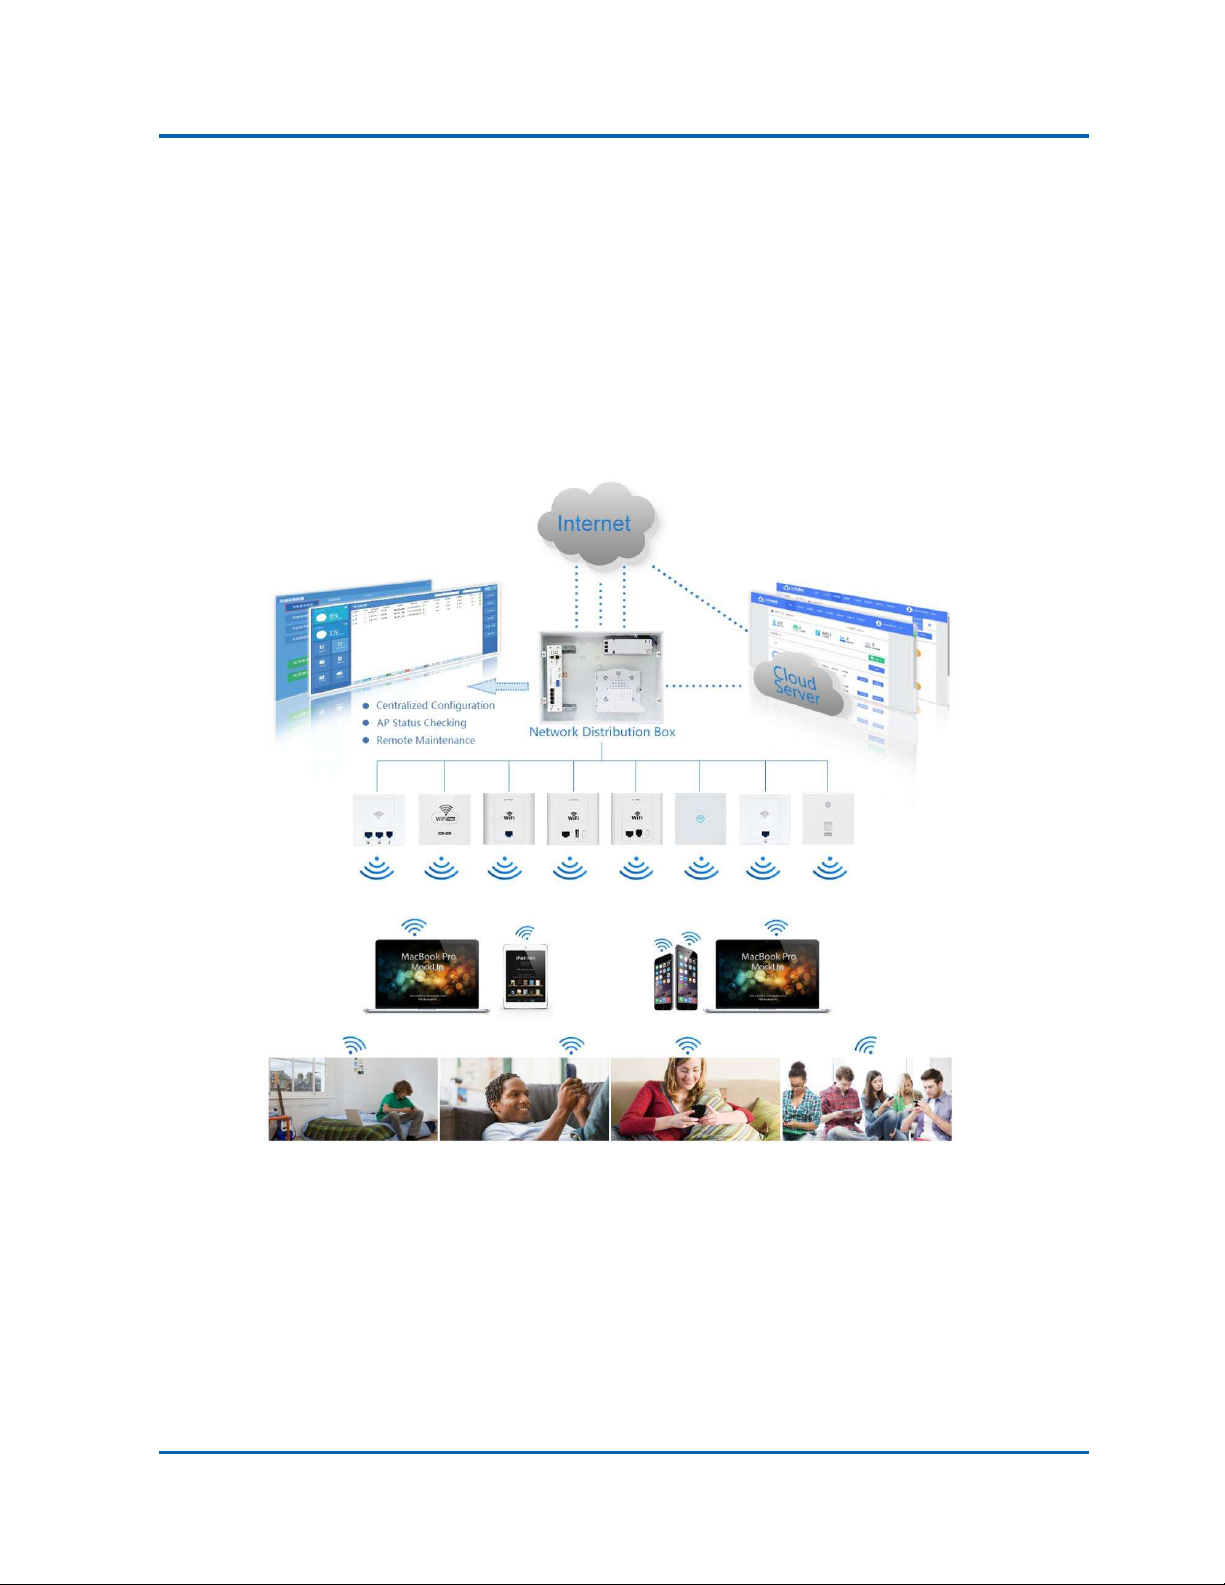
MR series broad band router is an CAPWAP home use router with WLAN Controller and PoE switch
functions. Build in network/electronic distribution box, it supply Ethernet for PC, IPTV or other
entertainment device, then supply PoE power and Ethernet together for in wall wireless AP to bring
seamless wireless coverage for each corner.The working diagram showed as follow:

User Manual NRS-AP10 and NRS-RC1
User Manual | 7
1.2 Default Data:
Management IP address & LAN IP address: 192.168.18.1
Login Password: admin
1.3 Packing and Accessory
Broad Band Router
Power Adapter (26W or 72W)
Power Cord
User Manual

User Manual NRS-AP10 and NRS-RC1
User Manual | 8
Chapter 2:
Hardware Introduce
Hardware
Installation
User Manual NRS-AP10 and NRS-RC1
User Manual | 9
2.1 Hardware
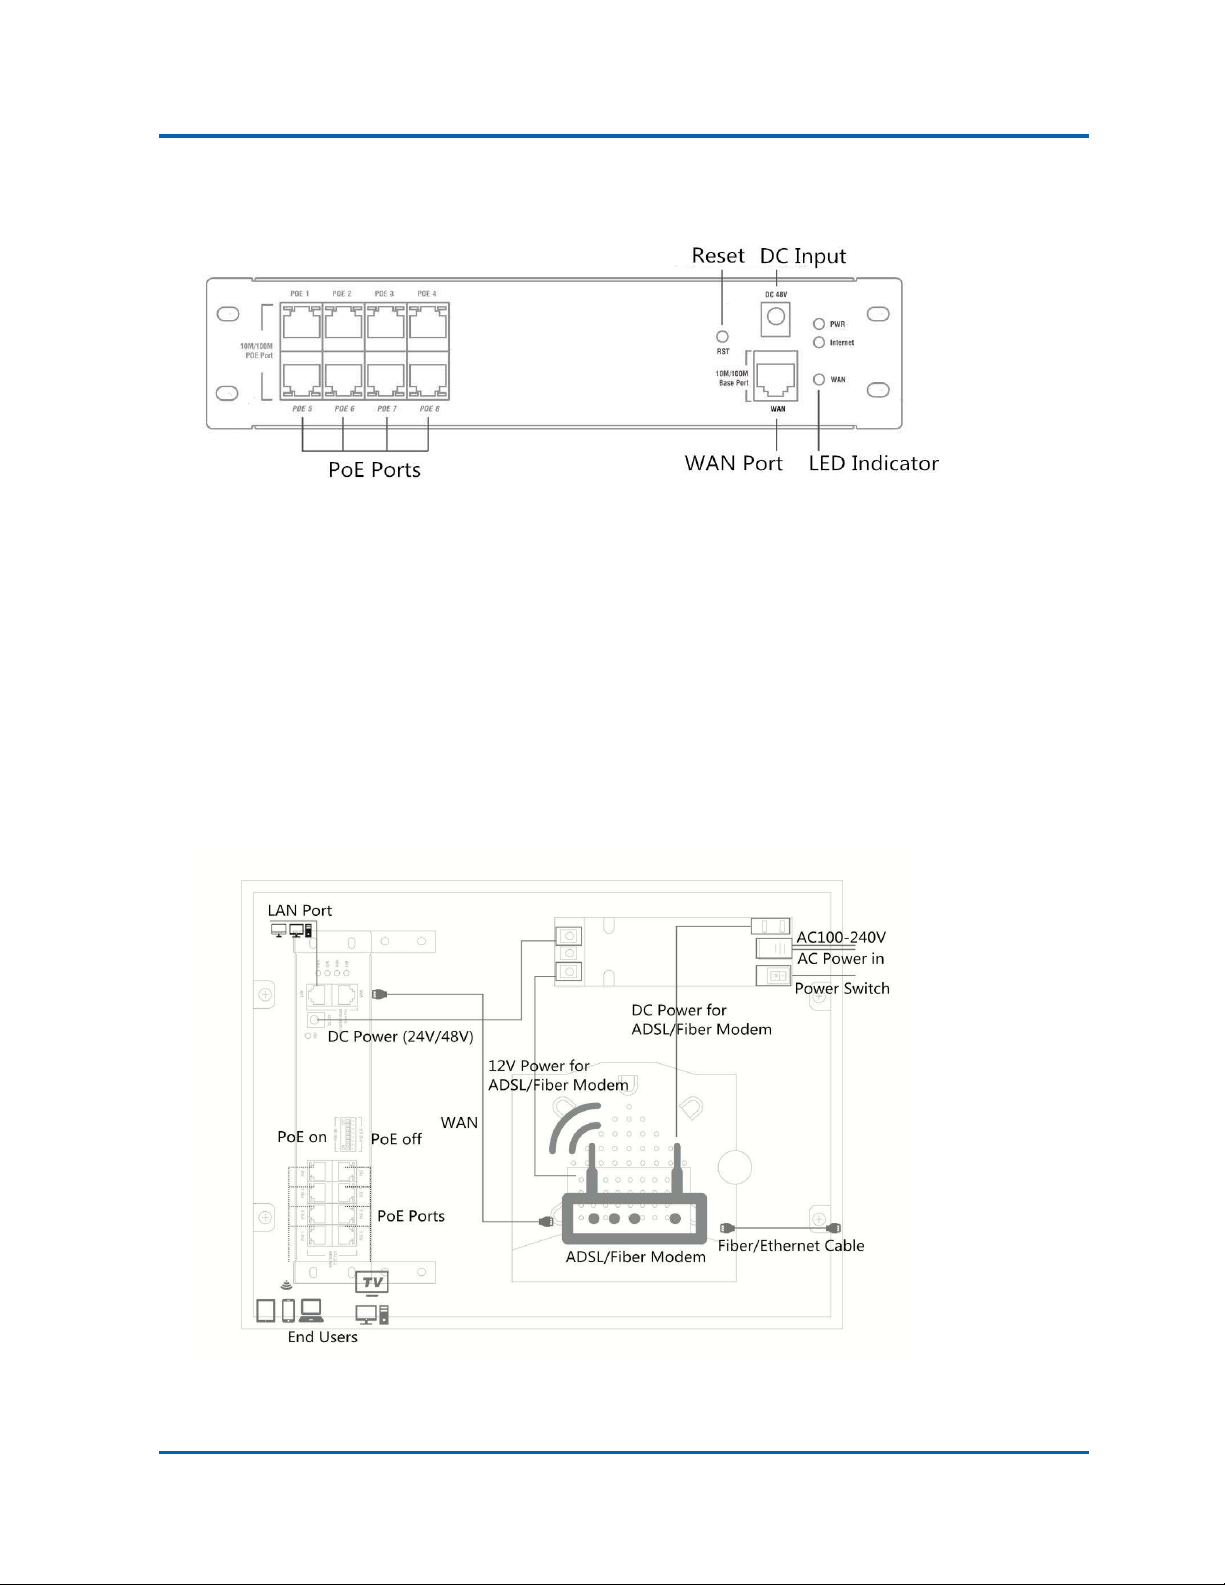
WAN: Ethernet Port, connect with ADSL Modem mainly.
DC Input: Can be 48V or 24V, we take 48V for example; Pls note: If 48V DC input, then the PoE ports can
supply 48V PoE out for PD equipment. If 24V DC Input, then the PoE ports support passive PoE, supply 24V
Passive PoE for PD equipment.
Reset: Press 10 seconds to revert to factory default data
LED Indicator: to show the working status of Internet, Power
PoE Ports: Work with 48V PD equipment to supply Ethernet and 48V PoE Power; Work with PC as LAN port
to supply Ethernet
2.2 Installation

User Manual NRS-AP10 and NRS-RC1
User Manual | 10
Chapter 3:
Login
User Manual NRS-AP10 and NRS-RC1
User Manual | 11
Chapter 3: Login
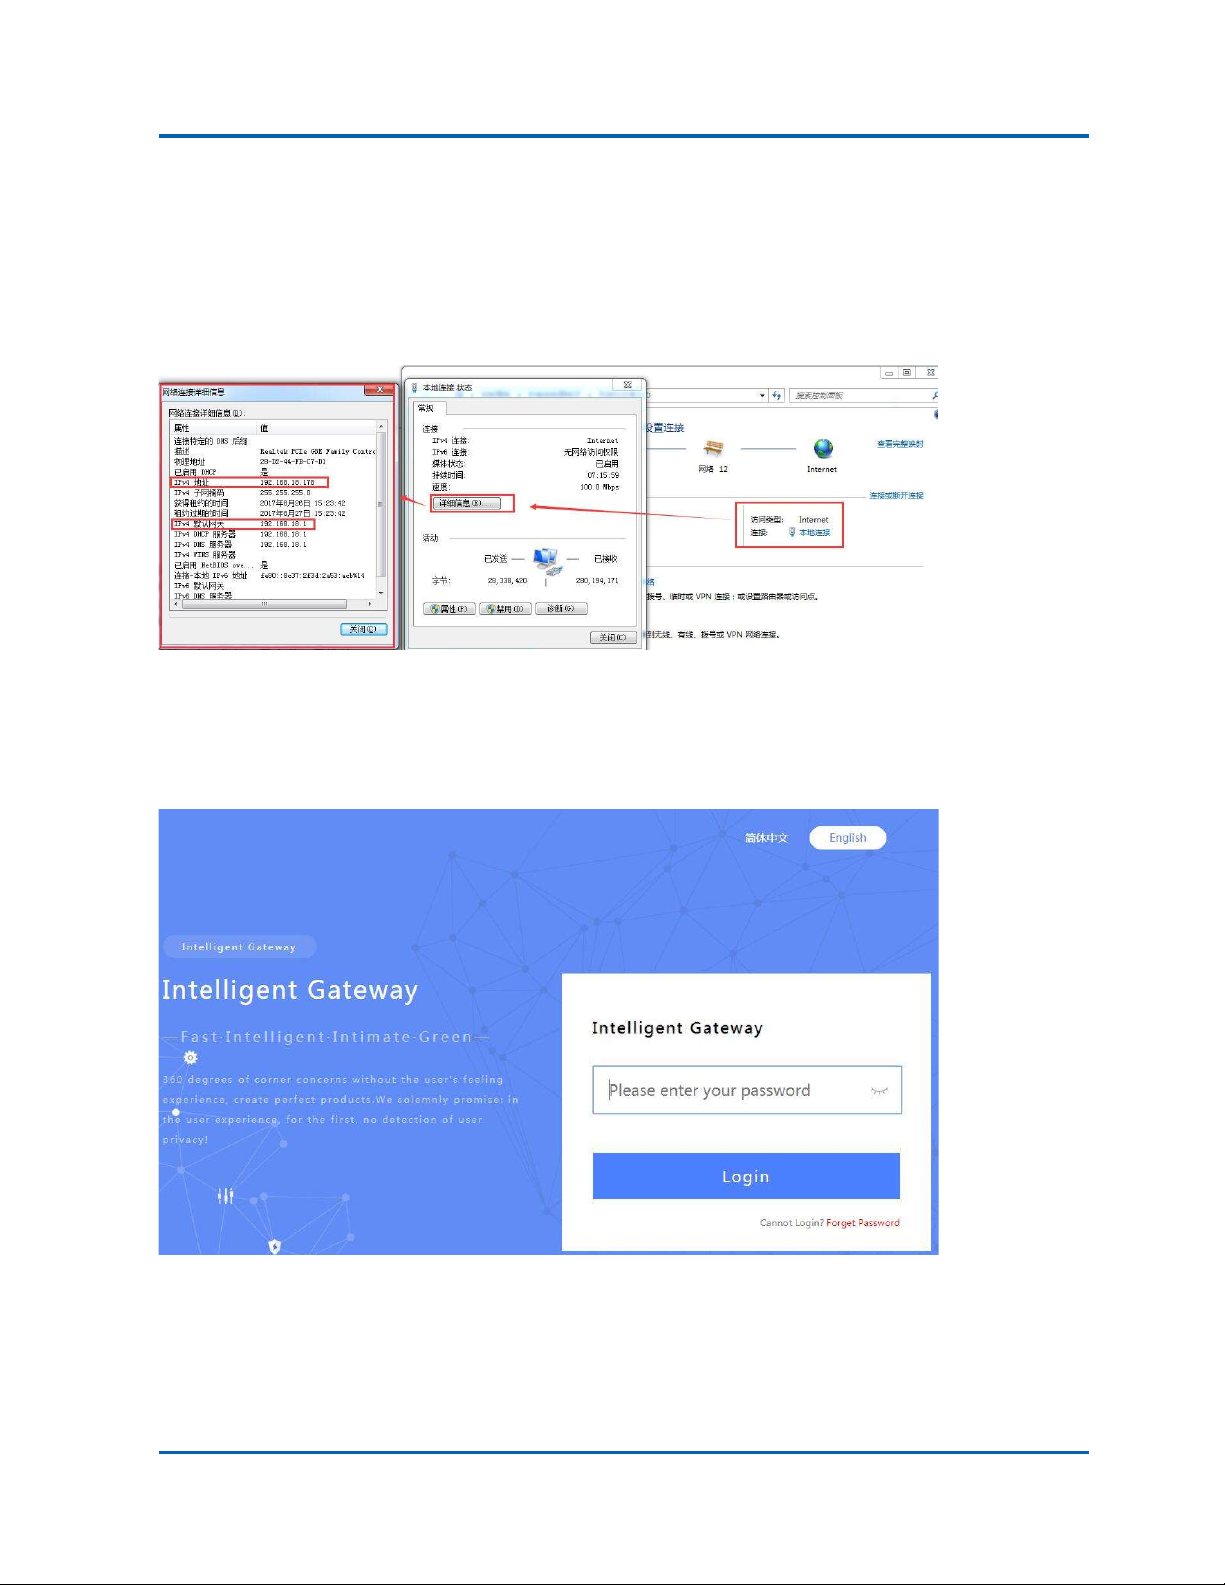
A. Confirm the PoE ports is 48V PoE or 24V Passive PoE; If 24V Passive PoE, pls disable PoE power first by
the PoE on/off switch, then connect LAN ports with PC.
B. Connect LAN Port with PC, then PC will get IP address: 192.168.18.X (X is number from 2~254, The default
LAN IP address is 192.168.18.1)
C. Open IE browser, input broad band router’s IP address 192.168.18.1, Enter to log in this broad band
router’s WEB GUI.
D. Choose the Language, then input admin and Login

User Manual NRS-AP10 and NRS-RC1
User Manual | 12
Chapter 4:
WEB GUI Configuration
User Manager
AC
LAN Settings
WAN
URL Filter
Behaviour Control
Timed Reboot
Upgrade Firmware
Advanced Settings
User Manual NRS-AP10 and NRS-RC1
User Manual | 13
Chapter 4: WEB GUI Configuration
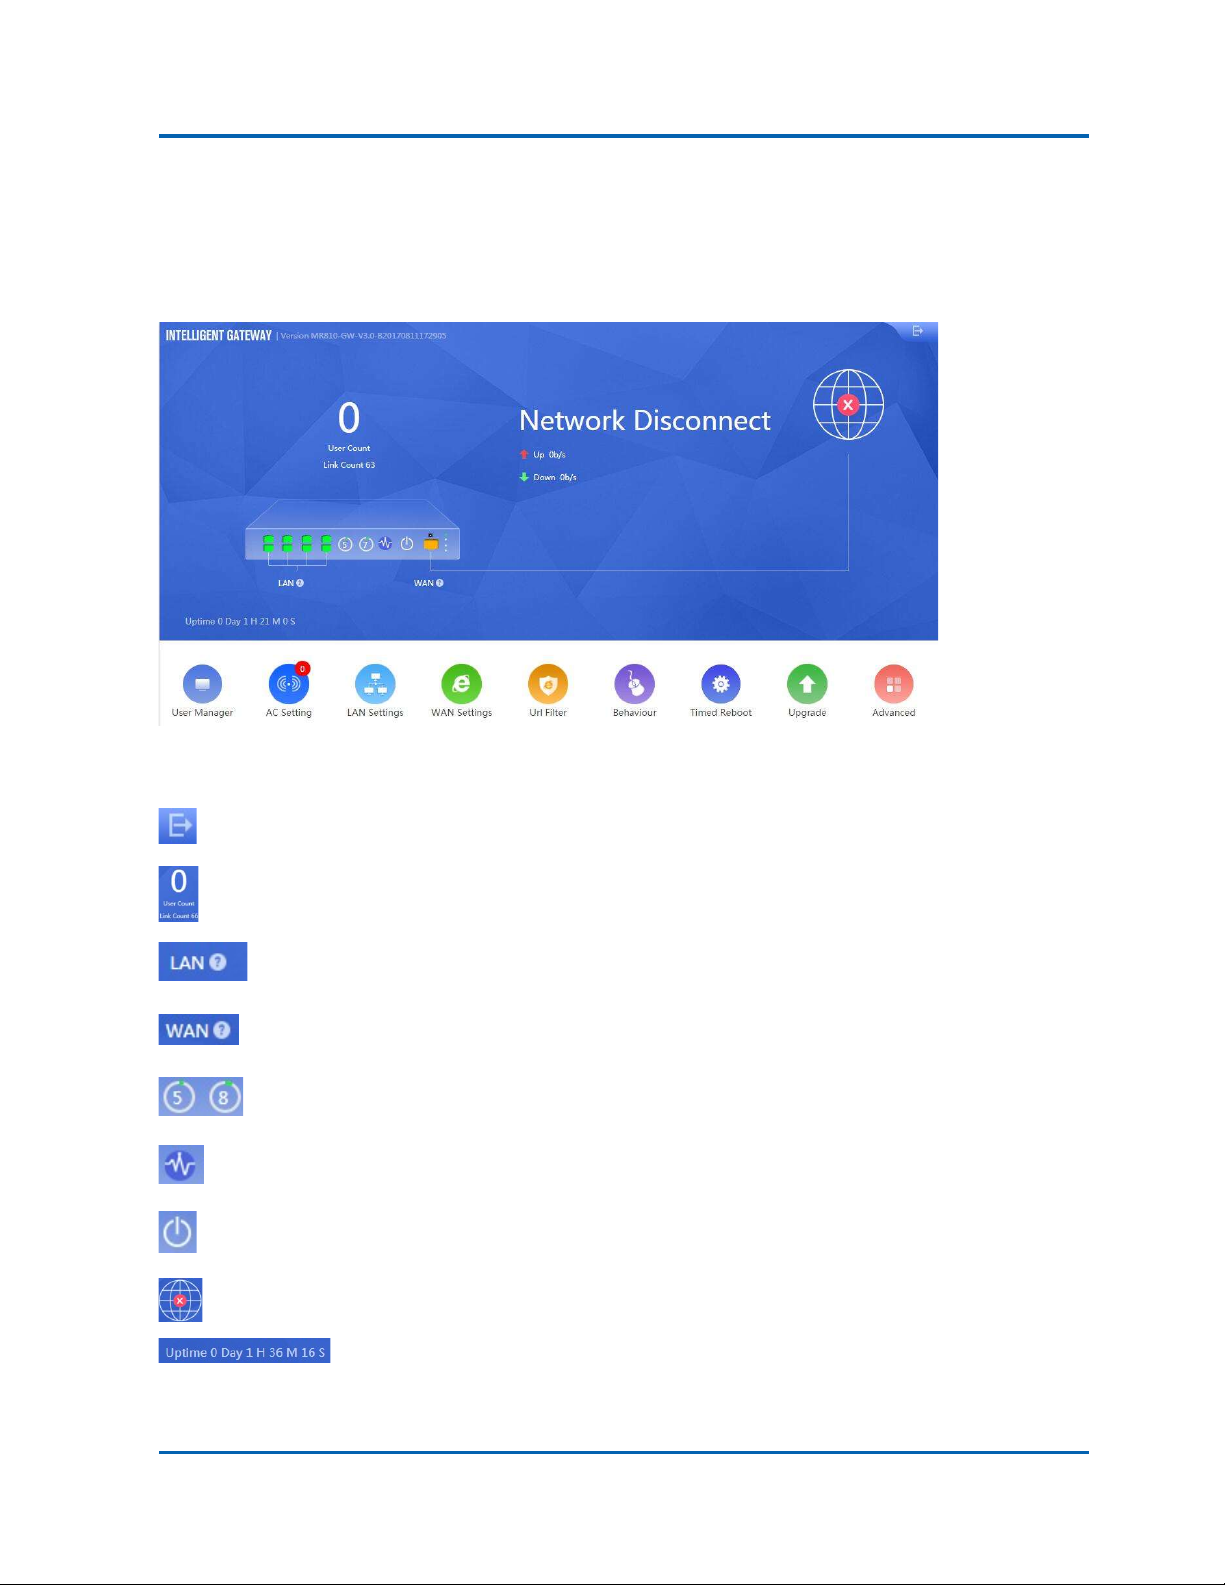
When login this broad band router, the following home page will pop up as follow:
Version: Show firmware version
: Exist this GUI WEB
: To manage the online users, click it to user manager page
: Click to check the LAN status
: Click to set the WAN Setting
: Here show the CPU and Memory capacity
: Timed Reboot: To set up the reboot time;
: Reboot the broad band router
: Ethernet working status, click to WAN setting page.
: The broad band router running time.
Let’s introduce User Manager, AC Setting, LAN Setting, WAN Setting, Url Filter, Behaviour, Timed Reboot,
Upgrade, Advanced functions one by one to make users with more understanding in this product.
User Manual NRS-AP10 and NRS-RC1
User Manual | 14
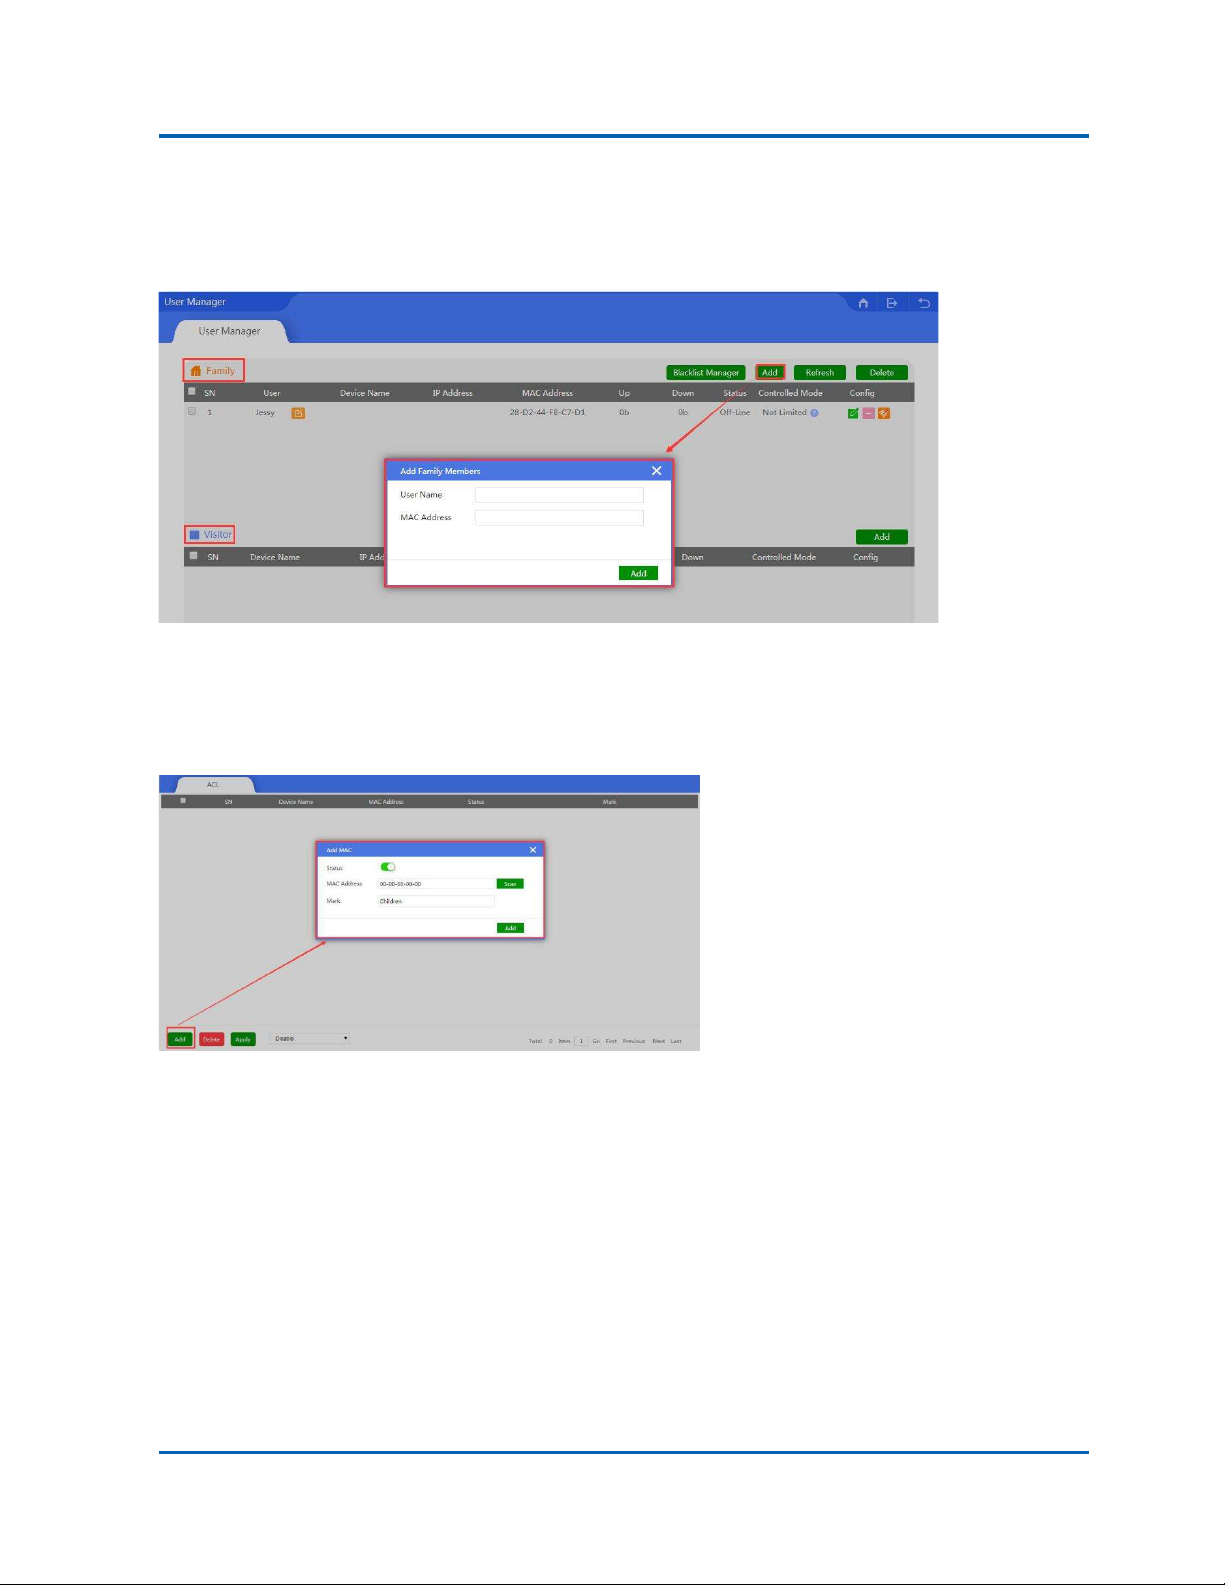
4. 1. User Manager
In user manager, can manage the network behavior of family members and visitors.
Add: Add the MAC which will be managed, configuration showed in above picture.
Blacklist Manager: Mean add the MAC address into black name, prohibit it Ethernet behavior,
configuration showed as following picture;
Config: To controller the Ethernet behavior or Ethernet time, configuration showed as follow

User Manual NRS-AP10 and NRS-RC1
User Manual | 15
4. 2. AC
This broad band router with WLAN controller function, which can manage, control and configure the
connected in wall wireless access point
Click button of AC, it will pop up following picture, which showed all the wireless AP connected into this
broad band router;
4.2.1 Device List
Device List to show the online/offline wireless AP list; Online wireless AP with green color, Offline wireless
AP with red color.
All AP: Show QTY of wireless AP which connected with this WLAN controller; 20 mean max to manage
20PCS wireless AP.
Offline AP: Show QTY of wireless AP which offline already
Online AP: Show QTY of wireless AP which online

User Manual NRS-AP10 and NRS-RC1
User Manual | 16
WLAN Users: Show QTY of end users which access into wireless AP.
Batch Set: Set Channel, TX Power, Time to restart, Max users, device login password in batch.
Delete: Delete the chosen wireless AP from this device list.
Reboot: Restart this wireless AP
Reset: return to factory default
Upgrade: Upgrade firmware.
: if tick it, mean select all the wireless AP; If tick here, mean select this wireless AP;
Name : Can mark AP the location or model number other information which easy to know this wireless
AP.
IP: The wireless AP’s IP address
MAC: MAC address of wireless AP
SSID: Show the SSID of device 1 and device 2
Users: Mean how many users connected with this wireless AP
Channel: Show this wireless AP’s channel, including device 1 and device 2
TxPower: Mean the wireless AP’s RF power
Device Model: Model number of this wireless AP
Uptime: running time
Config : to check the wireless AP’s working status, configure the wireless AP’s basic and advanced
data.

User Manual NRS-AP10 and NRS-RC1
User Manual | 17
4.2.2: Address Server:
Address Server: Mean this AC controller can assign IP address for wireless AP automatic, no need to
change wireless AP’s IP address one by one
Refresh: to refresh the wireless AP’s IP address
Function: Enable/Disable, default is Enable
Server IP address: default is 192.168.200.1; can change to anyone you like, but pls note, if server IP is
192.168.200.1, then wireless AP’s IP address will be one from 192.168.200.2 to 192.168.200.254
Server Address Count: default is100, can be 1~100, based on the QTY of wireless AP.
Effective Time: can be 1~24 hours
Allocated AP number: show the QTY of wireless AP which assigned IP address by this WLAN controller.
When setup the above data, click Apply to save it.
AP address information list: to show wireless AP’s model number, IP address, MAC address and running
time.
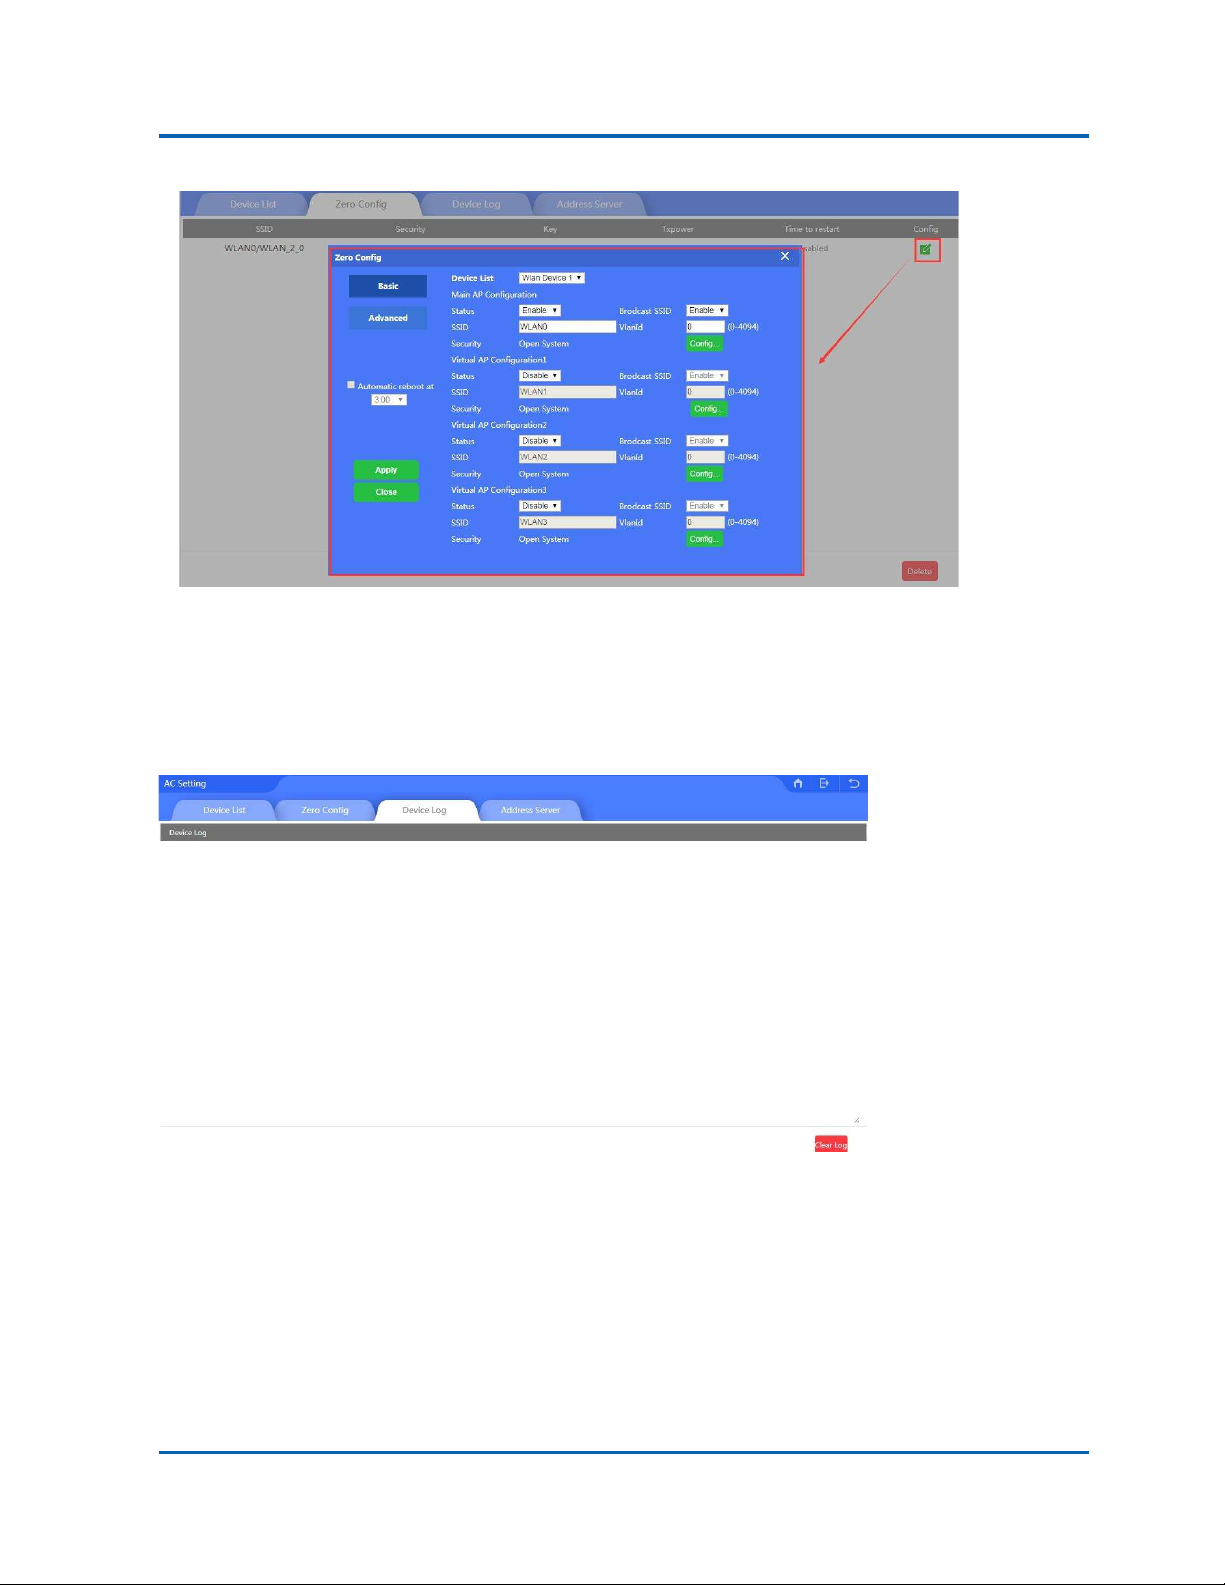
4.2.3: Zero Config
This function make wireless AP plug and play, but recommend to configure this function before connect
wireless AP into this network as following reason:
1. If configure this function after wireless AP connected into this network, then all wireless AP should be
reboot, then wireless AP will get the configuration from Zero config.
2. There is one group only in Zero config, which will make all wireless AP in same SSID, password, channel...

User Manual NRS-AP10 and NRS-RC1
User Manual | 18
Wireless Basic: to setup wireless AP’s SSID, password, Tag VLAN
Device List: Wlan Device 1 and Wlan Device 2; Wlan Device 1 mean 2.4G Radio mainly; Wlan Device 2 mean
2.4G or 5.8G radio, based on wireless AP.
Main AP Configuration: setup the wireless AP’s main SSID, Tag VLAN, Configure Password.
Virtual AP Configuration: setup the wireless AP’s virtual SSID, Tag VLAN, Configure Password. The default
status is disable for this virtual SSID.
Automatic Reboot at: Mean can setup this wireless AP reboot at certain time automatic, to improve the
performance.
Wireless Advanced: to set up the channel, RF power, ShortGI, Coverage Threshold of wireless AP

User Manual NRS-AP10 and NRS-RC1
User Manual | 19
Channel: Auto in default, but recommend to setup channel by manual based on environment.
RF Output Power: 100%, 75%, 50%, 25%, 12.5%, can adjust it based on application. More RF Power, mean more
WiFi Range;
Coverage Threshold: This make end users to connect the outdoor CPE with stronger signal strength;
For example, If one outdoor CPE with -80dBm coverage threshold data, another outdoor CPE with -95dBm
coverage threshold data, then end users will connect the outdoor CPE with -95dBm coverage threshold
always even this outdoor CPE with very weak signal strength.
After setup all the data, click Apply to add zero config group as follow:
Pls note, click config button , can modify the data if need.
User Manual NRS-AP10 and NRS-RC1
User Manual | 20
Delete: If need, can delete this zero config.
4.2.4: Device Log
Device Log is keeping the operation record of this WLAN controller.
This manual suits for next models
1
Table of contents
Other Niveo Professional Wireless Access Point manuals


Popular Wireless Access Point manuals by other brands

ZyXEL Communications
ZyXEL Communications P-2612HNU-Fx Series quick start guide

Zinwell
Zinwell AP-G250 user manual

Cisco
Cisco Meraki MR70 installation guide

TRENDnet
TRENDnet TEW-435BRM - 54MBPS 802.11G Adsl Firewall M Quick install guide

Edge-Core
Edge-Core ECWO4320 quick start guide

Cisco
Cisco Aironet 3800P Series Getting started guide


