Niveo Professional NWA 100 User manual

NWA100 Access Point
1
Niveo Professional NWA 100
Wireless 900N Dual Band PoE Access Point
Manual v1.3

NWA100 Access Point
2
Copyright Statement
is the registered trademark of Netstar Products BV. All products and product names
mentioned herein are the trademarks or registered trademarks of their respective holders. Copyright of the
whole product as integration, including its accessories and software, belongs to Netstar Products BV. No part
of this publication can be reproduced, transmitted, transcribed, stored in a retrieval system, or translated into
any language in any form or by any means without the prior written permission of Netstar Products BV. If you
would like to know more about our product information, please visit our website at
www.niveoprofessional.com.
Disclaimer
Pictures, images and product specifications herein are for references only. To improve internal design,
operational function, and/or reliability, NIVEO PROFESSIONAL reserves the right to make changes to the
products described in this document without obligation to notify any person or organization of such revisions
or changes. NIVEO PROFESSIONAL does not assume any liability that may occur due to the use or application
of the product or circuit layout(s) described herein. Every effort has been made in the preparation of this
document to ensure accuracy of the contents, but all statements, information and recommendations in this
document do not constitute the warranty of any kind, express or implied.
Warrantee, complaints and return of goods
Niveo warrants that the goods delivered by it are free of design, material and manufacturing faults, such for a
period of 12 months following delivery. The Warrantee issued by Niveo will never exceed the Warrantee issued
by Niveo’s own supplier in respect of the goods, such in full compliance with the relevant terms of Warrantee
of this supplier. The Warrantee is not valid if the damage is the result of incorrect handling by the buyer and/or
if the buyer has acted contrary to the instructions (of use) for the products. Without prejudice to the above,
Niveo will never be held to extend its Warrantee beyond replacement or crediting of the value of the faulty
product delivered, such at the discretion of Niveo. The buyer will only have a right to replacement if it turns
out impossible to repair the goods in question.
Details of the Niveo Professional warranty can be found on www.niveoprofessional.com.
Exclusions and Limitations
This limited warranty does not apply if: (a) the product assembly seal has been removed or damaged, (b) the
product has been altered or modified, except by Niveo, (c) the product damage was caused by use with non‑
Niveo products, (d) the product has not been installed, operated, repaired, or maintained in accordance with
instructions supplied by Niveo, (e) the product has been subjected to abnormal physical or electrical stress,
misuse, negligence, or accident, (f ) the serial number on the Product has

NWA100 Access Point
3
been altered, defaced, or removed, or (g) the product is supplied or licensed for beta, evaluation, testing or
demonstration purposes for which Niveo does not charge a purchase price or license fee.
ALL SOFTWARE PROVIDED BY NIVEO WITH THE PRODUCT, WHETHER FACTORY LOADED ON THE PRODUCT
OR CONTAINED ON MEDIA ACCOMPANYING THE PRODUCT, IS PROVIDED “AS IS” WITHOUT WARRANTY OF
ANY KIND. Without limiting the foregoing, Niveo does not warrant that the operation of the product or
software will be uninterrupted or error free. Also, due to the continual development of new techniques for
intruding upon and attacking networks, Niveo does not warrant that the product, software or any equipment,
system or network on which the product or software is used will be free of vulnerability to intrusion or attack.
The product may include or be bundled with third party software or service offerings. This limited warranty
shall not apply to such third party software or service offerings. This limited warranty does not guarantee any
continued availability of a third party’s service for which this product’s use or operation may require.
TO THE EXTENT NOT PROHIBITED BY LAW, ALL IMPLIED WARRANTIES AND CONDITIONS OF
MERCHANTABILITY, SATISFACTORY QUALITY OR FITNESS FOR A PARTICULAR PURPOSE ARE LIMITED TO
THE DURATION OF THE WARRANTY PERIOD. ALL OTHER EXPRESS OR IMPLIED CONDITIONS,
REPRESENTATIONS AND WARRANTIES, INCLUDING, BUT NOT LIMITED TO, ANY IMPLIED WARRANTY OF
NON-INFRINGEMENT, ARE DISCLAIMED.
Some jurisdictions do not allow limitations on how long an implied warranty lasts, so the above limitation may
not apply to you. This limited warranty gives you specific legal rights, and you may also have other rights
which vary by jurisdiction.
TO THE EXTENT NOT PROHIBITED BY LAW, IN NO EVENT WILL NIVEO BE LIABLE FOR ANY LOST DATA,
REVENUE OR PROFIT, OR FOR SPECIAL, INDIRECT, CONSEQUENTIAL, INCIDENTAL OR PUNITIVE DAMAGES,
REGARDLESS OF THE THEORY OF LIABILITY (INCLUDING NEGLIGENCE), ARISING OUT OF OR RELATED TO THE
USE OF OR INABILITY TO USE THE PRODUCT (INCLUDING ANY SOFTWARE), EVEN IF NIVEO HAS BEEN
ADVISED OF THE POSSIBILITY OF SUCH DAMAGES. IN NO EVENT WILL NIVEO’ LIABILITY EXCEED THE
AMOUNT PAID BY YOU FOR THE PRODUCT. The foregoing limitations will apply even if any warranty or
remedy provided under this limited warranty fails of its essential purpose. Some jurisdictions do not allow the
exclusion or limitation of incidental or consequential damages, so the above limitation or exclusion may not
apply to you.
Technical Support
Website: http://www.niveoprofessional.com
Tel:+31 (0) 297 25 61 61
Email: info@niveoprofessional.com

NWA100 Access Point
4
Contents
CHAPTER 1 PRODUCT OVERVIEW....................................................................................................................................... 5
1.1 PRODUCT FEATURES ........................................................................................................................................................ 5
1.2 PACKAGE CONTENTS........................................................................................................................................................ 5
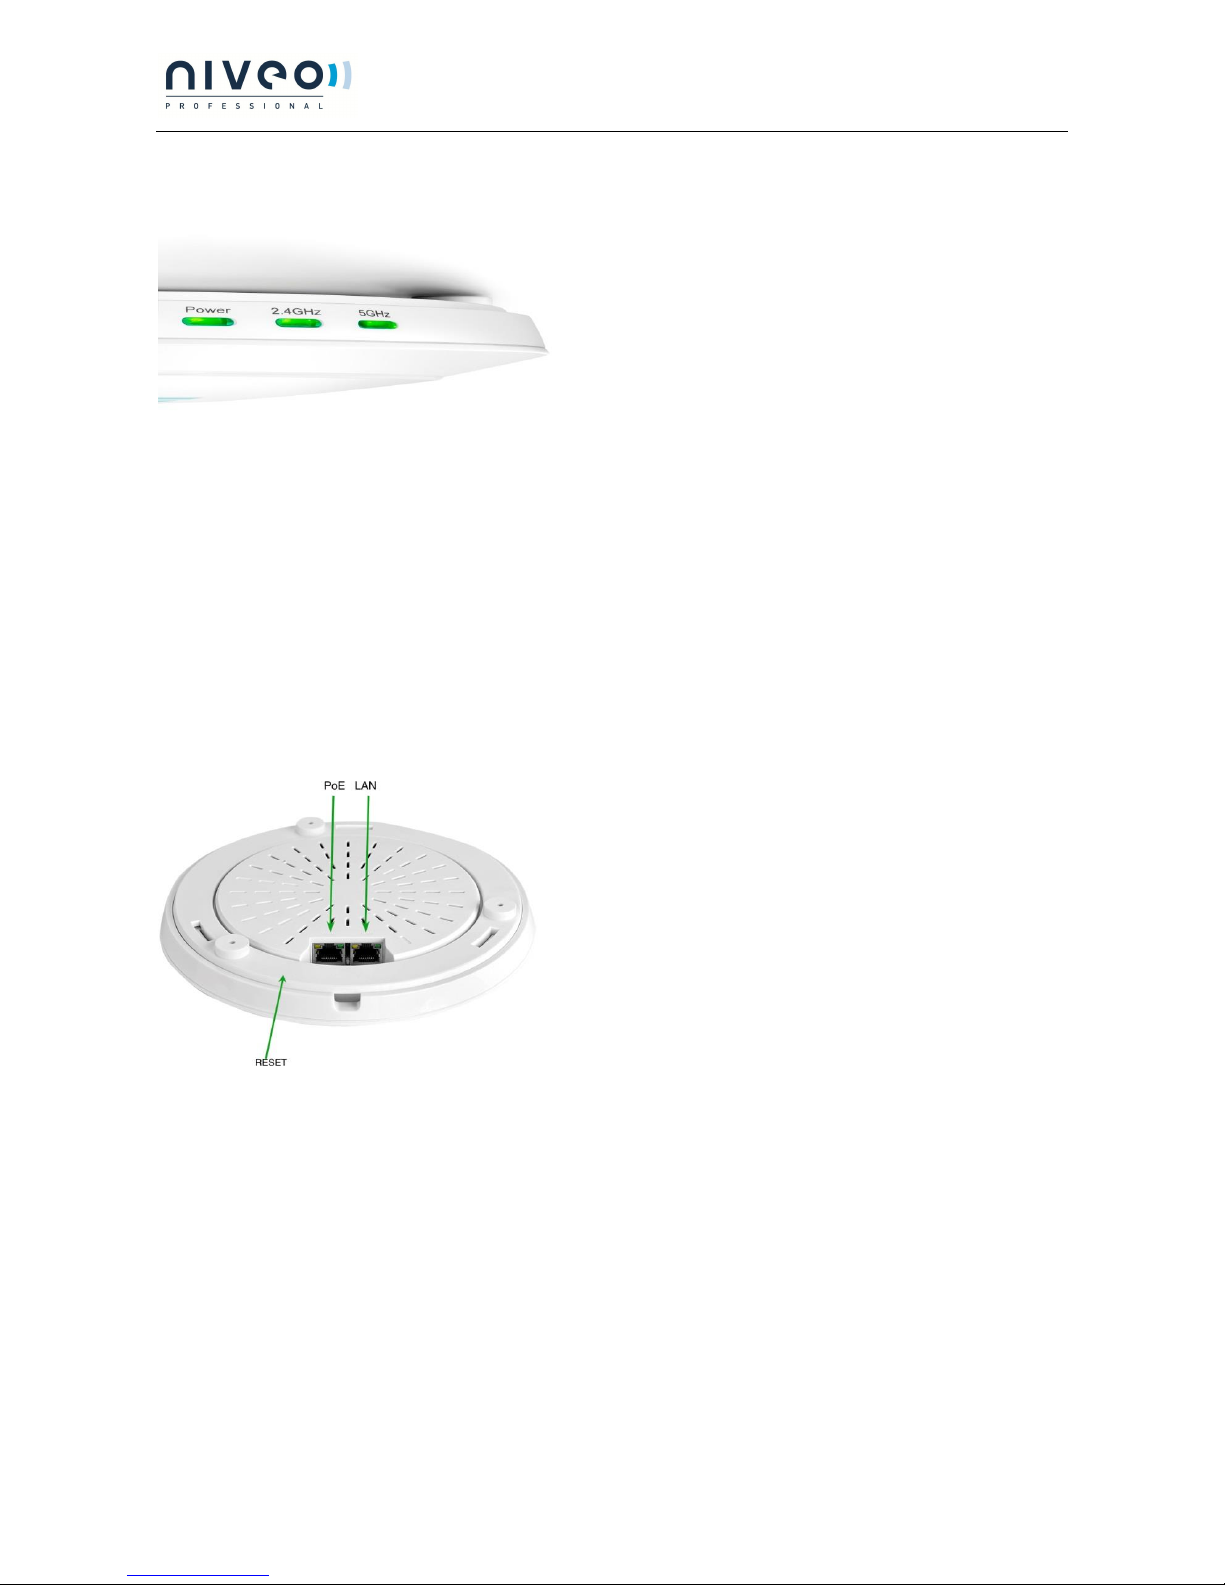
1.3 LEDS AND INTERFACES ....................................................................................................................................................6
CHAPTER 2 INSTALLATION ................................................................................................................................................. 7
CHAPTER 3 CONFIGURATION GUIDELINES........................................................................................................................ 8
3.1 IP CONFIGURATION .........................................................................................................................................................8
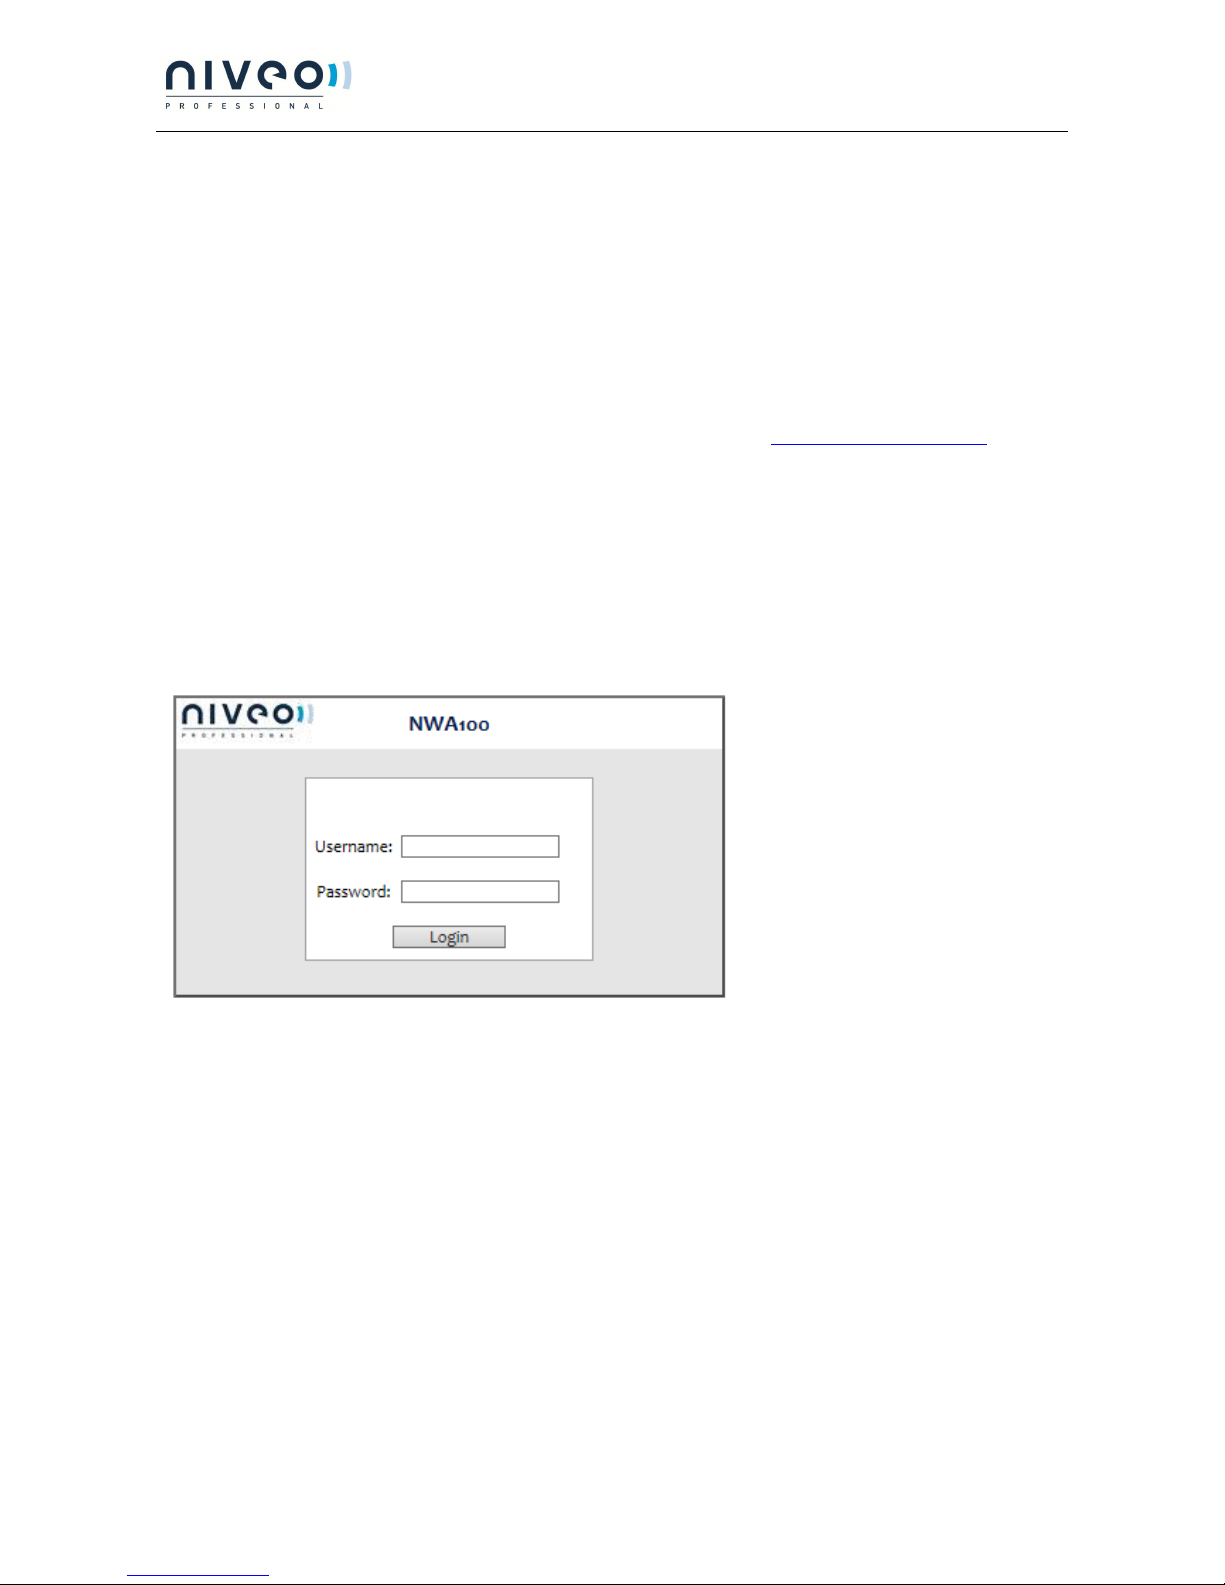
3.2 WEB LOGIN....................................................................................................................................................................8
3.3 STATUS .........................................................................................................................................................................9
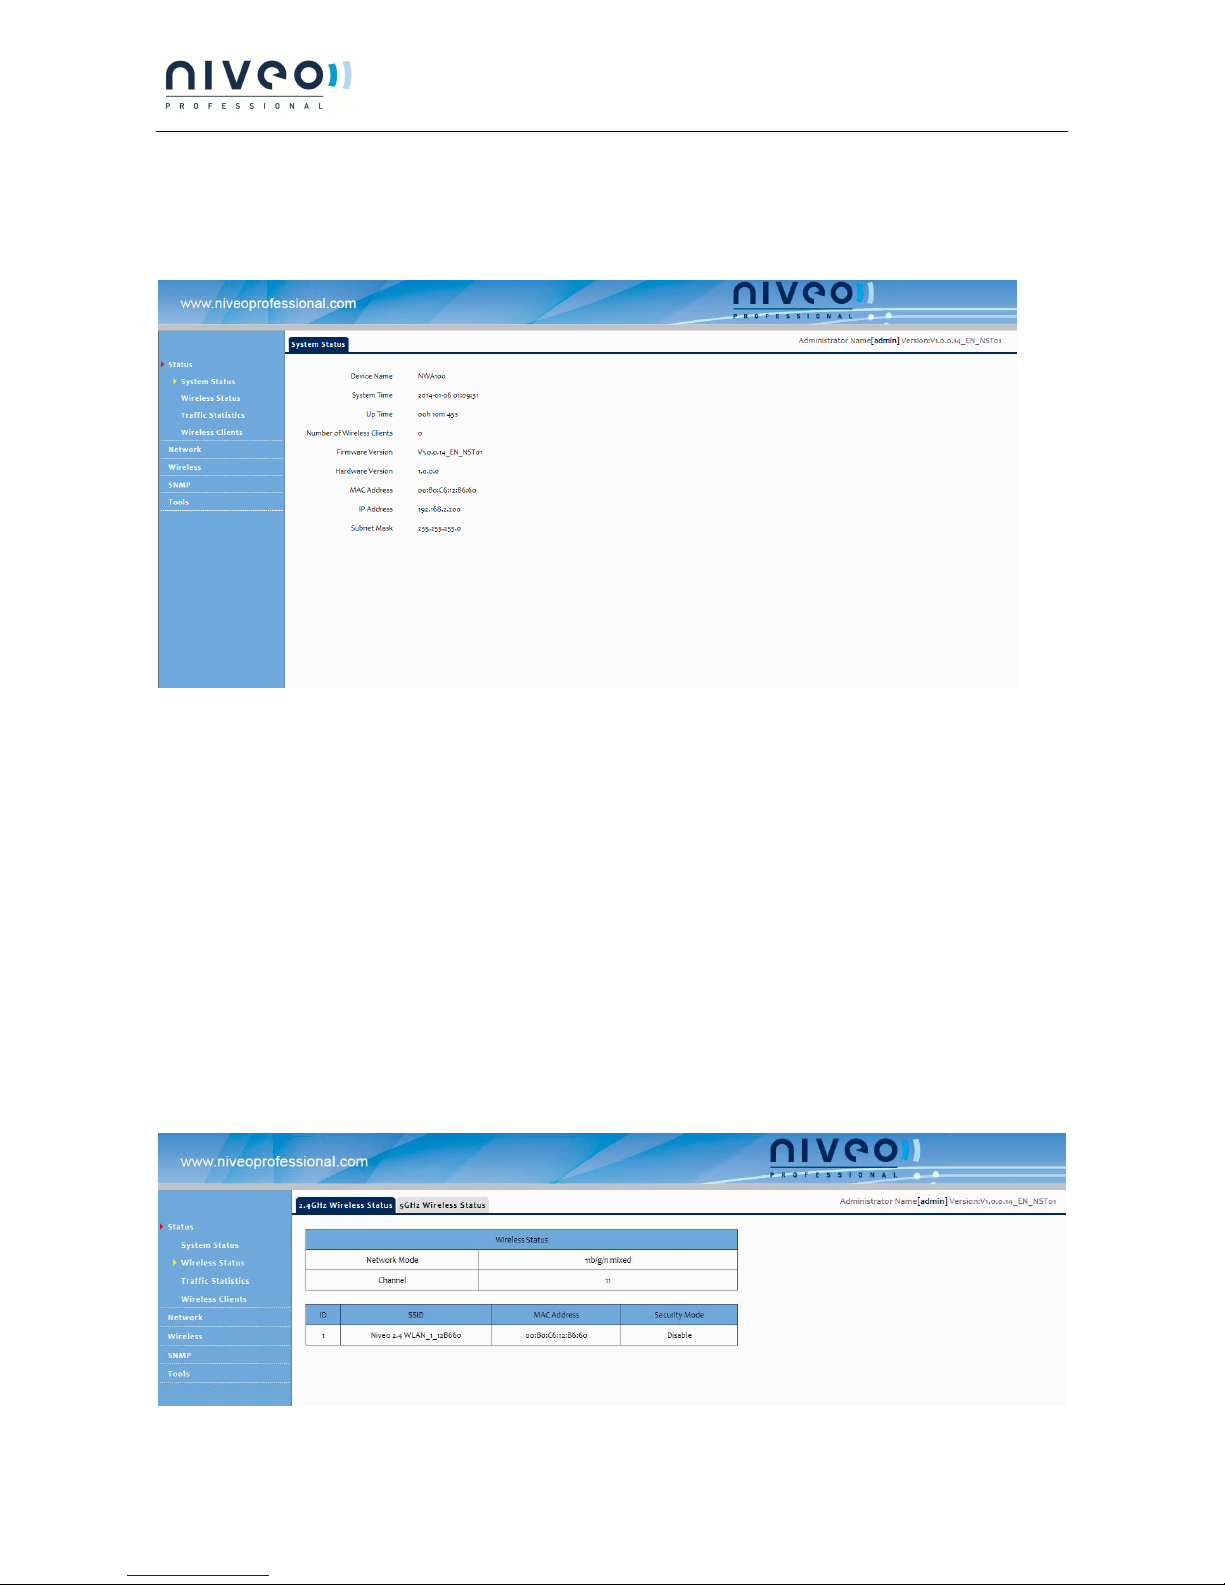
3.3.1 System Status....................................................................................................................................................... 9
3.3.2 Wireless Status..................................................................................................................................................... 9
3.3.3 Traffic Statistics ..................................................................................................................................................10
3.3.4 Wireless Clients ...................................................................................................................................................10
3.4 NETWORK .................................................................................................................................................................... 11
3.4.1 LAN Settings ........................................................................................................................................................ 11
3.5 WIRELESS.....................................................................................................................................................................12
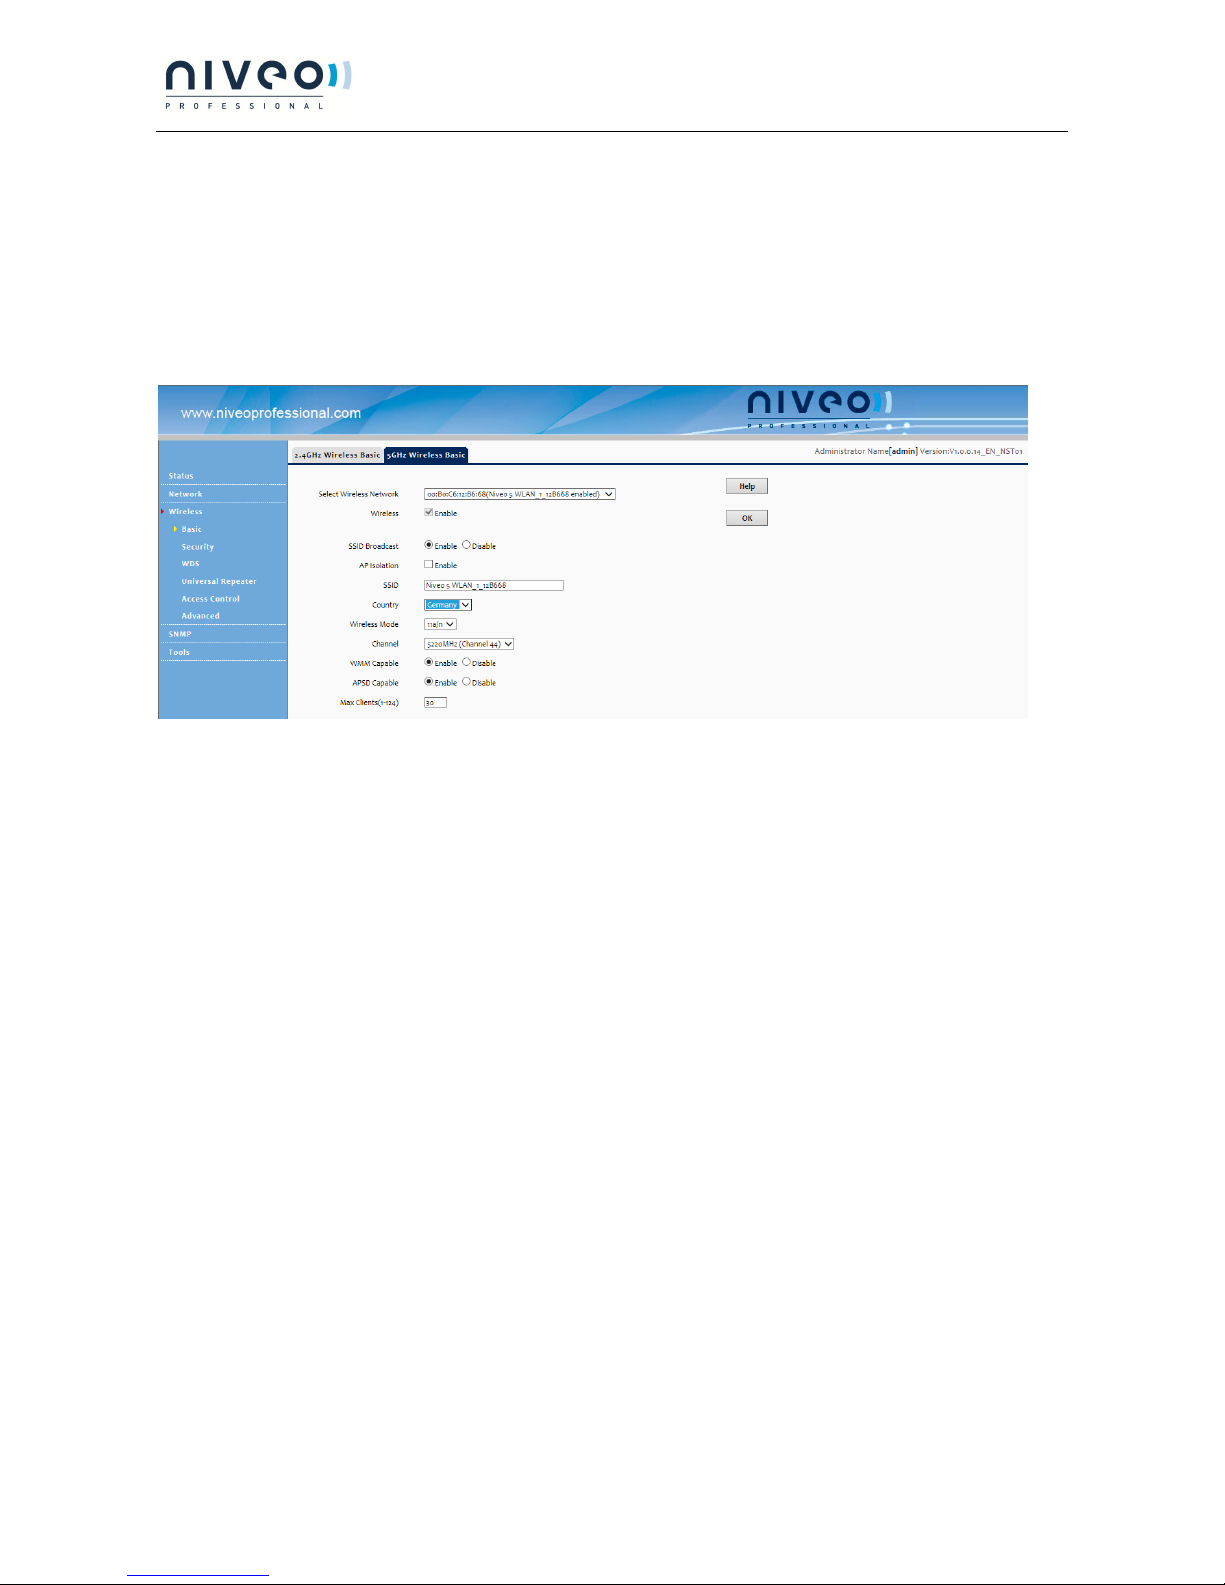
3.5.1 Basic..................................................................................................................................................................... 12
3.5.2 Security ...............................................................................................................................................................14
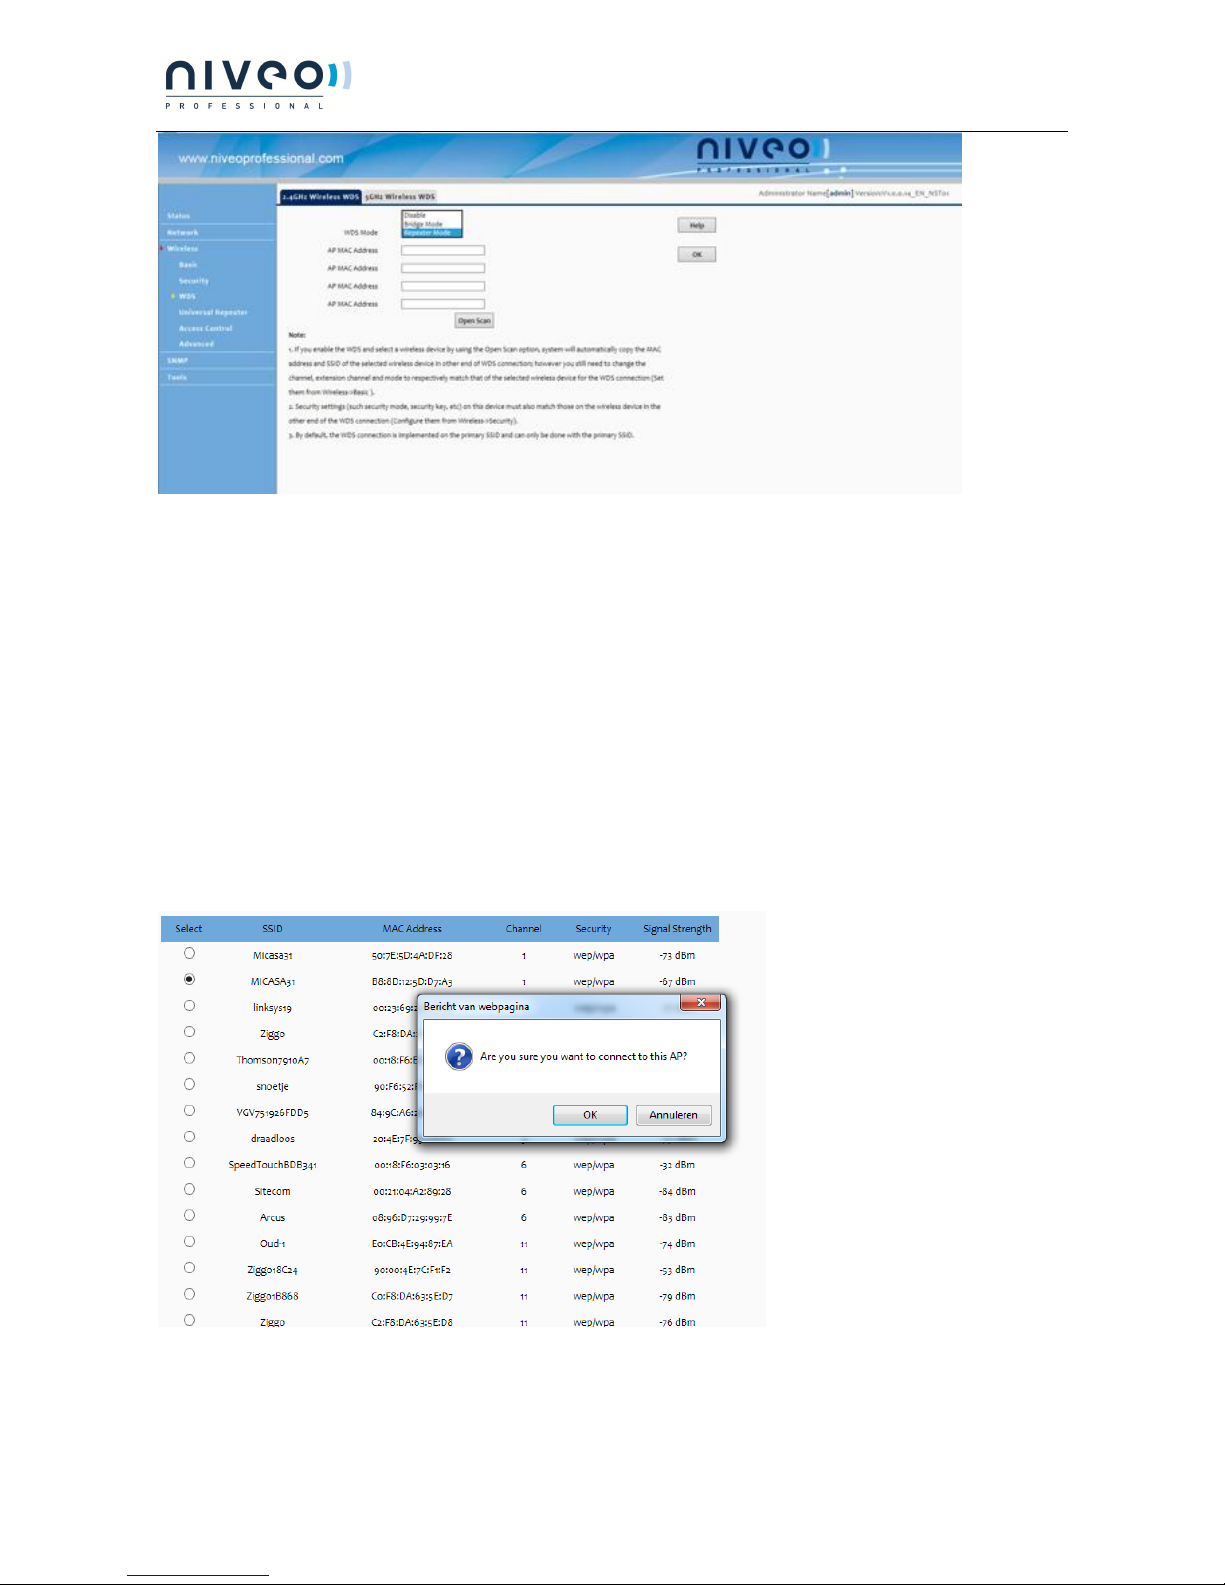
3.5.3 WDS.....................................................................................................................................................................15
3.5.4 Universal Repeater.............................................................................................................................................. 17
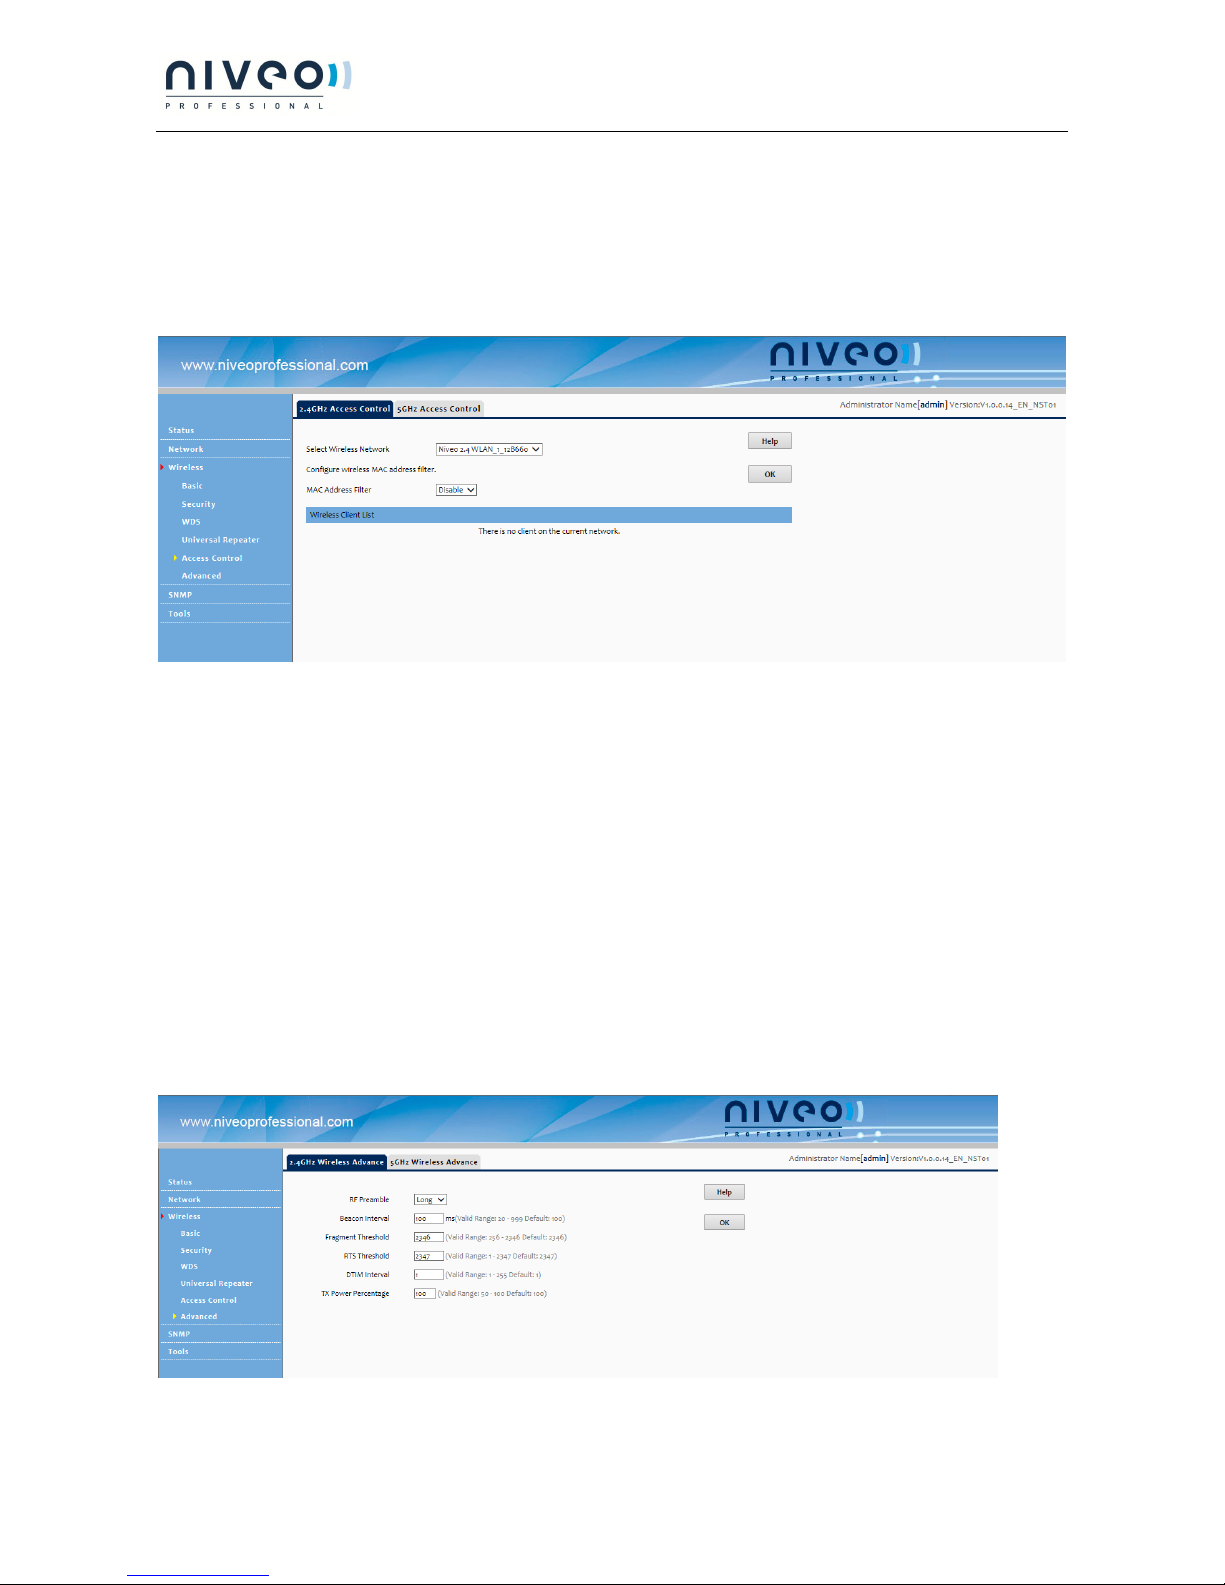
3.5.5 Access Control.....................................................................................................................................................18
3.5.6 Advanced ............................................................................................................................................................18
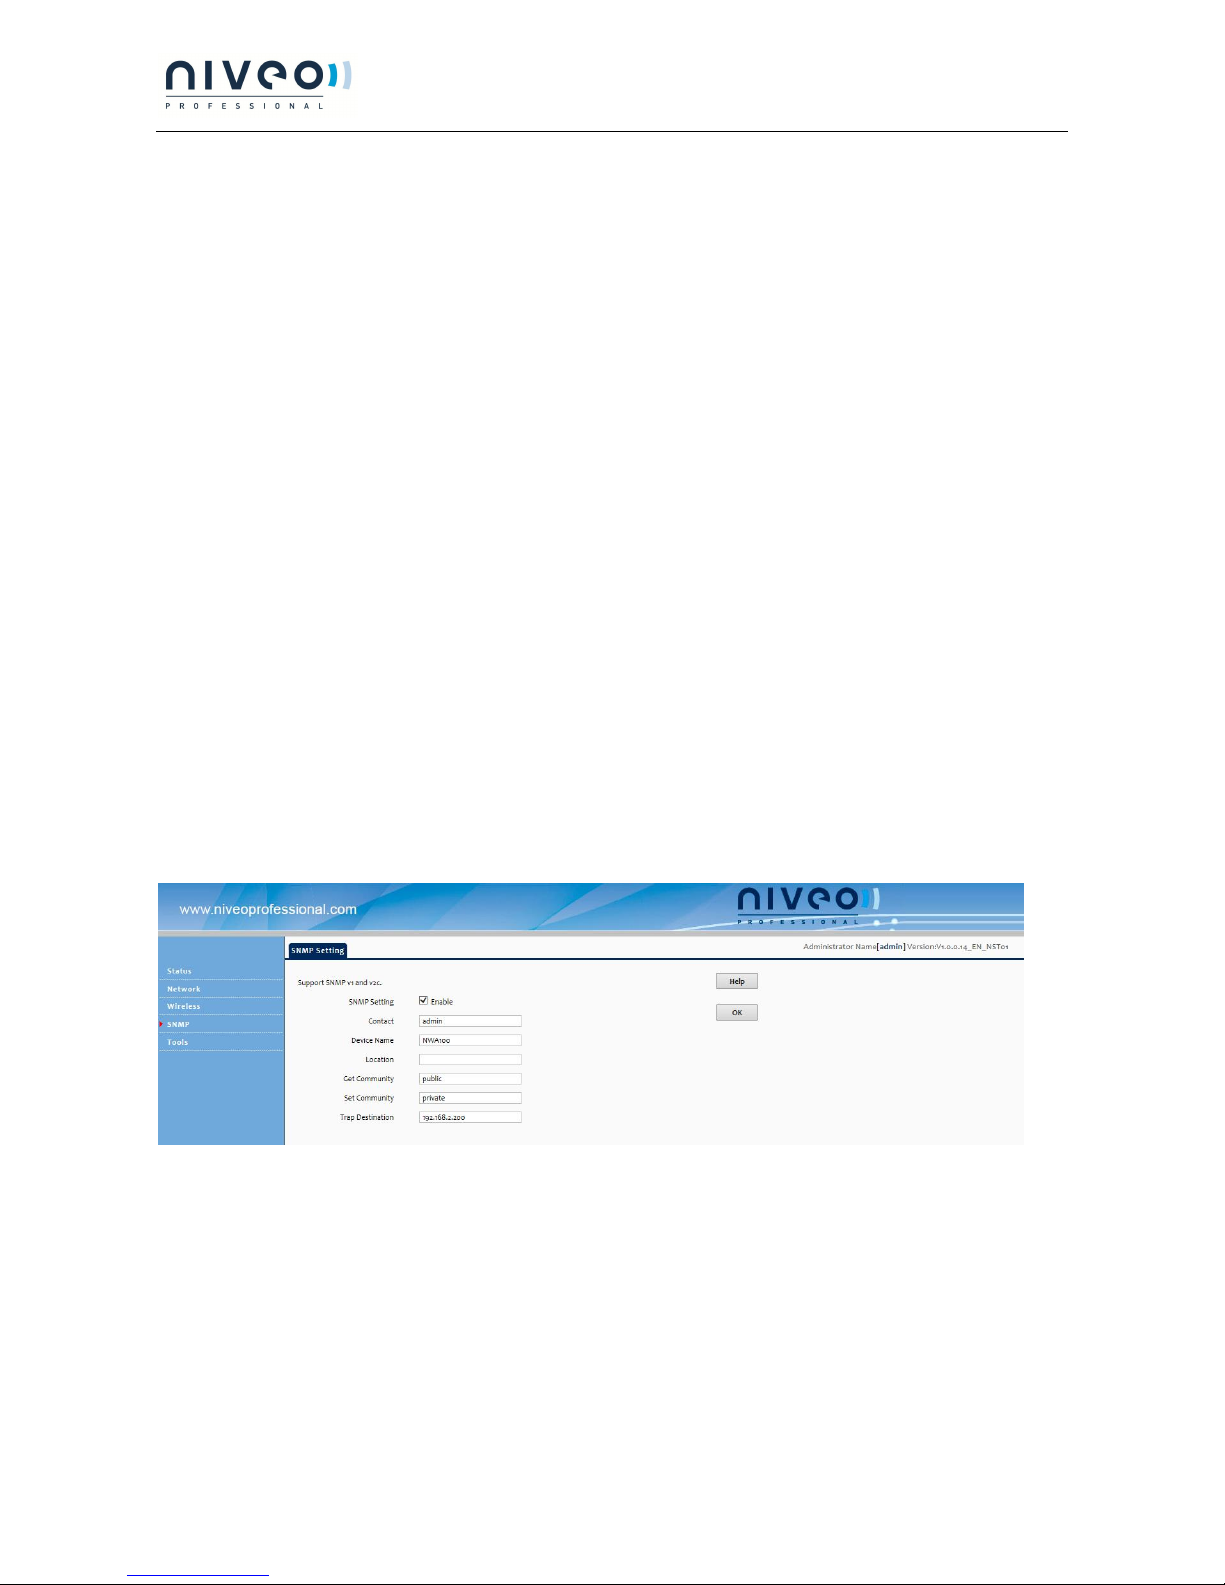
3.6 SNMP.........................................................................................................................................................................19
3.7 TOOLS..........................................................................................................................................................................19
3.7.1 Maintenance ........................................................................................................................................................19
3.7.2 Time..................................................................................................................................................................... 21
3.7.3 Logs ..................................................................................................................................................................... 21
3.7.4 Configuration ......................................................................................................................................................22
3.7.5 User Name & Password .......................................................................................................................................23
3.7.6 Diagnostics..........................................................................................................................................................23
3.7.7 LED ..................................................................................................................................................................... 24
APPENDIX 1 GLOSSARY ..................................................................................................................................................... 25
APPENDIX 2 CONFIGURE PC ............................................................................................................................................. 26
WIN7 OS CONFIGURATION................................................................................................................................................. 26
WINDOWS XP OS CONFIGURATION ..................................................................................................................................... 29
APPENDIX 3 SAFETY AND EMISSION STATEMENT...........................................................................................................31

NWA100 Access Point
5
Chapter 1 Product Overview
The Wireless AP is a best-in-class 802.11n indoor access point designed specifically for wireless projects. With
suspension installation and existed structure, the device saves time and costs. Versatile and powerful, the
Wireless AP offers multiple security modes and supports 802.11n and 802.3at PoE power supply, which makes
your data transmission safe..
1.1 Product Features
Supports IEEE802.11n, IEEE802.11g, IEEE 802.11b and IEEE802.11a;
1000M Ethernet port for wired LAN connection;
PoE Port for connecting to power supply or connecting to IEEE802.3at PoE_PSE switch;
One RJ-45 10/100/1000 IEEE802.3ab, IEEE802.3u, IEEE802.3 auto-sensing Gigabit port for data
transmission or power supply;
Wireless rates of up to 450Mbps;
Unified Management allows network administrators to centrally manage APs on LAN;
Supports IP address, wireless SSID, device name, channel, wireless security and domain diagnostics;
WEP, WPA-PSK, WPA2-PSK and WPA-PSK/WPA2-PSK encryptions secure wireless network against
unauthorized accesses;
Can be configured to select an optimum channel for device to operate on;
Can be configured to adjust transmitting power;
Supports AP and WDS mode.
1.2 Package Contents
Please verify that the package contains the following items:
Wireless Access Point
Power Adapter
PoE Injector
5 screws
Ethernet Cable
Bracket
Install Guide
If any of the above items are incorrect, missing, or damaged, please contact your reseller for immediate
replacement.

NWA100 Access Point
6
1.3 LEDs and Interfaces
Side Panel:
Power
Solid: Receiving electrical power;
Blinking: Functioning properly;
Off: Receiving no electrical power or LED is disabled manually.
2.4GHz, 5GHz
Solid: Wi-Fi is enabled;
Blinking: Transferring data;
Back Panel:
RESET
Restores the device to the factory default settings when pushed and held for 7 seconds (This button has
been hidden by the bracket of this device. Before pressing this button, you should remove the bracket.).
PoE
PoE Port for connecting to power supply or connecting to IEEE802.3at switch;
LAN
1000M Ethernet Port for connecting to an Ethernet LAN device such as a PC or switch, etc.

NWA100 Access Point
7
Chapter 2 Installation
Installation procedures:
1. Connect the injector to the power adapter.
2. Connect the PoE port of the injector to the PoE port on this device with an Ethernet cable.
3. Connect the LAN port of the injector to the switch.
4. Hang the AP:
⑴Install the bracket onto the ceiling or wall.
⑵Fix the AP onto the bracket.
The network topology is shown below:

NWA100 Access Point
8
Chapter 3 Configuration Guidelines
3.1 IP Configuration
The default IP address of your wireless access point is 192.168.2.200. If you are using the default IP subnet,
the computer you are using to connect to the device should be configured with an IP address that starts with
192.168.2.x (where x can be any number between 1~253) and a Subnet Mask of 255.255.255.0; if you have
changed the subnet of the wireless access point, the computer you are using to connect must be within the
same subnet. If you are not clear about this configuration, please refer to Appendix 2: Configure PC.
3.2 Web Login
To connect to the Wireless AP using the defaults IP address:
1. Open a Web browser.
2. Enter 192.168.2.200 into your browser.
3. Enter the default User Name admin and default Password admin into the login window.
4. Click Login and your Web browser shall automatically display the home page.

NWA100 Access Point
9
3.3 Status
3.3.1 System Status
This screen displays this device’s current system status.
1. Device Name: Displays this device’s name.
2. System Time: Displays system’s current time.
3. Up Time: Displays the device’s uptime.
4. Number of Wireless Clients: Displays the information of connected wireless clients (if any).
5. Firmware Version: Displays Device’s current firmware version.
6. Hardware Version: Displays Device’s current hardware version.
7. MAC Address: Displays device’s LAN MAC address.
8. IP Address: Displays device’s LAN IP address.
9. Subnet Mask: Displays device’s subnet mask.
3.3.2 Wireless Status
This section displays 2.4GHz and 5GHz wireless status.

NWA100 Access Point
10
1. Network Mode: Displays device’s current network mode.
2. Channel: Displays device’s current channel.
3. SSID: Displays device’s network name.
4. MAC Address: Displays connected wireless client’s MAC address.
5. Security Mode: Displays device’s current security mode.
3.3.3 Traffic Statistics
This section displays each SSID’s traffic statistics.
1. Total RX Traffic: Total RX bytes SSID has received.
2. Total RX Packets: Total RX packets SSID has received.
3. Total TX Traffic: Total TX bytes SSID has transmitted.
4. Total TX Packets: Total TX packets SSID has transmitted.
3.3.4 Wireless Clients
This section displays information of connected clients (if any). You can view 2.4GHz client list and 5GHz client
list respectively here.

NWA100 Access Point
11
1. MAC Address: Displays connected wireless client’s MAC address.
2. Link Rate: Displays the link speed rate between this device and the connected wireless client.
Note -----------------------------------------------------------------------------------------------------------------------------
If no clients are connected to this device, a prompt message will appear: There is no wireless client
connected to the device!
-----------------------------------------------------------------------------------------------------------------------------------------
3.4 Network
3.4.1 LAN Settings
Here you can configure the LAN IP address, subnet mask, gateway and DNS servers.
Note -----------------------------------------------------------------------------------------------------------------------------
1. Default LAN IP:192.168.2.200, default subnet mask: 255.255.255.0.
2. If you change the default IP address, you must use the new IP address to re-log in.
-----------------------------------------------------------------------------------------------------------------------------------------

NWA100 Access Point
12
3.5 Wireless
3.5.1 Basic
Select 2.4GHz or 5GHz to configure basic settings.
2.4GHz Wireless Basic
1. Select Wireless Network: 8 SSIDs are available here.
2. Enable: Select it to enable wireless feature. As for 2.4GHz, only the first SSID is enabled by default and it
can’t be disabled. Up to 8 SSIDs can be enabled at the same time.
3. SSID Broadcast: This option allows you to have your network name (SSID) publicly broadcast or if you
choose to disable it, the SSID will be hidden. It is enabled by default.
4. AP Isolation: Isolates clients connected to the same SSID.
5. SSID: This is the public name of your wireless network. Select the SSID you wish to configure from the
drop-down list.
6. Wireless Mode: Select a right mode according to your wireless client. The default mode of 2.4GHz is
11b/g/n mixed.
11b mode: Select it if you have only 11b wireless devices in your wireless network. Up to 11Mbps wireless rate
is supported on this mode.
11g mode: Select it if you have only 11g or 11n wireless devices in your wireless network. Up to 54Mbps
wireless rate is supported on this mode.
11b/g mixed mode: Select it if you have 11b and 11g wireless devices in your wireless network. Up to 54Mbps
wireless rate is supported on this mode.
11b/g/n mixed mode: Select it if you have 11b, 11g and 11n wireless devices in your wireless network. In this
mode wireless connection rate is negotiated. Up to 450Mbps wireless rate is supported on this mode.
7. Channel: Select from 1~13 channels or Auto. The best selection is a channel that is the least used by
neighboring networks.
8. Channel Bandwidth: Select a proper channel bandwidth to enhance wireless performance. Select 20/40M
frequency width when device is operating in 11n, select 20M frequency width when device is operating in

NWA100 Access Point
13
non-11n mode.
9. Extension Channel: This is used to enhance data throughput ability for 802.11n devices on the network.
10. WMM-Capable: WMM is QoS for your wireless network. Enabling this option may better stream wireless
multimedia data such as video or audio (recommended).
11. ASPD Capable: Select to enable/disable the auto power saving mode. By default, this option is disabled.
12. Maximum Clients: Total clients should be within 124.
5GHz Wireless Basic
1. Select Wireless Network: 8 SSIDs are available here.
2. Enable: Select it to enable wireless feature. As for 2.4GHz, only the first SSID is enabled by default and it
can’t be disabled. Up to 8 SSIDs can be enabled at the same time.
3. SSID Broadcast: This option allows you to have your network name (SSID) publicly broadcast or if you
choose to disable it, the SSID will be hidden. It is enabled by default.
4. AP Isolation: Isolates clients connected to the same SSID.
5. SSID: This is the public name of your wireless network. Select the SSID you wish to configure from the
drop-down list.
6. Wireless Mode: Select a right mode according to your wireless client. The default mode of 5GHz is 11a/n.
11a mode: Select it if you have only 11a wireless devices in your wireless network. Up to 54Mbps wireless rate
is supported on this mode.
11a/n mode: In this mode wireless connection rate is negotiated. Up to 450Mbps wireless rate is supported
on this mode.
7. Channel: Select 149, 153, 157, 161, 165 or Auto in 11a mode and select 149, 157 or Auto in 11a/n mode. The
best selection is a channel that is the least used by neighboring networks.
8. WMM-Capable: WMM is QoS for your wireless network. Enabling this option may better stream wireless
multimedia data such as video or audio (recommended).
9. ASPD Capable: Select to enable/disable the auto power saving mode. By default, this option is disabled.
10. Maximum Clients: Total clients should be within 124.

NWA100 Access Point
14
3.5.2 Security
This section allows you to secure your wireless network. Here we introduce 4 security modes to you.
WEP
WEP is intended to provide data confidentiality comparable to that of a traditional wired network. Two types
of encryption can be used with WEP: Open and Shared Key.
1. Encryption Type: Select Open or Shared from the drop-down list.
2. WEP Key: Select Hex or ASCII from the drop-down list. Enter 5 or 13 valid ASCII characters
(0-9,a-z,A-Z,@,*,-,_ can be included) if you select ASCII or enter 10 or 26 valid Hex characters (0-9,a-f,A-F can
be included) if you select Hex.
WPA-PSK
The WPA (Wi-Fi Protected Access) protocol implements the majority of the IEEE 802.11i standard. It enhances
data encryption through the Temporal Key Integrity Protocol (TKIP) which is a 128-bit per-packet key,
meaning that it dynamically generates a new key for each packet. WPA also includes a message integrity
check feature to prevent data packets from being tampered with. Only authorized network users can access
the wireless network. WPA adopts enhanced encryption algorithm over WEP.

NWA100 Access Point
15
1. Cipher Type: Select AES (advanced encryption standard) or TKIP (temporary key integrity protocol) &AES.
2. Security Key: Enter a security key, which must be between 8-63 ASCII characters long.
3. Key Update Interval: Enter a valid time period for the key to be changed.
WPA2-PSK
WPA2 (Wi-Fi Protected Access version 2) is based on 802.11i and uses Advanced Encryption Standard (AES)
instead of TKIP. It is more secured than WPA and WEP.
1. Cipher Type: Select AES (advanced encryption standard) or TKIP (temporary key integrity protocol) &AES.
2. Security Key: Enter a security key, which must be between 8-63 ASCII characters long.
3. Key Update Interval: Enter a valid time period for the key to be changed.
3.5.3 WDS
Wireless distribution system (WDS) is a system enabling the wireless interconnection of access points in an
IEEE 802.11 network. It allows a wireless network to be expanded using multiple access points without the
traditional requirement for a wired backbone to link them. Note: The Access Points you select must support
WDS.

NWA100 Access Point
16
1. WDS Mode: Select Disable, Repeater Mode or Bridge Mode.
2. AP MAC Address: Displays the remote AP’s MAC address.
For Example:
Access Point 1 LAN IP: 192.168.2.200
Access Point 2 LAN IP: 192.168.2.223
WDS Mode: Repeater Mode
Configure Access Point 1:
1. Enter the remote AP’s MAC address and click OK.
2.You can also scan the remote AP.
1)Click Open Scan to select the remote AP and click OK to add the corresponding MAC address
automatically.
2) Click OK to save your settings.

NWA100 Access Point
17
Then follow the steps mentioned above to configure the Access Point 2. After the two APs have added each
other, they can be bridged successfully.
Note -----------------------------------------------------------------------------------------------------------------------------
1. In WDS mode, the two APs should support WDS and you should keep their SSIDs, channels, security modes
and keys the same. As for IP address, they should not be the same but on the same network segment;
2. Once the security mode has been changed, please reboot the device.
3. If one of the APs is in Bridge Mode, the remote one must be in Repeater Mode.
4. In Bridge mode, clients won’t be able to access the device’s primary SSID.
-----------------------------------------------------------------------------------------------------------------------------------------
3.5.4 Universal Repeater
Select Universal Repeater and enable scan to automatically populate SSID and channel of the AP to connect
or manually enter the AP's SSID, channel and security key.
Note -----------------------------------------------------------------------------------------------------------------------------
1. Enabling scan does not populate the security key, so you must still manually enter it.
2. Make sure your (local) AP, PCs connected and the remote AP to connect are on the same subnet with
different IP addresses.
3. If ping requests sent from PCs connected to your local AP are properly replied by the targeted remote AP,

NWA100 Access Point
18
Universal Repeater is successfully operating; if not, check your settings again.
-----------------------------------------------------------------------------------------------------------------------------------------
3.5.5 Access Control
Specify a list of devices to allow or disallow a connection to your wireless network via the device's MAC
addresses. To deactivate this feature, select "Disable"; to activate it, select "Allow" or "Deny" (2.4GHz/5GHz).
MAC Filter Mode: Select Allow or Deny from the drop-down list.
1. To permit a wireless device to connect to your wireless network, select Allow, enter its MAC address, click
Add and then OK. Then only this device listed as “Allowed” will be able to connect to your wireless
network; all other wireless devices won’t be allowed.
2. To disallow a wireless device to connect to your wireless network, select Deny, enter its MAC address, click
Add and then OK. Then this device listed as “Denied” will be unable to connect to your wireless network.
3.5.6 Advanced
This section allows you to configure advanced wireless settings (2.4GHz or 5GHz). If you are new to
networking and have never configured these settings before, we recommend you to leave the default
settings unchanged.
1. RF Preamble: This is used to synchronize frames. Do not change it unless necessary.
2. Beacon Interval: This is a time interval between any 2 consecutive Beacon packets sent by an Access Point

NWA100 Access Point
19
to synchronize a wireless network. Specify a valid Beacon Interval value between 20-999. The default value is
100.
3. Fragment Threshold: Specify a valid Fragment Threshold value between 256-2346. The default value is
2346. Any wireless packet exceeding the preset value will be divided into several fragments before
transmission.
4. RTS Threshold: Specify a valid RTS Threshold value between 1-2347. The default is 2347. If a packet
exceeds the preset value, RTS/CTS scheme will be used to reduce collisions. Set it to a smaller value if there
are distant clients and interference.
5. DTIM Interval: A DTIM (Delivery Traffic Indication Message) Interval is a countdown informing clients of
the next window for listening to broadcast and multicast messages. When such packets arrive at device’s
buffer, the device will send DTIM (delivery traffic indication message) and DTIM interval to wake clients up
for receiving these packets. Specify a valid value between 1-255. The default is 1.
6. TX Power Percentage: Control TX power . Specify a value between 50 - 100. The default is 100.
3.6 SNMP
The Simple Network Management Protocol (SNMP) is widely used in local area networks (LANs) for
collecting information, managing, and monitoring network devices, such as servers, control systems, hubs,
switches, and routers. Specialized software in each SNMP capable device, known as an Agent, continuously
monitors the status of the device and reports the results to the SNMP Manager software.This AP supports
both SNMP v1 and SNMP v2c.
Click Enable to enable the SNMP feature.
1. Get Community: Specify a community for reading SNMP agent information;
2. Set Community: Specify a community for writing SNMP agent information.
3.7 Tools
3.7.1 Maintenance
Upgrade
Upgrade is released periodically to improve the functionality of your device or to add new features

NWA100 Access Point
20
Click Tools > Maintenance > Upgrade to enter the screen below:
To upgrade device software:
1. Click Browse to locate and select upgrade file on your hard disk.
2. Click Upgrade to upgrade device firmware.
3. When the firmware upgrade completes, your wireless access point will automatically restart.
4. Restore the AP back to factory default settings after reboot.
Note -----------------------------------------------------------------------------------------------------------------------------
When uploading software to the Wireless AP, it is important not to disconnect the device from power supply.
If the power supply is interrupted, the upload may fail, corrupt the software, and render the device
inoperable. When the upload completes, your wireless access point will automatically restart. The upgrade
process typically takes about several minutes.
-----------------------------------------------------------------------------------------------------------------------------------------
Reboot
The Reboot option restarts the wireless access point using its current settings. Connections will be lost
during reboot.
Click Tools > Maintenance > Reboot to display screen below:
Table of contents
Other Niveo Professional Wireless Access Point manuals
Popular Wireless Access Point manuals by other brands

Atmel
Atmel Wireless LAN Access Point user guide

Pakedge Device & Software
Pakedge Device & Software WK-2 user guide

TRENDnet
TRENDnet TEW-413APBO Specifications

TP-Link
TP-Link EAP690E Quick installation guide

MikroTik
MikroTik wAP ac Series quick start guide

Allied Telesis
Allied Telesis AT-TQ5403 Series Quick installation guide