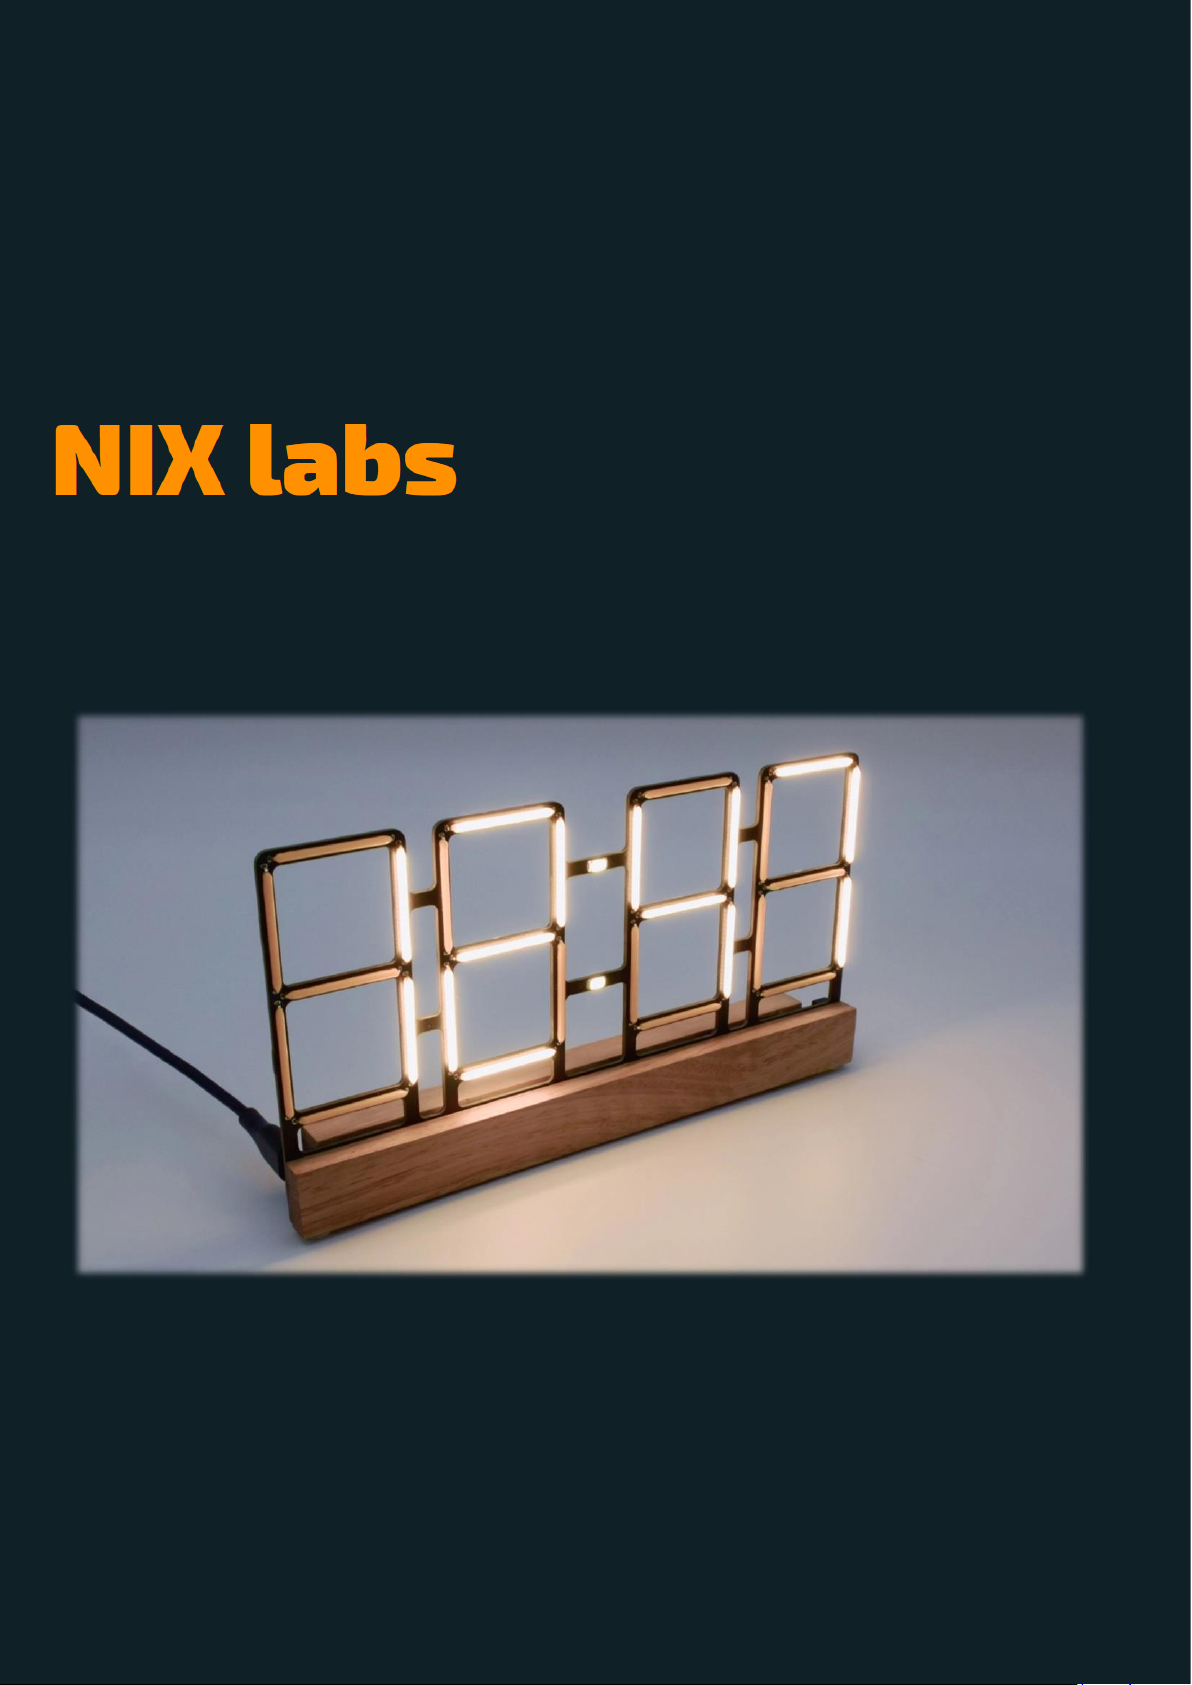
NIX Labs FL4 User manual
© 2022 NIX labs | Revision A1
Filament Clock User’s Guide

NIX4 and NIX6 User’s Guide
Filament Clock User’s Guide
1
Contents
1. Introduction.....................................................................................................................................................2
1.1 Precautions......................................................................................................................................................2
2. Key Features ....................................................................................................................................................2
3. Overview..........................................................................................................................................................3
4. Model and Version Identification....................................................................................................................3
5. Powering Up ....................................................................................................................................................3
5.1 Other Power Sources.......................................................................................................................................4
6. Reading the Display .........................................................................................................................................4
6.1.1 Time Display.....................................................................................................................................................4
6.1.2 Date Display.....................................................................................................................................................5
6.1.3 Temperature Display .......................................................................................................................................5
7. Using the Built-In Buttons................................................................................................................................6
7.1 Setting the Time...............................................................................................................................................6
7.2 Using the Counter/Timer.................................................................................................................................6
7.3 Parameters Settings Menu ..............................................................................................................................7
8. Online Configuration Application (Web App)..................................................................................................8
8.1 Using the Web App..........................................................................................................................................9
8.2 Time, Date and Display Options ....................................................................................................................11
8.3 LEDs and Display Brightness Options.............................................................................................................12
8.4 Anti-Poisoning and LED Changer Options......................................................................................................13
8.5 On-Off Timer..................................................................................................................................................14
9. Maximising the Light Sensor Accuracy ..........................................................................................................15
10. Maximising Temperature Accuracy...............................................................................................................15
11. Settings and Time Backup..............................................................................................................................15
12. Troubleshooting.............................................................................................................................................16
13. Firmware Upgrade.........................................................................................................................................18
14. Cleaning and Maintenance............................................................................................................................19
15. Warranty and Repairs....................................................................................................................................19
16. Specifications.................................................................................................................................................20
16.1 Dimensions ....................................................................................................................................................21

NIX4 and NIX6 User’s Guide
Filament Clock User’s Guide
2
1. Introduction
Thanks for your NIX labs purchase! Our products are highly customisable yet easy to use straight out of the box, so
please refer to the Quick Start Guide included in the box or downloaded from nixlabs.com.au/support for the fastest
setup experience. This manual will guide you through our more advanced features, product specifications and
device troubleshooting.
NIX labs Filament Clock models are based on linear LED filament arranged as a seven-segment digital display.
Available in many colours, these efficient and low-voltage LED filaments make for a unique, easy-to-read timepiece.
1.1 Precautions
This product is not a toy and should be handled with care. Do not expose to moisture or dew - refer
to operating and storage temperature limits in this manual. If bringing into a warm environment from
the cold, allow condensation to clear before powering up. Do no insert objects into the gaps in the
enclosure as components may be damaged or short-circuited. Do not press on the LED filaments as
they are not flexible and may break. Staring at the LEDs in higher brightness modes may be harmful.
Always carry your clock by its base.
2. Key Features
•Large and bright, low-flicker seven-segment display with several colour options available
•High-accuracy calibrated clock with temperature compensation
•5+ Day Supercapacitor time and date backup, settings are saved permanently
•Time, Date and Temperature displays with auto-cycling option
•Count-up and count-down timer
•Customisable RGB backlighting LEDs with seven presets, rainbow and random colour mode
•Night-time display and LED dimming with adjustable level and threshold
•Selectable button beep, 12/24-hour time format, °C/°F temperature display and optional leading zero
•USB Powered with web-based configuration application –no software download needed and compatible
with Windows, Mac, Linux, ChromeOS and Android. Many options are configurable using built-in buttons.
•Each day can have up to two configurable on/off times to maximise LED life and reduce power
consumption.
NIX4 and NIX6 User’s Guide
Filament Clock User’s Guide
3
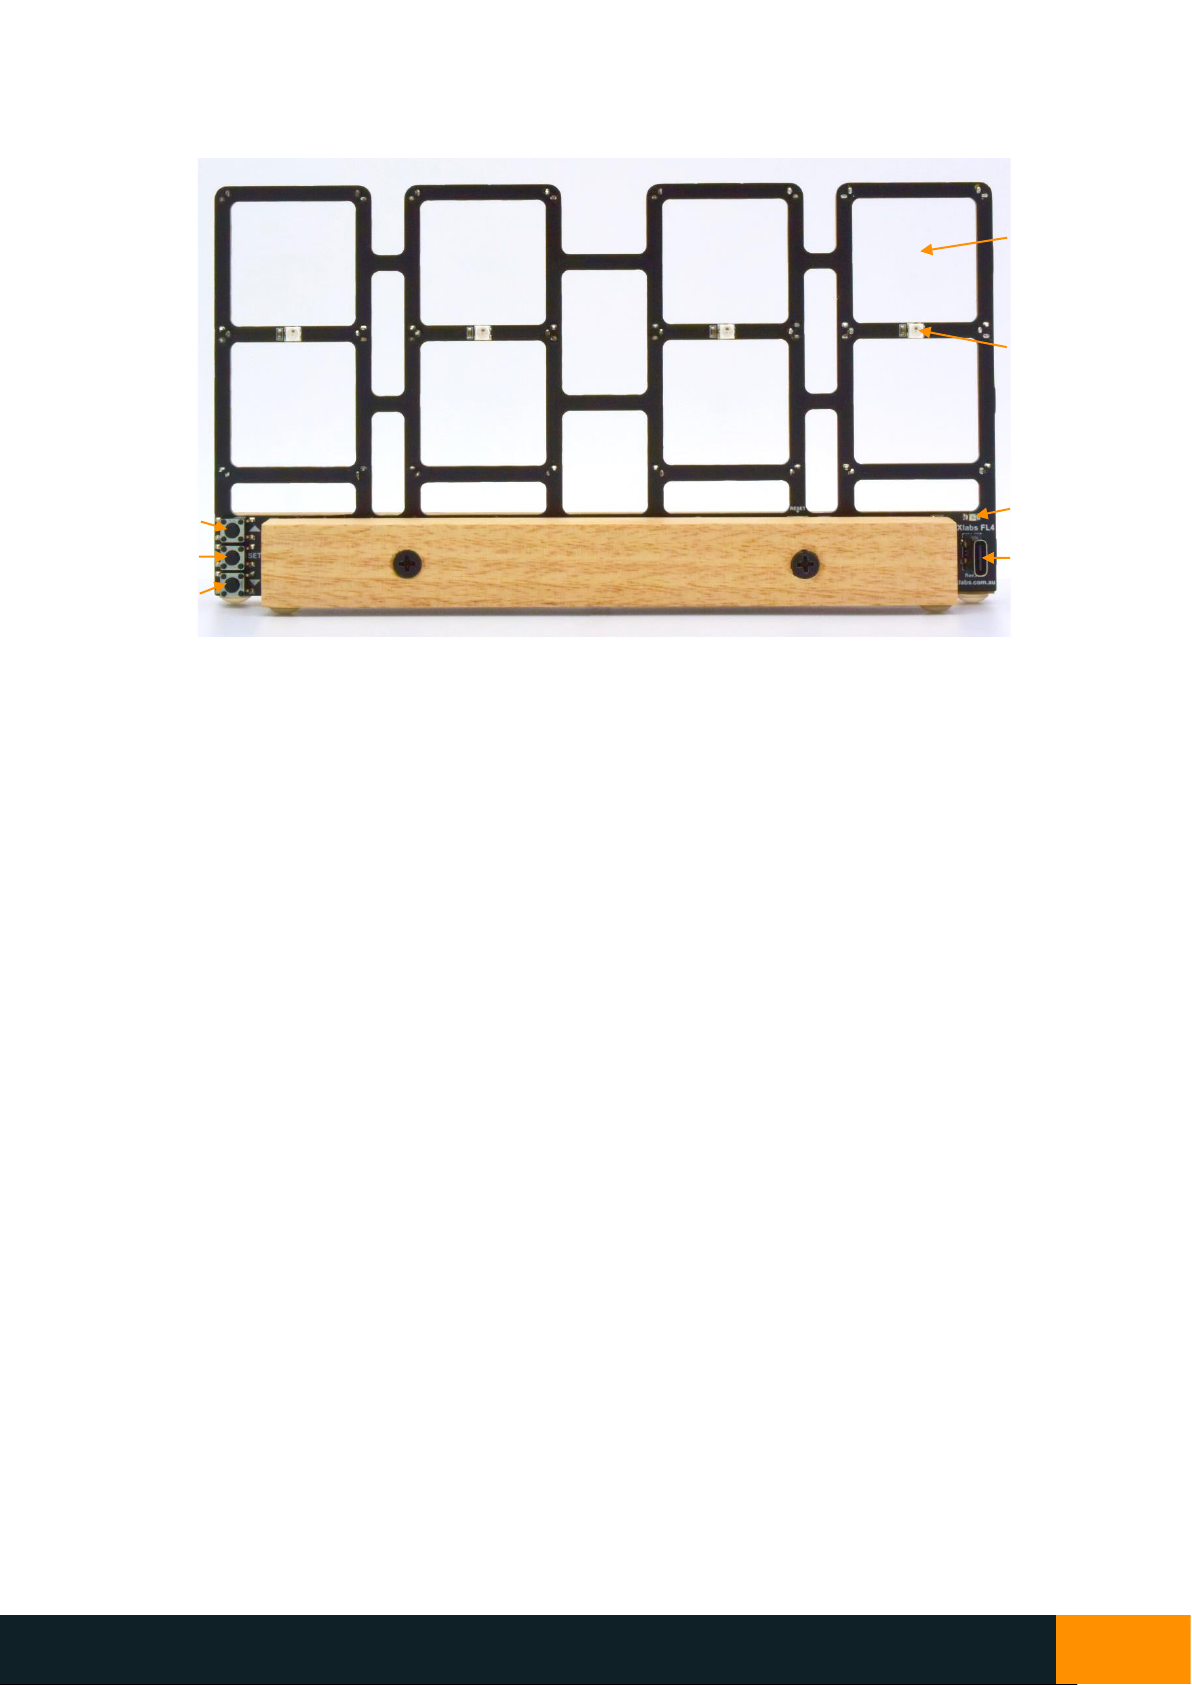
3. Overview
4. Model and Version Identification
The NIX labs filament clock range includes the FL4 model at time of printing. The device’s product and version
information can be found when using the web app by selecting the gear icon in the upper right and selecting
Diagnostics from the menu. The circuit board is marked with the product’s model (eg: FL4) and major hardware
revision (eg: Rev A) near the USB socket.
5. Powering Up
Check the box for the following items and remove them from their packaging:
•FL4 filament clock
•Australian power adaptor (or Multi-Region adaptor for international orders)
•Quick-start guide
For international orders supplied with the multi-region power adaptor, remove the AU plug from the power
adaptor, and replace with the correct one for your region (US, EU or UK).
Plug the power adaptor’s USB-C end into the socket on the back of your clock either way around. Connect the
power adaptor to the wall outlet and turn on - your clock will show 88:88 for a few seconds after which it is ready
to use.
Up Button
Set Button
Down Button
Light Sensor
USB Socket
Display Digits
(other side)
Backlighting
LEDs

NIX4 and NIX6 User’s Guide
Filament Clock User’s Guide
4
5.1 Other Power Sources
Your NIX labs device is powered by a standard USB-C connector, just like many mobile phones, cameras and other
computer accessories. This means it can be powered from a number of sources such as computers, power banks
and common USB chargers. The supplied voltage is important in ensuring maximum display brightness and should
be as close to 4.9V to 5.1V as possible –using low quality USB cables and chargers is not recommended. The power
supply included features a robust construction, high output capability and all the required regulatory safety
approvals. For this reason, only operation with the supplied adaptor is recommended and warranted.
If using a power adaptor other than the NIX labs recommended unit, ensure it has a 5.0-5.1V output rated for at
least 1A. Ensure any substitute power adaptor carries the compliance markings for your country, for example, the
Australian RCM ( ) and/or safety approvals such as the UL mark ( ). Do not use generic adaptors from eBay or
similar, as poor quality units can be a fire and shock hazard, and could damage you or your clock.
When powering from a computer, connect directly to the computer’s USB port – avoid unpowered hubs or
extension cables. You can use any good-quality charge & data USB-C to regular USB-A or USB-C to USB-C cable to
connect your clock to your computer or phone/tablet.
The display brightness will adjust automatically according to the power output of the adaptor (or PC) used. If the
display seems dim, despite being set to full brightness, or in the case of a flickering/flashing display, ensure the
supplied adaptor is used. It is also possible to read the voltage using the web app’s diagnostics screen – the
acceptable range is 4.7V to 5.3V.
6. Reading the Display
The back-side of the display has RGB back-lighting, which can be set to show a different colour based on the current
“screen” (Time, Date or Temperature). The FL4 displays hours and minutes in a “digital” seven segment format,
with one colon in between. Do not press on the LED filaments as they are not flexible and could be cracked from
mishandling. The following section describes how to read the display in each of the Time, Date and Temperature
modes.
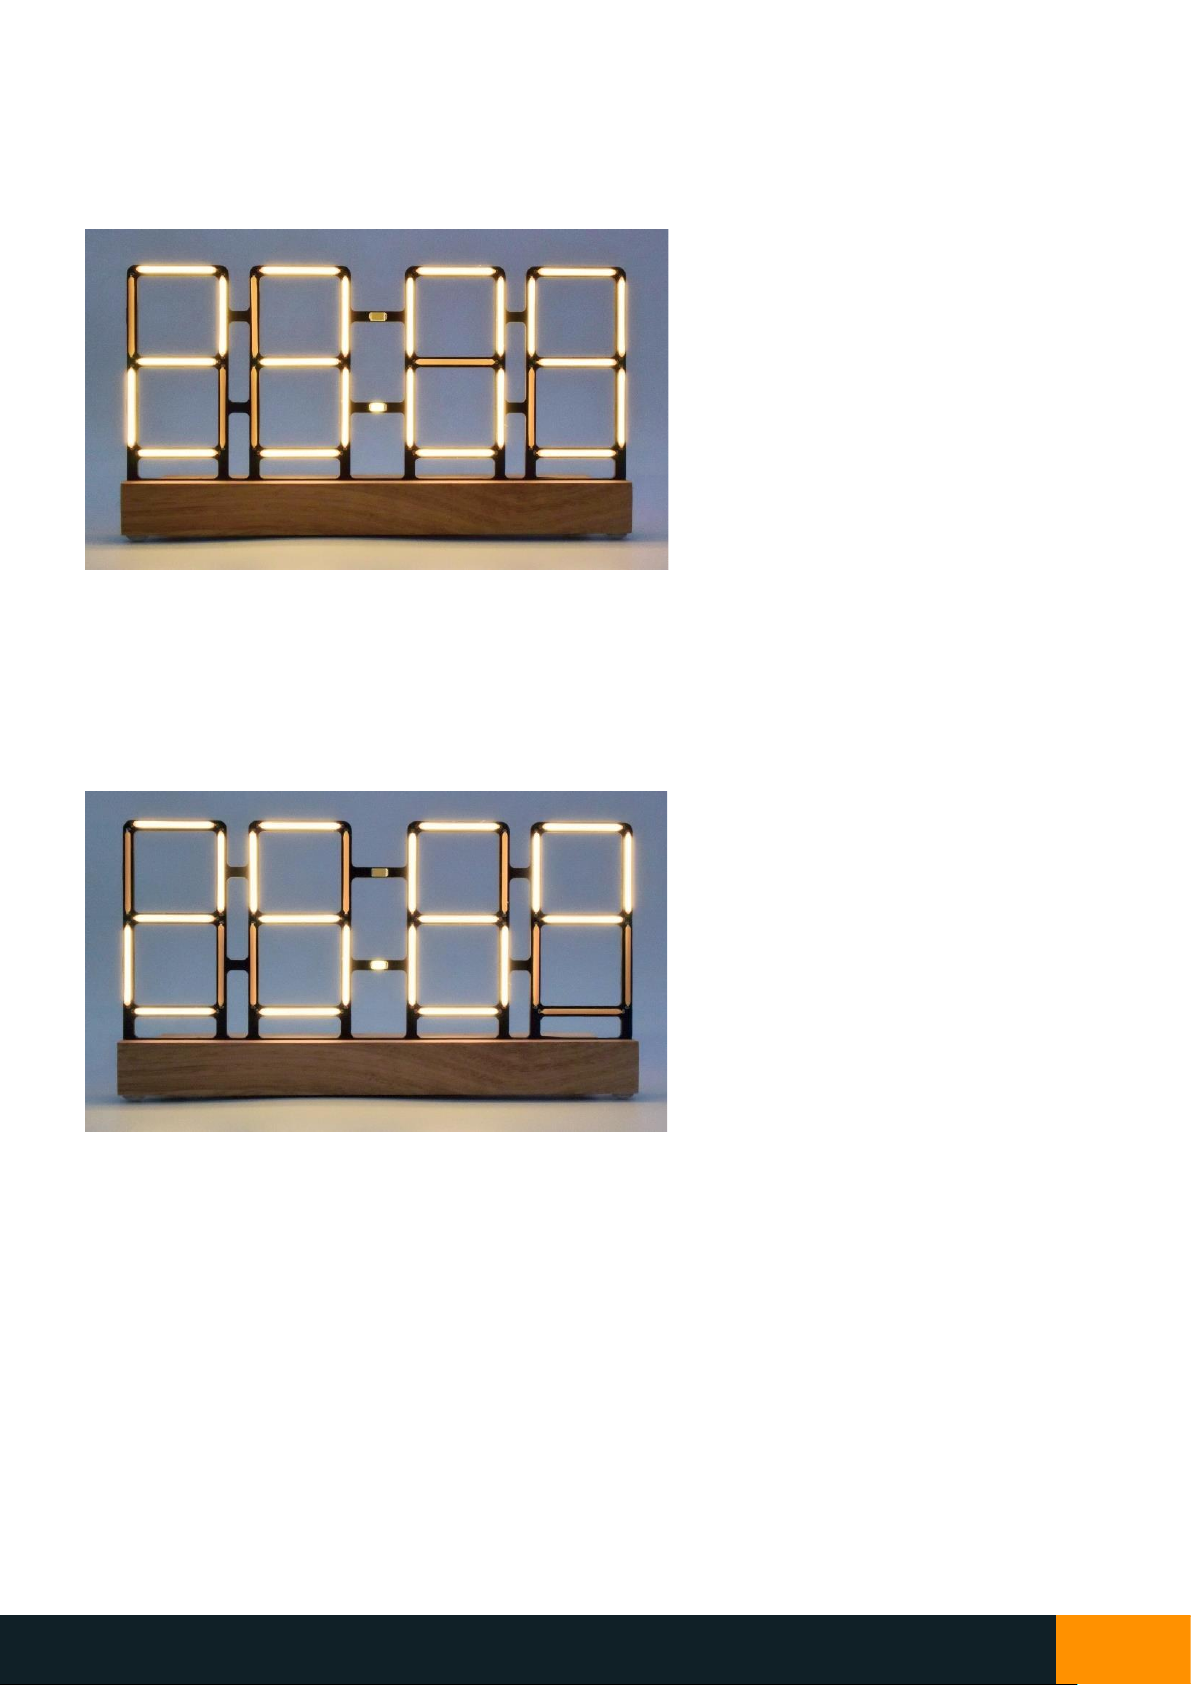
6.1.1 Time Display
The FL4 shows time in an HH:MM format, which can be in 12 or 24-hour with or without a leading zero for hours
less than 10. In this time screen, the colon separator can be set as solid on, solid off, fast flashing (0.5Hz) or slow
flashing (1Hz). In the example below, the time is 12:47.
NIX4 and NIX6 User’s Guide
Filament Clock User’s Guide
5
6.1.2 Date Display
The FL4 can show the date in a DD.MM or MM.DD format. In this date screen, the lower colon separator is lit to
distinguish between the day and month. In the example below, the format has been set to DD.MM and so it is the
23rd of September (23/09).
6.1.3 Temperature Display
The FL4 shows temperature in a XX.X format in either °C or °F, with a displayed range of 0.0°C to 65.5°C (or
equivalent in °F). In this temperature screen, the display is left-aligned and the lower colon separator is shown as a
decimal point. In the example below, the temperature is 25.6°C.

NIX4 and NIX6 User’s Guide
Filament Clock User’s Guide
6
7. Using the Built-In Buttons
Many parameters can be set using the three built-in buttons, so connection to the Web App for configuration is not
required. When on the home screen, briefly pressing the ▲button displays the date, and then temperature for a
few seconds. If the date is not set (which can be done using the Web App) then only the temperature will be shown.
Also on the home screen, briefly pressing the ▼ button cycles through the LED backlighting colour options. Using
the Web App allows individual setting of the time, date and temperature screen backlighting colours –if they are
set individually, then pressing the button only changes the time screen. If the colours are not set individually, or
LEDs-Off is selected, then the button setting applies to all screens. The built-in backlighting colours are as follows:
Red
Green
Blue
Cyan
Magenta
Yellow
White
Custom
Cycling
Off
7.1 Setting the Time
Press the SET button briefly and the display will be changed to only show the hour digits. Press the ▲ and ▼
buttons to set the hour and SET to advance to the minutes to do the same. After adjusting the minutes, pressing
SET again will save the new time and return to the normal time screen. When the new time is saved, the seconds
are set to zero. If the setting menu is entered into but the hour and minute values were not changed, then there
will be no change to the time (including seconds). If in the time setting mode and no button has been pressed for
30 seconds, the display will revert back to the normal time screen without saving.
7.2 Using the Counter/Timer
When your clock is showing the time, hold ▲for 3 seconds to start an up-counter. To start a countdown timer,
hold the ▼button on the time screen, and the display will change to showing just the timer hours. Press the ▲
and ▼buttons to set the hours, then press SET to advance to the minutes, and then SET again to start the timer.
The maximum counter/timer value is 99 hours and 59 minutes. If the up-counter reaches 99:59, it will be cancelled
automatically.
When a timer is running, the ▲ and ▼ buttons are disabled, briefly pressing SET will pause/resume, and holding
SET for 3 seconds will cancel the timer. Every minute the current time will be shown for about 3 seconds. If you set
a counter/timer, the display will stay on even if an on-off timer is set (USB sleep is not affected). A timer/counter
will continue running through sleep, however unplugging your clock will cancel it.
NIX4 and NIX6 User’s Guide
Filament Clock User’s Guide
7
7.3 Parameters Settings Menu
Hold the SET button for 3 seconds and the displaywill enter the parameters settings menu, which allows adjustment
of the brightness, backlighting colour, 12/24hr time and other settings. The leftmost digit showsthe setting number,
and the rightmost digits show the current value –use the ▲and ▼ buttons to adjust. Press the SET button briefly
to advance to the next setting, and at the end of the settings list it will save all changes and return back to the
normal time screen. If no button has been pressed for 30 seconds, the display will revert back to the normal time
screen, saving any settings that were changed. The ordering and description of these options are shown below.
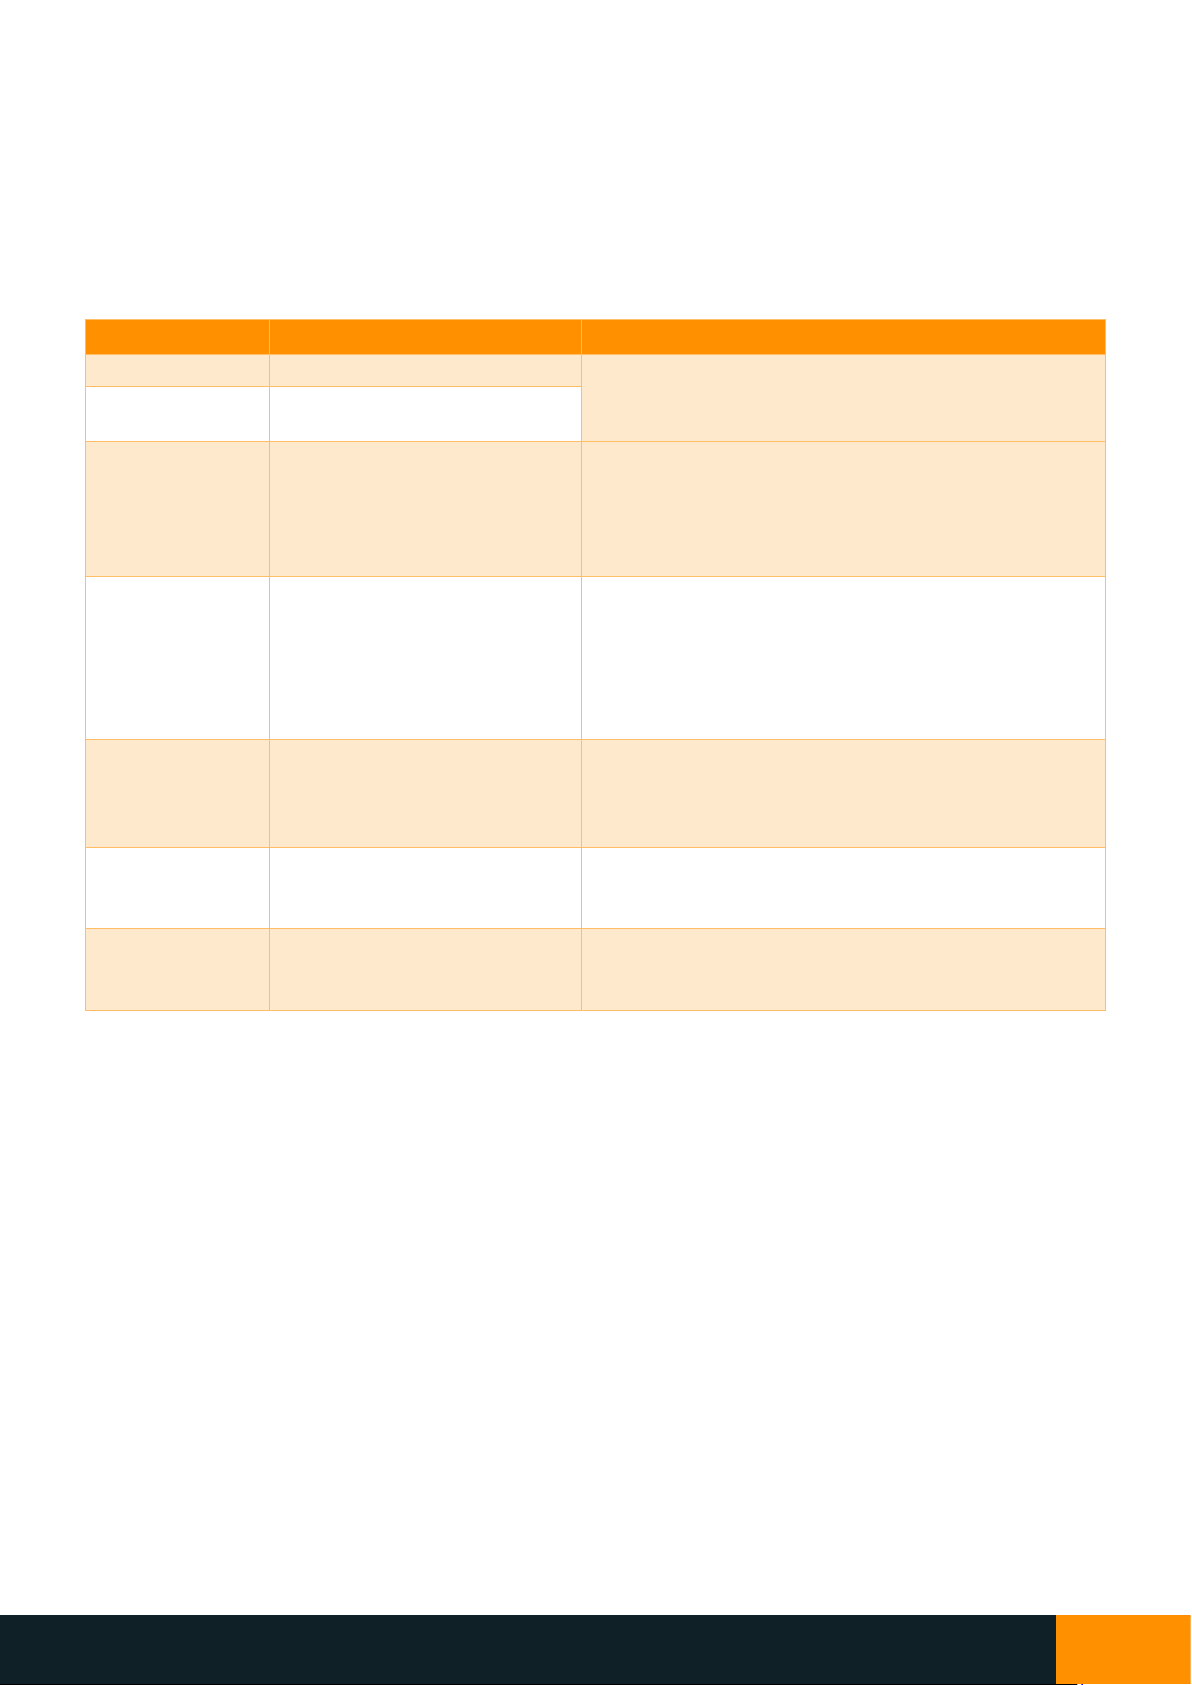
Setting Number
Description
Usage
1
Set day-time display brightness
Use ▲and ▼to set display brightness from 0 (min) to
7 (max).
2
Set night-time display
brightness
3
Set night-time light threshold
Press ▲to use the current ambient light level as the
night-time detection threshold.
Press ▼to use existing threshold.
“1” = New night-time threshold will be set
“0” = No change to threshold level
4
Set custom LED backlighting
colour
Cycle through backlighting colours by holding ▲or ▼
and release on the desired colour. To show the custom
colour on the normal time screen, exit the menu and
use ▼to cycle through presets until new colour is
selected.
Note: no value is shown on right side of display.
5
Set LED backlighting brightness
Use ▲ and ▼to set backlighting brightness, applied to
all screens. Low brightness may affect the custom
colour appearance.
Note: no value is shown on right side of display.
6
Select 12hr or 24hr time format
Use ▲and ▼to choose time format.
“12” = 12-hour
“24” = 24-hour
7
Select °C or °F temperature
Use ▲and ▼to choose temperature units.
“1” = °F (Degrees Fahrenheit)
“0” = °C (Degrees Celsius)

NIX4 and NIX6 User’s Guide
Filament Clock User’s Guide
8
8. Online Configuration Application (Web App)
A key feature of your NIX labs clocks is ease of use, and as such, it is not necessary to connect your device to the PC
for operation, and many options can be set, if desired, using the three built-in buttons. The web-based configuration
application (“web app”) uses the WebUSB feature on Chromium-based browsers, such as Google Chrome,
Microsoft Edge or Opera, on Windows, Mac, Linux and Android, and does not require any additional software or
drivers to be installed. Linux users may need to add a udev rule with idVendor=04d8 and idProduct=eead.
To access the web app, simply connect the clock to your Windows PC or Android device, open Chrome, and visit
app.nixie.com.au, then click “Connect” and select your device from the popup list.
Below is a comparison of all the options that can be set using the buttons or web app.
Buttons
Web App
Set time
✓
✓
Set date
✓
Start a counter/timer
✓
12/24hr time format
✓
✓
Leading zero on time display
✓
Button beep
✓
Colon on/off/flash
✓
Auto-show date and temperature
✓
Date format (DD/MM/YY or MM/DD/YY)
✓
Select °C / °F temperature units
✓
✓
Customise LED backlighting colour
✓
✓
Randomised LED backlighting colour
✓
Rainbow cycling LED backlighting colour
✓
✓
Adjust rainbow colour cycling speed
✓
Different backlighting colour for time, date and temperature
✓
Day and night display brightness
✓
✓
Set LED backlighting brightness
✓
✓
Set LED backlighting dimming level at night
✓
Set ambient-light night dimming threshold
✓
✓
Select ambient-light or time-based night dimming
✓
Enable dynamic display/backlight brightness
✓
Display effects
✓
On-off timer
✓
Read diagnostic information
✓
Download event logs
✓
Firmware upgrade
✓

NIX4 and NIX6 User’s Guide
Filament Clock User’s Guide
9
8.1 Using the Web App
You can use any good-quality charge & data USB cable to connect your clock to your computer or phone/tablet.
The interface uses drivers already built into modern operating systems (Windows, Mac, Linux and Android) and the
WebUSB feature of Chromium version 61 and newer –no additional software is required.
When your clock is connected, use Google Chrome, Microsoft Edge or Opera Browser to visit app.nixie.com.au and
click on the Connect button at the top right of the page. A dialog will appear listing all of the compatible NIX labs
devices found - choose your device and click connect. Upon connection, all of the device’s settings are loaded from
the clock to the Web App. The Web App is arranged with tiles to group similar features, and the settings in each tile
can be saved to your clock by mousing over the tile and clicking the send button that appears at the top right. If
you adjust a setting using the device’s buttons whilst you are connected to the Web App, the page must be
refreshed in order to update the controls on the settings tiles.
Note: Because most computers have a slightly lower USB voltage than the supplied power adaptor, the higher-level
display brightness options may be dimmer compared to normal.
An overview of the Web App showing major buttons and features is included in the screen capture on the next
page.

NIX4 and NIX6 User’s Guide
Filament Clock User’s Guide
10
Connection
Status
More
Options
Connect
Button
Tile Apply
Button
Settings
Tiles
Settings
Controls

NIX4 and NIX6 User’s Guide
Filament Clock User’s Guide
11
8.2 Time, Date and Display Options
The first tile, called “Time, Date and Display” allows setting of the time and date, as well as display options such as
when to automatically show the date/temperature. The table below lists the different settings available:
Item
Setting Name
Description
①
Time and date
When the slider is ‘on’ (as shown below) then the current PC time and date will be
applied when the tile settings apply button is clicked. If the slider is set to off, a
manual time and date entry box will appear.
②
Time Format
Select 12hr (default) or 24hr time display format
③
Date Format
Select DD.MM (default) or MM.DD date format.
④
Temperature units
Select °C (default) or °F temperature units.
⑤
Show leading zero
Enable or disable (default) time screen leading zero. Eg: 8:35 becomes 08:35
⑥
Tails on 6/9 and 7
Enable tails on digits 6 and 9 (default=on), and on digit 7 (default=off)
⑦
Button beep
Enable or disable (default) beep on button press, with two loudness settings.
⑧
Colon mode
For the colon between the hours, minutes and seconds, choose between colon off,
colon solid on (default), fast (0.5Hz) flash or slow (1Hz) flash.
This setting only applies to the time display screen.
⑨
Display mode
Choose to show just the time screen (default), or automatically display the date
and/or temperature every 30 seconds, 1 minute, or 5 minutes. The duration of
each screen is about 3 seconds.
⑩
Night Detection
Mode
Choose to have night mode dimming either based on the ambient light level
(default) or based on a time window. When “Based on a timer” is selected, enter
the start and end times to the nearest 15 minutes (as shown below).
When “Based on ambient light” is selected, a button will appear that can be used to
set the threshold to the current ambient level.
⑪
Autoscale Display
Brightness
Enable or disable (default) dynamic display brightness. During the day (see ⑨) the
display will vary between the set night/day level based on the ambient light level.
⑫
Autoscale LED
Brightness
Enable or disable (default) dynamic backlighting brightness. During the day (see ⑨)
the LEDs will vary between the set night/day level based on the ambient light level.
①
Display example without/with tails for digits 6, 9, 7:
6without/with
9without/with
7 without/with
②
③
④
⑤
⑥
⑦
⑧
⑨
⑩
⑪
⑫
NIX4 and NIX6 User’s Guide
Filament Clock User’s Guide
12
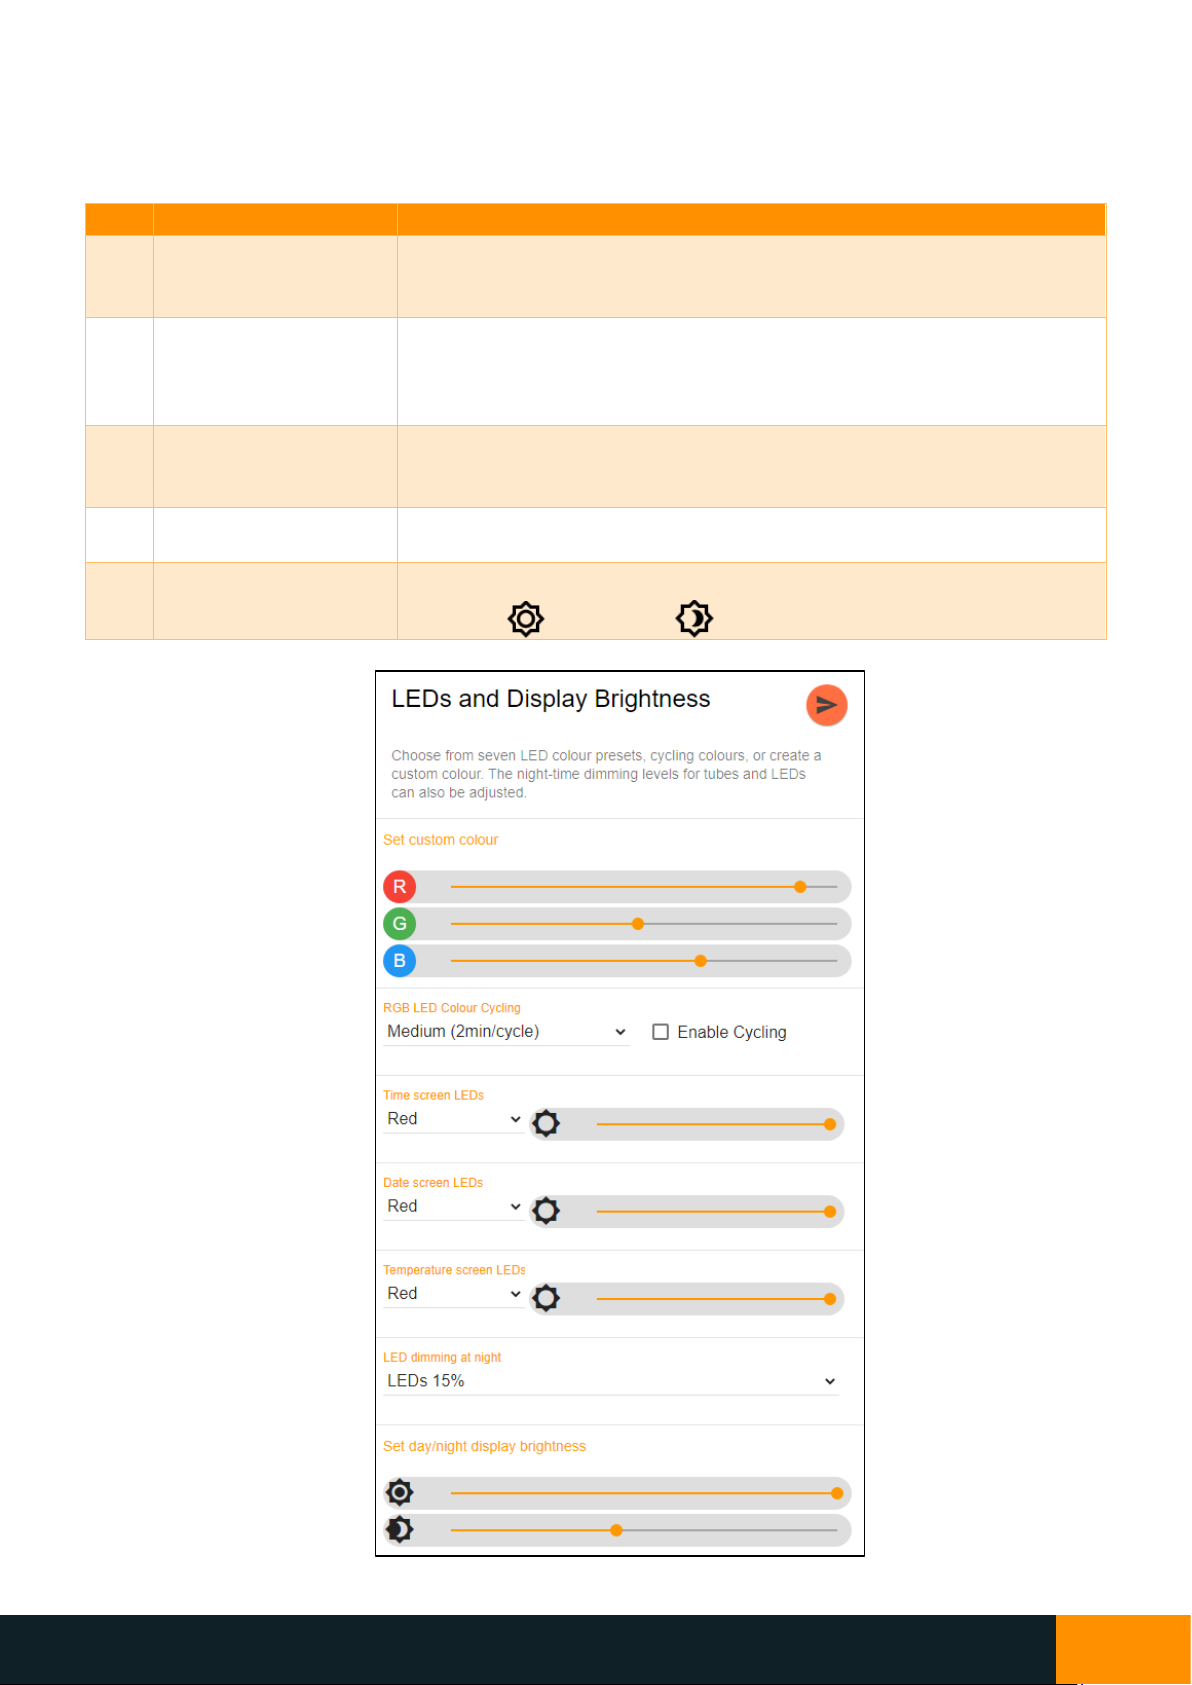
8.3 LEDs and Display Brightness Options
The second tile, called “LEDs and Display Brightness” allows setting of the display day and night brightness, and the
LED backlighting colours. The table below lists the different settings available:
Item
Setting Name
Description
①
Set custom LED colour
Use red, green and blue sliders to adjust custom colour. During adjustment,
the custom colour is shown for 5 seconds automatically. If you change the
sliders, the new custom colour will be saved when you submit the settings.
②
LED colour cycling
Change between static home-screen LED colour set in ③(default) or six
speeds of auto colour changing. If colour cycling is enabled, then it over-
rides the independent time/date/temperature screen colours and
brightness, with the time screen brightness being applied to all.
③
④
⑤
Time/Date/Temperature
screen LED colour and
brightness
Select the LED colour and brightness when showing the Time, Date, and
Temperature screens. The default is all cyan.
⑥
LED dimming in night
mode
Select the level of dimming applied for night mode. Options are no dimming,
50%, 15% (default), or LEDs off.
⑦
Set day and night
display brightness
Use the sliders to set the day and night display brightness:
Day icon: Night icon:
①
②
③
④
⑤
⑥
⑦

NIX4 and NIX6 User’s Guide
Filament Clock User’s Guide
13
8.4 Anti-Poisoning and LED Changer Options
The third tile, called “Anti-Poison and LED Changer” is only useful for Nixie-clock models since the filament clock’s
display does not need wear leveling. However, these settings can still be used as a display and LED effect feature,
or to change the LED backlighting colour periodically. If the display is currently disabled due to the On-Off Timer
setting, then no display effect or LED change will occur. If the backlighting LEDs are set to colour-cycling, the LED-
After option will be ignored. The table below lists the different settings available:
Item
Setting Name
Description
①
Enable Display
Antipoisoning
Choose to enable or disable (default) the display antipoisoning effect. If disabled,
options ②and ③will be hidden. Regardless of this control, the LED changer will
still work according to settings ⑤and ⑥.
②
Antipoisoning
Pattern
Four styles of antipoisoning routine are available. To try each, set the Occurrence
Time ⑤ to “Run immediately”.
③
LED Cycling
During Antipoison
Select whether the LEDs should cycle through the colours during the anitpoisoning
routine.
④
Dimming at Night
This option selects the behaviour during night time –antipoisoning disabled, or
enabled at normal display brightness.
⑤
Occurrence Time
Select the occurrence time for the display antipoisoning and/or LED colour changer.
Options are Runs every hour (on the hour), Runs on a random minute each hour,
Runs every 10 minutes (on the minute), Runs on a random minute every 10
minutes, or Run immediately until stopped.
⑥
LED After
Antipoisoning
Select whether the LEDs should change colour after the antipoisoning finishes.
Options: No Change, Change to Next Preset, and Change to a Random Colour.
If the LED cycler is enabled or the LEDs are off, then this setting has no effect.
①
②
③
④
⑤
⑥

NIX4 and NIX6 User’s Guide
Filament Clock User’s Guide
14
8.5 On-Off Timer
The fourth tile, called “On/Off Timer” allows setting of up to two independent on and off times each day, settable
in 15-minute increments. When the time reaches the exact minute of the on or off time, the display and backlighting
will turn on or off respectively. The times do not have to be set in pairs –it is possible to set just a single off time
for example. When the clock is off/sleeping, pressing any button will wake it. Utilising the on-off timers can greatly
increase display lifetime and reduce power consumption.
Remember that any time midnight or after is part of the next day’s on/off timer. By default, all timers are disabled.
Item
Setting Name
Description
①
②
USB Sleep/Wake
Sleeps when the clock detects no activity on the computer’s USB port, such as
when the PC goes to sleep or is shut down. This feature depends on the
computer’s hardware and may not be compatible for all devices.
③
Day Selection
Each day can have up to two on/off times.
④
Enable/disable first
on/off time
Click to enable/disable the first on-off times in ⑤ and ⑥.
⑤⑥
First on/off time
Set the on and/or off time in 15-minute increments. As soon as the clock “rolls
over” onto the set time, the display and LEDs will turn on or off respectively.
⑦
Enable/disable
second on/off time
Click to enable/disable the first on-off times in ⑧ and ⑨.
⑧⑨
Second on/off time
Set the on and/or off time in 15-minute increments. As soon as the clock “rolls
over” onto the set time, the display and LEDs will turn on or off respectively.
⑩
Copy to... button
When on the Sunday tab, this button applies the Sunday on/off times to all days.
When on the Monday tab, this button applies the Monday on/off times to all
weekdays.
①
②
③
④
⑤⑥
⑦
⑧⑨
⑩

NIX4 and NIX6 User’s Guide
Filament Clock User’s Guide
15
9. Maximising the Light Sensor Accuracy
Your filament clock has backlighting LEDs that can be set to a colour of your choice and can give a great ambience
effect when the colour projects onto a wall behind the clock. If the backlighting LEDs are set to a high intensity,
and/or the surface behind your clock is fairly reflective, the LEDs may influence the light sensor which could limit
the effectiveness of the auto-brightness feature or may even prevent your clock from dimming during the night.
If this occurs, try moving your clock further away from the rear surface or reducing the LED intensity. You could also
change to time-based night dimming or re-setting the night-time light threshold.
10.Maximising Temperature Accuracy
NIX labs products feature sophisticated digital compensation to maximise clock accuracy over a wide operating
temperature range. For best compensation performance, the temperature sensor is located inside the case.
Although this gives the best clock accuracy, the temperature readout feature uses a correction algorithm so that
the temperature displayed to you is as close as possible to the ambient air temperature, rather than the
temperature inside the case (which is usually about 2-3°C warmer). This correction gives best accuracy when your
clock is located in free space, with relatively still air and after a 1-hour stabilisation time after turn-on or changing
display brightness.
11. Settings and Time Backup
All settings are saved permanently to memory, which has a storage time typically greater than 10 years. During a
power outage, the time and date continues to run off a supercapacitor, which has a run-time between 5 to 7 days.
Keeping your clock plugged into power and avoiding prolonged exposure to high temperatures will maximise the
supercapacitor’s life.
NIX4 and NIX6 User’s Guide
Filament Clock User’s Guide
16
12. Troubleshooting
Before contacting support, please try the following troubleshooting steps. If problems persist, contact
[email protected]om.au.
Symptom
Steps to try in order
How to fix
Display is off
Press any button to wake the device from a
programmed off-time. If the display turns on, then the
clock was turned off automatically according to the
configured on-off timer
Connect your device to a PC and
refer to On-Off Timer to adjust or
disable the timer feature.
Press the ▼button and observe if backlighting colour
changes. If so, the USB voltage is too low to run the
display.
Ensure that you are using the
supplied USB power adaptor.
Replacements can be ordered from
NIX labs.
Unplug clock, wait a few seconds, and re-connect.
If the problem occurs frequently,
contact NIX labs. You can force a
reset by pressing the red button
under the clock with a bent
paperclip (this clears time and
settings).
Ensure USB connector is firmly attached, that you are
using the supplied power adaptor and the outlet is
working. If still inoperable, try a different USB charger
such as those supplied with mobile phones.
If operation is normal with an
alternate power adaptor, then
order a replacement adaptor from
NIX labs.
Display is dim
Refer to Parameters Settings Menu or Using the Web
App to set the display brightness level and night-
detection threshold.
Try changing both day and night
dispaly brightness levels. If the
clock is using the night brightness
value, refer to Parameters Settings
Menu (or Using the Web App) to
set the night-detection threshold.
Ensure you are using the supplied power adaptor and
that it is firmly attached, as brightness is automatically
reduced if the USB voltage drops too low.
Ensure you are using the supplied
USB power adaptor. Replacements
can be ordered from NIX labs.
Display is
flashing on and
off
Ensure you are using the supplied power adaptor and
that it is firmly attached. If powered from a computer,
do not use unpowered USB hubs or extension cables.
Ensure you are using the supplied
USB power adaptor. Replacements
can be ordered from NIX labs.
If powered from a computer, avoid
unpowered USB hubs.
Segment is not
fully lit,
flickering or has
dark spots.
Ensure you are using the supplied power adaptor and
that it is firmly attached. Try increasing the display
brightness setting. Contact NIX labs if the problem
persists.
Refer to Parameters Settings Menu
or Using the Web App to increase
the display brightness.
Display and
LEDs are
brighter than
set level
Power supply voltage is too high. Ensure you are using
an appropriate power adaptor. If powered from a
computer, try a different port or USB hub.
Ensure you are using the supplied
power adaptor. If powered from a
computer, try a different port or
USB hub.

NIX4 and NIX6 User’s Guide
Filament Clock User’s Guide
17
Cannot connect
via USB
Unplug clock, wait a few seconds, and re-connect,
making sure USB connector is firmly attached. Ensure
the USB cable is working by trying in another device
such as a mobile phone or camera. Do not use charge-
only USB cables.
Replacement cables can be
ordered from NIX labs.
LEDs Change
Colour
Randomly
Use Web App to check if the hourly or random-minute
LED changer is enabled. The Web App also allows
setting of the LEDs to different colours depending on
whether the Time, Date or Temperature screen is
being shown.
Adjust settings as desired Using the
Web App.
Other
unexpected
behaviour
Unplug clock, wait a few seconds, and re-connect.
If the problem occurs frequently,
take note of what seems to trigger
the fault, and contact NIX labs for
support.
Perform a firmware upgrade by selecting “Firmware
Update” from the “More Options” icon in the Web
App. Refer to Using the Web App.
Unplug clock and force a reset by pressing the red
button under the clock with a bent paperclip. This will
clear the time and settings.

NIX4 and NIX6 User’s Guide
Filament Clock User’s Guide
18
13. Firmware Upgrade
Your NIX labs clock can be upgraded to the latest firmware version in less than one minute using the online Web
App. Click the gear icon and select Firmware Update from the menu. From here you can see the changes and new
features in the latest version, and start the upgrade if desired. The display will turn off during the upgrade and a
single LED will be lit to show the status –this is referred to as Bootloader Mode (refer to below table). The time/date
and all of your settings are preserved during the update, which usually takes 30 seconds.
LED Colour
Meaning
Red
Device is in bootloader mode, but no PC is connected
Yellow
Device is in bootloader mode and connected to the PC
Purple
Firmware download in progress
Green
Upgrade completed (see note below)
Note: during a successful firmware upgrade, the green LED will flash only very briefly. If the green LED stays lit, but
the display does not light, then the firmware upgrade was corrupted. In this case, follow the steps below to
manually enter the bootloader and try the firmware upgrade again.
If the firmware has become corrupt or behaviour is erratic, you can manually enter the bootloader and still connect
to the Web App to do a firmware upgrade. To do this, unplug the clock then hold down all three buttons whilst
plugging back in. A single LED should now be shown according to the table above. To exit the bootloader mode,
simply disconnect then reconnect the USB cable.

NIX4 and NIX6 User’s Guide
Filament Clock User’s Guide
19
14. Cleaning and Maintenance
If your device become dusty, unplug it and wipe with a clean, lightly dampened cloth. Do not use solvents on the
case as they may cause damage. If insects or dust gets into your clock, unplug it and use a can of compressed air /
air duster (available at computer stores) to blow out the material via the gaps around the base. Never insert objects
into the gap in the enclosure as this could damage components or cause a short-circuit. Take care when handling
since the LED filaments are not flexible and may break if bent or pressed on.
There are no single-use fuses on the circuit board, nor any batteries. There are not any hazardous voltages present
within the product. Apart from general cleaning, no maintenance or periodic servicing is required.
15. Warranty and Repairs
All NIX labs products come standard with a back-to-base three year warranty, in addition to your rights under the
Australian Consumer Law or other relevant local regulations. Repair and refurbishment services are also offered for
products outside of warranty. We recommend keeping the product packaging for safe storage or if you need to
send it back to NIX labs.
“Back-to-base” warranty means that the customer arranges for shipment back to NIX labs, and provided the
warranty claim is valid, NIX labs arranges shipment back to the customer. As a first step, please try the
troubleshooting guide in Troubleshooting. For all servicing and support needs, please contact NIX labs:
[email protected]om.au.
Other manuals for FL4
1
Table of contents
Popular Home Lighting Accessories manuals by other brands

Haoyang Lighting
Haoyang Lighting S14-4815-SS-3R user manual

Home Accents Holiday
Home Accents Holiday 23RT54520141 Assembly instructions

Goobay
Goobay LED Wire Star 3D user manual

Home Accents Holiday
Home Accents Holiday 1005356632 quick start guide

Home Accents Holiday
Home Accents Holiday TY073-1314-0 Use and care guide

HD
HD DCCT0702 quick start guide

LIVARNO home
LIVARNO home 427179 2301 manual

Bestway
Bestway Dream Glimmers owner's manual

Home Accents Holiday
Home Accents Holiday 21SV22947 12FT Inferno Pumpkin Skeleton Easy Assembly and operation instructions

Somogyi
Somogyi home MX 801 instruction manual

GE
GE SNOWMAN FCB-XM-CH0083-24V-48"-B Assembly manual

DS Produkte
DS Produkte YZKY17415 instructions


