Nobilium Ticonium Colloid-Saver 3.5 User manual

Owner’s Manual
NOBILIUM
TM
TM
Special Features
Description: Colloid-Saver 3.5 duplicator
Part #: 40811
Capacity: 3.5 allons (13.2 Liters)
Electrical: 115 Volt, 60 Hz, 12 Amps
Height: 26” (66 cm)
Width: 17 1/2” (44.5 cm)
Depth: 18 3/4” (47.6 cm)
Weight: 90 Lbs (40.8 Kg)
Shipping Weight: 96 Lbs (43.5 Kg)
Colloid-Saver™3.5 Duplicator
• Intelli-Heat™ computer-controlled
heating system prevents over-heating
and eliminates chunks of colloid
• Altitude setting for precision
temperature control
• SmartCycle™ stirring cycle activated
only when needed, minimizing colloid
breakdown
• High volume, no-drip, no-clog
dispensing nozzle
• Pre-set programs for virtually any
colloid
• Fully programmable
• Flexible capacity: Use 1 to 3.5 gallons
• USB port for future software upgrades
• Lighted work area with laser
sight-line
• Extra large easy-to-fill tank
• Corrosion-proof front panel
• Air-Cooled, no water or drain required
• Optional extension for continuous
dispensing
Special Features
Specifications
Fully Automatic
& Computer Controlled
Helps to extend colloid life!
Designed & Manufactured
in our Albany, NY Factory

2
Congratulat ons!
ou have just purchased a quality piece of CMP Dental Laboratory
Equipment. It’s quality has been carefully controlled and thoroughly
tested for optimum performance and durability.
If you have any questions regarding CMP’s quality line of dental laboratory
equipment and supplies, please call toll-free: 800-833-2343 or 518-434-3147
(Fax: 518-434-1288) between the hours of 8:00 AM and 4:30 PM Eastern
Time. Or, if you prefer, visit us at our web site: www.cmpindustries.com . . .
we will be pleased to assist you.
This manual may be available in other languages. Please check our website.
Special Features

It is important to thoroughly review this
manual and test your new duplicator prior
to loading with duplicating material.
I. Receiving & Unpacking
We have made every effort to test your
equipment and inspect it for damages prior
to packing for shipment. However, once the
equipment leaves our factory, the shipping
company accepts the equipment and the
responsibility becomes theirs for its safe and
undamaged delivery.
When you unpack your shipment, keep all
the packing materials until you are confident
that the equipment is in good working
condition and functions properly. If there
is any concealed damage, the shipping
company may need to examine the container
when a claim is filed.
If there is damage, the carrier should be
contacted as soon as possible. The claim
for damages must be filed with the carrier.
We are not in a position to assist you with
replacement, repair or warranty issues until
the carrier has completed their investigation.
If no damage has been found, place the
duplicator on a level bench where it will be
used. It is best to locate the unit adjacent
to the area where the duplicate models
will be cooled. Do not block the exhaust fan.
II. Electrical Connection
The Colloid-Saver 3.5 duplicator requires
only a standard 115V–60 Hz outlet to
operate. Before plugging-in the duplicator,
be sure to identify the electrical specifica-
tions of the outlet. A dedicated circuit
should be used as the Colloid-Saver 3.5
duplicator draws about 12 amps at 115 volts.
As with any electrical device, take extra care
when handling liquids around electrical
connections to avoid accidental shock.
It is important to carefully read and follow
the instructions in the next section
prior to actually plugging-in the duplicator.
III. Testing & Inspection
This is a very important step in the installa-
tion of your new Colloid-Saver 3.5 duplicator.
Even though your unit was fully tested and
inspected before leaving our factory, it may
have suffered damage during transit. For this
reason the following testing and inspection
steps are very important.
Note: The parts list located in the back of this
manual will help in the proper identification of the
items described below.
1. DO NOT insert the power cord.
Remove the rear panel and inspect
internal components visually. Look for
loose connections and parts.
2. Replace rear panel after inspection.
3. Remove the top cover by rotating it
clockwise and check inside the tank to
be sure there are no interferences with
the stirrer. Make sure stirrer knob is tight.
4. Replace top cover and rotate it
counter-clockwise to engage it with the
locking pins in the tank. Make sure cover
handle is facing forward.
5. Check to be sure the duplicator’s
identification plate voltage agrees with
the electrical voltage of the outlet. If unsure,
test voltage or contact a qualified electrician.
If these two items are compatible, plug
duplicator into the electrical outlet.
Note: The Colloid-Saver 3.5 duplicator (115V)
draws about 12 amps and should be on its own
dedicated circuit.
3

6. Flip the main power switch to the On (I)
position. The main power switch is located
on the right side of the unit, adjacent to the
electrical cord (Figure A).
7. Press the red POWER button located on
the front display panel to start the duplicator
(Figure C).
The display panel should illuminate and
shows the PROCESS temperature (actual
temperature reading of the tank) and the
hold temperature SET POINT. The unit is
now in “Standby Mode” (no heating lights
illuminated).
8. The Colloid-Saver 3.5 duplicator has been
pre-programmed for use with Nobilium,
Ticonium or Niranium colloids at sea level.
If the duplicator will not be used at sea level,
or other colloids will be used, you must
make setting adjustments as shown in
section VI.
IV. Colloid Loading & Cook-Down
1. Remove the top cover by rotating it
clockwise, then fill duplicator with 1 to 3 ½
gallons (4 to 13 liters) of colloid material.
Note: Colloid material must be chopped into small
(2 to 5 cm) chunks. Using larger chunks of material
may cause the stirrer mechanism to fail.
Do not fill the tank more than 3/4 full
initially. To maximize the volume of material
in the tank, wait 5 minutes after cook-down
begins, then remove the top cover and add
remaining material until the tank is full.
Make sure to add any liquid that may be in
the bottom of colloid container. The liquid
contains ingredients which extend the life
of the colloid. Replace
top cover and rotate it
counter-clockwise to
engage it with the
locking pins in the
tank (Figure B). As a
safety measure, the
top cover must be fully
rotated into a locked position
before the motor will function.
2. Press the ENTER button on the front
display panel. (The display will indicate
“Cook”).
3. Press the V arrow once (the display will
indicate “Hold”). Select either cook or hold
and press the ENTER button.
4. The stirring motor will start and the
display panel will indicate the PROCESS
temperature (actual temperature reading
of the tank) and the cook-down temperature
SET POINT.
5. All three heating lights will illuminate.
Heating will continue until the cook-down
temperature is reached. Then the duplicator
fan will activate until the unit reaches the
hold temperature. This cook-down process
takes 2 to 3 hours. (To suspend or restart
the cook-down process, press the ENTER
button).
6. The material is ready when the controller
display blinks “READY” (Figure C) and an
audible “beep”sounds. Turn off the audible
“beep” by pressing the SET button.
Note: The ready display and sound can be
turned off in the profile setup.
V. Operation
Cook-Down
It is best to cook-down in late afternoon.This
allows the cool-down cycle to occur in the
evening when the duplicator is not in use.
4
(Figure A)
(Figure B)

5
Colloid Storage
Please follow these procedures when storing
used material that will be re-melted.
1. After removing the colloid from the
duplicating flask, rinse with water to remove
any foreign material clinging to the colloid.
Pieces of gypsum or investment that remain
in the colloid can permanently damage the
tank and/or stirrer, as they will be dragged
around inside the tank during the cook-down
cycle.
2. ently shake-off excess water.
3. Store colloid in a clean, covered
container. Keep container covered so
moisture is not lost.
4. When ready to cook-down, cut colloid
molds in quarters, then load duplicator.
5. If re-melted colloid is difficult to
dispense due to high viscosity, add small
amounts of water until the viscosity is
reduced.
Changing Duplicating Material
When the tank is virtually empty, press
the red POWER button on the front panel to
turn-off the duplicator. To remove the colloid
at the very bottom of the tank, simply allow
it to cool then peel it out.
Preventive Maintenance & Cleaning
1. Clean Colloid-Saver 3.5 duplicator
approximately once a month or when
new duplicating material is added. Your
frequency of cleaning may vary with usage.
Scrub inside wall of tank and cover assembly
with a non-abrasive pot scrubber.
2. Inspect stirrer for wear and distortion.
Clean with non-abrasive pot scrubber.
3. Remove back panel and inspect the
bearing. If any colloid is leaking from this
area, the bearing must be replaced.
4. Be very careful not to spill liquids on
the duplicator! Liquids can damage the
control panel and circuit boards. If a spill
occurs, unplug the duplicator immediately
and clean thoroughly.
5. Clean fan air filter regularly to maintain
proper air flow.
Calibration
Calibration of the Colloid-Saver 3.5
duplicator is not necessary. The computer
controller is self-calibrating.
Continuous Dispensing (Emptying)
The Colloid-Saver 3.5 duplicator
can be used to fill flasks in a continuous
line using the optional Dispensing
Extender shown in (Figure D).
(Figure D)
Dispensing
Extender

Attributes
PROFILE A 15-100% On/Off 199°F (93°C) 133°F (56°C) 30 mins. F° 0 “Sea Level”
PROFILE B 15-100% On/Off 207°F (97°C) 131°F (55°C) 30 mins. F° 0 “Sea Level”
PROFILE C 15-100% On/Off 204°F (96°C) 134°F (57°C) 20 mins. F° 0 “Sea Level”
PROFILE D 15-100% On/Off 207°F (97°C) 131°F (55°C) 15 mins. F° 0 “Sea Level
Power Supply Interruption
In the event of a power interruption
(example: electrical outage due to weather),
the computer-controller will remember the
heating cycle and will continue with the
same cycle if the power supply comes
back online within 15 minutes. If the
colloid material is not solid, start a normal
cook-down cycle by turning the unit on and
pressing the ENTER button. If the power
supply is off for more than 15 minutes and
the colloid material is completely solid,
select the cold start cook-down cycle by
following these steps: With the power on,
press the SET button then the “ ” button
then the SET button twice (display will flash
“DONE”), then press ENTER twice.
VI. Settings
The factory default profile “A” is set-up
for Nobilium, Ticonium or Niranium colloid
products used at sea level. If the duplicator
will not be used at sea-level, the altitude
setting must be adjusted. Failure to set
the Altitude could cause the duplicator to
deliver poor quality colloid.
Select Pre-Programmed Setting
If not using Nobilium, Ticonium or Niranium
colloid products, review the requirements
of the duplicating material to be used and
match them to one of the pre-programmed
profile settings below. To select a specific
profile, the duplicator must be in “Standby
Mode” (power on but no heating lights illu-
minated). Press the SET button twice. The
display will show the first option on the set-
tings menu which is the present profile.
Press the “^” (UP) button to find the profile
to be changed. Press the SET button again
to select the profile. Press the ENTER button
to exit the settings menu.
Develop Custom Settings
If none of the pre-programmed settings
match the requirements of the duplicating
material, then develop a custom profile.
To develop custom profile settings, the
duplicator must be in “Standby Mode”
(power on but no heating lights illuminated).
Press the SET button once. Then press the
“^” button to find the attribute to be
changed. When the desired attribute is
displayed, press the SET button to select it.
Then press the “^” or “ ” button to change
the setting. Press the SET button to confirm
the change. Press the ENTER button to exit
the settings menu. The attribute setting
options are presented below along with their
maximum and minimum values.
To reset the duplicator to factory defaults,
scroll through the menu options until the
display reads “SET DEF.” Press the SET
button to return all settings to factory default
settings and “DONE” will be displayed. To
abort changes, press the Enter button to
re-enter the “Stanby Mode.” Other
attributes (KP, KI, KD) cannot be edited.
6
Stirrer Ready Cook-Down Temp. Hold Temp. Cook Dwell F° or C° Altitude
Max. 100% On/Off 207°F or (97°C) 140°F or 60°C 60 Minutes F°/C° +255' x 100
Min. 15% On/Off 190°F or (88°C) 125°F or 52°C 1 Minute F°/C° – 14' x 100
(+ 25,500')
(–1,400')
^
^
Display “STR” “RDY” “SCT” “SHT” “SCD” “DE ” “ALT”
*
* Default settings

7
If manufacturer- recommended
specifications for the colloid to be
used are unavailable, follow these steps:
1. Cook-Down Temperature – Select a
profile and edit the cook-down temperature
as described on page 6. Start with
Cook-Down temperature of 200°F (93°C).
If the colloid is fully melted after 30 minutes,
then reduce the next cook-down tempera-
ture by increments of 2°F (1°C). Continue
the process until the colloid is not fully melt-
ed. Use the lowest cook-down temperature
that will yield usable material in order to
maximize colloid life.
2. Hold Temperature – Select a profile
and edit the hold temperature as described
on page 6. Start with a Hold Temperature of
140°F (60°C) then gradually lower the hold
temperature as performed above. Use the
lowest hold temperature that will yield
usable material in order to maximize
colloid life.
VII. Troubleshooting
1. Colloid-Saver 3.5 duplicator will not turn on.
A. Check wall outlet for power.
B. Check if power cord is connected to
duplicator.
C. Check if the main power supply is
turned to the On (O) position.
D. Check if back panel is secure.
E. Check 15 amp circuit breaker on right
side rear. (Press to reset)
2. Duplicator front panel display is working,
but duplicator does not heat.
A. Check heater connections on terminal
board, relay & controller.
3. Motor will not run.
A. Check 1 amp circuit breaker on right
side rear. (Press to reset)
B. Check top cover. It must be fully
rotated into a locked position.
C. Check motor connections on terminal
board, relay & controller.
4. Fan does not turn on.
A. Check fan connections on terminal
board, relay & controller.
5. Top cover will not open.
A. Top cover is designed to resist opening
during the advanced stage of the cook-down
cycle. This is a safety measure to prevent the
addition of colloid during the advanced
stages of the cook-down cycle which may
result in splash of hot colloid material.
8
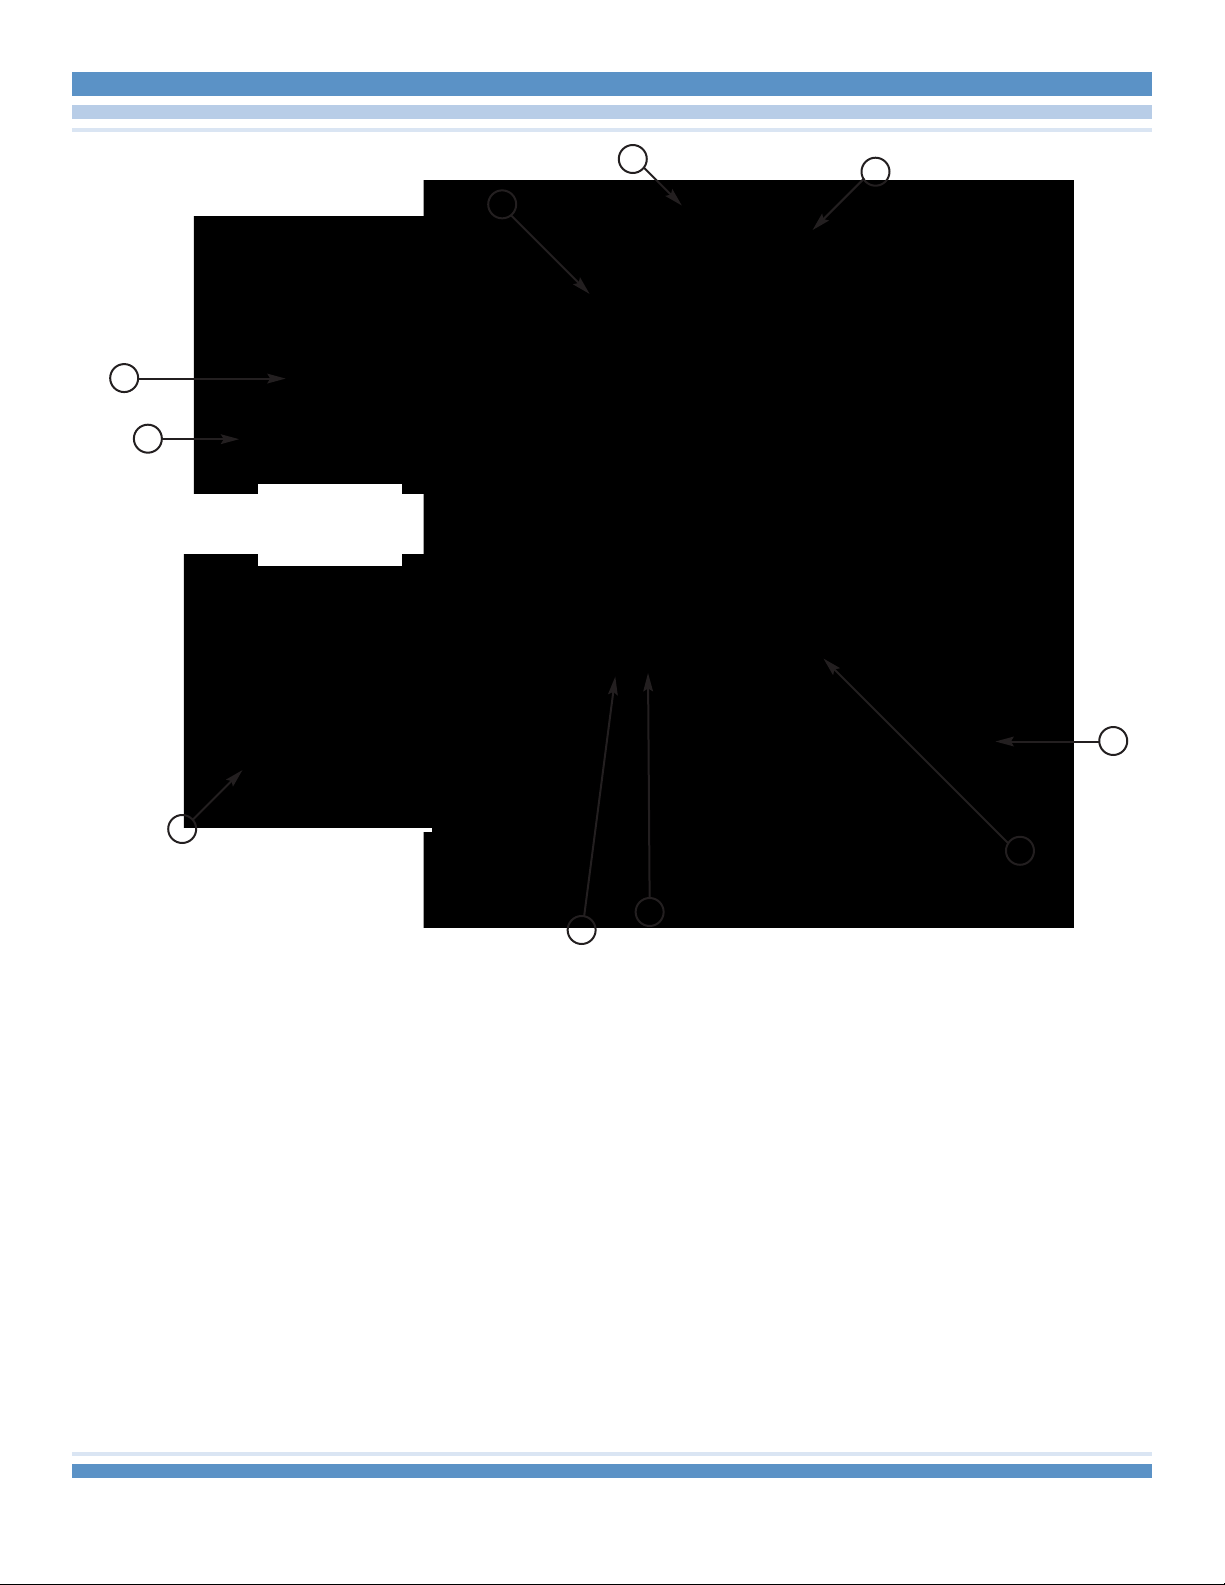
Front V ew w th Top Cover
ITEM & DESCRIPTION PART NUMBER
1. Front Panel Control 40811P37
2. Precision Laser 40811P48
3. LED Light 40811P38
4. Power Entry Module 40811P20
5. Cover Lock 40811P44
6. Poly Cover 40811P1
7. Cover Interlock 40811P45
8. Cover Handle 40811P43
9. Power Cord Assembly 40811P61
10. Mold Form Front Panel 40811P27
1
10
4
5
3
2
9
8
7
6
Underside
of Top Cover

9
S de V ew & Valve
ITEM & DESCRIPTION PART NUMBER
1. USB Port Connector 40811P39
2. 1 Amp Motor Circuit Breaker 65383P7
3. 15 Amp Main Breaker 65383P6
4. Power Entry Module 40811P20
5. Rubber Feet 40811P19
6. Knob 40811P2
7. Valve Body 40811P7
8. Locking Nut 40811P11
123
4
5
6
78

10
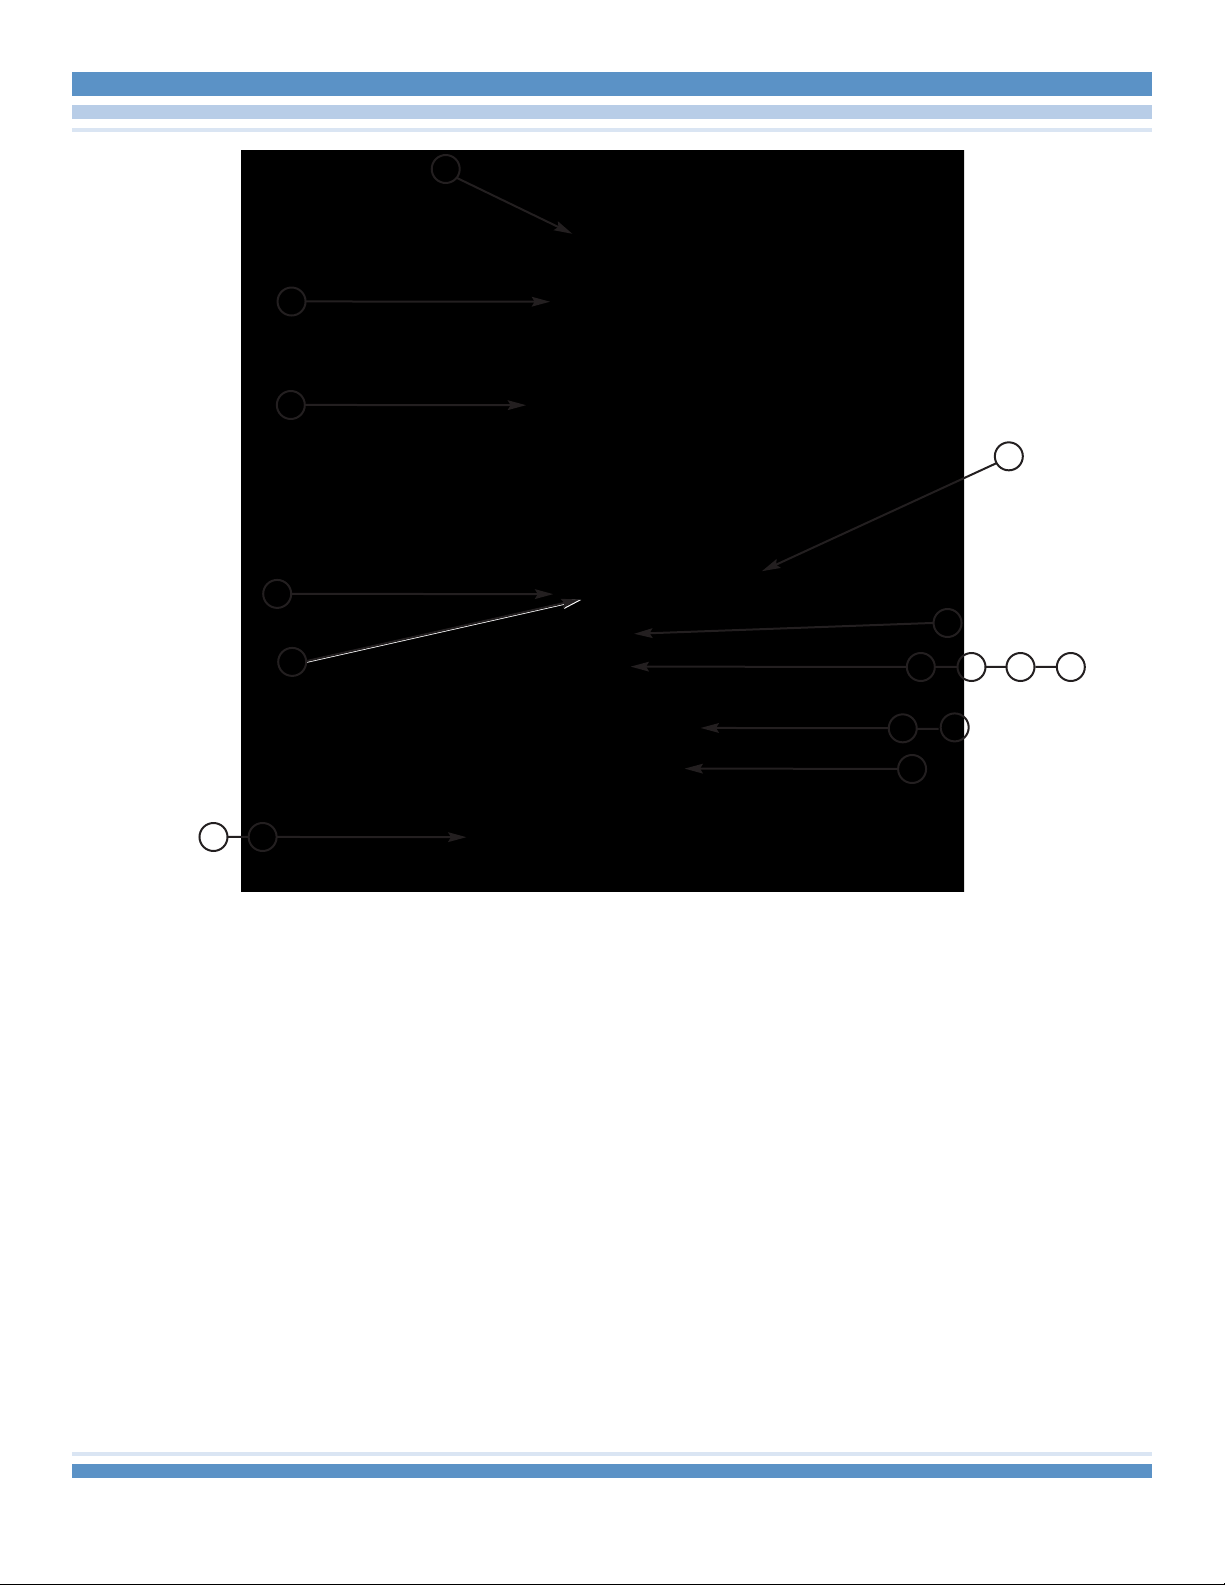
Ins de V ew
(S de)
ITEM & DESCRIPTION PART NUMBER
1. Fan 36081R
2. Fan uard 40811P22
3. Fan Air Filter 40811P22A
4. Side Heater 40811P33
5. Controller 40811P34
6. Drawer Slide 40811P12
7. Solid State Relay 41984P18
8. Handle 40811P26
9. 2-Pin Connector 40811P51
10. 8-Pin Connector (X2) 40811P50
11. 14-Pin Terminal Block 40811P52
12. Flat Cable 40811P53
13. Relay 5V 40811P49
14. USB Port Connector 40811P39
1 2 3
8
4
7
9
10
11
13
6
5
12
14
Ins de V ew (Back)
ITEM & DESCRIPTION PART NUMBER
1. Coupling Hub 5/8 40811P23
2. Coupling Hub 3/4 40811P24
3. Coupling Spider 40811P25
4. Keyed Drive Shaft 40811P30
5. Shaft Collar 40811P35
6. Motor 40811P31
7. earhead 40811P31A
8. Power Supply 40811P40
9. Thermistors 120C 40811P28
10. Tank Assembly 40811 3
11. Bottom Heater 4081132
12. Cover Interlock Bracket 40811P46
13. Panel Safety Switch 40811P47
14. Panel Safety Switch Bracket 40811P60
15. Bottom Heater Bracket 40811P17
16. Tank Support Bracket 40811P36
12
2 3 4
13
7
10
9
11
15
14
6
8
16
1
11
5
12
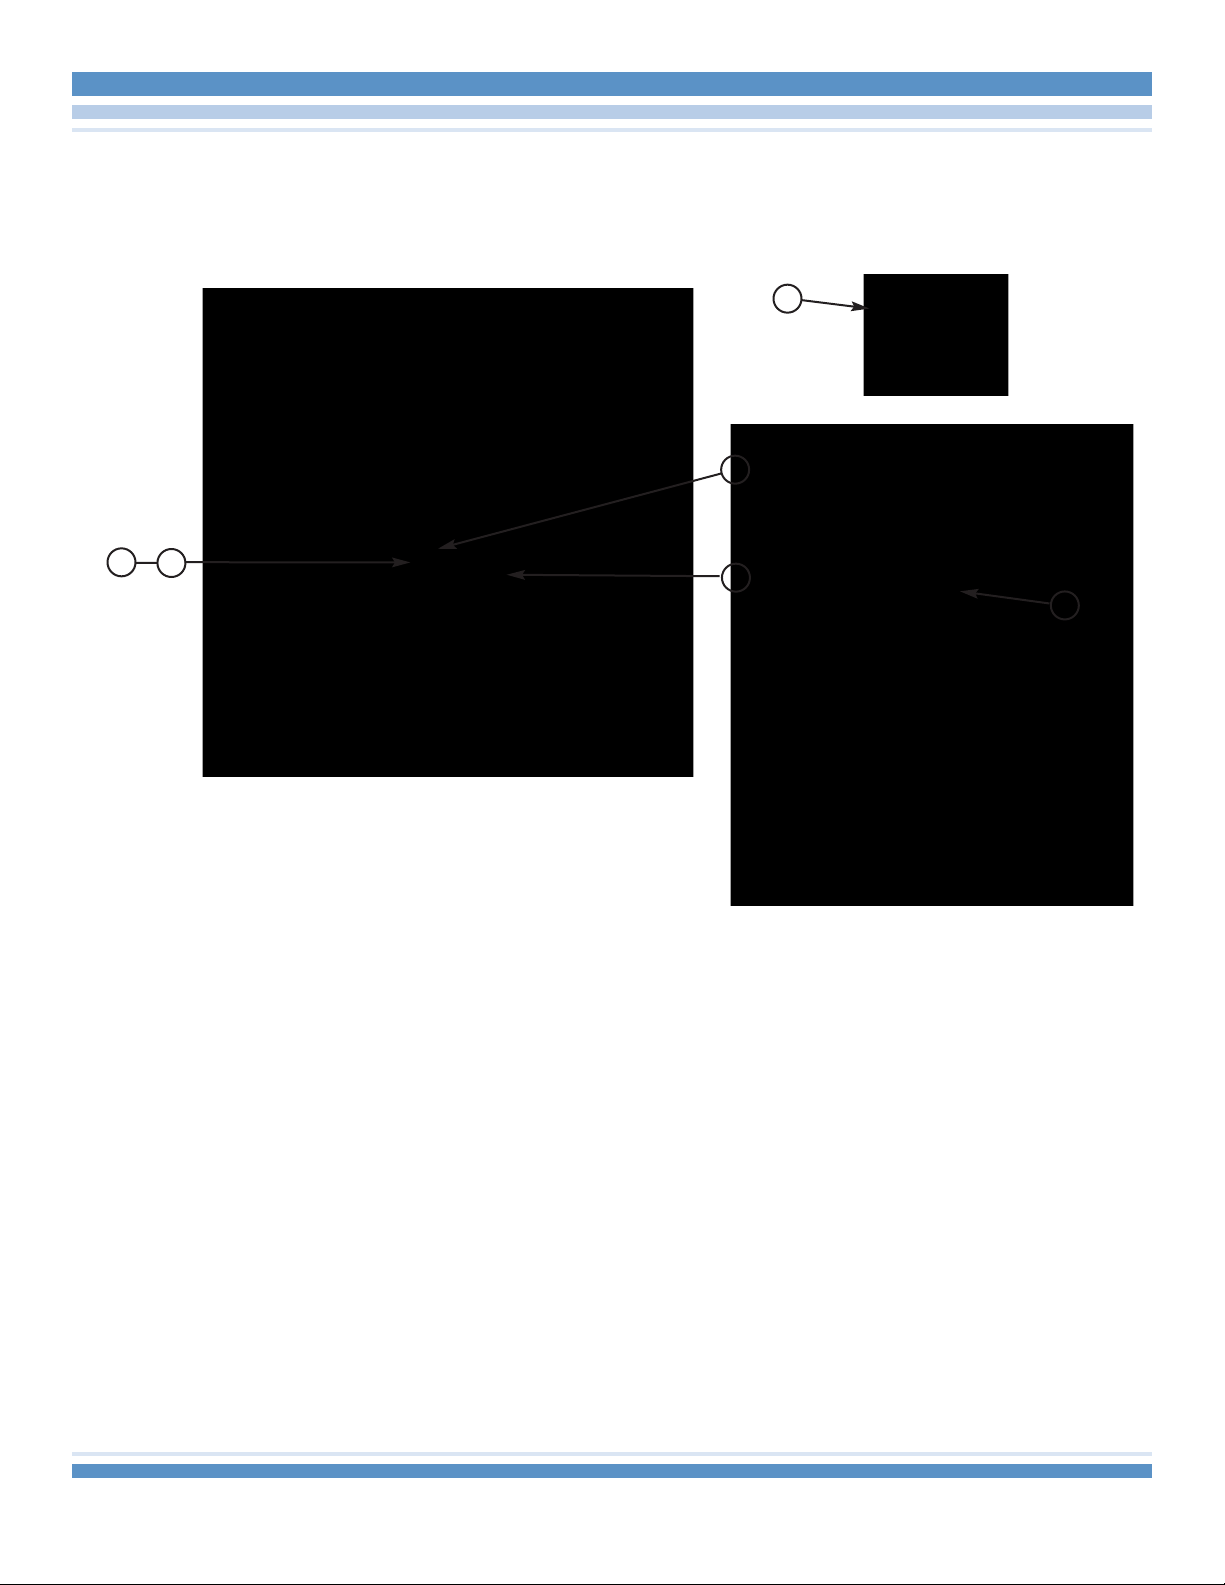
Ins de Tank & St rrer
ITEM & DESCRIPTION PART NUMBER
1. Thermocouple K-Type 10980
2. Main Shaft 40811P13
3. Bearing 40811P29
4. Seal 40811P41
5. Stirrer Assembly 40811 2
6. Stirrer Knob 40811P18
4
3
2
5
1
Inside View of Tank
6

13
Accessor es
ITEM & DESCRIPTION PART NUMBER
1. Dispensing Extender 40811P58
1

413 North Pearl Street •Albany, New York •12207 •USA
Toll-Free: 800 833-2343 •USA: 518 434-3147 •Fax: 518 434-1288
Website: www.cmpindustries.com
Form 40811
NOBILIUM
TM
TM
Table of contents


