Nobody Messes with... IT JT 200 User manual

1181 South Rogers Circle
Suite 18
Boca Raton, Florida 33487
e-mail [email protected]
www.jti-innovation.com
03/03
OPERATION
INSTRUCTIONS
THIS DEVICE COMPLIES WITH PART 15 OF THE FCC RULES. OPERATION IS SUBJECT TO THE
FOLLOWING TWO CONDITIONS: (1) THIS DEVICE MAY NOT CAUSE HARMFUL INTERFERENCE, AND
(2) THIS DEVICE MUST ACCEPT ANY INTERFERENCE RECEIVED, INCLUDING INTERFERENCE THAT
MAY CAUSE UNDESIRED OPERATION.
NOTE: THE MANUFACTURER IS NOT RESPONSIBLE FOR ANY RADIO OR TV INTERFERENCE
CAUSED BY UNAUTHORIZED MODIFICATIONS TO THIS EQUIPMENT. SUCH MODIFICATIONS COULD
VOID THE USER'S AUTHORITY TO OPERATE THE EQUIPMENT.

THIS SYSTEM INCLUDES
• Computerized control module
• A pair of four-button, Elusive Code™
icon labeled remote controls
• JTI Programmable six-tone siren
• JTI True Dual™ impact sensor
• Super bright red LED indicator
• Push button valet switch
• Wallet instruction card
• Manuals
• Window decals
• Warranty registration card
VERY IMPORTANT
JTI will warrant the control module to the original purchaser for as long as you
own your vehicle. This warranty is effective only if your system has been
installed by an authorized JTI dealer. You must fill out your warranty registration
card and send it along with an original copy of your sales receipt to JTI within 10
days of purchase to activate your warranty.
By purchasing this system and sending in your warranty card and original sales
receipt, you are automatically eligible for the JTI Protection Plus Program™. The
Protection Plus Program™can, under certain conditions, provide a refund of the
comprehensive insurance deductable if your vehicle is stolen while equipped
with this security system. For detailed information, please visit our website at
www.jit-innovation.com.
1
Congratulations on your purchase of a Nobody Messes with..IT JT200
vehicle security/convenience system. This system represents the most
advanced and reliable technology in vehicle protection.
2. If the remote is lost or damaged, the system can also be disarmed by using
the valet switch. Turn the ignition to the ON position and press the valet switch
for five seconds or five times depending on the valet switch setting that has been
programmed. The systems default setting is five seconds.
User Selectable Quiet Mode
Your security system has the ability to be armed and disarmed silently (no siren
chirps / horn honks). To place the security system into quiet mode, press
and simultaneously on the remote control for three seconds. The
parking lights will flash once to indicate you have placed the system into quiet
mode. You may then arm and disarm the system silently by pressing on the
remote control. Quiet Mode does not effect the Panic feature.
To take the security system out of quiet mode, press and
simultaneously on the remote control for three seconds. The parking lights will
flash twice to indicate that you have placed the system into normal operating
mode. You may then arm and disarm the system by pressing on the
remote control.
Valet Mode
Valet mode is used to prevent the security system from arming. The security
system should be placed into valet mode when the vehicle is being serviced. It
may also be used as a manual disarm, in the event of loss or damage to the
remote control. It should be noted that convenience features such as keyless
entry and trunk release will continue to function via the remote control even if
USING YOUR SECURITY SYSTEM
Arming
1. To arm the system manually, press on the remote control once. The
siren (horn) will chirp once and the parking lights will flash one time. If installed,
the vehicle's doors will lock.
2. Automatic passive arming: After the doors have been closed, the LED
indicator will flash rapidly for thirty seconds. At the end of thirty seconds, the
system will arm, chirp the siren (horn) once and flash the parking lights once. If
installed, the vehicle’s doors will lock. NOTE: Passive arming is a selectable
feature that may be turned ON or OFF by your authorized dealer/installer.
After the security system is armed, the LED indicator will flash approximately
once every second to indicate that the system is actively protecting your vehicle.
With the security system armed, your vehicle is protected in the following
ways:
•Light impacts will result in the parking lights activating and a three chirp pre-
warn siren blast.
•Heavy impacts will result in the siren and parking lights activating for the
programmed alarm duration. The alarm comes set at the thirty-second alarm
duration, but can be programmed for sixty seconds.
•If a door is opened, the system will activate immediately resulting in the siren
and parking lights activating for the programmed alarm duration.
•Turning on the ignition will trigger the security system.
•If the optional start disable system is installed, the vehicle’s starter will be
prevented from cranking.
If you inadvertently trigger the security system, you can at any time disarm the
security system by pressing on the remote control.
NOTE: If any entry points (doors, hood, trunk) are not closed when arming, the
siren will chirp three times to indicate an open zone.
Disarming
1. To disarm the system, press on the remote control. The siren (horn) will
chirp twice and the parking lights will flash twice. If installed, the vehicle’s doors
will unlock. Also, if installed, the interior lights will turn on and stay on for twenty-
five seconds or until you turn on the ignition.
NOTE: If the siren chirps four times, this is an indication that a zone has been
violated. See Security Zone Intrusion Memory.
23
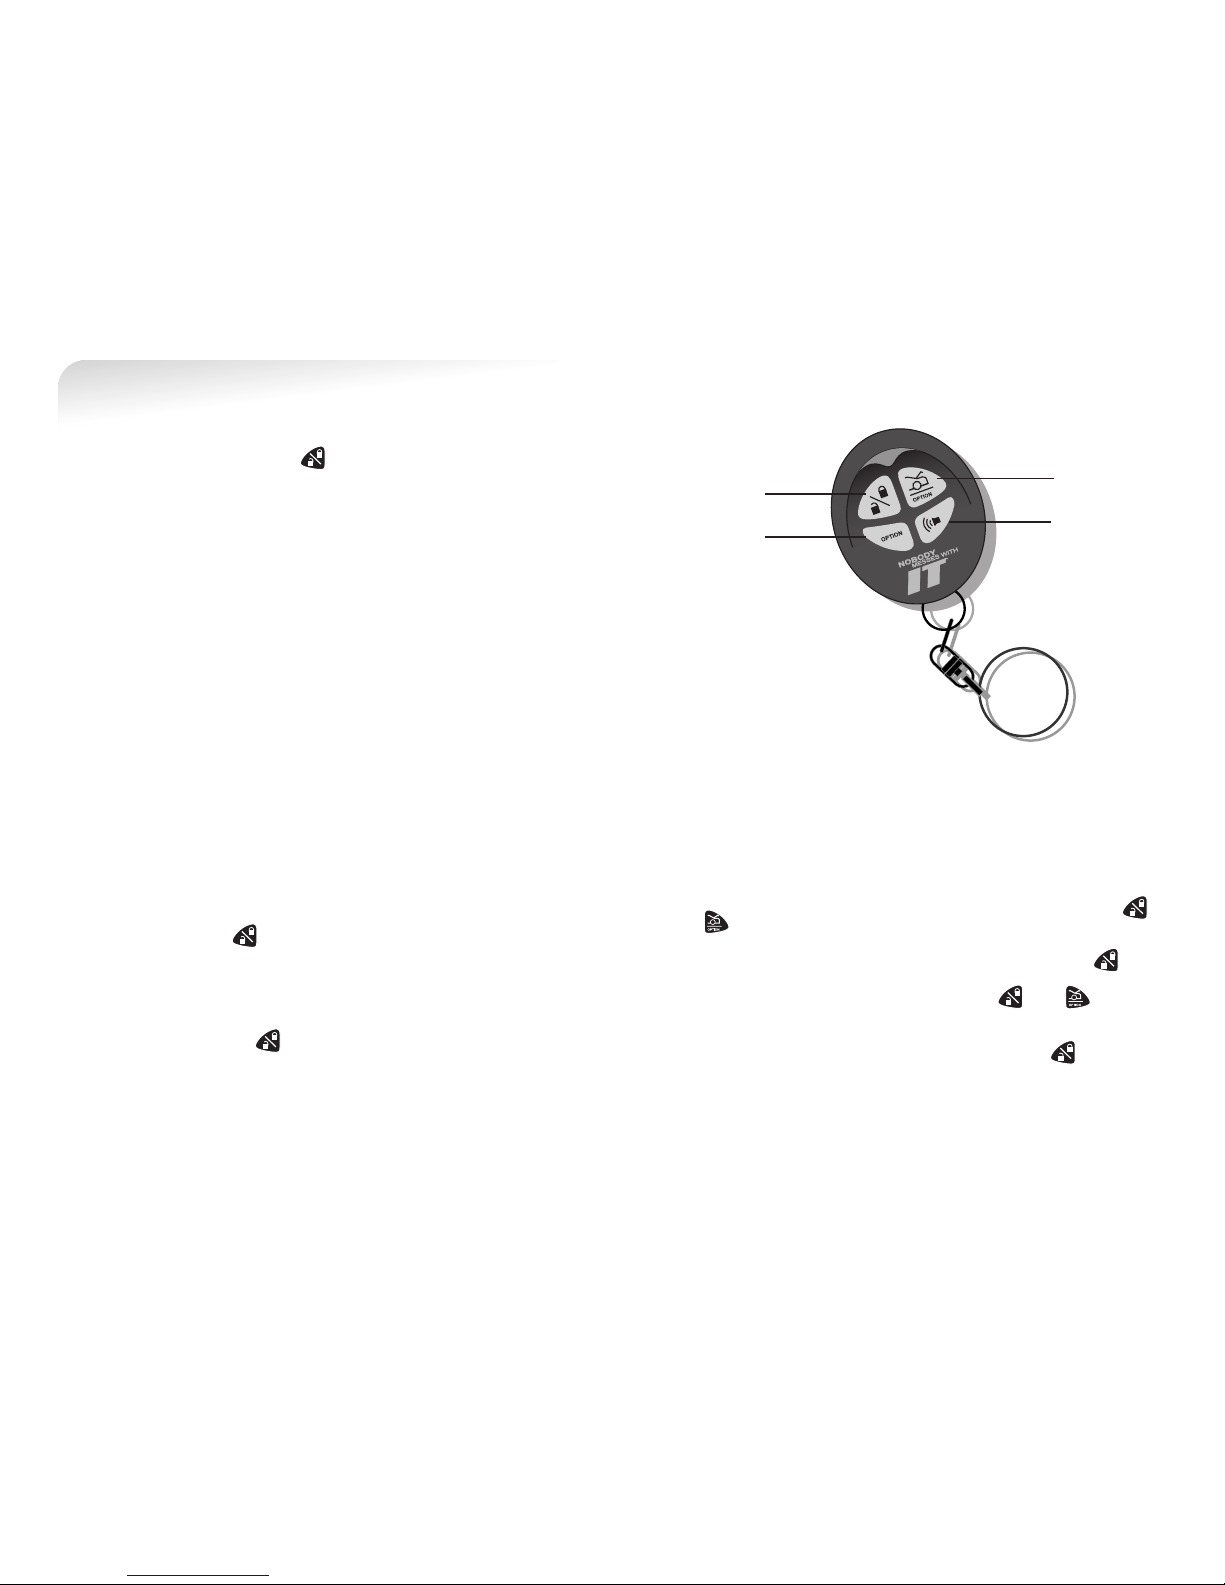
Button 3:
Trunk Release
Button 4:
Panic
Button 1:
Lock / Unlock
Button 2:
Option

LED Indicator
The security system’s status is reported to you via the LED indicator located
inside the vehicle. The following is a menu of different indications:
Flashing Armed
Off Disarmed
On Constant Valet mode
Rapid Flashing 30-second Passive Arming Countdown
Security System Zone Intrusion Memory
If the security system is triggered during your absence, the siren (horn) will chirp
4 times upon disarming. The LED indicator will flash two to six times to indicate
which zone has triggered the security system.
2 Flashes Door Zone
3 Flashes JTI true dual™impact sensor full impact triggered
4 Flashes JTI true dual™impact sensor pre-warn impact triggered
5 Flashes Trunk/hood zone triggered
6 Flashes Ignition zone
OPTIONAL FEATURES
Remote keyless entry
The security system can be interfaced with your vehicle’s power door locks. This
feature will lock the vehicle’s doors when the system is armed. It will also unlock
the doors when the system is disarmed. The remote keyless entry feature will
operate even when the system is in the valet mode to always provide the owner
with convenience.
NOTE: Some vehicles may require additional parts to utilize the keyless entry
feature.
Ignition controlled power door locks
When the ignition controlled power door lock feature is installed, the vehicles
doors can lock automatically when the vehicle’s ignition is turned on and unlock
automatically when the ignition is turned off. The lock and unlock function can be
programmed independently by your authorized JTI installer/dealer.
the security system is in valet mode. At the time of installation, the system
will be programmed to enter valet mode with the valet switch in one of the
following ways:
Factory Default Method: To place the security system in valet mode, turn the
ignition key to the ON position and press and hold the push-button valet switch
for five seconds. The red LED indicator will turn on solid. The ignition may be
turned off and the security system will stay in valet mode. To turn the valet mode
off, repeat the process and the LED indicator will turn off.
High Security Method: To place the security system in valet mode, turn the
ignition key to the ON position and press the push-button valet switch five times.
The red LED indicator will turn on solid. The ignition may be turned off and the
security system will stay in valet mode. To turn the valet mode off, repeat the
process and the LED indicator will turn off.
Valet Mode Via Remote
You can also place the security system into valet mode via the remote control by
pressing and simultaneously for three seconds. The parking lights will
flash once and the red LED indicator will turn on solid. To turn the valet mode
off, simply repeat the process. The parking lights will flash two times and LED
indicator will turn off.
Panic Feature
You may also trigger the security system via the remote control by pressing
for three seconds. This is done to attract attention to your vehicle.
The siren (horn) will sound for thirty seconds. This feature will also work when
the security system is in valet mode. Pressing on the remote control will
turn the panic feature off.
Car Finder
Car finder can be used to locate your vehicle in a crowded parking lot. Simply
press on the remote control two consecutive times to activate car finder.
The siren will sound three short blasts and flash the parking lights. To re-activate
car finder, simply repeat the process.
Multi-Car Remote Operation
Your remote control transmitter is also able to operate a second vehicle if that
vehicle is equipped with a Nobody Messes With..It security system with Elusive
Code™. Your authorized JTI dealer can program this feature.
Vehicle #1 will be the primary vehicle (all functions will operate).
Vehicle #2 will be the secondary vehicle ( on the remote control will
arm/disarm the security system, no other functions will be available from the
primary remote on the secondary vehicle).
45

Interior illumination
The security system may be interfaced to the vehicle’s interior lights. When the
security system is disarmed/unlocked, the vehicle’s interior lights will turn on.
The interior lights will turn off after twenty-five seconds, if the security system is
armed/locked, or if the ignition is turned on.
Trunk release
The security system may be interfaced to the vehicle’s electric trunk release. By
pressing and holding for three seconds, the vehicle’s trunk will open. If the
trunk release feature is not used, this button may be used to control other
options (remote car starter, window roll up, etc.).
Option button
This button may be used to control another optional accessory. Pressing
momentarily will activate the option.
Starter disable
The security system can be connected to a starter disable mechanism providing
additional security by disabling the ability to start the engine during an attempted
break-in.
REMOTE BATTERY REPLACEMENT
The remote control is powered by a 12-volt battery that lasts approximately six
months to one year depending on the frequency of use. A weak remote battery
will be indicated by the following symptoms:
A) Remote control range decreases.
B) The LED on the remote goes dim.
If the battery needs to be replaced, please see your authorized JTI dealer.
OPTIONAL ACCESSORIES
Remote engine start
The JTI add-on remote car starter allows you to start your vehicle via the remote
control. This module will allow you to keep the interior of your car warm in the
winter and cool in the summer.
Power trunk release
If your vehicle is not equipped with power trunk release, the JTI A-73 trunk
release kit can be added to provide remote controlled trunk release.
Field disturbance sensor
A field disturbance sensor covers the interior and perimeter of the vehicle with
an invisible field. The A-35 (dual zone) field disturbance sensor reacts to any
intrusion in and around the perimeter of the vehicle. The field disturbance
sensor can be added to any JTI alarm system and is a must for vehicles with
convertible tops.
Door lock motor
The A-22 power door lock motor kit is for those vehicles not equipped with
power door locks. With the addition of the A-22 motor, the vehicle may be
locked and unlocked by remote control. One A-22 motor will be required for
each door that will be controlled by remote control.
Power window control
The A-71 (two-way) power window controller kits can be used to allow the
security system to operate the vehicle’s power windows by remote control.
67

TROUBLESHOOTING
Siren doesn’t chirp when arming or disarming – The security system may
have been placed into quiet mode. See User Selectable Quiet Mode.
Red LED is always on –The security system may have been placed into valet
mode. See Valet Mode.
Siren chirps four times when disarming the system –The security system
has been triggered in your absence. See Security System Zone Intrusion
Memory.
Siren chirps 3 times when arming the system –The door or trunk has been
left open. See Arming and Disarming the Security System.
8
Table of contents
Other Nobody Messes with... IT Remote Starter manuals


