Intec i-Starter 3.5 User manual

700 AMPS
i-Starter 3.5
AVVIATORE D’EMERGENZA


Italiano 4
Descrizione prodotto 4
Istruzioni per l’uso 5
Specifiche tecniche 7
Domande più frequenti 8
Problemi / Soluzioni 8
Avvertenze 9
English 10
Product description 10
Instruction for use 11
Technical specifications 13
Most frequently asked questions 14
Problem / Solutions 14
Warning 15
4
Grazie per aver scelto un prodotto i-Starter.
Seguire accuratamente le istruzioni contenute nel presente manuale.
La non osservanza delle disposizioni di sicurezza può causare danni a cose e
persone, e danneggiare irreparabilmente il dispositivo.
Conservare il Manuale per future consultazioni.
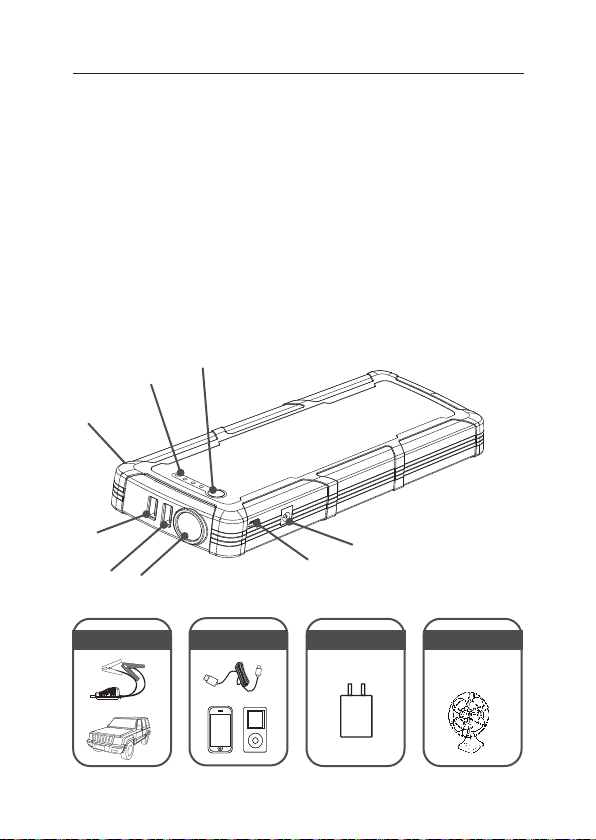
DESCRIZIONE PRODOTTO
Italiano
1. Pulsante
2. Indicatore
3. Ingresso cavi con pinze
4. Porta USB per ricarica ultrarapida
5. Porta USB 5V 2.1A
6. Lampada LED
7. Presa di ricarica ultrarapida.
8. Uscita 15V 10A
Ingresso cavi con pinze Porta USB per ricarica veloce Presa di ricarica Micro-USB Uscita 15V 10A
Cavo di avviamento intelligente
Caricatore
ultrarapido QC3.0 Alimentazione di
dispositivi a 12V
1
2
3
4
5678

5
ISTRUZIONI PER L’USO
Indicatore
Premere il pulsante per controllare lo stato di carica del dispositivo.
Indicatore Spento 1 Led 2 Led 3 Led 4 Led
Livello carica 0% 25% 50% 75% 100%
L’indicatore lampeggerà un led alla volta durante la ricarica. Le luci fisse indicano
il livello di carica. L’indicatore si spegne a carica completa.
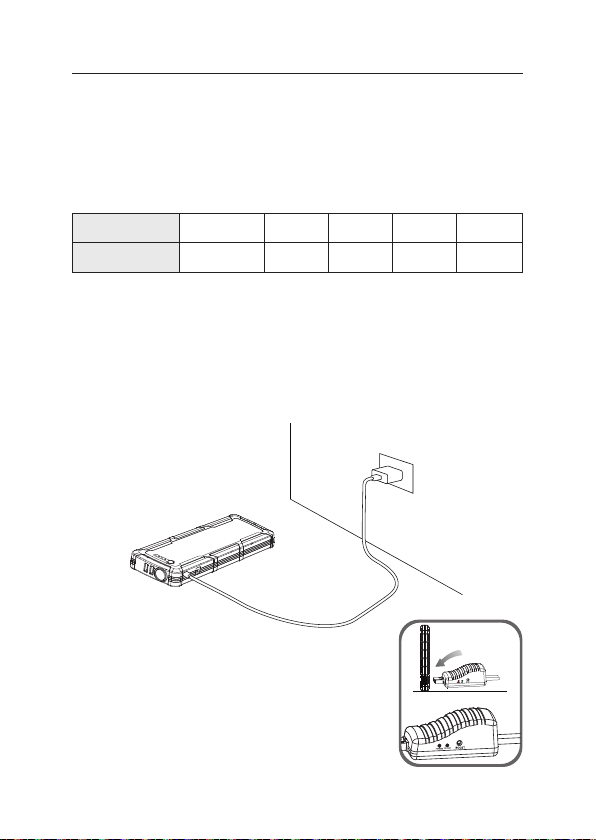
Istruzioni per la ricarica
1. Connettere il cavo USB al caricatore e collegarlo ad una presa di corrente.
2. Collegare il cavo Micro-USB alla presa di ricarica ultrarapida del dispositivo.
In alternativa, collegare il cavo Micro-USB alla presa di ricarica del dispositivo
quindi connetterlo ad un porta USB attiva.
Italiano
Prima di avviare un veicolo 12V
Inserire il connettore blu del cavo con pinze nell’ingresso
12V (3) assicurandosi che non ci siano indicatori LED
accesi.
6
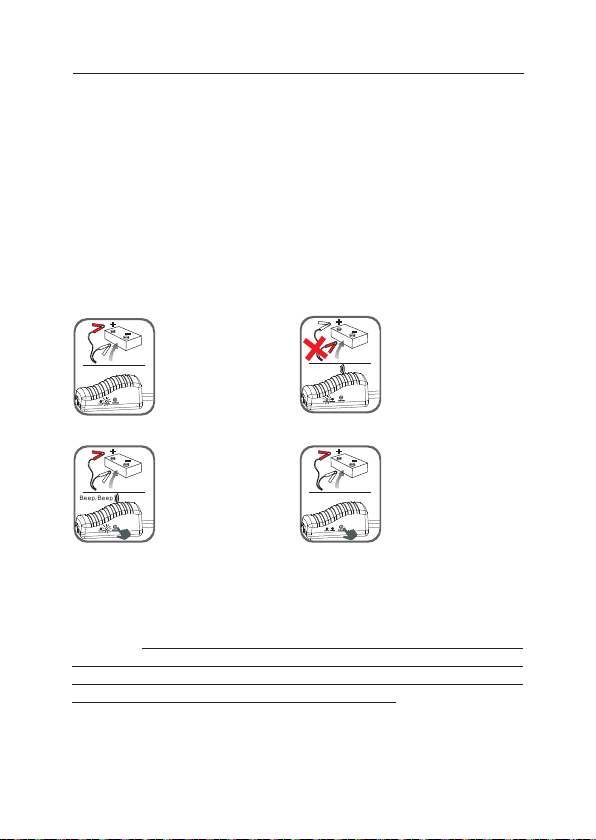
Avviamento di emergenza
1. Il dispositivo deve essere ben carico, con i quattro LED blu dell’indicatore accesi.
2. Connettere la pinza rossa al terminale positivo (+) della batteria oppure
al polo positivo remoto. Connettere la pinza nera al polo negativo (-) della
batteria oppure al polo negativo remoto.
3. È importante che la connessione venga fatta con entrambi i lati della pinza
saldamente ancorati sul metallo. In caso di depositi solforosi sul polo, questi
devono essere preventivamente rimossi.
4. Avviare il veicolo per un massimo di 3 secondi e far riposare almeno tre minuti
tra un tentativo ed il successivo.
5. Quando il veicolo è in moto rimuovere una pinza alla volta, riporla negli
appositi alloggiamenti e ricaricare il dispositivo appena possibile.
Attenzione: quando viene premuto il pulsante per più di due secondi, viene inibita
per 30 secondi la funzione di sicurezza del dispositivo. È importante che, ad
avviamento effettuato, i cavi vengano rapidamente disconnessi dalla batteria, per
non sottoporre il dispositivo ad un pericoloso sovraccarico.
Be ep, Be ep
Beep, Be ep
LED VERDE fisso:
Indica la connessione
corretta e avviatore
attivo. Si può procedere
all’avviamento.
LED VERDE
lampeggiante e beep:
Batteria del veicolo
molto scarica. Premere il
pulsante per due secondi
e quindi procedere
all’avviamento.
LED spenti e nessun
“beep”:
Indica batteria veicolo
assente o interrotta.
Premere per due secondi
il pulsante e quindi
procedere all’avviamento.
LED ROSSO
lampeggiante e “beep”:
Indica l’inversione
di polarità. Invertire
la connessione
immediatamente.
Italiano
Be ep, Be ep
Beep, Be ep
Be ep, Be ep
Beep, Be ep
Be ep, Be ep
Beep, Be ep
7
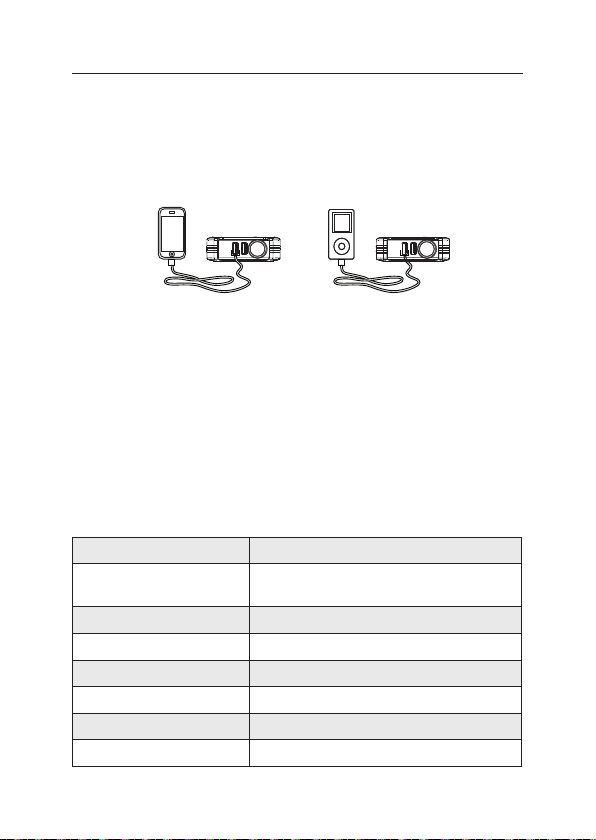
Ricarica di telefoni e tablet
1. Connettere il dispositivo elettronico alla porta USB per la ricarica veloce (4).
2. Premere il pulsante dell’avviatore per avviare la ricarica, i-Starter 3.5 riconoscerà
automaticamente l’amperaggio di cui necessita il dispositivo da ricaricare.
SPECIFICHE TECNICHE
Capacità batteria litio (LiPo)* 17000mAh (62.9Wh)
Uscite 5V-2.1A; Ricarica veloce (5V-2.4A; 9V-2A;
12V-1.5A),12V per avviamento
Ingresso Ricarica veloce 5V / 9V
Tempo di ricarica Circa 4 ore
Potenza 700A
Temperature di utilizzo -20°C / 60°C
Dimensioni 231.5x90.5x29.5 mm
Peso 605 gr
(*) Batteria al Litio-Polimero
Italiano
Per l’alimentazione di dispositivi a 12V
1. Collegare il cavo di ricarica (non incluso) alla porta di uscita 15V 10A (8).
2. Collegare l’altro capo del cavo al dispositivo 12V da ricaricare.
3. Premere il pulsante dell’i-Starter 3.5 per avviare la carica.
Utilizzo della lampada LED
Premere per 3 secondi il pulsante per accendere la lampada. La luce può essere:
Fissa, Lampeggiante, SOS.

8
PROBLEMI / SOLUZIONI
Problema Causa Rimedio
i-Starter 3.5 non è
completamente carico
anche se i LED sono
accesi
In caso di lungo
inutilizzo il dispositivo
potrebbe non essere
completamente carico
anche se i led sono
accesi
Ricaricare l’apparecchio
connettendolo al suo
caricatore per qualche ora
Premendo l’interruttore i
LED non si accendono
E’ entrata in funzione
la protezione di basso
voltaggio
Connettere subito
il dispositivo al suo
caricabatteria
D: Come si spegne il dispositivo?
R: Il dispositivo si spegne da solo automaticamente quando non c’è carico o
quando la ricarica è completa.
D: Quanto tempo impiega l’i-Starter 3.5 a caricarsi completamente?
R: Se il dispositivo è completamente scarico possono essere necessarie fino a
4 ore.
D: Quante volte posso ricaricare il mio telefono?
R: Con questo dispositivo potete in media ricaricare fino a 8 volte il vostro iPhone 6
D: Per quante volte il dispositivo carico al 100% è in grado di avviare un veicolo a
benzina di media cilindrata?
R: Fino a 30 volte, dipende da altri fattori quali la temperatura e lo stato della
batteria del veicolo.
D: Ogni quanto tempo devo caricarlo?
R: Consigliamo vivamente di caricarlo almeno una volta ogni tre mesi o dopo ogni
utilizzo.
DOMANDE PIÙ FREQUENTI
Italiano

9
AVVERTENZE
1. Entrambe le pinze devono essere ben connesse ai poli della batteria o ai
terminali remoti. Questi devono essere esenti da ruggine, sporco o solfati.
2. Se la vettura non parte dopo il terzo tentativo occorre far raffreddare
convenientemente il dispositivo, altrimenti verrà irreparabilmente danneggiato.
Controllare che la vettura non abbia altri problemi che ne impediscono la messa
in moto.
3. NON connettere tra di loro le due pinze, rischio di scintille ed incendio.
4. NON aprire il dispositivo, rischio di incendio.
5. L’uso incorretto del dispositivo può danneggiare in modo irreparabile la
batteria
6. La garanzia non si applica alla batteria in quanto materiale di consumo.
7. L’avviatore deve sempre essere ricaricato in ambienti ben areati e a
idonea distanza da materiali facilmente infiammabili.
8. La non osservanza delle istruzioni può portare ad un grave danneggiamento
dell’unità.
Inoltre:
• Usare sempre la massima attenzione nell’uso per avviamento
• Tenere al di fuori della portata dei bambini
• Non tenere in luogo umido
• Non immergere in acqua
• Non usare in vicinanza di liquidi infiammabili o in presenza di gas infiammabili
• Qualunque intervento deve essere fatto da personale autorizzato
• Non esporre a fonti di calore
• La ricarica deve essere effettuata a temperatura ambiente e solo con il
caricabatteria in dotazione
• Se utilizzato al di fuori degli standard operativi si possono verificare perdite
di liquidi. Evitare attentamente il contatto con gli occhi, la pelle e gli abiti. In
caso di contatto con occhi o pelle lavare con acqua abbondante e rivolgersi ad
un medico.
Italiano

10
Thank you for choosing a i-Starter product.
We advise you to carefully follow the instructions contained in this manual.
Non-compliance with the safety regulations can lead to damage to persons or
goods and cause irreparable damage to the device.
Keep this instruction Manual for future consultations.
PRODUCT DESCRIPTION
English
1. Switch
2. Indicator
3. Jump start socket
4. Quick Charge output port
5. 5V 2.1A output port
6. LED Flash Light
7. Quick Charge input port
8. 15V 10A output port
Jump start socket Quick Charge output port Quick Charge input port 15V 10A output port
Intelligent jumper
cable
Home ultra charger
QC3.0 For 12V vehicle
products
1
2
3
4
5678
11
INSTRUCTIONS FOR USE
Indicator
Press the push button in order to check the charge state of the device.
Indicator Switched off 1 Led 2 Led 3 Led 4 Led
Charge level 0% 25% 50% 75% 100%
One led at a time will flash in the indicator during recharge. Steady-on-lights
indicate the charge level. The indicator switches off once fully charged.
Recharge instructions
1. Plug the home charger into the USB cable.
2. Connect the Micro connector to the i-Starter 3.5 host.
English
Jump start 12V vehicle Instruction
Connect the blue plug fully seated into the host, and
make sure the Cable Indicator is off.

12
Emergency start
1. The device must be properly charged, with the four blue LEDs of the indicator
switched on.
2. Connect the red clamp to the positive terminal (+) of the battery, or to the
remote positive pole. Connect the black clamp to the negative pole (-) of the
battery or to the remote negative pole.
3. The connection must be realized with both sides of the clam firmly attached
to the metal. In case of sulphur deposits on the pole, these must be previously
removed.
4. Turn the ignition key for a maximum of 3 seconds and then wait for a further
3 minutes before attempting to jump start again.
5. When the engine is running, remove one clamp at a time, return the clamps
to their housing and recharge the starter as soon as possible.
Note: when the push button is pressed for over two seconds, the security function
of the device is inhibited for 30 seconds. Once the engine has been jump started,
the cables must be quickly disconnected from the battery in order not to overload it.
English
Be ep, Be ep
Beep, Be ep
Be ep, Be ep
Beep, Be ep
Be ep, Be ep
Beep, Be ep
Be ep, Be ep
Beep, Be ep
GREEN LIGHT on:
Telling the connection
is correct and the
circuit is working, you
can turn on the engine
to jump-start directly.
GREEN LIGHT blinking
with buzzing:
Indicates very low
battery. Press the push
button for two seconds
and then jump start the
engine.
No Lights on, No
buzzing:
Indicates absent or
interrupted vehicle battery.
Press the push button for
two seconds and then
jump start the engine.
RED LIGHT on with
buzzing:
Indicates reversed
polarity. Invert the
connection immediately.

13
Charging of cell phones and tablets
1. Plug the switch cable to Quick Charge output port.
2. Select appropriate connector and connect it to your mobile phones or tablet.
3. Touch the switch button, it can recognise eletronic products’s suitable
parameters, start to charge for mobile phone/tabletc etc.
TECHNICAL SPECIFICATIONS
Lithium Battery Capacity (LiPo)* 17000mAh (62.9Wh)
Outputs 5V-2.1A; Quick Charge (5V-2.4A; 9V-2A;
12V-1.5A); 12V jump start
Input socket Quick Charge 5V / 9V
Recharge time About 4 hours
Power 700A
Operating temperatures -20°C / 60°C
Sizes 231.5x90.5x29.5 mm
Weight 640 gr
(*) Lithium polymer Battery
English
For power supply to 12V vehicle products or 12V electronics
1. Plug the optional switch cable to 15V 10A output port.
2. Connect the optional switch cable and 12V vehicle product or 12V electronics
3. Press the switch button to power supply.
Use of the LED lamp
Press the switch 3 seconds to start the LED flash light.
There are 4 modes of LED light appear in order (normal, strobe. SOS, off) if you
press slightly.

14
PROBLEMS / SOLUTIONS
Problem Cause Solution
The i-Starter 3.5 is not
fully charged despite the
LEDs being switched on
If not used for a long
period of time, the
device could not be fully
charged despite the
LEDs being on
Recharge the device by
connecting it to its charger
for a few hours
By pressing the push
button, the LEDs do not
switch on
Low-voltage protection
has been activated
Connect the device to its
charger immediately
Q: How do I switch off the device?
A: The device shuts down automatically when it is not on charge or when the
recharge process is over.
Q How many times can I recharge my cell phone?
A: This device allows you to recharge your iPhone 6 up to 8 times on average.
Q: How long does the charger provided take to recharge the i-Starter 3.5?
A: If the device is completely dead, it may take up to 4 hours.
Q: How many times is a 100% charged device able to start a mid-size petrol
vehicle?
A: Up to 30 times. It depends on other factors such as temperature and the state
of the vehicle battery.
Q: How often shall I recharge it?
A: We warmly recommend you to charge it at least once every three months or
after each use.
MOST FREQUENTLY ASKED QUESTIONS
English

15
WARNING
1. Both clamps must be well connected to the battery poles or to the remote
terminals. They must be free of rust, dirt or sulphates.
2. If your car does not start after the third attempt, you’d better let the device
cool down properly to avoid irreparable damage. Search for other problems
that may prevent your car from starting.
3. DO NOT connect the two clamps together as this may cause sparks or fires.
4. DO NOT open the device to avoid fire risk.
5. Incorrect use of the device can irreparably damage the battery.
6. The guarantee does not apply to the battery as this is a consumable item.
7. The booster must always be recharged in well-ventilated places and
away from easily inflammable materials.
8. Non compliance with the above instructions may lead to serious damage of
the unit.
Furthermore:
• Always pay the utmost attention when using the device for engine starting
• Keep out of children’s reach
• Do not keep in a humid place
• Do not soak in water
• Do not use in close proximity to inflammable liquids or in the presence of
inflammable gases
• Any intervention must be carried out by authorized personnel only
• Do not expose to heat sources
• Battery charging must be carried out at room temperature and only by using
the charger provided
• If the device is not used in compliance with the operational standards, leaking
of fluids may occur. Carefully avoid contact with eyes, skin and clothes. In
case of contact with eyes or skin, wash with plenty of water and see a doctor.
English

vr 1.2 - 20191030
i-Starter è un marchio distribuito dalla INTEC srl
Via A. De Francisco 148/4 - 10036 Settimo T.se (TO)
T. +39 011 8957403 F. +39 011 8958012
www.i-starter.it
Table of contents
Languages:
Other Intec Remote Starter manuals

Popular Remote Starter manuals by other brands

Glacier Start
Glacier Start GLC-GS-CHR-T5 installation guide

Code Alarm
Code Alarm PC 7500 owner's manual

Prestige
Prestige PE1BZ owner's guide

CrimeStopper
CrimeStopper EZEE Start EZ-1 operating instructions

Peak
Peak PKC0LS Owner's manual and warranty information

Firstech
Firstech RF-1WR3R-FM Quick start card


Voxx Electronics
Voxx Electronics Prestige PE1BZ owner's guide

Clore Automotive
Clore Automotive Booster Pac ES400 Operator's manual

Directed Electronics
Directed Electronics AS-6870TW-FM user guide

Groz
Groz LED-346 instruction manual

Stanley
Stanley J309 instruction manual

Prestige
Prestige APS-57 installation manual