NOCRY NCG-8000 User manual

4 1/2in Angle Grinder
Instruction Manual
We've tried to make this manual useful, simple, and understandable.
Please read it carefully, and keep it safe for future reference

1

WHAT'S INSIDE THIS MANUAL
THE ABC'S OF ANGLE GRINDER SAFETY 3
Battery and fast charger safety 5
Work area safety 7
Personal safety 8
Meaning of safety symbols 9
INCLUDED ACCESSORIES & THEIR PURPOSES 13
HOW TO USE YOUR ANGLE GRINDER 14
How to turn the angle grinder on/off 14
How to fit the guard 14
How to attach the handle 15
How to attach a grinding/cut-off disc 15
How to grind with the angle grinder 16
How to cut rebar with the angle grinder 16
How to cut a frozen bolt with the angle grinder 17
How to cut tile, stone or concrete with the angle grinder 17
How to sharpen blades with the angle grinder 17
How to grind mortar with the angle grinder 18
THE ABC’S OF NOCRY BATTERIES 19
How to remove or insert a battery 19
When to charge the battery 20
MAINTENANCE 21
ANGLE GRINDER LIABILITY 21
DISPOSAL 22
WARRANTY 22
HOW TO CONTACT NOCRY 23
2

THE ABC'S OF ANGLE GRINDER SAFETY
Read all safety warnings and instructions before
using your angle grinder.
They're pretty reasonable, and neglecting them may bring a touch of explosion,
fire, and/or serious injury to your grinding and polishing sessions. There are other
(and much better) ways to get your adrenaline going.
Save this manual for future reference, review in between uses, and make sure
that anyone who's going to test your new angle grinder has read and fully
understood all the information in here as well.
In case this manual happens to disappear in the black hole all manuals seem to go
into, you can get a digital version of it at www.nocry.com/instructions,or by letting
us know at [email protected].
So, let's get to it, shall we?
✔
✔
✔
✔
Only use your angle grinder and its accessories for grinding metal, cutting
tile, stucco and pavers, routing or mortaring, sanding, polishing or
sharpening. Would you use a hammer to screw in a screw? Exactly.
Only pair your angle grinder with the accessories that are made for angle
grinders, and do not require liquid coolants. You can find a list of accessories
that come included in the package on page 13.
Before using this angle grinder with accessories you already own, make
sure they're designed to withstand rotation speeds of 10,000rpm or more,
and
are not too small or too big for the tool. Speaking of…
Only use accessories that are in perfect working condition. If the accessory
has dropped or been hit, mount it onto your angle grinder, and let it run at the
highest speed for 1 minute. In most cases, a damaged accessory will fail this
test. Keep everyone - including yourself - at a safe distance away from the
spinning parts.
3

✔
✔
✔
✔
✔
✔
✔
✔
✔
✔
Grinding discs, flanges, support discs and other accessories must fit the
angle grinder's spindle exactly (find the spindle size on page 12).Accessories
that are too loose will rotate unevenly, vibrate heavily, and make you lose
control of the tool.
Mount the abrasive surface of the grinding discs below the level of the
protective edge to keep the disc protected. The protective guard must be
securely attached and positioned so that the least amount of disc is exposed
towards you.
Keep the cutting tools sharp and clean. Blunt blades are much more prone to
getting jammed and are harder to control.
Make sure there is nothing stuck in the moving parts of your angle grinder
before turning it on. It moves fast - and it will ruin your day even faster.
Do not turn the angle grinder on or off while it's in contact with the
workpiece.
Keep your fingers, hands, limbs, and any other body parts, as well as the
power cable away from the moving parts. If the grinder can cut tile, just
imagine what it could do to your digits.
Do not use your angle grinder if it doesn't work as it should. Get it repaired
or replaced before using. Should you have any problems or concerns about
anything, let us know by emailing [email protected]m.
To avoid or reduce the impact of kickback, hold the tool firmly, have your
body and arms in a stable position, and outside of the area the tool could
move in case of kickback, and do not use the tool with any accessories that
have “teeth”.
Exercise extra caution when working with corners, sharp edges etc., as
rotating accessories can bounce or get snagged.
Wait until the tool has come to a complete stop before carrying it, putting it
down, or changing an accessory. The alternative is completely losing control
of the tool, as it starts moving around the floor or table.
4

✔
✔
✔
✔
✔
✔
Your angle grinder has a paddle trigger lock, meaning the grinder won’t simply
stop working should you release your finger. Ensure that you disengage the
paddle switch lock before before making any adjustments, inserting a
battery or accessory, or putting the tool in storage. Seems reasonable,
doesn't it.
To keep your angle grinder well-maintained, regularly check if any parts are
misaligned, damaged or broken, or if there's anything else that might affect its
performance. If you notice anything odd, definitely take your angle grinder for
repair before using it or let us know by emailing [email protected]mand we’ll
get on the case right away.
Clean the ventilation openings on a regular basis. The motor fan draws dust
into the housing, and leads to an accumulation of dust, which in turn creates
an electric hazard and could prevent your grinder working as well as it should.
Work or repairs on the angle grinder should only be carried out by a
professional. It’s best to leave the really serious stuff to a qualified repair
person who only uses original replacement parts.
Make sure that anyone using your angle grinder or servicing it is acquainted
with this manual. The exception to the rule are children and infirm people -
they shouldn't be using your angle grinder even if they remember every word
written here.
Store your angle grinder away from children. Enough said.
Battery and fast charger safety
✔
✔
Only use original NoCry 20V batteries. Use of unoriginal batteries may lead to
explosions. And who needs that?
Do not try to open the battery. You risk the danger of short-circuiting, being
electrocuted, and it will also void your warranty (see page 22)
5

✔
✔
✔
✔
✔
✔
✔
✔
✔
When a battery pack is not in use, keep it away from other metal objects
such as paper clips, coins, keys, nails, screws etc. Shorting the battery
terminals may cause burns or a fire.
The battery has built-in temperature-dependent overload protection: When
the load is too high or when the temperature goes above 158°F, the speed of
the wrench will automatically be reduced until it cools to within its normal
temperature range.
Hazardous vapors may be emitted from the battery if it's damaged, and can
irritate your respiratory system. If you smell fumes or feel other than your
usual self, stop the work, ventilate the work area properly, and seek
medical help.
Under abusive conditions, liquid may leak from the battery; stay well clear.
Liquid from the battery may cause irritation or burns. If you should make
accidental contact, make sure to wash affected areas thoroughly with water. If
liquid contacts eyes, seek immediate medical attention.
The fast charger is designed to charge your batteries indoors only and away
from living areas. Ideally batteries should be charged on a bench in a
workshop or garage. If you do not have such a space, charge your batteries
away from people in an area of infrequent use, just in case anything should
happen. Better safe than sorry.
Keep your fast charger away from any kind of liquid or moisture, as we don’t
need to tell you - electricity and water don’t mix.
If the battery pack is cracked or damaged in any way, do not insert it in the
charger. There is a danger of electric shock or electrocution.
When charging multiple batteries, always allow the charger to cool down
before charging another battery.
Do not abuse the cord of the fast charger. Never use it for carrying or pulling
anything or forcefully unplug it. Keep the cord away from heat, oil, sharp edges
6

✔
or moving parts. Damaged or entangled cords increase the risk of electric
shock.
Do not use the charger if it has been subjected to a heavy knock, dropped or
otherwise damaged in any way. Take the charger to an authorized service
centre for a check or repair or contact us at [email protected], and we'll sort
it out ASAP.
Work area safety
✔
✔
✔
✔
✔
✔
✔
Keep your working area clean and well illuminated. Accidents are much more
likely to happen in dirty, unorganized, or poorly lit workspaces - accidents that
are easy to avoid with basic upkeep.
Secure any movable workpiece(s) you're working on. A workpiece secured
with suitable clamps or in a vice is much more likely to be steady and stay in
place than one held by hand.
Do not operate your power tools in dusty or explosive areas, such as in the
presence of flammable liquids or gases, for a very simple reason - power tools
may create sparks which could ignite the dust or fumes.
Use appropriate dust extraction or collection equipment if working in closed
environments, along with respiratory protection.
If you're working in areas where the angle grinder might
come in contact
with concealed electric cables, hold it by the insulated grip surfaces at all
times. That way, you will reduce the possibility of electrocution in case the
grinder touches a live conductor.
Do not expose your angle grinder to rain and moisture. Water and electric
tools don't mix.
If damp conditions are unavoidable, use a residual current device (RCD)
protected supply for charging your grinder.
7

✔
✔
✔
Keep children and bystanders away. Distractions can easily cause you to lose
control, so consider operating your power tools a solo venture. You'll catch up
with everyone later, when you've made progress with your project.
If you absolutely must have children in the working area, ensure that they're
always closely supervised by another, responsible
, adult, and do not interfere
with your work.
Familiarize yourself with your local general rules of occupational health and
safety. The sooner you do that, the sooner you can start using your angle
grinder.
Personal safety
✔
✔
✔
✔
✔
Eye, ear, face, hand, and respiratory protection is a must when operating
your angle grinder. Do not underestimate the power of personal safety
equipment.
Do not wear loose-fitting clothing or jewelry when working with your angle
grinder, and make sure your hair cannot get stuck in the moving parts.
Do not take unnecessary risks by trying to reach areas that are obviously
too far away to reach safely. Keep proper footing and balance at all times -
it'll help you keep control in unexpected circumstances, whether it be the
angle grinder slipping out of your hands, or someone deciding it would be fun
to attempt to pull a jumpscare on you in your workshop.
Make sure to use and maintain the angle grinder correctly, and take enough
breaks during the work to avoid health problems related to vibration in hands
and arms.
Common sense is the best protection, isn't it? Stay alert - watch what you're
doing, exercise common sense, and do not operate power tools when you're
tired or under the influence of drugs, alcohol, or strong medication.
8

✔
Exercise extra caution if you have an active or passive medical implant.
Consult with your doctor and/or the manufacturer of the implant before
using
the angle grinder, as it produces an electromagnetic field during operation.
NB! NoCry Work & Safety Gear and the manufacturing plant shall not be liable for
any changes made to the tool, nor for any damage resulting from such changes.
Meaning of safety symbols
These symbols are on your angle grinder for a reason - to keep you aware and
safe. Please take them into account.
This angle grinder conforms with North American safety
standards.
Read the instructions before starting to use this angle grinder.
Do not throw this angle grinder out with regular waste, but
dispose of it in the appropriate manner so it can be recycled. See
page 21 for how to responsibly dispose.
This angle grinder is intended for indoor use only.
Exercise overall caution when operating your angle grinder.
9

This angle grinder has a thermal fuse rating of 266°F. Fuse will
blow to protect your grinder should this temperature be exceeded.
This angle grinder is Class II (double insulated).
Do not expose or immerse the battery to moisture, rain or water.
Do not burn or expose the battery to heat or open flames.
Battery has a max operating temperature of 122°F. This operating
temperature should not be exceeded.
Battery contains lithium ion. Do not dispose of batteries with
household items. Return exhausted batteries to your local
collection or recycling point.
10
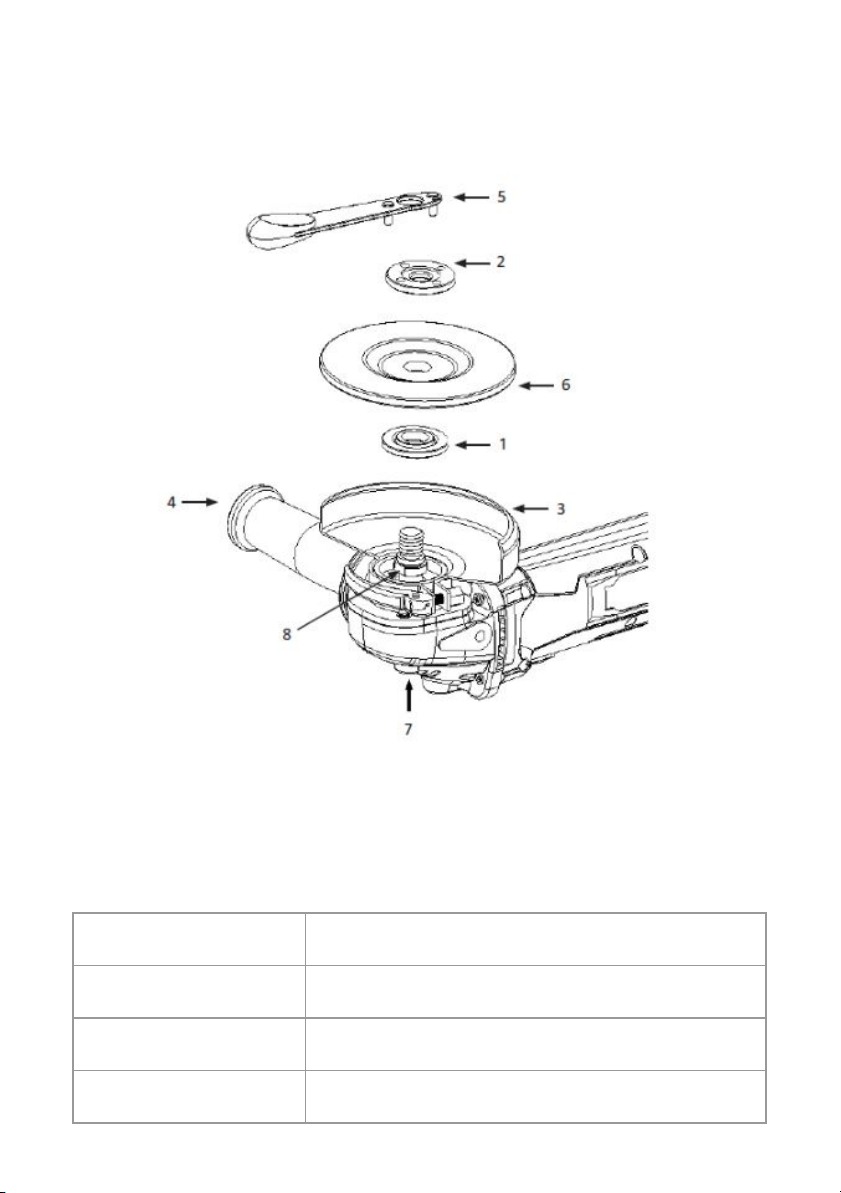
TECHNICAL SPECIFICATIONS
1.
Inner flange disc
2.
Outer flange disc
3.
Guard
4.
Handle
5.
Tightening key
6.
Grinding / cut-off disc
7.
Spindle lock button
8.
Spindle
Model
NoCry NCG-8000 4 1/2 Inch Angle Grinder
Voltage
120V, 60Hz
Motor type
Brushed
Guard size
4 1/2in / 115mm
11

Rated voltage
20V
Maximum speed
10,000rpm
Sound pressure level
LPA = 78.50 dB(A)
KPA = 3 dB
Sound power level
LWA = 89.50 dB(A)
KWA = 3 dB
Vibration level for
surface grinding*
ah, AG = 7.54 m/s2
K = 1.5 m/s2
Runtime
60 minutes/ 4 Ah battery
Battery
Lithium-Ion 20V 4000mAh
Battery model
NBP-4.0Ah
Battery max
temperature
122°F
Battery charging time
2 hours
Charging voltage
100-130V AC
50-60Hz
60W
Weight of the main
body
3.97lbs
Spindle thread
M16 (5/8in)
Hole diameter of the
grinding/cut-off disc
55/64in
*The actual vibration level when using the angle grinder can deviate from the
indicated value, depending on how the tool is used.
12

INCLUDED ACCESSORIES & THEIR PURPOSES
These are the accessories you should find included in your cordless impact wrench
kit (the baretool version comes with only the angle grinder itself). If there's
✔
✔
✔
✔
✔
✔
✔
✔
✔
1 handle for mounting on either side of the angle grinder for improved
stability when working. See page 15 for instructions on how to attach it.
1 lock nut wrench that's kept inside the handle for convenience and
safekeeping.
1 cutting guard - full enclosure. See page 14 for instructions on how to attach
it.
1 grinding guard - half enclosure. See page 14 for instructions on how to
attach it.
1 cutting disc - see page 15 for instructions on how to attach it.
1 diamond cutting disc for more difficult cuts - like cutting tile and masonry.
See page 15 for instructions on how to attach it.
1 grinding disc for sharpening rough-and-tumble tools like hoes, shovels and
ice scrapers, and for the initial grinding of axes, hatchets and lawnmover
blades. See page 15 for instructions on how to attach it.
1 rechargeable 4Ah battery that holds charge for up to 1h if run continuously
at full speed. Rechargeable from 0 to 100% in approximately 2h, and lasts for
up to 200 charging cycles. Can be used with other NoCry cordless power tools.
1 fast charger for charging your NoCry batteries only. LED lights show when
battery is fully charged. Charges 2Ah worth of power per hour, meaning it take
will 45 minutes to charge a 1.5 Ah battery, 1.5 hours for 3 Ah, and 2 hours for
4 Ah batteries.
13
✔
1 canvas bag for storing your new angle grinder. Elastic hook'n'loop straps
securely hold and store your tool, battery and fast charger, protecting them
from accidental knocks while carrying.
HOW TO USE YOUR ANGLE GRINDER
How to turn the angle grinder on/off
Very straightforward: Plug the angle grinder in, and press the on/off switch
upwards to turn the tool on, and push it downwards to turn the angle grinder off.
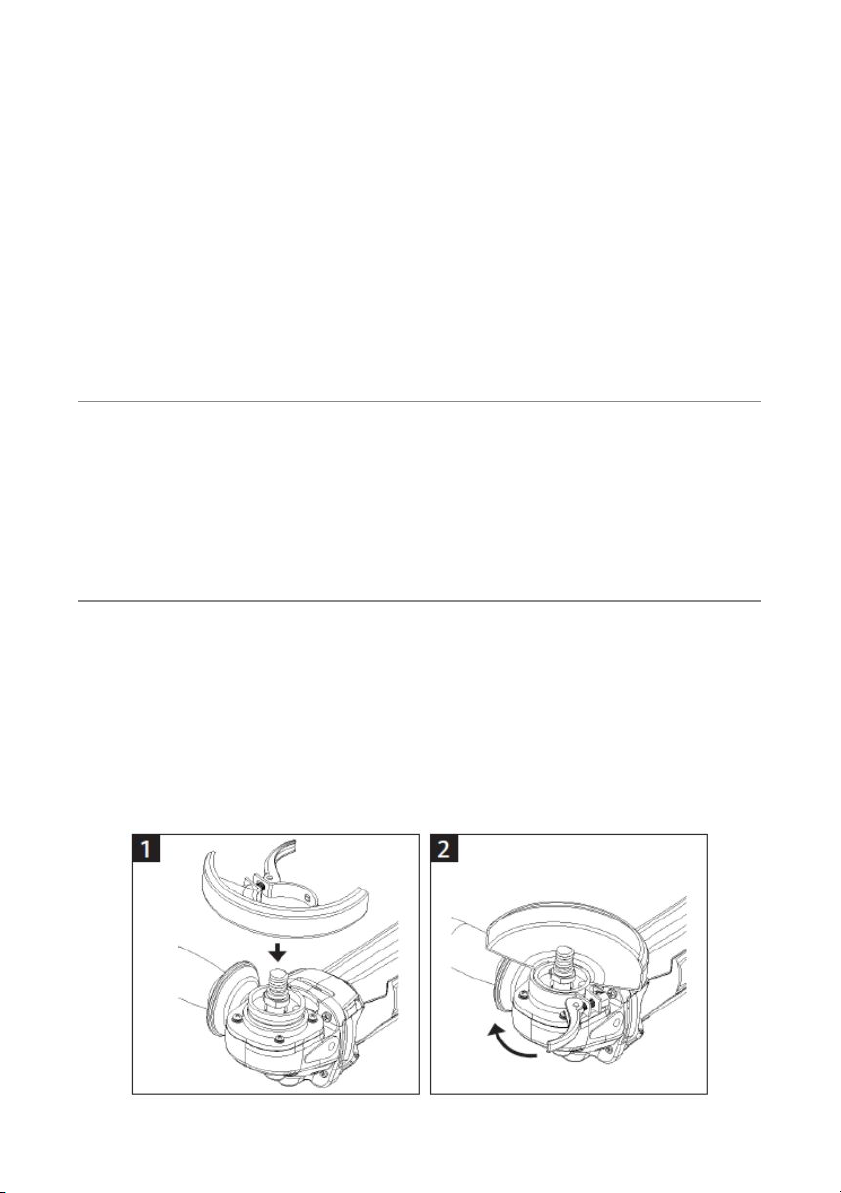
How to fit the guard
1.
2.
3.
Press and hold the guard adjusting lever, while putting the guard on the angle
grinder.
Rotate the guard until the lever lines up with the notches on the guard.
Adjust the clamping force of the locking arm by tightening the hex screw out
or in when the locking arm is unloaded.
14

How to attach the handle
1.
2.
Choose whether you'd like to install the handle on the left or right side of the
angle grinder.
Simply rotate the handle clockwise until it's tight in the angle grinder. Done!
How to attach a grinding/cut-off disc
1.
2.
3.
Place the inner flange disc over the spindle with the locking edges (A) facing
down, and making sure that the disc and spindle's edges meet. The flange
disc must not rotate freely, but follow the rotation of the spindle.
Place the grinding or cut-off disc on the inner flange disc, and align the hole
against the shoulder.
Fit the outer flange disc, and tighten with the tightening key. Press and hold
the spindle lock button (indicated with an arrow in the photo) to prevent the
spindle from rotating during tightening.
15

4.
When the disc is attached, test-run the grinder at low speed for a few
minutes, not placing the disc against an object. If the disc shows any signs of
being damaged during this test run, replace it immediately.
How to grind with the angle grinder
✔
✔
Only attempt to grind ceramic, steel and stone - not wood or soft metals such
as lead, which will quickly “clog” the grinding disc and make it unusable and
cause damaged.
Grind by moving the angle grinder from side to side in a 10-15° angle,
applying light yet steady pressure for maximum material removal. There is no
need to use the angle grinder with extreme force, as the weight of the angle
grinder provides sufficient pressure.
How to cut rebar with the angle grinder
1.
2.
3.
Mount a cut-off disc onto your angle grinder (see page 15 for a short how-to),
and turn the tool on.
Prop up the long side of the rebar, and hold it securely.
Move the cutoff disc through the metal, allowing the weight of the tool to do
16

most of the work. Allow for the short end to drop freely to avoid binding the
blade.
How to cut a frozen bolt with the angle grinder
1.
2.
Mount a cut-off disc onto your angle grinder (see page 15 for a short how-to),
and turn the tool on.
Move the disc through the bolt, flush to concrete. You can brush the cut-off
disc against the surface, but make sure to not cut into it, as that will break the
disc.
How to cut tile, stone or concrete with the angle grinder
1.
2.
3.
4.
Mount a diamond cut-off disc onto your angle grinder (see page 15 for a
short how-to), and turn the tool on.
Mark the outline of the cut accurately both on the front and back of the tile.
Clamp the tile onto your workbench, and score the outline by about 1/8in
deep on the front side of the tile.
Flip the tile over, and cut through it from the back. Extend the cuts slightly
past the lines at the corners to make them crisp and square.
How to sharpen blades with the angle grinder
1.
2.
Mount a grinding disc onto your angle grinder (see page 15 for a short
how-to).
Secure the blade with clamps, so it does not move during sharpening.
17

3.
4.
Orient the grinder, and adjust the blade guard to deflect sparks from your
face and body. Align the grinding disc with the angle on the blade.
Start the grinder and move the grinding disc steadily across the blade while
applying light pressure. Pushing the grinder too hard will overheat the metal,
changing its color and not letting it stay sharp for long.
How to grind mortar with the angle grinder
1.
2.
Mount a diamond cut-off disc onto your angle grinder (see page 15 for a short
how-to), and start the tool.
Make two or three 1/2in deep passes to completely clear the joint. Stay about
1/8in from the brick to avoid damaging it.
18
THE ABC’S OF NOCRY BATTERIES
Only original NoCry 20V lithium ion batteries can be used with your cordless
impact driver, using other branded batteries are incompatible and can lead to
injuries and pose a fire hazard.
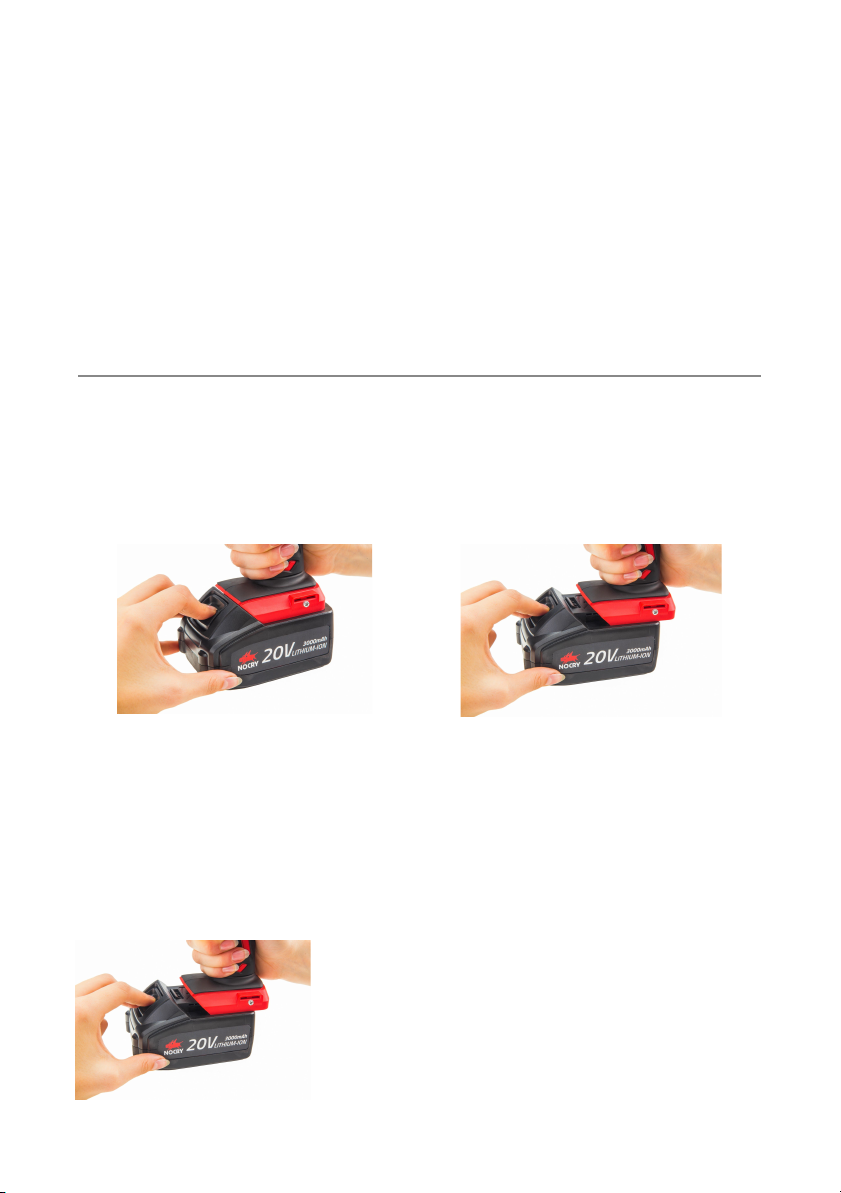
How to remove or insert a battery
Place the the driver on a flat surface, and check that the direction switch is in the
centre position.
To remove a battery…
1. Hold the grinder by the handle in
one hand, and press and hold the
unlock button with the other.
2. Gently slide the body of the tool
away from the base of the battery.
There’s no need to exert any
unnecessary force as you can damage
the battery power contacts.
To insert a battery…
1. Line the connectors of the battery up with the
base of the grinder's handle.
2. Slide the tool and the battery towards each other.
Ensure the contacts meet and make a ‘click’ noise.
3. Check the battery is securely attached to the
angle grinder before using again.
19
Table of contents
Popular Grinder manuals by other brands


Bosch
Bosch PWS 20-230 J Professional Original instructions

Parkside
Parkside PFBS 12 A1 Translation of the original instructions

Clarke
Clarke CAT133 Operating & maintenance instructions

Skil
Skil 9325 parts list

Worx Professional
Worx Professional WU820 Original instructions

Makita
Makita GB602 instruction manual


