NOESIS Florio F10 Pro User manual

User Manual

EN
FR
P03
P30

3
EN
User Manual
QQuuiicckk SSttaarrtt GGuuiiddee
WHAT’S IN THE BOX
*The illustrations in this manual are for reference only. The actual appearance may vary.
Robot Vacuum and Mop*1
(with a Cleaning Tool) 80 PCS Cleaning
Pads
Base Station*1 (with a
Dust Bag) Guide Plate*1
Power Cord*1
Mop Plate*1
Fragrance
Cube*1 2.5 floz (75ml)
Cleaning
Solution*1
User Manual1
Mop Tray*1
Quick Start
Guide1
Dust Bag1
4EN
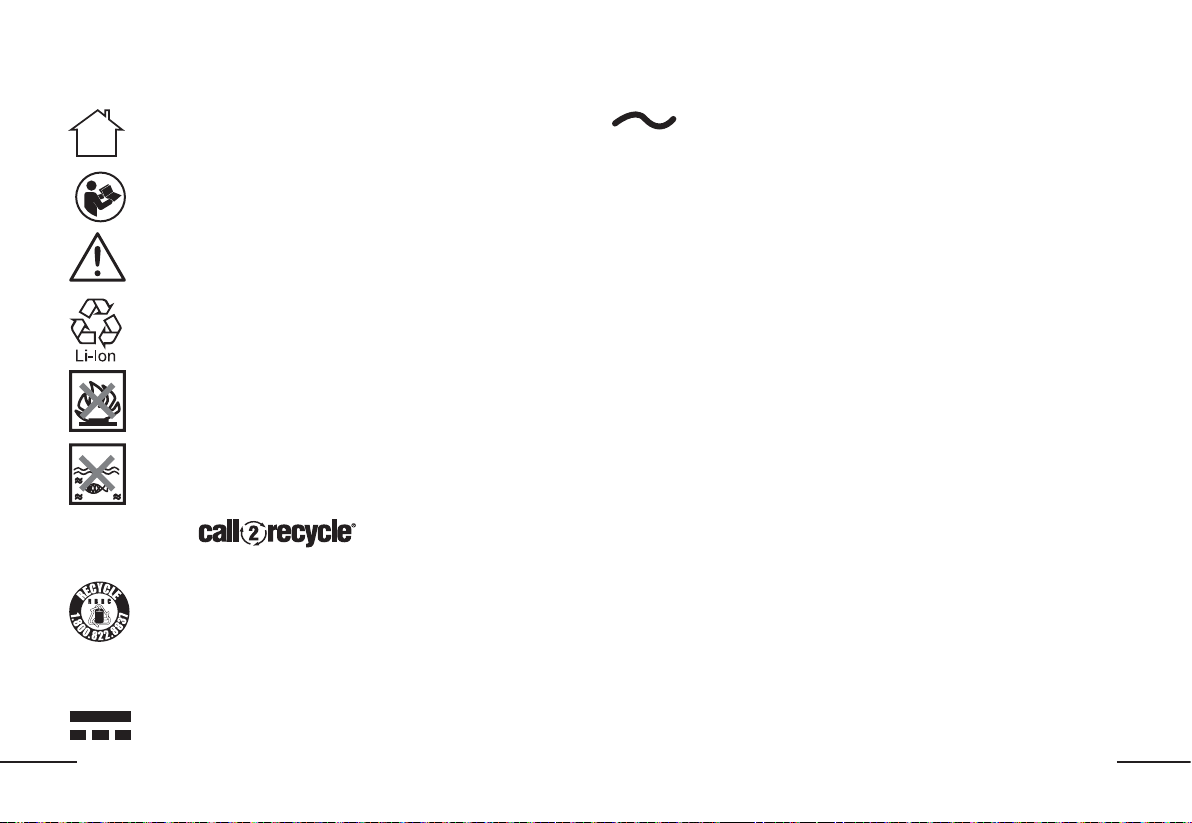
SYMBOLS
SYMBOLS
For indoor use only
To reduce the risk of injury, user must read instruction
manual
Caution
Li-Ion battery, battery must be recycled
Do not burn
Batteries may enter water cycle if disposed improperly,
which can be hazardous for ecosystem. Do not dispose
of waste batteries as unsorted municipal waste.
POSITEC Inc. has established a partnership with the
RBRC Corporation to recycle any Positec batteries
with the RBRC-call2recycle seal. For environmental
protection, please do not discard batteries in the trash.
After the batteries' life cycle is ended, then please call
1-800-822-8837 for a free service that will properly
dispose of the battery.
Direct current
Alternating current
5
EN
CONTENTS
CONTENTS
PRODUCT SAFETY
PRODUCT SAFETY
WARNING: This product can expose you to chemicals including lead
and Di(2-ethylhexyl)phthalate (DEHP) which are known to the State
of California to cause cancer and birth defects or other reproductive harm.
For more information go to www.P65Warnings.ca.gov.
For Household Use Only
WARNING - Risk of Electric Shock. Dry location use only.
WARNING - To reduce the risk of injury, user must read
instruction manual.
CAUTION - To Reduce The Risk Of Injury From Moving Parts -
Unplug Before Servicing.
CAUTION - To Reduce The Risk Of Injury From Moving Parts.
Keep the power off Before Servicing.
CAUTION: In order to avoid a hazard due to inadvertent resetting
of the thermal cut-out, this appliance must not be supplied
through an external switching device, such as a timer, or
connected to a circuit that is regularly switched on and off by
the utility.
ROBOT VACUUM AND MOP SAFETY
ROBOT VACUUM AND MOP SAFETY
WARNINGS
WARNINGS
IMPORTANT SAFETY
IMPORTANT SAFETY
INSTRUCTIONS
INSTRUCTIONS
When using an electrical appliance, basic precautions should always be
followed, including the following:
WHAT’S IN THE BOX P03
PRODUCT SAFETY P05
TECHNICAL SPECIFICATIONS P10
DETAILED PRODUCT COMPONENTS P11
GETTING TO KNOW YOUR NR200L P13
TIPS BEFORE CLEANING P14
BASE STATION PREPARATION P15
ROBOT PREPARATION P17
DOWNLOAD THE APP P18
START CLEANING P19
CLEANING MODES P20
MAINTENANCE P21
TROUBLESHOOTING P26

6EN
READ ALL INSTRUCTIONS
READ ALL INSTRUCTIONS
BEFORE USING THIS
BEFORE USING THIS
APPLIANCE
APPLIANCE
Failure to follow the warnings and instructions may result in electric shock,
fire and/or serious injury.
WARNING
WARNING – To reduce the risk of fire, electric shock, or
injury:
1. Do not leave appliance when plugged in. Unplug from outlet when
not in use and before servicing.
2. To Reduce The Risk Of Electric Shock – Do not use outdoors or on
wet surfaces.
3. Do not allow to be used as a toy. Close attention is necessary when
used by, or near, children and pets. Children should be supervised
to ensure that they do not play with the machine. Do not allow
children or pets to sit on the machine.
4. Use only as described in this manual. Use only manufacture’s
recommended attachments.
5. Do not use with damaged cord or plug. If appliance is not working
as it should, has been dropped, damaged, left outdoors, or
dropped into water, return it to a service center.
6. Do not pull or carry by cord, use cord as a handle, close a door
on cord, or pull cord around sharp edges or corners. Do not run
appliance over cord. Keep cord away from heated surfaces.
7. Do not unplug by pulling on cord. To unplug, grasp the adaptor, not
the cord.
8. Keep hair, loose clothing, fingers, and all parts of body away from
openings and moving parts.
9. Do not operate the machine in an area where there are open
fireplaces, lit candles or fragile objects on the floor to be cleaned
or where there are candles on candlesticks, tables, etc. that the
machine may accidentally hit or bump into.
10. Do not operate the machine in a room where an infant or child is
present and unattended.
11. Do not charge the unit outdoors.
12. Use only the charger supplied by the manufacturer to recharge.
13. Do not incinerate the appliance even if it is severely damaged. The
batteries can explode in a fire.
14. Do not put any object into openings. Do not use with any opening
blocked; keep free of dust, lint, hair, and anything that may reduce
air flow.
15. Do not handle charger, including charger plug, charger terminals
and appliance with wet hands.
16. Turn off all controls before unplugging.
17. Do not use to sweep flammable or combustible liquids, such as
gasoline, or use in areas where they may be present.
18. To Reduce the Risk of Fire, do not use a flammable or combustible
liquid to clean a floor.
19. The metal hooks on both sides above the rag box are sharp and
danger, do not touch them to avoid your hands being injured.
20. Do not pick up anything that is burning or smoking, such as
cigarettes, matches, or not ashes.
21. Do not use without dust bag and/or filters in place.
22. Make sure the cable is located so that it will not be stepped on,
tripped over, run over by the machine or otherwise subjected to
damage or stress.
23. CAUTION - Risk of Injury. Brush May Start Unexpectedly. Keep the
appliance be switched off Before Cleaning or Servicing.

7
EN
24. WARNING - To Reduce the Risk of Fire and Electric Shock due
to internal component damage, use only NOESIS cleaning fluid
intended for use with the appliance. See the Cleaning Fluid section
of this manual.
SAFETY WARNINGS FOR BATTERY PACK
SAFETY WARNINGS FOR BATTERY PACK
INSIDE THE TOOL
INSIDE THE TOOL
a) Do not dismantle, open or shred battery pack.
b) Do not expose battery pack to heat or fire. Avoid storage in direct sunlight.
c) Do not short-circuit a battery pack. Do not store battery packs
haphazardly in a box or drawer where they may short-circuit each other or
be short-circuited by other metal objects. When battery pack is not in use,
keep it away from other metal objects, like paper clips, coins, keys, nails,
screws or other small metal objects, that can make a connection from one
terminal to another. Shorting the battery terminals together may cause
burns or fire.
d) Do not subject battery pack to mechanical shock.
e) In the event of battery leaking, do not allow the liquid to come in contact
with the skin or eyes. If contact has been made, wash the affected area
with copious amounts of water and seek medical advice.
f) Do not use any battery pack which is not designed for use with the
equipment.
g) Keep battery pack out of the reach of children.
h) Always purchase the battery pack recommended by the device
manufacturer for the equipment.
i) Keep battery pack clean and dry.
j) Wipe the charging terminals with a clean dry cloth if they become dirty.
k) Battery pack need to be charged before use. Always use the correct
charger and refer to the manufacturer’s instructions or equipment
manual for proper charging instructions.
l) Do not leave battery pack on prolonged charge when not in use.
m) After extended periods of storage, it may be necessary to charge
and discharge the battery pack several times to obtain maximum
performance.
n) Recharge only with the charger specified by NOESIS. Do not use any
charger other than that specifically provided for use with the equipment.
o) Retain the original product literature for future reference.
p) Use only the battery pack in the application for which it was intended.
q) Dispose of properly.
r) Do not mix cells of different manufacture, capacity, size or type within a
device.
s) Keep the battery away from microwaves and high pressure.
t) If placing the robot into storage charge it fully and turn it off before
placing it in a cool dry place. Recharge it at least every three months to
prevent the battery over discharging.
User manual requirements for wireless
User manual requirements for wireless
product
product
a) This device complies with part 15 of the FCC Rules. Operation is subject to
the following two conditions:
(1) This device may not cause harmful interference, and
(2) This device must accept any interference received, including
interference that may cause undesired operation.
b) Caution: Changes or modifications to this unit not expressly approved by
the party responsible for compliance could void the user’s authority to
operate the equipment.
c) This device contains licence-exempt transmitter(s)/receiver(s) that comply
with Innovation, Science and Economic Development Canada’s licence-
exempt RSS(s). Operation is subject to the following two conditions:
(1) This device may not cause interference.
(2) This device must accept any interference, including interference that
may cause undesired operation of the device.
d) NOTE: This equipment has been tested and found to comply with the limits
for a Class B digital device, pursuant to part 15 of the FCC Rules. These
limits are designed to provide reasonable protection against harmful
interference in a residential installation. This equipment generates, uses
and can radiate radio frequency energy and, if not installed and used in
accordance with the instructions, may cause harmful interference to radio

8EN
communications. However, there is no guarantee that interference will
not occur in a particular installation. If this equipment does cause harmful
interference to radio or television reception, which can be determined by
turning the equipment off and on, the user is encouraged to try to correct
the interference by one or more of the following measures:
- Reorient or relocate the receiving antenna.
- Increase the separation between the equipment and receiver.
- Connect the equipment into an outlet on a circuit different from that to
which the receiver is connected.
- Consult the dealer or an experienced radio/TV technician for help.
Region Selection (for Wi-Fi 2.4G device)
Region Selection (for Wi-Fi 2.4G device)
Limited by local law regulations, version for North America does not have
region selection option.
SAVE THESE INSTRUCTIONS
SAVE THESE INSTRUCTIONS
SAFETY PRECAUTIONS WHEN USING THIS
SAFETY PRECAUTIONS WHEN USING THIS
PRODUCT
PRODUCT
CAUTION: Remain alert and follow the procedure below: Please read this
CAUTION: Remain alert and follow the procedure below: Please read this
manual carefully before using the product and keep it properly. The robot is
manual carefully before using the product and keep it properly. The robot is
not a toy. Supervise children and pets when the robot is cleaning DO NOT place
not a toy. Supervise children and pets when the robot is cleaning DO NOT place
anything on top of the unit. Take care when walking in work areas to avoid
anything on top of the unit. Take care when walking in work areas to avoid
stepping on or tripping over the unit as it moves on its own. DO NOT operate
stepping on or tripping over the unit as it moves on its own. DO NOT operate
unit on floors with exposed electrical outlets. DO NOT immerse robot in water
unit on floors with exposed electrical outlets. DO NOT immerse robot in water
or other liquids.
or other liquids.
1. Problems that may arise when the mopping robot sweeps the floor should
be solved as soon as possible. Please clean up power cords and small
objects on the floor so they will not block the path when mopping. Fold the
fringe underneath the carpet, and keep hanging curtains and tablecloths
away from the floor.
2. In an environment that has stairs or drop-offs, please test the product
first to check if it can detect ledges. Consider blocking off stairs or edges
of drop-offs with a protective fence to prevent the product from falling. It
should be ensured that the protective device will not cause personal injury
such as by tripping.
3. Please use the product by following the instructions in the manual. Only
use accessories recommended or sold by the manufacturer.
4. Ensure that the supply voltage matches the voltage rating shown on the
charging stand.
5. If the power cord is damaged, it must be replaced by the manufacturer, its
service agent or similarly qualified persons in order to avoid a hazard.
6. Please turn off the product before cleaning and maintaining the product.
7. Always pull the plug from the power socket before cleaning and
maintaining the product.
8. Before discarding the product, please remove it from the charging stand,
turn off the power switch.
9. If the product will not be used for a long time, please disconnect the
product from the power supply.
10. The product must be discarded in accordance with local laws and
regulations.
11. The used battery must be discarded in accordance with local laws and
regulations.
12. This appliance is not intended for use by persons (including children) with
reduced physical, sensory or mental capabilities, or lack of experience
and knowledge, unless they have been given supervision or instruction
concerning use of the appliance by a person responsible for their safety.
13. Use the product only in an indoor home environment. Do not use the
product in outdoor, commercial, or industrial places.
14. Do not use the product with a damaged power cord or power socket. Do
not continue to use the product when the product cannot work properly
due to falling, damage, outdoor use or water ingress. The product should
be repaired by the manufacturer or its after-sales service in order to avoid
accidental injury.
15. Please use the product by following the instructions in the manual. Our
company is not responsible for any loss and damage caused by improper
use.
WARNING
WARNING

9
EN
16. Only use the original charging stand provided by the manufacturer. Users
shall not replace the battery by themselves. If the battery is suspected
to be damaged, please contact the manufacturer, authorized dealer or
similarly qualified persons to replace it.
17. The product should not be used in an environment with open flames or
fragile objects.
18. The product should not be used in an overly hot (above 400C) or overly cold
(below 00C) environment.
19. Do not allow hair, clothes, fingers, or any other parts of human body to be
close to the opening and operating parts of the product.
20. The product should not be used on wet or watery ground.
21. The product should not mop any flammable materials such as gasoline
or toner powder for printers and photocopiers. The product should not be
used for cleaning areas with flammable materials.
22. The product should not vacuum any burning items, such as cigarettes,
matches, ashes and other items that may cause a fire.
23. Use the power cord carefully to avoid damage. It is forbidden to use the
power cord to drag or lift the product and its charging stand. It is forbidden
to use the power cord as a handle. It is forbidden to run the power cord
through a door gap. It is forbidden to pull the power cord around a sharp
corner or edge. Do not operate the product over a power cord. Keep the
power cord away from heat sources.
24. It is forbidden to use the damaged charging stand. If the charging stand is
damaged, it must be repaired or replaced by the manufacturer, authorized
dealer or similarly qualified persons in order to avoid a hazard.
25. It is prohibited to burn the product even if it is severely damaged. The
product battery may cause an explosion.
INSTRUCTIONS FOR DISCARDING
INSTRUCTIONS FOR DISCARDING
BATTERY
BATTERY
If you want to discard the battery contained in this machine, please do not
discard it along with household garbage. Instead, hand it over to the nearest
used battery recycling station or after-sales service center for centralized
disposal.
The following instructions are not for general users, but are to be used as the
disposal instructions for the final battery disposer.
The chemical substances contained in the batteries of this machine will pollute
the environment if handled improperly. Before discarding the robot, please be
sure to take out the battery from the robot body in advance. The battery should
be handed over to a special battery collection point for centralized disposal.
Be careful! Leakage of the battery can cause human injury!
If the battery leaks, do not allow the leakage to come into contact with eyes or
skin. In case of accidental contact, please thoroughly wash your hands and eyes
with clean water immediately. If you still feel uncomfortable, consult a doctor
immediately.

10 EN
TECHNICAL SPECIFICATIONS
TECHNICAL SPECIFICATIONS
Robot Vacuum and Mop
Model NR200L
Dimension 332 x 312 x 97mm (13.1 x 12.3 x 3.8in)
Weight 4kg (8.8lbs)
Battery capacity Li Battery 5200mAh
Rated voltage 14.8V
Frequency bands for WIFI 2412-2462 MHz
Maximum Output Power for WIFI 30 dBm
Base Station
Model NA0004
Dimension 332 x 392 x 470mm (13.1 x 15.4 x 18.5in)
Weight
12.5kg (27.6lbs) (with full water), 10.5kg (23.1lbs) (with no water)
Adaptor input 120V~60Hz 0.8A
Rated input 20V
Rated output 20V 2.5A
Rated current 8.6A
* Actual product may vary due to the continuous product enhancement. Our company reserves the right to make improvement to the product at any time.For
household use only.
FOR BATTERY TOOLS
FOR BATTERY TOOLS
The ambient temperature range for the use and storage of tool and battery is 0 đ-45 đ(32 ē-113 ē).
The recommended ambient temperature range for the charging system during charging is 4 đ-40 đ(39 ē-104 ē).
DETAILS REGARDING SAFE DISPOSAL OF USED BATTERIES
DETAILS REGARDING SAFE DISPOSAL OF USED BATTERIES
Do not throw batteries away or throw them in the normal trash can. Also do not dispose of the battery with the machine. Remove the used battery from the
machine and dispose of the used battery at the nearest or convenient dedicated recycling point.
CUSTOMER SERVICE
CUSTOMER SERVICE
Any questions or concerns please contact our customer service team at our toll-free number: 855-813-8377
11
EN
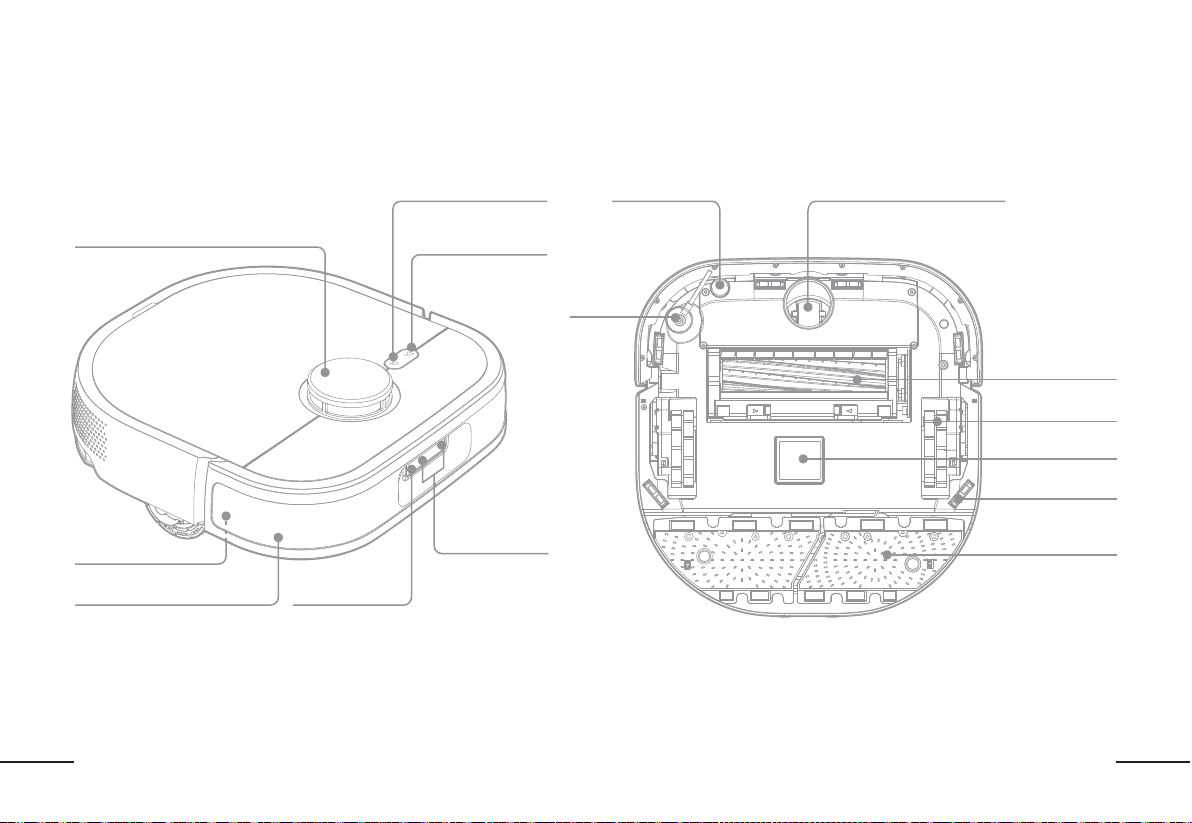
DETAILED PRODUCT COMPONENTS
DETAILED PRODUCT COMPONENTS
TOP VIEW
TOP VIEW
BOTTOM VIEW
BOTTOM VIEW
Laser Distance Sensor (LDS) Start/Pause Button
Home Button Caster Wheel
Drive Wheels
Bumper
Binocular Vision Obstacle
Avoidance Sensor
Brush Roll
Auto Dust Collection Port
Side Brush
Omnidirectional Sensors
AI Camera
Carpet Sensor
Cliff Sensor
Mop Plate

12 EN
DETAILED PRODUCT COMPONENTS
DETAILED PRODUCT COMPONENTS
INSIDE VIEW
INSIDE VIEW
FRONT VIEW
FRONT VIEW
Water Outlet
Fragrance Cube
Cleaning Tool
Front Cover
Dust Bag
Guide Plate
Top Cover
ON/OFF Button
Dust Bin
Water Inlet
Charging Contacts
Reset Button
New Mop Pad Box
Used Mop Pad Box
Water Tank

13
EN
GETTING TO KNOW YOUR NR200L
GETTING TO KNOW YOUR NR200L
START/PAUSE
BUTTON HOME BUTTON START BUTTON HOME BUTTONINDICATOR
OPERATION PANEL FOR ROBOT OPERATION PANEL FOR BASE STATION
RESET BUTTON
Button Operation and function
Short press: Start/pause cleaning
Long press for 2 seconds: Start spot cleaning mode
Short press when robot is cleaning: pause the robot
Short press when robot is paused/in standby: send robot
home to charge
Long press for 2 seconds: replace the mop pad
Short press: Wi-Fi Configuration
Long press for 5 seconds: Restore factory settings
Button / Indicator Operation and function
Short press: Change the cleaning mode
NOTE: You can also change the cleaning mode in the
app
Indicates current status
Short press: Start/pause cleaning
Short press: Robot leaves the base station (if robot is in
the base station)
Robot returns to the base station for recharging (if
robot is not in the base station)
Long press for 3 seconds: Turn on/off the child lock
MODE CHANGE
BUTTON

14 EN
Open doors for an accurate floorplan map
Open doors for an accurate floorplan map
In order to better help the robot explore the entire
space and build a home map, please open the
door of each room before using it for the first
time.
Create Virtual Boundaries
Create Virtual Boundaries
After mapping your floor plan, create virtual
"no-go" areas via the NOESIS app to limit areas/
rooms that you do not want the robot to clean and
ensure that the robot runs smoothly.
TIPS BEFORE CLEANING
TIPS BEFORE CLEANING
Organize the space to be cleaned
Organize the space to be cleaned
Before using the robot, pick up any items or low
objects (like a weight scale) to maximize the
space for cleaning.
Prevent the robot from falling
Prevent the robot from falling
The robot is equipped with cliff sensors to prevent
falling, but for extra security, place a protective
fence or set areas with drop-off’s as a “no-go”
area in the app.
Cover objects with strong reflective surfaces
Cover objects with strong reflective surfaces
Ensure that there is no object with a strong
reflective surface (ex: mirror) within 3.5
inches/10cm on the ground as it will confuse the
robot navigation lasers.

15
EN
BASE STATION PREPARATION
BASE STATION PREPARATION
1. Remove the packaging tapes
1. Remove the packaging tapes
Remove all tape from the front cover and mop pad
boxes in the base station.
2. Insert power cord into the base station
2. Insert power cord into the base station
3. Install guide plate
3. Install guide plate
Take out the power cord and then insert it into the
base station (please insert the power cord firmly).
Align the buckles of guide plate with the slots in
front of the base station and snap to install as
shown.
4. Place
4. Place
and power on
and power on
the base station
the base station
Place the base station against the wall and connect
the power.
Please ensure enough space on each side of the
base station as shown below.
1
50cm
70cm
70cm
5. Install mop tray
5. Install mop tray
Push the mop tray into the back of the base station.
Follow the directional arrow on the tray.
NOTE: The robot will provide a voice alert letting you
know if installation was successful.
*The base station will be reset when it is powered on. Please do not place the robot in the base station at this time.
6. Install the fragrance cube
6. Install the fragrance cube
Remove the fragrance cube from the packaging
and place it into the base station.

16 EN
3) Remove the new mop pads from their packaging.
4) Turn the mop pads with the granular textured
side down (Please notice the instruction label on
mop pads).
5) Align the mop pad holes with the positioning
posts in the new mop pad box, insert mop pads and
remove the support rods.
7. Insert new mop pads
7. Insert new mop pads
BASE STATION PREPARATION
BASE STATION PREPARATION
6) Place the new mop pad box back into base
station and close the front cover.
1) Slide up the front cover of the base station
2) Pull out the new mop pad box
8. Fill water
8. Fill water
Open the top cover of base station and take out
the water tank.
Unscrew the lid and fill with water.
NOTE: To add cleaning solution, add 2.5 floz
(75ml) of solution to the clean water tank.
*It is recommended to use only the NOESIS cleaning
solution with the robot.
Screw the lid and put the water tank back into
base station.
1
21
2
2
1
support rod

17
EN
ROBOT PREPARATION
ROBOT PREPARATION
1.
1.
Remove protective packaging from the
Remove protective packaging from the
robot
robot
Remove the protective strips on either side of the
robot.
2.
2.
Turn on the robot
Turn on the robot
Open the cover of the robot. Push the ON/OFF
button to the right to turn on the robot.
3.
3.
Install mop plate
Install mop plate
Install the mop plate onto the robot as shown.
NOTE: The robot will provide a voice alert if the
installation is successful.
4.
4.
Charge the robot
Charge the robot
Gently push the robot into the base station to charge.
NOTE: The robot will provide a voice alert when charging
has started. The side with camera should be facing outside.

18 EN
DOWNLOAD THE APP
DOWNLOAD THE APP
For best experience, download the NOESIS app
to customize your cleaning, set a schedule and
access even more features.
Scan the QR code below or visit your mobile
application store to download the
"NOESIS HOME" app

19
EN
START CLEANING
START CLEANING
1. Start Cleaning
1. Start Cleaning
Short press " " on the base station, or
Short press " " on the robot, or
Short press " " in APP,
and the robot will start cleaning. (In order to have a
better cleaning experience, it is recommended to
use the vacuuming mode for the first use.)
2. Map and Planned Cleaning
2. Map and Planned Cleaning
During the first cleaning, the robot will be building
a map of your home.
NOTE: You can access your map in the app.
3. Automatically replace the mop pad
3. Automatically replace the mop pad
If mopping, the robot will start the automatic mop
pad replacement function when it completes
the default mopping area (the default area is 269
ft
2
/25 m
2
) or the current cleaning task.
NOTE: You can customize the mop pad replacement
by area or by room cleaned through the app.
4. Automatically add water
4. Automatically add water
When the water is low in the on-board water
tank, the robot will automatically return to the
base station to refill from the water tank.
5. Auto-Empty
5. Auto-Empty
After vacuuming, the robot will return to the
base station and automatically empty itself
into the sealed bag found at the top of the base
station.
6. Cleaning task completed
6. Cleaning task completed
When cleaning has completed, the robot will return
to the base station to recharge. Before recharging,
it will empty the dust bin, refill the water tank and
replace the dirty mop pad.
NOTE: the robot will automatically return to the base
station to recharge if the power is less than 15%. Once
it is fully recharged, it will return to finish cleaning.

20 EN
CLEANING
CLEANING
MODES
MODES
1. Changing the Cleaning Mode
1. Changing the Cleaning Mode
Short press “ ” on the base station once to
select the cleaning mode, or select the cleaning
mode in the APP.
The START BUTTON on the base station and
the light ring of the indicator will flash in white.
It will revert to the previous cleaning mode
if there is no confirmation action within 10
seconds.
Short press “ ” on the base station once or
confirm the pop-up information in the APP to
select the cleaning mode.
2. Mop Pad Replacement
2. Mop Pad Replacement
To change the mop pad in the middle of a cleaning
task, long press “ ” on the robot, or
short press “ ” in the APP.
NOTE: After replacing the mop pad, the robot will
continue any unfinished cleaning task.
3. Spot Cleaning
3. Spot Cleaning
To spot clean a certain area, manually place the
robot in the area to be cleaned and long press “
” on the robot for 2 seconds, or
select a specific area on your map with the "
" in the APP.
NOTE: the spot cleaning area is a rectangular space of
5.2ft x 5.2ft (1.6m*1.6m) with the robot as the center point.
4. Start the auto dust colleaction task
4. Start the auto dust colleaction task
Short press the DUST COLLECTION BUTTON “
” in the APP.
Other manuals for Florio F10 Pro
1
This manual suits for next models
1
Table of contents
Languages:
Other NOESIS Vacuum Cleaner manuals


