NoiseKen ISS-7630 User manual
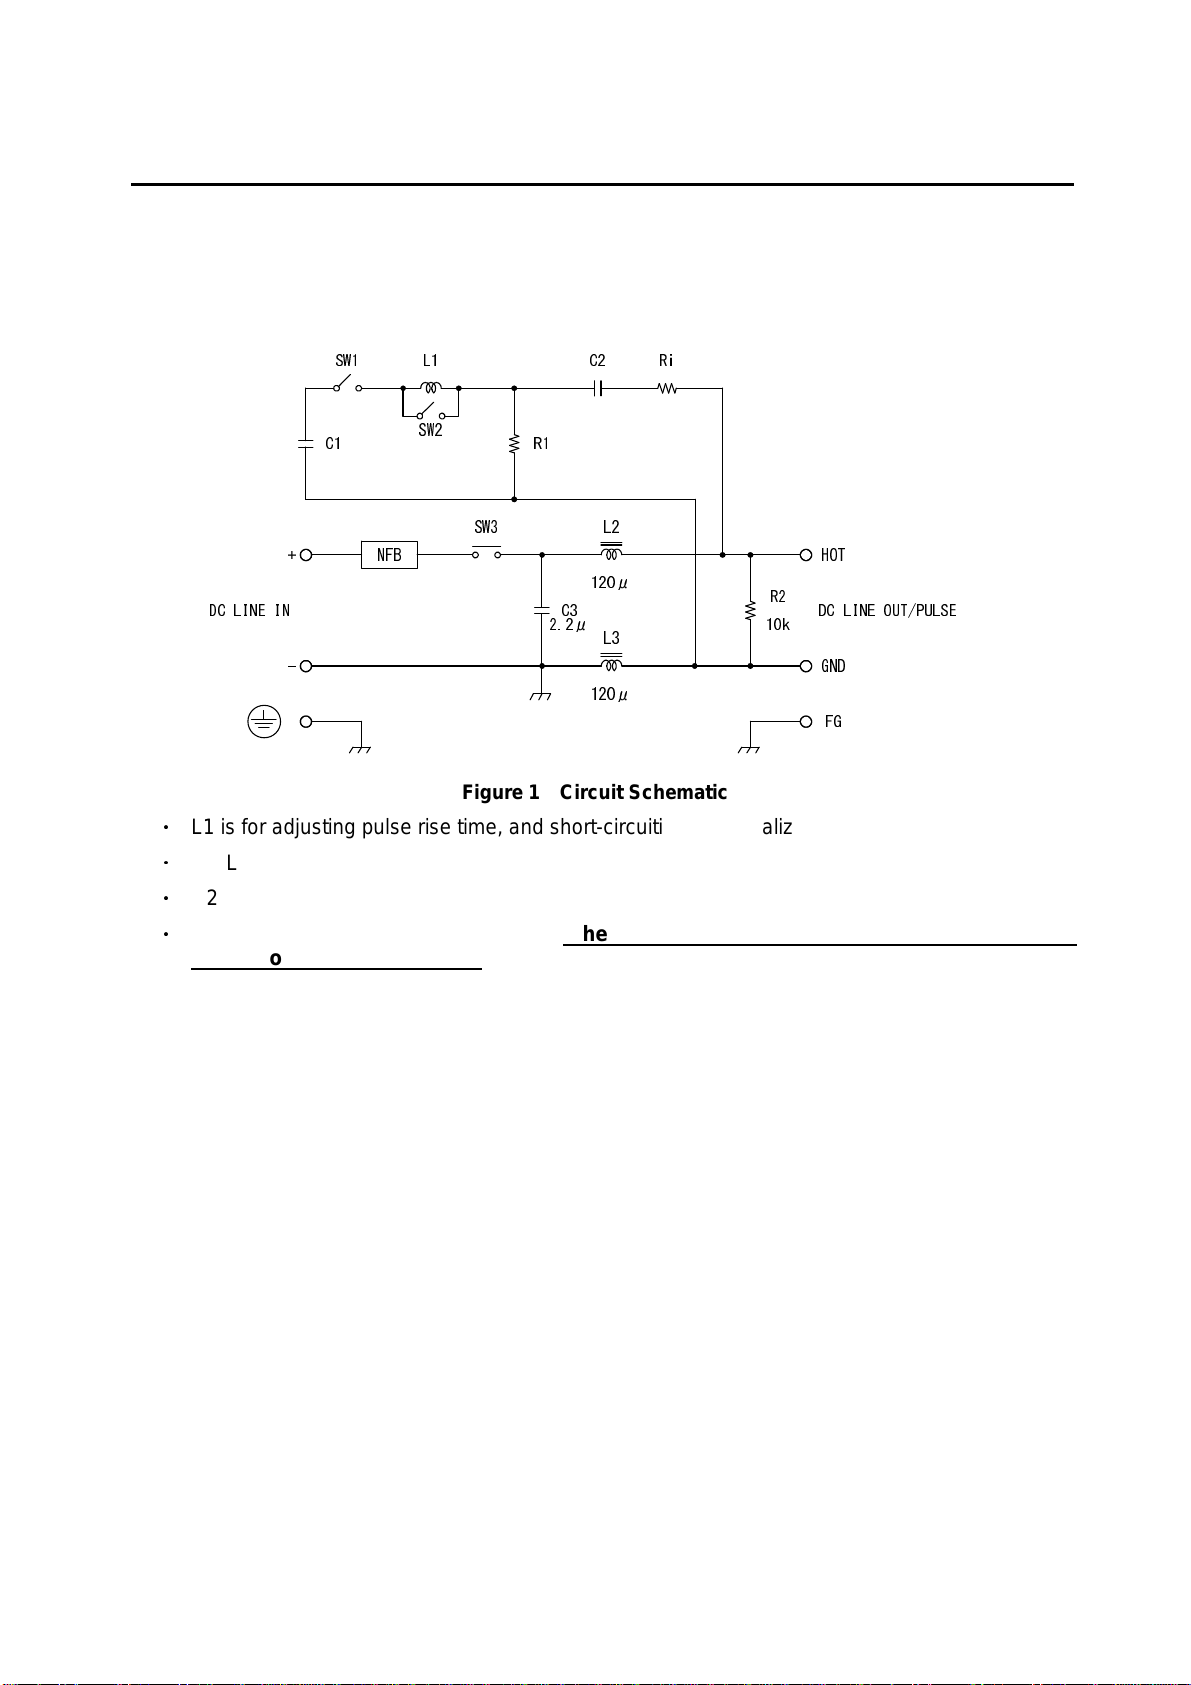
INSTRUCTIONMANUAL
AUTOMOTIVE TRANSIENT
SIMULATOR
MODEL
ISS-7630
Noise Laboratory Co., Ltd.
2.00 Edition
AEJ00369-00E-1-F

NOTICE
•
The contents of this instruction manual (the “Manual”) are subject to change
without prior notice.
•
No part of the Manual may be reproduced or distributed, in any form or by any
means, without the authorization of Noise Laboratory Co., Ltd. (the
“Company”).
•
The contents of the Manual have been thoroughly examined. However, if you
find any problems, misprints, or missing information, please feel free to contact
our sales agent who you purchased our product from.
•
The Company assumes no responsibility for any loss or damage resulting from
improper usage, failure to follow the Manual, or any repair or modifications of
this product undertaken by a third party other than the Company or the agent
authorized by the Company.
•
The Company assumes no responsibility for any loss or damage resulting from
remodeling or conversion solely undertaken by the user.
•
Please note that the Company cannot be held responsible for any
consequences arising from the use of this product.
•
Product names and business names referred to in the Manual are generally
trademarks or registered trademarks of third parties. Those trademarks have
nothing to do with the Company. ® and TM are not always referred to in this
manual.

- -1
1. IMPORTANT SAFETY PRECAUTIONS
The following instructions are very important for safe handling of ISS-7650 (the “Unit”).
Read them carefully before use.
1. Do not use the Unit near flammable materials or fire sources. When used,
there is a risk of fire due to pulses, etc
2. Any person with medical electronics such as a heart pacemaker is not to
operate the Unit. And, do not enter the test area while the Unit is operating.
3. To avoid electric shock, be sure that the power of the Unit, the power source,
and the device under test ("DUT") are all turned OFF, and make sure there is
no residual voltage before making any connections.
4. A number of safety recommendations are listed in the later chapter "BASIC
SAFETY PRECAUTIONS". Be sure to read them before test environment
settings, connecting and testing.
5. Do not touch AC power voltage switch terminals or external output terminals.
There is a risk of electric shock.

- -2
Memorandum

- -3
2. APPLICATION FORM FOR INSTRUCTION MANUAL
We place an order for an instruction manual.
Model: ISS-7630
Serial No.:
Applicant:
Company name:
Address:
Department:
Person in charge:
Tel No.:
Fax No.
Cut off this page “APPLICATION FORM FOR INSTRUCTION
MANUAL” from this volume and keep it for future use with care.
When an INSTRUCTION MANUAL is required, fill in the above Application Form and
mail or fax it to the following sales department of our company.
To: Noise Laboratory Co., Ltd.
1-4-4 Chiyoda Chuo-ku Sagamihara City,
Kanagawa Pref., 252-0237 Japan
Tel: +81-(0)42-712-2051 Fax: +81-(0)42-712-2050
Cut
line

- -4
Memorandum

- -5
3. CONTENTS
1. IMPORTANT SAFETY PRECAUTIONS................................................................................1
2. APPLICATION FORM FOR INSTRUCTION MANUAL........................................................3
3. CONTENTS............................................................................................................................5
4. PREFACE...............................................................................................................................6
5. BASIC SAFETY PRECAUTIONS..........................................................................................7
5-1.
S
YMBOLS OF
H
AZARD
.....................................................................................................7
5-2.
B
ASIC
S
AFETY
P
RECAUTIONS
.........................................................................................7
5-3.
L
OSS OF
W
ARNING
L
ABEL
............................................................................................9
6. MAIN FEATURES................................................................................................................10
6-1.
D
ISTINCTIVE
F
EATURES
................................................................................................10
6-2.
S
CHEMATIC
C
IRCUIT
D
IAGRAM OF THE
U
NIT
..................................................................11
6-3.
R
EGARDING
ISO7637-2
(S
ECOND EDITION
2004-06-15) ..............................................12
7. PART NAMES AND FUNCTIONS.......................................................................................15
8. TEST PROCEDURE.............................................................................................................23
8-1.
P
RE
-O
PERATION
C
HECK
..............................................................................................23
8-2.
V
ARIOUS
S
ETTINGS
......................................................................................................24
8-3.
S
TARTING AND
F
INISHING
T
EST
....................................................................................25
9. REMOTE CONTROLLING BY PC.......................................................................................26
9-1.
P
REPARATION
..............................................................................................................26
9-2.
H
ARDWARE
S
ETUP
.......................................................................................................26
9-3.
I
NSTALLING
S
ERIAL
P
ORT
D
RIVER
.........
エラー
エラーエラー
エラー
!
ブックマークが定義されていません。
ブックマークが定義されていません。ブックマークが定義されていません。
ブックマークが定義されていません。
9-4.
I
NSTALLING
R
EMOTE
C
ONTROL
S
OFTWARE
...
エラー
エラーエラー
エラー
!
ブックマークが定義されていませ
ブックマークが定義されていませブックマークが定義されていませ
ブックマークが定義されていませ
ん。
ん。ん。
ん。
9-5.
U
SING THE
R
EMOTE
C
ONTROL
S
OFTWARE
エラー
エラーエラー
エラー
!
ブックマークが定義されていません。
ブックマークが定義されていません。ブックマークが定義されていません。
ブックマークが定義されていません。
9-6.
T
URNING
R
EMOTE
C
ONTROL
S
OFTWARE AND THE
U
NIT
OFF.
エラー
エラーエラー
エラー
!
ブックマークが定
ブックマークが定ブックマークが定
ブックマークが定
義されていません。
義されていません。義されていません。
義されていません。
10. SPECIFICATIONS..............................................................................................................28
11. WAVEFORM VERIFICATION............................................................................................31
12. ACCESSORIES..................................................................................................................33
13. OPTIONS............................................................................................................................34
14. WARRANTY.......................................................................................................................35
15. MAINTENANCE.................................................................................................................37
16. NOISE LABORATORY SUPPORT NETWORK
エラー
!
ブックマークが定義されていませ
ん。

- -6
4. PREFACE
ThankyouverymuchforpurchasingISS-7630(the"Unit").Pleasereadthisinstructionmanual
(the"Manual")thoroughlypriortouseoftheUnitinordertoattainthemaximumandsafeuseof
theUnit.
RemoteControlSoftwaretocontroltheUnitbyaPCisalsoattached.
When you control the
Unit through the software, please read the instruction manual of Remote Control
Software thoroughly in addition to the Manual to ensure safety and correct
procedures.
The Manual will let you operate ISS-7630 safely and make the most use of it if
you strictly follow the operational procedures and the safety instructions.
Keep the Manual handy whenever you operate ISS-7630.

- -
7
5. BASIC SAFETY PRECAUTIONS
5-1. Symbols of Hazard
This sign indicates the presence of "dangerous voltage/current" that may
endanger persons.
This sign indicates "handle with care".
Refer to the Manual to protect human bodies and devices.
This sign indicates a protective ground terminal.
This sign indicates a connection to FG (steel case).
5-2. Basic Safety Precautions
1. The Unit is grounded by the three line AC cord with a grounding conductor.
Never fail to insert the AC cord to an outlet with an earth terminal to avoid an
electric shock.
【
【【
【
Precautions regarding connection and use
】
】】
】
2. Use the AC cord which matches the source voltage, as the shape of the AC
cord differs depending on the source voltage.
【
【【
【
Precautions regarding connection and use
】
】】
】
3. When changing fuses, choose the same melt off type and rating. Also, be sure
to unplug the AC chord before changing fuses.
【
【【
【
Precautions regarding use and safety
】
】】
】
4. Do not supply the Unit with voltage or overload beyond the specification
range. The Unit may be damaged if this is not obeyed.
【
【【
【
Precautions regarding connection and use
】
】】
】
5. Use the input and output cables which meet the current and power capacity
requirements.
【
【【
【
Precautions regarding connection and use
】
】】
】
Indication of Warning
The following warning indication
is placed on the upper left of the
rear-panel of the Unit, and alerts
a risk of electric shock.
.

- -
8
6. Before connecting the Unit, turn OFF the DC power source and the Unit, and
make sure that there is no residual voltage. Connect each cable securely.
Nonobservance may cause electric shock or damage to the internal parts of
the Unit and connected devices.
【
【【
【
Precautions regarding bodily injury and connection
】
】】
】
7. When a protective cover, etc. of the Unit is removed for connection to the Unit,
be sure to place the protective cover before supplying electricity. There is a
risk of short-circuiting or electric shock.
【
【【
【
Precautions regarding connection and use
】
】】
】
8. Use accessories and optional items supplied by the Company to ensure safe
operation.
【
【【
【
Precautions regarding connection and use
】
】】
】
9. Do not open the Unit's cover, as voltages are generated within the Unit's
enclosure,
【
【【
【
Precautions regarding bodily injury
】
】】
】
10. Do not block any ventilation openings of the Unit.
【
【【
【
Precautions regarding environment
】
】】
】
11. Do not utilize or store the Unit under extremely high or low temperature
environment (Operating environment: 23°C
±
±±
±
5°C / Operating Humidity Range:
25~75%).
【
【【
【
Precautions regarding environment
】
】】
】
12. Do not use the Unit under high humidity or dusty conditions.
【
【【
【
Precautions regarding environment
】
】】
】
13. Should condensation form, fully dry the Unit before usage.
【
【【
【
Precautions regarding environment
】
】】
】
14. Do not wipe the body of the Unit with solvents such as lacquer thinner or
alcohol. When the Unit gets dirty, wipe it with a detergent moistened fabric
etc.
【
【【
【
Precautions regarding use
】
】】
】
15. Do not use the Unit near flammable materials or fire sources. When used,
there is a risk of fire due to discharge, etc.
【
【【
【
Precautions regarding bodily injury and environment
】
】】
】
16. The Company and its sales agent assume no responsibility for any bodily
injury, loss, damage or resultant damage arising from derelict misuse of the
Unit on the part of the user.
【
【【
【
Precautions regarding bodily injury, use, environment, and connection
】
】】
】
17. Should the necessity of services such as repair, maintenance, or internal
calibration arise, leave them to qualified service personnel only.
【
【【
【
Precautions regarding use and safety
】
】】
】

- -
9
5-3. Loss of Warning Label
1. If the warning label is peeled off and missing or it gets dirty, replace it with a new one
for safety.
2. If the warning label is lost, order a new one from our sales agent or the technical
service center of the Company.

- -10
6. MAIN FEATURES
6-1. Distinctive Features
Capable of performing tests of Test Pulse 3a/3b in accordance with ISO/DIS 7637-2.2
(2002-07-16), ISO/DIS 7637-2.3 (2003-05-20),ISO7637-2 (Second edition 2004-06-15), and
ISO 7637-2(Third edition 2011-03-11).
Capable of performing Coupling Clamp Tests (Optional)
Capable of detailed configuration of output waveform voltage/time.
・
Test Pulse 3a output voltage Us is variable from -10V to -350V in steps of -1V.
・
Test Pulse 3b output voltage Us is variable from 10V to 350V in steps of t 1V.
・
Pulse cycle t1 is variable from 10
µ
s to 999
µ
s in 1
µ
s steps (10
µ
s to 1000
µ
s when controlled
by Remote Control Software)
・
Burst interval (t4) is variable from 1ms to 100ms in steps of 1ms.
・
Burst rest interval (t5) is variable from 9ms to 999ms in steps of 1ms.
Capable of tests with rise time tr < 3.5ns, which is harsher than the Standards.
Ensures the standard waveform (Annex D) for both with no load and with 50
Ω
load by DC
LINE OUT/PULSE.
An optional measuring device is available to allow easy verification (pre-start checkup) of the
standard waveform (Annex D).
The maximum DUT
(
Device Under Test
)
capacity is 60V 30A.
Output terminals are the electric-shock free safety plugs which protect against electric shock.
Compatible with AC Input driving voltage of 100V, 110V, 120V, 200V, 220V, and 240V by a
jumper switch on the rear panel.
Capable of creating test conditions not limited to the Standards by utilizing optional Remote
Control Software. Also capable of running user defined sequential tests (sequence) combining
various test settings.
Capable of noise unsusceptible stable transmissions by using an optional Optical Interface
Unit and Remote Control Software for the purpose of communication between the Unit and the
PC (when used standalone without mounting to a rack).
An optional ISS-7690 is capable of integrated pulse output when the Unit is installed onto
System Rack ISS-7602 (Optional). The optional 50A type ISS-7690 can expand DUT capacity
to 60V max, 50A max.

- -11
6-2. Schematic Circuit Diagram of the Unit
The schematic circuit diagram of the Unit’s pulse generation is shown in Figure 1. The basic action
is that when the SW1 is closed ON, the electric charge stored in capacitor C1 will flow through L1,
C2, the internal resistor Ri, and the DUT connected between the HOT-GND Output Terminals, and
then return to capacitor C1.
NFB
DC LINE IN DC LINE OUT/PULSE
FG
+
-
HOT
GND
C1 R1
L1 C2 Ri
SW3
SW1
SW2
L2
L3
C3 R2
10k
120μ
2.2μ
120μ
Figure 1
Circuit Schematic
・
L1 is for adjusting pulse rise time, and short-circuiting SW2 realizes tr < 3.5ns.
・
L2, L3, and C3 direct the pulse injection to LINE OUT (PULSE) only and not to LINE IN.
・
C2 is the coupling capacitor for injection onto LINE.
・
DC ON/OFF Switch controls the SW3. When SW3 is ON, DC voltage input into LINE IN is
output to LINE OUT (PULSE).

- -12
6-3. Regarding ISO7637-2 (Second edition 2004-06-15)
ISO7637-2 (Second edition 2004-06-15) specifies the standards relevant to the transient pulse
simulator for in-vehicle devices. This specifies the configurations of the test, the pulse voltage
waveforms, the testing voltage level and testing environment, etc. The Unit is capable of performing
tests in accordance with this standard. The schematic test setup is excerpted from the standard and
shown below. For details, be sure to refer to the ISO Standards.
a)Pulse adjustment
8
1
2
3
65
74
Figure 2
Test Cofigulation (During Pulse Verification)
When verifying the Unit waveform, do not connect DUT and leave the output open. Turn DC LINE ON
(Circuit Breaker also ON), and be sure to short the + and – terminals of DC INPUT with the accessory
Shortlead Cable (for Waveform Verification). The resistor 7 and diode 8 in Figure 2 should not be
connected under the Pulse 3a and Pulse 3b testing environment.
In the text of the standard, Use of the voltage probe is specified for verifying pulse, but Annex D
expressly specifies that coaxial measuring device shall be used for the purpose of verification of
Pulse 3a and Pulse3b. Also, the reasons for this are given in the same text.
For non-load measurement of Pulse 3a and Pulse 3b in accordance with Annex D, coaxial type
measuring devices developed by the Company are used. By employing this measuring device, the
ringing and probe cable interference that used to be generated by conventional voltage probes is
highly improved, and clean waveforms (see Figure 3) can be observed.
This measuring device is available as an optional item.
Figure 3 No Load Waveform

- -13
Pulse 3a Waveform Standard (ISO7637-2 (Second edition 2004-06-15))
0V
U
A
t1
t4 t5
Us
0.1Us
0.9Us
Us
tr
td
Figure 4
Pulse 3a Waveform
Table 1
Pulse 3a Parameters
Parameter
12V
System
24V
System
Output
Open
Us
-
112V~
-
150V
-
150V~
-
200V
Ri 50
Ω
T
d
0.1
µ
s
–
0/+0.1
µ
s
Tr 5ns
±
1.5ns
t1
100
µ
s
t4
10ms
t5
90ms
Annex D
(No load)
Us -200V
±
20V
Tr 5ns
±
1.5ns
Td 150ns
±
45ns
Annex D
(50
Ω
load)
Us -100V
±
20V
Tr 5ns
±
1.5ns
Td 150ns
±
45ns
Annex D Requirements
・
12V/24V System (UA = 0V,
Coaxial Measuring Device)

- -14
Pulse 3b Waveform Standard (ISO7637-2 (Second edition 2004-06-15))
0V
U
A
Us
t1
t4 t5
Us
tr
td
0.9Us
0.1Us
Figure 5
Pulse 3b Waveform
Table 2
Pulse 3b Parameters
Parameter
12V
System
24V
System
Output
Open
Us
+75V
~
+100V
+150V
~
+200V
Ri 50
Ω
T
d
0.1
µ
s
–
0/+0.1
µ
s
Tr 5ns
±
1.5ns
t1
100
µ
s
t4
10ms
t5
90ms
Annex D
(No load)
Us +200V
±
20V
Tr 5ns
±
1.5ns
Td 150ns
±
45ns
Annex D
(50
Ω
load)
Us +100V
±
20V
Tr 5ns
±
1.5ns
Td 150ns
±
45ns
Annex D Requirements
・
12V/24V System (UA=0V, Coaxial Measuring Device)

- -15
7. PART NAMES AND FUNCTIONS
Main Unit (ISS-7630)
Figure 6
Front Panel
Figure 7
Rear Panel
②
Power Switch
①
Control Panel
⑦
FG
Terminal
③
DC Input
Terminals
④
Circuit Breaker
⑤
Output
Terminals HOT
⑨
AC Input
(Internal FUSE)
⑧
Protective
Conductor
Terminal
⑩
AC Source Voltage
Selection Terminals
Communication
Terminal
⑫
Interlock
Terminal
⑬
Ventilation Fan
⑥
Output Terminals
GND
⑭
External Output Terminals

- -16
①
Control Panel
to make local settings.
Figure 8
Control Panel
A Us Display
The “Us Display” monitors the Us value. It will display pulse voltage regardless of “FUNCTION G”
ON or OFF. The waveform is shown in Figure 4 and Figure 5.
B TEST TIME/t4 Display
Displays either the “TEST TIME” or “t4” value. It will display “TEST TIME” when “FUNCTION G”
is not lit, and “t4” when lit. When “START Button K” is pressed, the display will automatically
change to “TEST TIME” (and FUNCTION will be unlit).
“TEST TIME” is the timer for the test duration of pulse injection, and can be set between 1
~
999.
The unit of time can be set as [min] or [sec] with the “TEST TIME Button I.” The countdown timer
displays the remaining time. The test completes 1 second after the displayed value becomes “0,”
and the Unit goes into STOP mode.
“t4” is the pulse output duration, and can be set from 1 to 100 in steps of 1. The unit of
measurement is [ms]. The set range of “t1” imposes limits on possible “t4” and “t5” values. Also,
“t4” and “t5” impose restrictions each other. This relationship is shown on Table 3.
T1 Requirements
t4, t5 Limit Relationship
t1
<
100
μ
s When t4/(t4+t5)
≦
0.1
t1
≧
100
μ
s When t4/(t4+t5)
≦
0.9
Table 3
A
Us Display
B TEST TIME/t4
Display
C
t1/t5 Display
E
UP / DOWN Buttons
F
SELECT Button
G
FUNCTION Button
H
DC LINE Button
M
Warning Lamp
J
tr Selection Buttons
K
START Button
L
STOP Button
D
Pulse 3a/3b Buttons
I
TEST TIME Button

- -17
C t1/t5 Display
Displays either “t1” or “t5” value. It displays “t1” when “FUNCTION G” is not lit, and “t5” when lit.
When the “START Button K” is pressed, the display will automatically change to”t1” (and
FUNCTION will be unlit). Refer to Figure 4 and Figure 5.
The value “t1” is the pulse output repetition cycle in the pulse output duration (t4), and can be set
from 10 to 999 in steps of 1. It is measured in [
µ
s]. The set range of “t1” sets limits to “t4” and “t5”
values. Also, “t4” and “t5” are interdependent each other. This relationship is shown on Table 3.
The value “t5” is the pulse pause duration, and can be set from 9 to 999 in steps of 1. It is
measured in [ms]. The set range of “t1” sets limits on “t4” and “t5” values. Also, “t4” and “t5” are
interdependent each other. This relationship is shown on Table 3.
D P3a Button, P3b Button
The” P3a Button, P3b Button” let you choose Pulse 3a or Pulse 3b waveform output. The
waveform of the lit button will be output. This choice must be made during STOP mode, as the
setting cannot be altered in START (Run) mode.
E UP / DOWN Buttons
The “UP / DOWN Buttons” raise or lower the value displayed in the currently selected display.
Keeping holding the button down will accelerate the value increment/decrement. Even if you try
to set the value beyond the allowable range, it stops at the moment it reaches the limit. Changing
the setting must be made in the STOP mode since they cannot be altered in START (Run) mode.
F SELECT Button
Lets you select one of the three row displays. The selected display repeats blinking. Every time
the button is pressed, the selected row will change from row 1
→
row 2
→
row 3
→
row 1.
G FUNCTION Button
Lets you select the values to be displayed in the three row displays. When this button is not lit,
the displays will be “Us, TEST TIME, t1” from top to bottom and “Us, t4, and t5” when lit. When
the START Button is pressed, the “FUNCTION Button G” will be unlit, and the displays will
automatically become “Us, TEST TIME, and t1.” During START mode, keeping holding this
button down will light the lamp and “Us, t4, t5” values can be confirmed.

- -18
H DC LINE Button
Serves as the switch to control DC output, and moves the DC ON/OFF contactor SW3 in Figure
1. It is OFF immediately after the Power Switch is turned ON, When the button is turned ON,
externally inputted DC will be output from the HOT output terminal. It works independently of the
“START Button K.”
During START mode, this button cannot be switched from LINE OFF to LINE ON. Also, it can be
turned off in START mode (ON
→
OFF), At this time, the Unit will go into STOP mode, which is
identical to “STOP Button L” pressing.
When error signals (“Connection being disconnected) are input from the Interlock Terminals
⑫
on the rear panel, DC LINE will be turned OFF.
I TEST TIME Button
Lets you select the unit of measure for the test time, which can be set from 1 to 999 in steps of 1.
When not lit, the unit is [min (minutes)], and [sec (seconds)] when lit. The test time will be
displayed on “TEST TIME/t4 Display B” when the “FUNCTION Button G” is not lit.
J tr Selection Buttons
Let you set the pulse waveform rise time tr as “5ns” or “<3.5ns (less than 3.5ns)”. “5ns” setting
meets the 3.5ns to 6.5ns range specified by the Standards. The rise time is guaranteed within
the range between
±
20V and
±
350V. “<3.5ns” setting allows tests with shorter rise time than
the Standards, and can be employed when you prefer to outputting faster rising waveforms than
the Standards. The rise time becomes shorter than 3.5ns when Us is in the range of
±
50V to
±
300V. This is very useful when examining the margins. Having fast rise time means that the
wave spectrum will include much high frequency components, and from the spectral point of
view, it is equivalent to tests with high pulse voltage Us.
The settings must be made during STOP mode as they cannot be altered in START mode.
K START Button
By pressing the “START Button” for 1 second, the Unit will go into START mode and the pulses
are output between Output Terminals HOT
⑤
and GND
⑥
. The test will stop at completion or
by pressing “STOP Button K.” The following functions (buttons) will be disabled in START mode.
Pulse 3a/3b Button D
UP / DOWN Buttons E
DC LINE Button H OFF to ON
tr Selection Buttons J
L STOP Button
Lets you stop START mode. When it is pressed, the pulses will no longer be output from the
Output Terminals, and the Unit will return to STOP mode. As STOP Button does not work
with DC output , DC output is not turned OFF. Turn the DC Output OFF with DC LINE
Button.
Table of contents
Other NoiseKen Portable Generator manuals