Nokia MEDIAMASTER 9760 C User manual

Owner’s Manual
MEDIAMASTER
9760 C


GB 3
MEDIAMASTER 9760 C
CONTENTS
Nokia Multimedia Terminals operates a policy of continuous development.
Therefore we reserve the right to make changes and improvements to any
of the products described in this manual without any prior notice.
The EMC Directive 89/336/EEC is applied to this product.
Nokia is a registered trademark of Nokia Corporation.
Copyright © 2000. Nokia Multimedia Terminals.
All rights reserved.
For your safety 4
Remote control 5
Front and rear Panel 6
How to insert a Smartcard 7
About the CA Module 7
Preparing the Remote Control 8
Connecting the Mediamaster 8
Connecting the Mediamaster to the TV 9
Connecting a TV and VCR with
SCART connectors 9
Connecting an Satellite Receiver and VCR 10
Connecting a HiFi System 10
Connecting to the mains supply 11
Switching on for the First Time with
SCART Connections 11
Tuning Procedure when RF Connections
are Used 12
First time installation 13
General Information 13
The Welcome Menu 13
Language 13
Initialization 14
Viewing mode 16
General Information 16
Programme Information 16
The “i” (Information) Button 17
Guide 17
List of TV or Radio Channels 18
Options (Green Button) 18
TV Release (0) 19
Video Recording 19
The TEXT Button (Teletext) 19
EXIT TV button 19
Main menu 20
General Information 20
TV and Radio Channels 20
Edit Channels 20
System Configuration 24
Channel Search 24
TV Settings 24
Receiver Upgrade 25
Time Adjustment 25
Reinstall 25
User Preferences 26
Language Preferences 26
Parental Control 26
Appearance Preferences 27
System Information 28
Conditional Access 29
Smartcard settings 29
Reminder List 30
Glossary 31
Problem solving 32
Front panel display 32
Technical specifications 33

GB 4
GENERAL OPERATION OF THE MEDIAMASTER
Throughout this manual you will notice that the everyday opera-
tion of your Mediamaster is based on a series of user friendly on-
screen displays and menus. These menus will help you get the
most from your Mediamaster, guiding you through installation,
channel selection, viewing and many other functions.
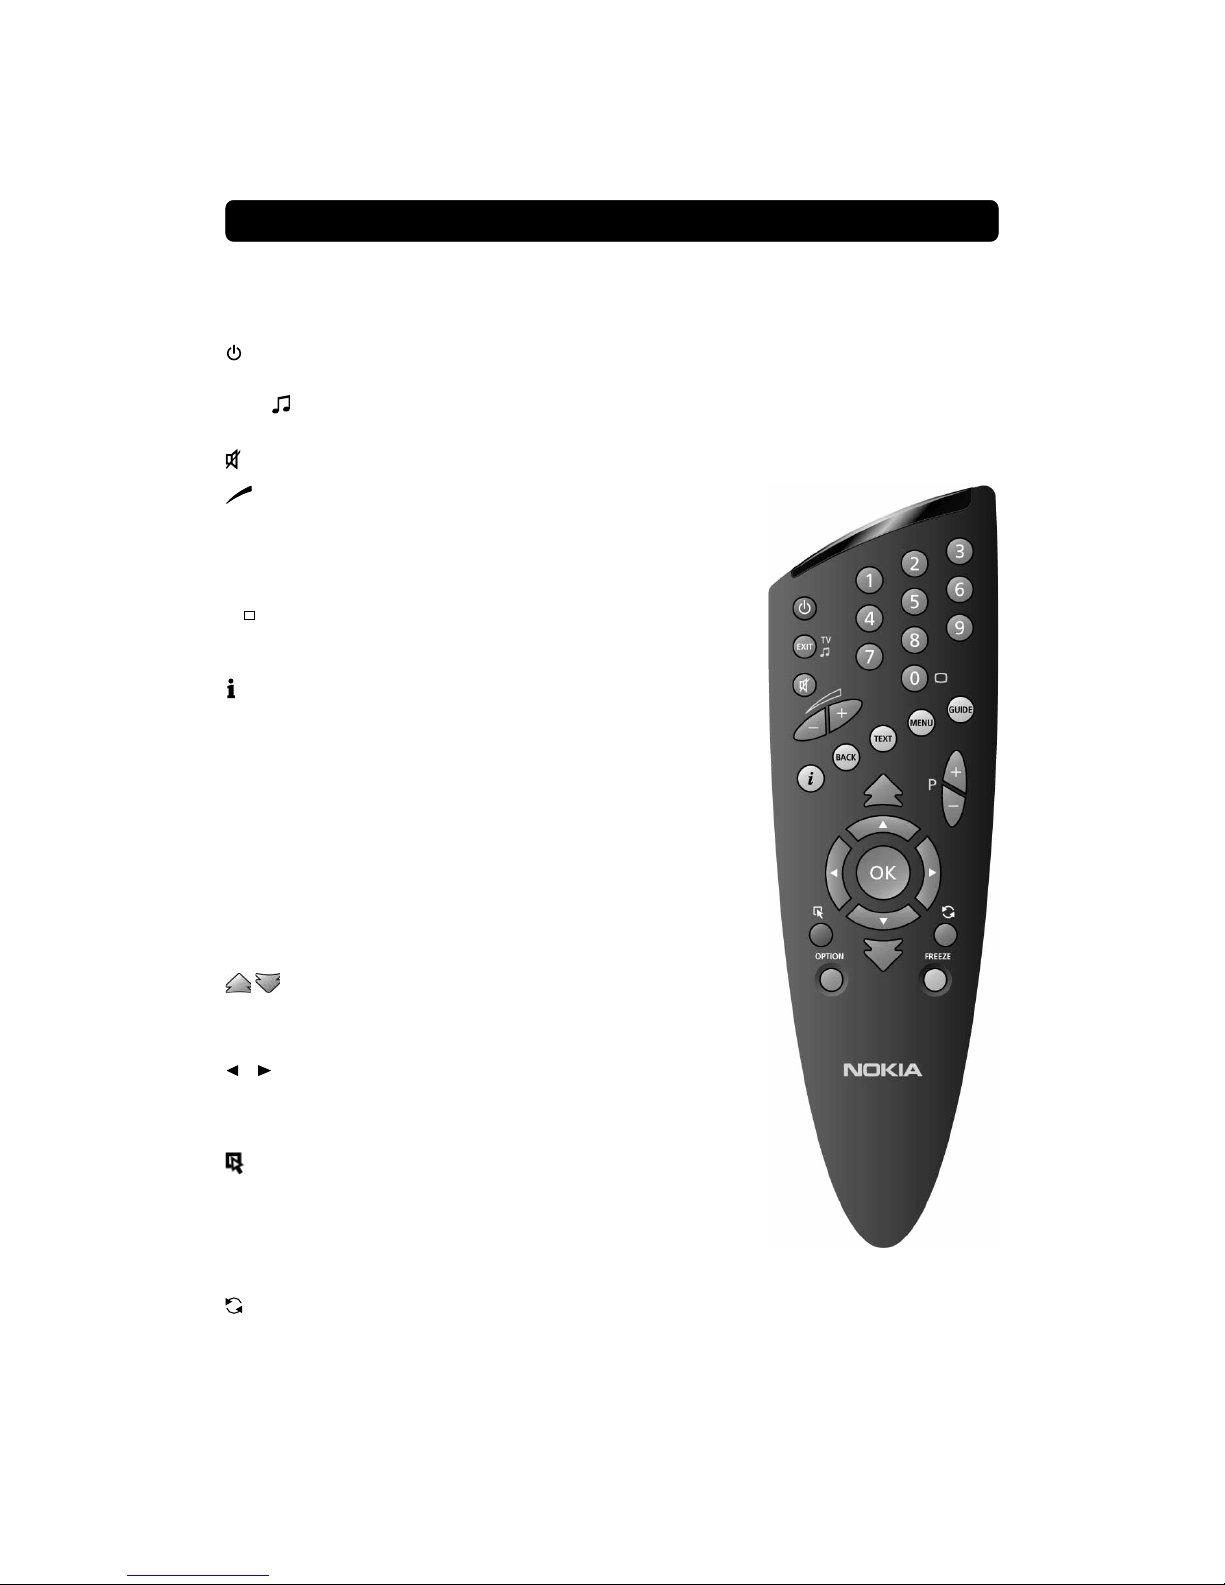
All functions can be carried out using the buttons on the remote
control, and some of the functions can also be carried out using
the buttons on the front panel.
If at any time when using the menus (except Installation and
Reinstall) you want to return to the normal TV/Radio mode, press
the EXIT button.
The Mediamaster is easy to use, always at your command and
adaptable for future advances.
Please be aware that new software may change the functional-
ity of the Mediamaster.
Should you experience any difficulties with the operation of your
Mediamaster, please consult the relevant section of this manual,
including the Problem Solving, or alternatively call your dealer or
a customer service adviser.
Please note: The first thing to do before sending the Media-
master to service is to:
1Perform the ”Diagnostic” procedure in System Information
menu.
2Try downloading new software into the Mediamaster.
With this procedure, the new software may solve the problem
in the quickest and most efficient way. See the relevant sec-
tion ”Receiver Upgrade” further on in this manual.
•Allow clear space around the Media-
master for sufficient ventilation.
•Do not cover the Mediamaster or place
it on a unit that emits heat.
• Use a soft cloth and a mild solution of
washing-up liquid to clean the casing.
• Never allow liquids, spray or other materi-
als to come into contact with the inside of
the Mediamaster.
• Do not connect or modify cables when the
Mediamaster is plugged in.
FOR YOUR SAFETY
• Do not remove the cover.
• Do not allow the unit to be exposed to hot,
cold or humid conditions.
• Service should be carried out only at a Nokia
Authorised Service Centre.
• Please note that the only way to isolate the
Mediamaster completely from the mains
supply is to unplug the mains lead!

GB 5
To switch the Mediamaster in and out of standby mode.
EXIT TV To return to the viewing mode from a menu without stor-
ing settings (in menu mode).
To switch between TV or Radio (in viewing mode).
To turn the sound off/on (mute).
- + To adjust the volume. The Mediamaster’s maximum level is
controlled by the TV’s present volume setting.
0 - 9 To change channel and to select individual menu options.
Note: If 0 is entered as the first digit, the TV Release func-
tionality is activated (see below).
0 TV Release. To switch between digital TV/Radio, analogue
TV and analogue satellite TV and VCR, when your systems
are connected by SCART leads.
Info. To display short and extended information (if transmit-
ted) about current and next programmes.
BACK To go back one level in the menus without storing settings.
TEXT To select teletext information.
Press to enter teletext (if available).
MENU To display or exit from the ”Main Menu” screen.
GUIDE To obtain a list of present and following programmes for the
available channels. This information is only shown if your
Service Provider transmits programme information (EPG in-
formation).
P+ P- To change channels up and down by one unit.
To change page in a menu/list/text if more than one page is
available. To browse through teletext history.
▲ ▼ To move up/down in the menus and to change channels.
To change settings in menus.
OK To confirm choices and selection of a highlighted item.
To display the TV/Radio channel list (in viewing mode).
(Red) To download an Open TV application.
OPTION (Green) To select service options in viewing mode.
FREEZE (Yellow) To select the freeze function in viewing mode.
Press once to freeze the screen picture. Press the button
once again to unfreeze the picture.
(Blue) To toggle between present and previous TV/Radio
channels in viewing mode.
This section describes how to operate the Mediamaster using the buttons on the remote control.
Some of the functions can also be carried out using the buttons on the front panel.
REMOTE CONTROL

GB 6
Rear Panel
to put the Mediamaster
in and out of standby
mode
to move up/down in
the menus and to
change channels.
Display
shows channel number, error messages, remote con-
trol commands and time in standby mode
Front Panel
AUX SCART
for connection to a VCR
or a satellite receiver
Mains lead
230 V AC
±15%
50-60 Hz
TV AERIAL
for the connec-
tion to the cable
network socket
DIGITAL AUDIO
phono connector
S/PDIF output for
connection to
a HiFi system
TV SCART
for the connec-
tion to the TV
SERIAL
to read and load
data information
TV / VCR
for an RF-lead to
the aerial input of
the TV or a VCR
AUDIO L/R
Connection of a
HiFi system
Slot
for a Smartcard for
future services
Slot
for the Smartcard from the
Service Provider
Slot
for a CA module
with a Smartcard
Button
to release the
CA module

GB 7
ABOUT THE SMARTCARD AND CA MODULE
PIN Code
The Smartcard is loaded with a 4-digit code, also called a PIN code
(Personal Identification Number).
You will be asked to enter this code in order to get access to some
of the functions in the Mediamaster.
Note! The gold chip
must be on the under-
side and inwards on the
smartcard
The Mediamaster box has access to scrambled TV/Radio chan-
nels based on the embedded Nagravision system. To be able to
receive these scrambled digital channels you will need a special
Smartcard distributed by your Service Provider.
The Service Provider is the programme distributor of the cable
channels.
It is also possible to connect a separate CA (Conditional Access)
module to the box. The CA module makes it possible to receive
other scrambled channels (if transmitted on the cable net.)
This module is equipped with its own Smartcard and may create
special menus not described in this manual. If so, please follow
the instructions within these menus or from the Service Provider.
Only some ”free” channels may be available without the Smart-
card (or the CA Module.)
After inserting the Smartcard, leave it in the slot permanently. Do
not remove it again, unless your Service Provider asks you to do
so. This is important, because if your Service Provider wants to
download new information, the card has to be in the slot.
How to insert a Smartcard
• Insert your Smartcard fully into the left-hand lower slot be-
hind the lid of the front panel of the Mediamaster. The gold
chip should face downwards and inwards.
• The upper slot is intended for future services such as bank
services and others.
About the CA Module
• Follow the instructions delivered together with the CA mod-
ule. Use only a DVB Standard Common Interface CA Module
• Insert the module fully into the right-hand slot behind the lid
of the front panel.
• Press the grey button on the front panel if you need to remove
the CA module.
Smartcard
CA Module
Smartcard for the CA Module

GB 8
The box for your Mediamaster should contain the
following items:
• the Mediamaster
• a remote control with 2 AAA batteries
• a SCART lead (fully featured 1,0 metre)
• an Owner’s Manual
• a Software License agreement
INSTALLATION OF THE MEDIAMASTER
About the SCART sockets
• The rear panel of the Mediamaster is equipped with 2 SCART
sockets (see diagram). When you connect other products
to any of these sockets, always use fully featured SCART
leads (as supplied). There are “less well specified” SCART
leads on the market and picture quality could be reduced if you
use them.
SCART socket
SCART lead
Owner’s manual License
agrement
Preparing the Remote Control
• Remove the cover on the battery compartment at the bottom
of the remote control.
• Insert the 2 AAA (1,5 V) batteries, as shown in the diagram,
taking care to observe the +and -markings indicated inside.
• Replace the cover.
Connecting the Mediamaster
There are many different types of TV/VCR and other equipment
that you can connect to the Mediamaster.
In this manual you will see some of the most common ways to
connect your equipment.
If you use RF leads you will have to tune your TV and VCR to the
Mediamaster output channel (see page 12).
Remote control

GB 9
Connecting the Mediamaster to the TV
As most local cable network are distributing TV programmes from
both digital and analogue sources, the signal from the wall net-
work socket will be of the two different kinds:
aDigital signal information to be handled by the Mediamaster.
These signals are sent to the TV through the SCART leads.
bAnalogue signals which bypass the Mediamaster through RF
leads.
Due to that you must connect the Mediamaster and the VCR
to the TV as discribed below.
• Connect the SCART lead between the main SCART socket on
the TV and the TV SCART socket on the Mediamaster.
• Connect an RF lead between the TV/VCR output on the Media-
master and the TV aerial input on your TV.
• Connect an RF lead between the TV AERIAL input socket on
the Mediamaster and the network socket.
SCART
RF
Network
socket
Connecting a TV and VCR with SCART connectors
Refer to your VCR’s manual for full instructions.
If your TV has a SCART socket, but your VCR does not
RF
RF
SCART
SCART
Network
socket
SCART
RF
• Connect a SCART lead between the main SCART socket on
the TV and the TV SCART socket on the Mediamaster.
• Connect a SCART lead between the VCR
and the AUX SCART socket on the
Mediamaster.
• Connect an RF lead from the TV/VCR output on
the Mediamaster to the TV aerial input on the VCR.
• Connect an RF lead from the RF output on the
VCR to the TV AERIAL input socket on the TV.
• Connect an RF lead between the TV AERIAL input socket
on the Mediamaster and the network socket.
• Follow the connections from above, but without the Media-
master/VCR SCART lead.
Your VCR then will have to be tuned to your
Mediamaster as described on page 12.
VCR
Mediamaster
Mediamaster
VCR
Network
socket

GB 10
Connecting a HiFi System
• Connect an RCA/Cinch stereo cable from the AUDIO L R sock-
ets on the Mediamaster to the LINE, AUX, SPARE or EXTRA
input sockets on your HiFi system.
• If available you can connect an RCA/Cinch single cable from
the DIGITAL AUDIO socket on the Mediamaster to your HiFi
or Dolby Pro Logic system.
Note: To avoid interference you must use a screened video
cable.
Connecting an Satellite Receiver and VCR
1 Connect a SCART lead between the main SCART socket on
the TV and the TV SCART socket on the Mediamaster.
2 Connect a SCART lead between the TV SCART socket
on the satellite receiver and the AUX SCART socket
on the Mediamaster.
3 If your TV is equipped with two SCART connectors
and the VCR also has a SCART; always use the second
SCART to connect the VCR to the TV.
4 Connect an RF lead from the RF output on the VCR to the TV
aerial input on the TV.
5 Connect an RF lead from the RF output on the satellite re-
ceiver to the RF input socket on the VCR.
6 Connect an RF lead from the TV/VCR output on the Media-
master to the RF input socket on the satellite receiver.
7 Connect an RF lead between the TV AERIAL input socket on
the Mediamaster and the network socket.
8 Connect the coaxial cable between the LNB and the LNB
socket on the satellite receiver.
Both the VCR and the satellite receiver must be tuned to dif-
ferent UHF channels than the Mediamaster when using RF-
connectors.
Satellite
dish
Network
socket
RF
SCART
RF
Media-
master
VCR
LNB
cable
Satellite receiver
The satellite receiver must be switched OFF (in standby
mode) when you want to watch digital cable channels
from the Mediamaster.

GB 11
•Plug in your Mediamaster
•You will now see the ”Welcome”menu on the screen.
•Press OK on the Mediamaster remote control to start the In-
stallation procedure.
You may now proceed to “First Time Installation.”
Switching on for the First Time with SCART Connections
Before you connect the box to the mains supply make sure the
RF cable between the box and the cable network socket is con-
nected. If not, the startup procedure will take about 10 minutes.
During this time the box will not respond to any commands!
When you connect the box to the mains supply it will always
check if a new software*)is available.
Different values, e. g. E406, E001 a. o. alternatly with
— — — — , will be shown on the display during the check pro-
cedure.
If a new software is found it will be automatically downloaded.
The procedure will take a few minutes. Do not disconnect the
mains cord or any other cables in the system during the process.
If you connect the box for the first time: After a successful check
(and a possible new download) you will get the “Welcome”menu
on the TV screen.
You are now ready to continue with the “First time installation”
process.
*)Software is a set of instructions the box needs to work.
Connecting to the mains supply

GB 12
This procedure is necessary if your Mediamaster is con-
nected to the TV with an RF lead only.
To tune your TV to the RF signal you might also need your TV
manual in addition to this manual. The steps below explain what
to do if you have been unable to use SCART leads in your con-
nection.
1 Plug in your Mediamaster.
Tuning your TV to the Mediamaster
2 Select a channel number on the TV that is not currently used
for other TV channels.
3 Follow the instructions in your TV manual to tune the TV chan-
nel selector to UHF channel 43 (this is the Mediamaster’s fac-
tory preset UHF channel). If you are already using this chan-
nel, select another non occupied UHF channel between 21to
69 on the TV.
4 For example, if you select UHF channel 45 on your TV, you
must change your Mediamaster to the same channel.
Use the or buttons on the front panel of the Mediamaster,
or on the remote, to change to the corresponding channel. You
will see the UHF channel number displayed on the front panel
of the Mediamaster.
5 When you have correctly changed the UHF channel number
you will see the ”
Welcome
”menu on the TV screen.
If there is interference from other channels you will have to
change the chosen UHF channel.
6 Follow the instructions in your TV manual to store this UHF chan-
nel as the channel used by your Mediamaster. You will have to
select it when you want to watch digital TV/Radio channels.
7 Once the welcome message is visible, press the OK button
on the Mediamasters remote control to start the installation
procedure.
If for some reason you have to change the RF channel later,
you can do this by using TV settings menu further on in this
manual.
If you have a VCR connected it must be tuned to a different
UHF channel (between 21 to 69) than the Mediamaster.
You may now proceed to “First Time Installation.”
Tuning Procedure when RF Connections are Used

GB 13
Language
Select the desired menu language.
This will also be the main language for audio and subtitling.
General Information
Once you have correctly connected the Mediamaster, you also
have to perform a “First Time Installation.”
During this procedure, helpful information is displayed at the bot-
tom of the menus.
Please note!
The OK button always confirms a selection within these menus,
and pressing it will take you to the next step in the installation
process. However, and this is important, often more than one
value has to be entered in a menu. First, perform all necessary
settings on the different lines. Then, confirm them all simultane-
ously by pressing OK.
You can always go back to the previous menu by pressing the
BACK button.
Use the buttons to move upwards and downwards from one
line to another. Use to change settings.
You can also use the numeric buttons on the remote control to
select a line in a menu and to enter numeric values.
FIRST TIME INSTALLATION
The Welcome Menu
This picture indicates that you have started the installation pro-
cedure.
Press the OK button to proceed.

GB 14
FIRST TIME INSTALLATION
Initialization
The Service Provider will supply you with a specific “Setup Iden-
tifier”code number. This code contain all information necessary
to start the channel search procedure. Please note that this code
number is specific for the service provider and the area where the
box is located.
Enter the number with the numeric buttons on the remote con-
trol. If you enter a wrong digit use the to erase it. ,
Press OK and the channel search procedure will start.
You will be informed what is going on during the search proce-
dure.
When you get this message the channel search procedure is fin-
ished.
Press the OK button.
You can now adjust the time by using the buttons, ±1/2 an
hour at a time.
You can also adjust the minutes by using the buttons.
Now the box is ready to show TV channels from the network.
(If the smartcard is not inserted you will be informed to do so.)

GB 15
FIRST TIME INSTALLATION
If the automatic search procedure failed you can manually enter
the values necessary for the search procedure. The values you
have to enter you can get from your service provider.
Use the number buttons on the remote control to enter the dif-
ferent values. If you enter a wrong digit use the to erase it. You
use the to move from one line to another.
The “.”will be automatically set.
Frequency with 4 digits.
Network Number with 3 digits.
Symbol Rate with 5 digits.
Modulation: Select Modulation with the buttons.
Home Application Identifier
Service Provider Identifier
When you have entered the values, press OK to start the chan-
nel search.
Normally the channel search procedure will work without any
problems. If the Setup Identifier code is wrong or you have
moved the box to another living area; after two unsuccessful en-
tries of the code you will get the menu shown below.

GB 16
VIEWING MODE
General Information
The following describes the basic functions of your Mediamaster
while watching TV or listening to radio channels from the cable
network.
The functions described here can only be used if they are in-
cluded in the transmitted programme information.
If you select a programme to which you do not have access, you
will get a message on the screen.
While viewing, the current channel number will be shown on the
front panel display.
However, when you have changed into Radio mode (to listen to ra-
dio channels) the number will be preceded by the capital letter A;
and e.g. A123 will be shown in the display.
It is possible for the service provider to transmit other services
than TV channels only. For example it is possible to transmit
games via the cable net. In such a case the display will show the
capital letter Obefore the figures, and e.g. O456 will be shown.
In addition to the normal functions like switching the Media-
master in/out of stand-by, changing the volume etc. (ref. to the
overview of the remote control) there are some other useful func-
tions which will be explained in this part of the manual.
Programme Information
Every time you change channels you will receive programme in-
formation for a few seconds. (In the “User Preferences”menu
you can select how long this information will be shown.)
The information may include:
Current time.
Channel list.
Channel number and name.
Name of the current and next programme.
The start and total time of the current programme.
A bar, indicating the elapsed time of the current programme.
Recommended lowest age limit for watching the programme.
The start and total time of the next programme.
Programme information will only be available if it is included in
the transmission. Otherwise a “No information available”mes-
sage will be shown.
You may change channel lists with the buttons.
Information about
the next programme
Information about
the current pro-
gramme
Channel number
and name
Current
time
Channel
list
Age limit
information
This symbol will be shown in the upper left corner of the screen
when a downloadable application (”Open TV”) is included in a
channel transmission.
To close an application and return to watch TV, press the P+ or
P- button on the remote control.
Please refer to page 27 for more information.
Press the red button on
the remote control to
start downloading an
“Open TV”application

GB 17
VIEWING MODE
The “i” (Information) Button
The Mediamaster has the ability to display information about pro-
grammes currently being broadcast as well as those being broad-
cast next.
This procedure is the same for both TV and Radio mode.
By pressing the “i”button while watching TV you will get a spe-
cial Programme Information Banner. Select channel with or
the numeric buttons.
The “i” symbol is coloured blue when displaying information
about the current channel, and red when information for another
channel is shown.
In this view, you can select to get information about the current
and next programme by using the buttons.
You can leave the menus at any time and return to viewing TV by
pressing EXIT.
Guide
By pressing the GUIDE button you get access to the TV Guide
(or Radio Guide if you are listening to radio channels) which will
give the titles of the current and next programmes on different
channels.
Use the buttons to move the cursor to another programme.
Use the double arrow buttons to move a page at a time up and
down.
When a line is highlighted, you can get more information about
this programme by pressing the “i”button.
Press “i”again to get more information about the current pro-
gramme.
If a lot of information is available you can use the double arrow
button to see the rest of the text.
Press “i”a third time to return to TV/Radio mode.
*

GB 18
List of TV or Radio Channels
At the channel search procedure, two Channel lists are created.
One list named “All TV”containing all channels, and another
named “Free TV”containing only free channels.
In the “All TV”list scrambled channels are marked with a picture
of a Smartcard (if this information is transmitted in the signal) and
locked channels are marked with a padlock.
If you have performed a new channel search the new channels
found will be marked with a star in the “All TV”list.
When viewing TV or listening to radio channels you can access
the Channel List by pressing OK.
At the top of the menu you will see the name of the list.
Change channel lists with
.
To open the radio channel list you first have to enter radio mode
by pressing “EXIT TV ”and then OK.
You can change channel by stepping with the buttons or
enter the channel number with the numeric buttons on the re-
mote control.
Press OK when a channel name is highlighted to start watching/
listening to it.
To change one channel list page at a time, use the double arrow
buttons.
VIEWING MODE
Options (Green Button)
By pressing the OPTION button, you open a menu in which it is
possible to enter temporary settings. The menu will only appear
if the programme contains any options to change.
Settings made in this “options menu”are only valid for the pro-
gramme you currently are watching. If you leave the programme
and return to it again, the temporary settings will be gone.
Audio Language
If available, you can select among the different languages being
broadcast.
Subtitle Language
If available, you can select among different subtitle languages. If
you select “OFF”, you will not get any subtitling at all.
Channel number
and name
Name of the
Channel list
Indicates a
locked channel
Indicates a
scrambled
channel
You can also get more information about a marked (highlighted)
channel by pressing the “i”button.

GB 19
VIEWING MODE
TV Release (0)
With the 0button you can toggle between analogue terrestrial
TV, video, analogue and digital satellite TV signals.
(This is only valid if the units are connected via SCART cables; not
by a RF connection.)
Video Recording
Please note, that during the recording of a digital channel, eve-
rything shown on the screen will be registered! For example, if
you call up a menu from the Mediamaster on the screen, the
menu will be recorded!
The TEXT Button (Teletext)
Pressing the TEXT button will open a Teletext page (if Teletext
is transmitted.) Select teletext pages with the numeric buttons
on the remote control.
You can also quickly step to the different page alternatives shown
in any page by pressing . Press OK on a selected number to
go to that page.
The “0”button will show the index page (normally page 100.)
will show the next or previous teletext page.
You can use the double arrow buttons to browse through the
pages you just have visited.
Press EXIT, BACK or TEXT to return to TV/Radio mode.
EXIT TV
This button has double functions.
While watching TV: The TV/ function is used to switch from
TV to Radio mode and vice versa.
When you have entered a menu, the EXIT function is used to
leave the menu at any time without changing anything.
Format
If you have a TV set with a 4:3 picture format, and the transmis-
sion is in 16:9, you can select Fullscreen or Letterbox to change
display format.
Fullscreen will fill up the screen vertically, but cut off some infor-
mation from the left and right sides of the picture.
Letterbox will give a complete picture, but leave black areas at
the top and bottom.

GB 20
MAIN MENU
General Information
Many of the functions of the Mediamaster are available from the
Main Menu. Press MENU to open it.
TV and Radio Channels
Please refer to “List of TV and Radio channels”on page 18.
Edit Channels
From these menus you can create and edit channel lists. You can,
for example, create favourite lists; add, delete, rename and ar-
range the order of the channels within the lists.
The “All TV”list can contain hundreds of channels. By creating
your own favourite lists you can make channel handling more
convenient.
Important when editing channels!
Changes in the Edit Channels menus always take immediate ef-
fect; it is not possible to cancel changes by pressing BACK!
Table of contents
Other Nokia Media Converter manuals
Popular Media Converter manuals by other brands

SIIG
SIIG USB 2.0 Video Capture Device Quick installation guide

Terrasat
Terrasat IBUC 2 Operation manual

IMC Networks
IMC Networks McBasic TX/FX supplementary guide

LGB
LGB 55024 instruction manual

Worldcast Systems
Worldcast Systems APT IP Silver Quick Start Notice

Linear Technology
Linear Technology Analog Devices LT8301 datasheet