Nonny Mini User manual

Just a touch to keep in touch.
User manual

Nonny –User Manual v.3.1
2
Read these instructions carefully before using the device or
carrying out any maintenance.
Follow all the safety instructions; failure to do so could cause
accidents and/or damage.
Keep these instructions for future reference.

Nonny –User Manual v.3.1
3
Dear Customer,
Thank you for choosing
Nonny.
We are proud of our product, which was
devised to provide a simpler and more
complete means of communication with
our loved ones.
We hope that,
as for many other people,
Nonny will help you and those you love to
keep in touch with just a touch.

Nonny –User Manual v.3.1
4
Index
General safety information.......................................................... 5
Maintenance and storage............................................................ 7
Nonny’s main controls. ................................................................ 9
Configuring Nonny for the first time.......................................... 12
Installing the smart dock (Nonny Mini) ................................... 12
4G data sim card installation................................................... 13
Initializing Nonny..................................................................... 17
The information panel. .............................................................. 22
The settings menu...................................................................... 24
Contact us. ................................................................................. 33

Nonny –User Manual v.3.1
5
General safety information.
•The device is to be used only as described in this manual.
Any other use not recommended by the maker can cause
fires, burns or other accidents to users.
•This device is intended for use by adults.
•Check that the electric plug is intact before attaching the
battery charger.
•Keep the power cable out of the reach of children.
•The device is inflammable: keep away from unprotected
flames.
•Before cleaning or moving the device make sure that it is
turned off and the plug is disconnected.
•Do not place any wet items on the device.
•Do not close or obstruct the device’s ventilation grid.
•Do not place the device against walls and/or panels, always
leave at least 10 cm. space behind it to allow ventilation
and cooling.
•Do not insert sharp and/or metallic objects into the device’s
ventilation grid.
•Do not open the device while trying to make adjustments to
its interior: contact Valileo S.R.L.S. via e-mail at:
•Do not use the device if it has fallen from a height or if it
has been damaged in any other way. Contact Valileo S.R.L.S.
the necessary electrical or mechanical repairs.
•The most common cause of overheating is poor ventilation
of the device.
•Remove accumulated dust when the device is off using a
damp cloth.

Nonny –User Manual v.3.1
6
•Do not use abrasive products to clean the device. Cleaning
should be done using a damp (not wet) cloth, rinsed with
soapy water.
•Do not immerse the device, the cable, or any other element
of the device in water or other liquids.
•Do not cover the device with cloths, mats or similar.
•Keep the device out of reach of domestic animals.
•Do not tread on the power cable.
•Avoid the cable being chewed or used as a game by
domestic animals.
•Do not use the charger cable as a rope or similar.
•Do not tamper with the device’s software; the use of the
device is described in this manual and any infringement
thereof could give rise to safety problems.
ATTENTION
•The back of the device could be hot.
•Do not cover the device with cloths, clothing or
inflammable items.
•In the case of anomaly (a strange smell or noise), switch
the device off, pull out the plug, do not try and repair
anything, and contact Valileo S.R.L.S. via e-mail at:
•Do not immerse the device in water.

Nonny –User Manual v.3.1
7
Maintenance and storage.
CLEANING THE OUTSIDE SURFACE OF THE DEVICE
•Wait until the device has cooled down before cleaning or
moving it.
•Do not use abrasive cleaning products. Cleaning should be
made using a damp (not wet) cloth rinsed in soapy water.
•If this is not enough, use a soft cloth dampened with warm
water (less than 40°C.) and a neutral detergent. Leave the
device to dry completely before reusing.
•Do not use corrosive detergents or solvents such as petrol.
Do not wash the device with water.
•While cleaning do not use oils, chemical substances or
other items which could damage the surface.
•Use a dust catching cloth to dust the device.

Nonny –User Manual v.3.1
8
STORAGE
•When not in use, keep the device together with this manual
in its original box in a cool, ventilated place.
INFORMATION ON THE CORRECT DISPOSAL OF THE DEVICE AS
PER THE EUROPEAN DIRECTIVE 2011/65/EU
At the end of the device’s useful life it must not be
disposed of together with other household waste.
It must be handed in to special collection centres
for differentiated waste disposal or to retailers
providing this service. Separate disposal of an
electric or electronic device avoids possible
negative effects on the environment and on people’s health
whilst at the same time allowing the recovery and re cycling of
the materials making up such device, with significant savings in
energy and resources.
To highlight the obligatory separate disposal of these products,
the above symbol is printed on the device. Any incorrect
disposal of the device by the user will imply the application of
administrative sanctions as laid down by current law.
Nonny –User Manual v.3.1
9
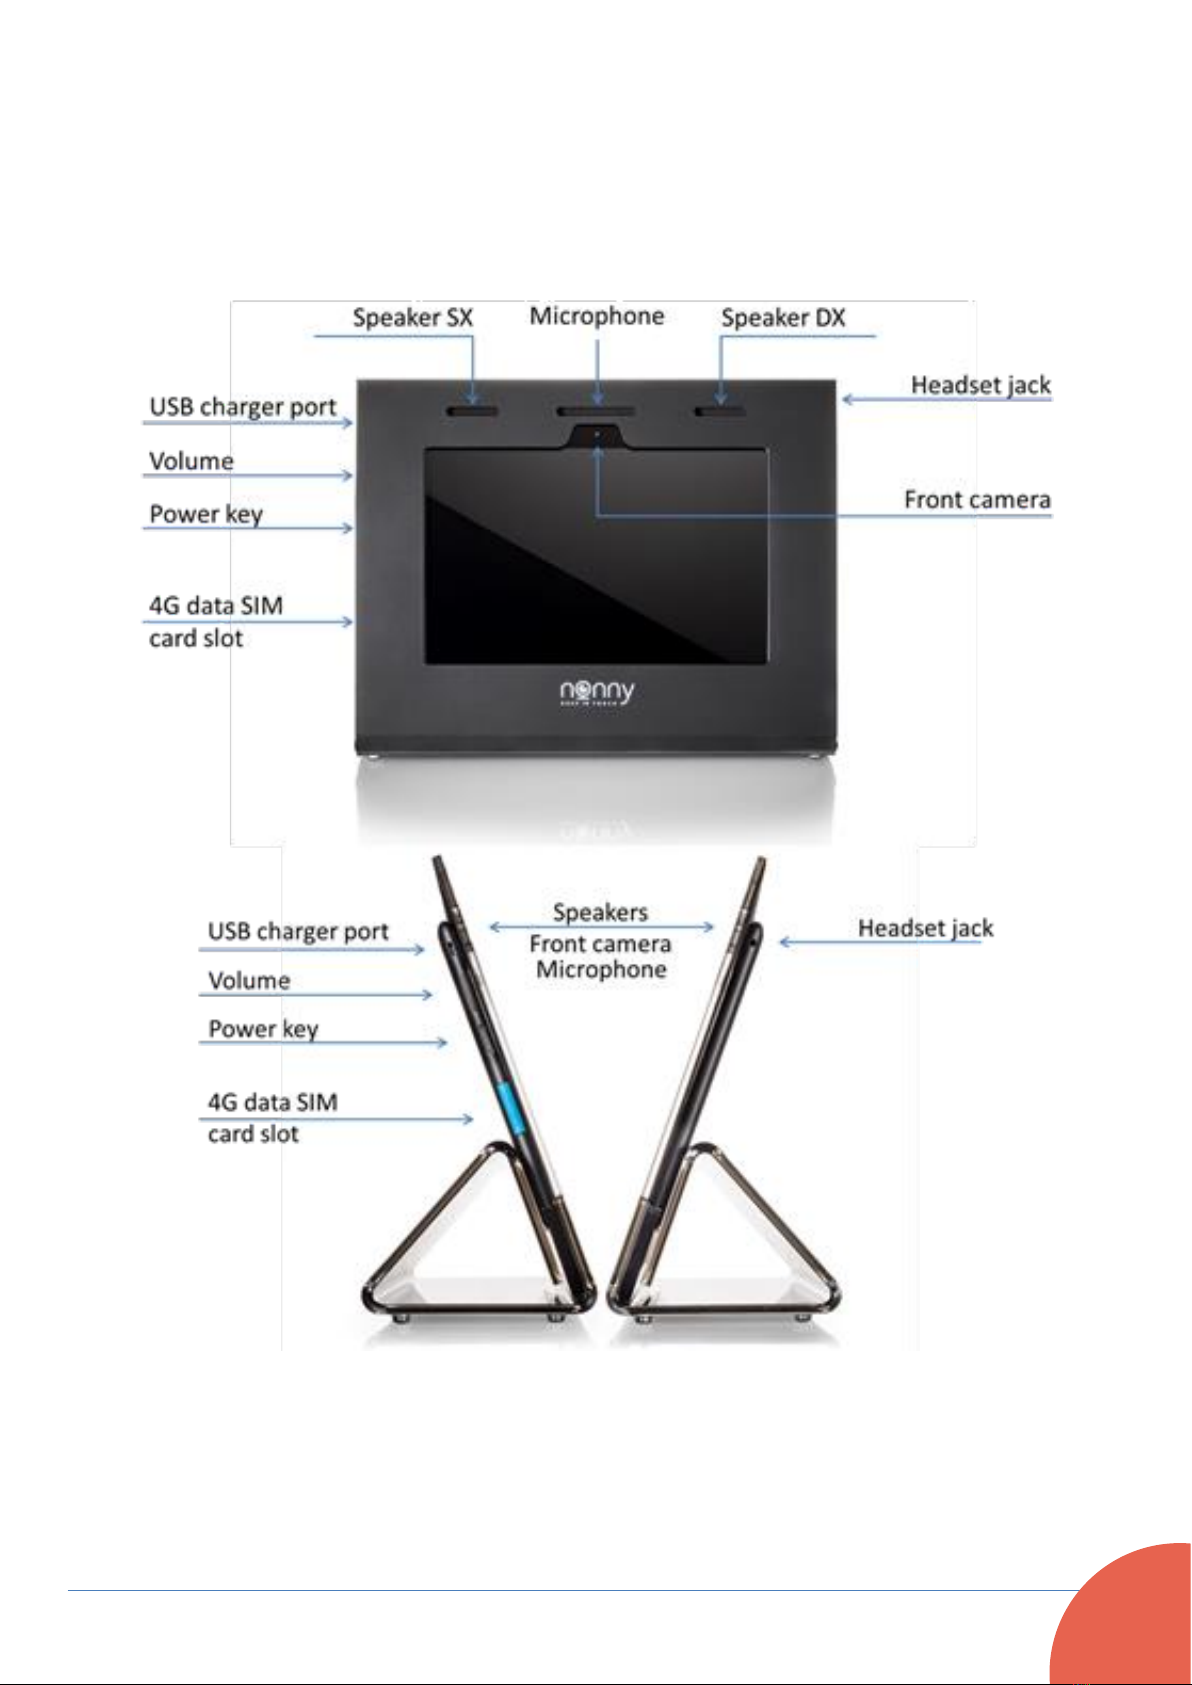
Nonny’s main controls.
Nonny version 1.0

Nonny –User Manual v.3.1
10
Nonny version 1.5

Nonny –User Manual v.3.1
11
Nonny Mini
Nonny –User Manual v.3.1
12
Configuring Nonny for the first time.
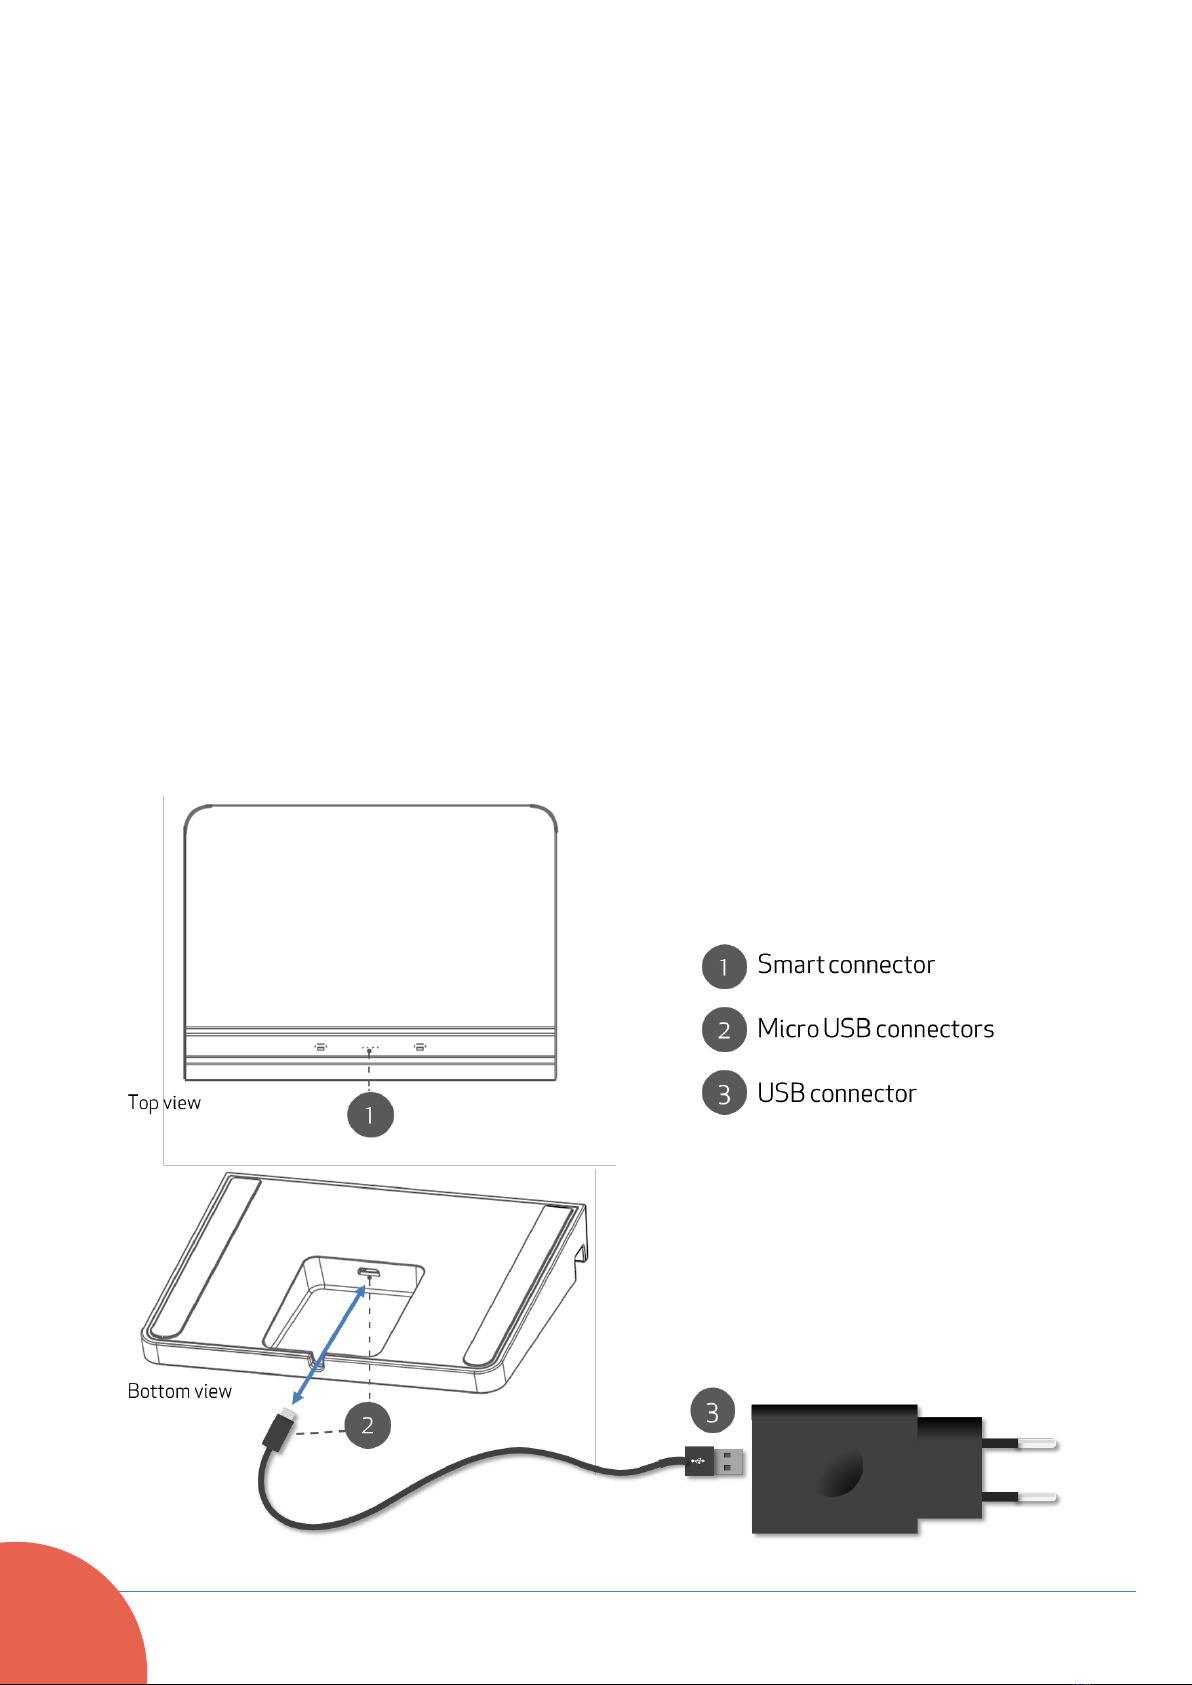
Installing the smart dock (Nonny Mini)
Remove the smart dock and the USB cable from the package.
Insert the cable micro USB connector into the smart dock micro
USB plug, located at the bottom side of the dock.
To keep the cable firm, gently push it into the small groove
located on the rear border of the dock.
Finally connect the USB cable end to the USB adaptor and plug it
into a wall power outlet.
Nonny –User Manual v.3.1
13
4G data sim card installation
If you have a 4G data SIM, installation may be made as follows.
Before using it, verify that the card has the security PIN code
DISABLED. If enabled, please insert it in a normal
smartphone and disable the security pin otherwise Nonny
will not be able to detect it and use it.
Procedure for Nonny version 1.0
•Carefully slide the tablet out of the top of its frame.
•Using your fingernail open the blue sim slot cover.
•Extract the SIM support frame from its storage place, put the
SIM into its frame with the contacts facing down, and insert
the support frame back into its space.
•Close the slot cover and slide the tablet back into the frame.

Nonny –User Manual v.3.1
14
Procedure for Nonny version 1.5
•Carefully slide the tablet out of the top of its frame.
•Using the pin provided, insert it into the small round socket,
extract the SIM support frame from its storage place, put the
SIM into its frame with the contacts facing down, and insert
the support frame back into its space.
•Slide the tablet back into the frame.
Be very careful not to confuse the socket to
be used to extract the Sim support with the
microphone socket which is located a little
higher up.
Nonny –User Manual v.3.1
15
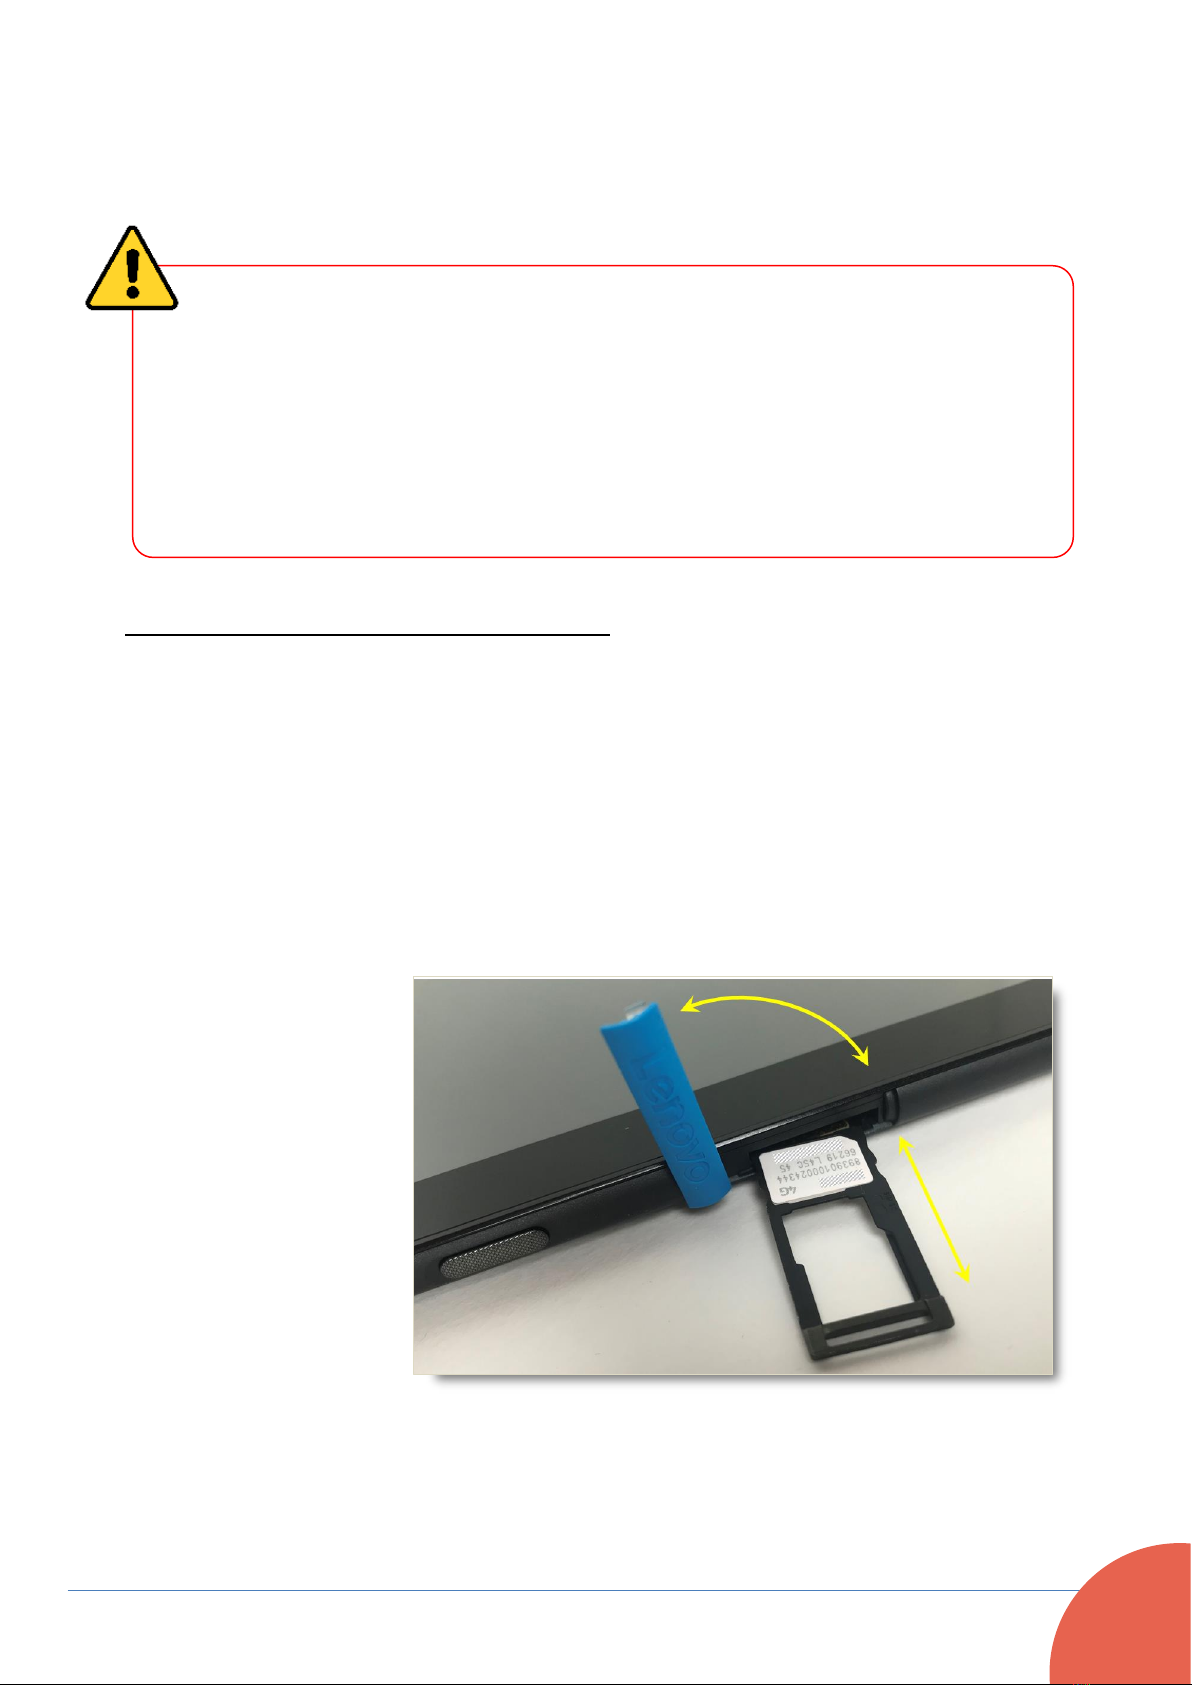
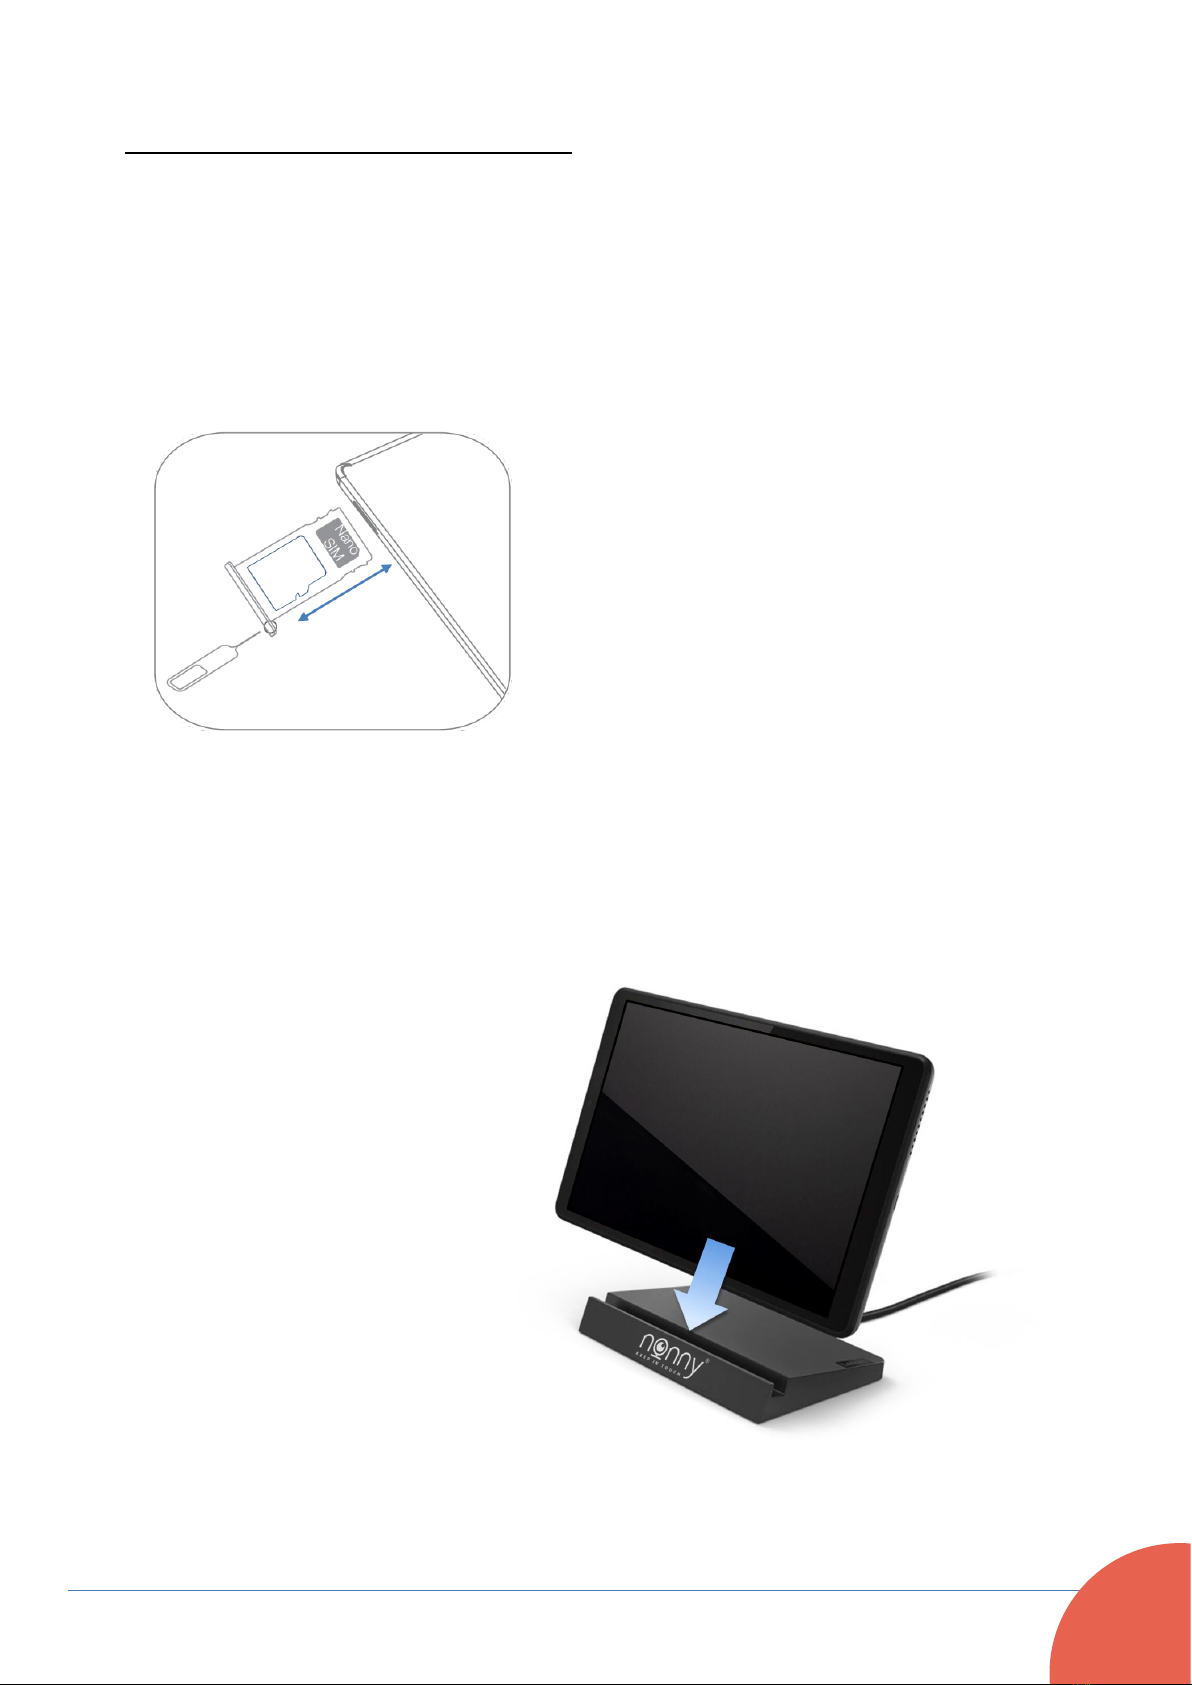
Procedure for the Nonny Mini
•Locate the 4G card tray at the bottom edge of the device.
•Insert the pin provided in the small hole of the 4G card tray
and gently push it until the tray will open. Position the nano 4G
sim card with the contacts facing down and slide the tray back
into its slot.
•Slide the tablet into its dock making sure that the smart
connector at the bottom edge of the tablet is aligned with the
corresponding plug on the dock.

Nonny –User Manual v.3.1
16
Powering up your device.
[Classic models]: Connect Nonny to the electric plug using the
USB magnetic cable provided.
[Nonny Mini]: The tablet will be powered directly by its smart
dock when connected.
Switch on Nonny by keeping the on switch pressed until the
system makes a small vibration.
Once switched on, wait until the operating system has
completely charged up and until you can see the initial
configuration screen shown below, before proceeding.
First screen of the initial wizard configuration
To proceed with the initial configuration, just touch the screen.
Nonny –User Manual v.3.1
17
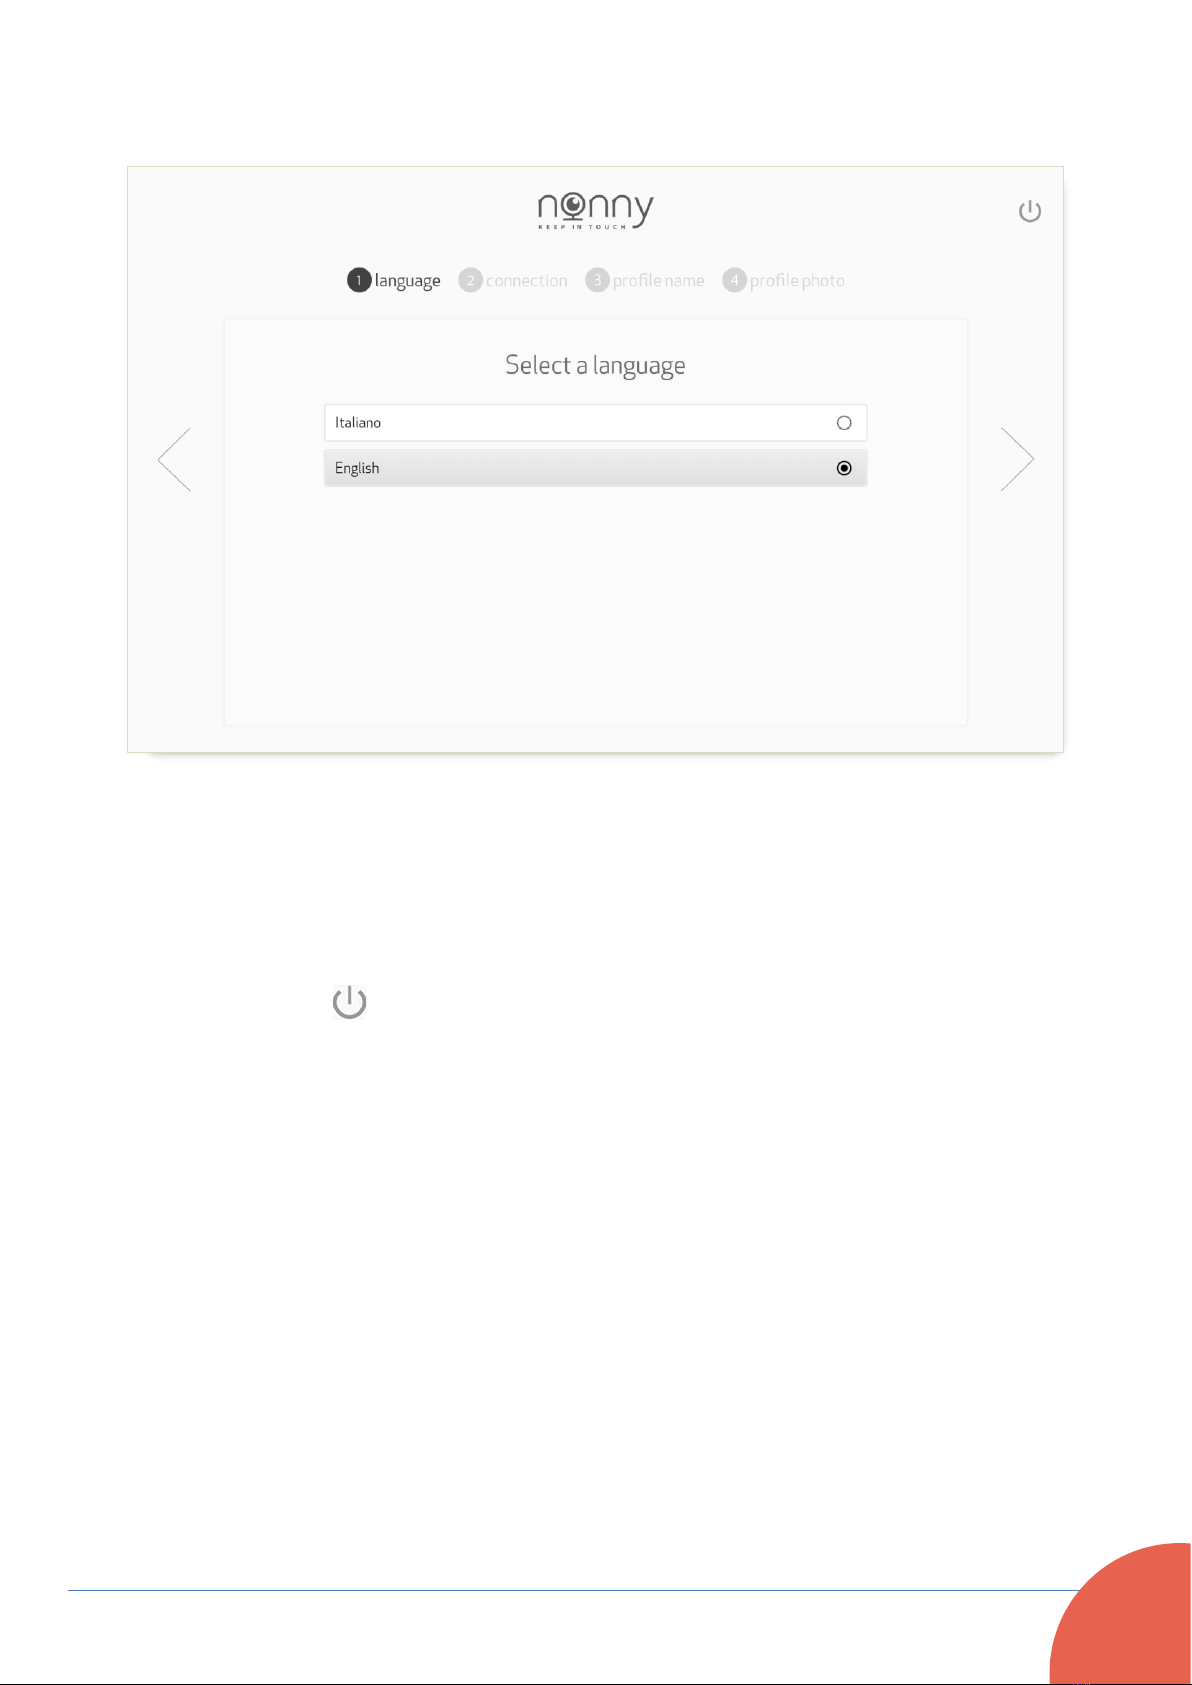
Initializing Nonny
Language selection.
This screen allows you to choose your preferred language.
To switch off the device, simply touch the icon on the top right
of the screen and confirm your intention on the following
screen.

Nonny –User Manual v.3.1
18
Connections settings
The next step is to select the type of connection, between a 4G
SIM card and Wi-Fi. Both these options may be activated.
•Data Network: this option is available only if the 4G SIM has
already been inserted and is identified by the device. If the
SIM requires APN manual insertion, select the option
“Manual configuration of SIM card” and insert the required
parameters. Then save the changes.
•Wi-Fi Network: In this case select the network among those
identified and listed and, if required, provide the appropriate
password.
Once the Internet connection has been established, Nonny will
show an arrow pointing to the right which then leads to the next
step.
Nonny –User Manual v.3.1
19
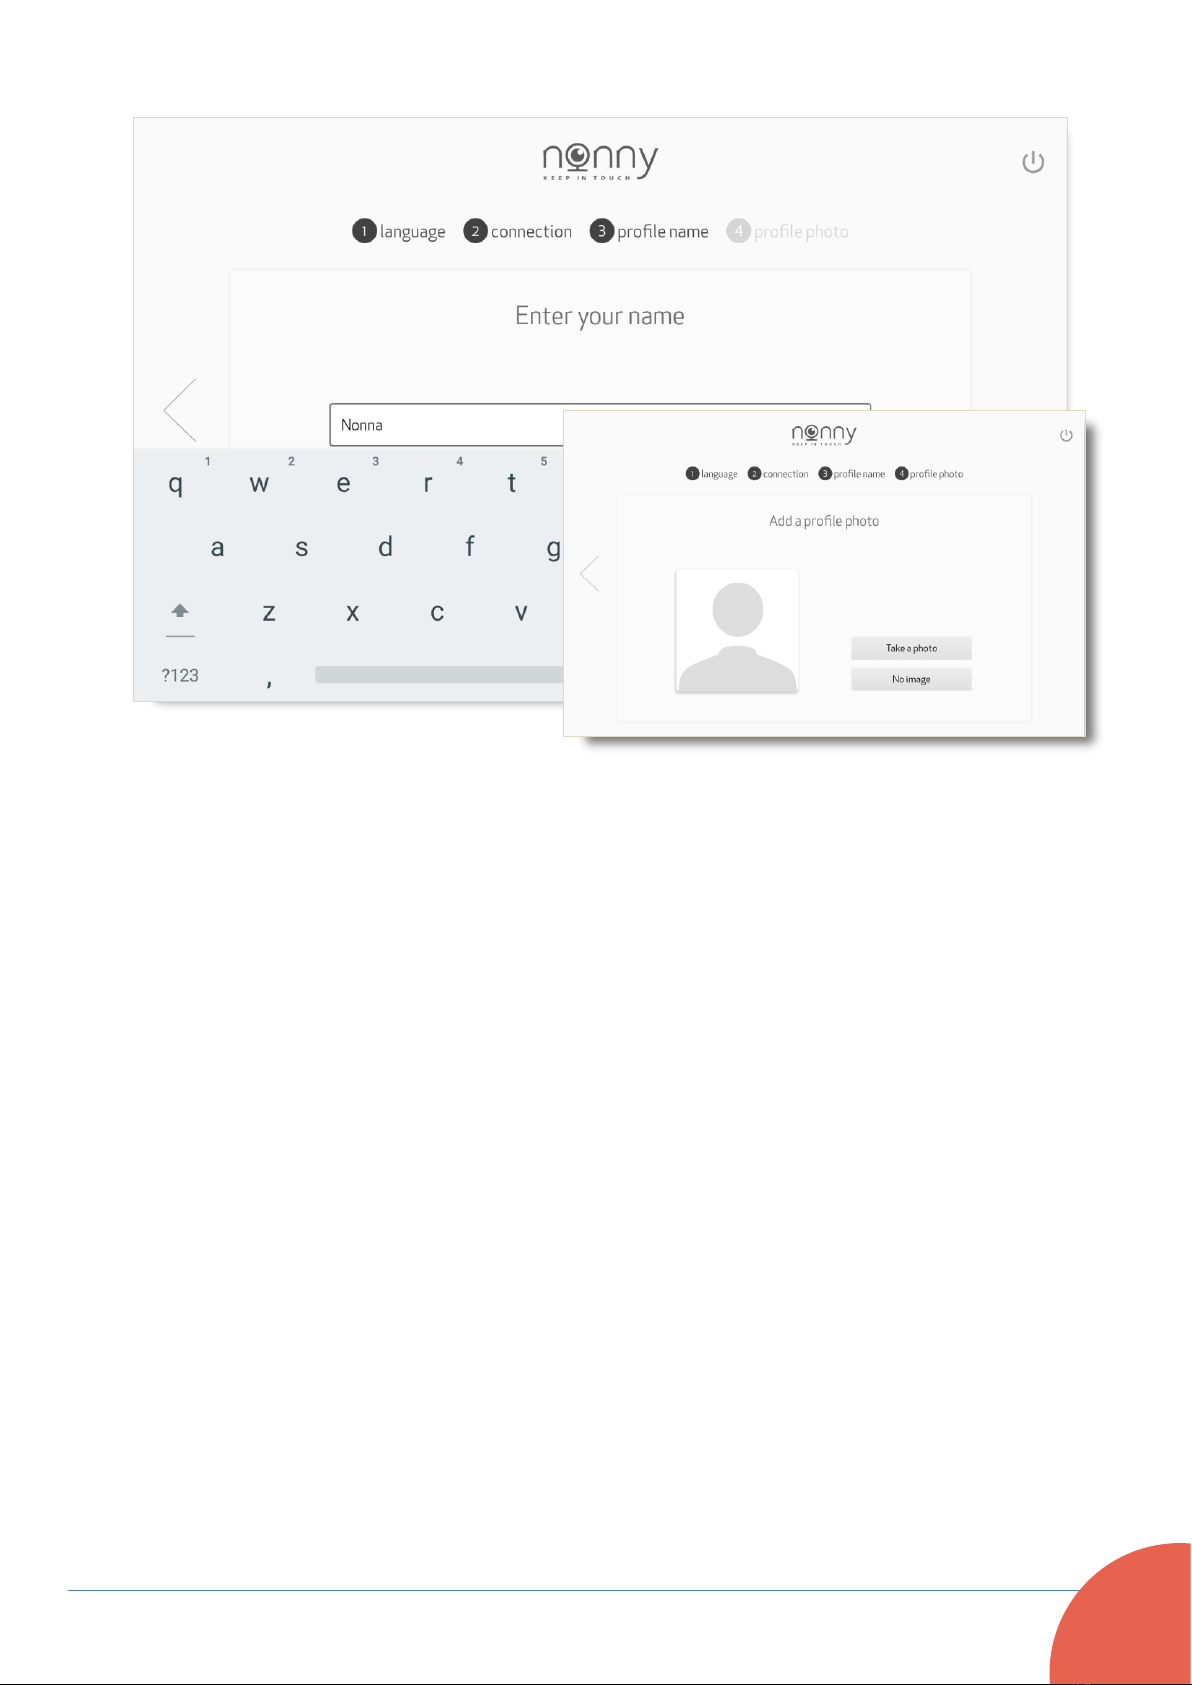
Setting the name and photo of the user profile
This step is to configure the user profile.
The name and the photo set in this phase will be visualized by
the contacts using the Nonny app on their smartphones.
The username is obligatory but can be subsequently modified at
any time.
The photo of the user profile is not obligatory and can be
inserted or modified subsequently. Should the user decide not
to use a photo, a generic icon will appear to represent the Nonny
user.
Nonny –User Manual v.3.1
20
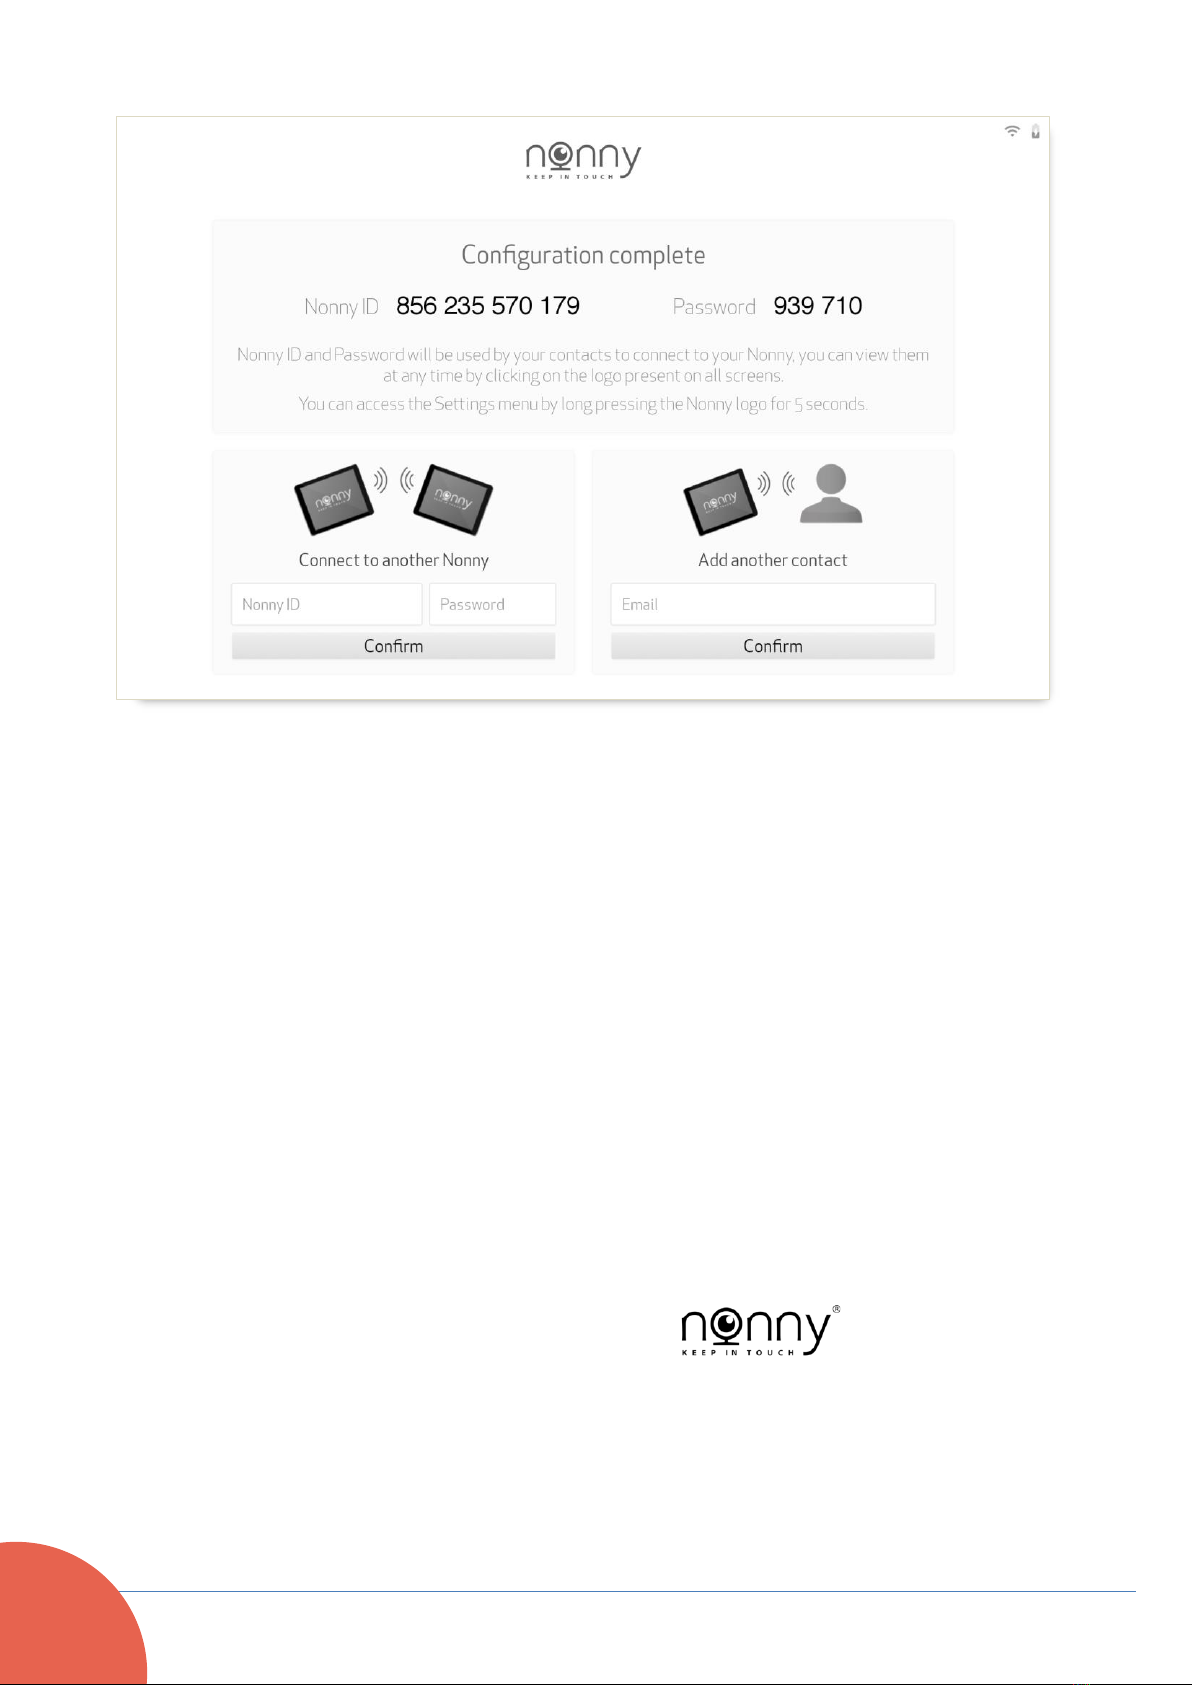
Final screen of the initial configuration process and adding the first few
contacts.
Done! Nonny now has all the necessary information and the
configuration process can end with a courtesy screen which
permits the first few contacts to be inserted.
Connections can be made both with other Nonny device holders
and with other users who have an Android or iOS smartphone.
To connect with another Nonny device you need the ID and
Password of the device with which you wish to connect.
The Nonny ID and Password codes, which identify each single
Nonny device, can be found in the INFORMATION PANEL which
can be accessed by touching the logo ( ) at the center
top of the screen (see the information panel section below).
This manual suits for next models
2
Table of contents


