Norden NVS-PA0032006PM User manual

NVS-PA0032006PM
6 Zone Remote Paging Microphone with Volume Control
User Manual

1
.
Thank you for using our public address system. Please read this User Manual
carefully to make better use of this equipment

2
Contents
Profile of Product…………………………………………………..…………………………………………3
Description……………………………………………………………………………………………3
Features…..…………………………………………………………………………..………………. 3
Appearance...…………………………………………….……………………………………………………..4
Address Setting………………………………………………………………………………………………..7
Paging Operations……….………………………………………………………………………………….. 7
Applications...………………….……………………………………………………………………………… 8
Specifications…………………………………………………………………………………………………..8

3
Profile of Product
Description
The NVS-PA0032006PM is a remote paging station used in conjunction with the
NVS-PA0029006CP/NVS-PA0030006CP six-zone amplifier. It adopts touch-key
technology, glass panel craft, anti-fingerprint coating and high-gloss bevel cutting
techniques. It is smooth in touching, exquisite and beautiful in appearance and
fashion in style. Equipped with simple operation and intuitive signal display, it
corresponds to the amplifier 6-zone toggle switch, which makes switching calls
easy and fast. This paging station is highly stable and has a low failure rate, making
it an ideal choice for a high-quality paging station.
Features
Zone-independent switches for quick control of six-zone switches of the
amplifier.
Featured by signal level indication, it has more intuitive paging sound pressure.
With key lock function.
2 chime tones, chime up and chime down.
The dual RJ45 interfaces have zone control and override function, with the
maximum cascading 3 paging stations per channel, and the maximum
transmission distance of 300m, while the maximum transmission distance of
500m when connected to a single paging station, not requiring a separate
power adapter but powered by the DMA series 6-zone amplifier for audio
transmission.
One-channel hidden microphone volume knob.
One key to page all zones.
With anti-fingerprint coating for the touch panel.
With priority function, with the ID6 as the highest-priority paging microphone.
4
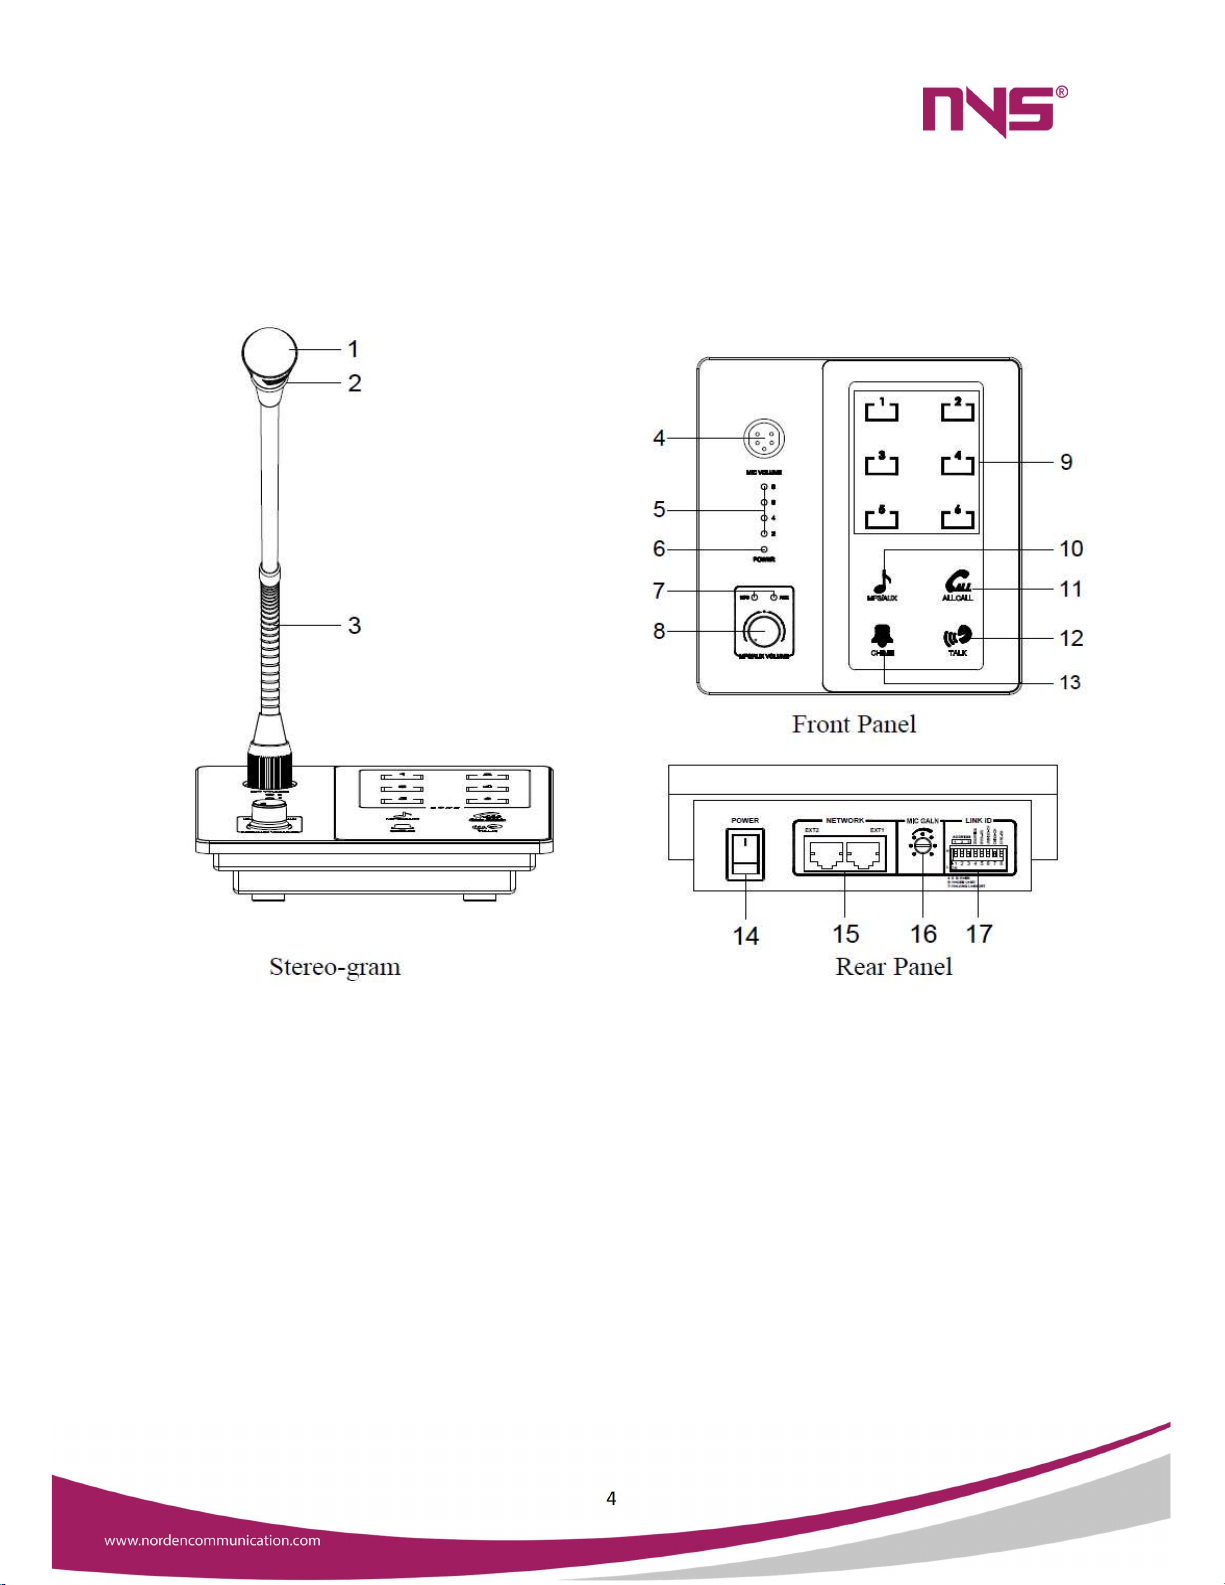
Appearance
1. Microphone Head
2. Microphone Switch Indicator Ring
Press the Voice Broadcast button to turn it on. When the red light turns on,
you can start speaking.
When the voice broadcast function is disabled, the light ring indication does
not illuminate.
3. Microphones rob (The angle can be adjusted freely
)
4. Five pin XLR
Dismantle 5-pin screw microphone connector.

5
5. Four-segment level indicator
Orange represents the maximum volume indicator, while blue denotes all
other volume indicators.
6. Power Supply Indicator
7. AUX/MP3 Indicator
When the host is playing MP3, the MP3 source indicator is blue, and the
AUX source indicator is blue when the host is playing an AUX source.
The key indicator varies according to the host source.
8. AUX/MP3 Volume Knob
When the AUX or MP3 source indicator is blue, turn the volume up knob
clockwise and the volume down knob counterclockwise.
9. Six-zone touch buttons 1-6 (blue backlight marks selected)
10. Source toggles button
Touch the button to turn it on as backlight is blue and turn it off when
backlight is white.
To switch the host to AUX or MP3, gently click the touch button (the
corresponding blue backlight varies from the status of the button).
11. All-zone broadcast button
When the backlight is blue, touch the button to enable all-zone broadcast,
and to turn it off when it is white.
Press and hold the all-zone broadcast button for 1 second to lock all the
buttons; the indicator for the button flashes for 1 second; then, press and
hold the button for 2 seconds to restore the buttons to their original state.
12. Voice broadcast button
When the lighting is orange, touch the button to turn on voice talk; when it
is white, touch the button to turn it off.
13. Chime button
Touch the button to enable it as backlight is blue, and it will stop when it's
over.
Touch the button to play ascending chime.
14. Power Switch
Press down button “one” to turn on the power and press again button "one”
to turn off the power.
15. Dual RJ45 remote communication and audio transmission interface
Support up to six remote paging microphones cascading on a single port,
with a maximum transmission range of 300 metres.
Three remote paging microphones can be cascaded onto one port with a
maximum transmission range of 600 metres.

6
Note: To ensure the above effective transmission distance, it is required to
use CAT 5e network cable or above, with a single line resistance ≤ 12Ω per
100m.
16. Microphone gain knob
Clockwise to the volume up and counterclockwise to volume down.
17. 8 DIP Switches
1, 2, 3 is for address bit settings.
4 is for the strong cut enable setting switch, and the switch is on to the H
and the switch is off to the L.
5 is for the strong cut enable setting switch, and the switch is on to the H
and the switch is off to the L.
6 designates an MP3 as a USB flash drive or SD card, switch to “H” means
MP3 as USB flash drives, and “L” means the MP3 as SD cards.
7 and 8 are not available.

7
Address Setting
Dip switches "1~3" are used for paging station ID setting, and the following paging
station ID are the binary value of paging station ID 1~6, dial up to "1", dial to "ON"
position to "0".
Note: The screen printing on the switch "1" is the lowest binary bit, "3" is the
highest binary bit. The remote paging microphone with the ID6 has the highest
priority.
Paging Operations
1. All-zone paging
You can conduct a one-key all-zone broadcast after pressing the "ALL CALL"
button, which causes the zone 1-6 indications on the panel to light up in blue
and the goose-neck microphone light ring to turn red.
2. Zone paging
Touch the "TALK" button on the machine panel, choose a zone from 1 to 6, and
you can start talking when the goose-neck microphone light ring turns red.
3. Priority
The ID1-5 are devices of the same level. When the high-priority device ID6
makes a paging, the “TALK” orange light on the panel of the low-priority device
flashes at a fixed frequency; when the low-priority device makes a paging, the
“TALK” orange light on the panel of the high-priority device is not lit (indicating
that it can override the paging), and the “TALK” orange light on the panel of the
remaining low-priority devices flashes at a fixed frequency.

8
Application
Specifications
Sl
No
Part Number NVS-PA0032006PM
1 Sensitivity 30±3mV
2 Frequency Response 200Hz-15KHz
3 Signal to Noise Ratio ≥70db
4 RJ45 RS485 communication
protocol
5 Input Power Host power supply
6 Weight 0.89Kg
7
Dimension 172×160×53mm

Table of contents
Other Norden Microphone manuals


