Norman LightGuard 360 N301124-G User guide

1/4
N3011
24
-
G
LightGuard 360TM System Installation
Instructions
Inside Mount
Housing
Housing
Cover
Left
Channel
Screw
Location
Label
Right
Channel
Roller Shade
M Bottom Channel
U Bottom Channel
Outside Mount
Left
Channel
Housing
Cover
Swivel
Bracket
Bottom
Channel
Housing
Roller Shade
Right
Channel
Bottom Channel
Cover
Recommended tools
●Power drill
●Tape measure
●Screwdriver
●Level ruler
●Pencil
Hardware included
Hardware Drawing Usage
1 1/4" Hexagon
screw
To install Housing,
Bottom Channels, Side
Channels, Swivel Bracket
2" Flat head screw
To install safety tension
device
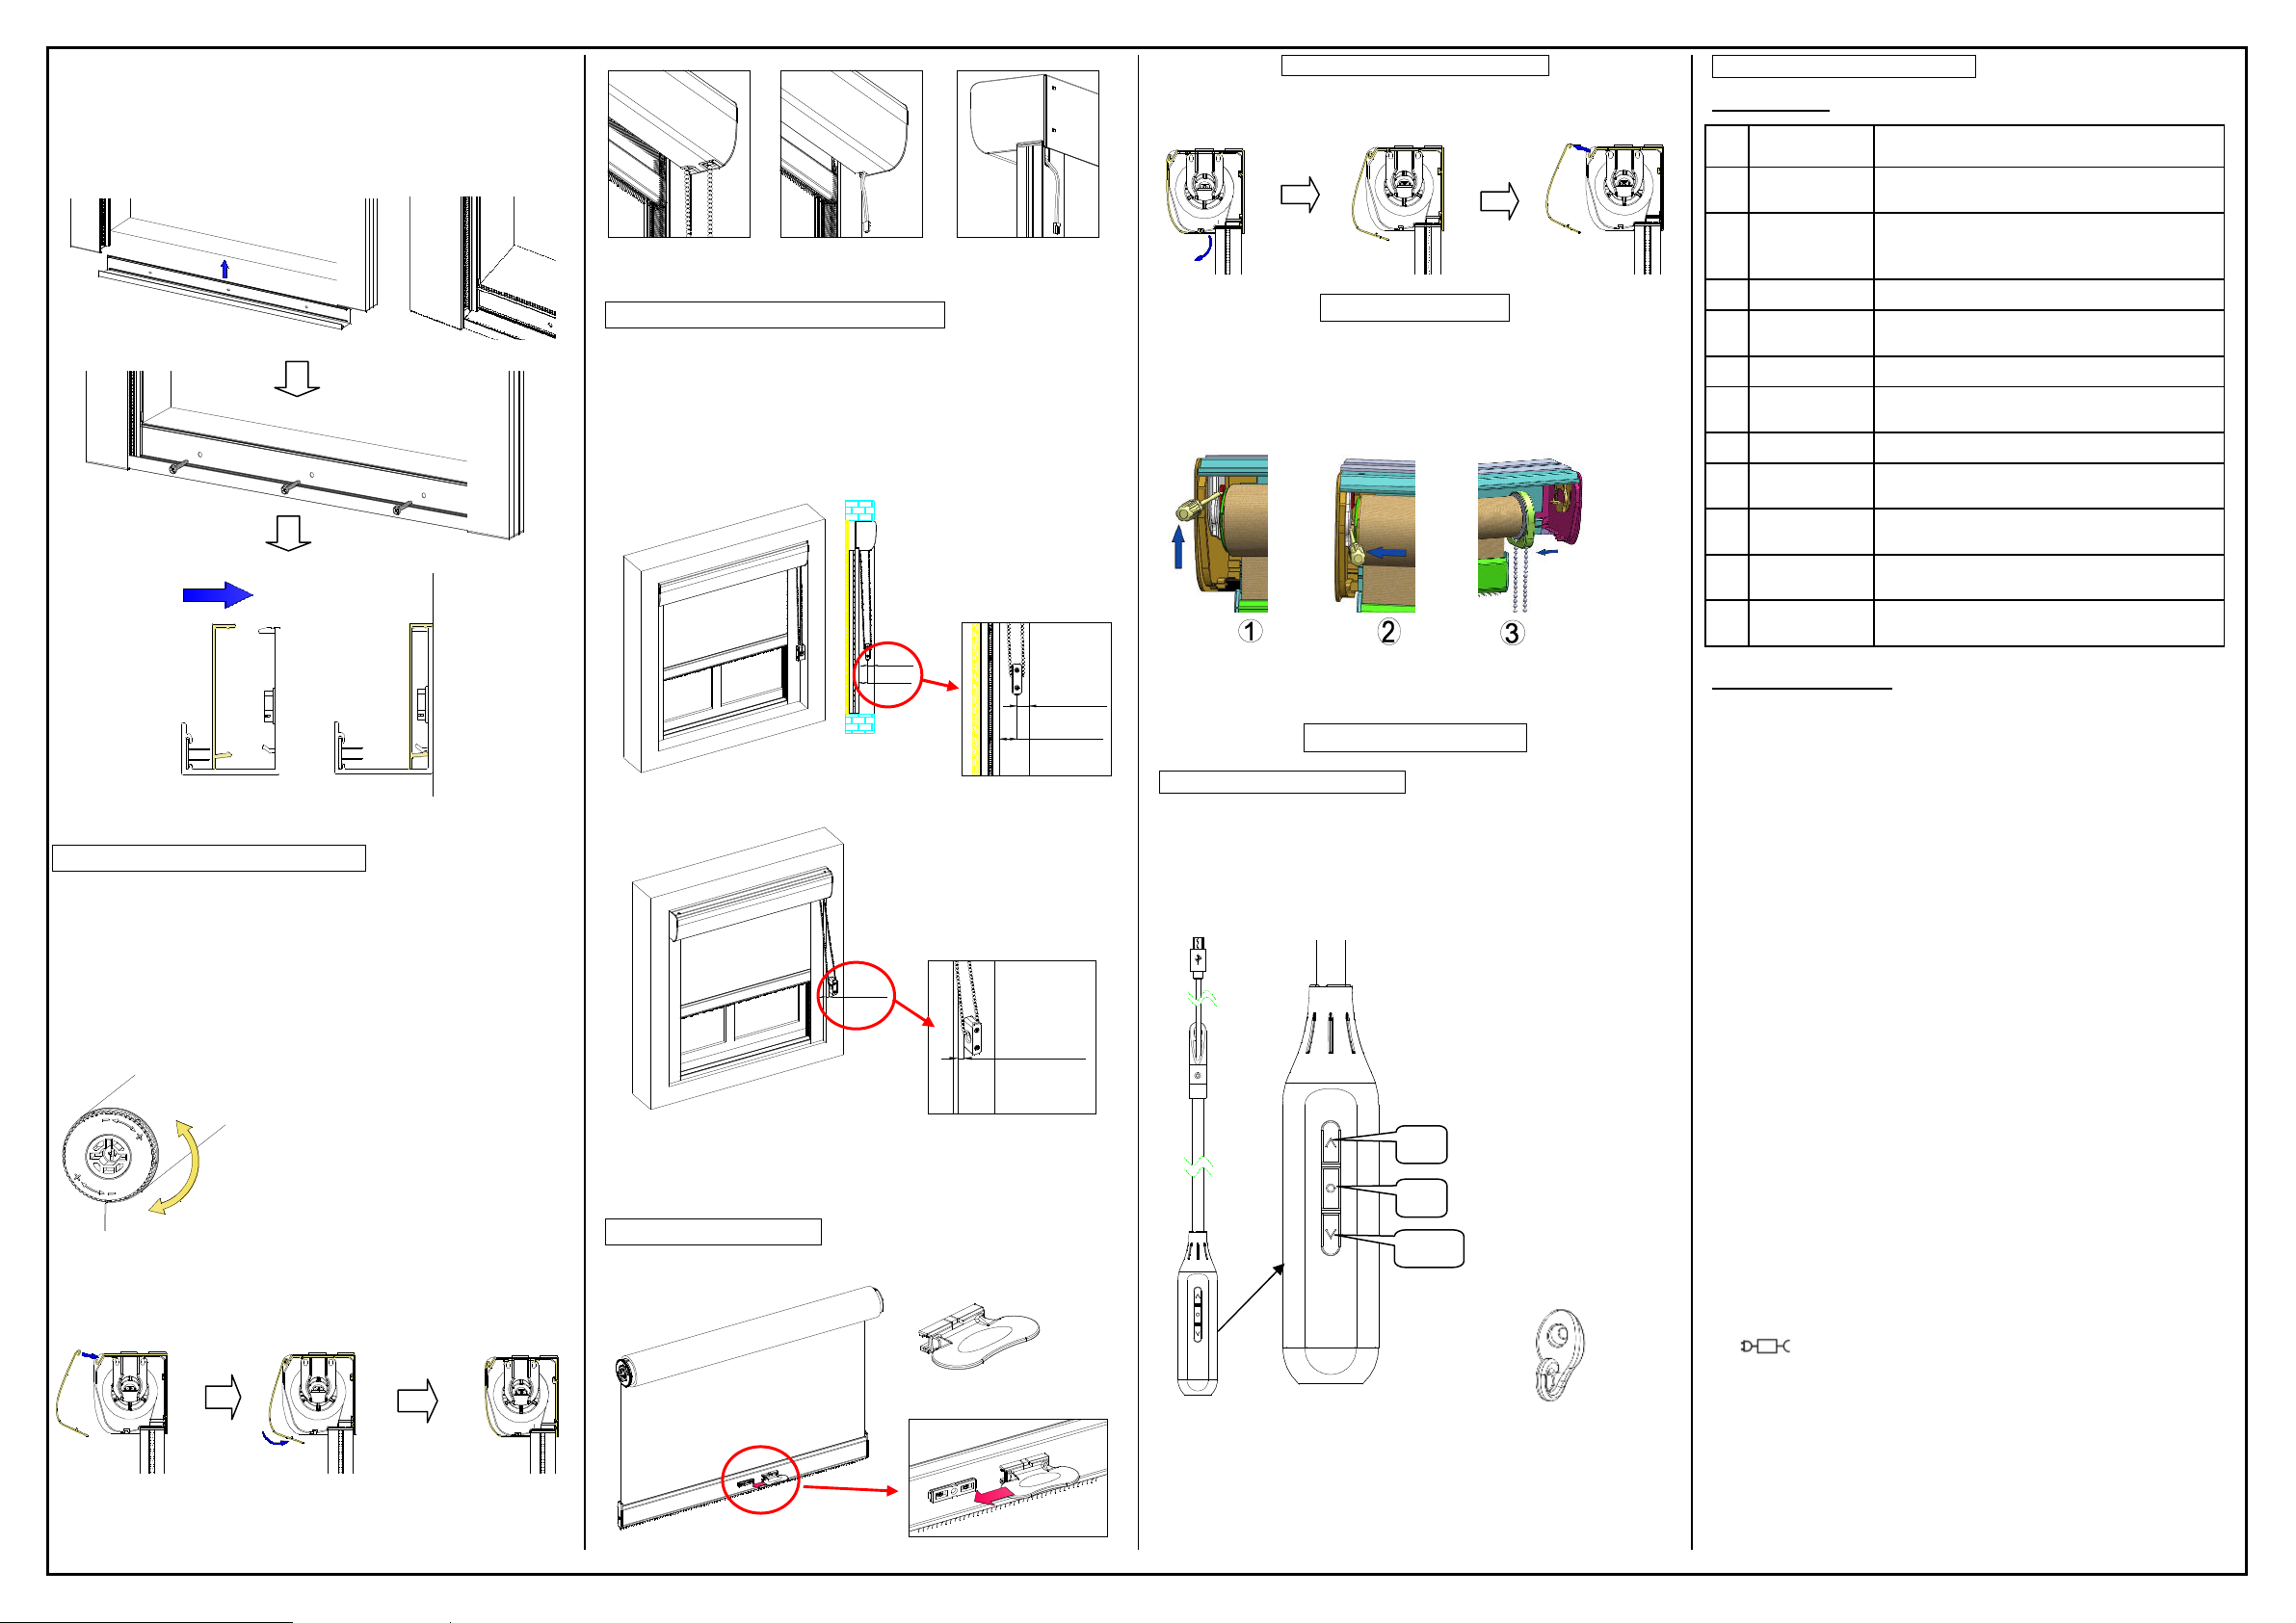
Installation of Housing & Side Channels
1. Installation of the housing
Install the housing to the wall with 1 1/4" hexagon screws. Check
to see if the window header is level. If not, use shims to level the
housing.
Inside Mount
Outside Mount
2. Installation of the shade
①First, insert the control side into the tongue of the bracket for
the control side.
②Second, press the end plug and insert the end plug into the hole
of bracket of the other side.
③Third, slide the lock pin in the shade bracket downward into
the end plug to prevent the shade from falling.
○4Finally remove the paper band from the shade.
3. Installation of the side channels
Note: Make sure the shade functions properly before installing the
side channels.
Inside Mount:
Determine the left and right channels by noting the mark of
LEFT/RIGHT on the top end cap of the side channels. The front
of each channel contains labels indicating location of screw holes.
Position the top of each channel around the hem bar and clip into
the slot of the housing end cap.
Take out the PVC card that stick on the side channel, and then
fold it into a U-shape and place into the channel near the screw
location labels to reveal each screw hole. Remove the screw
location label after side channels are properly installed.
Motorized Shades:
For motors with power cord and plug cord must be routed through
the back of the channel. Remove the channel end cap and run the
cord through the cutout and behind the channel. Install the side
channels as described earlier.
Outside Mount:
First, install the swivel brackets. Make sure that the inner edge of the
bend flushes with the window edge, and left brackets face upward and
right brackets face downward.
1 1/4"
7/8"
2 1/2" ~ 3"
7/8"
1 1/4"
3 1/2" ~ 4"
Left brackets
face upward
and inner edge of
the bend flush
with edge of
the window.
ousing
Right brackets
face downward
and inner edge
of the bend flush
with edge of the
window.
Divided Envenly
Divided Envenly
Determine the left and right channels by noting the mark of
LEFT/RIGHT on the top end cap of the side channels.
Position the top of each channel around the hem bar and put into
the housing end cap, and the inner edge of the side channels flush
with the window edge. And then rotate the bend of swivel
brackets down/up to lock the side channels.
Left Brackets
Right Brackets
4. Installation of the bottom channel
Note: Please skip this step if there is no bottom channel.
Inside mount: Place the bottom channel into the side channels
and install the screws through the screw holes.
Left
Channel
U-shaped
PVC card
Screw
Location
Label
Clip
top of the
side channel into
the slot of the
housing end cap.
Light block film
to cover the light
between wall and
housing end cap.
Right Channel
Top Cap
Scan to watch
Bottom
edge of the
housing aligns with the
top edge of the window.
Left
brackets
r
otate
d
own
Right
brackets
r
otate
up
Scan to watch
2/4
N3011
24
-
G
Outside mount: Slide the bottom channel from bottom of the side
channels and install the screws through the screw holes, and then
align the bottom channel cover with bottom channel and press it
into bottom channel.
5. Installation of the housing cover
Note: Make sure the shade functions properly before installing the
housing cover.
For cordless shades, if the shade begins to slide down on its own or it
fails to roll up, the issue can be easily fixed by turning the adjustment
dial towards “+” to increase the tension. Conversely, if the shade cannot
stop at the desired height and tends to roll up by itself, the tension can be
decreased by turning the adjustment dial towards the “-”.
The shade must be installed on the brackets when adjusting.
Installation: Hang the top edge of the housing cover on the
housing, and then flip down the bottom of the housing cover into
the end cap. Pay attention not to pinch the bead chain / power
cord.
6. Installation of safety tension device
For Continuous Cord Loop, properly secure the safety tension
device. The bead chain should be fully extended upon installation
of the device.
Inside mount:
Mount inside the opening
3/4"
≧
3/4"
≧
3/4"≧
3/4"≧
Mount outside the opening / wall mount
3/4"
≧
3/4"
≧
Outside Mount: The safety tension device should be installed
outside of the side channels.
7. Installation of handle
For Cordless shades, slide the handle into the handle base.
Removal of Housing Cover
Flip down the bottom edge of the housing cover to detach from
the housing end cap, and then remove the housing cover from the
top.
Removal of Shades
①Use a tool to push the lock pin on end plug bracket upward.
②Use flathead screwdriver to draw back the end plug from
bracket.
③Finally remove shade from mounting bracket. As shown in
drawing.
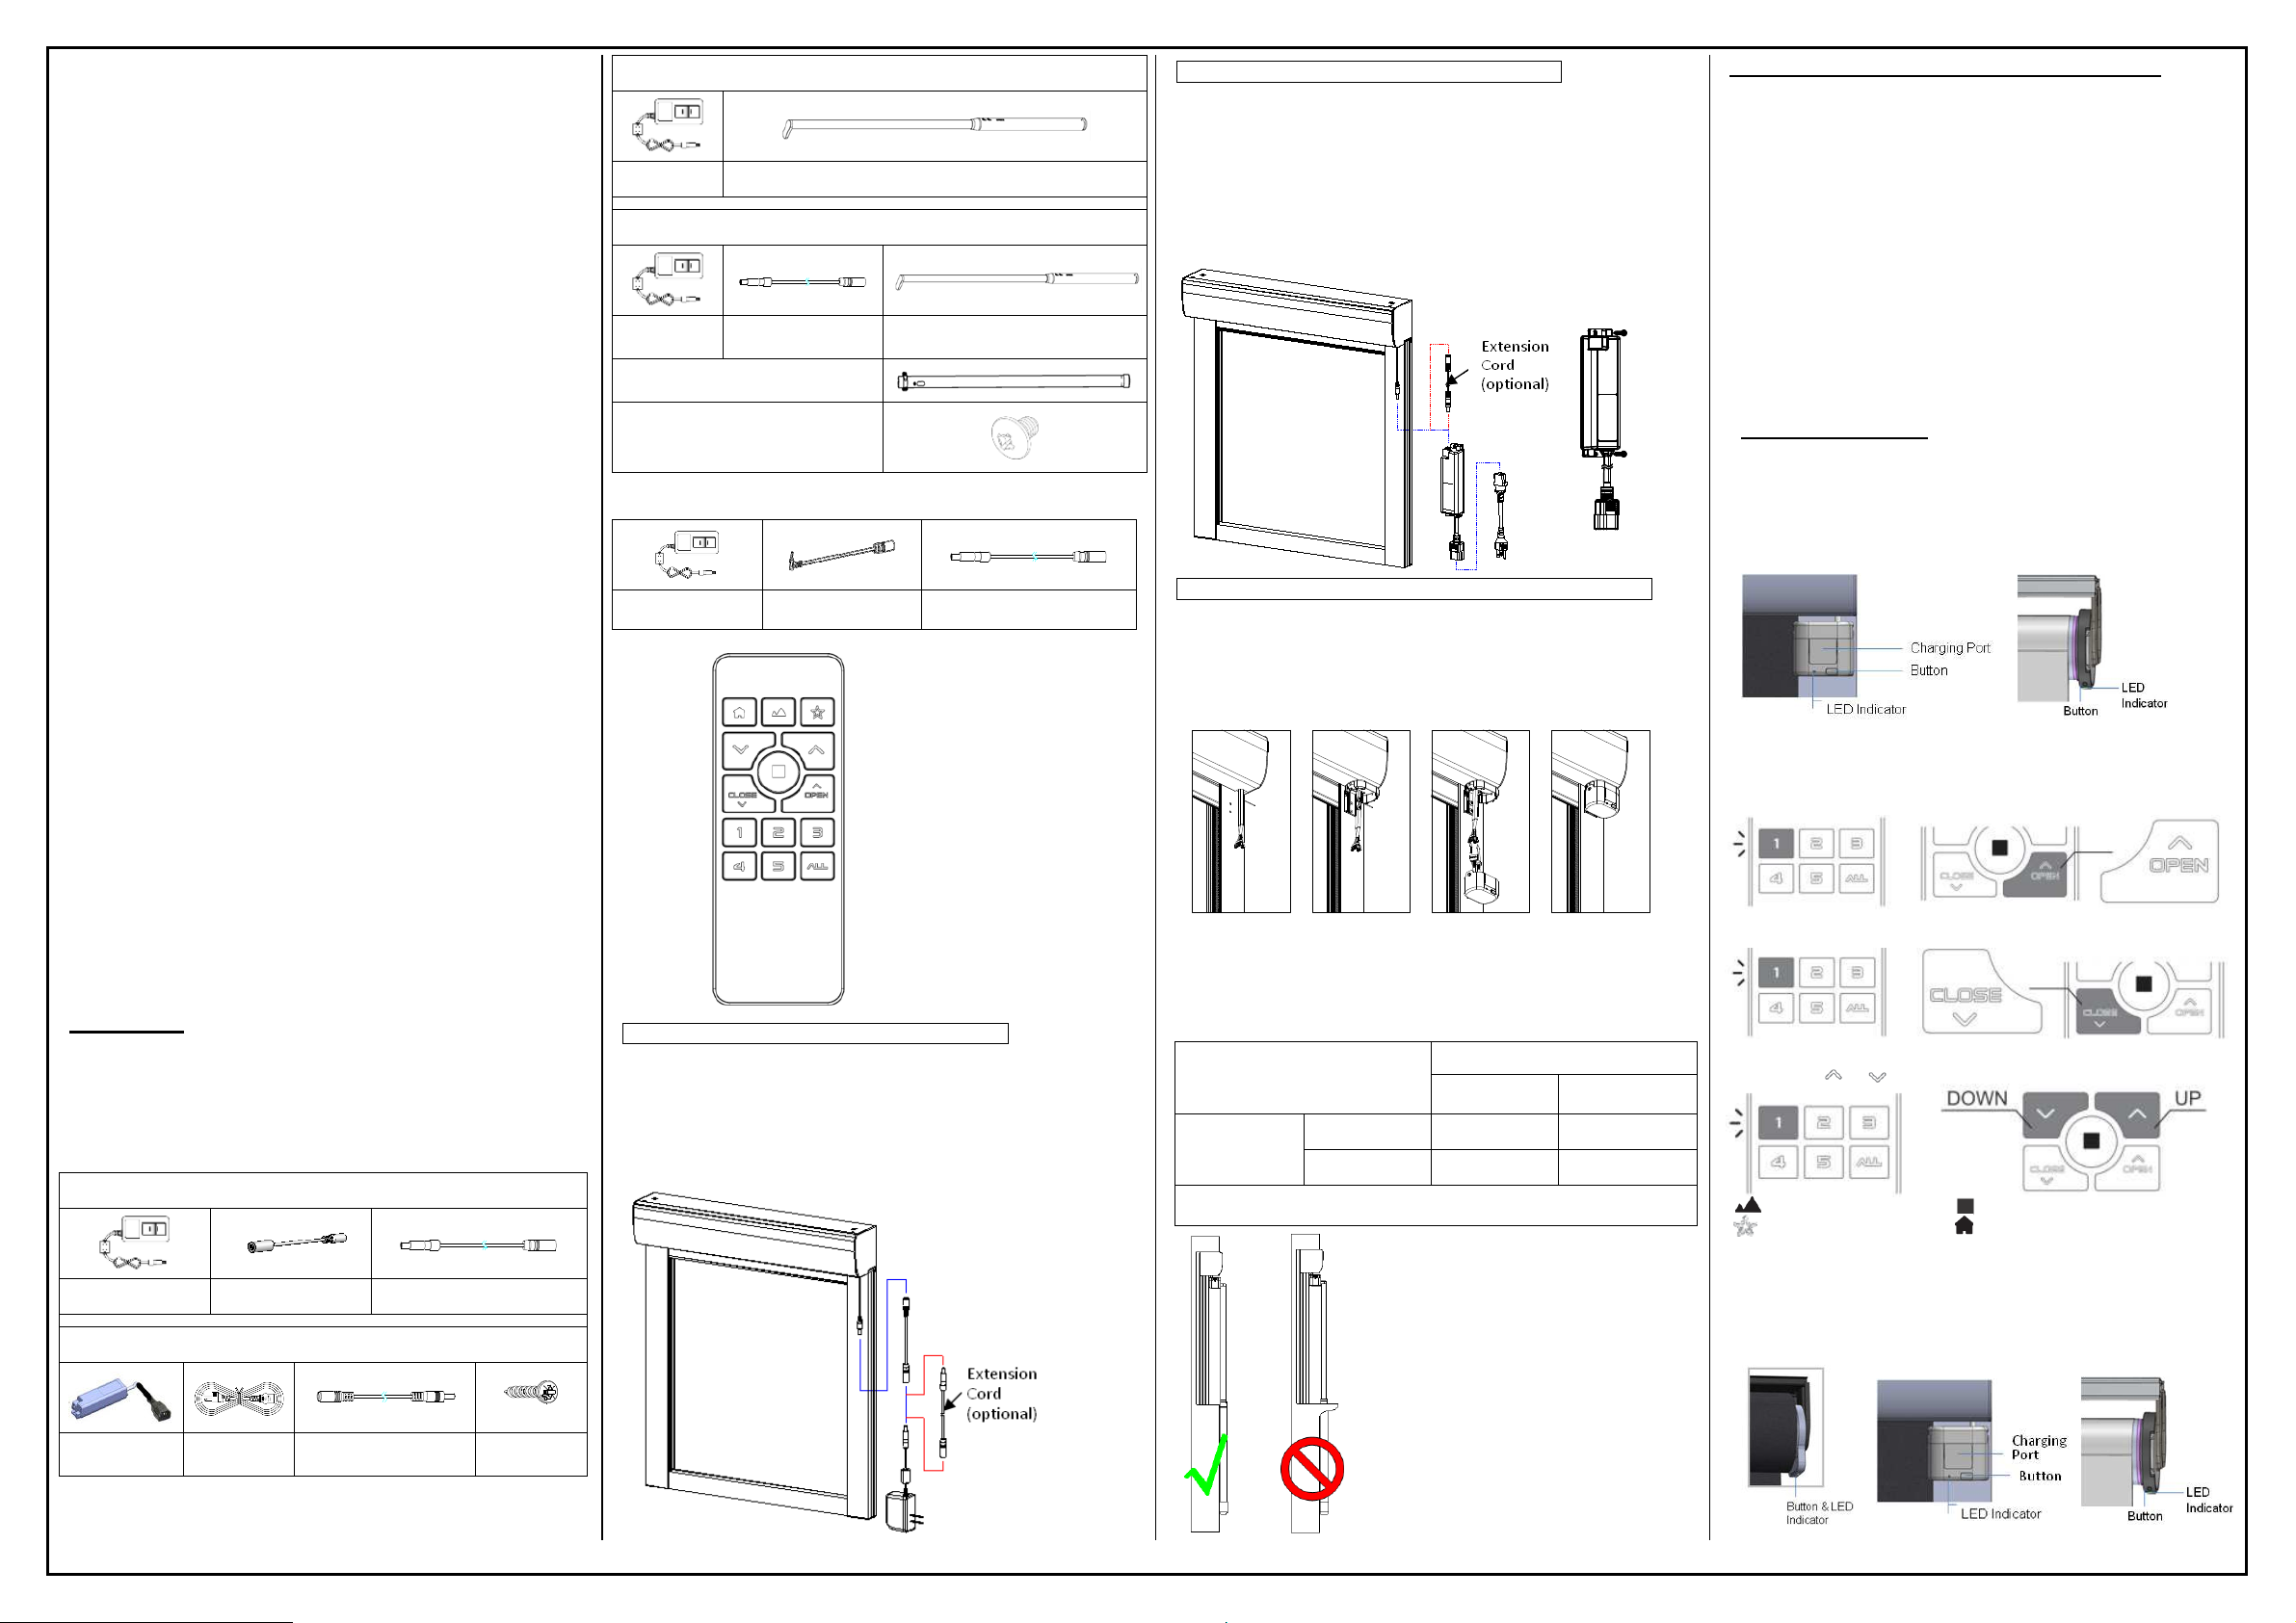
Motorized Installation
AutoWand
TM
Motorization
Please connect the cable of the control wand to the motor, and then the
shade will turn on automatically.
Use one M3 x 3/4” flat head screw to install the hook to the wall to hang
the control wand.
Norman Smart Motorization
Specification
NO.
Item Specification
1
Power Source
MRS-32A: AC Power 100-240V, 50 / 60Hz
MRS-32B/32C: Battery Power Li-ion batteries
2
Battery
operating
voltage range
4.2V~3.4V (Single cell)
3
Radio type 2.4G RF
4
Frequency
band(s) 2415~2459MHz
5
Motor type Brush DC motor
6
Charge type Charging Wand for MRS-32B
Power Adapter for MRS-32C
7
Charging Time
< 3 hours
8
Charging
Temperature 5°C/41°F ~ 35°C/95°F
9
Operating
Temperature 0°C/32°F ~ 40°C/104°F
10
Relative
Humidity 0% ~ 90% (Non-condensing)
11
Ave. Sound
Level @1m ≦50dBA
Safety Precautions
Thank you for your purchase. Please review the instructions carefully
before using the product, and save these instructions for future
consultation.
WARNING! Important safety instruction: It is critical for your safety
and the safety of those around you to follow these instructions. Please
save these instructions for future use.
WARNING! The motor/shade must be disconnected from its power
source during cleaning, maintenance and when replacing parts.
The products may contain Lithium-ion batteries; the battery contains
flammable materials such as organic solvents. Please read the
Important Safety Precautions before using the product.
Please recharge the batteries every 3-6 months to ensure optimal
performance of batteries.
Product operation is intended for temperatures between 0°C/32°F
~40°C/104°F.
Please note that the limited warranty will be voided if the product is
modified, dismantled or used in any manner other than its intended
purpose.
The accessories, including Charging Wand, Adapter, and Remote are
designed to be used with our Motorized Shades. Do NOT use them
for any other purpose.
Please make sure the shade route is clear when operating to avoid
danger or damage.
In order to improve the user experience and functionality, the
firmware and software of this product will automatically update from
time to time.
WARNING! For the purposes of recharging the battery, only use
the detachable supply unit provided with this appliance.
Detachable supply unit (UHVUU3036-240015SA)
Do NOT disassemble the products or any of their components. They
do not contain serviceable parts. Servicing of these products should
be referred to qualified personnel.
This appliance contains batteries that are only replaceable by skilled
personnel, trained authorized retailer or electrician.
Do NOT operate the product with wet hands to avoid risk of
electrical shock. The product needs to be powered off and
Cordloop Motorized w/ cable
runs through front side
Motorized w/ cable
runs through back side
Top
Stop
Down
Control Wand Hook
3/4
N3011
24
-
G
disconnected from its power source during cleaning, maintenance
and/or replacing parts.
The appliance is not intended for use by persons (including children)
with reduced physical, sensory or mental capabilities, or lack of
experience and knowledge, unless they have been given supervision
or instruction concerning use of the appliance by a person responsible
for their safety. Children should be supervised to ensure that they do
not play with the appliance.
The appliance is only to be used with the power supply unit provided
with the appliance.
If the supply cord is damaged, it must be replaced by the
manufacturer, its service agent or similarly qualified persons in order
to avoid a hazard.
WARNING: Important safety instructions. It is important for the
safety of persons to follow these instructions. Save these instructions.
WARNING: Important safety instructions. Follow all instructions,
since incorrect installation can lead to severe injury
-before installing the drive, remove any unnecessary cords or
components and disable any equipment not needed for powered
operation;
-the characteristics of the driven part must be compatible with the
rated load and rated operating time;
-the mass and the dimension of the driven part shall be compatible
with the rated torque and rated operating time;
-fixed controls have to be clearly visible after installation;
This appliance contains batteries that are only replaceable by skilled
persons.
Do NOT operate when maintenance, such as window cleaning, is
being carried out in the vicinity.
IMPORTANT: Please reserve space for connecting the Power
Charger while installing the shade, please refer to “Installation”
Section for more information.
Do not allow children to play with fixed controls. Keep remote
controls away from children.
Frequently examine the installation for imbalance and signs of wear
or damage to cables springs and fixings. Do not use if repair or
adjustment is necessary.
LpA ≤70 dB (A).
Installation
Please take a moment to review the following installation guide.
The installation of mounting brackets and shades is same as non-
motorized shades.
Check components for AC adapter Plug-In (MRS-32A)
36W Adapter
36W Adapter Connector Cord Extension cord (optional)
65W Adapter
65W Adapter Power Cord
Extension cord
(optional)
1” screw for
65W adapter
Check components for rechargeable Battery with charging wands (MRS-32B)
Wireless Charging Wand
36W Adapter
Charging Wand
Wired Charging Wand
36W Adapter
Extension cord
(optional) Charging Wand
Extension pole
for charging wand (Optional)
M4 x 1/4”screw bolt
Check components for rechargeable battery with AC adapter charger
(MRS-32C)
36W Adapter 32C’s Adapter
Connector Cord Extension Cord(optional)
Remote
AC Adapter Plug-In (MRS-32A) with 36W adapter:
Please connect the connector cord to the adapter, and then plug the
connector cord into the cable of the motor, last plug the adapter to the
outlet. If there is extension cord ordered, then connect the extension cord
between connector cord and adapter.
The shade will turn on automatically after plug into the outlet. And the
indicator light will blink green.
AC Adapter Plug-In (MRS-32A) with 65W adapter:
Please connect the adapter to the cable of the motor, and then plug the
AC power cord into the adapter, last plug the AC power cord into to the
outlet. If there is extension cord ordered, then connect the extension cord
between adapter and cable of the motor.
The 65w adapter will be supplied with 2 pcs of 1” screws, which can be
used to fix the adapter if needed.
The shade will turn on automatically after plug into the outlet. And the
indicator light will blink green.
Rechargeable Battery with Charging Wands Motor (MRS-32B):
1. Pass the motor cable through the holder bracket of the charging port.
2. Install the holder bracket of the charging port to the side channel by
M4 x 1/4”screw bolts.
3. Connect the wire line of the charging port with the motor cable, and
then put the lines into charging port and plug the charging port to the
holder bracket.
When install the shade, the front edge of the charging port should not be
within the front edge of bottom window or windowsills or obstacles,
otherwise the charging rod cannot be used.
The minimum shade height for shade installed within bottom window /
windowsills / obstacles:
Min shade height
System Wireless Charging
Wand
Wired Charging
Wand
3.5”Housing 40 9/16”42”
LG360
4.5”Housing 41 1/2”42 7/8”
Note: If Extension Pole is ordered, it needs to add 33 11/16
”
to above min
height size.
CHARGING THE SHADE (MRS-32B & MRS-32C)
Warning!
Please charge the shade before use!
Please DO NOT use the shade when charging.
Please recharge your shade every 3~6 months to ensure optimal
performance of batteries.
For shade with MRS-32B, please only use the charging wand
included with this product. If using the extension cord, please DO
NOT bend or twist the cord to avoid product damage or safety
hazard.
For shade with MRS-32C, please only use the 36W AC Adapter
included with this product. If using the extension cord, please DO
NOT bend or twist the cord to avoid product damage or safety
hazard.
After charging, please store the 36W AC Adapter, extension cord for
later use.
SHADE OPERATION
For Shade with MRS-32A AC Adapter, the shade will power on as soon
as the power is connected.
For Shade with MRS-32B and MRS-32C Battery Power, press and hold
the shade button for 3 seconds and the green light will flash to indicate
that it is powered on and ready for operation.
Operating the Shade by Remote Control
Select the group of the shade (it can select one or multiple groups at same
time), press OPEN to fully raise the shade (fully open position).
Select the group of the shade (it can select one or multiple groups at same
time), press CLOSE to fully lower the shade (fully close position).
Select the group of the shade (it can select one or multiple groups at same
time), press
or to adjust shade location.
:
::
:Move to Best View : Stop the shade
: Move to My Favorite : Move to Best Privacy
Note: “All”
button default controls all shades at same time.
Operating the Shade with Shade Button
When the remote is out of reach, the shade can be operated by shade button.
Press the button to move the shade in first direction when the shade is still.
Press the button to stop the shade while the shade is in motion.
Press the button again to move the shade in the opposite direction.
MRS-32A
MRS-32B
MRS-32C
MRS-32B
MRS-32C

4/4
N3
011
24
-
G
TROUBLESHOOTING
Problems
Possible
Cause Description
No Signal
Operate the shade with the remote
and check the
LED indicator on the shade.
Green light blinks
: The shade receives signal
normally.
Red light blinks
: Low battery / Over temperature
limit
Red/Green light blinks
: Other problems
No light
: Not receiving signal / Not paired with a
Remote / The shade is powered OFF.
Low battery
of Remote
Please check if t
he remote group lights work
normally, or replace with new batteries.
Low battery
of Shade
Please use charging wand to charge the shade
with MRS
-32B.
Please use
36W Adapter to charge the shade with
MRS
-32C.
The shade is
not paired
with the
Remote
Press
and hold the paired Group button and check
if the shade
responds.
Shade response as shift
x 1 means it has been
paired.
Shade has no response means it needs to be paired
first
.
Please refer to “Remote Control Manual” for
pairing steps
.
Over
Temperature
Protection
The shade might be overheated when the LED
indicator on shade blinks red during operation.
Please wait at least 30 minutes and operate the
shade again.
Please refer to the Specifications for
applicable operating temperature
.
The limits
are no
t fully
setup.
Press
/ on Remote to operate the shade and
check if the shade LED blinks green and the
shade works normally.
If not, the shade limits
might not be fully set up for full functionality.
Please refer to “Remote Control Manual” to set
up s
hade limits again.
IMPORTANT! Upper and Lower limits must be
setup for full function of the shades.
No reaction
upon
operation
Other
Problems
Re
-power ON:Hold the shade button for 3
seconds
to power the shade ON/OFF. If the
problem
still exists, please try “Hardware reboot”.
Hardware reboot
:Hold the shade button for 10
seconds until the red light illuminates and the
shade will reboot.
If the problem still
exists, please contact your
customer service
for further assistance.
Abnormal
power
failure
Abnormal power failure may cause an unintended
change to the shade limits. Please refer to
“Remote Control Manual” to set up limits again
.
Limits shift
Others
Pl
ease contact customer service for further
assistance
.
SAFETY STATEMENT
Federal Communication Commission Interference Statement
This device complies with Part 15 of the FCC Rules. Operation is subject to the
following two conditions: (1) This device may not cause harmful interference, and
(2) this device must accept any interference received, including interference that
may cause undesired operation.
This equipment has been tested and found to comply with the limits for a Class B
digital device, pursuant to Part 15 of the FCC Rules. These limits are designed to
provide reasonable protection against harmful interference in a residential
installation.
This equipment generates, uses and can radiate
radio frequency
energy and, if not installed and used in accordance with the instructions, may
cause harmful interference to radio communications. However, there is no
guarantee that interference will not occur in a particular installation. If this
equipment does cause harmful interference to radio or television reception, which
can be determined by turning the equipment off and on, the user is encouraged to
try to correct the interference by one of the following measures:
• Reorient or relocate the receiving antenna
• Increase the separation between the equipment and receiver.
• Connect the equipment into an outlet on a circuit different from that to
which the receiver is connected.
• Consult the dealer or an experienced radio/TV technician for help.
FCC Caution: Any changes or modifications not expressly approved by the party
responsible for compliance could void the user's authority to operate this
equipment.
This transmitter must not be co-located or operating in conjunction with any other
antenna or transmitter.
Industry Canada Equipment Standard for Digital Equipment (ICES)
–Canada
This Class B digital apparatus complies with Canadian ICES-003. Cet appareil
numérique de la classe B est conforme à la norme NMB-003 du Canada. CAN
ICES-3 (B)/NMB-3(B)
Innovation, Science and Economic Development Canada (ISED) Compliance
Statement
This device complies with ISED’s licence-exempt RSS standard(s).
Operation is subject to the following two conditions: (1) this device may not cause
interference, and (2) this device must accept any interference, including
interference that may cause undesired operation of the device.
Le présent appareil est conforme aux CNR d’ ISED applicables aux appareils radio
exempts de licence. L’exploitation est autorisée aux deux conditions suivantes : (1)
le dispositif ne doit pas produire de brouillage préjudiciable, et (2) ce dispositif
doit accepter tout brouillage reçu, y compris un brouillage susceptible de
provoquer un fonctionnement indésirable.
Radiation Exposure Statement:
This equipment complies with FCC/ISED radiation exposure limits set forth for an
uncontrolled environment. This equipment should be installed and operated with
greater than 20cm between the unit & your body.
Déclaration d'exposition aux radiations:
Cet équipement est conforme aux limites d'exposition aux rayonnements
FCC/ISED établies pour un environnement non contrôlé. Cet équipement doit être
installé et utilisé à plus de 20cm entre le radiateur et votre corps.
SAFETY INSTRUCTIONS FOR LITHIUM BATTERIES
The product may contain lithium-ion batteries; the battery contains flammable
materials, such as organic solvents. Mishandling of the battery may cause fire,
smoke, or explosion.
DANGER
Do not immerse the battery in any liquid, such as water, beverages, or other fluids.
Exposure to liquid may damage the battery or the battery pack. Damaging the
battery may generate heat, smoke, catch fire, or explode.
Do not use or place the battery in or near an open flame, heater or high
temperature areas (above 80°C or 176°F) ), such as those near a microwave or
other cooking appliance.
Subjecting the battery to high temperature or near electromagnetic radiation may
damage the polyolefin separator and can cause short circuit. This may cause the
battery to generate heat, smoke, catch fire, or explode.
About Charging: Do not use unauthorized chargers.
Only charge the battery within recommended conditions (e.g., temperature range,
voltage, and current). Use of an unauthorized charger could cause the battery to
generate heat, smoke, catch fire, or explode.
Do not attach or insert battery with polarity reversed.
If the battery does not easily fit into the charger or device, check the battery
orientation. Do not force the battery into the compartment. If the battery is inserted
incorrectly, the battery may generate heat, smoke, catch fire, or explode.
Do not connect the battery to an AC outlet or DC automotive plug.
The battery requires a specific charger. If the battery is connected directly to a
power outlet, the battery may generate heat, smoke, catch fire, or explode.
Do not use the battery in equipment for which it was not intended.
If the battery is used in unapproved applications or systems, the battery may be
damaged and generate heat, smoke, catch fire, or explode.
Keep the battery away from heat and fire.
Excessive heat will damage the battery and may cause it to generate smoke, catch
fire, or explode.
Do Not connect the positive (+) and negative (-) terminals with a conductive
material. Do not carry or store the battery with any metal objects. If the battery is
shorted, it may overheat and the battery may generate heat, smoke, catch fire, or
explode.
Avoid excessive impact to the battery.
Impact beyond specification may damage the battery. This may cause the
battery to leak, generate heat, smoke, catch fire, or explode.
Do not penetrate the battery with any sharp object.
If subjected to a hard strike or penetrated by an object, the battery may be
damaged, thereby causing the battery to short-circuit. This may cause the
battery to generate heat, smoke, catch fire, or explode.
Do not directly solder to the battery.
Soldering directly to the battery could melt the separator, damage the fume
release vent or other safety mechanisms. This may cause the battery to
generate heat, smoke, catch fire, or explode.
Do not disassemble the battery.
Disassembly or modification of the battery may damage the protection circuit.
This may cause the battery to generate heat, smoke, catch fire, or explode.
Do not charge the battery near high temperature.
If the battery is charged while exposed to high temperature, the battery’s
protection circuit may activate and prevent charging, or fail and cause the
battery to generate heat, smoke, catch fire, or explode.
WARNING
Ingestion
Keep away from small children.
Keep the battery away from small children. If the battery or any of its
component parts is swallowed, seek medical attention immediately.
Mixed Use
Do not mix with other batteries.
The battery should not be used with other batteries having a different capacity,
chemistry, or manufacturer. Doing so could cause the battery to generate heat,
smoke, catch fire, or explode.
Rust, Discoloration and Deformities
Do not use abnormal batteries.
Immediately stop using the battery if there are noticeable abnormalities, such
as smell, heat, discoloration, or deformity. The battery may be defective and
could generate heat, smoke, catch fire, or explode with continued use.
Charging Time
Stop charging if the charging process cannot be finished.
If the battery cannot finish the charging process within the specified time, halt
the charging process. The battery may generate heat, smoke, catch fire, or
explode.
Leakage -1
Do not use a leaking battery near open flame.
If the battery or liquid leaking from the battery has an irritating odor, the
battery should be kept away from any open flame. If exposed to an open
flame, the battery could ignite and explode.
Leakage -2
Do not touch a leaking battery.
If liquid leaking from the battery gets into your eyes or makes contact with
your skin, immediately flush your eyes or skin with clean water and seek
medical attention. If left untreated, it will cause significant eye or skin
damage.
Transport
Pack the battery securely for transport.
To prevent short-circuit or damage during transport, securely pack the battery
in a case or carton.
CAUTION
Exposure to Direct Sunlight
Do not use or leave the battery in a location exposed to excessive heat, such
as in direct sunlight or in a car. Doing so could cause the battery to generate
heat, smoke, catch fire, or explode. It may also cause the battery’s
performance and life to deteriorate.
Use with other Equipment or Power
The battery pack has a protection circuit. Do not use the battery with other
equipment or power as it may damage the protection circuit. If the protection
circuit fails, the battery may generate heat, catch fire, smoke, or explode.
Charging Temperature Range
Only charge the battery between 5°C and 35°C. Charging outside of this
temperature range may cause the battery to leak, generate heat, or result in
serious damage. It may also cause the battery’s performance and life to
deteriorate.
Charging Method
Read the user’s manual for proper product charging method.
First Time Usage
Please contact the supplier if the battery gives off an unusual odor, generates
heat, or shows signs of rust prior to its initial use.
Flammable Materials
Do not charge or discharge near flammable materials. Doing so could result
in fire.
Handling of Exposed Contacts or Conductors
If the battery pack has a system interface consisting of stripped lead wires or
exposed contact plates, handle with due care. Temporarily insulate exposed
contacts and conductors with an insulator such as polypropylene tape or
polyvinylchloride tape. Failure to do so could result in an electrical shock; a
short circuit causing the battery to generate heat, smoke, catch fire, or explode;
or the combustion of other materials.
Recycling
When disposing of the battery, recycle it according to local rules and
regulations.
1 1/4"
2"
1 3/8"
2 1/8"
Installation Template
for Swivel Bracket
Table of contents
Popular Window Blind manuals by other brands


ConceptBlindsDirect
ConceptBlindsDirect Deluxe Roman blind operating instructions

WeatherMaster
WeatherMaster Eclipse Shutters installation manual

Hard Head
Hard Head 021573 operating instructions

Levolor
Levolor Real Wood Blind Series Installation operation care

Sonevo
Sonevo RD31 manual

Bali
Bali Horizontal Blinds How to install

Sunwood
Sunwood 35MM BASSWOOD installation instructions

IKEA
IKEA FYRTUR 34 quick start guide

Hella
Hella TOP FOAM screen protect Installation instructions and instructions for use

WAREMA
WAREMA Venetian 2.25/35.17 Operating and maintenance instructions

Sonevo
Sonevo RM31 manual

Velux
Velux FSLC Series installation manual