Norqain ETA 2824 User manual

1
www.norqain.com
USER MANUAL
INTERNATIONAL WARRANTY

CONTENT
English 3 –26
Deutsch 27 –50
Français 51 –74
OTHER LANGUAGES
For other languages, please
refer to the following link:
Service History 75 –77
International Warranty 78
www.norqain.com/usermanuals

3
You are a NORQAINER – your life, your way
We’d like to congratulate you on purchasing your NORQAIN watch.
You are now a NORQAINER!
Share your extraordinary life moments wearing your NORQAIN with #norqainer.
@norqain
We look forward to seeing you with your NORQAIN.

4
Material
NORQAIN cases and steel straps assure
wearing comfort and robustness. Manufactured
from premium-quality alloys, our watches meet
the highest standards.
Leather
The strap of your NORQAIN watch is made
from authentic leather and has been inspected
for the highest quality standards. Its life span
depends on the use of the genuine leather.
Temperature
NORQAIN timepieces are equipped to bring
out the best of your time in a temperature
range from 0 to 50 °C/ 32 to 122 °F.
However, please keep in mind that when your
watch is worn on your wrist, low temperatures
are hardly attainable due to your body
temperature.
IMPORTANT INFORMATION

5
Your NORQAIN timepiece is a delicately
thought-out masterpiece, which is here for you
at all times. It contains numerous components
that depend on each other to perform for you
on a high level. We see these components as a
team. A team which loves to expose itself to
all kinds of weather and is prepared for
anything. However, like many of the best
teams, your NORQAIN is not free from the
occurrence of wear and tear. Through proper
care, you can make the most of your time with
your NORQAIN timepiece.
Chlorine and salt water can damage the case.
Frequently rinse your NORQAIN watch with
running water.
Montres NORQAIN SA or your authorised
retailer will gladly support you with the care of
your NORQAIN.
Please visit www.norqain.com/service for more
information on service and care.
MAINTENANCE
6
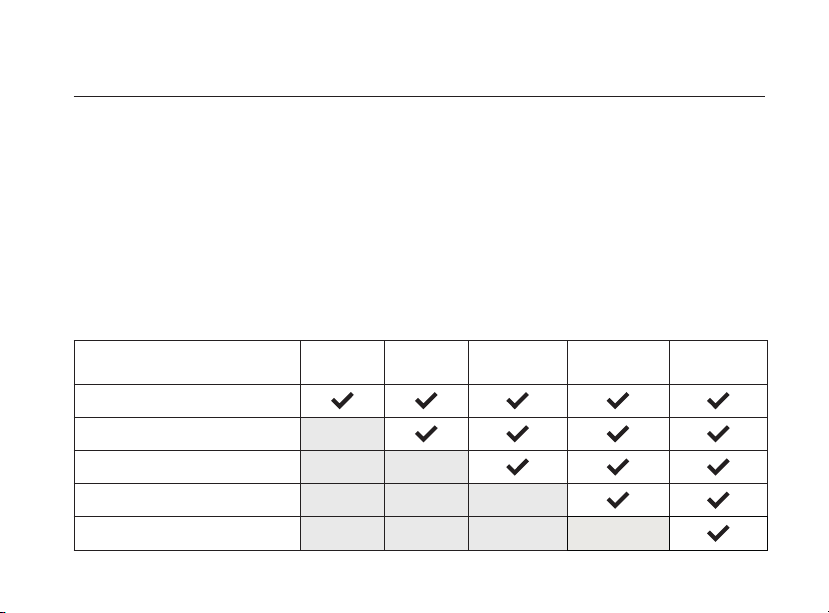
You can find the water resistance information of every NORQAIN watch at the bottom of the
case. Check the following chart to see which activities you can perform with your model.
ACTIVITIES / DEGREE
OF WATER RESISTANCE
3 bar, 30 m,
100 ft
5 bar, 50 m
165 ft
10 bar, 100 m,
330 ft
20 bar, 200 m,
660 ft
50 bar, 500 m,
1650 ft+
Water drops, washing your hands
Shower, swim, sports on water
Watersports
Diving (open water)
Diving (deep-sea)
A robust, airtight case protects your
timepiece’s movement from water. This case
can be affected by external influences like
chlorine, saltwater, dust, sweat or cosmetics.
Thus, we suggest you verify the water
resistance at least every two years.
Checking your watch’s water resistance only
takes a few minutes and can be done at your
nearest authorised NORQAIN retailer.
www.norqain.com/retailers
WATER RESISTANCE

7
ETA 2824 / SELLITA SW200-1 NN20/1
Manufacture Calibre
Warranty (in years) 2+1*4+1*
Power Reserve (in hours) 38 70
Additional Features Date -
Balance Frequency (vibrations per
hour/Hz) 28,800/4 28,800/4
COSC-Certified NO YES
TECHNICAL INFORMATION: AUTOMATIC 3HAND WATCH
Check the following chart to discover the technical information of your model.
*More information on page 25
8
1. Hour hand
2. Minute hand
3. Seconds hand
4. Date
1. 2.
3. 3.
1. 2.
AUTOMATIC 3HAND WATCH
4.
ETA 2824 / SELLITA SW200-1 Manufacture Calibre NN20/1
9
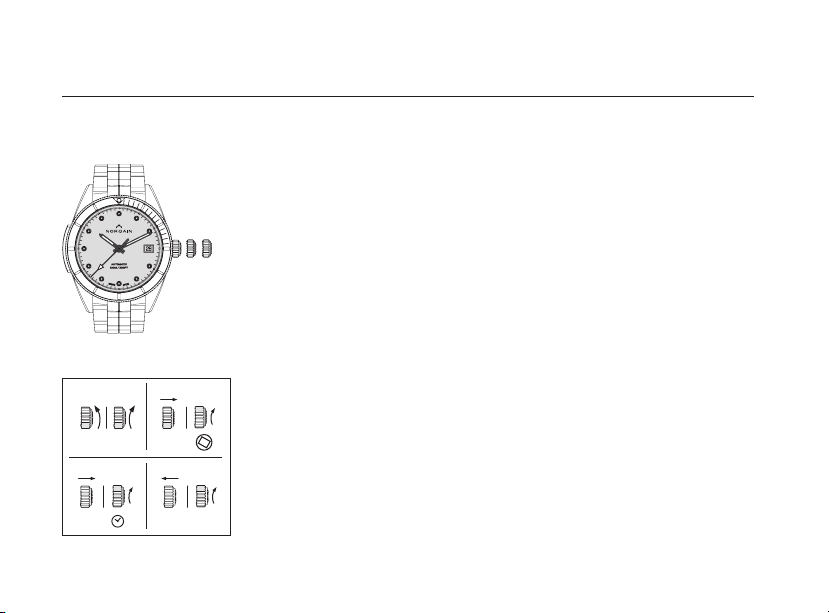
STARTUP FOR THE AUTOMATIC 3HAND WATCH WITH DATE
1. Manual winding
Untighten the waterproof,
screwed crown counter-
clockwise. Next, turn the
crown clockwise
approximately 40 times.
3. Setting of the time
Pull the crown into the 3rd
position (III.). Then
continue turning it
clockwise until you reach
the present-day and the
correct time. Be aware of
noon and midnight to make
sure the date changes at
midnight.
2. Setting of the date
Pull the crown out into the
2nd position (II.). Turn it
clockwise until you reach
the date of the day prior to
the startup.
WARNING: The date can
not be changed between
10:00pm and 2:00am.
4. Push the crown into the 1st
position (I.). Next, turn
clockwise and screw down
the crown until you feel a
slight resistance.
CLICK!
CLICK!
40 x
10
CLICK!
CLICK!
40 x
10
1. 2.
3. 4.
CLICK!
CLICK!
40 x
10
CLICK!
CLICK!
40 x
10
I. II. III.
10
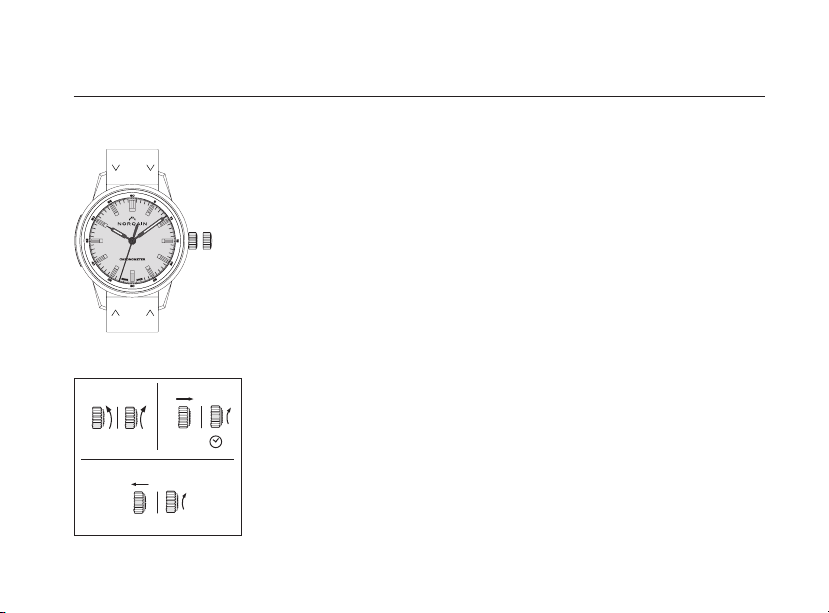
STARTUP FOR THE MANUFACTURE CALIBRE NN20/1
AUTOMATIC WATCH WITHOUT DATE
1. Manual winding
Untighten the waterproof,
screwed crown counter-
clockwise. Next, turn the
crown clockwise approxima-
tely 40 times.
3. Push the crown into the 1st
position (I.). Next, turn
clockwise and screw down
the crown until you feel a
slight resistance.
2. Setting of the time
Pull the crown out into the
2nd position (II.). Turn it
clockwise until you reach
the correct time.
CLICK!
CLICK!
40 x
10
1. 2.
3.
CLICK!
CLICK!
40 x
10
CLICK!
CLICK!
40 x
10
I. II.

11
ETA 7753 SELLITA SW500a
Warranty (in years) 2+1*2+1*
Power Reserve (in hours) 48 48
Additional Features Date Day/Date
Balance Frequency (vibrations per
hour/Hz) 28,800/4 28,800/4
COSC-Certified NO NO
TECHNICAL INFORMATION: AUTOMATIC CHRONOGRAPH
Check the following chart to discover the technical information of your model.
*More information on page 25

12
1. Hour hand
2. Minute hand
3. Seconds hand
4. Hour counter
5. Minute counter
6. Seconds counter
7. Quick date adjuster
8. Date
A= Start/Stop
B= Reset
1. 2.
6.
A
5.
4.
3.
1. 2.
6.
B
AUTOMATIC CHRONOGRAPH
A
5.
4.
8.
B
3.
7.
ETA 7753 SELLITA SW500a
8.

13
STARTUP FOR THE AUTOMATIC CHRONOGRAPH WATCH WITH
QUICK DATE SETTING FUNCTION
1. Manual winding
Untighten the waterproof,
screwed crown counter-
clockwise. Next, turn the
crown clockwise approxima-
tely 40 times.
3. Push the crown into the 1st
position (I.). Next, turn
clockwise and screw down
the crown until you feel a
slight resistance.
2. Setting of the time
Pull the crown out into the
2nd position (II.). Turn it
clockwise until you reach
the correct time.
CLICK!
CLICK!
40 x
10
1. 2.
3.
CLICK!
CLICK!
40 x
10
CLICK!
CLICK!
40 x
10
I. II.

14
By repeatedly pushing the
quick date adjuster (by using
the NORQAIN date pusher)
the date-disc will rotate
forward until reaching the
desired date. You do not need
to readjust your chronograph;
your chronograph will stay
active.
The quick date setting
cannot be performed between
8:30pm and 11:30pm.
QUICK DATE SETTING CHRONOGRAPH

15
STARTUP FOR THE AUTOMATIC CHRONOGRAPH WATCH
WITH DAY/DATE FUNCTION
1. Manual winding
Untighten the waterproof,
screwed crown counter-
clockwise. Next, turn the
crown clockwise approxima-
tely 40 times.
3. Setting of the time
Pull the crown out into the
3rd position (III.). Then
continue turning it
clockwise until you reach
the current day and the
correct time. Be aware of
noon and midnight to make
sure the date changes at
midnight.
2. Setting of the day and date
Pull the crown out into the
2nd position (II.). Turn the
crown counter clockwise to
set the day and clockwise to
set the date. Set the day and
date of the day prior to
startup.
WARNING: The date can
not be changed between
10:00pm and 2:00am.
4. Push the crown into the 1st
position (I.). Next, turn
clockwise and screw down
the crown until you feel a
slight resistance.
CLICK!
CLICK!
40 x
10
CLICK!
CLICK!
40 x
10
1. 2.
3. 4.
CLICK!
CLICK!
40 x
10
CLICK!
CLICK!
40 x
10
I. II. III.

16
a
b
Reading the elapsed time
(flagging the starting time)
Set the mark of the rotating
bezel to the minute hand
position (a).
The elapsed time can be read
off the scale at the position
on the rotating bezel, where
the minute hand is indicated
(b).
In our example, 10 minutes
have passed (c).
aMarked starting point
bMomentary point in time
cTime elapsed
Your NORQAIN Adventure watch has a rotating bezel with 12-hour indexes and a 15-minute
scale. The bezel only rotates counter-clockwise. For example, the bezel can remind you of your
starting time and additionally show you the elapsed time.
ROTATING BEZEL
c
Bezel

17
ROTATING BEZEL
Reading the remaining time
(flagging the time limit)
Set the mark of the rotating
bezel to the desired point in
time (b).
Now you can read the
remaining time off the scale
on the rotating bezel between
the position of the minute
hand (a) and the mark (b).
In our example, 20 minutes
remain (c).
aMomentary point in time
bEnd time
cRemaining time
Note: For security reasons, especially when diving, the bezel
can only be rotated counter-clockwise.
c
Bezel
a
b

18
1. Push Aand start the
process. The seconds
counter (3) will show you
the elapsed time.
2. If you wish to stop the
time, push Aagain. The
elapsed time will be
shown in hours (hand 1),
in minutes (hand 2) and
in seconds (hand 3). By
repeatedly pushing A,
you can measure
multiple time periods.
3. Push Bto set your time
measurement back to the
starting point.
CHRONOGRAPH TIMING FUNCTION
A
2
1
3
B
A
B
1
2
3
19
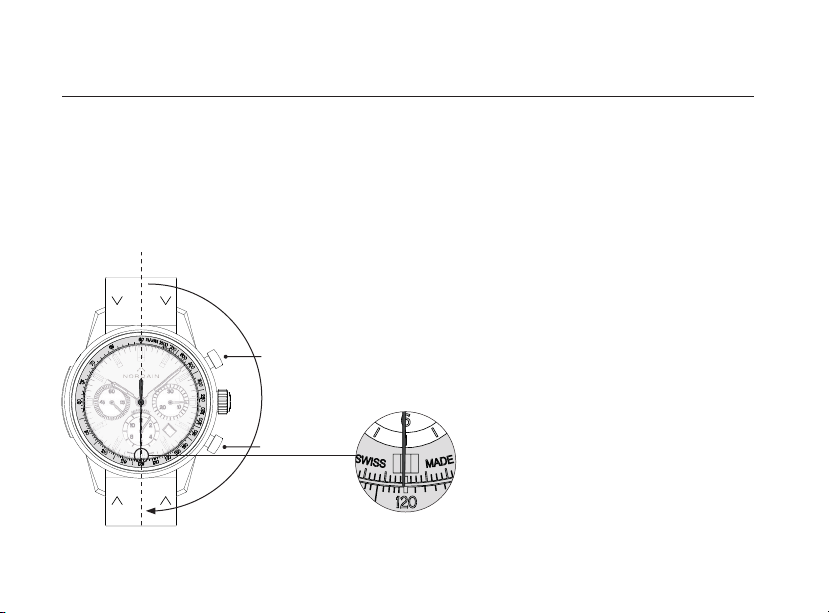
TACHYMETER
Average speed
Begin the time measurement
by activating the chronograph
function (pusher A). End the
time measurement after
reaching the distance of
1 kilometre / 1 mile (pusher A).
If the measured time
(presented by the
chronograph seconds counter)
is for example at 30 seconds,
the tachymeter will show an
average speed of 120km/h or
120 mph.
120 x 1/h x 1km = 120 km/h
Set the seconds back to 0
(pusher B) before starting
further time measurements.
The tachymeter is a scale on the dial of your NORQAIN watch. It is divided into grades. It is used
to measure the average speed or hourly performance during an observation period of less than
60 seconds via the chronograph function (see previous page).
30 sec.
A
B

20
TACHYMETER
Hourly performance
Start the time measurement
by activating the chronograph
function (pusher A). After
completing your unit, end the
time measurement (pusher A).
If your required time for a unit
is 20 seconds, the tachymeter
will show 180, meaning that in
one hour you can complete 180
units.
180 x 1/h = 180 units
Set the seconds back to 0
(pusher B) before starting further
time measurements.
20 sec.
This manual suits for next models
2
Table of contents
Languages:
Other Norqain Watch manuals


