Nortek Track Bro User manual

CJP Issue 1 14/6/17
“Track Bro” GPS Tracker Installation and User Guide
Table of Contents
1.0 INSTALLATION . .......................................................................................................................................................... 2
1.1 Choosing a Suitable Sim Card................................................................................................................................. 2
1.2 Fitting the Sim Card. .............................................................................................................................................. 3
1.3 Testing GPRS and GPS Signals ................................................................................................................................ 3
1.3.1 LED Indicators . ............................................................................................................................................... 3
1.4 Water Resistance . ................................................................................................................................................. 3
2.0 SETTING UP THE TRACKER . ....................................................................................................................................... 4
2.1 Programming the Mobile Phone Network APN..................................................................................................... 4
2.2 Connecting to the Tracking Server......................................................................................................................... 5
2.3 Choosing SMS or GPRS Operation Mode ............................................................................................................... 5
2.4 Set Control Numbers. ............................................................................................................................................ 5
3.0 PROGRAMMING THE TRACKER.................................................................................................................................. 6
3.1 Setting the Geofence Boundary (Option) .............................................................................................................. 6
3.2 Over speed Alarm (Option).................................................................................................................................... 6
3.3 Send Current Location SMS at Same Time Each Day (option) ............................................................................... 7
3.4 Shock Alarm (Option). ........................................................................................................................................... 7
3.5 External Alarm Trigger by ACC Wire (Option)........................................................................................................ 8
3.6 Low Internal Battery Warning................................................................................................................................ 8
3.7 Sleep Mode (Power & Data Saving) ....................................................................................................................... 9
3.8 GPRS Position Upload Interval ............................................................................................................................... 9
4.0 USING THE TRACK BRO . .......................................................................................................................................... 1 0
4.1 Device location by Calling .................................................................................................................................... 1 0
4.2 Device location by Texting ................................................................................................................................... 1 0
4.3 Device location Online . ....................................................................................................................................... 1 0
4.3.1 Online Registration . ..................................................................................................................................... 1 0
4.3.2 Setting Online Parameters ............................................................................................................................ 1 2
5.0 USING THE TRACK BRO APP ..................................................................................................................................... 1 5

CJP Issue 1 14/6/17
1.0 INSTALLATION
The GPS Tracker requires a strong GPS and GPRS (Mobile Phone) signal to operate reliably and so some
experimentation may be required in order to find the best fitting location for a given Motorbike, Vehicle or Asset.
The Tracker contains a small lithium battery and should not be exposed to direct heat / sunlight, and as such,
mounting behind a windscreen or close to a hot engine should be avoided. The Tracker should be mounted with the
flat non labeled side, pointing upwards towards the sky.
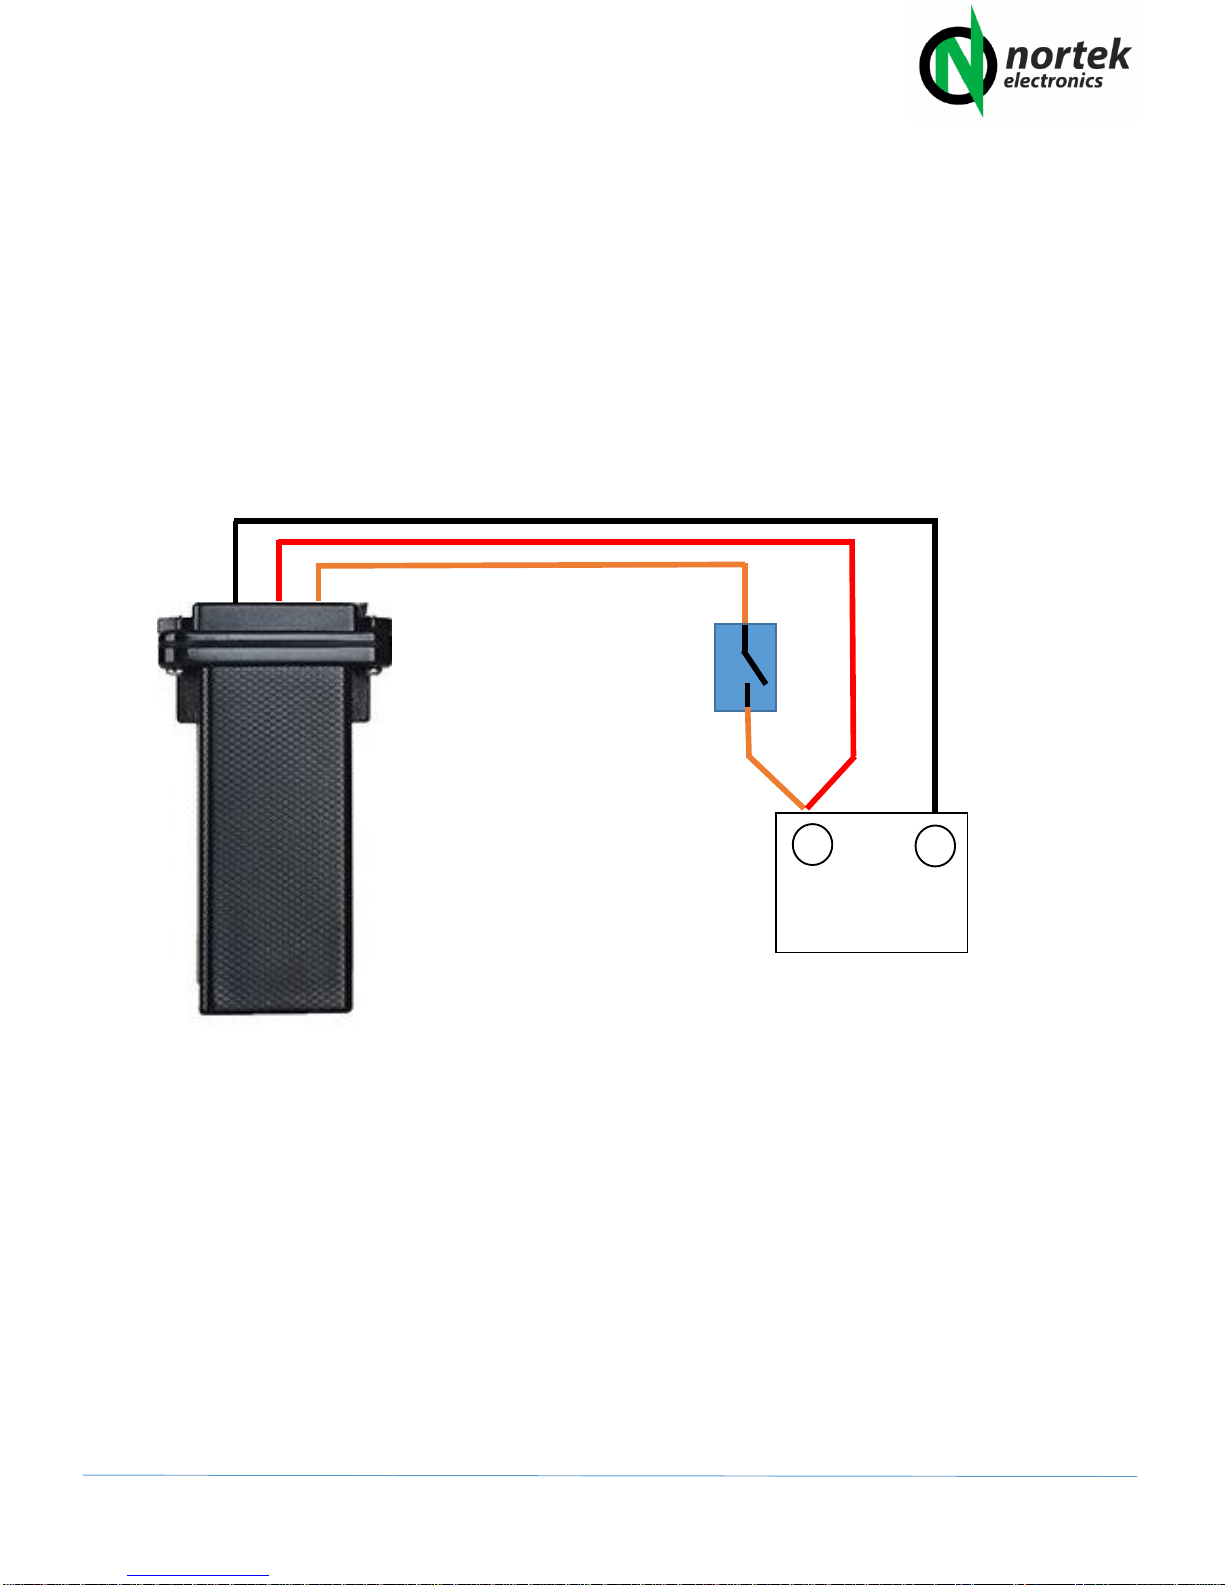
In normal operation, the Tracker requires the Red (+) and Black (-) wires connected to a 10V –40V DC Supply which
is permanently powered (not switched by Ignition). The orange wire is optional and used for ACC switching which
allows various functions to be carried out from external sources (Described in more detail in section 3.5 ). In most
applications this wire can remain unconnected and should be isolated using insulation tape or a terminal block. We
recommend using an in line blade fuse of no more than 3 amps on the positive connection (red wire) if direct
connection to a battery or higher current circuit is used.
1.1 Choosing a Suitable Sim Card
The Tracker will work with any mobile phone network which has a 2G (GPRS) network (The Three UK network is NOT
suitable) on either PAYG or Contract tariff and the Tracker requires a FULL SIZE sim card. The choice of tariff will
largely depend on your requirements and the application that the Tracker is intended to be used for. If you only
intend to fit the Tracker as an emergency anti-theft tracking device or occasional use, then we would recommend
using a PAYG Sim Card, which has a long non use expiry (In the UK, Giff Gaff is one example) and loading it with a
small credit balance. Most PAYG networks require you to make at least one ‘paid for’ activity every so often (Usually
3 –6 months) in order to keep the Sim active, so this should also be established from the Network prior to choosing
a sim. If you use the tracker in GPRS mode the Sim should never be at risk of expiry, however if you use the Tracker
in “SMS” mode, then simply sending a single text command or making a call to the Tracker every few months will be
enough to keep the Sim active and retain the credit balance.
In cases where the Tracker is used frequently, for regular long journeys or business use, then it may be cheaper to
obtain a Low Cost contract or 30 Day Sim or to use a PAYG Sim which offers the purchase or monthly bundles of
Data, Calls and Texts. Data use, is often by far the biggest user of credit on a Sim in any Tracking device, especially if
it is set to continuously upload its position data to the server. The more frequent the data upload intervals, the more
Data will be consumed over a period. The Tracker can be programmed to upload its position data, every 1 –1800
seconds, and suffice to say a setting of 30 seconds per position upload, will consume less Data over a month, than a
setting of 5 second per upload, however the 5 second period will give a more accurate mapping position. The data
uploads are very small (Around 100 –125 bytes) so even a data allowance of 500mb or 1GB will go a very long way,
even for regular daily use.
If you are unsure about which Sim would suit your needs then we would recommend testing it for a month or two,
with different data upload interval settings on a PAYG sim and then decide on whether a PAYG, 30 Day or 12 month
contract SIM will be more cost effective. A UK Suggestion for a low cost 30 day contract SIM would be Plusnet
Mobile which uses the EE network.

CJP Issue 1 14/6/17
1.2 Fitting the Sim Card
The Tracker requires a FULL SIZE sim card, which is fitted inside the Tracker, just under the waterproof top cover.
Carefully, undo the two screws and nuts which hold the top cover to the main body, and gently remove it, being
careful not to damage the rubber sealing gasket fitted between the cover and body or put any strain on the power
wires which pass through the cover. Once the cover is removed you will see the top of the Circuit board, which
contains two small status LED indicators and under the board, you will also see the edge of the Sim card holder.
Gently, but firmly slide the sim card into the sim holder, noting the position of the flat ‘orientation’ notch printed on
the case label. The Sim has to be pushed all of the way into the holder, where it will lock into place. Note that the
Sim Card Holder is also fitted with a switch, which powers up the tracker, only when a card is inserted, so if the
Tracker fails to power up in the next section, then you should double check that the Sim has correctly locked itself
into position.
The Network Sim that you use will come with a mobile phone number, issued by your provider. It is important
that you note this number, as it will be used to set up and communicate with your tracker.
1.3 Testing GPRS and GPS Signals
Like all Trackers, the “Track Bro” relies on having access to both GPRS and GPS signals, so before replacing the top
cover, it is important to check that the Tracker has good access to both signals in the location where it has been
mounted. There are two small LEDS fitted on the circuit board, close to the Sim Card holder, the Blue LED indicates
GPS signal status and the Yellow led indicates GPRS (2G Mobile phone signal) status.
Switch on the Tracker, and both LED’s should begin to flash. After a few minutes the Tracker should find GPS
information and access the Mobile Phone network and both lights should stop flashing and remain solid. If neither
LED begins to flash, then please check power connections, and ensure that the sim card is pushed firmly into its
holder.
1.3.1 LED Indicators
Yellow Light Flashing = Scanning for Mobile Phone Network
Yellow Light Solid (ON) = Mobile Phone Network Found and Connected.
Blue Light Flashing = Searching for GPS Signal
Blue Light Solid (ON) = GPS Locked and Connected
If either LED fails to stop flashing after five minutes then you may need reposition the Tracker and try again. Once
connection is established, refit the rubber sealing gasket and top cover.
1.4 Water Resistance
The “Track Bro” is water resistant in normal use, in relation to rain and road spray, and is suitable for external use.
However if the Tracker is exposed to power washing, or salt water spray (i.e Marine use or being used in Coastal
Locations) then it is advisable to add a small amount of silicone sealant around the wire access grommet on the top
cover to protect the rubber gasket. Under no circumstances should the Tracker be submerged in water.

CJP Issue 1 14/6/17
2.0 SETTING UP THE TRACKER
The “Track Bro” is setup and programmed by way of sending a series of Text Messages to it using a normal mobile
phone. The network who has supplied your Sim Card will have issued you with a Mobile Phone number for the Sim,
and this number will be used to communicate commands and instructions to your Track Bro. You can also remotely
switch features on/off as required, add / replace control numbers or change parameters or timing functions simply
by sending the Track Bro a text containing the instruction. Note: If you send an instruction to the Tracker whilst it is
in an area with no 2G network coverage, then it will not be actioned and acknowledged until a Signal is re-
established.
The default SMS password for the Track Bro is “0000” and this will form part of most text message instruction
commands. After each command is received the tracker will send back a “set ok” text.
The format for ALL text commands are a 3 digit command followed by the 4 digit password, without a space.
<Command><Password> eg. 8030000
Where the “803”is command, and “0000”is the password.
If you wish to change the default password, contact Nortek for more details.
2.1 Programming the Mobile Phone Network APN
In order to connect successfully to the Online Tracking Portal and use the APP, you will need to program the tracker
with the network APN information, so that it can send / receive data from your chosen network. First you will need
to find out the correct APN settings for your network, and this can often be found via Google or by contacting your
Sim provider directly. For the purposes of this example, we will use the APN settings of the EE network.
The command to program the APN is 8030000, so a text message should be sent to the Tracker using the following
format
8030000 <space> APN <space> APN username <space> APN password
So in this Example, we will be using the APN details for the EE network, and the details are as follows
APN = everywhere
APN User = eesecure
APN Password = secure
So to program the Track Bro with the EE APN, you would text the following command
8030000 <space> everywhere <space>eesecure<space> secure
Some networks, such as Giffgaff do not require an APN password, so this can just be left blank example:-
8030000<space>giffgaff.com<space>giffgaff<space>
NOTE: <space> means a space character, not the words!!

CJP Issue 1 14/6/17
2.2 Connecting to the Tracking Server
To use our Free Online Tracking Portal (http://trackbro.nortek.co.uk) you will need to send the tracker, the following
text command
8040000<space>89.242.7.83<space>5013
2.3 Choosing SMS or GPRS Operation Mode
The Tracker has two modes of operation. SMS Only and GPRS (Data). To use the Online Tracking Portal or Mobile
Phone App, you will need to use the GPRS function, however this will require data from your network. If you purely
wish to use the Tracker as an Anti-Theft device for use if an item / vehicle is stolen or for random location tracking by
call and text message, then SMS only mode should be used. You can toggle between SMS or GPRS Modes as
required. Please note than SMS use will still be maintained even when GPRS is selected.
To select SMS Only Mode, text: 7000000
To select GPRS Mode, text: 7100000
2.4 Set Control Numbers
The “Track Bro” can be programmed with up to 3 different Mobile Phone numbers and these are referred to as
“control numbers”. Each number is given a priority, of “1”, “2” and “3” and the number of the main owner /
operator should always be given a priority of “1”
So to program the control numbers use the following format
<phone number><password><space><priority number>
So to program a mobile phone number of “0778451207” using the default user password of “0000” and give it a
priority of “1” you would text:
07784512070000<space>1
To program second number of “0776542789” with a priority of “2”, you would text:
07765427890000<space>2
You can update / overwrite any of the three programmed numbers at any time, simply by re-entering a new number
& settings its priority number.
Note:- These control numbers are simply used in order to convey an “Alarm” text or call in the event of a trigger.
The ability to use any mobile phone in order to program the device, or Track it by SMS or APP is retained. So for
example, if a Vehicle or Bike was stolen, a Police Officer or any nominated third party could still track its position
by SMS or APP, without having their phone number pre-programmed into the Tracker as a control number.

CJP Issue 1 14/6/17
3.0 PROGRAMMING THE TRACKER
3.1 Setting the Geofence Boundary (Option)
This is useful for protecting Vehicles or objects that are parked / stationary for a given length of time. Examples are,
Caravans, Motorhomes or Motorbikes which are parked up over the Winter Months, A Vehicle left for a few weeks
in an Airport Car Park, or Plant Equipment left on a site.
A Geofence is an invisible GPS based boundary consisting of a pre-determined area around a parked vehicle or asset.
If the Vehicle / object moves out of the protected area, then the Tracker will send an alarm text to the first Control
number, alerting them to a possible theft.
To set the Geofence, the Tracker should already be located within the area where it is to be protected. The
protected area boundary can be programmed numerically in Metres.
First, to turn on the Geofence protection text: 2110000
To set the Geofence Boundary In metres text: 0050000<space><Boundary in metres>
So to set the Geofence Boundary for 500 metres would look like:
0050000<space> 500
To turn off the Geofence Protection Text: 2100000
Because of the variation in GPS Accuracy, in order to avoid False Alarms, we would recommend a setting of between
150M and 1000M in most applications.
3.2 Over speed Alarm (Option)
To program an over speed alarm, i.e send an Alarm to the programmed numbers if a vehicle exceeds a certain speed,
use the following text command.
Command: 122<space><speed in km/h>
So to set an over speed alarm for 160 km/h you will need to text: 1220000 160
To switch off the over speed alarm text: 1220000 000

CJP Issue 1 14/6/17
3.3 Send Current Location SMS at Same Time Each Day (option)
This feature will automatically send a text with the current location of the Tracker to the first control number at the
same time, every day.
Command: 6650000HHMM
HH = Equals Hours in 24 hour clock format
MM = Equals Minutes, 00 to 59
So to get an automatic update at 6pm each day, you would text: 66500001800
To switch OFF this function, text: 6650000OFF (6650000 + OFF no space)
3.4 Shock Alarm (Option)
The Tracker has a built in Shock Alarm, which will send out an Alarm in the event that shock is sensed over a duration
of 0 (instant) to 120 seconds. This feature can be used to protect against heavy sustained vandalism or theft by
towing away.
Command: 1810000Txx
Replace the “xx” with a number representing the Shock duration time of between 0 to 120 seconds
Example: to set a Shock Duration time of 10 seconds you would text 1810000T10
To turn off the Shock Alarm Function text: 1800000
To avoid false alarms caused by passing vehicles or high winds, we recommend setting a Shock Duration of between
5 and 20 seconds. However if protection against accident impact is required, then this will need to be set to “0”
(instant). Some experimentation may be required to find the optimal setting for a given situation.

CJP Issue 1 14/6/17
3.5 External Alarm Trigger by ACC Wire (Option)
The Tracker is fitted with a Third (orange) wire, which is used to expand the tracker’s alarm facility by using external
switch or relay contacts. Intended to be used either as an Emergency Panic Alarm (SOS) or as a First line intruder
alarm, this wire can be configured to take switched inputs from N/O (normally open) Panic Switches, Door Contacts,
Glass Break Alarms, PIR’s and Micro-switches.
If the Track Bro detects a positive voltage (10v –40v dc) on this wire, then an Alarm condition is created, which
sends an alarm message to the stored contact numbers. Alternatively the wire can be fitted to the IGN switched
circuit on the vehicle to warn against unauthorised use.
To Switch ON the ACC function, text: 8860000
To Switch OFF the ACC function, text: 8870000
3.6 Low Internal Battery Warning
The Track Bro is fitted with a small internal Lithium Battery which is charged from the host power supply. In the
event that power is cut to the Vehicle, or the Battery removed then the internal battery will take over and continue
all normal operation and Tracking functions for up to 4 hours. In the Event that this battery reaches <20% capacity, a
text message warning will be sent to the main control number.
Battery condition is also routinely included on any Text Messages sent from the Tracker and appears in numerical
form such as BAT:1 to BAT:5, these numbers represent capacity in 20% increments, so BAT:1 will represent 20%
capacity and BAT:5 will represent 100% (full) Capacity.
Battery
12V or 24V
-
+
Switch
N/O

CJP Issue 1 14/6/17
3.7 Sleep Mode (Power & Data Saving)
The Track Bro is intended for permanent connection to its Host’s battery supply. On a healthy car or leisure battery,
it should operate for a number of weeks before charging becomes necessary. However for applications with smaller
batteries (Motorcycles) or where the Tracker is left connected for a number of weeks / months or in vehicles only
used for infrequent use, then the power saving function should be activated upon installation.
“Sleep Mode” will automatically close all power hungry GPS and GPRS connections after a user-programmed amount
of time (1 –720 minutes) whilst the vehicle / bike is parked, reducing its background power consumption
considerably. However the Tracker remains on Stand-by and will automatically reactivate all functions once the
Vehicle / Bike begins to move or an Alarm condition is sensed.
Whilst “Sleep Mode” is active, all GPRS data uploads to the Server & App are stopped, thus also conserving needless
Data use from the network whilst parked.
To turn on sleep mode use the following command: SLEEP0000<space><time in minutes>
So to turn on Sleep Mode after 15 minutes of inactivity text: SLEEP0000 15
To Turn OFF the Sleep Mode function text: SLEEP0000 0
3.8 GPRS Position Upload Interval
This controls the update frequency of which the current GPS position co-ordinate data is uploaded to the Online
Tracking Portal and APP in order to track the real time vehicle movement online. This data upload interval can be
user set to between 1 and 1800 seconds. The lower the figure, the more accurate the point to point routing will be
on the online portal and APP, however this will also consume more data. Experimentation may be required to find
the correct setting between Accuracy and Data use for your application.
To set the Data Upload Interval use the following command: 8090000<space><time in secs>
So, to set a data upload time of 10 seconds, text: 8090000 10

CJP Issue 1 14/6/17
4.0 USING THE TRACK BRO
The Track Bro can be tracked by Text, Call or Online.
4.1 Device location by Calling
In its simplest form the Track Bro can be used as Theft tracking device simply by calling the Mobile Number of the
Sim inside the Tracker from ANY Mobile Smart Phone. When called, the Track Bro will automatically answer, make a
beep tone and then hang up the call. It will then send a Text Message back to the phone which called it, containing
the vehicle speed and a link to Google Maps, which when clicked will show the current location of the Vehicle and its
heading.
4.2 Device location by Texting
To get current location text: 6690000
The Tracker will then send a Text Message back to the phone which texted it, containing the vehicle speed and a link
to Google Maps, which when clicked will show the current location of the Vehicle and its heading.
4.3 Device location Online
The Track Bro can also be used with our Free online tracking portal, located at http://trackbro.nortek.co.uk
4.3.1 Online Registration
To use the online account, simply select “Register” (Indicated by the arrow below) on the Website and register your
details along with your choice of password.
Once registered, login using the details that you have just provided.

CJP Issue 1 14/6/17
Next, you will need to add the Tracker Details into your online account. Browse to the “Devices” section at the top
left of the screen, and click the “+” button.
In the “Device” Box which opens, for the “Name” field, enter whatever you wish to identify the tracker, such as
“Paul’s Tracker” or a Registration Number. In the “Identifier” field you need to enter the unique ID number which is
printed on the Tracker Label (Do not confuse this with the IMEI number)
Once this information has been completed, save the changes by clicking the Tick symbol box in the bottom right
corner. Assuming that the Track Bro is connected and operating it should now appear under the “Devices” heading.

CJP Issue 1 14/6/17
4.3.2 Setting Online Parameters
Next, you can set up the Parameters for your account. For example MPH / KMH units for speed, and KM / Miles for
Distance. Click on the Cog icon on the top far right of the screen, then select “Account” from the drop down menu.
You can now customise your own preferences from within the “Distance” and “Speed” and “Time zone” options. We
recommend using the default “Open Street Map” option for the Map Layer.
Don’t forget to save any changes that you make, by clicking
the Tick icon on the bottom right of the screen.
In the next few pages, we move onto actually reading back the
Tracking / Route information.

CJP Issue 1 14/6/17
4.3.3 Tracking a Route
To track a route logged by the Tracker, first you need to click on the “Reports” tab, at the Bottom Left of the screen.
This will open another box, which contains the Route Tracking Options.
In the box marked type, select “Route” from the drop down options. Then click on “Configure”, this will open
another Sub menu, where you select the parameters for which you wish to track

CJP Issue 1 14/6/17
From the “Device” field, select the Tracker ID that you wish to Track, in this case “Chris’s Tracker”. (The Group field
can be ignored). Next select the date and time from and to period that you wish to track, the date should be entered
in the American YY-MM-DD format, e.g 2017-06-11 would be 11th June 2017.
Save the changes that you have made, by clicking the Tick icon in the Bottom Right Corner
You will then be taken back to the Main Map Screen. From here, click on the “Show” box:
This will now load all of the Co-Ordinates for that date period, and produce a Route on the Map Pane. You can also
export this GPS Data in an Excel spreadsheet format, by clicking the ”Export” box.
Note: If there is no tracking information for the period that you have entered on the previous configure screen, then
there will be route data or Map plotting information displayed, and you should go back and enter in a different time
/ date period

CJP Issue 1 14/6/17
5.0 USING THE TRACK BRO APP
The “Track Bro” uses the popular Traccar Platform and Android & IOS Apps are available free of charge. You need to
download two apps, Traccar Client, which holds the configuration settings, and Traccar Manager, which actually runs
the tracking interface.
First, Download and install Traccar client from Playstore or Itunes
Android: https://play.google.com/store/apps/details?id=org.traccar.client
IOS: https://itunes.apple.com/us/app/traccar-client/id843156974
5.1 Open the Track Bro App
Enter the following settings
Device Identifier: Enter the ID number printed on the tracker label (Do not
confuse this with the IMEI number)
Server Address: 89.242.7.83
Server Port: 5013
Frequency: This should match the upload data frequency interval which
you set in section 3.8
All other settings can be left at their default.
Before closing the App, toggle the Service Status button to ‘on’ (Service Running)

CJP Issue 1 14/6/17
5.2 Traccar Manager App
Next, download and install the Traccar Manager App
Android: https://play.google.com/store/apps/details?id=org.traccar.manager
IOS: https://itunes.apple.com/us/app/traccar-manager/id1113966562
Make sure that you have already registered a Tracking Account online (Section 4.3.1)
Open the Traccar Manager App, and at the first screen change the server url to http://89.242.7.83:8082
Login using the same details as you registered on the website portal. The Tracker will load and show the Current
Location of the Tracker on the map. To show historical tracking history for a given period, click the “reports” icon
from the Top control Bar
In the “Reports” page, select the Tracker name from the ‘Devices’ drop down list, followed by Configure.

CJP Issue 1 14/6/17
In the “Configure” screen, select the Tracker name from the Device list. Then you will need to select the required
date and time range, in the “from” and “to”fields, for the period that you wish to view (Note that the dates need to
be entered in the American YY-MM-DD format). Once this is completed, tap the Tick box at the bottom right of the
screen.
The “Reports” page will reload, showing all of the co-ordinate history for the period that you have selected. Close
this page, by tapping the “X” icon on the top right.

CJP Issue 1 14/6/17
The reports page will close, and you will now be shown the Tracking Data for the period chosen on the Map. You can
zoom in / out and move the Map around using normal app based screen gestures.
Note: If there is no tracking information for the period that you have entered on the previous configure screen, then
there will be route data or Map plotting information displayed, and you should go back and enter in a different time
/ date period
END OF DOCUMENT
Table of contents