Nortel NT2H57UG User manual

NT2H57UG 323-3221-291
Broadband Access & Video Networks
Video Codec Enclosure
(VCE)
Installation Manual
Standard Rel 1.0 July 1995


Installation Manual 323-3221-291 Rel 1.0 Standard
Broadband Access & Video Networks
Video Codec Enclosure
(VCE)
Installation Manual
1995 Northern Telecom
All rights reserved.
DV-45 is a trademark of Northern Telecom
Publication number: 323-3221-291
Product release: Rel 1.0
Publication status: Standard
PEC: NT2H57UG
Date: July 1995

Video Codec Enclosure (VCE) 323-3221-291 Rel 1.0 Standard
ii
Publication history
July 1995
Standard issue for general release.

Installation Manual 323-3221-291 Rel 1.0 Standard
iii
Contents
Introducing a VCE 1–1
What is a VCE? 1–1
Regulations 1–1
Physical characteristics 1–2
Cabinet weight 1–2
External dimensions 1–2
Cabinet cover 1–3
Mounting options 1–3
Alarm indicators 1–3
VCE components 1–3
DV-45 shelf 1–4
Power supply 1–4
Signal and power interface panel 1–5
Ordering VCE components 1–7
Ordering examples 1–7
Installing a VCE 2–1
Receiving a VCE 2–1
Locating a VCE 2–1
Mounting a VCE 2–2
Free-standing installation 2–3
Cabinet installation (Zone 4 earthquake) 2–5
Cabinet installation (wall mount) 2–10
Installing VCE components 3–1
Connecting DS3 carrier facilities to a DCS card 3–2
Connecting optical carrier facilities to a DMI-F45 3–4
Connecting optical carrier facilities to a DV-OC3 unit 3–6
Installing cards in a DV-45 shelf 3–11
Replacing a power supply 3–15
Observing safety guidelines 4–1
DV-45 shelf 4–1
DV-45 units 4–1
Handling units 4–2
Storing units 4–2
Installing or replacing units 4–2

iv
Contents
Video Codec Enclosure (VCE) 323-3221-291 Rel 1.0 Standard
Optical fibers 4–3
Laser radiation 4–3
Bending optical fibers 4–3
Handling optical fibers 4–3
Splicing optical fibers 4–4
Repairing optical fibers 4–4

Installation Manual 323-3221-291 Rel 1.0 Standard
1-1
Introducing a VCE 1-
This chapter introduces a video codec enclosure (VCE) in terms of:
• what it is
• the regulations used to manufacture it
• its physical characteristics
• its internal components
• ordering a VCE.
What is a VCE?
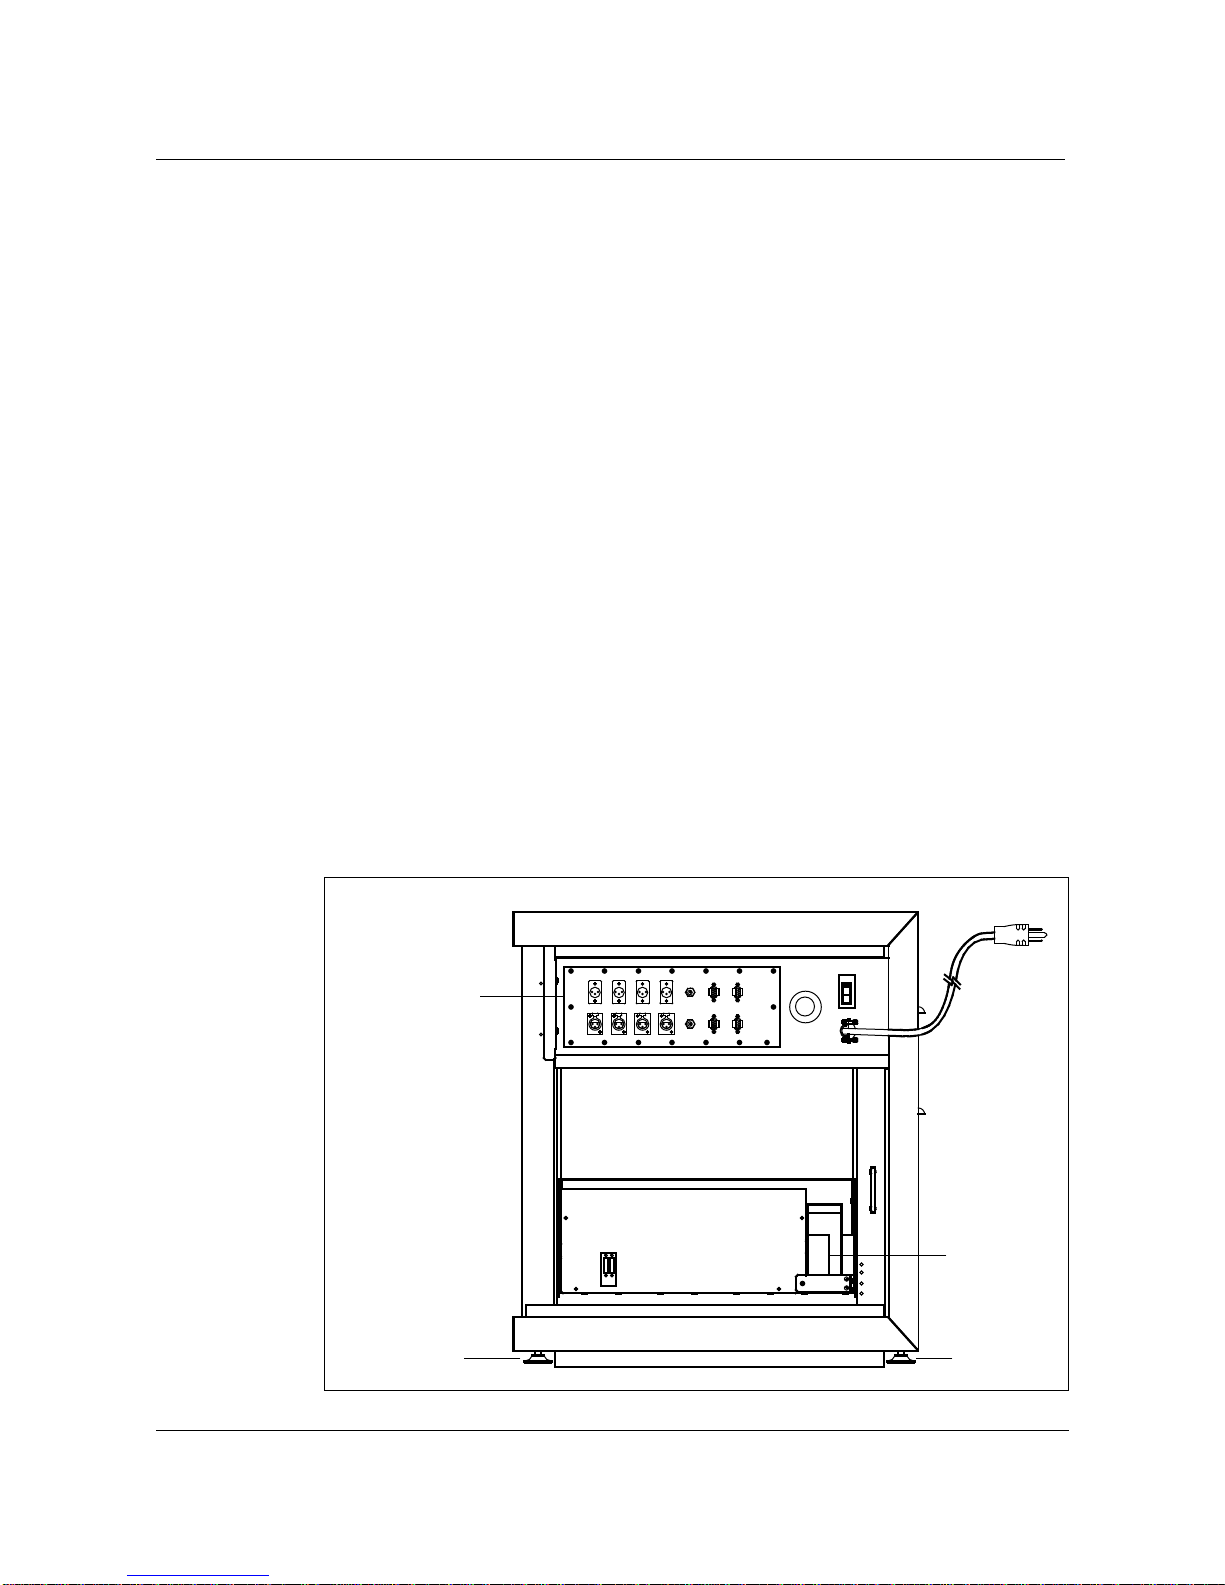
A video codec enclosure (VCE) is a low-cost cabinet used to house Northern
Telecom’s Digital Video Codec (DV-45) products.A typical application for a
VCE is Digital Video Learning Network (DVLN) applications and other
similar broadband products. The enclosure is spill proof and is cooled by
natural convection. The cabinet frame is supplied with an Oxford dark grey
(S-30497) finish and the cover is finished in light BTS dolphin grey (S-30480).
Regulations
AVCE meets all regulatory requirements for the Underwriters Laboratories
(UL), Canadian Standards Association (CSA), and the Federal
Communication Commission (FCC) when equipped with the standard
application configurations provided by Northern Telecom (Nortel).
CAUTION
Equipment within a VCE has been tested and found to comply
with the limits for a Class A digital device, pursuant to Part 15
of the FCC Rules. These limits are designed to provide
reasonable protection against harmful interference when the
equipment is operated in a commercial environment.
Equipment within a VCE generates, uses and can radiate radio
frequency energy and, if not installed and used in accordance
with the instruction manual, may cause harmful interference to
radio communications. Operation of equipment within a VCE in
a residential area is likely to cause harmful interference; users
will be required to correct the interference at their own expense.

1-2
Introducing a VCE
Video Codec Enclosure (VCE) 323-3221-291 Rel 1.0 Standard
In addition, when equipped with standard application configurations, a VCE
meets the following non-regulatory requirements:
• Earthquake Zone 4 upper floor—Bellcore NEBS TR-NWT-000063
• Office vibration—Bellcore NEBS TR-NWT-000063
• Transportation vibration—Bellcore NEBS TR-NWT-000063
• Drop test—Bellcore NEBS TR-NWT-000063
• Thermal performance—NT corporate standard 1524.00 and 1523.01
Physical characteristics
The physical characteristics of a VCE are presented in terms of its weight,
dimensions, mounting options, and external alarm indicators.
Cabinet weight
AVCE is mounted on a cardboard-protected, palletized platform for
transportation. A VCE weighs 134 lbs (61 kg) when empty. It can be
hand-trucked or hand-carried by two people to any location.
External dimensions
The overall dimensions of the unit (see Figure 1-1) are:
• Height 27 in. (689 mm)
• Width 24 in. (610 mm)
• Depth 24 in. (610 mm).
To provide access to the transversely-mounted equipment and to the
connections on the VCE, the enclosure should be mounted with 3 ft (914 mm)
clearance on the sides and front.
Figure 1-1
Cabinet dimensions
27 in.
(689 mm)
24 in.
(610 mm)
24 in.
(610 mm)

Introducing a VCE
1-3
Installation Manual 323-3221-291 Rel 1.0 Standard
Cabinet cover
Aone-piece, three-sided cover is used on a VCE.The cover is secured by four
hex-socket screws on the front of the VCE and is designed to slide completely
off of the unit. Slots are provided in the lower-rear corners of the cover to
facilitate removal with a standard screwdriver.
Mounting options
AVCE may be installed: free-standing on the floor; with an optional Floor
MountingKit (Zone 2to 4 earthquake);or with anoptionalWall Mounting Kit.
AVCE is equipped with integral leveling feet for free-standing installations.
Alarm indicators
No external alarm indicators are provided on a VCE to indicate the state of
equipment mounted within a VCE, except for the 120 Vac breaker; the breaker
state can be seen on the interface panel. To view any other indications on
equipment mounted within a VCE,
the cabinet cover must be removed.
VCE components
AVCE has the following internal components (see Figure 1-2):
• DV-45 shelf
• power supply
• signal and power interface panel.
Figure 1-2
VCE with cover removed
Power supply
Front Rear
Signal interface panel
(connectorized version)
DMI-F45 module
housing
DV-45 shelf
(rear)
Leveling foot Leveling foot

1-4
Introducing a VCE
Video Codec Enclosure (VCE) 323-3221-291 Rel 1.0 Standard
DV-45 shelf
The DV-45 shelf has eleven slots for equipment.All cards are inserted into the
DV-45 shelf from the left side of the VCE (after the cover is removed).
A typical card configuration for a basic Digital Video Learning Network
(DVLN) room application is shown in Figure 1-3. The power supply is located
underneath the DV-45 shelf.
Figure 1-3
Typical DV-45 shelf configuration for a DVLN room application
Power supply
AVCE is provided with a 120 Vac/-48 Vdc 300W switch-mode power supply.
AVCE is delivered with a 10 ft (3.1 m) power cord that is prewired through
the interface plate. This is attached to a 7.5A breaker on the interface plate
(see Figure 1-2 on page 1-3).
Note:
If a VCE is bolted to the floor or wall, local electrical practices
specify that the flexible power cord must be replaced with a conduit or
armored cable entry and that the supply is connected to a 120 Vac, 15A
power source with a double-pole breaker/isolator.
Power is distributed to the equipment in the DV-45 shelf
through a distribution
board mounted on the right-rear panel.
No battery backup or location for a switch unit to provide backup power is
furnished with the standard configuration.
Note:
If a DMI-F45 optical module is used, it is installed next to the power
supply (see Figure 1-2 on page 1-3).
Decoder
CAUTION
Decoder
Position #
Decoder
Coder MCU
DCS
0 1 2 3 4 5 6 7 8 9 10
OC3

Introducing a VCE
1-5
Installation Manual 323-3221-291 Rel 1.0 Standard
Signal and power interface panel
Asignal and power interface panel is provided on the top-right side of the VCE
(see Figure 1-2 on page 1-3). There are two versions of the signal interface
panel (see Figure 1-4 and Figure 1-5). See Table 1-1 for connector pinouts.
Figure 1-4
Knockout interface panel
(included in PEC NT2H57AA)
Figure 1-5
Connectorized interface panel
(included in PEC NT2H57AB)
FIBER
ON
OFF
AC
INPUT
1234
PUSH PUSH PUSH PUSH
AUDIO OUTPUT
AUDIO INPUT
VIDEO
OUT
VIDEO
IN
RS-422
RS-232
DS1-3
DS1-4
FIBER
ON
OFF
AC
INPUT

1-6
Introducing a VCE
Video Codec Enclosure (VCE) 323-3221-291 Rel 1.0 Standard
Table 1-1
Connectorized interface panel—connector pinouts
Connector Pin # Signal (DV-45 connection) Cable Color
Audio Outputs1-4
Cable NT2H5726 1 Ground (Decoder/Program Ch1 G) Ground lead
2 Signal (Decoder/Program Ch1 +) Red
3 Signal (Decoder/Program Ch1 -) Black
Audio Inputs 1-4
Cable NT2H5728 1 Ground (Coder/Program Ch1 G) Ground lead
2 Signal (Coder/Program Ch1 +) Red
3 Signal (Coder/Program Ch1 -) Black
RS-232
Cable NT2H5730 1 not connected
2 Rx (DCS/Monitor Ch1 -) Blue-White
3 Rx (DCS/Monitor Ch2 -) Orange-White
4-5 not connected
6 Ground (DCS/Monitor Ch1 G) Ground lead
7 Tx (DCS/Monitor Ch1 +) White-Blue
8 Tx (DCS/Monitor Ch2 +) White-Orange
9 not connected
RS-422
Cable NT2H5730 1 not connected
2 Tx- (DCS/Monitor Ch3 -) Blue-White
3 Rx- (DCS/Monitor Ch4 -) Orange-White
4-5 not connected
6 Ground (DCS/Monitor Ch3/4 G) Ground lead
7 Tx+ (DCS/Monitor Ch3 +) White-Blue
8 Rx+ (DCS/Monitor Ch4 +) White-Orange
9 not connected
DS1-3
Cable NT2H5730 1 not connected
2 Tx3R (DCS/Program Ch1 -) Blue-White
3 Rx3R (DCS/Program Ch2 -) Orange-White
4-5 not connected
6 Ground (DCS/Program Ch1/2 G) Ground lead
7 Tx3T (DCS/Program Ch1 +) White-Blue
8 Rx3T (DCS/Program Ch2 +) White-Orange
9 not connected
DS1-4
Cable NT2H5730 1 not connected
2 Tx4R (DCS/Program Ch3 -) Blue-White
3 Rx4R (DCS/Program Ch4 -) Orange-White
4-5 not connected
6 Ground (DCS/Program Ch3/4 G) Ground lead
7 Tx4T (DCS/Program Ch3 +) White-Blue
8 Rx4T (DCS/Program Ch4 +) White-Orange
9 not connected

Introducing a VCE
1-7
Installation Manual 323-3221-291 Rel 1.0 Standard
Ordering VCE components
Table 1-2 shows the standard equipment, kits, and optional equipment
available with a VCE. We recommend that you carry at least one spare power
supply. For ordering other DV-45 equipment, refer to the
DV-45 Reference
Manual
, PEC NT2H7902. For ordering application-specific equipment, refer
to the application-specific documentation (for example, for DVLN Rel 3.1
equipment refer to the
DVLN System Documentation
, PEC NT2H65AC).
Note:
AVCE does not come equipped with DV-45 cards.
Ordering examples
Table 1-2
VCE parts list
Description PEC code CPC code
VCE cabinet with knockout interface panel, DV-45
shelf, power supply, and 10 ft ac-power cord NT2H57AA A0626349
VCE cabinet with connectorized interface panel,
DV-45shelf,powersupply,and10 ft ac-power cord NT2H57AB A0636399
Optional parts
:
Wall mounting kit NT2H57KB A0626353
Floor mounting kit, Zone 2 to 4 earthquake NT2H57KC A0626354
BNC/BNC coaxial cable assembly (for internal
DCS, Decoder, Coder connections) NT2H5720 A0626359
BNC/Snap-on coaxial cable assembly (for
internal DMI-F45 connections) NT2H5722 A0626360
Spare part
:
Power supply, 120 Vac / 48 Vdc NPS50376L119 A0626954
Example Ordering codes
Free-standing VCE with knockout interface panel NT2H57AA
Floor-mounted VCE with knockout interface panel NT2H57AA, NT2H57KC
Wall-mounted VCE with connectorized interface
panel NT2H57AB, NT2H57KB
Cables for VCE with DCS, Decoder, Coder 2 x NT2H5720
Cables for VCE with DCS, 3 Decoders, Coder 4 x NT2H5720
Cables for VCE with DCS, Decoder, Coder, OC3 unit 4 x NT2H5720
Cables for VCE with DCS, Decoder, Coder, DMI-F45 2 x NT2H5720;2 x NT2H5722

1-8
Introducing a VCE
Video Codec Enclosure (VCE) 323-3221-291 Rel 1.0 Standard

Installation Manual 323-3221-291 Rel 1.0 Standard
2-1
Installing a VCE 2-
Installing a video codec enclosure (VCE) involves receiving it, locating it, and
mounting it.
Receiving a VCE
The VCE and any optional packages ordered are delivered on a transport
pallet. To verify the shipment before moving the equipment to its final
location, open or remove the cardboard carefully. You may want to reuse the
packaging to transfer the equipment to the installation site. If there are any
packages missing from the shipping order, contact your shipping agent or
Northern Telecom (Nortel) immediately (the phone numbers are on the
shipping order). The cabinet may be transported to the installation site by
hand-truck or carried by two people.
Locating a VCE
AVCE is designed for indoor use and should be installed in a location which
provides a minimum of 3 ft (914 mm) clearance on both sides and the front of
the unit. Additionally, a 1 in. (25 mm) clearance on the top of the cabinet is
required; see Figure 2-1. Access to 120 Vac power and signal cabling must be
considered according to local procedures.AVCE cannot be mounted with any
type of top attachment or side-by-side mounting provision.
Figure 2-1
Clearances
Circuit pack removal
3 ft clearance
(minimum)
Access to connectors
3 ft clearance
(minimum)
Cabinet
Cover removal
3 ft clearance
(minimum)

2-2
Installing a VCE
Video Codec Enclosure (VCE) 323-3221-291 Rel 1.0 Standard
Mounting a VCE
AVCE must only be installed by trained service personnel and all electrical
connections to the main ac-supply must be made by a licensed electrician
following all the relevant local electrical codes. Where a direct connection is
made to the main ac-power supply, a double-pole manual disconnect device
must be used. Read through the appropriate procedure before proceeding with
the installation.
AVCE may be installed:
• free-standing on the floor (see Procedure 2-1 on page 2-3)
• floor mounted in a zone 2-4 earthquake area (see Procedure 2-2 on page
2-5)
• wall mounted (see Procedure 2-3 on page 2-10)
Note:
Connecting the DV-45 equipment and setting DV-45 card options is
application specific and is not detailed in this document. Refer to the
application documentation for specific information (for example, for the
DVLN Rel 3.1 application, refer to the
DVLN System Documentation
,
PEC NT2H65AC).

Installing a VCE
2-3
Installation Manual 323-3221-291 Rel 1.0 Standard
Procedure 2-1
Free-standing installation
Use this procedure to install a VCE free-standing on the floor; see Figure 2-1
on page 2-1 for clearances. This procedure assumes that the VCE is close to a
standard 120 Vac 15A power outlet and is connected to it by the attached
10 ft ac-power cord.
Note:
Prior to shipping the cabinet to the site, determine the availability of
a suitable ac-power outlet. Check where power and signal cables are to be
run. Arrange for any site preparation work to be done prior to installation
of the VCE.
Tools
1 Level
1 5/32 in. Allen key
1 Flat-bladed screwdriver
Action
Step Action
1 Remove the cardboard protection from the VCE. Using a 5/32 in.Allen key,
remove the 4 cover-retaining screws and slide the cover off; see Figure 2-2.
Note:
If the cover does not come off freely, insert a flat-bladed screwdriver
into the slots located in the lower rear corners of the VCE cover and jog the
cover loose.
Figure 2-2
Removing the VCE cover
—continued—
3 slots on each
side of the cover

2-4
Installing a VCE
Video Codec Enclosure (VCE) 323-3221-291 Rel 1.0 Standard
Procedure 2-1 (continued)
Free-standing installation
Step Action
2 Unbolt the VCE from its transport pallet.
3 Move the VCE to its final position in the equipment lineup and level the unit
by adjusting the levelling feet.
4 Connect the power cable to the 120 Vac 15 A power outlet.
Note:
The power should be disconnected at the power supply breaker panel.
5 Connect the DV-45 equipment. See the application-specific documentation.
6 Put on an antistatic bracelet to protect the DV-45 cards.
7 Unpack all the DV-45 circuit packs.
8 Insert the cards in the DV-45 shelf (for a typical application, see Figure 1-2 on
page 1-3) but do not insert them into the backplane. That is, leave the latches
closed.
9 Check that the option switches on each card have been set correctly. The
correct settings are application specific (for example, see
DVLN Classroom
Site Equipment Installation
, 323-1411-301, for the DVLN application).
10 Push the card into the backplane and close the latches on each card.
11 Install the locking bar when the last card has been installed.
12 Replace the VCE cover and the four cover-retaining screws.
13 Turn on the ac-power supply.
—end—
CAUTION
Risk of damaging electrostatic sensitive devices
Avoid touching any components on the printed circuit
board. Electrostatic sensitive devices can be damaged
by electrostatic discharge. Always ground yourself
before handling a circuit pack.

Installing a VCE
2-5
Installation Manual 323-3221-291 Rel 1.0 Standard
Procedure 2-2
Cabinet installation (Zone 4 earthquake)
Use this procedure to install a VCE where Zone 4 earthquake protection is
required, that is, the
VCE is bolted to the floor; see Figure 2-1 on page 2-1 for
clearances and location information.
Note 1:
Prior to shipping the cabinet to the site, determine the type of
electrical distribution panel and the availability of a suitable 120 Vac, 15 A
power supply with a double-pole breaker/isolator. Check where power
cable and signal cables are to be run.Arrange for any outside contract work
to be completed prior to the installation of the cabinet.
Note2:
AVCEmust be bolted to the floor forZone 4 earthquake protection
using the Floor Mounting Kit (PEC NT2H57KC) option. A VCE must be
connected to the local power through a conduit or armoured cable.
Note 3:
The Floor Mounting Kit (PEC NT2H57KC) must be used for this
option.Although the leveling feet may be used to initially level the cabinet,
the entire weight of the cabinet must rest on the support shims provided in
the kit, and not on the leveling feet.
Tools
1 Floor Mounting Kit (PEC NT2H57KC)
1 Drill, electric (hammer-type if drilling concrete)
1 Drill bit suitable for drilling holes for the floor anchors
1 Socket set, 1/2 in. drive
1 Torque wrench
1 Wire strippers
1 Flat-bladed screwdriver
1 Electrician standard tools
1 Level
1 5/32 in. Allen key
Action
Step Action
1 Beforepositioningandsecuring the VCE, markallreferences and layout lines
on the floor in accordance with the building floor plan drawing and the job
specifications.
—continued—

2-6
Installing a VCE
Video Codec Enclosure (VCE) 323-3221-291 Rel 1.0 Standard
Procedure 2-2 (continued)
Cabinet installation (Zone 4 earthquake)
Step Action
2 Mark the VCE anchor points as shown in Figure 2-3.
Figure 2-3
VCE anchor points
3 Drill the floor anchor holes in accordance with one of the following:
•
Concrete floor
Use an electric drill with a masonry drill bit. Drill holes at
least 3.25 in. (83 mm) deep. Use a vacuum cleaner to remove cement
particles from the holes.
•
Wood/steel floor
Drill appropriate pilot holes for lag bolts in wood, or
clearance holes for machine bolts in steel.
Note:
If the VCE is not installed immediately after drilling the anchor holes,
cover the anchor holes with adhesive tape.
4 Remove the cardboard protection from the VCE. Using a 5/32 in.Allen key,
remove the four cover-retaining screws and slide the cover off the VCE; see
Figure 2-4.
Note:
If the cover does not come off freely, insert a flat-bladed screwdriver
into the slots located in the lower rear corners of the VCE cover and jog the
cover loose.
—continued—
Wall
Wall clearance
typically
0.75 in.(19 mm)
3.25 in. (85 mm)
17.5 in. (445 mm)
20.6 in. (525 mm)1.7 in. (43 mm) 1.7 in. (43 mm)
Anchor points
Anchor points
Leveling feet
Leveling feet
Cabinet
Table of contents
Other Nortel Enclosure manuals
Popular Enclosure manuals by other brands

Renkforce
Renkforce 1433358 operating instructions

Peavey
Peavey PBK12FM operating manual

Crestron
Crestron BB-1600 installation guide

D-Link
D-Link DSM-G600 - MediaLounge Wireless G Network Storage Enclosure NAS... installation guide

Martin Audio
Martin Audio W8LCD Specifications

HP
HP BladeSystem c7000 Setup and installation guide