North Kiteboarding NAVIGATOR CONTROL SYSTEM User manual

NAVIGATOR CONTROL SYSTEM
2020
USER MANUAL
RELEASE DATE: AUGUST 2019
VERSION: CS01

Thank you for choosing North.
At North we are drawn to nature’s ever-changing
playground – where water meets wind.
Those two elements create an alchemy that is never
the same, one day to the next. It stirs our restless
souls, our hearts quicken. It promises us re within.
We chase it.
Every day we are inspired – and humbled - by
nature’s engineering genius and her beautiful,
intuitive simplicity. To that we add cutting-edge
technology from the world’s best design workrooms
and decades of performance expertise.
North is where nature meets technology, in the
pursuit of a ride that will lift us out of this World and
halfway to another.
This is kiteboarding.
We are North.

4
RELEASE OF LIABILITY
Releases of liability, claim waiver and assumption of risk:
By assembling and/or using this North Kiteboarding product, you agree that you have read and
understood this entire North Kiteboarding product owner manual, including all instructions and
warnings, prior to using North Kiteboarding products in any way.
In addition, you agree that you will ensure that any additional or subsequent users of your
North Kiteboarding products will read and understand the entire product manual of the North
Kiteboarding product, including all instructions and warnings contained in this manual, prior to
allowing that person to use your North Kiteboarding product.
ASSUMPTION OF RISK:
In using your North Kiteboarding product and any of its components, you freely agree to
assume and accept any known and unknown risks of injury to you and third parties when using
this equipment.
The internal risks, dangers and hazards of the sport can be greatly reduced by adhering to the
warning guidelines listed in this user’s manual and by using common sense.
WARNING:
Use this product at your own risk. Kiteboarding is a HAZARDOUS activity which involves RISKS and
DANGERS that are unavoidable and can result in serious bodily injury or death of the user and
others. Ensure all parts of your product are thoroughly checked before each use. Download and
read the User Manuals and Installation Guides relating to the product before using it. Failure to do
so may result in personal injury or death.
RELEASE AND WAIVER OF CLAIMS:
In consideration of the sale of the North Kiteboarding product to you, you hereby agree to the
fullest extent permitted by laws as follows;
To waive any and all claims, that you have or may have in the future against North Kiteboarding and all
related parties resulting from the use of the North Kiteboarding product and any of its components.
North Kiteboarding and any of its agents are released from any and all liability for any loss, damage,
injury or expense that any users of this product may suffer, or that your next in kin may suffer, as a
result of the use of this product, including but not limited to negligence, breach of contract in the
part of North Kiteboarding, or any of its agents, in the design and manufacture of this product.

USER MANUAL NAVIGATOR CONTROL SYSTEM 5
SAFETY WARNINGS
For your safety and the safety of others, North Kiteboarding strongly urge you to undergo lessons
with a recognised certied instructor prior to using this product. This user manual is NOT a
substitution to lessons.
Kiteboarding involves unavoidable risks so it is important that you familiarise yourself with these
risks and take appropriate measures to minimise risks as much as possible. You should also
familiarise yourself with safety precautions and systems related to your equipment.
Kiteboarding is a high-intensity action sport. As such, you should not participate in this sport
if you are physically unt or suffer from any medical conditions that may put you at further risk
when kiteboarding.
LIMIT DANGERS TO YOURSELF:
• Be aware of the usual risks associated with water sports such as drowning, rapidly
changing conditions, hypothermia, sunburn, fatigue, rocks, waves etc.
• Do not kiteboard in extreme weather and/or rapidly changing conditions such as large
storms, thunder etc.
• Check weather reports, local prevailing conditions, tides, and currents prior to launching.
• Do not kite in offshore winds, or strong onshore winds.
• Choose the appropriate kite for your body size, ability and the conditions. Do not use a kite
size that is beyond your control for the given conditions. If conditions change while you are
kiteboarding and you can no longer control your kite, return to shore.
• When the kite is inated but not in use, secure the kite in one place with a non-abrasive,
heavy object to prevent it from ying away in any sort of conditions.
• Check over all of your equipment prior to launching. Do not launch if lines are knotted,
frayed, cut, tangled or damaged in any way.
• Only y your kite on unobstructed waters. Do not y your kite over land.
• Be aware of the surroundings prior to launching. Do not y your kite around power lines,
power poles, tall buildings, trees, cliffs, airports etc. Gusty conditions can make launches
unpredictable so be cautious of potential collisions with obstacles.
• Always kite with a partner or a supervisor observing you from land.
• Whenever possible use a launch and landing assistant.
• Be familiar with your quick release system and do not be afraid to use it if necessary.
• Always use a safety leash so your kite is contained in case of a primary quick
release deployment.
• Keep hands clear of lines when they are under tension from the kite. Lines can be very
sharp and abrasive.

6
• Never wrap lines around ngers, arms, hands, legs, head etc.
• Helmets are strongly recommended to avoid injury from your board or other hard objects.
• We strongly recommend you wear a Personal Flotation Device (PFD) or impact vest
while kiteboarding.
• Do not kitesurf, surf or foil in shallow waters or in areas with underwater obstacles.
LIMIT DANGERS TO OTHERS:
• Be courteous to other riders and comply with established give way rules.
• Stay clear of other water users. Leave sufcient space between you and swimmers, boats,
paddle boarders and any other water user.
• Familiarise yourself with local marine use guidelines and obey all established rules.
• Respect wildlife and behave accordingly.
• When hydro-foiling you operate at greater speeds than normal and obstacles and
other water users get closer exponentially faster. Be aware of this and adjust your
actions accordingly.
• Note that this is a non-exhaustive list. Use common sense if other risks arise.
WARRANTY POLICY
+180 WARRANTY
We believe in our products, stand behind our quality and value our customers.
That’s why we’re giving you an extra 180 days beyond the legal warranty period for your country of
purchase, just for registering your product online. Your product must be registered within 60 days
of purchase at www.northkb.com, to receive a free extended warranty.
To register your North product simply:
1. Fill out the online registration form at www.northkb.com
2. Have your purchase receipt handy so you can upload it during product registration
FOR ANY WARRANTY CLAIMS PLEASE CONTACT YOUR NORTH KITEBOARDING RETAILER.
NORTH WARRANTY TERMS
This warranty covers new products purchased ONLY from an authorized North Kiteboarding centre,
retailer or distributor or from the North Kiteboarding website.
North Kiteboarding warranties our products to be free from major defects in material or
workmanship to the original purchaser ONLY, for a period of 365 days* from the date of purchase.
*Warranty period may vary by country of purchase.

USER MANUAL NAVIGATOR CONTROL SYSTEM 7
THIS WARRANTY IS SUBJECT TO THE FOLLOWING LIMITATIONS:
1. Warranty claims within the extended 180 days are valid only when the product is registered and
activated in the warranty registration section of www.northkb.com within 60 days of purchase.
2. Warranty registration must be accompanied by the original purchase receipt in which the name of
retailer and date of purchase must be clear and legible.
3. Warranty is only valid when the product is used for its normal intended recreational use and will
not cover products used in teaching or rental operations, unless this is an ofcial North qualied
& afliated school.
4. North Kiteboarding will make the nal warranty determination, which may require inspection and/
or photos of the equipment which clearly show defects. If necessary, this information must be
sent to your point of purchase, or your country’s North Kiteboarding distributor, postage prepaid.
5. If North Kiteboarding deems the product defective, the warranty only covers the repair or
replacement of the defective product. North Kiteboarding will not be responsible for any costs,
losses or damages incurred as a result of the loss of use of this product.
6. The warranty does not cover damage caused by misuse, abuse, neglect or normal wear or tear
including, but not limited to: punctures, rigging with other than North Kiteboarding components,
damage due to excessive sun exposure or hot temperatures such as inside an unventilated
car, damage due to the product being stored in temperatures exceeding 45 degrees Celsius,
damage caused by improper handling and storage, damage caused by use in waves or shore
breaks, damage caused by self launching or self landing, damage caused by crashing the kite
at high speed, damage caused by the use of kickers, sliders or other such equipment or riding on
anything other than water, damage caused by using any inappropriate tools or any tool other than
those specied within the installation guides and user manuals, damage caused by neglect of the
care and maintenance instructions provided within the Installation Guides and User Manuals.
7. This warranty is void if any repair, change or modication has been made without authorization to
any part of the equipment.
8. The warranty for any repaired or replaced equipment is good from the date of the original
purchase only.
9. All warranty claims must be accompanied by a digital copy of the original purchase receipt in
which the name of the ofcial retailer and date of purchase must be clear and legible.
10. There are no warranties that extend beyond the warranty specied herein.
For any warranty claims please contact your North Kiteboarding retailer. A claim form can be
downloaded from northkb.com.
Contact us at
North Kiteboarding
North Actionsports Group
Lageweg 34
2222 AG Katwijk, The Netherlands

8
1. Overviews
1.1. Control System Overview
1.2. Line Assembly Overview
1.3. North Connect Quick Release Overview
2. Set Up
2.1. Check your line lengths
2.2. Attaching control lines to the kite
3. Operation
3.1. Emergency safety procedures Summarised:
3.2. North Connect Quick Release
3.2.1. Deploying the North Connect Quick Release
3.2.2. Resetting the Single Line Flag landing line
3.2.3. Replacement of North Connect Quick Release
3.3. Security Finger
3.4. Kite Leash
3.4.1. Attaching the kite Leash to North InterLoop System
3.4.2. Attaching kite leash to harness
3.4.3. Kite Leash Quick Release
3.5. Depower system
3.5.1. Depower
3.5.2. Powering up:
3.6. Adjustable bar length
3.7. Adjustable line length
4. Accessories
4.1. The North InterLoop System
4.1.1. To release the Modular Harness Loop:
4.1.2. To reattach the Modular Harness:
5. How to care for your Control System
6. Serial Number
9
10
10
10
11
11
11
12
13
14
14
15
15
15
16
17
17
18
19
20
20
20
20
20
22
22
CONTENTS PAGE
USER MANUAL NAVIGATOR CONTROL SYSTEM 9
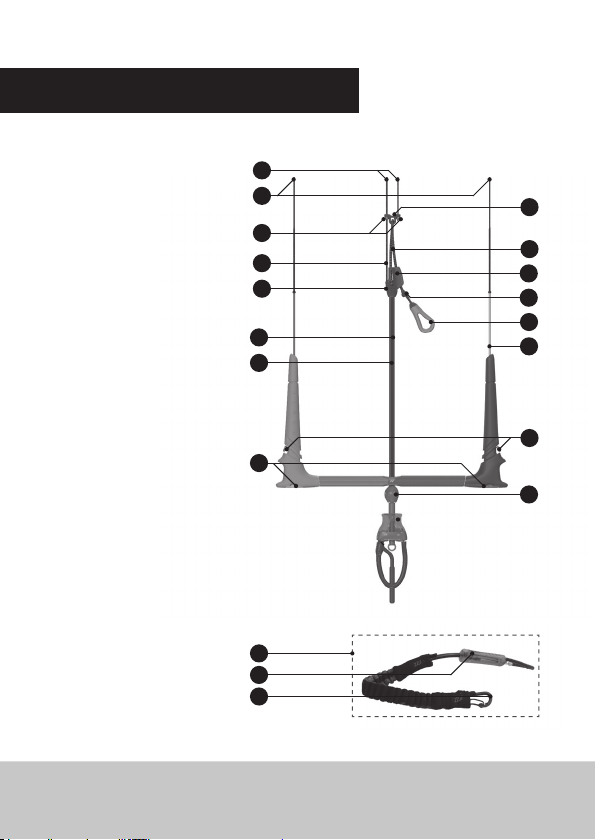
1 - Front lower lines
2 - Back lower lines
3 - Pulley Power Bracket
4 - Power balls
5 - Elasticised trim line
6 - Elasticised landing line
7 - Depower Cleat
8 - Cleat Base
9 - Cleat stopper ball
10 - Trim handle
11 - Multibore tubing
12 - Upper leader line PU tubing
13 - Depower main line
14 - Retractable line retainer pull tab
15 - Bar width adjustment Cassette
16 - Spinning handle
17 - Kite Leash
18 - Leash Release Handle
19 - Carabiner
1. OVERVIEWS
16
3
5
14
17
18
19
10
12
4
1
2
6
8
11
13
7
15
9
1.1. CONTROL SYSTEM OVERVIEW
10
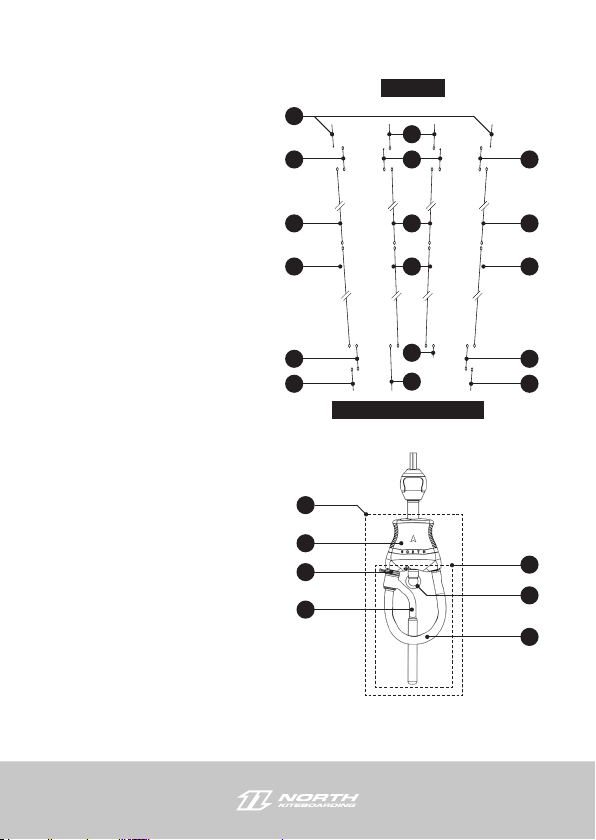
1.3. LINE ASSEMBLY OVERVIEW
1.3. NORTH CONNECT QUICK RELEASE OVERVIEW
1 - Connect QR
2 - Quick release handle
3 - The North InterLoop
4 - LockGuard safety ring
5 - Landing line leash ring
6 - Security nger
7 - Modular Harness Loop
1 - Rear Pigtail
2 - Front Pigtail
3 - Rear Line Connector
4 - Front Line Connector
5 - Upper Rear Control Line (10M)
6 - Upper Front Control Line (10M)
7 - Lower Rear Control Line (12M)
8 - Lower Front Control Line (12M)
9 - Upper Leader Line
10 - Lower Leader Line
11- Fixed front line stopper
12- Landing Line
1
2
4
6
3
5
7
1
3
5
7
9
10
3
5
7
9
10
2
4
6
8
11
12
NAVIGATOR CONTROL SYSTEM
NORTH KITE

USER MANUAL NAVIGATOR CONTROL SYSTEM 11
2.1. CHECK YOUR LINE LENGTHS
Flying lines can change over time, so it is recommended to check the line lengths before each use.
Your North Navigator Control System comes standard with 22m lines. Split in sections; 12m for
lower control lines and 10m for upper control lines.
1. Lay out lines from the control system and separate them. Fasten the line ends to a rope (or
strong line), and attach to a stable object such as a tree.
2. Take the bar and pull the lines until tight. The top of the quick release handle should be
approximately 1cm away from touching the bottom of the bar.
3. Check the length of the lines. All lines should be exactly the same length.
4. Line lengths can be adjusted by removing the bar width adjustment cassette and moving
the control line position along the leader line. (See 3.7. in this user manual)
2.2 ATTACHING CONTROL LINES TO THE KITE
1. With the kite positioned securely with the leading edge facing upwind on the ground,
unwind lines from the control system walking downwind.
2. Place control system on the ground with the red end of the bar on the right hand side.
Begin to untangle the steering lines starting at the bar and walking upwind back
towards the kite, keeping the lines parallel to each other. The lines should not be twisted
or cross over each other.
3. Once lines are clear and tangle free, attach the four lines from the control system to the
corresponding pigtails on the kite using a larks head connection. Use the colour code
system to connect the correct control system line connectors to the pigtails. Double check
the connections are tight and secure.
4. The line connectors are designed to be exactly the same length so you can easily change the
front (knotted end) and rear (larks head loop) connectors to match most other manufacturers
kite congurations. Please familiarise yourself with the safety procedures and trimming
instructions outlined in your Kite User Manual to ensure your kite is compatible.
WARNING:
Before launching, ensure your lines are free of tangles and attached correctly. Wrongly attached
lines will result in a danger to the rider and others.
WARNING:
Whilst the Navigator Control System is compatible with most other kites, it features a low V which
can impact the steering behavior of a kite. When using a non North Kite, ensure your kite is suited
to a low V setup.
2. SET UP

12
3.1. EMERGENCY SAFETY PROCEDURES SUMMARISED:
1. Depower the kite using the depower cleat. Use the clam cleat mainline depower system to
depower the kite. Pull the trim handle downwards and secure it into the cleat to fasten it.
2. Let go of the bar. If you are still overpowered let go of the bar. This depowers the kite as
much as possible while the Navigator Control System is still attached to your harness.
3. North Connect Quick Release. If your kite is still overpowered grab ahold of the red quick
release handle on the North Connect. Push the red quick release handle away from you,
following the arrow to release the kite. This should release all power from the kite.
4. Secondary Quick Release. If your kite is still powered, disconnect the kite from your body
using your kite leash quick release mechanism. Grab hold of the red plastic section with
your entire hand and following the arrow push the release system away from your body
towards the kite.
WARNING:
The secondary quick release system should only be activated in an emergency. Activating will
disconnect the kite from your body. Uncontained kites can be an extreme danger to the rider and to
others, causing damage, serious injury or death.
3.2. NORTH CONNECT QUICK RELEASE
Releasing the North Connect Quick Release, provided your kite leash is attached, will depower your
kite leaving the rider still attached to the kite. This will result in your kite being contained by the
kite leash. This North Connect Quick Release system will release the residual power from your kite
by allowing it to ‘ag’ out on one of the front control lines. This Quick release should only be used
when necessary.
3. OPERATION
USERS MAXIMUM WEIGHT: 120KGS
USERS RECOMMENDED MINIMUM WEIGHT: 35KGS

USER MANUAL NAVIGATOR CONTROL SYSTEM 13
Ensure you are familiar with the operation of the quick release system in case of the event you
need to activate the quick release features. Wash out your North Connect with water before use.
The North Connect Quick Release system is compatible with other connection systems provided
the North Connect Quick Release remains within easy reach of the rider at all times. However, we
strongly recommend using a standard harness hook as the means of connection to all Modular
Harness Loops except the North Modular Slide Surf Loop. If using the North Modular Slide Surf
Loop, we recommend a rope slider harness attachment.
WARNING:
Safety procedures cannot be learnt during an emergency situation and thus the use of the release
system requires training by a certied recognised instructor.
WARNING:
Check the function of the release system before and after each use.
WARNING:
The quick release has not been tested in icy conditions so may not be suitable for use snow kiting.
WARNING:
Use of the release system in ways not outlined in this North Kiteboarding User Manual may cause
serious injury or death.
WARNING:
In order to activate the depower quick release system, you must have your kite leash attached
to the landing line leash ring on the North Connect Quick release and to your harness leash
attachment ring.
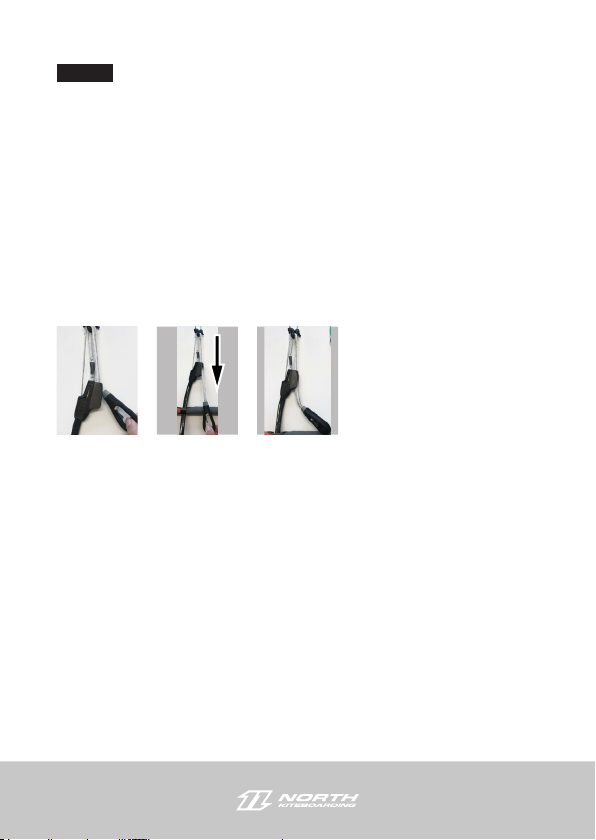
3.2.1. DEPLOYING THE NORTH CONNECT QUICK RELEASE
Deploying the North Connect Quick Release will leave the rider still attached to the kite and will
only depower the kite. For complete separation from your kite, you will need to activate the quick
release handle on your kite leash.
1. Ensure the North Connect Quick Release is properly engaged before launching.
2. To release, grab the RED quick release handle and rmly push it away from your body, towards
the kite in the direction of the arrow. This will cause the pin to release the North Connect and
the kite will depower by transferring the load onto the single line ag security line.
Once the kite has depowered and landed safely, you are able to move towards the kite by “walking’
up the single line Flag landing security line. Do not wrap lines around arms or ngers etc. It is
14
important that when you come to the North Control System not to grab hold of it. Instead, continue
to move towards the kite until you reach the leading edge and can secure the kite.
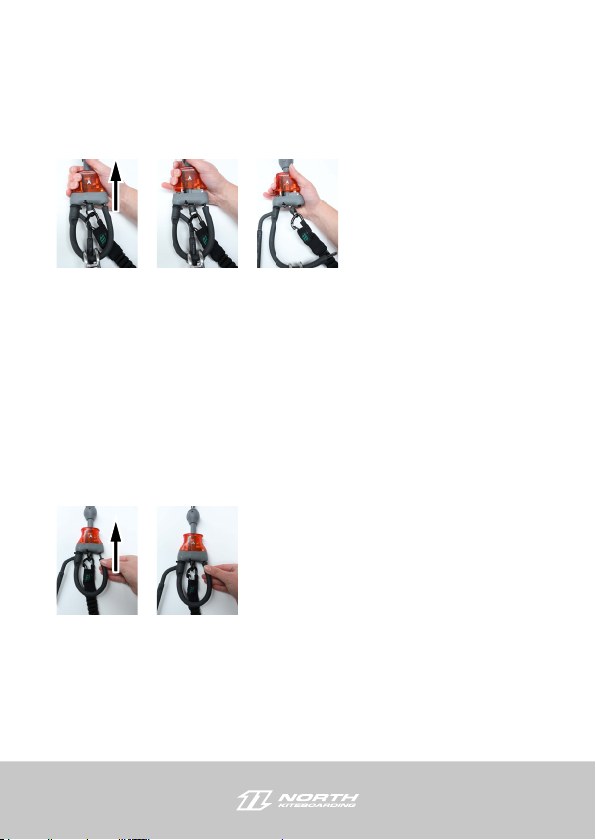
3.2.2. RESETTING THE SINGLE LINE FLAG LANDING LINE
Once you have recovered all equipment safely, you will need to reset the landing line to use it again.
1. Lay out your lines as if you were going to attach them to your kite, by separating each
individual line parallel to one another.
2. Make sure all lines are running freely and are not tangled.
3. To reassemble the quick release system, push the end of the Modular Harness Loop back
into the main body of the North Connect until you hear it click.
4. Then ensure the landing line is pulled back into place so the ring is touching the bottom of
the quick release body again.

USER MANUAL NAVIGATOR CONTROL SYSTEM 15
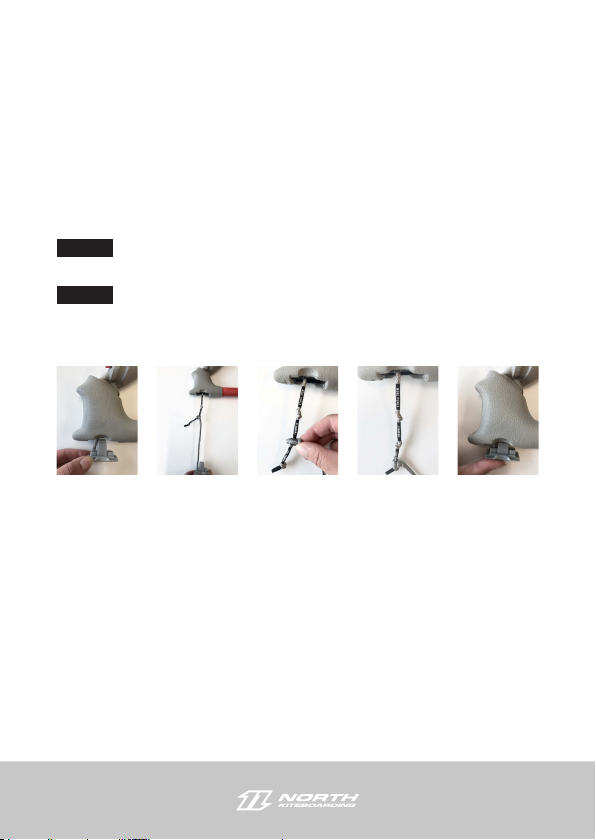
3.2.3. REPLACEMENT OF NORTH CONNECT QUICK RELEASE
Spare parts for your North Control Systems are available at your local North Kiteboarding retailer
or online at northkb.com
1. Unwind lines from Control System.
2. Pull landing line attached to the landing line leash ring in the middle of the Modular
Harness Loop until you get to the connection to the front lines.
3. Disconnect the landing line from the front line by undoing the loop-to-loop connection. Put
the landing line aside.
4. Using an 3mm Allen key, undo the fastener from the spinning handle. Wiggle to separate
the top from the bottom of the spinning handle. Use a at head screwdriver to pry them
apart if needed.
5. Insert the bottom of the spinning handle of the new North Quick Release to the top of the
spinning handle. Using an 3mm Allen key to fasten the M4 x 25mm screw that locks the
handles together.
6. Reattach the landing line a loop-to-loop connection and pull the landing line
back through.
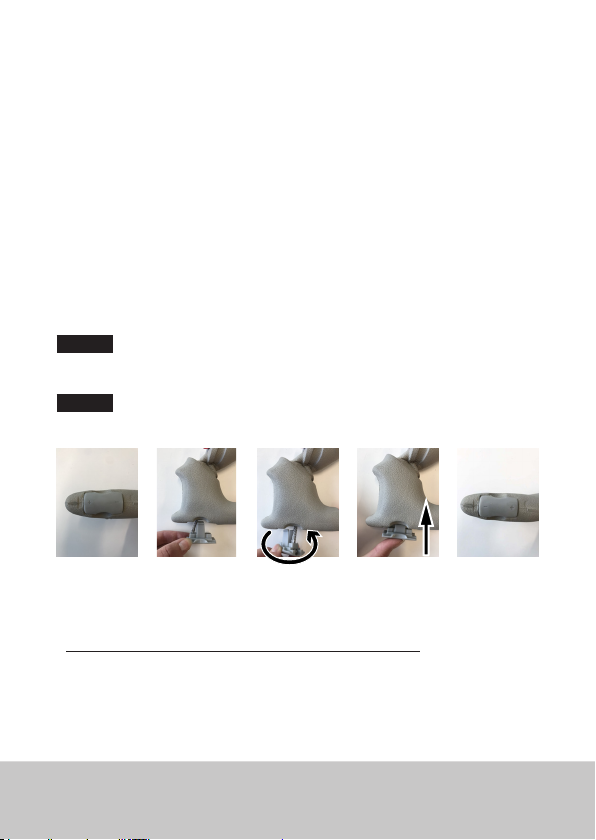
3.3. SECURITY FINGER
The security nger is active only when the riders harness hook is hooked into the harness loop.
It is important that there is a secure connection between the harness hook and the Modular
Harness Loop.
1. How to engage security nger:
2. Hook your Modular Harness Loop into your harness hook.
3. Only once hooked into the harness hook, engage your security nger when ready to launch
your kite.
4. Engage, the security nger by inserting it into the centre of the harness hook. When done
correctly the end of your security nger should be between the harness hook and the
Modular Harness Loop.
5. Conrm that the security nger is secure. This will stop your Modular Harness Loop from
accidentally dropping out of your harness hook.
WARNING:
When the security nger is engaged, you have a semi-permanent connection to the kite. Ensure
you know where your quick release handle is located and how to activate it before securing the
security nger.

16
WARNING:
Ensure the security nger is fully rotated, positioned in the interior of the harness loop, before
engaging it into the centre of the harness hook. Engaging it into the harness hook when not fully
rotated may risk the security nger releasing itself from the harness hook.
To release the security nger, bend and slide the security nger out of the harness hook.
3.4. KITE LEASH
Before launching your kite ensure your kite leash is attached to the landing line leash ring located
inside you Modular harness loop.
Your kite leash is the last connection between you and your kite, allowing for complete separation
of your body from the kite. This safety kite leash release system should only be used in extreme
emergency situations. Releasing your kite is a great danger for other individuals on land and on
the water.
3.4.1 ATTACHING THE KITE LEASH TO NORTH CONNECT
1. Open the carabiner at the end of the leash.
2. Hook the carabiner to the small ring located in the middle from the underside of the
Modular Harness Loop.

USER MANUAL NAVIGATOR CONTROL SYSTEM 17
3.4.2 ATTACHING KITE LEASH TO HARNESS
1. Pull the quick release handle to release the pin.
2. Thread the covered line around a secure connection point on the harness. We recommend
fastening to a ring on the side of the harness or front of the harness spreader bar as
shown below. Your harness needs to feature a dedicated leash attachment.
3. Place the pin through the loop at the end of the covered line.
4. Simultaneously pull the quick release handle while lifting the pin so it runs parallel to the
quick release handle.
5. Release the handle so it conceals the pin and locks it in place.
Note: the release pin should be loaded as shown with the pin 90 degrees to the side of North label.
3.4.3. KITE LEASH QUICK RELEASE
For complete separation from the kite in emergency situations, use the quick release on your kite
leash. This will completely detach the kite and control system from the rider. This should only
be used in extreme emergency situations as uncontained kites will y uncontrollably downwind,
which could cause damage, serious injury or death.
1. Grab the red release handle grip on the kite leash and with your entire hand and push it
away from your body.
2. By pushing the release handle grip away from your body, the release mechanism will be
activated and the kite leash will separate completely from your harness.
18
WARNING:
The secondary quick release system on the kite leash should only be activated in an emergency.
Activating will disconnect the kite from your body. Uncontained kites can be an extreme danger to
the rider and others and can cause damage, serious injury or death.
3.5. DEPOWER SYSTEM
The kite power can be adjusted with the depower system.
3.5.1. DEPOWER:
1. Pull the trim handle towards your body until you get the desired depower.
2. Lock the line off in the clam cleat at your desired power, by moving the trim handle
adjuster into the cleat.
3.5.2. POWERING UP:
1. First pull the trim handle a short distance towards your body, and then pull the trim handle
away from the clam cleat, allowing the line to be released from the teeth of the cleat.
2. Secondly let the line slide back until you get desired power position.
3. To lock off the line, move the trim handle back towards the cleat, so that the teeth of the
cleat can lock in the line.
USER MANUAL NAVIGATOR CONTROL SYSTEM 19
3.6. ADJUSTABLE BAR LENGTH
The North Navigator Control System is adjustable. When the cassettes, located on the underside
of the bar, are positioned with the positive ends facing outwards, the bar will be at its maximum
length. When the cassettes are positioned with the negative ends facing outwards, the bar will be
at its minimum length.
To add or reduce 5cm of length from your bar:
1. Pull the cassettes downwards to unclip them from bar.
2. Flip each cassette 180 degrees until the positive and negative signs indicate the desired
bar length.
3. Re-insert the cassettes by pushing them back into the bar ensuring they are ush with the
underside of the bar.
NOTE: you may need to pull the leader lines above the EVA bar ends to assist during reload.
WARNING:
Ensure both cassettes are on the same settings i.e. either both positive signs are on the outside of
the bar or both negative signs are on the outside of the bar.
WARNING:
DO NOT adjust bar length while riding or while the kite is powered or attached to you in any form.
*Recommended width adjustment - / +
BAR WIDTH 45 50 55
Kite Size 3,4,5,6,7 8,9,10,11 12,13,14
20
3.7. ADJUSTABLE LINE LENGTH
You can adjust the length of your North lines easily from your North Control System Adjusting your
line length compensates for stretch in the lines and is not primarily designed for trim as that is
the purpose of the depower system. To adjust the line length:
1. Remove the cassette clip and pull the lines through approximately 20cm. This will reveal
line adjustment settings.
2. Select your setting by attaching your larks head connection to your chosen knot
3. Pull the line back through the bar and reclip the cassette so it is ush with the bar.
WARNING:
DO NOT adjust line length while riding or while the kite is powered or attached to you in any form.
WARNING:
Be careful not to rotate the cassette when you pull it out of the bar as this will adjust the bar length.
NOTE: the factory setting is on the middle (standard) knot.
Table of contents
Other North Kiteboarding Aircraft manuals


Popular Aircraft manuals by other brands

Piper Aircraft Corporation
Piper Aircraft Corporation ARCHER II PA-28-181 Operating handbook

Cabrinha Kites
Cabrinha Kites Contra 2005 manual

Airglas
Airglas GLH3000 Nose Ski Instructions for Continued Airworthiness

Gin Gliders
Gin Gliders Atlas 2 user manual

Niviuk
Niviuk Vital OCTAGON manual

Kanardia
Kanardia EMSIS User and installation manual


